59
2009 Pearson Education, Inc. All rights rese 1 2 Introduction to the Visual Basic Express 2008 IDE
| Date post: | 31-Dec-2015 |
| Category: |
Documents |
| Upload: | eustacia-price |
| View: | 219 times |
| Download: | 2 times |

2009 Pearson Education, Inc. All rights reserved.
1
22
Introduction tothe Visual Basic
Express 2008 IDE
2009 Pearson Education, Inc. All rights reserved.
2
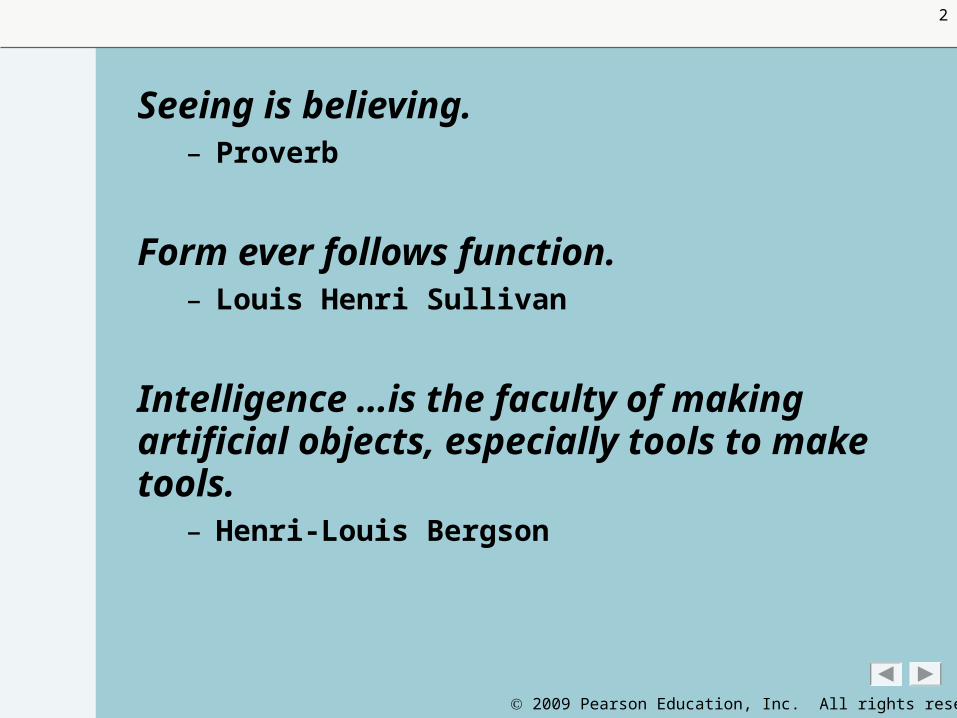
Seeing is believing.– Proverb
Form ever follows function.– Louis Henri Sullivan
Intelligence …is the faculty of makingartificial objects, especially tools to make tools.
– Henri-Louis Bergson
2009 Pearson Education, Inc. All rights reserved.
3
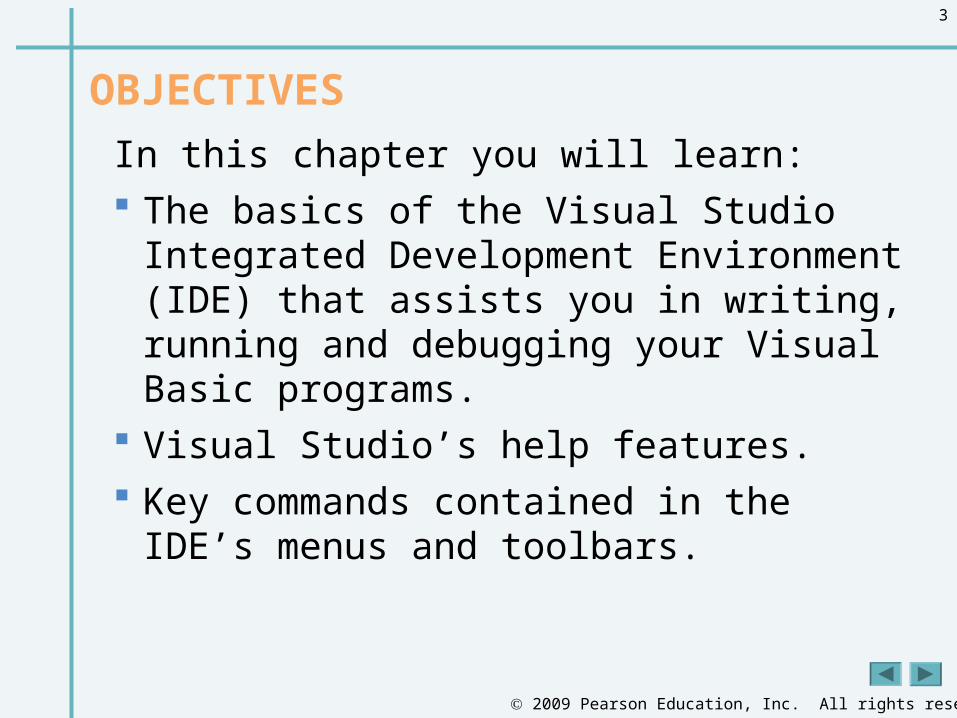
OBJECTIVES
In this chapter you will learn: The basics of the Visual Studio Integrated
Development Environment (IDE) that assists you in writing, running and debugging your Visual Basic programs.
Visual Studio’s help features. Key commands contained in the IDE’s menus
and toolbars.

2009 Pearson Education, Inc. All rights reserved.
4
OBJECTIVES The purpose of the various kinds of windows
in the Visual Studio 2008 IDE. What visual programming is and how it
simplifies and speeds program development. To create, compile and execute a simple
Visual Basic program that displays text and an image using the Visual Studio IDE and the technique of visual programming.

2009 Pearson Education, Inc. All rights reserved.
5
2.1 Introduction
2.2 Overview of the Visual Studio 2008 IDE
2.3 Menu Bar and Toolbar
2.4 Navigating the Visual Studio IDE
2.5 Using Help
2.6 Using Visual Programming to Createa Simple Program that Displays Textand an Image

2009 Pearson Education, Inc. All rights reserved.
6
2.1. Introduction to Visual Basic
BASIC was developed in the mid-1960s for writing programs quickly and easily.BASIC’s primary purpose was to teach programming to
novices.
When Microsoft developed the Windows® graphical user interface (GUI), the natural evolution of BASIC was to Visual Basic.
Visual Basic programs are created with the use of a software tool called an Integrated Development Environment (IDE).
2009 Pearson Education, Inc. All rights reserved.
7
Introduction to Visual Basic (Cont.)The latest versions of Visual Basic are fully
object oriented.
Visual Basic is also event driven—it responds to user-initiated events such as mouse clicks, keystrokes and timers.
It is a visual programming language—you’ll drag and drop objects like buttons and textboxes into place.

2009 Pearson Education, Inc. All rights reserved.
8
Introduction to Visual Basic (Cont.)
• Visual Studio 2008 is Microsoft’s Integrated Development Environment (IDE) for creating, running and debugging programs.
• A simple Visual Basic program can be created by dragging and dropping predefined blocks into place through visual programming.

2009 Pearson Education, Inc. All rights reserved.
9
2.2 Overview of the Visual Studio 2008 IDE
• Start Microsoft Visual Basic 2008 Express Edition. (Fig. 2.1)
Fig. 2.1 | Start Page in Visual Basic 2008 Express Edition.
New Project button
Start Page tab
Collapsed Toolbox window Start Page links Empty Solution Explorer (no projects open)

2009 Pearson Education, Inc. All rights reserved.
10
2.2 Overview of the Visual Studio 2008 IDE (Cont.)
• The Recent Projects section shows solutions you have been working on.
• Getting Started focuses on using the IDE for creating programs, learning Visual Basic, connecting to the developer community and providing development tools.
• Visual Basic Express Headlines and MSDN: Visual Basic Express Edition link to information about Visual Basic.

2009 Pearson Education, Inc. All rights reserved.
11
2.2 Overview of the Visual Studio 2008 IDE (Cont.)
• The IDE also has an internal web browser.
• To request a web page, enter its URL into the location bar (Fig. 2.2).
Requested web page (URL in location bar
drop-down menu)Selected tab for requested web page
Fig. 2.2 | Displaying a web page in Visual Studio.

2009 Pearson Education, Inc. All rights reserved.
12
2.2 Overview of the Visual Studio 2008 IDE (Cont.)
• Select File > New Project... to create a new project (Fig. 2.3).
• Project templates are the project types users can create in Visual Basic.
– A Windows Forms application has a graphical user interface (GUI).

2009 Pearson Education, Inc. All rights reserved.
13
2.2 Overview of the Visual Studio 2008 IDE (Cont.)
Windows Forms Application (selected)
Fig. 2.3 | New Project dialog.
Default project name
(provided by Visual Studio)
Description of selected project
(provided by Visual Studio)

2009 Pearson Education, Inc. All rights reserved.
14
2.2 Overview of the Visual Studio 2008 IDE (Cont.)
• Click OK to display the IDE in Design view (Fig. 2.4).
Active tab
Fig. 2.4 | Design view of the IDE.
Form (Windows Forms application)
Properties window
Tabs Menu Menu bar Solution Explorer window

2009 Pearson Education, Inc. All rights reserved.
15
2.2 Overview of the Visual Studio 2008 IDE (Cont.)
• As you place controls on the Form, you’ll be able to modify their properties.
• Figure 2.5 shows where the Form’s title text can be modified
Fig. 2.5 | Text box control for modifying a property in the Visual Studio IDE.
Text box (displaying the text Form1)
which can be modified

2009 Pearson Education, Inc. All rights reserved.
16
2.2 Overview of the Visual Studio 2008 IDE (Cont.)
• Figure 2.6 shows a dialog in which a control’s font properties can be modified.
OK button
Cancel button
Fig. 2.6 | Dialog for modifying a control’s font properties in the Visual Studio IDE.

2009 Pearson Education, Inc. All rights reserved.
17
2.3 Menu Bar and Toolbar
• Many commands are contained in menus (Fig. 2.7).
• The set of menus displayed depends on what you are currently doing in the IDE.
Fig. 2.7 | Visual Studio menu bar.

2009 Pearson Education, Inc. All rights reserved.
18
2.3 Menu Bar and Toolbar (Cont.)
Fig. 2.8 | Summary of Visual Studio 2008 IDE menus.
Menu Description
File Commands for opening, closing, adding and saving projects, as well as printing project data and exiting Visual Studio.
Edit Commands for editing programs, such as cut, copy, paste, undo, redo, delete, find and select.
View Commands for displaying IDE windows and for adding toolbars.
Project Commands for managing projects and their files.
Build Commands for compiling Visual Basic programs.
Debug Commands for debugging and running programs.
Data Commands for interacting with databases.
Format Commands for arranging and modifying a Form’s controls.
Tools Commands for accessing additional IDE tools and options.
Window Commands for hiding, opening, closing and displaying IDE windows.
Help Commands for accessing the IDE’s help features.

2009 Pearson Education, Inc. All rights reserved.
19
2.3 Menu Bar and Toolbar (Cont.)
Fig. 2.9 | Standard Visual Studio toolbar.
Open File Save All Copy FindUncomment
the selected
lines
Redo Navigate
Forward
New
Project
Add New Item
Save
Cut
Paste
Comment out the
selected lines
Undo Navigate
Backward
Start Stop Step Over
Solution
ExplorerObjectBrowser Error List
ImmediateToolboxProperties
Window
Step Out Step Into Break All
• You can access common commands from the toolbar icons (Fig. 2.9).
2009 Pearson Education, Inc. All rights reserved.
20
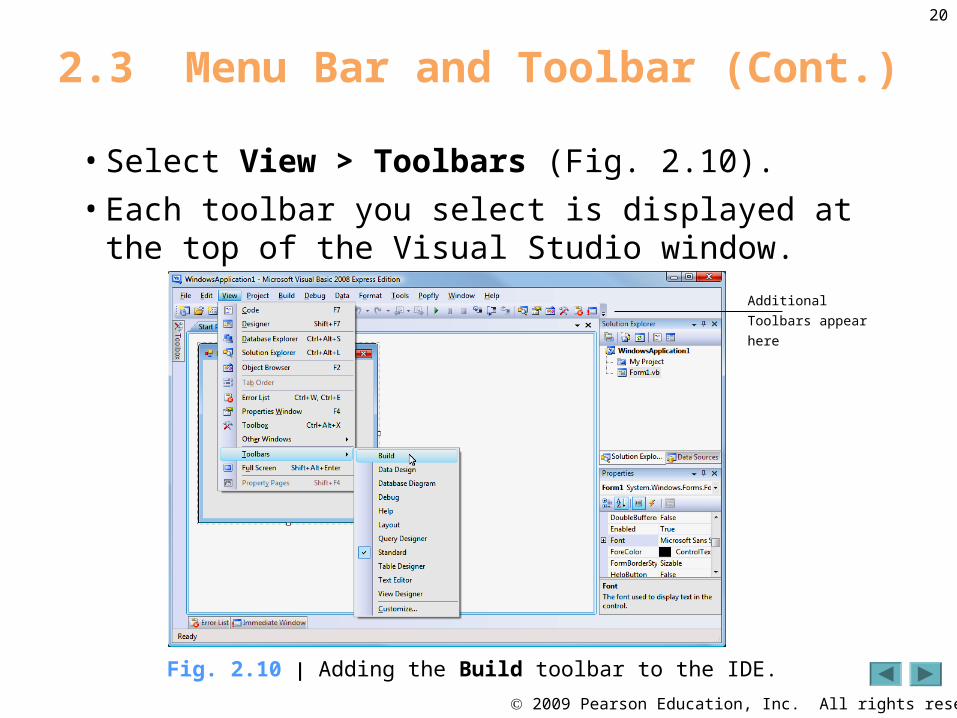
2.3 Menu Bar and Toolbar (Cont.)
• Select View > Toolbars (Fig. 2.10).
• Each toolbar you select is displayed at the top of the Visual Studio window.
Fig. 2.10 | Adding the Build toolbar to the IDE.
Additional
Toolbars appear
here

2009 Pearson Education, Inc. All rights reserved.
21
2.3 Menu Bar and Toolbar (Cont.)
• Some icons contain a down arrow that you can click to display related or commands (Fig. 2.11).
Toolbar
Down arrow indicates
additional commands
Fig. 2.11 | IDE toolbar icon showing additional commands.

2009 Pearson Education, Inc. All rights reserved.
22
2.3 Menu Bar and Toolbar (Cont.)
• Positioning the mouse pointer over an icon highlights it and, after a brief pause, displays a description called a tool tip (Fig. 2.12).
Tool tip displayed when
the mouse pointer rests
on an icon for a few
seconds
Fig. 2.12 | Tool tip demonstration.

2009 Pearson Education, Inc. All rights reserved.
23
2.4 Navigating the Visual Studio IDE
• The IDE provides windows for accessing project files and customizing controls (Fig. 2.13).
Solution
Explorer
Fig. 2.13 | Toolbar icons for four Visual Studio windows.
Properties
window
Object
Browser
Toolbox

2009 Pearson Education, Inc. All rights reserved.
24
2.4 Navigating the Visual Studio IDE (Cont.)
• Visual Studio provides a space-saving feature called auto-hide.
– When auto-hide is enabled, a tab appears along the edge of the IDE window (Fig. 2.14).
Icon for hidden window
(auto-hide enabled)
Fig. 2.14 | Auto-hide feature demonstration.

2009 Pearson Education, Inc. All rights reserved.
25
2.4 Navigating the Visual Studio IDE (Cont.)
– Placing the mouse pointer over one of these icons displays that window (Fig. 2.15).
Toolbox
title bar
Fig. 2.15 | Displaying a hidden window when auto-hide is enabled.
Horizontal orientation for pin icon
when auto-hide is enabled
2009 Pearson Education, Inc. All rights reserved.
26
2.4 Navigating the Visual Studio IDE (Cont.)
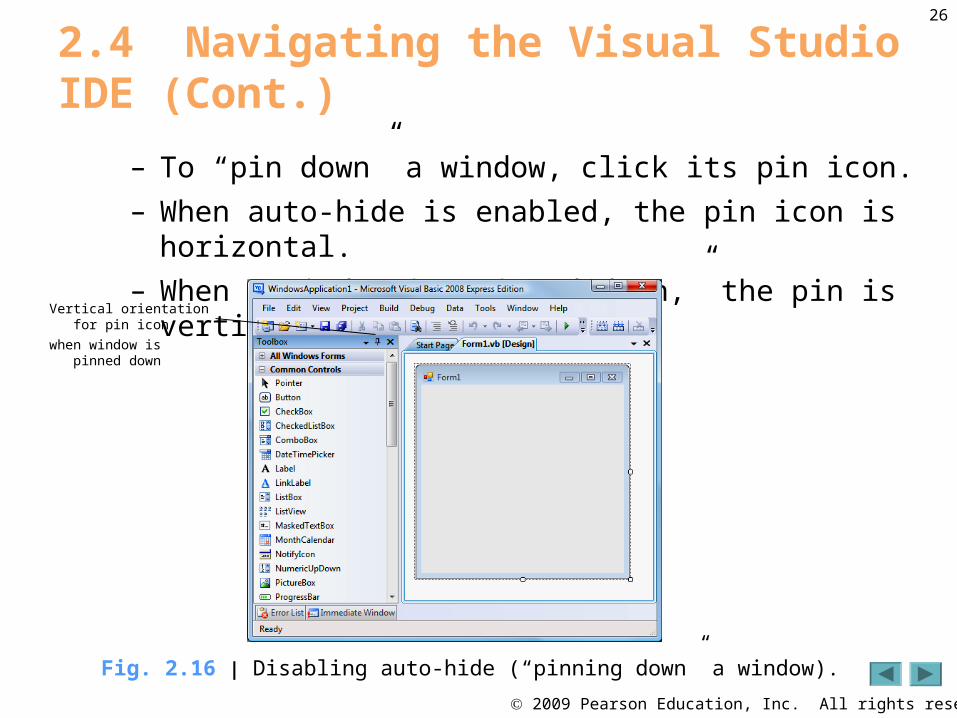
– To “pin down” a window, click its pin icon.
– When auto-hide is enabled, the pin icon is horizontal.
– When a window is “pinned down,” the pin is vertical (Fig. 2.16).
Fig. 2.16 | Disabling auto-hide (“pinning down” a window).
Vertical orientation for pin icon
when window is pinned down

2009 Pearson Education, Inc. All rights reserved.
27
2.4.1 Solution Explorer• The Solution Explorer (Fig. 2.17) provides
access to all of the solution’s files.
• The solution’s startup project is the one that runs when you select Debug > Start Debugging.
2.4 Navigating the Visual Studio IDE (Cont.)
Show All Files icon
Toolbar
Startup project
Fig. 2.17 | Solution Explorer with an open project.
2009 Pearson Education, Inc. All rights reserved.
28
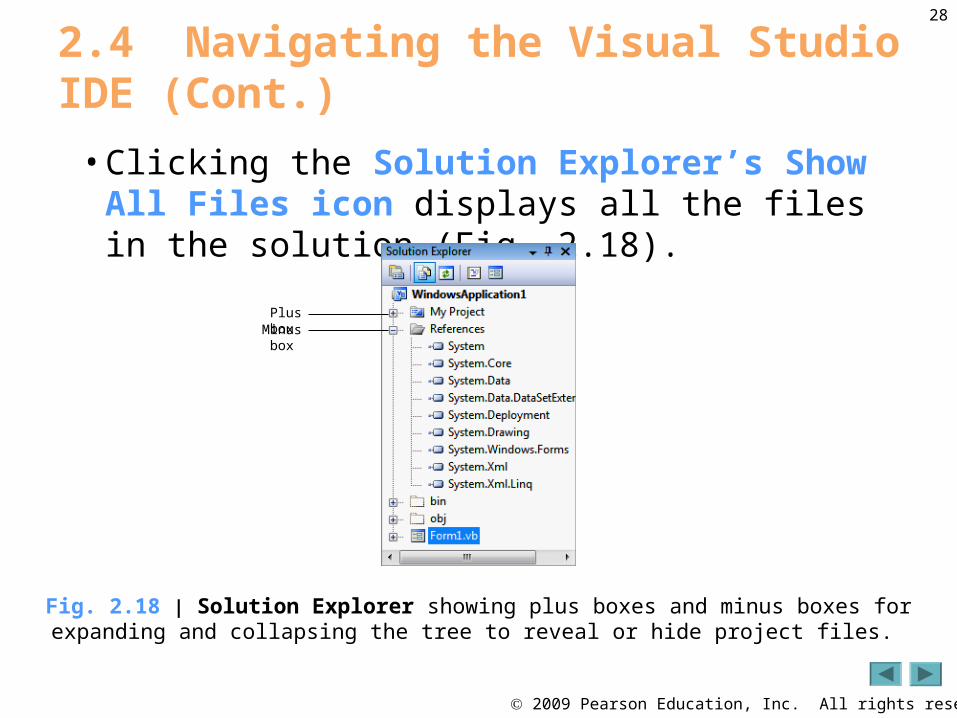
• Clicking the Solution Explorer’s Show All Files icon displays all the files in the solution (Fig. 2.18).
2.4 Navigating the Visual Studio IDE (Cont.)
Plus box
Fig. 2.18 | Solution Explorer showing plus boxes and minus boxes for expanding and collapsing the tree to reveal or hide project files.
Minus box

2009 Pearson Education, Inc. All rights reserved.
29
• The plus and minus boxes can be clicked to expand and collapse the project tree.
– Click the plus box to the left of My Project (Fig. 2.19).
2.4 Navigating the Visual Studio IDE (Cont.)
Minus box indicates
that the file or folder
is expanded (changed from
plus box)
Fig. 2.19 | Solution Explorer expanding the My Project file after clicking its plus box.

2009 Pearson Education, Inc. All rights reserved.
30
– Click the minus box to collapse the tree from its expanded state (Fig. 2.20).
2.4 Navigating the Visual Studio IDE (Cont.)
Fig. 2.20 | Solution Explorer showing collapsed nodes after all minus boxes are clicked.
Plus boxes indicatethat the file or folder
is collapsed (changedfrom minus box)
2009 Pearson Education, Inc. All rights reserved.
31
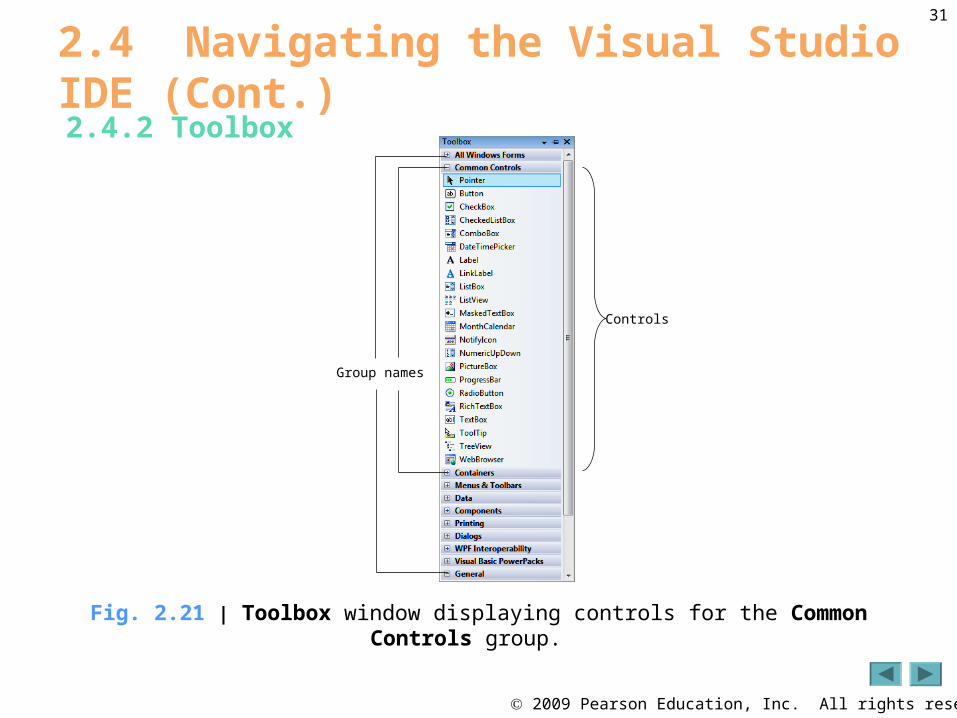
2.4.2 Toolbox 2.4 Navigating the Visual Studio IDE (Cont.)
Fig. 2.21 | Toolbox window displaying controls for the Common Controls group.
Controls
Group names
2009 Pearson Education, Inc. All rights reserved.
32
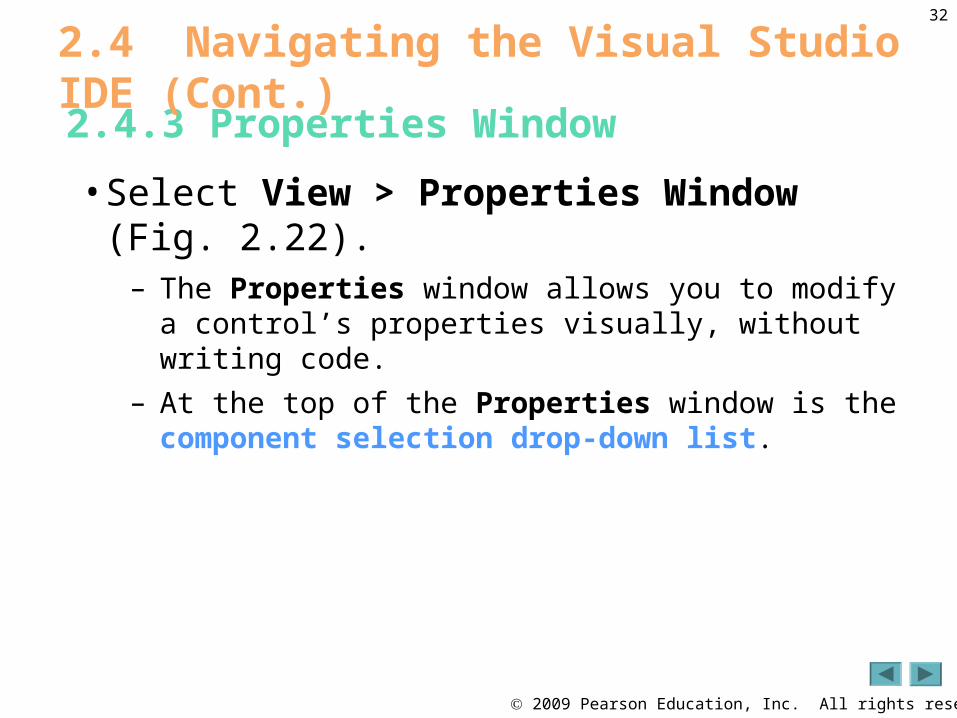
2.4.3 Properties Window 2.4 Navigating the Visual Studio IDE (Cont.)
• Select View > Properties Window (Fig. 2.22).
– The Properties window allows you to modify a control’s properties visually, without writing code.
– At the top of the Properties window is the component selection drop-down list.

2009 Pearson Education, Inc. All rights reserved.
33
2.4 Navigating the Visual Studio IDE (Cont.)
Fig. 2.22 | Properties window.
Component selection
Toolbar
Scrollbox
Scrollbox
Property values
Description
Properties
Alphabetic icon
Categorized icon
2009 Pearson Education, Inc. All rights reserved.
34
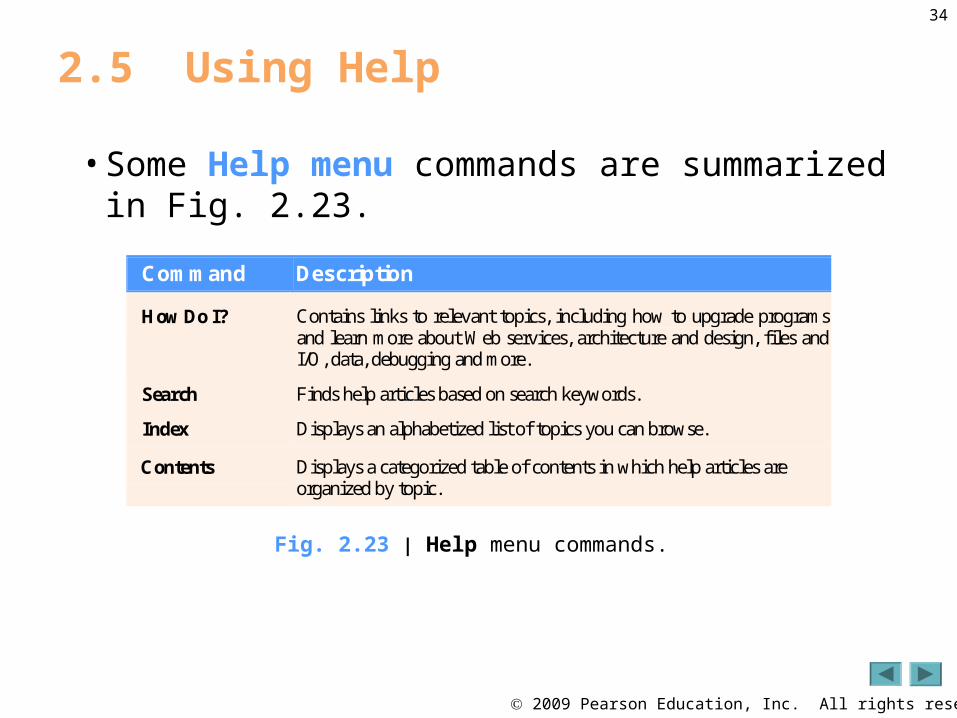
2.5 Using Help
• Some Help menu commands are summarized in Fig. 2.23.
Fig. 2.23 | Help menu commands.
Command Description
How Do I? Contains links to relevant topics, including how to upgrade programs and learn more about Web services, architecture and design, files and I/O, data, debugging and more.
Search Finds help articles based on search keywords.
Index Displays an alphabetized list of topics you can browse.
Contents Displays a categorized table of contents in which help articles are organized by topic.
2009 Pearson Education, Inc. All rights reserved.
35
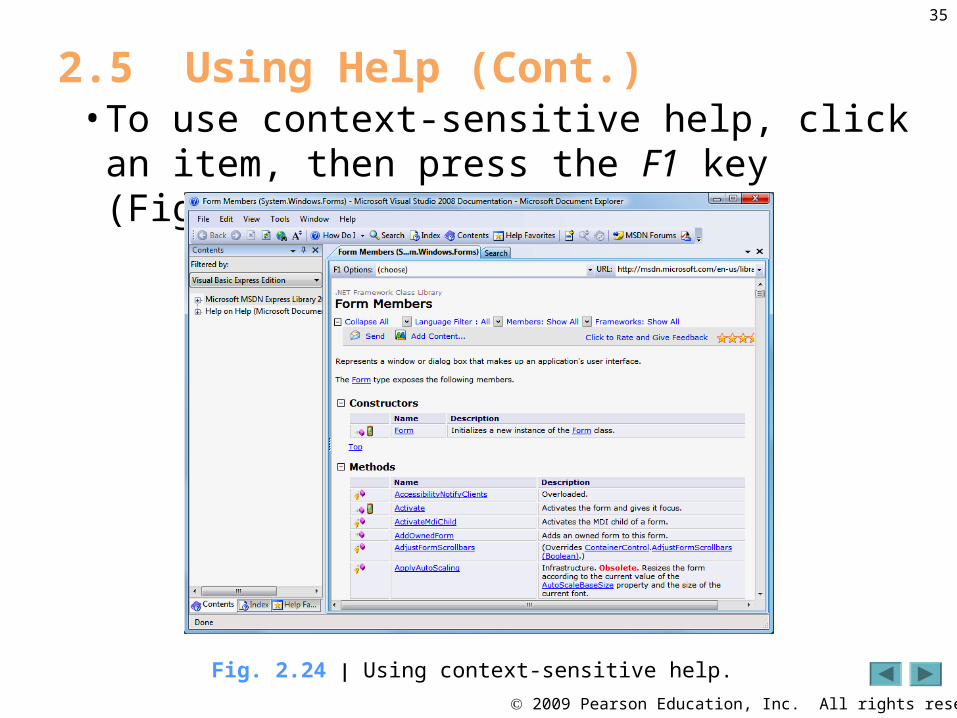
• To use context-sensitive help, click an item, then press the F1 key (Fig. 2.24).
2.5 Using Help (Cont.)
Fig. 2.24 | Using context-sensitive help.

2009 Pearson Education, Inc. All rights reserved.
36
• The Help options can be set by selecting Tools > Options• Make sure that Show all settings is checked (Fig. 2.25).
• Select Help, then set the Show Help using:drop-down list to External Help.
2.5 Using Help (Cont.)
Fig. 2.25 | Options dialog displaying Help settings.
Show all settings CheckBox
Help options selected
Show Help using drop-down list

2009 Pearson Education, Inc. All rights reserved.
37
2.6 Using Visual Programming to Create a Simple Program... (Cont.)
• Figure 2.26 shows the result of a program as it executes.
Fig. 2.26 | Simple program executing.
Label control
PictureBox control
2009 Pearson Education, Inc. All rights reserved.
38
2.6 Using Visual Programming to Create a Simple Program… (Cont.)
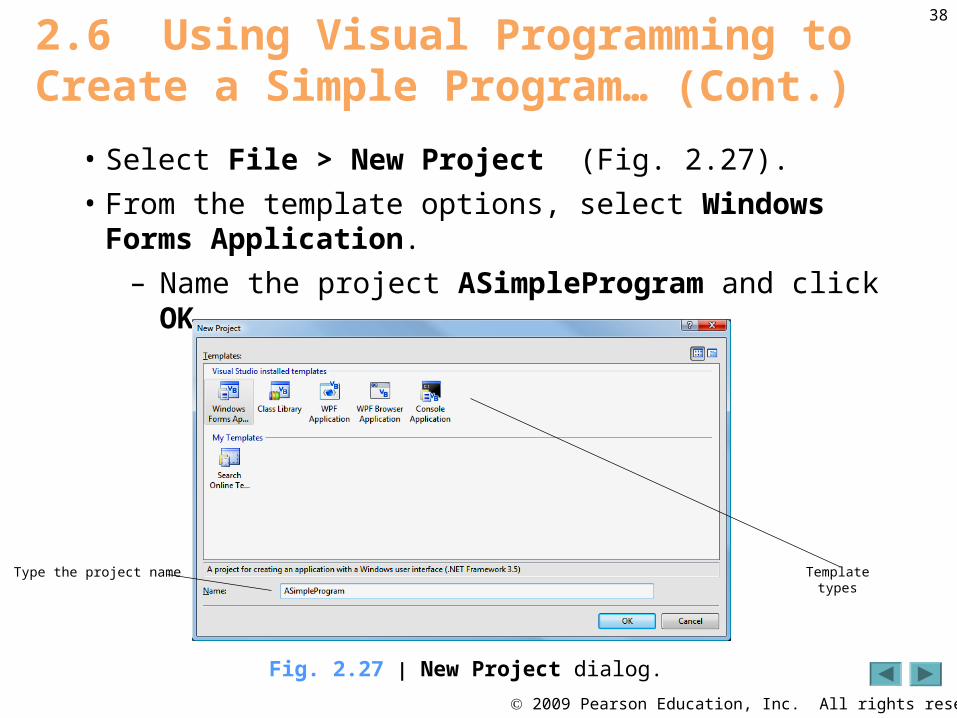
• Select File > New Project (Fig. 2.27).
• From the template options, select Windows Forms Application.
– Name the project ASimpleProgram and click OK.
Fig. 2.27 | New Project dialog.
Template types
Type the project name
2009 Pearson Education, Inc. All rights reserved.
39
2.6 Using Visual Programming to Create a Simple Program… (Cont.)
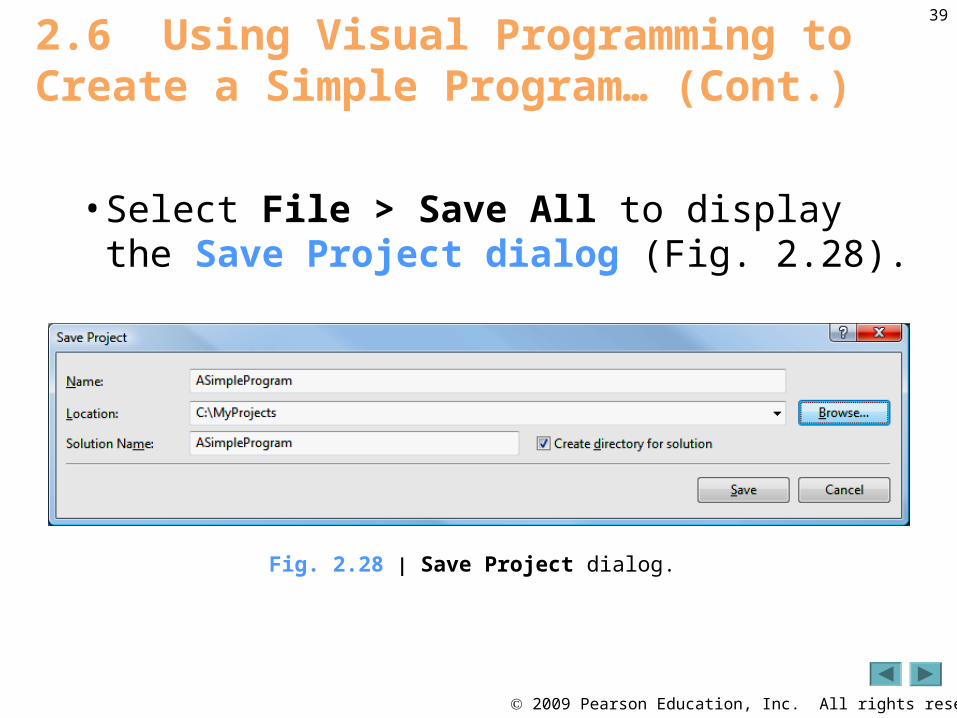
Fig. 2.28 | Save Project dialog.
• Select File > Save All to display the Save Project dialog (Fig. 2.28).

2009 Pearson Education, Inc. All rights reserved.
40
2.6 Using Visual Programming to Create a Simple Program… (Cont.)
Fig. 2.29 | Setting the project location in the Project Location dialog.
– To set the project location, click the Browse… button (Fig. 2.29).
Selected project location
Click to set projectlocation

2009 Pearson Education, Inc. All rights reserved.
41
2.6 Using Visual Programming to Create a Simple Program… (Cont.)
• When you first begin working in the IDE, it is in Design Mode.
– The text in the Form’s title bar is determined by the Form’s Text property (Fig. 2.30).
Fig. 2.30 | Setting the Form’s Text property in the Properties window.
Name and type of object
Property valueSelected property
Property description
2009 Pearson Education, Inc. All rights reserved.
42
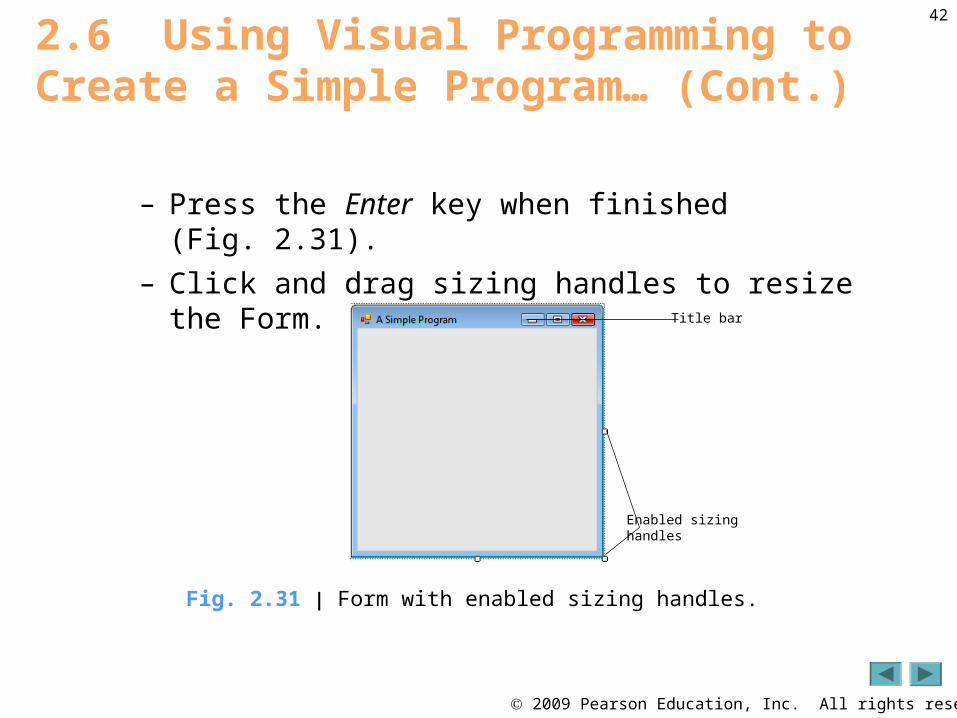
2.6 Using Visual Programming to Create a Simple Program… (Cont.)
Fig. 2.31 | Form with enabled sizing handles.
– Press the Enter key when finished (Fig. 2.31).
– Click and drag sizing handles to resize the Form.
Title bar
Enabled sizing handles

2009 Pearson Education, Inc. All rights reserved.
43
2.6 Using Visual Programming to Create a Simple Program… (Cont.)
Fig. 2.32 | Resized Form.
– Click and drag one of the Form’s enabled sizing handles to make the Form larger (Fig. 2.32).

2009 Pearson Education, Inc. All rights reserved.
44
2.6 Using Visual Programming to Create a Simple Program… (Cont.)
• Clicking BackColor in the Properties window causes a down-arrow button to appear (Fig. 2.33).
• The arrow displays tabs for Custom, Web and System. Click the Custom tab to display the palette.
Fig. 2.33 | Changing the Form’s BackColor property.
Current color
Down-arrow button
Light blue
Custom palette

2009 Pearson Education, Inc. All rights reserved.
45
2.6 Using Visual Programming to Create a Simple Program… (Cont.)
Fig. 2.34 | Form with new BackColor property applied.
• Once you select a color, the palette closes and the Form’s background color changes (Fig. 2.34).
New background color

2009 Pearson Education, Inc. All rights reserved.
46
2.6 Using Visual Programming to Create a Simple Program… (Cont.)
Fig. 2.35 | Adding a Label to the Form.
• Select View > Toolbox to display the set of controls.
• Double click the Label control in the Toolbox (Fig. 2.35).
Label control

2009 Pearson Education, Inc. All rights reserved.
47
2.6 Using Visual Programming to Create a Simple Program… (Cont.)
• Set the Label’s Text property to Welcome to Visual Basic!.
• Set the AutoSize property to False (Fig. 2.36)so that you can resize the Label on your own.
Fig. 2.36 | Changing the Label’s AutoSize property to False.
AutoSize property
2009 Pearson Education, Inc. All rights reserved.
48
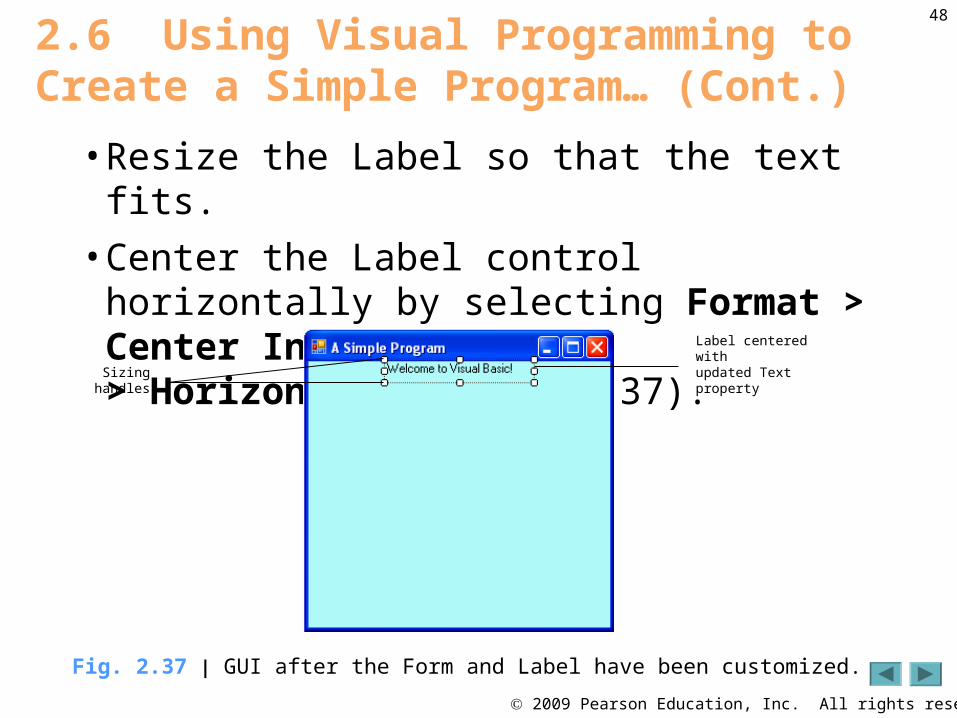
• Resize the Label so that the text fits.
• Center the Label control horizontally by selecting Format > Center In Form> Horizontally (Fig. 2.37).
2.6 Using Visual Programming to Create a Simple Program… (Cont.)
Sizing handles
Label centered with updated Text property
Fig. 2.37 | GUI after the Form and Label have been customized.

2009 Pearson Education, Inc. All rights reserved.
49
Fig. 2.38 | Properties window displaying the Label’s properties.
Ellipsis button
• Select the Font property, which causes an ellipsis button to appear next to the value (Fig. 2.38).
2.6 Using Visual Programming to Create a Simple Program that Displays Text and an Image (Cont.)

2009 Pearson Education, Inc. All rights reserved.
50
• When the ellipsis button is clicked, the Font dialog (Fig. 2.39) is displayed.
– Under Font, select Segoe UI.
– Under Size, select 24 points and click OK.
2.6 Using Visual Programming to Create a Simple Program… (Cont.)
Font sample
Fig. 2.39 | Font dialog for selecting fonts, styles and sizes.
2009 Pearson Education, Inc. All rights reserved.
51
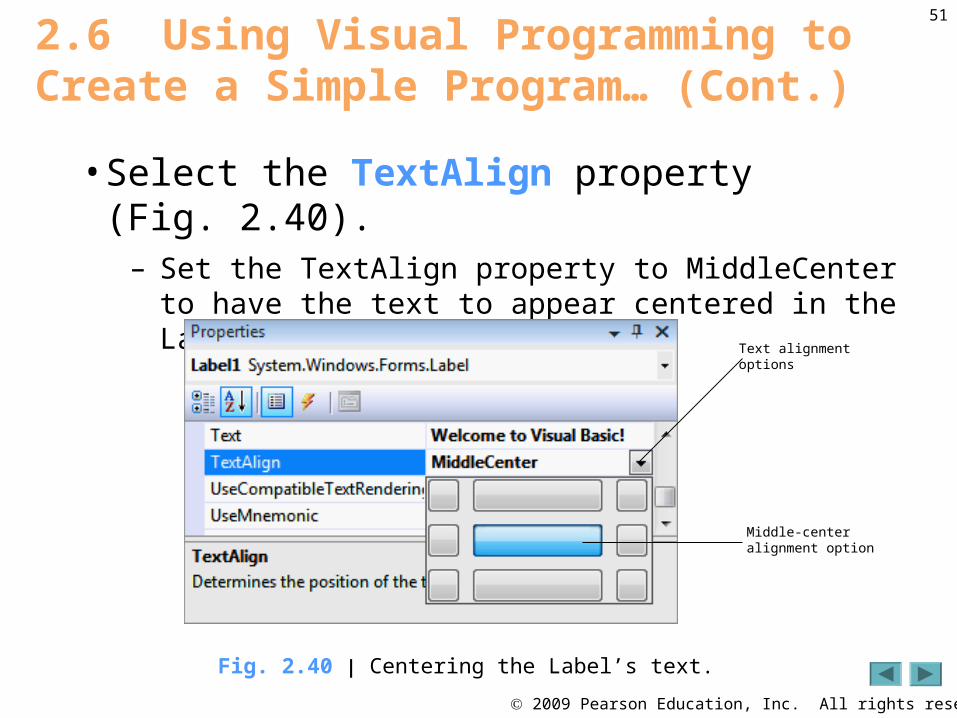
• Select the TextAlign property (Fig. 2.40).– Set the TextAlign property to MiddleCenter to have the
text to appear centered in the Label.
2.6 Using Visual Programming to Create a Simple Program… (Cont.)
Fig. 2.40 | Centering the Label’s text.
Text alignment options
Middle-center alignment option

2009 Pearson Education, Inc. All rights reserved.
52
• The PictureBox control displays images.
• Locate the PictureBox in the Toolbox and double click it to add it to the Form (Fig. 2.41).
2.6 Using Visual Programming to Create a Simple Program… (Cont.)
Fig. 2.41 | Inserting and aligning a PictureBox.
PictureBox
Updated Label

2009 Pearson Education, Inc. All rights reserved.
53
• Locate the Image property (Fig. 2.42).
• No picture has been assigned, so the value of the Image property displays (none).
2.6 Using Visual Programming to Create a Simple Program… (Cont.)
Fig. 2.42 | Image property of the PictureBox.
Image property value (no image selected)

2009 Pearson Education, Inc. All rights reserved.
54
Fig. 2.43 | Select Resource dialog to select an image for the PictureBox.
• Click the ellipsis button to display the Select Resource dialog (Fig. 2.43).
2.6 Using Visual Programming to Create a Simple Program… (Cont.)

2009 Pearson Education, Inc. All rights reserved.
55
• Click the Import…button.
• Locate bug.png, select it and click OK• The resource named bug represents bug.png
(Fig. 2.44).
2.6 Using Visual Programming to Create a Simple Program… (Cont.)
Fig. 2.44 | Select Resource dialog displaying a preview of selected image.
Image file name
2009 Pearson Education, Inc. All rights reserved.
56
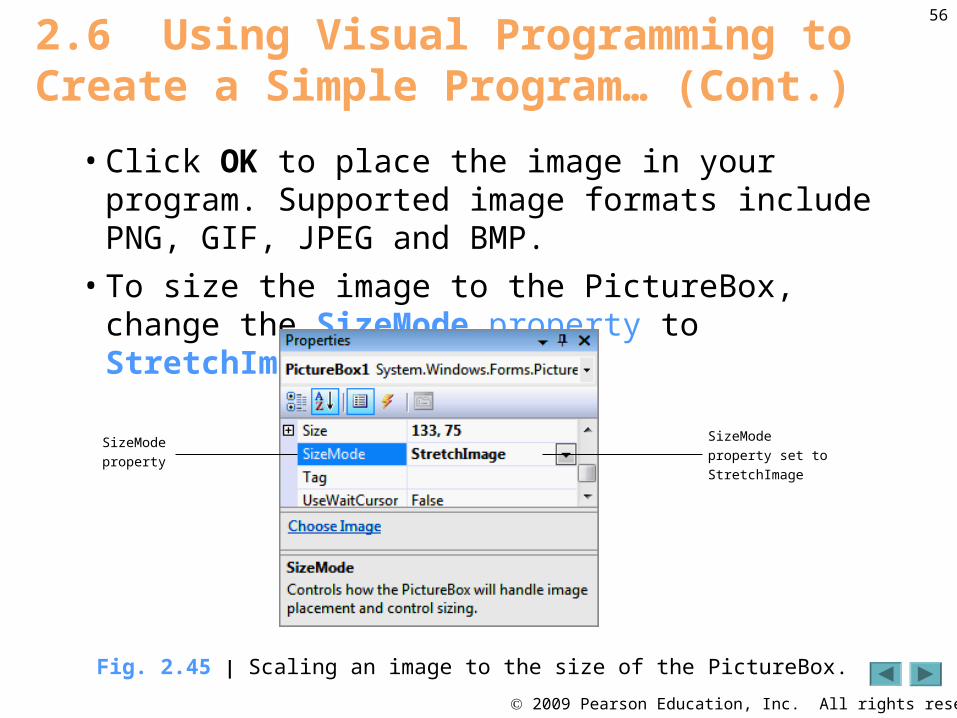
• Click OK to place the image in your program. Supported image formats include PNG, GIF, JPEG and BMP.
• To size the image to the PictureBox, change the SizeMode property to StretchImage (Fig. 2.45).
2.6 Using Visual Programming to Create a Simple Program… (Cont.)
Fig. 2.45 | Scaling an image to the size of the PictureBox.
SizeMode property set to StretchImage
SizeModeproperty

2009 Pearson Education, Inc. All rights reserved.
57
Fig. 2.46 | PictureBox displaying an image.
• Resize the PictureBox, making it larger (Fig. 2.46).
• Select File > Save All to save the entire solution.
2.6 Using Visual Programming to Create a Simple Program… (Cont.)

2009 Pearson Education, Inc. All rights reserved.
58
• Select Debug > Start Debugging to execute the program (Fig. 2.47).
2.6 Using Visual Programming to Create a Simple Program… (Cont.)
Fig. 2.47 | Debugging a solution.
Debug menu

2009 Pearson Education, Inc. All rights reserved.
59
• In run mode, the program is executing, and you can interact with only a few of the IDE features (Fig. 2.48).
2.6 Using Visual Programming to Create a Simple Program… (Cont.)
Fig. 2.48 | IDE in run mode, with the running program in the foreground.
Form
Running program
IDE displays text Running which signifies that the program is executing


