50
© 2009 www.funartlessons.com 1 Press Spacebar or down arrow to continue
| Date post: | 13-Dec-2015 |
| Category: |
Documents |
| Upload: | kellie-hampton |
| View: | 222 times |
| Download: | 0 times |
© 2009 www.funartlessons.com
1
Press Spacebar or down arrow to continue
Congratulations! You have purchased a FunArtLessons.com Art Unit.
To view and print this document:
If you have Microsoft PowerPoint 2003-2007 installed on your computer then
you are viewing this page in design mode. From the menu bar at the top of
the window select View Slideshow. To print this unit as a booklet, click on
the office button (PPT 2007) or File Print (PPT 2003) and select print.
If you do not have Microsoft PowerPoint installed on your computer then
you are viewing this document using PowerPoint Viewer. Use the space bar
or arrow keys to advance through the slides. To print, hold down the
command key while pressing the P key. This will open your print dialogue
box. To exit PowerPoint Viewer press Esc key.
© 2009 www.funartlessons.com
2
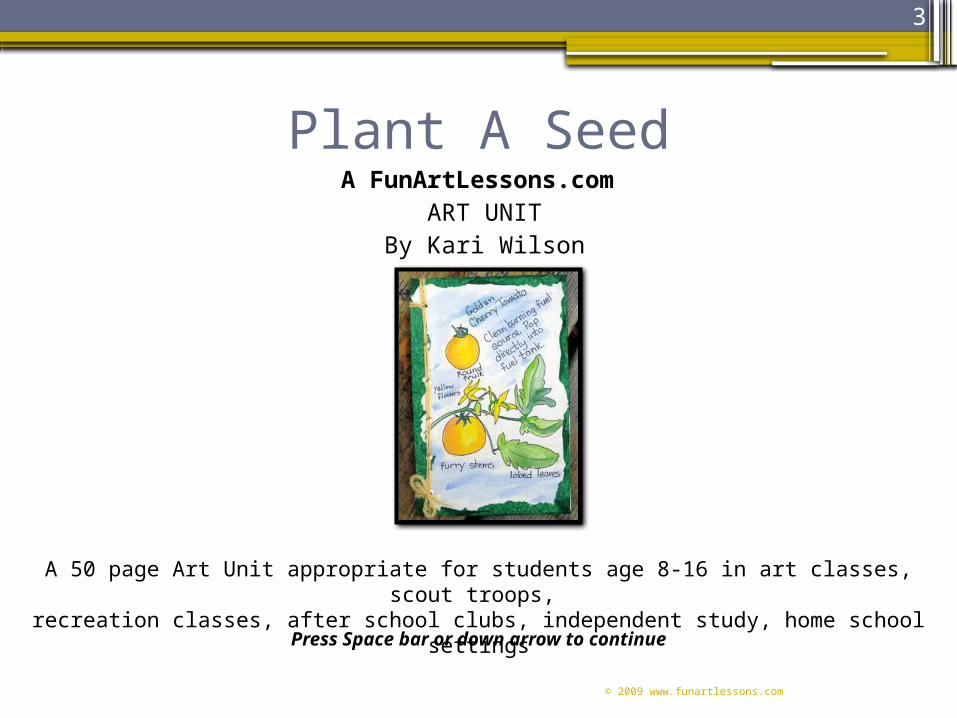
Plant A SeedA FunArtLessons.com
ART UNITBy Kari Wilson
© 2009 www.funartlessons.com
3
Press Space bar or down arrow to continue
A 50 page Art Unit appropriate for students age 8-16 in art classes, scout troops, recreation classes, after school clubs, independent study, home school settings
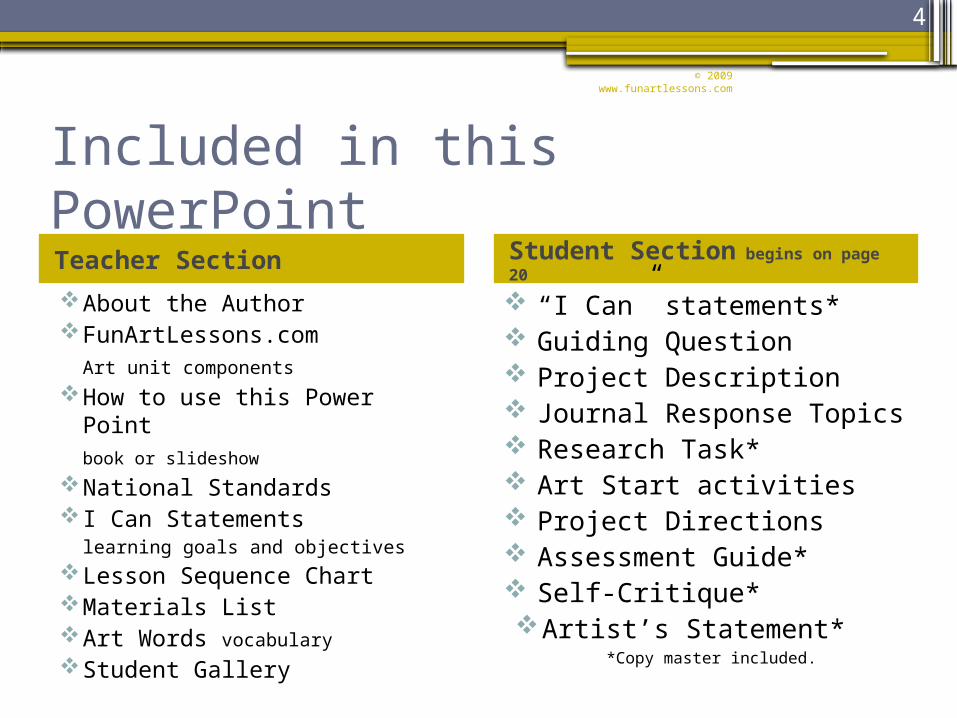
Included in this PowerPointTeacher Section Student Section begins on page 20
About the Author FunArtLessons.com
Art unit components
How to use this Power Pointbook or slideshow
National Standards I Can Statements
learning goals and objectives Lesson Sequence Chart Materials List Art Words vocabulary
Student Gallery
“I Can” statements* Guiding Question Project Description Journal Response Topics Research Task* Art Start activities Project Directions Assessment Guide* Self-Critique*Artist’s Statement*
*Copy master included.
4
© 2009 www.funartlessons.com
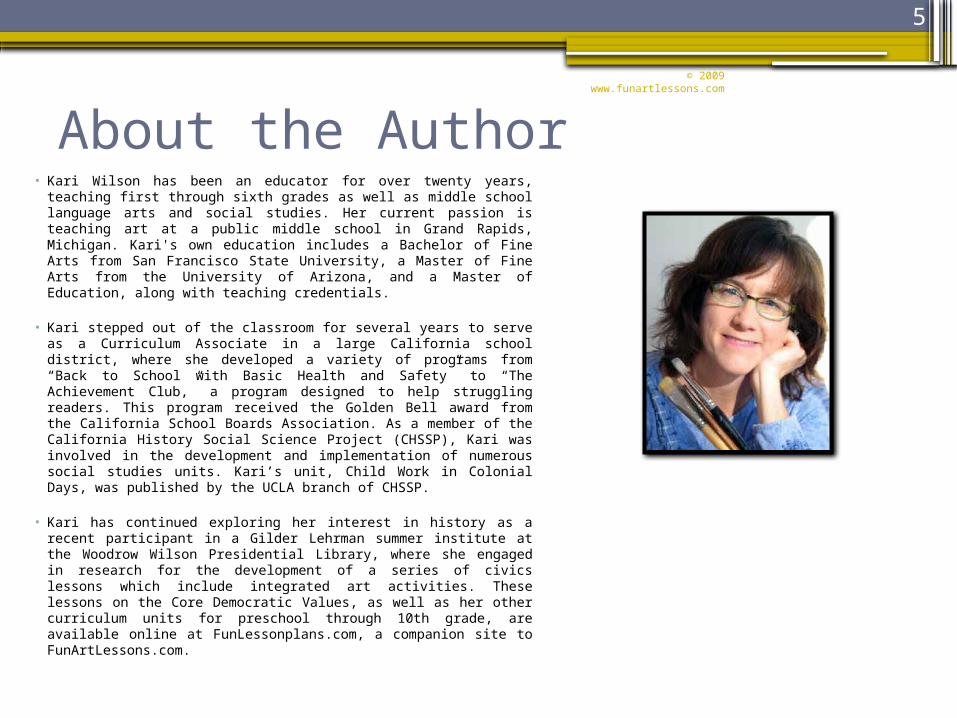
About the Author• Kari Wilson has been an educator for over twenty years,
teaching first through sixth grades as well as middle school language arts and social studies. Her current passion is teaching art at a public middle school in Grand Rapids, Michigan. Kari's own education includes a Bachelor of Fine Arts from San Francisco State University, a Master of Fine Arts from the University of Arizona, and a Master of Education, along with teaching credentials.
• Kari stepped out of the classroom for several years to serve as a Curriculum Associate in a large California school district, where she developed a variety of programs from “Back to School with Basic Health and Safety” to “The Achievement Club,” a program designed to help struggling readers. This program received the Golden Bell award from the California School Boards Association. As a member of the California History Social Science Project (CHSSP), Kari was involved in the development and implementation of numerous social studies units. Kari’s unit, Child Work in Colonial Days, was published by the UCLA branch of CHSSP.
• Kari has continued exploring her interest in history as a recent participant in a Gilder Lehrman summer institute at the Woodrow Wilson Presidential Library, where she engaged in research for the development of a series of civics lessons which include integrated art activities. These lessons on the Core Democratic Values, as well as her other curriculum units for preschool through 10th grade, are available online at FunLessonplans.com, a companion site to FunArtLessons.com.
© 2009 www.funartlessons.com
5
FunArtLessons Art Unit ComponentsGuiding Question
The guiding question provides “food for thought” to help connect the project to a larger philosophical discussion.
Journal Response TopicsStudents write responses in their sketchbooks and share with partners and group mates. This process helps enrich class discussion and helps students plan their project.
Art StartArtStart is a series of independent activities which provide exercise in basic art skills and concepts needed for the unit project. Students work independently in their sketchbook the first 10-15 minutes of class.
ResearchThe research component encourages students to explore cultural, historical and environmental connections between the unit project and the world beyond the classroom.
The ProjectSlides provide step-by-step instructions. During project work days demonstrate additional skills or methods as they become necessary. The Lesson Sequence chart provides a basic time frame for the project. During project work days circulate assisting students with methods, techniques and ideas.
AssessmentUse the “I Can” slide and worksheet to help students track their learning. Use the Interactive Assessment Guide to engage students in analyzing the ways in which their art and work habits meet the project criteria. The self-critique questions ask the artist to reflect on the art-making process. Answers can be rewritten on the form provided to create an Artist’s Statement.
ExhibitionIt is important for students to have the opportunity to display their work to complete the process of communication in which artists are engaged. Instructions are provided for students to create a gallery information card, write an artist’s statement and find an appropriate venue for display.
© 2009 www.funartlessons.com
6

How to use this PowerPoint: Book or SlideshowUse this document as a Book, a slideshow, or both, depending on your resources.
If you have a computer and digital projector in your classroom:Read the Teacher Section directly on the computer screen as you plan
your lessons. Then, display the Student Section Art Start sketchbook activities and step-by-step project instructions as a slideshow for your class. Print out only the student worksheets, as needed.
If you do not have a digital projector in your classroom:Read the Teacher Section on the computer screen as you plan your
lessons. Photocopy Student Section pages to use as hand-outs. Use the step-by-step project instructions to plan the project and guide your demonstrations.
If you do not have a computer in your classroom:Print entire document and use as you would any hard-copy, teacher
resource publication. Make photocopies of Student Section pages to use as handouts.
© 2009 www.funartlessons.com
7

This Lesson Meets National StandardsThis lesson addresses the following standards established by the National Art Education Association:
Content Standard Achievement Standard
Understanding and applying media, techniques, and processes
Students apply media, techniques, and processes with sufficient skill, confidence and sensitivity that their intentions are carried out in their art.
Understanding the visual arts in relation to history and cultures
Students will know and compare characteristics of artworks in various eras and cultures.
Reflecting upon and assessing the characteristics and merits of their work and the work of others
Students will compare multiple purposes for creating works of art.
© 2009 www.funartlessons.com
8

What Your Students Will Learn
Your students will learn about art, themselves and the world in this unit. They will also have fun! The “I Can” statements are a kid friendly way of presenting the learning goals and objectives of this unit, all of which have been aligned with the National Art Education Association Standards.Have students write each “I Can” statement in their sketchbooks as they gain new skills.Or, photocopy the “I Can” statements check-off sheet in the student section so that students can track their progress.
I can:• Describe the purpose for
botanical illustrations
• Name two historically important botanical publications.
• Compare botanical illustration with expressive artwork depicting plant life.
• Use ink and watercolor wash to create a botanical illustration.
© 2009 www.funartlessons.com
9

Lesson SequenceDay 1 Day 2 Day 3 Day 4 Day 5
Slides 20-25
•Introduce project
•I Can Statements
•Introduce Art Words
•Discuss Guiding Question
•Art Start 1
Slides 26-29
•Journal Response 1
•Research
•Share research in small groups
Slide 30 & slides 33-36
•Art Start 2
•Demonstrate preparing book cover
Slides 14-19•Show botanical illustrations gallery images as time allows
Slide 31 & 37
•Art Start 3
•Demonstrate planning botanical drawing
Slides 32 & 38
•Journal Response 2
•Demonstrate use of watercolors
© 2009 www.funartlessons.com
10
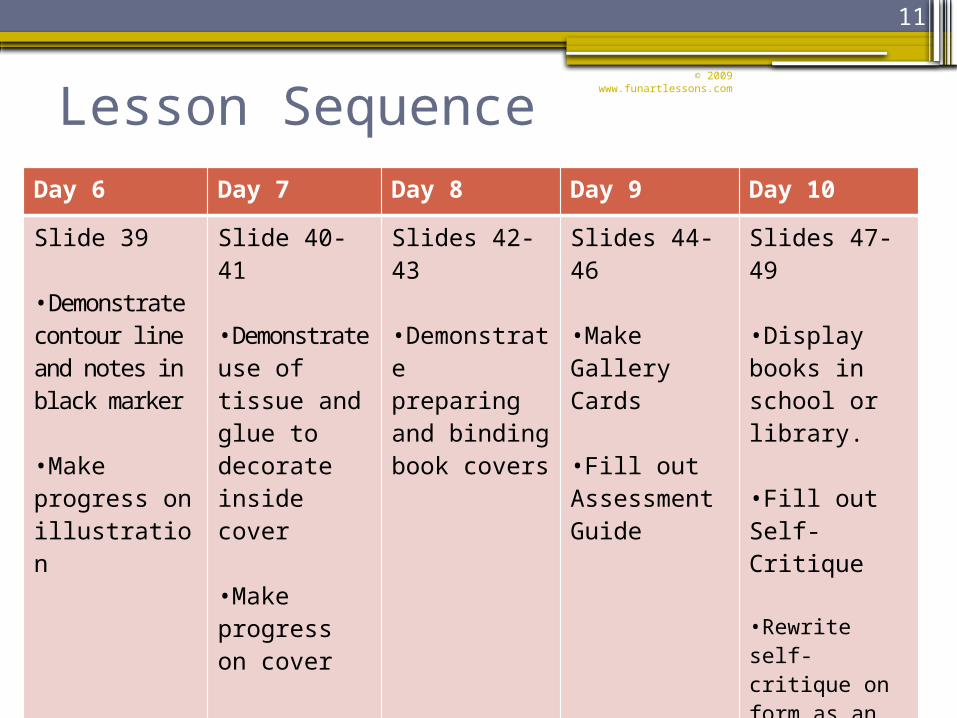
Lesson SequenceDay 6 Day 7 Day 8 Day 9 Day 10
Slide 39
•Demonstrate contour line and notes in black marker
•Make progress on illustration
Slide 40-41
•Demonstrate use of tissue and glue to decorate inside cover
•Make progress on cover
Slides 42-43
•Demonstrate preparing and binding book covers
Slides 44-46
•Make Gallery Cards
•Fill out Assessment Guide
Slides 47-49
•Display books in school or library.
•Fill out Self-Critique
•Rewrite self-critique on form as an Artist’s Statement for display
© 2009 www.funartlessons.com
11
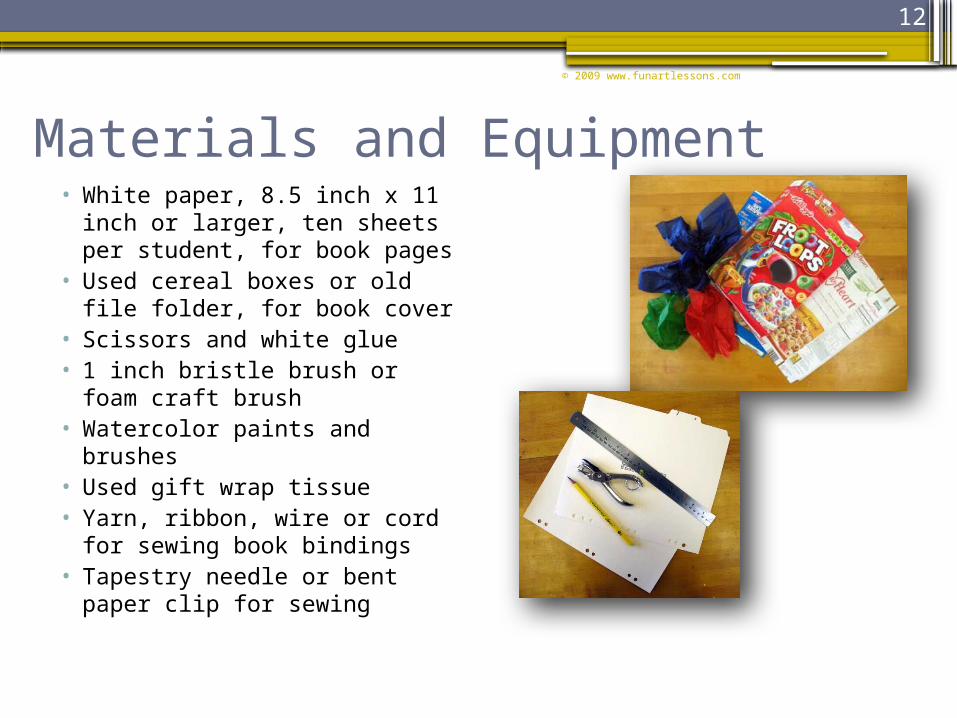
Materials and Equipment• White paper, 8.5 inch x 11
inch or larger, ten sheets per student, for book pages
• Used cereal boxes or old file folder, for book cover
• Scissors and white glue• 1 inch bristle brush or foam
craft brush• Watercolor paints and
brushes• Used gift wrap tissue• Yarn, ribbon, wire or cord for
sewing book bindings• Tapestry needle or bent
paper clip for sewing
© 2009 www.funartlessons.com
12
Art WordsIntroduce vocabulary as you begin the project. Reinforce terms during Art Start activities. Invite students to write vocabulary words and definitions in their sketchbook. Encourage students to use Art Words as they answer journal responses and discuss art work.
Illustration▫ A work of art created to
accompany a text, and which may appear in reproduced form on paper or the internet
Botanical▫ Having to do with or
derived from plantsContour Line
▫ The outside lines which define the edges of a subject or shape of an object
Composition▫ The arrangement of
shapes, colors, forms, and light and dark areas in a work of art
Balance▫ The arrangement of art
elements in a composition which leads to an equilibrium in the work of art
Harmony▫ The effect of combining
similar elements in an artwork to create a unified whole
© 2009 www.funartlessons.com
13
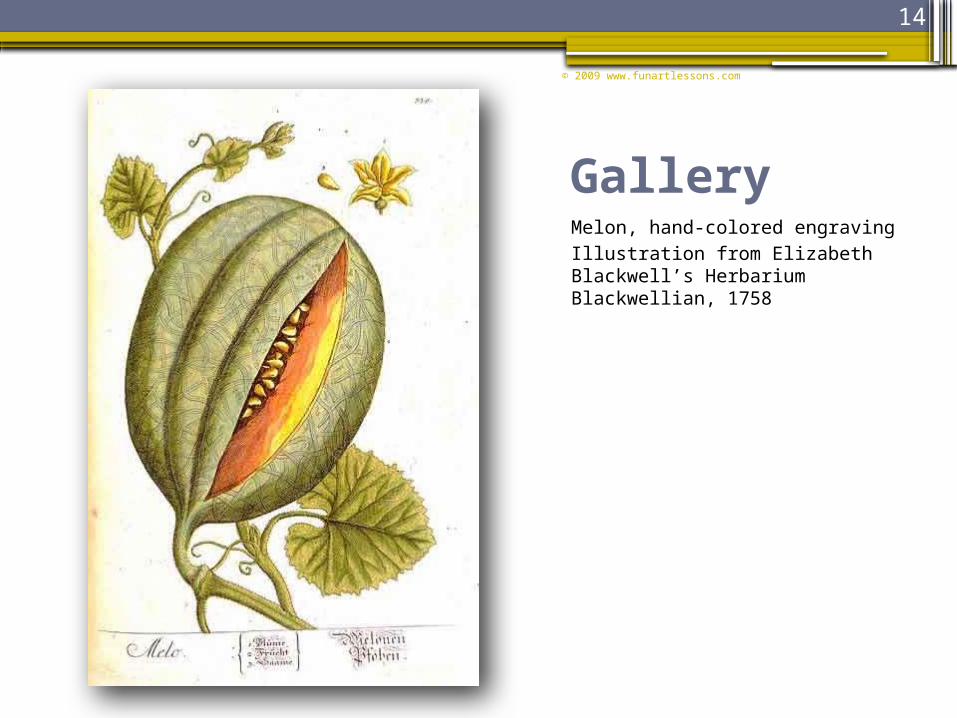
14
GalleryMelon, hand-colored engravingIllustration from Elizabeth Blackwell’s Herbarium Blackwellian, 1758
© 2009 www.funartlessons.com
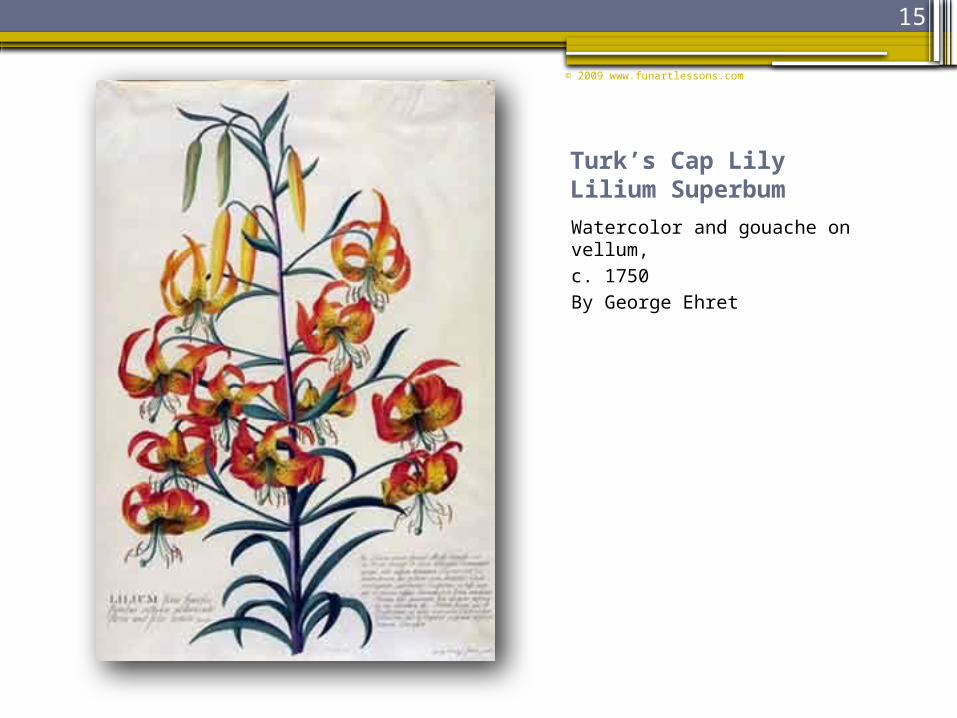
Turk’s Cap LilyLilium Superbum
Watercolor and gouache on vellum, c. 1750By George Ehret
© 2009 www.funartlessons.com
15

Wild Blackberry
From de Materia Medica, Pedanius Dioscorides, 40-90 ce
© 2009 www.funartlessons.com
16

From FrenchAtlas of Plants
Atlas des plantes de France. 1891
© 2009 www.funartlessons.com
17
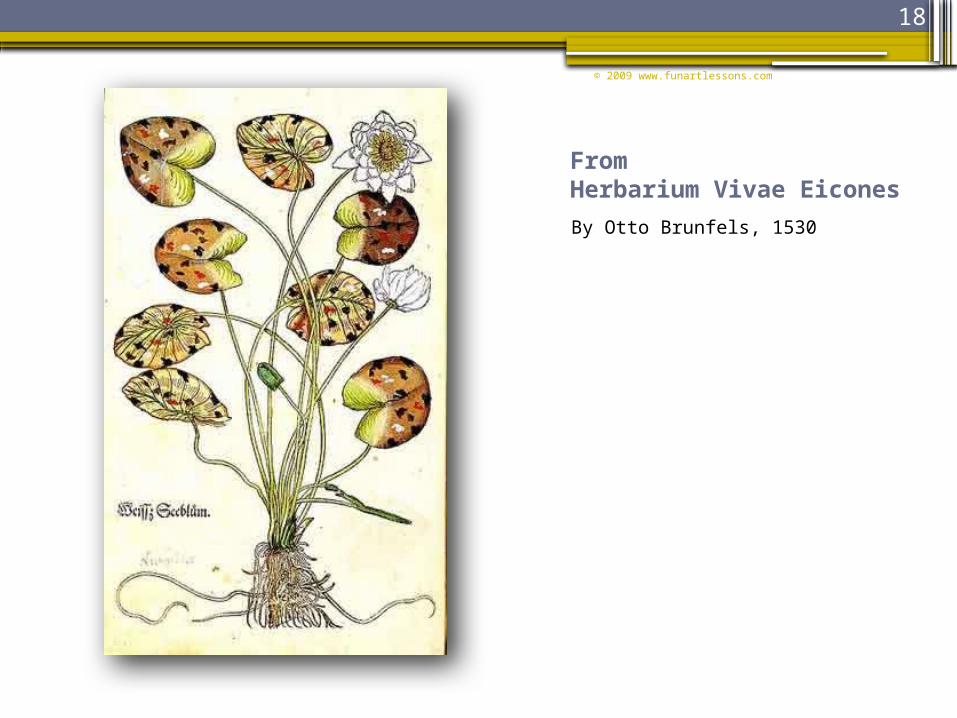
FromHerbarium Vivae Eicones
By Otto Brunfels, 1530
© 2009 www.funartlessons.com
18

Amomum Granas
By Adolphus Ypey,1813
© 2009 www.funartlessons.com
19
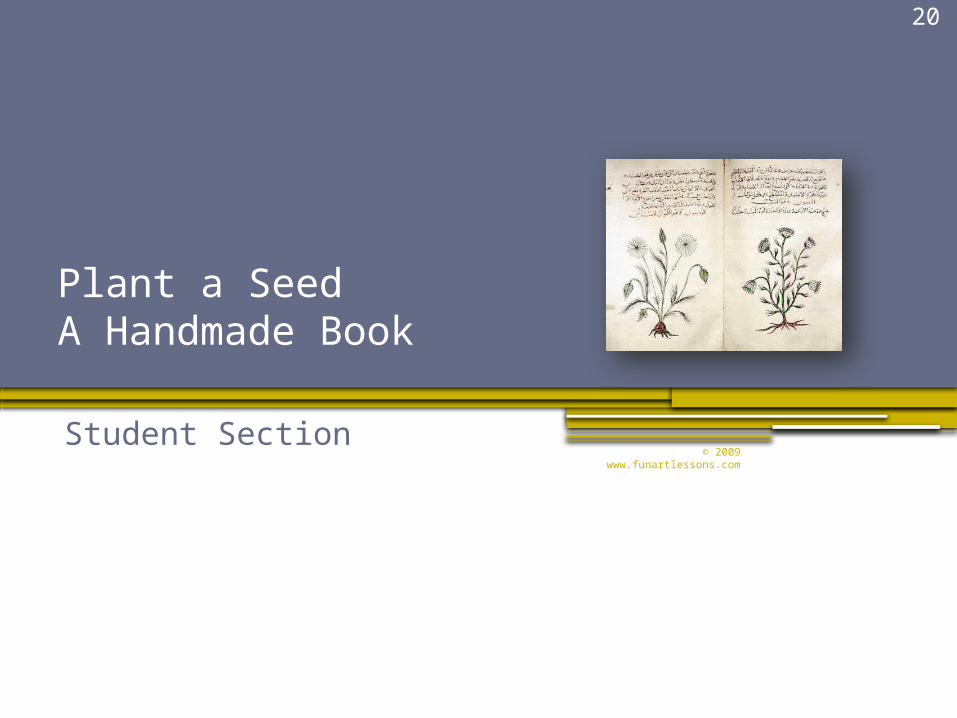
20
Plant a SeedA Handmade Book
Student Section© 2009 www.funartlessons.com

21
The Project Make a book to use as a sketchbook, scrapbook, journal or photo album.
Use watercolor to create a botanical illustration for your book cover.
© 2009 www.funartlessons.com

22
© 2009 www.funartlessons.comPlant A SeedWhat You Will Learn Name
Directions: You will learn about art, yourself and the world in this unit. You will also have fun! Check off each “I Can” statement as you gain a new skills.
I can:
Describe the purpose for botanical illustrations.
Name two historically important botanical publications.
Compare botanical illustration with expressive artwork depicting plant life.
Use ink and watercolor wash to create a botanical illustration.

Art WordsWrite vocabulary words and definitions in your sketchbook. Use Art Words as you answer journal responses and discuss art work.
Illustration▫ A work of art created to
accompany a text, and which may appear in reproduced form on paper or the internet.
Botanical▫ Having to do with or
derived from plantsContour Line
▫ The outside lines which define the edges of a subject or shape of an object
Composition▫ The arrangement of
shapes, colors, forms, and light and dark areas in a work of art
Balance▫ The arrangement of art
elements in a composition which leads to an equilibrium in the work of art
Harmony▫ The effect of combining
similar elements in an artwork to create a unified whole
© 2009 www.funartlessons.com
23

Guiding Question
Imagine you have discovered a new seed with powerful properties. What sort of plant do you think would be most useful to humankind?
© 2009 www.funartlessons.com
24
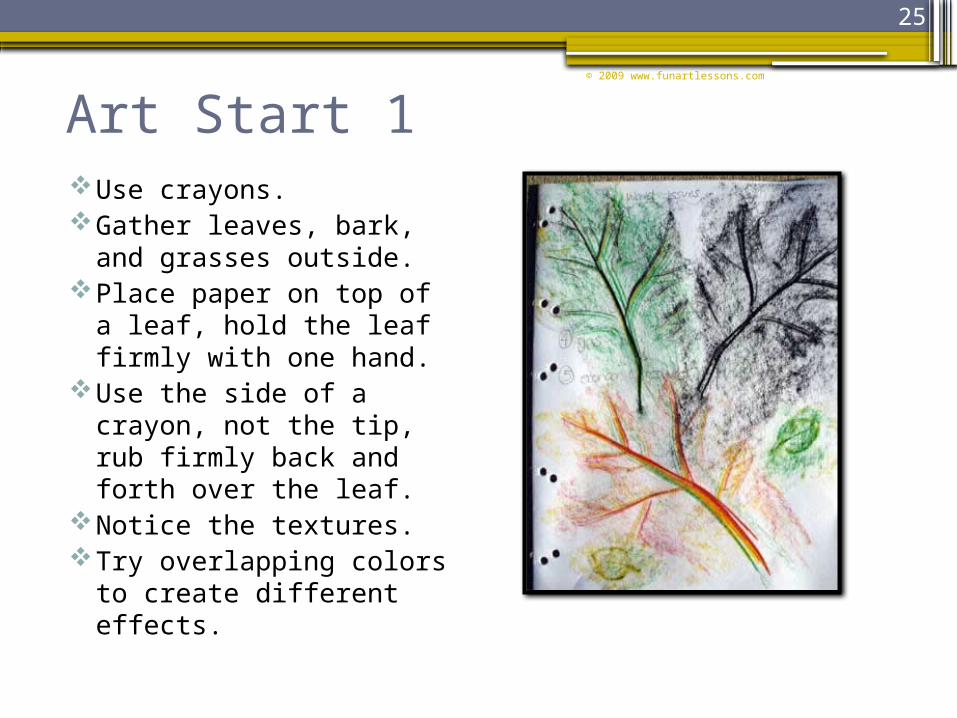
Art Start 1Use crayons.Gather leaves, bark, and
grasses outside.Place paper on top of a
leaf, hold the leaf firmly with one hand.
Use the side of a crayon, not the tip, rub firmly back and forth over the leaf.
Notice the textures.Try overlapping colors to
create different effects.
© 2009 www.funartlessons.com
25

26
Journal Response 1
List five global issues What are some problems in the world that
we need to fix?
Rank them 1 to 5 Number 1 is the most serious issue.
List three possible solutions How could we solve the most serious issue?
Share with others
© 2009 www.funartlessons.com

ResearchFind out about these two important contributors to botany and botanical illustration.
Pedanius Dioscorides, ca 40-90 ceElizabeth Blackwell, 1707-`758
Who was Dioscorides?
When and where did he live?
What was his contribution to botany?
Who was Elizabeth Blackwell?
When and where did she live?
What was her contribution to botany?
27
© 2009 www.funartlessons.com

Botany: The Study of PlantsPedanius Dioscorides
Wrote de Materia MedicaElizabeth Blackwell
Illustrated A Curious Herbal
28
© 2009 www.funartlessons.com

© 2009 www.funartlessons.com
29
ResearchUse the internet to find out about these two contributors to botany and botanical illustration.
Pedanius Dioscorides, 40-90 ce
Elizabeth Blackwell, 1707-`758
1. Who was Dioscorides?
2. When and where did he live?
3. What was his contribution to botany?
1. Who was Elizabeth Blackwell?
2. When and where did she live?
3. What was her contribution to
botany?Name Class
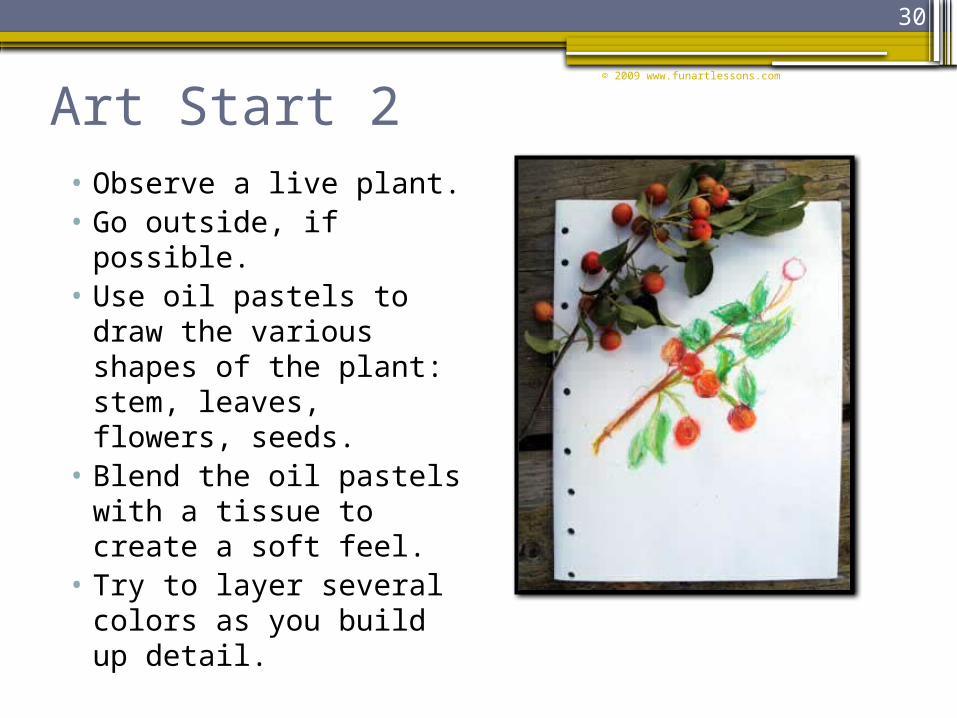
Art Start 2• Observe a live plant.• Go outside, if
possible.• Use oil pastels to
draw the various shapes of the plant: stem, leaves, flowers, seeds.
• Blend the oil pastels with a tissue to create a soft feel.
• Try to layer several colors as you build up detail.
© 2009 www.funartlessons.com
30
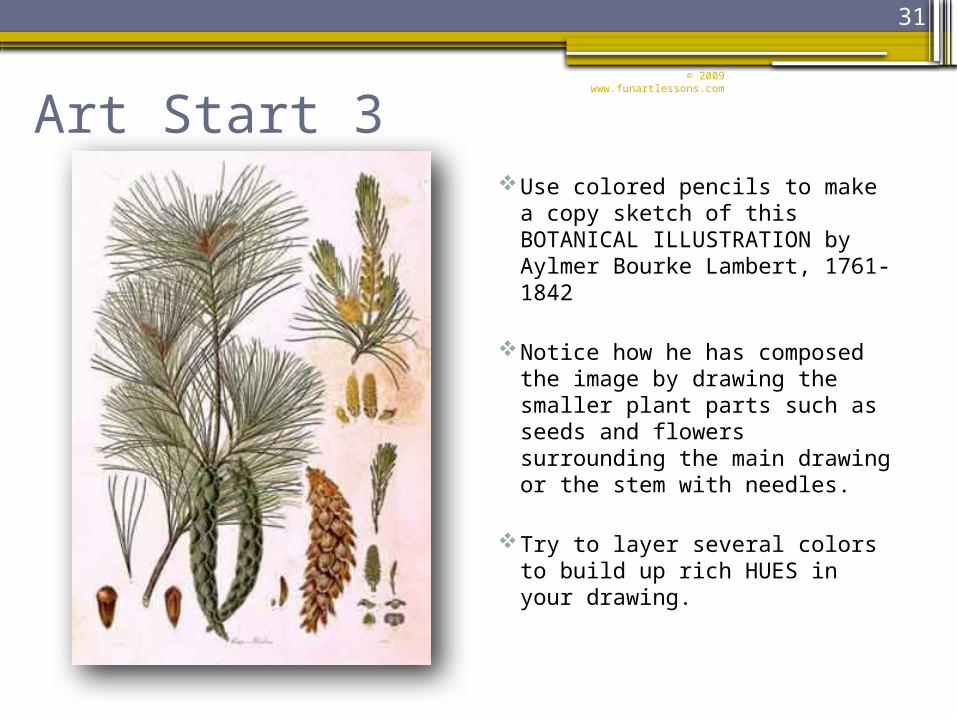
31
Art Start 3 Use colored pencils to make a
copy sketch of this BOTANICAL ILLUSTRATION by Aylmer Bourke Lambert, 1761-1842
Notice how he has composed the image by drawing the smaller plant parts such as seeds and flowers surrounding the main drawing or the stem with needles.
Try to layer several colors to build up rich HUES in your drawing.
© 2009 www.funartlessons.com
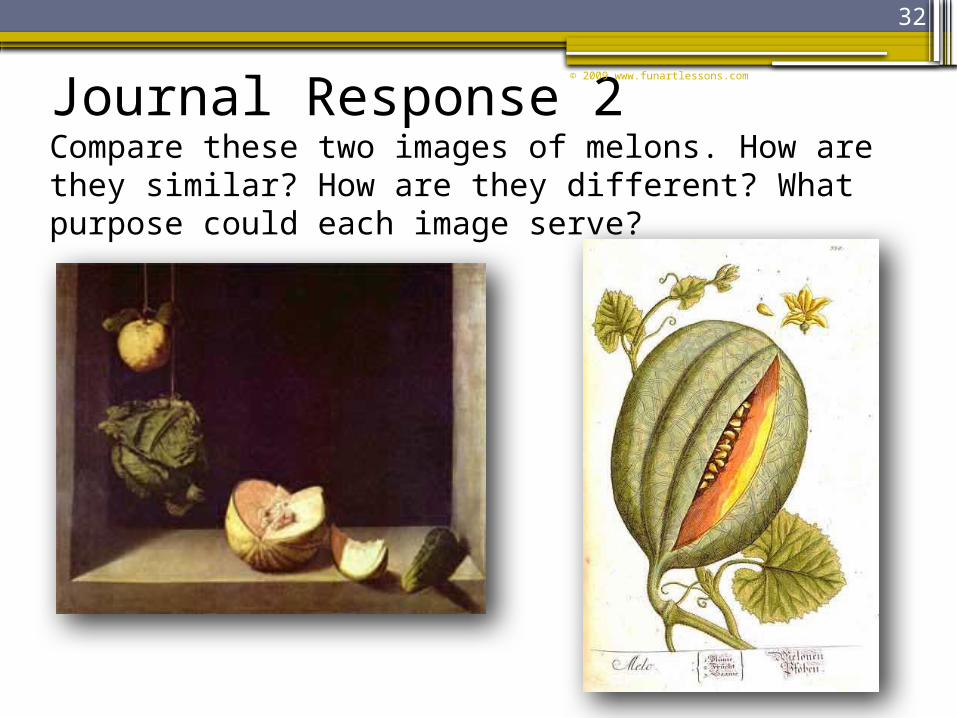
Journal Response 2Compare these two images of melons. How are they similar? How are they different? What purpose could each image serve?
© 2009 www.funartlessons.com
32
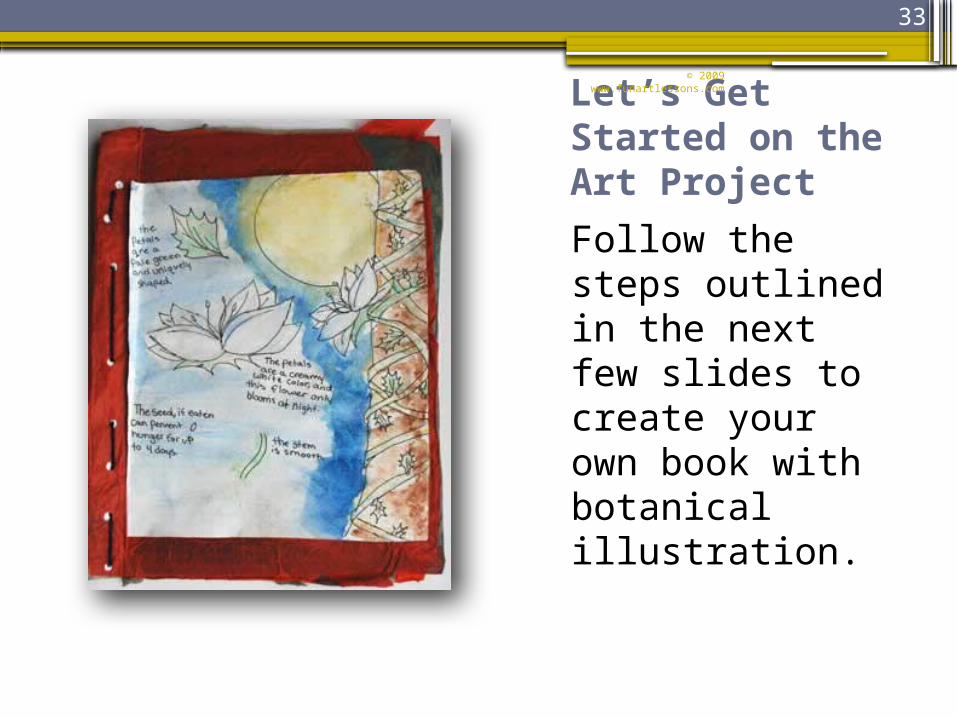
Let’s Get Started on the Art Project
Follow the steps outlined in the next few slides to create your own book with botanical illustration.
© 2009 www.funartlessons.com
33

Step OnePrepare Book Covers
• Cut a front and back cover from thin cardboard about ¼ inch larger than the paper you will use to fill your book.
• Hint: Go Green! Use cereal boxes or old file folders. They’re just the right thickness for this project.
• Use old gift wrap tissue in dark colors for the inside cover. Wrinkled and torn tissue is perfect.
© 2009 www.funartlessons.com
34
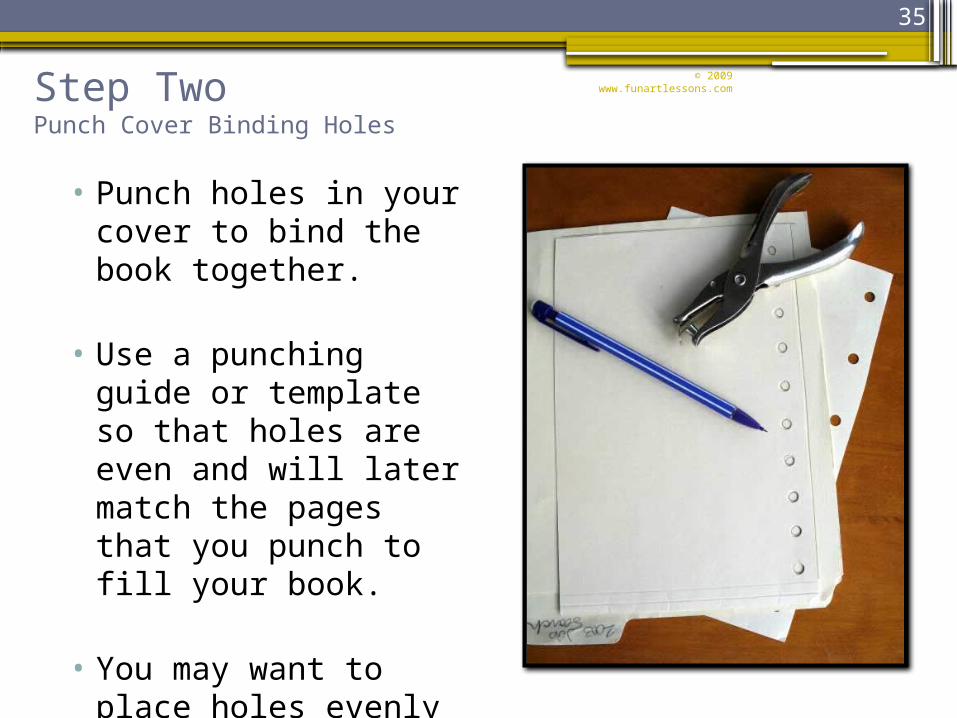
Step TwoPunch Cover Binding Holes
• Punch holes in your cover to bind the book together.
• Use a punching guide or template so that holes are even and will later match the pages that you punch to fill your book.
• You may want to place holes evenly along the spine or be creative with a pattern.
© 2009 www.funartlessons.com
35

36
Step ThreeScore the Front Cover Fold Line
• Use a ruler and a scissor edge or craft knife to gently score a line on the inside of the front cover so that it will open flat after you bind your book.
• Be careful NOT to cut all the way through the cardboard.
• Fold along this line and then flatten out for the next step.
© 2009 www.funartlessons.com

37
Step FourPlan Your Painting
• Get ready to paint your front cover. Look through your sketches for ideas.
• Use your imagination as you design a plant that could help solve a major global issue.
• Make a couple of planning sketches. Then lightly draw your design on the front cover.
© 2009 www.funartlessons.com

38
Step FivePaint Your Cover•Use a light wash of
watercolor paints to paint your design.
•Paint right over your pencil marks. You can erase these later.
• If your cover curls when it dries place it under a stack of books to flatten out.
© 2009 www.funartlessons.com

Step SixAdd a Contour Line
Use a fine point permanent marker to ink in the contour lines in your drawing.
Write botanical information such as the name of your plant and labels for the plant parts you’ve painted such as leaves, flowers, seeds or fruit.
Finish by adding a paragraph or notes around the edges of your drawing which explain the properties of your plant and the global issue it will solve!
© 2009 www.funartlessons.com
39

Step SevenDecorate the Inside Cover
• Use recycled gift tissue to decorate the inside of the book cover.
• Add water to white glue until it is the consistency of heavy cream.
• Use a wide brush to paint the glue mixture on top of tissue you have laid over the inside cover. Allow the tissue to fold and wrinkle as you paint. This will create an interesting texture.
© 2009 www.funartlessons.com
40
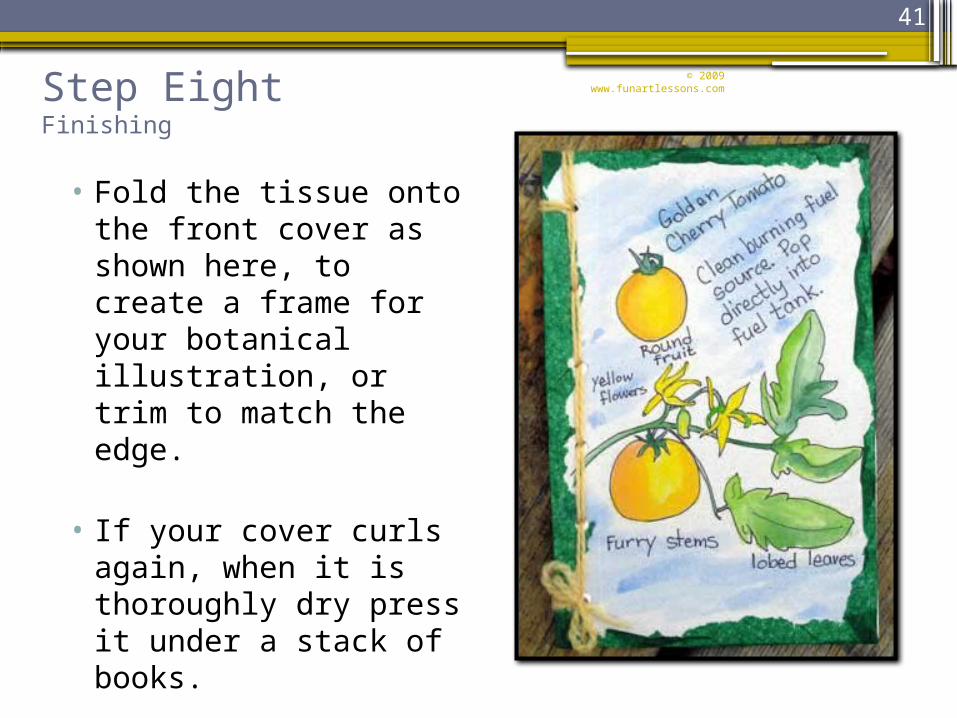
Step EightFinishing
• Fold the tissue onto the front cover as shown here, to create a frame for your botanical illustration, or trim to match the edge.
• If your cover curls again, when it is thoroughly dry press it under a stack of books.
© 2009 www.funartlessons.com
41

42
Step NinePrepare Book Pages
• Fold six to ten pieces of paper in half as shown. Use larger paper if you want to make a larger book.
• Punch holes along the left hand side. Punch 2 to 3 folded sheets at a time.
• Hint: Use a cardboard punching guide, as shown in the photo, to help you line up holes evenly on the paper. Be sure to use the same template that you used for your cover.
© 2009 www.funartlessons.com

Step TenBinding the Book
• Stack the folded book pages and place between the covers so that the holes line up.
• Hint: Do not insert the folded pages into each other, but rather stack the folded pages on atop the other for a smoother binding.
• Use yarn, ribbon, leather or even wire to sew the binding. A paper clip folded in half makes a good needle. Any simple stitch pattern is fine.
© 2009 www.funartlessons.com
43
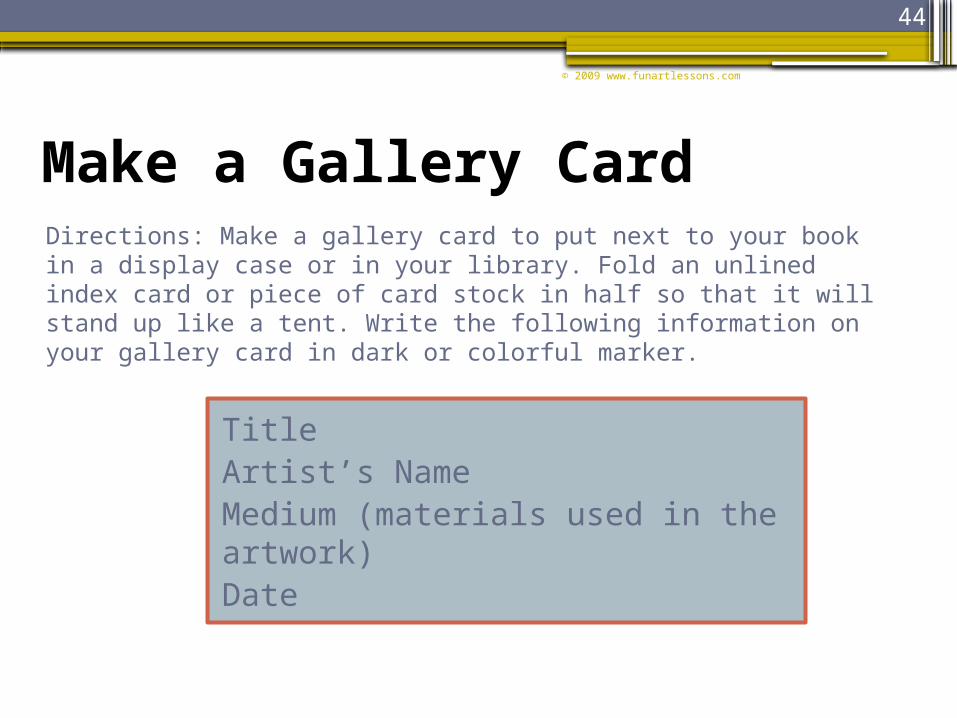
Make a Gallery CardDirections: Make a gallery card to put next to your book in a display case or in your library. Fold an unlined index card or piece of card stock in half so that it will stand up like a tent. Write the following information on your gallery card in dark or colorful marker.
© 2009 www.funartlessons.com
44
TitleArtist’s NameMedium (materials used in the artwork)Date
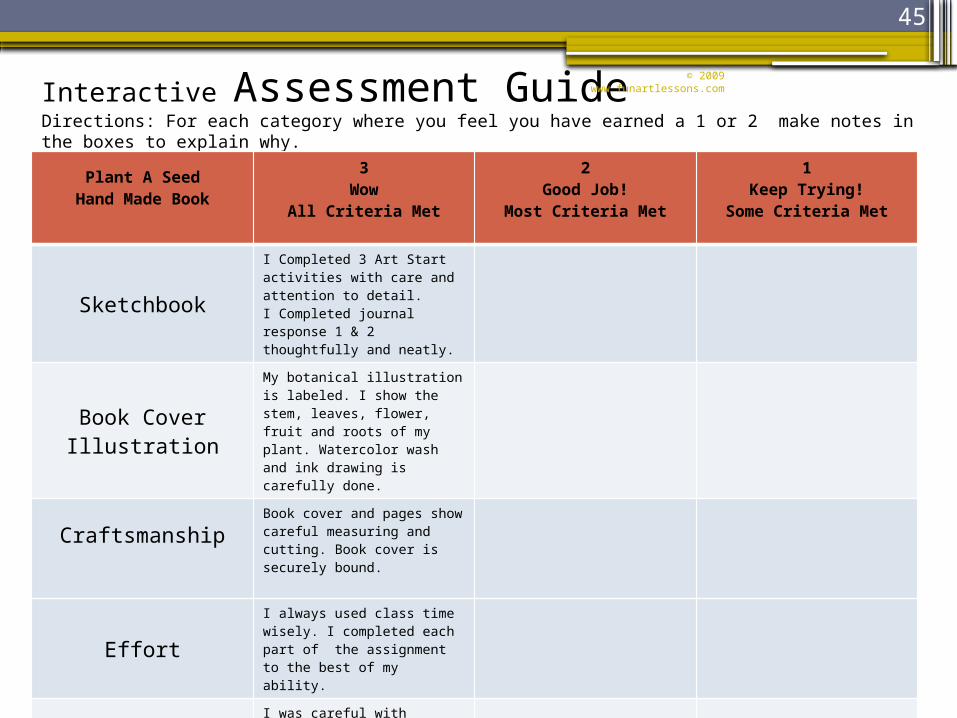
Interactive Assessment GuideDirections: For each category where you feel you have earned a 1 or 2 make notes in the boxes to explain why.
© 2009 www.funartlessons.com
45
Plant A SeedHand Made Book
3Wow
All Criteria Met
2Good Job!
Most Criteria Met
1Keep Trying!
Some Criteria Met
Sketchbook
I Completed 3 Art Start activities with care and attention to detail.I Completed journal response 1 & 2 thoughtfully and neatly.
Book Cover Illustration
My botanical illustration is labeled. I show the stem, leaves, flower, fruit and roots of my plant. Watercolor wash and ink drawing is carefully done.
CraftsmanshipBook cover and pages show careful measuring and cutting. Book cover is securely bound.
EffortI always used class time wisely. I completed each part of the assignment to the best of my ability.
Citizenship
I was careful with supplies and equipment. I cleaned up after myself and helped others. My attitude was enthusiastic and respectful.

Interactive Assessment GuideDirections: For each category where you feel you have earned a 1 or 2 make notes in the boxes to explain why.
© 2009 www.funartlessons.com
46
Plant A SeedHand Made Book
3Wow
All Criteria Met
2Good Job!
Most Criteria Met
1Keep Trying!
Some Criteria Met
Sketchbook
I Completed 3 Art Start activities with care and attention to detail.I Completed journal response 1 & 2 thoughtfully and neatly.
Book Cover Illustration
My botanical illustration is labeled. I show the stem, leaves, flower, fruit and roots of my plant. Watercolor wash and ink drawing is carefully done.
CraftsmanshipBook cover and pages show careful measuring and cutting. Book cover is securely bound.
EffortI always used class time wisely. I completed each part of the assignment to the best of my ability.
Citizenship
I was careful with supplies and equipment. I cleaned up after myself and helped others. My attitude was enthusiastic and respectful.

Art Self-Critique(Kri-teek: to discuss a creative work giving an assessment of its successful qualities.)
Directions: Look carefully at YOUR work of art. Answer each question in complete sentences. Use three vocabulary terms: Illustration, Contour Line, Composition, underline each word.
1. Describe your artwork. Tell about the materials you used and the decisions you made.
2. What are some of the challenges you faced in completing your book? What did you learn from this project?
3. Choose an element or principle of art that is used successfully. How has it contributed to your artwork?
© 2009 www.funartlessons.com
47

© 2009 www.funartlessons.com
48
Directions: Look carefully at YOUR work of art. Answer each question in complete sentences. Use 3 vocabulary terms: Illustration, Contour Line, Composition. Underline each term.
1. Describe your artwork. Tell about the materials you used and the decisions you made.
2. What are some of the challenges you faced in completing your book? What did you learn from this project?
3. Choose an element or principle of art that is used successfully . How has it contributed to your artwork?
Art Self-Critique(Kri teek: to discuss a creative work, giving an assessment of its successful qualities.) Name

© 2009 www.funartlessons.com
49
Artist’s Statement by
The End
Thank you for using this Fun Art Lessons.com Art Unit.
© 2009 www.funartlessons.com
50


