118
© 2011 Erick Sutanto, All Rights Reserved

© 2011 Erick Sutanto, All Rights Reserved

DESIGN AND FABRICATION OF MULTIMATERIAL ELECTROHYDRODYNAMIC-JET
DEPOSITION SYSTEM
BY
ERICK SUTANTO
THESIS
Submitted in partial fulfillment of the requirements
for the degree of Master of Science in Mechanical Engineering
in the Graduate College of the
University of Illinois at Urbana Champaign, 2011
Urbana, Illinois
Advisor:
Professor Andrew Alleyne

ii
Abstract
Electrohydrodynamic jet (E-jet) printing has emerged as a high resolution
alternative to other forms of direct solution-based fabrication approaches, such as ink-jet
printing. This thesis discusses the design, integration and operation of a unique E-jet
printing platform. The uniqueness lies in the ability to utilize multiple materials in the
same overall print-head thereby enabling increased degrees of heterogeneous integration
of different functionalities on a single substrate. By utilizing multiple individual print-
heads, with a carrousel indexing among them, increased material flexibility is achieved.
The hardware design and system operation for a relatively inexpensive system are
developed and presented. Crossover interconnects and multiple fluorescent tagged
proteins, demonstrating printed electronics and biological sensing applications,
respectively.

iii
To My Parents

iv
Acknowledgements
First and foremost, I owe my deepest gratitude to Professor Andrew Alleyne for
providing me the opportunity to join his research group. In the past two years, his
guidance and mentorship lead me to be a better researcher and develop maturity of my
character. The way Dr. Alleyne leads and runs the research group provides me a vivid
model of leadership skills that are worth to follow. Along with Dr. Alleyne, Dr. John
Rogers and Placid Ferreira have also been very helpful in my study with their innovative
ideas and inputs which enrich and broaden the scope of my research.
My two years in Urbana Champaign is not as cold as most people told me. The
presence of my fellow ARG students makes it warmer and I feel more like home. Bin Li
and Tim Deppen have been great friends and “brothers” as they continuously give
encouragement and share their experience with me. I will never forget that very trip to
DC and our visit to the “White House”. Vikas Chandan kindly helped me to understand
hard mathematical concepts and built my confidence in dealing with rigorous theorems.
Kira Barton, Dave Hoelzle and Neera Jain have been a role model for me in the area of
leadership and organizational. I would as well thank the rest of the group who makes life
in Urbana Champaign enjoyable: Nanjun Liu, Yangmin Xie, Richard Otten, Sandipan
Mishra, Justin Koeln, Joseph Fasl, Sarah Mannen and Megan Kania. I treasure every
second we spend together and hope that we can continue this friendship afterwards.
I cannot express with word how grateful I am to have loving parents who nurture
me from a little boy to a grown up man. They always encourage me to pursue the best
education and provides me the opportunity to study abroad to broaden my horizon. I

v
would like to also thank my siblings and friends who made my transition in Austin and
Urbana Champaign stress-free.
The success of my study would not be possible without the support of the
NanoCEMMS Center and the Department of Mechanical Science and Engineering. I
would also like to thank all the professors who taught my classes.
Most importantly, I would like to thank God, to whom I owe my very existence. I
would like to give thanks for all the blessings that have been bestowed upon me.

vi
Table of Contents
CHAPTER Page
LIST OF TABLES ............................................................................................................ ix
LIST OF FIGURES ........................................................................................................... x
CHAPTER 1 INTRODUCTION .................................................................................... 1
1.1 Microprinting Technology ................................................................................. 2
1.2 Electrohydrodynamic Jet Printing ...................................................................... 5
1.3 Organization of Thesis ....................................................................................... 9
CHAPTER 2 MULTIMATERIAL E-JET DEPOSITION SYSTEM .......................... 10
2.1 Multisyringe Toolbit Design ............................................................................ 12
2.2 Design Concepts ............................................................................................... 12
2.2.1 Design 1 – Manual Carousel Design .................................................................. 13
2.2.2 Design 2 – Motorized Carousel Design ............................................................. 15
2.2.3 Design 3 – “Ferris Wheel” Design ..................................................................... 17
2.3 Formal Toolbit Design ..................................................................................... 18
2.3.1 Components........................................................................................................ 18
2.3.2 Design Descriptions ........................................................................................... 20
2.3.1 Electronics .......................................................................................................... 21
2.3.2 Assembly Instructions ........................................................................................ 25
CHAPTER 3 DESKTOP E-JET SYSTEM WITH MULTISYRINGE HEAD ............ 29
3.1 Mechanical Design........................................................................................ 30

vii
3.1.1 Components .................................................................................................... 30
3.1.2 Assembly Instruction ...................................................................................... 34
3.2 Electronics..................................................................................................... 38
3.2.1 Voltage Amplifier ........................................................................................... 39
3.2.2 Pressure Regulator .......................................................................................... 39
3.2.3 Aerotech Stage Driver ..................................................................................... 40
3.3 User Interface ................................................................................................ 41
3.3.1 Initialization ....................................................................................................... 42
3.3.2 Main Program ..................................................................................................... 42
3.3.3 Program Finalization .......................................................................................... 48
CHAPTER 4 MICROPOSITIONING SYSTEM ......................................................... 49
4.1 System Modeling .............................................................................................. 49
4.2 Image Processing and Feature Detection ......................................................... 51
4.2.1 Image Capture .................................................................................................... 52
4.2.2 Region of Interest Setting ................................................................................... 53
4.2.3 Feature Detection ............................................................................................... 54
4.2.4 Analysis .............................................................................................................. 56
4.3 Micropositioning Control Structure ................................................................. 57
4.4 Controller Design ............................................................................................. 58
CHAPTER 5 MULTIMATERIAL E-JET PRINTING APPLICATION ..................... 61
5.1 Printing of Biological Sensor ........................................................................... 61
5.2 Multilayer Printed Interconnects ...................................................................... 65
5.3 Other Applications ........................................................................................... 68
CHAPTER 6 CONCLUSION AND FUTURE WORK ............................................... 69
6.1 Thesis Summary ............................................................................................... 69
6.2 Contributions and Conclusion .......................................................................... 70
6.3 Future Work ..................................................................................................... 71
LIST OF REFERENCES .................................................................................................. 72

viii
APPENDIX A ................................................................................................................... 75
A.1 Angled Bracket ................................................................................................ 76
A.2 Toolbit Base..................................................................................................... 77
A.3 Rotary Mount................................................................................................... 78
A.4 Syringe Holder Extender ................................................................................. 79
APPENDIX B ................................................................................................................... 80
B.1 Syringe Post Adapter ....................................................................................... 81
B.2 Stage Adapter................................................................................................... 82
B.3 Camera Adapter ............................................................................................... 83
B.4 Pressure Subassembly Adapter ........................................................................ 84
B.5 Camera Bracket ............................................................................................... 85
B.6 Top Panel ......................................................................................................... 86
B.7 Side Panel ........................................................................................................ 87
B.8 Back Panel ....................................................................................................... 88
B.9 Aluminum Extender 1...................................................................................... 89
B.10 Aluminum Extender 2.................................................................................... 90
B.11 Aluminum Extender 3.................................................................................... 91
APPENDIX C ................................................................................................................... 92
C.1 Image Converter Sub-function – imageRead.m .............................................. 93
C.2 Image Converter Sub-function – imageSpace.m ............................................. 94
C.3 Image Converter Sub-function – im2gcode.m................................................. 95
C.4 Image Converter Sub-function – generate_gcode.m ....................................... 97
C.5 Image Converter Sub-function – generate_gcode.m ....................................... 99

ix
List of Tables
Table 2.1 Components of Multisyringe Toolbit ............................................................................ 19
Table 3.1 Component List of Desktop System Housing ............................................................... 31
Table 3.2 Component List of Positioning System ......................................................................... 31
Table 3.3 Component List of Pneumatic System .......................................................................... 32
Table 3.4 Component List of CPU & Electronics ......................................................................... 32
Table 3.5Component List of Camera System ................................................................................ 32
Table 3.6 Component List of Supporting Parts ............................................................................. 33
Table 3.7 Signal Routing of Desktop E-jet Printer ........................................................................ 38
Table 3.8 DIP Switch Configuration ............................................................................................. 40
Table 5.1 Ink Composition of Fluorophores ................................................................................. 63

x
List of Figures
Figure 1.1 Manufacturing Output of Top 8 Countries from 1970-2009 [3] .................................... 1
Figure 1.2 Application Examples of Microprinting Technology [8,9,10,11,12] ............................. 2
Figure 1.3 Inkjet Printed Interconnect [20] ..................................................................................... 3
Figure 1.4 Comparison of Inkjet and E-jet Printing Operation Regime .......................................... 4
Figure 1.5 Schematic of Standard E-Jet Printer .............................................................................. 6
Figure 1.6 Input Signal of Drop on Demand ................................................................................... 7
Figure 1.7 E-Jet and Inkjet Droplet Size Comparison ..................................................................... 7
Figure 1.8 Various Printing Application of E-jet Printer ................................................................ 8
Figure 1.9 Sputtered Nozzle a) Sputtered Nozzle b) Hydrophobic Coating ................................... 9
Figure 2.1a) DNA Microarray, b) MEMS motor [31], c) Inkjet Printed Transistors .................... 11
Figure 2.2 Multisyringe Design Aspects ....................................................................................... 12
Figure 2.3 Carousel Toolbit Design .............................................................................................. 13
Figure 2.4 Repeatability Measurements by Visual Observation ................................................... 14
Figure 2.5 Repeatability Statistics of the Ball Detent Mechanism ................................................ 14
Figure 2.6 Positioning Accuracy of Vision System ...................................................................... 15
Figure 2.7 Carousel Design with DC Motor.................................................................................. 16
Figure 2.8 Positioning Profile using Vision System ...................................................................... 16
Figure 2.9 Ferris Wheel Design..................................................................................................... 17
Figure 2.10 Mechanical Failure on FWD ...................................................................................... 18
Figure 2.11 CAD Model of Formal Toolbit Design ...................................................................... 20
Figure 2.12 Fabricated Toolbit Parts Using Aluminum ................................................................ 21
Figure 2.13 System Interfacing of Multisyringe Tool Bit ............................................................. 21
Figure 2.14 DC Motor for Multisyringe Toolbit ........................................................................... 22
Figure 2.15 Schematic of Voltage and Pressure ............................................................................ 23
Figure 2.16 Electronic Valves on Pressure Manifold .................................................................... 24

xi
Figure 2.17 Circuit Design Using ExpressPCBTM
......................................................................... 24
Figure 2.18 Multisyringe Toolbit on Desktop E-jet System.......................................................... 25
Figure 2.19 Eletronics Assembly .................................................................................................. 26
Figure 2.20 Rotary Mount Assembly ............................................................................................ 26
Figure 2.21 Printhead Subassembly .............................................................................................. 27
Figure 2.22 Electrical and Angled Bracket Subassembly ............................................................. 28
Figure 2.23 Final Toolbit Assembly .............................................................................................. 28
Figure 3.1 Desktop E-jet Printer with Multisyringe ...................................................................... 29
Figure 3.2 Layout of Components on Breadoard .......................................................................... 30
Figure 3.3 Housing of Desktop E-jet printer ................................................................................. 34
Figure 3.4 Exploded View of Toolbit Mount Subassembly .......................................................... 35
Figure 3.5 Exploded View of the Stage Subassembly................................................................... 36
Figure 3.6 Exploded View of the Stage Subassembly................................................................... 37
Figure 3.7 Equipment Cabinets ..................................................................................................... 37
Figure 3.8 Port Mapping of Data Acquisition Card and Terminal Block (CB-68LP) .................. 38
Figure 3.9 Voltage Amplifier Configuration ................................................................................. 39
Figure 3.10 Calibration Plot of the Pressure Regulator ................................................................. 40
Figure 3.11 Graphical User Interface of Desktop System ............................................................. 41
Figure 3.12 Initialization of GUI ................................................................................................... 42
Figure 3.13 Voltage Signal Generator Loop ................................................................................. 43
Figure 3.14 Voltage Amplifier Trigger Loop ................................................................................ 44
Figure 3.15 Aerotech User Interface ............................................................................................. 44
Figure 3.16 Visualization System Algorithm ................................................................................ 45
Figure 3.17 Front End Camera Settings ........................................................................................ 46
Figure 3.18 Good Image Detection ............................................................................................... 46
Figure 3.19 Camera System Error Message .................................................................................. 47
Figure 3.20 Multisyringe DC Motor Control and Relay Switching .............................................. 48
Figure 3.21 Finalization Step of GUI ............................................................................................ 48
Figure 4.1 Multisyringe Toolbit .................................................................................................... 49
Figure 4.2 Bode Plot of the Multisyringe Toolbit Positioning System ........................................ 50
Figure 4.3 Desktop E-Jet Printer with Multisyringe Toolbit ......................................................... 51
Figure 4.4 Machine Vision Algorithm .......................................................................................... 52
Figure 4.5 Camera Initialization and Image Configuration ........................................................... 53

xii
Figure 4.6 Region of Interest Descriptor ....................................................................................... 54
Figure 4.7 Edge Detection of Nozzle Tip ...................................................................................... 55
Figure 4.8 Edge Detection Algorithm ........................................................................................... 56
Figure 4.9 Positioning Control Architecture ................................................................................. 57
Figure 4.10 Supervisor Switching Logic ....................................................................................... 58
Figure 4.11 Root Locus Plot of the Micropositioning System ...................................................... 59
Figure 4.12 Step Response of Micropositioning System .............................................................. 60
Figure 4.13 Friction Compensation Effect on Micropositioning System ...................................... 60
Figure 5.1 Setup of Multimaterial Printing in Desktop System .................................................... 62
Figure 5.2 Microarray Printing with Multisyringe E-Jet Toolbit .................................................. 62
Figure 5.3 Printing of Four Fluorescent Tagged Buffer Solution ................................................. 63
Figure 5.4 MATLAB Based Image to G-code Converter ............................................................. 64
Figure 5.5 Image Decomposition for Four Color Printing ............................................................ 65
Figure 5.6 Crossover Silver Interconnect ...................................................................................... 65
Figure 5.7 Step by step Process to Construct Interconnect Crossover .......................................... 66
Figure 5.8 Problems Found in Crossover Interconnect Printing ................................................... 66
Figure 5.9 AFM Image of the Silver Interconnect Crossover ....................................................... 67
Figure 5.10 Multisize Printing ....................................................................................................... 68
Figure 6.1 Tilted Nozzle Design for Simultaneous Printing ......................................................... 71

1
Chapter 1
Introduction
By definition, manufacturing refers to a process of converting raw materials to
useful products in a large scale [1]. Throughout history, manufacturing advances have
often marked the societal transitions associated with advancements in the human
condition. It is no accident that the Stone Age, Bronze Age, or Iron Age are all historical
labels on societies brought about by manufacturing advances. Moreover, the industrial
revolution in Europe in the 1800s was almost solely a manufacturing advance that
transformed all aspects of life and society. Currently, manufacturing is the chief
cornerstone of the U.S economy and by itself represents the one of the 6 largest
economies in the world [2,3].
Figure 1.1 Manufacturing Output of Top 8 Countries from 1970-2009 [3]

2
While much of the manufacturing focus up to the end of the last century was
focused on manufacturing at the macro-scale, more recently it has become important to
examine what societal or economic value manufacturing can add by examining very
small scale processes and systems. In recent years, the paradigm in U.S manufacturing
shifted from a labor intensive production to value added production which involves some
level of technological sophistication [4] and the small scale is where much of the value
added promise lies. The field of Nanotechnology studies phenomena that occur on the
length scale of 1-100 nanometers or 10-9
meters. Nanotechnology has been generating
remarkable scientific and technological breakthrough in the past decades. It enables and
improves a broad spectrum of application in electronics, health, energy, and many other
fields [5,6,7]. With so many promises, it logically follows that advancing nanotechnology
to the manufacturing floor will be valuable. This thesis seeks to contribute to the added
value by improving on a technique established for the larger length scales of
nanomanufacturing.
1.1 Microprinting Technology
Figure 1.2 Application Examples of Microprinting Technology [8,9,10,11,12]

3
Nano/micro-manufacturing has emerged as a critical component of nano and
micro systems technology. Along with an increasing variety of available materials comes
a need for increasingly sophisticated manufacturing platforms capable of utilizing said
materials at higher and higher levels of resolution. Research efforts to utilize graphic arts
printing for demanding applications, such as flexible electronics [13,14], photovoltaics
and biological sensing and engineering have grown rapidly in recent years. Figure 1.2
shows several application examples where microprinting might be suitably employed.
Printed-based manufacturing in the nano and micro scale is desirable for various
reasons [15,16], including: 1) its ability to cover a large-area, 2) high density 3)
heterogeneous materials integration 4) its ability to overlay materials on a flexible and
stretchable substrate, and lastly 5) low production cost. The predominant player on the
micro-printing technology has so far been the inkjet printer. Inkjet printers utilize thermal
or mechanical (piezo-driven) excitation to reliably print features with a peak resolution of
10-30 μm [17] depending on the specific technology. This resolution limit results from
the combination of minimum droplet size (~10-20μm) and placement errors (~± 10µm) at
a 1 mm standoff distance [18,19]. While suitable for a wide variety of applications, the
use of conventional graphic arts approaches such as ink-jet printing cannot be used for
manufacturing high-resolution products with feature resolutions of 1 μm and below.
Figure 1.3 shows a printed gold interconnects with a resolution of more than 200 µm; this
resolution is too coarse for achieving high integration density.
Figure 1.3 Inkjet Printed Interconnect [20]

4
Electrohydrodynamic Jet (E-jet) printing is an alternate printing technique for
solution-based deposition applications requiring resolutions between 100 nm to 10 μm
[21,22,23,24]. Recent advancements in E-jet printing speed and reliability [22,23] have
transformed this technology from a research tool to a viable manufacturing process.
Figure 1.4 compares the operating regime between inkjet and e-jet printer; [22]
successfully boosts E-jet printer from a frustrating several Hz to an exciting several kHz
printing frequencies. Additionally, design efforts have been made to bring the
affordability of E-jet systems in line with those of conventional ink-jet systems. Barton
et al. [24] recently developed a compact and affordable (< $50,000 US) E-jet printing
system, thereby making the process more accessible to researchers both in industry and
academia. In addition to the ability to print high-resolution features, [21] demonstrated E-
jet’s ability to print using a large variety of functional inks including metallic inks (e.g.
Ag), polymers, and biological materials.
Figure 1.4 Comparison of Inkjet and E-jet Printing Operation Regime
While promising, and demonstrating feasibility of the high-speed/high-resolution
E-jet concepts, most previous E-jet activities have focused on the printing capabilities of
a single nozzle with a single material solution. Heterogeneously integrated functional

5
electronic systems often require multiple materials (polymers, metals, biological
material) to be present and collocated on the same substrate. It is this demand for more
complex, multi-material functionality that leads to the need for an E-jet printing tool
capable of depositing multiple material inks with the same speed and resolution as
previously demonstrated systems.
This thesis work presents a new design for E-jet printing systems akin to early pen
plotters of the computer industry [25].The design objective is to replicate the successful
printing capabilities of single material single unit E-jet printing in a carrousel
configuration. Each element of the carrousel can carry an independent material ink
thereby creating a multi-material multi-unit system. Since the parameters associated with
individual unit E-jet print nozzles have been previously developed the key remaining
challenges are the appropriate mechanical system design and the operation of the multi-
unit system. In particular, the operational challenge involves the ability to accurately
index selected print nozzles with a resolution sufficient for overlaying individual material
droplets. This indexing and overlay registration also must be coupled with E-jet drop-on-
demand (DOD) capabilities [22].
1.2 Electrohydrodynamic Jet Printing
E-jet printing uses electric fields to induce fluid flows from micro capillary
nozzles to create devices in the micro/nano-scale range [21]. The Xerox Corporation
attempted to use Electrohydrodynamic functionality to generate a continuous ink flow
and integrate this concept to their inkjet printhead [26,27]. In 1998, [28] reintroduced the
E-jet concept and printed various colored ink droplets onto a uniform patterns of a thick
paper or transparency that is placed on top a conductive plate. These methods easily
surpassed the conventional state of the art ink-jet technology at the time. While [28]
proved the general concept, manufacturing issues such as speed/throughput, droplet
resolution/repeatability, ink variations and potential applications of the process were not
clearly addressed until [21].Figure 1.5 illustrates the basic components of an E-jet
system; these include an ink chamber, conducting nozzle, substrate, and translational
stage. The inset shows the conductive nozzle for a sense of scale.

6
Figure 1.5 Schematic of Standard E-Jet Printer
In addition to the unit hardware, there is a computer controlled system that varies
the tunable system parameters including: applied voltage, back pressure, and standoff
distance between the nozzle tip and the substrate. These process parameters are
dependent on the ink material, nozzle diameter, and substrate material. For a constant
voltage potential between nozzle and substrate, Choi et al. [29] proposed the relationship
of the jetting frequency, f, applied voltage, V, and the stand-off height, h, to be as follows:
3 2
Vf K
h
( 1.1 )
In Equation 1.1, K is a scaling factor which is dependent on the process parameters.
To achieve printing, the back pressure in the ink chamber pushes the ink through
the nozzle towards the tip. The applied voltage generates an electric field between the
nozzle and the substrate causing concentration of charge on the pendant drop emanating
from the tip. This concentrated charge generates shear stress, deforming the meniscus to a
conical shape [21] termed a Taylor cone. As shown in Figure 1.5, the development of the
Taylor cone is a result of increasing potential between the nozzle and the substrate. At a
certain voltage level, the shear stress generated by the charge overcomes the ink surface
tension; thereby releasing a droplet. As the applied voltage increases, the printing process
will transition through various printing modes (e.g., pre-jet, continuous jetting, spraying).

7
With a constant DC signal, the droplet frequency and droplet size are coupled.
The printing mode described by [22] conversely, provides users more degree of freedom
and allows the drop on demand printing process. Figure 1.6 illustrates the shape of input
signal train. The base voltage is set such that the Taylor cone formation is maintained.
Droplets will only be ejected when the signal is pulsed to the maximum voltage. With
this method, the printing frequency of the droplet is no more dependent on the dynamic
of the ink, but solely on the input signal. The pulse width varies the droplet size and gives
users the ability to print at high frequency yet maintaining a certain droplet resolution.
Figure 1.6 Input Signal of Drop on Demand
As one benchmark of resolution superiority, Figure 1.7 illustrates the difference
between an E-jet printing with 500 nm droplets and a high-quality ink-jet droplet with
reference to the inset on the bottom left corner. Figure 1.8 shows various printing
applications of the E-jet printer. The interested readers are referred to [21,22,23,24] for
further results of E-jet flexibility, speed and resolution.
Figure 1.7 E-Jet and Inkjet Droplet Size Comparison

8
Figure 1.8 Various Printing Application of E-jet Printer
Prior to printing, preparation of nozzle and substrate must be performed. The
nozzle used for E-Jet printing is a pre-pulled micropipette purchased from World
Precision Instruments. In order to provide conductivity property, the nozzles need to
undergo a sputtering process. The nozzles are placed inside the sputtering chamber and
20 nm of Au/Pd layer will be deposited at the outer wall of the nozzle. The nozzles are
typically sputtered for about 3 – 4 minutes at 50 psi vacuum pressure with 35% intensity.
Once sputtered, the nozzles are then submerged to a hydrophobic coating solution
for about ten minutes. The hydrophobic solution is composed of 10% 1H, 1H, 2H, 2H-
Perfluorodecanethiol and 90% D119-500 (solvent) by volume for about 10 minutes. The
nozzles are then placed inside D119-500 (100% by volume) for 1 minute. Due to capillary
action, both hydrophobic and the solvent solution will creep inside the nozzle. Therefore, in
order to remove excess fluid inside the nozzle, a back pressure must be applied. Removing
the excess fluid is necessary to prevent nozzle clogging. Figure 1.9 a and b shows nozzle
sputtering and hydrophobic coating process respectively.

9
Figure 1.9 Sputtered Nozzle a) Sputtered Nozzle b) Hydrophobic Coating
1.3 Organization of Thesis
This thesis is organized as follows. The thesis is opened up by introducing the
nano/micro-manufacturing technology, specifically the E-jet printer. It also explains the
basic principle of Electrohydrodynamic-Jet Printing technology. Chapter 2 presents the
challenge and solutions for mechanical design and fabrication of a multimaterial E-Jet
print-head. Section 3 also describes the integration of the new print-head into an existing
E-jet platform [30]. Chapter 4 provides the solution for the operational challenges
associated with indexing the print-head with respect to the desired substrate location to
allow overlay and DOD with multiple materials. A two stage macro-micro positioning
approach is used that incorporates vision-based feedback control for the micro
positioning. Chapter 5 provides two separate example applications demonstrating the
advantages of the added functionality; one from printed electronics and one from
biological sensing. A Conclusion provides an overview of the main contributions and
highlights future directions for this promising technology.

10
Chapter 2
Multimaterial E-Jet Deposition System
Electrohydrodynamic Jet (E-jet) printing has become a prominent printing
technique for applications at a much higher resolution (100nm to 10μm) [4-6] compared
to inkjet printer. Recent advancements in E-jet printing speed and reliability [22,23] have
transformed this technology from a research tool to a viable manufacturing process.
Barton et al. [24] recently developed a compact and affordable E-jet printing system,
thereby making the process more accessible to researchers both in industry and academia.
In addition to the ability to print high-resolution features, [21] demonstrated E-jet’s
ability to print using a large variety of functional inks including metallic inks (e.g. Ag),
polymers, and biological materials. Most previous results have demonstrated single-
nozzle printing capabilities. As the demand for more complex, multimaterial functionality
increases, the design of a multimaterial E-jet deposition tool, which is capable of
switching between multiple inks for successive printing, becomes paramount.
Multimaterial printing capitalizes on the unique advantages and versatility of E-jet
printing without being limited to the conventional single-nozzle printing applications.
The ability to accurately index the print nozzle to overlay multiple high-resolution
droplets of varying materials combined with recent developments in E-jet drop-on-
demand (DOD) capabilities [22] enables the production of complex functional devices.
Figure 2.1 shows several example applications where multisyringe E-jet toolbit can be
utilized both in biotechnology and printed electronics. Figure 2.1a shows DNA
microarray, Figure 2.1b is an inkjet-printed MEMS based motor constructed with two
materials [31], and Figure 2.1c illustrates the process flow for an all-inkjet-printed

11
transistor. By utilizing the multisyringe E-jet toolbit, these printed devices can be
miniaturized.
a) b)
c)
Figure 2.1a) DNA Microarray1, b) MEMS motor [31], c) Inkjet Printed Transistors
2
In this chapter, the author will present the design and fabrication of multimaterial
E-jet deposition system including the design concepts, component selection as well as the
fabrication evolution of the toolbit from prototype to formal design.
1 http://www.imbb.forth.gr/people/poirazi/drupal/?q=node/4 2 https://buffy.eecs.berkeley.edu/PHP/resabs/resabs.php?f_year=2005&f_submit=one&f_absid=100770
12
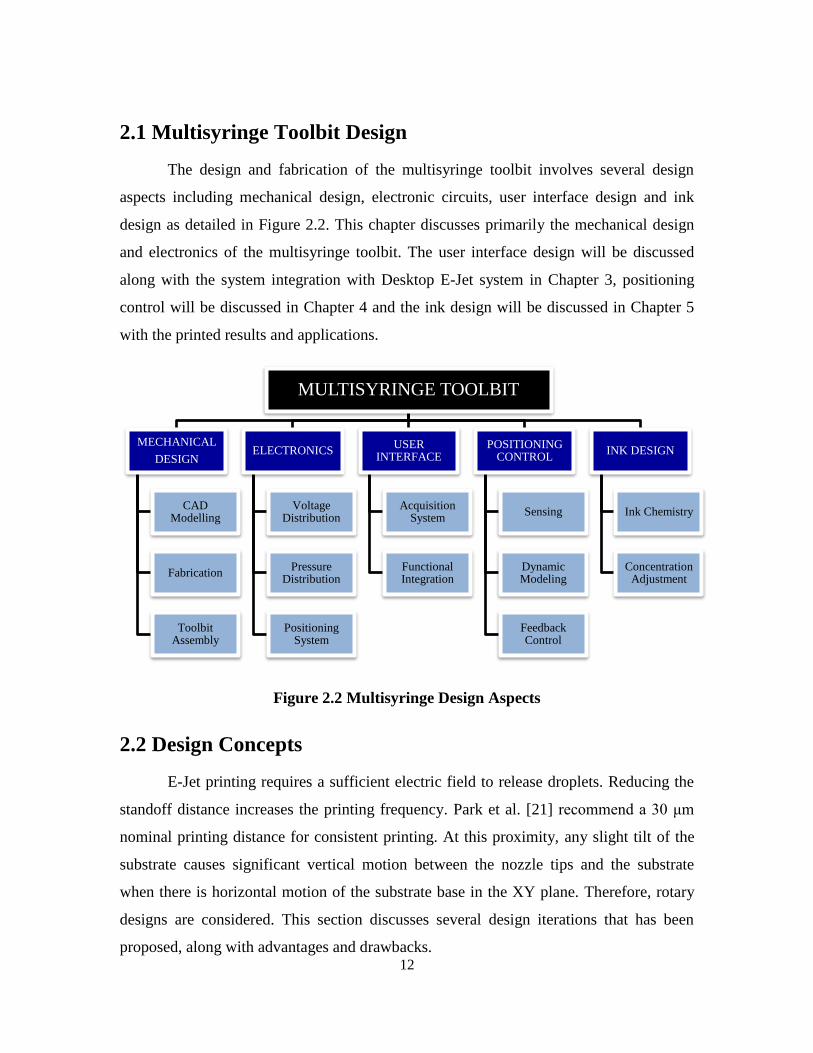
2.1 Multisyringe Toolbit Design
The design and fabrication of the multisyringe toolbit involves several design
aspects including mechanical design, electronic circuits, user interface design and ink
design as detailed in Figure 2.2. This chapter discusses primarily the mechanical design
and electronics of the multisyringe toolbit. The user interface design will be discussed
along with the system integration with Desktop E-Jet system in Chapter 3, positioning
control will be discussed in Chapter 4 and the ink design will be discussed in Chapter 5
with the printed results and applications.
Figure 2.2 Multisyringe Design Aspects
2.2 Design Concepts
E-Jet printing requires a sufficient electric field to release droplets. Reducing the
standoff distance increases the printing frequency. Park et al. [21] recommend a 30 μm
nominal printing distance for consistent printing. At this proximity, any slight tilt of the
substrate causes significant vertical motion between the nozzle tips and the substrate
when there is horizontal motion of the substrate base in the XY plane. Therefore, rotary
designs are considered. This section discusses several design iterations that has been
proposed, along with advantages and drawbacks.
MULTISYRINGE TOOLBIT
MECHANICAL
DESIGN
CAD Modelling
Fabrication
Toolbit Assembly
ELECTRONICS
Voltage Distribution
Pressure Distribution
Positioning System
USER INTERFACE
Acquisition System
Functional Integration
POSITIONING CONTROL
Sensing
Dynamic Modeling
Feedback Control
INK DESIGN
Ink Chemistry
Concentration Adjustment

13
2.2.1 Design 1 – Manual Carousel Design
The first toolbit design concept (Figure 2.3) resembles a carousel system and was
developed by Stephen Thompson (NanoCEMMS REU, 2009). This toolbit rotates
manually by hand and holds up to four syringes. The body of the toolbit is mounted a
bracket angled at 15 degrees from the vertical z-axis. To compensate for the 15 degree
angle offset, the nozzle holders are oriented 15 degrees in the opposite direction. This
design will bring the non-printing nozzle away from the substrate and keep the printing
nozzle at the minimum vertical position.
Figure 2.3 Carousel Toolbit Design
The rotary mount is sitting on a ball bearing and secured using a ball detent
mechanism. The ball detent locking mechanism is simple and elegant; however, the
indexing accuracy and repeatability are not sufficient for E-Jet printing. The accuracy and
repeatability are analyzed using images from the camera system. A series of experiments
were conducted to try and quantify the repeatability. The camera is held stationary and
the toolbit is switched back and forth. Figure 2.4 shows the position variation of the ball
detent locking mechanism which may have resulted from the “play” of the ball detent or
through some disturbance introduced by the operator’s hand while rotating the toolbit.
The statistical analysis in Figure 2.5 indicates that the nozzle placement varies within
250μm in the x-direction, which is too much for E-jet. The visual observation work led to
the idea of incorporating machine vision with the camera to servo the nozzle tip.
15o
15o
Angled
Mount Rotary
Mount
Toolbit
Base
Syringe
Nozzle
Bearing

14
Figure 2.4 Repeatability Measurements by Visual Observation
Figure 2.5 Repeatability Statistics of the Ball Detent Mechanism
1 2 3 4 5 6 7 8 9 10-80.5
-80
-79.5
k
xk [
mm
]
x-axis
1 2 3 4 5 6 7 8 9 10-28
-26
-24
k
yk [
mm
]
y-axis
1 2 3 4 5 6 7 8 9 101.4
1.5
1.6
k
zk [
mm
]
z-axis

15
2.2.2 Design 2 – Motorized Carousel Design
The second design iteration is mainly to observe the feasibility of the vision based
positioning system. Electrical and pressure distribution is not considered on this design.
As shown in Figure 2.6, the image is 2048 pixels in the horizontal direction and
corresponds to 235μm in actual distance; therefore the vision system has a resolution 115
nm each pixel.
Figure 2.6 Positioning Accuracy of Vision System
To implement the vision based positioning system, an actuator is necessary. A DC
motor (1524E012SR+15/8, MicroMo) is placed at the center of the rotational axis. The
motor is mounted on the base and the rotary mount is coupled to the motor shaft using a
cylindrical collar (see Figure 2.7). The motor has a high gear ratio (1670:1) in order to
rotate the shaft slowly and provide enough torque to rotate the rotary mount.

16
Figure 2.7 Carousel Design with DC Motor
The vision system is implemented using by incorporating the camera sensing and
the DC motor actuation in closed loop feedback. The image processing is performed
using Vision Assistant, a commercial package by National Instruments. This method
brings down the positioning accuracy down from several hundred microns to 1-5 microns
as illustrated by the position profile in Figure 2.8. Details of the positioning system can
be found in Chapter 4. With this positioning accuracy, droplet registration is feasible and
the next iteration was based on this finding.
Figure 2.8 Positioning Profile using Vision System

17
2.2.3 Design 3 – “Ferris Wheel” Design
Having demonstrated the feasibility of the vision based system, a new concept
was explored. The Ferris Wheel Design (FWD) is picked because it can be easily
expandable by stacking multiple rotary mounts. Voltage and pressure distribution are
now considered as part of the design. To demonstrate the concept, the toolbit shown in
Figure 2.9 integrates two printheads; however, the FWD can be easily expanded to more
printheads if necessary. This design used the 2nd
generation desktop system as its
platform.
Figure 2.9 Ferris Wheel Design
The accelerometer measures the gravitational acceleration, and when put at an
angle the voltage output goes down; therefore, it can substitute for the function of an
encoder while providing a more compact design. The circuit board used for voltage
distribution is placed inside the body of the toolbit and there are three connection ports on
the wall of the toolbit: i) Mini DIN Connector, ii) Motor positive voltage and iii) Motor
ground. The mini DIN connector is very compact and used to send and acquire signals
from and to the toolbit. The electrical connection to the nozzle is made using spring
loaded connectors and secured using a hinge and thumbscrew mechanism
Even though the motor has no play, backlash occurs at the assembly level. The
shaft of the DC motor is small (3 mm) and is very hard to be coupled with the collar;
DC Motor
Ball Bearing Rotating Piece
Base Mount Connection to
High Voltage Syringe Holder
Thumbscrew
Accelerometer
Holder Cover
PCB
Motor (+)
DIN
Motor (-)
Voltage (+)

18
therefore the rotary mount still has some play. The syringe barrel is quite long; hence it
drives up the diameter of the rotary mount (~100mm). The rotational moment of inertia
increases in quadratic fashion as the diameter increases and this became a major issue of
this design. With such a high moment of inertia, the motor shaft often time breaks due to
excessive shear stresses. Additionally, the rapid prototyping polymer material used for
the creation of the components was not completely suitable. It lacked sufficient structural
rigidity and was easily fractured. (see Figure 2.10).
Figure 2.10 Mechanical Failure on FWD
2.3 Formal Toolbit Design
After fabricating several prototypes, the toolbit design is finalized. The carousel
design is chosen because it has lower moment of inertia and requires less torque to
actuate the rotating arm. Instead of using the rapid prototyping polymer material,
aluminum is used to provide better rigidity for the toolbit. This design holds 4 printheads
and integrates all functionalities including the positioning system as well as the voltage
and pressure distribution system (see Figure 2.11). This toolbit has become the default
design for the 2nd
generation desktop E-jet system [30].
2.3.1 Components
Most components of the tool bit are commercially off the shelf (COTS) products
and some are constructed from rapid prototyping. Table 2.1 lists all COTS components of
the multisyringe and the total price of the COTS components are approximately
US$2200.

19
Table 2.1 Components of Multisyringe Toolbit M
ult
isy
rin
ge
Too
lbit
EQUIPMENT VENDOR PART# QTY COST TOTAL
Motor Driver AMC 25A8 1 $295.00 $295.00
Mini Din Connector Action-Electronics MD-65000-8S 1 $1.11 $1.11
Motor Driver Power Supply AMC PS300W24 1 $295.00 $295.00
6ft 8-pin Mini Din Cable CablesToGo 28190 1 $11.98 $11.98
Slotted Sensors Digikey 480-1946-ND 1 $11.89 $11.89
Optical Relay Digikey (Clare) CLA187-ND 4 $7.38 $29.52
Spring Loaded Connectors Digikey (MillMax) ED8200-02-ND 10 $44.90 $449.00
8 Pin IC Socket Digikey (MillMax) ED90048-ND 4 $0.56 $2.24
Banana Jack Female ECE Store - 1 $1.00 $1.00
Syringe Adapter EFD 7012341 4 $23.00 $92.00
PCB Express PCB - 1 $51.00 $51.00
Aluminum (Chassis 2) Kurland Steel 4”x4”x0.75” 2 $40.46 $80.92
Aluminum (Chassis 1) Kurland Steel 4”x4”x3” 1 $161.84 $161.84
Aluminum (Chassis 3) Kurland Steel 5”x3”x0.375” 1 $18.96 $18.96
Piano Hinge McMaster-Carr 1581A214 1 $3.37 $3.37
BNC Panel Jack McMaster-Carr 31-10 1 $1.85 $1.85
Wye Fitting McMaster-Carr 5148K411 1 $5.01 $5.01
Push To Connect Fitting (1/8"NPT - 5/32" Tube) McMaster-Carr 52065K116 6 $2.03 $12.18
Push to Connect Tube Fitting McMaster-Carr 52065K116 6 $2.03 $12.18
Threaded Plug McMaster-Carr 5481K14 1 $6.57 $6.57
Bearing McMaster-Carr 6661K109 1 $41.08 $41.08
Keystock (4mm x 4mm) McMaster-Carr 90457A120 1 $14.80 $14.80
Screw M4 Flathead (10 mm) McMaster-Carr 91294A190 1 $7.33 $7.33
Screw M6 Flathead (16 mm) McMaster-Carr 91294A238 1 $10.65 $10.65
Screw M4 Set (6 mm) McMaster-Carr 91313A139 1 $7.88 $7.88
Threaded Inserts M5 (10 mm) McMaster-Carr 91732A779 4 $5.74 $22.96
Screw M3 Flathead (12 mm) McMaster-Carr 92125A132 1 $4.46 $4.46
Screw M2 Flathead (8 mm) McMaster-Carr 92125A132 1 $4.46 $4.46
Screw M4 Flathead (20 mm) McMaster-Carr 92125A198 1 $5.91 $5.91
Screw M3 Machine (8 mm) McMaster-Carr 94387A209 1 $2.66 $2.66
Screw M5 Thumb (20 mm) McMaster-Carr 96016A245 1 $7.38 $7.38
Pressure Manifold McMaster-Carr NVV3KF3-42-02-01T 2 $31.00 $62.00
DC Motor MicroMo 2224U024SRIE2-512+1526:1+MG13 1 $328.30 $328.30
Electronic Pressure Valve SMC Pneumatic NVKF334-5G 4 $18.15 $72.60
Pressure Manifold SMC Pneumatic NVV3KF3-42-02-01T 2 $18.85 $37.70

20
2.3.2 Design Descriptions
Similar to the first design, the toolbit is mounted on a 15 degree angled mount and
the printheads are oriented 15 degrees in the opposite direction to keep the non-printing
nozzle away from the substrate. This toolbit handles up to 4 printheads, each of which is
controlled electronically. The DC motor (2224U024SRIE2-512+1526:1+MG13,
Mircomo) used in this design has larger shaft diameter (6 mm) to provide mechanical
robustness and is equipped with an incremental magnetic encoder at its back for coarse
positioning.
Figure 2.11 CAD Model of Formal Toolbit Design
Several parts of the toolbit body are machined and some others are rapid
prototyped to provide electrical isolation. To machine the toolbit body out of aluminum,
the design must be simplified to basic geometries like circles or squares. Therefore, the
machined parts are comprised of the overall body subdivided into several sections. These
includes: i) Angled mount, ii) Toolbit base, iii) Rotary mount, iv) Holder extenders.
Figure 2.12 shows the completed machined parts of the toolbit. It took 54 shop hours to
machine these four pieces, costing approximately US$3000. These 4 pieces are then
anodized for enhanced scratch resistance and durability. Mechanical drawings of these
parts can be found in Appendix A1 – A4 respectively.
1IN.

21
Figure 2.12 Fabricated Toolbit Parts Using Aluminum
2.3.1 Electronics
The electronics are primarily used for sensing and control of the toolbit. A data
acquisition card (PCI-6229, National Instrument) is used to send and acquire signal from
and to the toolbit. Some signals are amplified using a signal amplifier whenever
necessary; for instance the E-jet printing voltage and DC motor signal. Figure 2.13 shows
the system interfacing between the tool bit and the graphical user interface.
Figure 2.13 System Interfacing of Multisyringe Tool Bit
FRONT END GUI
PCI - 6229
BACK END PROGRAM
TOOLBIT
SIGNAL
AMPLIFIER
STATES COMMAND
SIGNALS
AMPLIFIED
COMMAND SIGNALS
ANGLED BRACKET TOOLBIT BASE ROTARY MOUNT SYRINGE HOLDER
EXTENDER

22
2.3.1.1 Positioning System
The DC motor is directly driven using a motor driver (25A8, AMC) which is
powered using a power supply (PS300W24, AMC). The DC motor is bidirectional and its
direction depends on the polarity of the applied voltage. There are 6 wires coming out
from the motor; two of them are the driving voltage and four others are for the encoder.
AO1 and AOGND on the data acquisition card is connected to “+REF” and “–REF” on
the motor driver respectively. The output signal and ground are connected to “motor +”
and “motor –” on the DC motor (see Figure 2.14). The signal coming out from the data
acquisition card can be scaled using the four potentiometers on the motor driver. In this
work, the applied voltage is directly proportional to the rotational speed.
Figure 2.14 DC Motor for Multisyringe Toolbit
The quadrature encoder has a resolution of 512 pulse per revolution. It is directly
connected to the data acquisition card. Number 4 and 5 in Figure 2.14 are connected to
“+5V” and ground respectively on the DAQ card. Channel A and B are connected to
“PFI8” and “PFI10” on the acquisition card (see Figure 3.8). “PFI8” and “PFI10” are
both counters that can be configured and synchronized to read a quadrature encoder. The
encoder is incremental; therefore, to get an absolute positioning a slotted infrared sensor
is used to reset the encoder position to zero. The slotted sensor is mounted on the
electrical connectors’ panel and a light barrier is placed in between the slot. The edge of
the light barrier indicates a zero position and the encoder counter will be reset.

23
2.3.1.2 Voltage and Pressure Distribution
Applied voltage and pressure are distributed by selectively toggling digital ports
on the data acquisition board. These ports are connected to solid state relays (CLA187-
ND, Digikey). When a digital signal is sent to the relay, light inside the relay will be
emitted and the photo-detector will trigger the switch on the high power side resulting in
current flow (see Figure 2.15). To distribute the printing voltage, the high voltage
connection from the TREK amplifier is connected to the inlet (#6 and #8) and the nozzles
are connected to the output side (#5 and #7).
Figure 2.15 Schematic of Voltage and Pressure
The pressure distributors (see Figure 2.16 ) consist of electronic valves
(NVKF334-5G, SMC Pneumatics) which are mounted on pressure manifolds
(NVV3KF3-42-02-01T, SMC Pneumatics). The electronic valve requires 24 volts to
operate and it is supplied using a DC power supply. In this work there are a total of 4
printheads; therefore there are 4 electronic valves mounted on two pressure manifolds.
The input pressure is split to the two manifolds and all output ports are directly connected
to the adapter head of the syringe barrel.
24 V

24
Figure 2.16 Electronic Valves on Pressure Manifold
2.3.1.3 Circuit Design
The circuit board is placed inside the base of the toolbit (see Figure 2.17). On the
boards are two optical relays to distribute the voltage signals to the four printheads. The
motor is also connected to the same circuit board. The driving voltage is directly routed
to the motor driver, while the encoder connection is going to the DAQ board via a mini
DIN cable. Other than for acquiring encoder signals, the mini DIN cable also sends
digital signals which trigger the amplifier. This board is designed using CAD software
2.17provided by ExpressPCBTM,3
and the board can be purchased directly using the
software. The file can be requested emailing the thesis author4.
Figure 2.17 Circuit Design Using ExpressPCBTM
3 http://www.expresspcb.com/
V+
V
- V
JE
T
1 2
3 4
VDD
GND
CH A
CH B
D1
D2
D3
D4

25
2.3.2 Assembly Instructions
The toolbit can be assembled once the machined parts, rapid prototyped parts,
PCB, and all components in Table 2.1 are in hand. Figure 2.18 shows the finalized
multisyringe toolbit assembly, mounted on the desktop E-jet system.
Figure 2.18 Multisyringe Toolbit on Desktop E-jet System
Some electronic components, such as the IC sockets and male pin headers need to
be soldered on the PCB (see Figure 2.19). Two 8 position IC sockets are soldered to the
center of the board as indicated by the white box in Figure 2.19. The male pin headers are
indicated by the blue color in this figure and are cut to size accordingly. The leftmost pins
are for the DC motor connection; one must pay extra attention when connecting the
motor to these 6 pins. If the orientation is wrong, channel A and B will be connected to
the motor input voltage and this potentially damages the encoder due to excessive current
(refer to Figure 2.14 and 2.17)). The middle pin headers are connected to the mini DIN
connectors, the rightmost headers are the high voltage connection to the syringes and the
top is the motor power supply and high voltage connection from the TREK amplifier.
The circuit board is mounted to the toolbit base upside down using 4 plastic spacers and
the DC motor is mounted on the center of the cylinder using M2 flathead fasteners.

26
Figure 2.19 Eletronics Assembly
The ball bearing (6661K109, McMaster) is press fitted to the nose of the toolbit
base while the rotary mount is loose fitted to the bearing. This will make the bearing sit
permanently on the toolbit base. A keystock (90457A120, McMaster) is inserted right
next to the flat surface of the motor shaft and an M4 set screw (91313A139, McMaster)
pushes the keystock against the motor shaft providing a rigid coupling between the rotary
mount and the motor (see Figure 2.20). A rapid prototype light barrier is mounted around
the rotary mount; the fin of this light barrier will slide in between the IR slotted sensor.
Figure 2.20 Rotary Mount Assembly
Set Screw
Ball Bearing
IR Light Barrier
Rotary Mount

27
The printhead extenders are mounted on the 4 flat surfaces of the rotary mount;
each is secured 4 using M4 flathead fasteners. Four syringe holders are rapid prototyped
and assembled individually a priori (see Figure 2.21). The syringe holder and holder
cover are joined together with a hinge (1581A214, McMaster) on the left side and
clamped together using an M5 thumbscrew (96016A245, McMaster). Since the syringe
holder is made of plastic material, a threaded insert (91732A779, McMaster) is used for a
more durable thread engagement. Electrical connection between the nozzle and the
amplifier is performed using 2 spring loaded connectors (ED8200-02-ND, Digikey). A
cable (22 AWG) is soldered to the back of these spring loaded connectors and the other
end is connected to ports 1 – 4 on the PCB accordingly (refer to Figure 2.17).
Figure 2.21 Printhead Subassembly
The electrical connections from the amplifiers and DAQ card are done through an
electrical panel. The electrical panel mount sits on top of the angled bracket and rapid
prototyped to prevent short circuit connection (see Figure 2.22). A BNC connector is
used for the DC motor power supply, a banana connector for the high voltage amplifier
and mini DIN connector is used for signal transmission. The DIN connector is connected
to the PCB via a ribbon wire. The slotted infrared sensor is also mounted on this panel on
an angled surface, perpendicular to the top surface of the rotary mount. The panel mount
and angle bracket are assembled together using 2 M3 fasteners.
SPRING LOADED
CONNECTORS
THREADED
INSERT

28
Figure 2.22 Electrical and Angled Bracket Subassembly
Once the electrical panel and angled bracket are assembled together, this
subassembly is mounted on the vertical stages of the syringe post. This subassembly is
held in place using 4 pieces M6 flathead fasteners. The toolbit base is then mounted on
the angled bracket. The infrared light barrier should sit right in between the slotted
sensor. As the toolbit components are mounted together, electrical wires from the panel
can be connected to the circuit board. Figure 2.23 shows the final step of the toolbit
assembly. The following chapter will discuss the toolbit integration with the desktop E-
jet system.
Figure 2.23 Final Toolbit Assembly

29
Chapter 3
Desktop E-Jet System with Multisyringe Head
The second generation desktop E-jet system [30] integrates the multisyringe
toolbit as one of its key feature. The multisyringe toolbit shares most of the hardware of a
contemporary single nozzle desktop printer [24]. The positioning system consists of high-
resolution XY positioning stages, a manual tip/tilt control and z-axis stage. The XY
positioning stage has a resolution of 1 nm, and a travel range of 110 nm which can be
controlled simultaneously with two separate drivers. This independent and simultaneous
control allows the printing of complicated straight line and circular patterns. Figure 3.1
shows the desktop system located in MEL 2232, UIUC.
Figure 3.1 Desktop E-jet Printer with Multisyringe

30
3.1 Mechanical Design
The main hardware components of the second generation desktop e-jet printer
include a positioning system, a pressure supply, a voltage supply, a visualization system
and the new multisyringe toolbit. Most parts are mounted on a 600 mm by 600 mm
breadboard and stored inside plexiglass housing for operational safety and better ambient
control. To maximize the space usage, the components are oriented diagonally with
respect to the edges of the breadboard. Aluminum adapter plates are machined (see
Appendix B1 – B5) and positioned on the breadboard as a base for the subassemblies.
The layout of the breadboard assemblies is illustrated in Figure 3.2.
Figure 3.2 Layout of Components on Breadoard
3.1.1 Components
Components of the desktop E-jet system are, in general, commercially available
products; some are rapid prototyped and the rest are machined in the machine shop. The
components lists are organized based on different functionalities of the printers, i.e.:
housing and chassis, positioning system, visualization system and miscellaneous
components. The total cost of the desktop system unit is $35,534.00 + the cost of
multisyringe toolbit which is approximately $5000 as described in Chapter 2.

31
Table 3.1 Component List of Desktop System Housing H
OU
SIN
G A
ND
CH
AS
SIS
EQUIPMENT VENDOR PART# QTY COST TOTAL
Aluminum Extrusion Cubic Joint McMaster-Carr 47065T244 8 $ 9.86 $ 78.88
Aluminum Extrusion Frame McMaster-Carr 47065T123 3 $ 26.38 $ 79.14
Aluminum Mount McMaster-Carr 9057K13 3 $ 40.37 $ 121.11
Aluminum Mount McMaster-Carr 9057K16 1 $ 84.47 $ 84.47
Extension Mount McMaster-Carr 9057K24 2 $ 53.26 $ 106.52
Extension Mount McMaster-Carr 8974K661 1 $ 13.25 $ 13.25
Handles McMaster-Carr 1568A12 2 $ 3.67 $ 7.34
Hinges McMaster-Carr 47065T162 4 $ 9.15 $ 36.60
Plexiglass (4' x 4') McMaster-Carr 8574K85 1 $ 105.38 $ 105.38
Plexiglass (2' x 2') McMaster-Carr 8574K55 1 $ 33.89 $ 33.89
Equipment Cabinet Mouser Electronics 563-WM-5611 1 $ 331.38 $ 331.38
Fixed Cabinet Shelf Mouser Electronics SH-12704 2 $ 43.87 $ 87.74
Breadboard Brackets Thor Labs VB01/M 2 $ 85.36 $ 170.72
Breadboard Feet Thor Labs BMF1/M 4 $ 6.50 $ 26.00
Breadboard (600 mm x 600 mm) Thor Labs MB6060/M 1 $ 537.00 $ 537.00
Table 3.2 Component List of Positioning System
PO
SIT
ION
ING
SY
ST
EM
EQUIPMENT VENDOR PART# QTY COST TOTAL
Controller Aerotech A 3200-MC-MACHINE-2 AXES 1 $ 2,150.00 $ 2,150.00
X-Stage Driver Aerotech NDRIVEML 10-40-MXH 1 $ 2,425.00 $ 2,425.00
Y-Stage Driver Aerotech NDRIVEML 10-40-IO-MXH 1 $ 2,425.00 $ 2,425.00
Electronic X-Y Stages Aerotech ANT 130-110-XY-PLUS-25DU-XY CMS-MP 1 $ 13,410.00 $ 13,410.00
Feedback Cable Aerotech ECZ01343 1 $ - $ -
FireWire Cable Aerotech NCONNECT-381-66 1 $ 30.00 $ 30.00
FireWire Interface Card Aerotech Nfire-PCI 1 $ 110.00 $ 110.00
Motor Cable Aerotech C189820-50 2 $ 260.00 $ 520.00
Testing Aerotech INTEGRATION - TEST AS SYSTEM 1 $ 410.00 $ 410.00
Manual Z-axis Micrometer Newport SM-50 1 $ 199.00 $ 199.00
Manual Z-axis Stage Newport M-443 1 $ 299.00 $ 299.00
Tip Tilt Stage Edmund Optics NT66-541 1 $ 299.00 $ 299.00
Stage Driver Power Supply AMC PS2X3W24 2 $ 285.00 $ 570.00

32
Table 3.3 Component List of Pneumatic System P
NE
UM
AT
IC S
YS
TE
M EQUIPMENT VENDOR PART# QTY COST TOTAL
Tubing McMaster-Carr 5549K33 10 $ 0.85 $ 8.50
Tubing McMaster-Carr 5549K31 25 $ 0.55 $ 13.75
Tubing McMaster-Carr 5648K236 25 $ 0.19 $ 4.75
Tube Fittings McMaster-Carr 5111K82 4 $ 0.52 $ 2.08
Tube Fittings McMaster-Carr 5111K95 4 $ 4.13 $ 16.52
Tube Fittings McMaster-Carr 5779K355 2 $ 6.12 $ 12.24
Fitting Converter McMaster-Carr 51215K701 2 $ 5.22 $ 10.44
Vacuum Pump Cole-Parmer EW-79610-02 1 $ 328.00 $ 328.00
Electronic Air Regulator Marsh Bellofram 2000SNNF42DF030100 1 $ 460.00 $ 460.00
Table 3.4 Component List of CPU & Electronics
CP
U &
EL
EC
TR
ON
ICS
EQUIPMENT VENDOR PART# QTY COST TOTAL
Keyboard/Mouse Dell GKM502 1 $ 19.99 $ 19.99
Monitor Dell ST2310 2 $ 229.00 $ 558.00
Computer Dell Optiplex 25 E1974_N 1 $ 1,035.66 $ 1,035.66
Surge Protector McMaster-Carr 7693K93 2 $ 25.02 $ 50.04
LabVIEW Cable National Instruments 187252-01 2 $ 59.00 $ 118.00
LabVIEW Card National Instruments NI PCI-6229 1 $ 799.00 $ 799.00
LabVIEW Connector Blocks National Instruments 777145-01 2 $ 79.00 $ 158.00
LabVIEW License National Instruments Research License 1 $ 100.00 $ 100.00
High Voltage Amplifier Trek 677B-L-CE 1 $ 3,045.00 $ 3,045.00
Table 3.5Component List of Camera System
VIS
UA
LIZ
AT
ION
SY
ST
EM
EQUIPMENT VENDOR PART# QTY COST TOTAL
Camera Edmund Optics NT59-051 1 $ 1,495.00 $ 1,495.00
C-Mount Lens Extender Edmund Optics NT54-356 1 $ 95.00 $ 95.00
Dual Hybrid Light Guide Edmund Optics NT58-790 1 $ 215.00 $ 215.00
Fiber Optic Adapter Edmund Optics NT39-944 1 $ 19.50 $ 19.50
Fiber Optic Illuminator Edmund Optics NT55-718 1 $ 395.00 $ 395.00
Knuckle Adjustment Edmund Optics NT53-887 1 $ 17.00 $ 17.00
Lens Edmund Optics NT55-834 1 $ 995.00 $ 995.00
Rack & Pinion Focusing Edmund Optics NT54-792 1 $ 330.00 $ 330.00
X Metric Axis Stage Edmund Optics NT55-026 1 $ 189.00 $ 189.00
Y-Z Metric Axis Stage Edmund Optics NT55-025 1 $ 365.00 $ 365.00
L Bracket McMaster-Carr 8982K134 Length: 4' 1 $ 12.82 $ 12.82

33
Table 3.6 Component List of Supporting Parts M
ISC
. EQUIPMENT VENDOR PART# QTY COST TOTAL
Screw: M4-L8-Cap McMaster-Carr 92855A408 pack of 25 1 $ 6.70 $ 6.70
Screw: M6-L10-Cap McMaster-Carr 92855A610 pack of 25 1 $ 7.54 $ 7.54
Screw: M6-L10-Flat McMaster-Carr 92125A234 pack of 100 1 $ 5.70 $ 8.64
Screw: M6-L25-Flat McMaster-Carr 93395A360 pack of 25 1 $ 7.61 $ 7.61
Dowel Pin McMaster-Carr 93600A118 1 $ 9.35 $ 9.35
Mounting Nuts McMaster-Carr 90592A016 pack of 100 1 $ 2.18 $ 2.18

34
3.1.2 Assembly Instruction
The housing for the desktop E-jet printer is built using slotted aluminum extrusion
(47065T123, McMaster). Plexiglass (8574K85 & 8574K55, McMaster) sheets are cut according
to C6 – C8 and slotted on extrusion bar (47065T123, McMaster). Each extrusion bar is coupled
using a cubical joint (47065T244, McMaster) on the eight corners. The housing provides a
cleaner environment and serves as a safety precaution against the high voltage electricity used
for printing. Fiber optic light guides (NT58-790, Edmund Optics) are routed from the top panel
while cables are fed from the back panel.
Figure 3.3 Housing of Desktop E-jet printer
Number one in Figure 3.2 is the subassembly for mounting the multisyringe toolbit. The
components in this subassembly are mounted on a vertical breadboard bracket (VB01/M, Thor
Labs). Four electronic pneumatic valves (NVKF334-5G, SMC Pneumatics) are mounted on a
manifold and placed right on top of this bracket. An assembly of aluminum pieces is used to
extend the multisyringe toolbit forward C9 – C11 this extender is machined in the MechSE
machine shop. The height of the toolbit is adjusted using a linear stage which is driven by a
vernier micrometer (M-443 & SM-50, Newport) for a fine adjustment. Figure 3.4 illustrates the
exploded view of the syringe post subassembly. Details of the multisyringe toolbit can be found
in Chapter 2.

35
Figure 3.4 Exploded View of Toolbit Mount Subassembly
The second subassembly in Figure 3.2 is the positioning stage for the substrate. The
lower and the upper stage controls the x and y direction respectively. A substrate mount
assembly is mounted above the stage; it includes a miniature tip tilt stage (NT66-541, Edmund
Optics) for substrate alignment, a vacuum chuck and an aluminum plate to ground the charge
during printing (see Figure 3.5). The substrate is then secured to the aluminum plate using the
suction from the vacuum pump. An O-ring is put underneath the grounding plate to minimize
pressure loss during suction. The tip tilt stage has two degrees of freedom which controls the
angle in the XZ and YZ plane. The manual tip-tilt stage provides a cost effective solution for
aligning the substrate against the syringe nozzle. The tilt adjustment is performed only once prior
to the printing using the aid of the camera system. A good tilt alignment allows printing on a
larger area since the nozzle will maintain a constant standoff distance, hence not hitting the
nozzle tip.
ALUMINUM
EXTENDER
BRACKET
ELECTRONIC
VALVES
MULTISRYINGE
Z STAGE

36
Figure 3.5 Exploded View of the Stage Subassembly
The camera subassembly (Number 3 in Figure 3.2) consists of an XZ linear stage (NT55-
025, Edmund Optics) and mounting L brackets for the camera. A knuckle joint (NT53-887,
Edmund Optics) provides more degrees of freedom to orient the camera properly. Attached to
the knuckle joint is a rack and pinion focusing mount (NT54-792, Edmund Optics) which holds
the lens tube (NT55-834, Edmund Optics). The magnification of the lens is adjustable from 2.5x
to 10x. C-Mount extender (NT54-356, Edmund Optics) is attached at the back of the lens tube to
provide additional 2x magnification. The camera (NT59-051, Edmund Optics) connected to the
back of the C-Mount extender captures the image and send streams of images to the CPU.
Details on the visualization subassembly can be seen in Figure 3.6.
GROUNDING
PLATE
TIP TILT
STAGE
SUBSTRATE
MOUNT
AEROTECH
STAGE

37
Figure 3.6 Exploded View of the Stage Subassembly
Most electronics of a desktop system unit are contained inside an equipment cabinet
(563-WM-5611, Mouser Electronics). Inside are the voltage amplifier (677B-L-CE, Trek), stage
driver (NDRIVEML 10-40-MXH & NDRIVEML 10-40-IO-MXH, Aerotech) powered using 2
amplifiers (PS2X3W24, AMC) and 2 data acquisition terminal blocks (777145-01, National
Instrument). The layout of the equipment inside the cabinet is shown in Figure 3.7. These
electronic devices are powered through a surge protector.
Figure 3.7 Equipment Cabinets
CAMERA
XZ Stage
LENS
FOCUSING
STAGE
EQUIPMENT
CABINET
STAGE
DRIVER
VOLTAGE
AMPLIFIER DAQ TERMINAL
BLOCK
DC MOTOR
CONTROLLER

38
3.2 Electronics
Communication between the CPU and the electronic device is performed using the data
acquisition card (NI PCI-6229, National Instrument). The data acquisition card is connected to
two terminal blocks (777145-01, National Instrument) via two connector cables (187252-01,
National Instrument). Mapping between ports of the DAQ card and the two connector blocks can
be seen in Figure 3.8 and Table 3.7 lists the signal routing of the desktop system.
Figure 3.8 Port Mapping of Data Acquisition Card and Terminal Block (CB-68LP)
Table 3.7 Signal Routing of Desktop E-jet Printer
No Port Signal Direction / Type Hardware Connection
1 P0.0 Send Voltage Trigger Out / Digital Trek Amplifier
2 P0.1 Print Head 1 Voltage Switch Out / Digital Optical Relay (Voltage)
3 P0.2 Print Head 2 Voltage Switch Out / Digital Optical Relay (Voltage)
4 P0.3 Print Head 3 Voltage Switch Out / Digital Optical Relay (Voltage)
5 P0.4 Print Head 4 Voltage Switch Out / Digital Optical Relay (Voltage)
6 P0.5 CNC Trigger In / Digital Aerotech Stage Driver
7 P0.8 Print Head 1 Pressure Switch Out / Digital Optical Relay (Pressure)
8 P0.9 Print Head 2 Pressure Switch Out / Digital Optical Relay (Pressure)
9 P0.10 Print Head 3 Pressure Switch Out / Digital Optical Relay (Pressure)
7 P0.11 Print Head 4 Pressure Switch Out / Digital Optical Relay (Pressure)
8 AO 0 E-Jet Voltage Signal Out / Analog Trek Amplifier
9 AO 1 Motor Input Signal (Multisyringe) Out / Analog Motor Driver
10 AO 2 Pressure Signal (Multisyringe) Out / Analog Pressure Regulator
11 +5V Encoder VCC Out / Analog DC Motor
12 PFI 8 DC Motor Encoder Channel A In / Counter DC Motor
13 PFI 10 DC Motor Encoder Channel B In / Counter DC Motor

39
3.2.1 Voltage Amplifier
The TREK voltage amplifier (677B-L-CE, Trek) can be controlled from the CPU via the
data acquisition board. There are several switches on the front panel of the amplifier and those
should be configured following Figure 3.9. At the back panel, there are three BNC connectors
which are i) digital enabled, ii) amplifier input and iii) voltage monitor. Since the DAQ terminal
block only takes a single wire connector, the BNC cable needs to be either split into a positive
and ground cable or split using a BNC adapter. The digital enabled port is connected to P0.0,
amplifier input is connected to AO0 and the voltage monitor is connected to the AI1. The voltage
amplifier multiplies the input voltage signal by 200 times; hence the input signal coming from
the DAQ board (±10V) will generate a maximum voltage of ±2kV.
# Setting
1 V
2 Output V/I
3 Amplifier
4 +
5 Remote
Figure 3.9 Voltage Amplifier Configuration
3.2.2 Pressure Regulator
The pressure regulator (200SNNF01DF030100, Marsh Bellofram) is controlled with
analog voltage signal from the DAQ board (AO2). The pressure regulator requires a 5 Volt
supply power; this can be taken from the +5V channel of the DC motor driver (25A8, AMC).
The ground connections of the power and the analog signal are coupled together. Inside the
pressure regulator, there are 9 DIP switches that need to be configured properly (see Table 3.8).

40
Table 3.8 DIP Switch Configuration
1 2 3 4 5 6 7 8 9
ON OFF OFF ON ON ON OFF ON OFF
There are four potentiometers inside the regulator which enables the user to tune the
controller. To calibrate the signal, make sure the regulator is sending 0 psi under no voltage input
signal. If this is not the case, tune the offset potentiometer. To maximize the full range of the
data acquisition card, send a 10 Volts signal from the DAQ card and tune the regulator controller
gain until it sends 30 psi. Depending on the setting of the potentiometers, a mapping from
pressure to voltage input can be generated by recording several data points. According to Figure
3.10, the output pressure and the input voltage have a linear relationship; hence the pressure can
be mapped using a simple linear equation obtained by fitting the data points.
Figure 3.10 Calibration Plot of the Pressure Regulator
3.2.3 Aerotech Stage Driver
The XY stages communicate with the computer using a firewire interface card (Nfire-
PCI, Aerotech). Each is powered using a DC power supply (PS2X3W24, AMC). Details on the
wiring diagram of the stages can be found in the Aerotech users manuals. Another important
aspect of the stage driver, aside from accurate, positioning is to trigger the printing voltage
y = 0.3062x + 0.5816
0
1
2
3
4
5
6
7
8
9
10
0 5 10 15 20 25 30
Vo
ltag
e S
ignal
Pressure [psi]

41
amplifier for CNC printing mode. The digital output port from the stage driver is connected to a
digital input of the DAQ board (P0.5). This signal will then be processed using LabVIEW to
trigger the amplifier.
3.3 User Interface
The user interface layout for the desktop printer is developed in LabVIEW (see Figure
3.11). It integrates the printing voltage and pressure signal, print-head switching, as well as the
machine vision system. The Graphical User Interface (GUI) is designed to allow users to send
command signals, display sensor data, change control parameters and visually monitor the
printing process. The functions are grouped into clusters to better organize the program. The
back end program of the user interface is organized into a flat sequence structure in LabVIEW.
The flat sequence includes initialization, main program and finalization.
Figure 3.11 Graphical User Interface of Desktop System
VOLTAGE CONTROL
MOTOR CONTROL
PARAMETERS
SYRINGE SELECTOR
VISION SYSTEM
PRESSURE CONTROL

42
3.3.1 Initialization
In the initialization step, control parameters and the states of the desktop system are
preconfigured to their default values. The pressure regulator is initialized to 1 instead of 0 psi for
the following reason. At 0 psi, there is no air flowing through the device, hence the actuating
system requires more power to actuate the valve. Holding the pressure for 1 psi prior for two
seconds will build up enough pressure to slightly open the valve allowing some air to flow
through. The back end program of the initialization process can be seen in Figure 3.12. The
pressure regulator, voltage amplifier are disabled and the DC motor for the multisyringe is
brought to rest by sending 0 input voltage and all relays of the multisyringe are switched off.
After all parameters and states are configured, the desktop system is ready to be operated by the
main program.
Figure 3.12 Initialization of GUI
3.3.2 Main Program
The main program controls most of the functionality of the desktop system. The
multisyringe adds a lot more complexity to the program such as a vision system, relay controls
for distributing the voltage and pressure signal, as well as control system for switching the print-
head. An event structure is used to respond to the buttons on the front end GUI. The basic
functions shared by both multisyringe and single syringe systems are the ability to regulate
voltage and pressure signals. There are two printing modes on the program, DC printing mode
and Pulse Width Modulation [22] printing mode.
STATE INITIALIZATION PRESSURE REGULATOR
SET TO 1 PSI
CONTROLLER INITIALIZATION

43
3.3.2.1 Voltage Control
There are two loops that are used to control the voltage amplifier. The first loop
continuously generates an analog signal that is amplified by the TREK amplifier (see Figure
3.13), while the other loop triggers the amplifier on and off (see Figure 3.14). These two
functions are placed on two different loops to reduce the response time for triggering the
amplifier. The PWM signal is generated using a DC signal simulator (Square Mode) where
parameters such as frequency, amplitude, offset and duty cycle can be controlled from the front
end GUI.
In PWM mode, users enter the base and maximum voltage. The amplitude and offset of
the DC signal simulator should therefore follow Equation 3.1 and 3.2. Droplet size is controlled
by the pulse width and printing period by the signal frequency. Therefore, of working with
percent duty cycle, the pulse width is in the unit of time (second); this allow user to vary the
printing frequency without affecting the droplet size (see Equation 3.3 . Signals generated are
sent to the port AO0, which is connected to the input amplifier port on the TREK amplifier.
Figure 3.13 Voltage Signal Generator Loop
2
MAX BASEV VAmplitude
( 3.1 )
2
MAX BASEV VOffset
( 3.2 )
[ ] [%] %
[ ]
Duty Cycle sDuty Cycle 100
Period s
( 3.3 )

44
There are two ways to trigger the amplifier: 1) in manual mode, users can trigger the
amplifier by clicking the “send signal” button in the front panel. In CNC mode, the send signal
button will be disabled and the digital signal from the Aerotech motor driver will take over the
control. Other than for positioning, the Aerotech stage driver is equipped with a digital I/O port
which is capable of sending digital signals to trigger the TREK amplifier. The command lines to
turn on the digital signal are embedded inside the G-code in Aerotech user interface (Figure
3.15). The command to turn on the digital signal is PSOCONTROL X ON; similarly,
PSOCONTROL X OFF turns off the digital signal. Prior to using these command lines, the stage
driver must first be selected using the command PSOOUTPUT X CONTROL 0 1. By
synchronizing the position and the triggering event, users can generate complex patterns (see
Chapter 4).
Figure 3.14 Voltage Amplifier Trigger Loop
Figure 3.15 Aerotech User Interface
CNC COMMAND
READER

45
3.3.2.2 Visualization System
Lumenera provides a downloadable driver and LabVIEW example on their website. The
visualization system of the desktop system GUI is programmed by modifying the provided
example program from Lumenera and augmenting it with Vision Assistant (National Instrument)
for added sensing capability. Vision Assistant provides the ability to detect the syringe position
that is used for micropositioning the nozzle tip (see Chapter 4 for details). There are four
subroutines involved in the visualization algorithm (see Figure 3.16).
Figure 3.16 Visualization System Algorithm
First is the initialization process. In this subroutine the program preconfigures several
parameters of the camera including image resolution, picture format and the frame rate. There
are several options provided for the user to set on the front end GUI (see Figure 3.17). By
selecting the screen resolution from the drop down menu, the region of interest (ROI) will be
automatically configured as well. The region of interest is used by the image processing
algorithm to localize the region of possible detected objects. The image processing algorithm is
performed only within the ROI; hence increasing computational speed. Users can also modify
the ROI manually by clicking the “process” button on the front end panel and sliding the bar at
the right hand side of the image frame.
Start
Session Frame Grabbing Loop + Image Processing
ROI Descriptor
End
Session

46
The main algorithm of the visualization system is run in an infinite loop. It continuously
grabs images from the camera and, on demand, it performs the edge detection algorithm that is
used to locate the nozzle tip (details on Chapter 4). The frame rate of the camera has a limit and
is proportional to the image resolution: higher resolution yields a lower frame rate and vice
versa. The edge detection scans the image in the horizontal direction within the ROI. There are
several parameters that can be adjusted to improve the sensitivity of detecting edges, primarily
contrast and steepness. The subsampling ratio determines the spacing of the scan lines; a higher
subsampling ratio value means a bigger gap between scan lines. Figure 3.18 shows an example
of the captured image with good edge detection parameter settings.
Figure 3.17 Front End Camera Settings
Figure 3.18 Good Image Detection
RESOLUTION
SETTING
EDGE DETECTION
SETTING
ROI
SLIDER

47
The LabVIEW program must be ended properly by clicking the stop button on the front
end panel (see Figure 3.11). The abort button on this program is disabled to prevent users from
clicking it. If the program crash for any reasons or not ended properly, the next time the program
is run, LabVIEW will give an error message regarding the camera system preparation (see Figure
3.19). When this happen, users must quit LabVIEW completely and reopen the program.
Figure 3.19 Camera System Error Message
3.3.2.3 Multisyringe Control
There are two functionalities required by the multisyringe system: i) motor control and ii)
relay switching. To control the motor, an analog signal is sent to the DC motor driver through
the DAQ board. The motor can be controlled both in open loop and closed loop fashions. To
control the motor manually, users click the buttons underneath the image frame on the front
panel (see Figure 3.17). The double arrow buttons are used for fast motion and the single arrow
is for a very slow movement; “stop motor” immediately zeros the voltage signal sent to the
amplifier. During micropositioning, stick slip friction often prevents the motor from moving. On
the front end panel there are several control parameters to adjust the friction compensation.
These parameters add a constant voltage signal to the main signal in the units of millivolts. The
friction compensation value is position dependent. Each position can be adjusted individually
and the values are selected accordingly by selecting the radio button at the bottom of the front
panel (see Figure 3.11).

48
Another way to regulate the position of the nozzle is by closed loop control. The ”center”
button will change the proportional gain and integral gain to a value that has been tuned
heuristically based on the stability analysis performed in Chapter 4. Algorithm details are
discussed in this chapter. The radio button will not only select the friction compensation value. It
will also send digital signals to activate or deactivate the optical relays which are used to switch
the E-Jet printing voltage and the back pressure.
Figure 3.20 Multisyringe DC Motor Control and Relay Switching
3.3.3 Program Finalization
By clicking the “stop” button on the front end panel, the program will proceed to the
finalization step. At this step, all devices will be disabled and some of the parameters are set
back to their default values (see Figure 3.21). This step makes the program ready for the next
use.
Figure 3.21 Finalization Step of GUI

49
Chapter 4
Micropositioning System
4.1 System Modeling
As previously described in Chapter 2, the multisyringe toolbit is driven by a DC motor
(see Figure 4.1). The motor has a high gear ratio (1526:1) to provide sufficient torque and remain
stationary with a control input of zero. Despite several advantages, the high gear ratio introduces
control challenges, especially for micropositioning as the effects of stick-slip friction become
more prominent. Based on a first principles analysis, the dynamics of the toolbit can be
represented in Equation 4.1.
Figure 4.1 Multisyringe Toolbit
d

50
1
P
P
s K
U s s s
( 4.1 )
Frequency domain system identification was performed to obtain the parameters of the
plant using a dynamic signal analyzer (DSA). The toolbit is a quasi-stable system; therefore, it
was stabilized with closed loop feedback during the identification process. The system
identification was performed around the equilibrium position (front view in Figure 4.1) with
oscillation amplitude of 7.5o. The DSA monitors the control input and the output response of the
plant, generating Bode diagram as shown in Figure 4.2. A dynamic model based on bode plot
was then constructed with identified variables provided in Equation 4.2. This model will later be
used to design a stable controller that meets desired performance specifications. According to
Equation 4.2, the rotary system is a type 1 linear system. Therefore, this system can theoretically
track the reference signal with zero steady state error under the subject of a step input.
Figure 4.2 Bode Plot of the Multisyringe Toolbit Positioning System
.1
85
s 1 25
U s s s 1
( 4.2 )
100
101
102
-50
-40
-30
-20
-10
0
10
Mag(d
B)
Data
Model
100
101
102
-180
-160
-140
-120
-100
Phase(d
eg)
Frequency(rad/sec)

51
4.2 Image Processing and Feature Detection
The required encoder resolution, based on the toolbit geometry illustrated in Figure 4.1 is
defined in Equation 4.3. To position the end effector within 2 µm accuracy (ε= 2 μm), it requires
an encoder resolution of approximately 60000 counts per revolution. Encoders with this
resolution are expensive and have a large physical envelope, thereby making it difficult to
integrate into a benchtop machine. A basic E-jet printer requires the aid of a camera to monitor
the printing process [21,24,30]; hence, no additional cost for implementing a vision based control
scheme will be introduced to the system (see Figure 4.3). The camera does not move; therefore,
the micropositioning is performed in an inertial reference frame. The vision system used in this
paper operates at a sampling frequency of 10 Hz, sufficient to perform real time tracking.
Applications that require high-speed transitions between materials may need investments in
high-speed cameras.
Figure 4.3 Desktop E-Jet Printer with Multisyringe Toolbit

52
2 dN
( 4.3 )
The Vision Assistant (National Instrument) is used to design the image processing
algorithm. It generates an algorithm to detect the intended object and locate the instantaneous
position of the nozzle tip. In cooperation with the image processing software from the data
acquisition system, the camera manufacturer, Lumenera, provides the camera driver and
Application Programming Interface (API) on their website. Example programs either for
LabVIEW or Matlab can also be downloaded from their website5. The overall machine vision
process is built by combining the image grabbing routine and feature detection algorithm. The
machine vision process consists of 4 steps as seen in Figure 4.4.
Figure 4.4 Machine Vision Algorithm
4.2.1 Image Capture
Image capture is a critical step on the machine vision algorithm. It must ensure streams of
good quality images for the feature detection step. In this step several parameters are
preconfigured; users cannot change these parameters while the loop is running. There are several
options for the image resolution contained in a dropdown menu as shown in figure 4.5. At the
back end program, the dropdown menu is connected to a case structure which contains several
constants describing the width, height, horizontal and vertical offset of the image (see Figure
4.5). The offset must always be adjusted depending on the image resolution to ensure that the
center region of the sensor array on the camera is always selected. The camera frame depends
mostly on the camera itself and the CPU. Higher resolution consumes more processing power
hence reducing the frame rate of the image streams.
5 http://www.lumenera.com/support/downloads/microscopy-downloads.php

53
Figure 4.5 Camera Initialization and Image Configuration
4.2.2 Region of Interest Setting
Edge Detection [32] is used to recognize the nozzle feature. Setting a region of interest
(ROI) is necessary to localize the nozzle position to reduce computation time. ROI is also
helpful in eliminating false edges. The algorithm for constructing the ROI is generated from the
vision algorithm. The ROI descriptor is grouped into a cluster and the size can be changed by
changing the number in the front end (x1, x2, y1, y2 in Figure 4.5). In the horizontal direction, the
ROI must span the entire width of the image to keep track of the nozzle’s lateral position. In the
vertical direction, a more convenient way to describe the ROI is using a slider bar.
A slider bar is placed next to the image placeholder (see Figure 4.6) to shifts the position
of the top of the ROI (y1) up and down. A separate while loop is added on the back end program
(see Figure 4.5) to respond to the slider position. The height of the ROI is prescribed to be 100
pixels (y2=y1+100), sufficient to detect the nozzle tip. The ROI descriptor while loop prevents
users from describing the ROI manually on the front end GUI because the value entered will be
automatically overwritten by the value of the slider bar. In the horizontal direction, x1 is always 0
and x2 is described as the width of the image and unchangeable once the program is running.
ROI SLIDER

54
Figure 4.6 Region of Interest Descriptor
4.2.3 Feature Detection
Once the ROI is described, the feature detection subroutine will take place. ROI acts like
the lower and upper bound where the edge detection algorithm is performed. Similar to the ROI,
the Feature Detection routine is built using the Vision Assistant toolbox. There are several
parameters associated with the feature detection as shown in Figure 4.5 and they need to be
heuristically adjusted to maximize the number of detected edges. Once these parameters are
found, it should be working most of the time assuming images with good contrast are used. In
the desktop E-jet system, back light is used and the camera does not move too much, hence
image quality should be relatively similar every experiment. An example of an image with good
contrast between the nozzle tip and the background is shown in Figure 4.7. Yellow points at the
edge of the nozzle indicate detected edges.
Slider Bar

55
Figure 4.7 Edge Detection of Nozzle Tip
In general, the nozzle edges can be detected by implementing the algorithm shown in
Figure 4.8. A 3 by 3 horizontal Sobel Operator Kernel [33] defined in Equation 4.4, filters the
image inside the ROI, A(x,y). The nozzle and the background image have an opacity contrast (see
Figure 4.7); hence, the Sobel Kernel will set a high value to the filtered image, B(x,y). A pixel is
recognized as an edge when B(x,y) is larger than a threshold value, η. The filtering process is
performed from the top left hand corner to the bottom right hand corner of the image. The
detected edges carries position information with it and these values can be used to determine the
position of the nozzle with respect to the camera.
1 0 1
2 0 2
1 0 1
XG
( 4.4 )
y
ROI
DETECTED
EDGE
min ymin
ma yma

56
Figure 4.8 Edge Detection Algorithm
4.2.4 Analysis
The detected edges contain coordinates information, and, by symmetry, the nozzle lateral
position, δX, can be described by Equation 4.5; where n is the number of detected edges. The four
subroutines are performed continuously to provide the micropositioning controller with the
instantaneous location of the nozzle tip. The resolution at present is limited by the pixel width.
i iX X
X
max min; i 1 : n
2
( 4.5 )
x<xmax
y<ymax
START
y=y+1
B(x,y)=GX x A(x-1:x+1,y-1:y+1)
B(x,y)<η
B(x,y)=0B(x,y)=0B(x,y)=1
x=x+1
END
y=ymin
X=0
T
F
T
T
F

57
4.3 Micropositioning Control Structure
The nozzle positioning is performed in two steps: macropositioning and
micropositioning. The reference position for macropositioning is defined in terms of an angle, θ,
whereas micropositioning defines the nozzle position in terms of pixel location relative to the
(0,0) coordinate (see Figure). In macropositioning, the angle θ is obtained using a quadrature
encoder whereas the micropositioning uses the image processing described in the previous
section. The positioning control architecture is illustrated in Figure Error! Reference source
not found.. The supervisor decides which controller to use based on the macropositioning error
tracking. Both positioning schemes use a proportional-gain controller.
Figure 4.9 Positioning Control Architecture
KP1
VISION
KP2
SUPERVISOR
ENCODER
y MIC
RO
SYRI
NG
E #
RMICRO
MICROPOSITIONING
MACROPOSITIONING
TS =100 ms
R1
CONTROLLER 1
CONTROLLER 2
G(s)
FRICTIONCOMPENSATION
∑
+-
+-
θ
R2R3R4
COMMAND SIGNAL
CONTROL SIGNAL
e2
e1
uOUTuIN
STOP
y MA
CRO
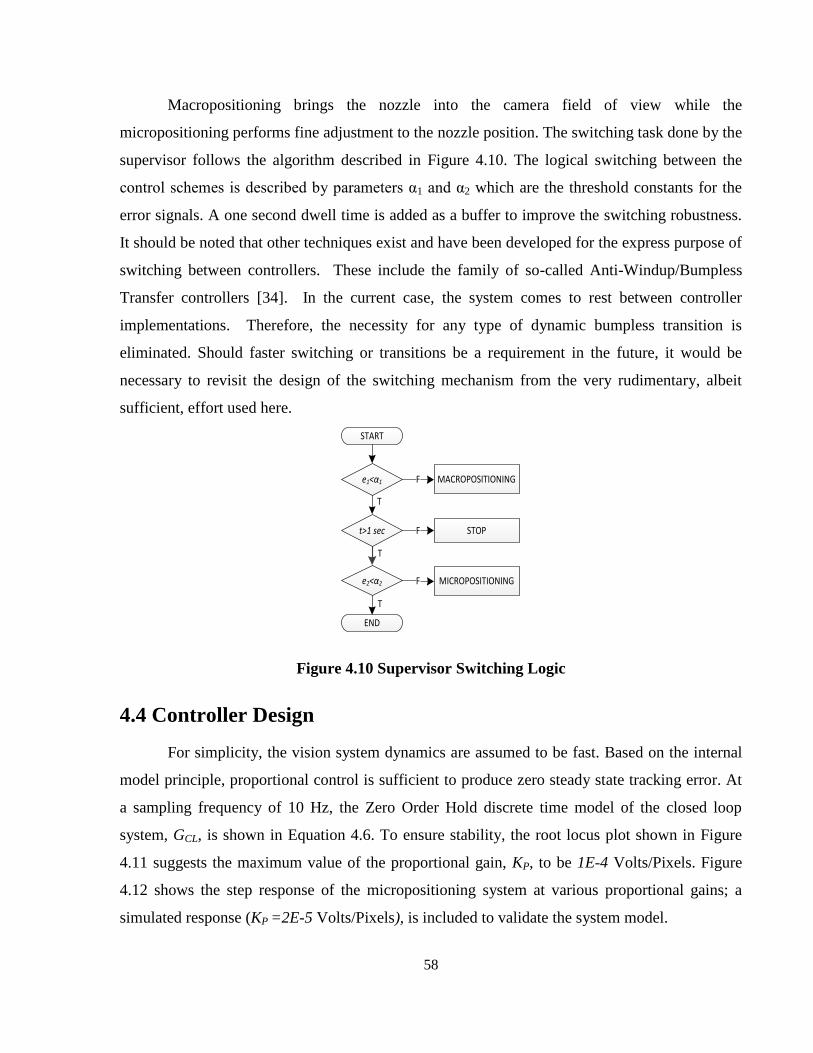
58
Macropositioning brings the nozzle into the camera field of view while the
micropositioning performs fine adjustment to the nozzle position. The switching task done by the
supervisor follows the algorithm described in Figure 4.10. The logical switching between the
control schemes is described by parameters α1 and α2 which are the threshold constants for the
error signals. A one second dwell time is added as a buffer to improve the switching robustness.
It should be noted that other techniques exist and have been developed for the express purpose of
switching between controllers. These include the family of so-called Anti-Windup/Bumpless
Transfer controllers [34]. In the current case, the system comes to rest between controller
implementations. Therefore, the necessity for any type of dynamic bumpless transition is
eliminated. Should faster switching or transitions be a requirement in the future, it would be
necessary to revisit the design of the switching mechanism from the very rudimentary, albeit
sufficient, effort used here.
Figure 4.10 Supervisor Switching Logic
4.4 Controller Design
For simplicity, the vision system dynamics are assumed to be fast. Based on the internal
model principle, proportional control is sufficient to produce zero steady state tracking error. At
a sampling frequency of 10 Hz, the Zero Order Hold discrete time model of the closed loop
system, GCL, is shown in Equation 4.6. To ensure stability, the root locus plot shown in Figure
4.11 suggests the maximum value of the proportional gain, KP, to be 1E-4 Volts/Pixels. Figure
4.12 shows the step response of the micropositioning system at various proportional gains; a
simulated response (KP =2E-5 Volts/Pixels), is included to validate the system model.
e1<α1
START
MACROPOSITIONING
MICROPOSITIONINGe2<α2
END
F
F
T
T
T
STOPt>1 sec F

59
P
CL 2
P P
K 488.2z 455.1G z
z 488.2K 1.81 z 455.1K 0.8098
( 4.6 )
Figure 4.11 Root Locus Plot of the Micropositioning System
The actual response of the motor is heavily damped by stick-slip friction compared to the
simulated response (see Figure 4.12). In micropositioning, the effect of stick-slip friction is more
apparent. As the nozzle approaches the reference, the error signal approaches zero as does the
control input. When the control input is too low to overcome friction, the motor stops; hence zero
steady state error is not achievable. A simple friction compensator (Equation 4.7) helps in
alleviating this problem. Figure 4.13 compares the controller performance in the absence and
presence of the friction compensator. Notice that when no friction compensator is used, the
steady state error is approximately 200 pixels or equivalent to approximately 100 µm. The
friction compensator constant C can be found by incrementing its value from zero until the
nozzle starts creating motion. The value of C may vary from one print head to the others and also
dependent on the direction of approach. If the friction continues to be an issue in future multi-
nozzle E-jet systems such as the one shown in Figure 4.13, approaches for adaptively identifying
the friction may be utilized if the manual compensation proves to be to labor intensive for
intended automation.
Root Locus
Real Axis
Imagin
ary
Axis
-2.5 -2 -1.5 -1 -0.5 0 0.5 1 1.5-1.5
-1
-0.5
0
0.5
1
1.5
System: Gz
Gain: 0.000112
Pole: -1
Damping: -0.000861
Overshoot (%): 100
Frequency (rad/sec): 31.4

60
IN IN
OUTIN IN
u C ; u 0u
u C ; u 0
( 4.7 )
Figure 4.12 Step Response of Micropositioning System
Figure 4.13 Friction Compensation Effect on Micropositioning System
0 0.5 1 1.5 2 2.5 3 3.50
100
200
300
400
500
600
700
800
900
1000
Time [s]
Positio
n [
Pix
els
]
Kp = 2E-5 (Sim)
Kp = 2E-5
Kp = 4E-5
Kp = 6E-5
Kp = 8E-5
Kp = 10E-5
Reference
0 0.5 1 1.5 2 2.5 3 3.50
200
400
600
800
1000
1200
1400
1600
Time [s]
Positio
n [
Pix
els
]
Left - w/ Friction Compensator
Right - w/ Friction Compensator
Left - w/o Friction Compensator
Right - w/o Friction Compensator
Reference

61
Chapter 5
Multimaterial E-Jet Printing Application
Printing with multiple materials adds versatility to E-jet printer. The multisyringe toolbit
promotes E-jet to be a competitive manufacturing instrument as more complex functional device
can be patterned with ease. Printed electronics and biological sensors have been highlighted as
the major application area for E-jet printing [21,35]. Now with more materials, researchers can
explore the potential application of E-Jet to the fullest. In this chapter several printing
applications are presented. In biological printing, , the author demonstrates the ability to
selectively print more than one material on a substrate, while in printed electronics the author
presents multilayer interconnects printing for a more versatile design of micro-scale circuitry.
5.1 Printing of Biological Sensor
One main application of E-jet is the printing of biological materials [21]. Overlaying or
creating patterns of multiple biological materials requires the ability to perform droplet
registration. In chapter 4, the author demonstrates the capability to align the nozzle tip within 2
μm accuracy after successive head switching; Figure 5.1 shows the experimental setup for
printing a buffer solution with different fluorescent agents. The solution in print-heads A and B
are tagged with Rhodamine 6G (Sigma-Aldrich) and FITC (Riedel-de Haén), respectively. The
buffer solution that is tagged with FITC is printed first. Once completed, the toolbit switches the
printhead and prints the Rhodamine buffer solution. To accurately space the droplets, a drop on
drop technique is used. Basically the stage will move to the prescribed position, dwell for several
milliseconds and eject a droplet.

62
Figure 5.1 Setup of Multimaterial Printing in Desktop System
After printing, the printed patterns are imaged using a fluorescent microscope (Axiovert
200M, Carl Zeiss, Inc). The microscope uses two different color filters to differentiate the two
inks. Figure 5.2 is produced by mixing the two color channels; Rhodamine is the orange droplet
and the ink tagged with FITC shows the green color. The printed droplet diameter is
approximately 2 µm, and the magnified image in Figure 5.2 shows the registration accuracy of
the droplet is well within 2 µm. This registration accuracy enables researchers to automatically
produce numerous chemical reactions at a very fine resolution with ease.
Figure 5.2 Microarray Printing with Multisyringe E-Jet Toolbit
0 10 5 15 20 X - Position [µm]

63
Four inks tagged with different fluorophores are printed on a silicon wafer substrate. The
wafer is fluorinated with tridecafluoro-1,1,2,2-tetrahydrooctyl-1-trichlorosilane to enhance the
image contrast. The fluorophores used are listed in Table 5.1. They are filtered using “CY-5”,
“Rhodamine”, “FITC” and “DAPI” filters during observation and indicated by red, orange, green
and blue color respectively in Figure 5.3. The droplet spacing is 10 µm and the droplet size is 3
µm. Glycerol is added to all solutions to prevent evaporation during printing. The evaporation
control reduces the likelihood of nozzle clogging. The glycerol also increases the ink’s dielectric
constant for better printability [21].
Figure 5.3 Printing of Four Fluorescent Tagged Buffer Solution6
Table 5.1 Ink Composition of Fluorophores
Ink Chemical Composition
1
Ovalbumin-Alexa Fluor 647 (Invitrogen) 5 uM
Glycerol 40% Volume
Buffer Solution NaCl 50 mM
Potasium Phosphate (pH = 6.9) 25 mM
2
Rhodamine B (Sigma-Aldrich) 30 uM
Glycerol 40% Volume
Buffer Solution NaCl 50 mM
Potasium Phosphate (pH = 6.9) 25 mM
3
4',6-diamidino-2-phenylindole dihydrochloride / DAPI (Sigma-Aldrich) 75 uM
Glycerol 10% Volume
Buffer Solution NaCl 50 mM
Tris-acetate (pH = 8.0) 25 mM
4
Fluorescein sodium salt (Riedel-de Haën) 30 uM
Glycerol 40% Volume
Buffer Solution NaCl 50 mM
Potasium Phosphate (pH = 6.9) 25 mM
6 Courtesy to Kazuyo Shigeta ([email protected])

64
A MATLAB based bitmap – G-code converter is developed to pattern Figure 5.3. This
program converts any type of bitmap image (*.jpg,*.png,*.bmp, etc) and users can as well
specify printing parameters such as printing speed, dwelling time, spacing and image size. Figure
5.4 shows the GUI of the image converter and the m-files associated with the GUI can be found
in Appendix C.1 - C.5. The “BROWSE” button allows users to select a bitmap file from a
particular folder and the image will be shown in the GUI. When the “GENERATE G CODE”
button is pressed, a text file containing the g-code is generated. As described section 3.2.3, the
axes of the desktop system follow the trajectories generated by the Aerotech Motion Composer
software tool. Aerotech Motion Composer only reads *.pgm extension files. These can be
generated by either copying the content of the generated text file to the Aerotech Motion
Composer or by renaming the file extension from *.txt to *.pgm.
Figure 5.4 MATLAB Based Image to G-code Converter
Four sets of image (see Figure 5.5) are used to create the four G-code programs. Using
Adobe Photoshop, the original image is decomposed into four layers then each is saved as
individual image. The image size must be preserved to maintain the same relative position to the
image origin (top left corner). Ejecting a droplet at the origin position prior to running the G-
code program helps to ensure that a correct starting location is used. If necessary this drop, or
similar approaches, can also be used as a registration marking for more complex printing
patterns.

65
Figure 5.5 Image Decomposition for Four Color Printing
5.2 Multilayer Printed Interconnects
Figure 2.1 shows how multiple materials are printed with Inkjet printing to fabricate
complex functional electronic devices. Likewise, complex functional electronic devices can also
be fabricated using an E-jet printer. In this work, fabrication of a crossover interconnect is
demonstrated (see Figure 5.6).
Figure 5.6 Crossover Silver Interconnect

66
Organic silver ink (TEC-IJ-010, Inktec) is used for printing the conductive silver line
(~8µm width) and a photo-curable polymer (NOA-76, Norland Products) is used to isolate the
two intersecting conductive lines. The silver ink is first printed on the silicon wafer substrate
coated with Polymide. The photo-curable polymer is then printed to top the silver at the
crossover location. Exposure of UV-light at 5 J/cm2 (~365nm) cures the polymer creating an
isolation layer for the crossing silver lines. These steps are illustrated in Figure 5.7.
Figure 5.7 Step by step Process to Construct Interconnect Crossover
There are several problems found in printing the crossover structure, including: poor
conductivity, surface wetting, curing challenges with NOA and weak connectivity/conductivity
of the top silver line. In Figure 5.8a, NOA74 (Norland Optics) is printed on top of the silver line
and surface wetting is observed to take place. To overcome this problem, NOA76 (Norland
Optics), which has a higher viscosity used and Figure 5.8b shows that a thicker and slimmer
isolation layer is printed. In Figure 5.8c, the second printed silver line (top layer) is embedded in
the NOA. Occasionally, the polymer is not cured for a reason that is the subject of current
ongoing investigations at the writing of this thesis. A stronger intensity UV light might be
necessary to fully cure the NOA for a more reliable isolation layer.
Figure 5.8 Problems Found in Crossover Interconnect Printing

67
As the isolation layer is printed on top of the underlying silver lines, the resulting
standoff distance changes at precisely the location of crossover between the two lines. The
resultant change in standoff height between the nozzle and substrate creates a local change in
electric field. As an illustration of this, a weak connection is observed at the edge of the NOA as
shown in Figure 5.8d . The change in height as suggested by the AFM image shown in Figure
5.9 is approximately 200nm. A bipolar printing mode (+/-) is currently being developed to
overcome this problem.
At the time of writing of this thesis, the creation of silver printed lines with suitable
conductivity is still a challenging and unsolved problem. The author feels that this is largely due
to the ink formulations and is currently working with Materials Science collaborators to explore
solutions. Currently, the percentage yield of good conductive lines is fairly low (<10%). The
width of Inkjet printed interconnects are typically in the order of 100 μm with a height of 1-3
μm. In contrast, an E-jet printed silver interconnect has a width of 5-10 μm with a thickness of
300 nm as shown in the AFM in Figure 5.9. During printing, the lines look connected; however,
after sintering the lines at 150oC, some of the organic materials evaporate and these create voids
or defects on the line. As a result, the conductivity of the silver interconnect lines is greatly
reduced. Nevertheless, the creation of a functional multi-material interconnect crossover should
be readily achievable after the printing conditions for Ag are resolved.
Figure 5.9 AFM Image of the Silver Interconnect Crossover

68
5.3 Other Applications
There are many more applications where the multisyringe E-jet toolbit can be used. For
instance, patterns with both coarse and small feature size can be printed using two different
nozzle sizes to save printing time. Figure 5.10 shows NOA89 printed with two different size
nozzles; the smaller droplets are printed using 1 micron nozzle and the bigger droplets are
printed using 5 micron nozzle.
Figure 5.10 Multisize Printing
Nozzle clogging is a major problem in E-jet printer. However, as an alternative, users can
take advantage of the multi-material printhead to preload the toolbit with more nozzles and easily
switch to the different printhead whenever nozzle clogging takes place. This will be very
beneficial, for example, in a roll to roll (R2R) manufacturing platform as the production time can
be reduced. Further improvement on the multisyringe toolbit is to introduce modularity on the
printhead design and universal connection on each head. This will allow the toolbit to have
different functionalities such as in situ UV curing and interconnect sintering [36].

69
Chapter 6
Conclusion and Future Work
This chapter concludes the discussion of the thesis. Section 6.1 provides a chapter-wise
summary of the work presented followed by the contribution and conclusion of this work. A
discussion on possible future avenues is discussed in section 6.3 w wraps up the thesis report.
6.1 Thesis Summary
The following provides the chapter-wise summery of the thesis work.
1. Chapter 1 opens up the thesis by introducing micro-printing technology which has brought
excitement to the manufacturing community as the production of large area and cost effective
functional devices becomes more realizable. A discussion about the Electrohydrodynamic-Jet
printing technology is presented and the relative benefits for E-jet printing are discussed.
2. The design and fabrication of the multisyringe toolbit are discussed in this chapter.
Component lists, assembly instructions and methods to distribute the voltage and pressure
signal are presented.
3. The previously developed Desktop E-jet System serves as a platform for the multisyringe
toolbit and in this chapter details the building of a Desktop E-jet System. Chapter 3 also
includes complete component lists, assembly instructions, circuitry and user interface design
which serve as a general guideline to build an entire Desktop E-jet System unit. The
combination of information in Chapters 2 and 3 provides the reader with the necessary
background to assemble a Desktop E-jet system complete with multi-syringe toolbit.
4. The algorithm to accurately index the nozzle tip after successive head changes is presented in
this chapter. With a vision based sensing technique, a novel micropositioning technique for

70
the multisyringe E-jet toolbit is introduced. This chapter also discusses the dynamic model of
the toolbit positioning system, image processing algorithm, the control architecture and the
resulting implementation on the experimental system
5. Several printed patterns are presented in Chapter 5 to demonstrate the type of functional
structures one can construct with the toolbit. In a biological application, the author presents
microarray printing of four buffer solutions tagged with different fluorescent agents. In a
printed electronics application, crossover silver interconnect structures are presented; this
structure allows a higher density silver interconnects circuit compared to a single layer
structure.
6.2 Contributions and Conclusion
The use of a multimaterial E-jet deposition system opens up new potential application
areas for this printing technology. As the demand to use wider varieties of ink increases,
procedures to distribute voltage and pressure described in this paper can be easily extended to
any design which incorporates multiple printheads.
Micropositioning with vision-based control can also be utilized in other systems where
spatial sensing ability is limited. One main challenge of this device is how to index the syringe
nozzles accurately. Edge detection image processing techniques recognizes the nozzle features
and output the nozzle’s instantaneous position with respect to an inertial reference frame,
allowing the use of feedback control for position tracking. In this paper the authors propose the
combination of macro and micropositioning, with supervisory control architecture, for the
indexing of the toolbit. The image processing technique can be extended to an online monitoring
or offline inspection system for the E-jet printer since the present sensing capability on an E-jet
printer is very limited.
The printed patterns presented in Chapter 5 give several design ideas where the notion of
multimaterial printing can be employed. With added multimaterial functionality, the desktop E-
jet system becomes a more appealing instrument for researchers across a wide variety of
scientific and technological areas. It makes the Desktop System a compact, cost effective and
versatile manufacturing instrument

71
6.3 Future Work
The multi-syringe toolbit developed in this thesis introduced the idea of multi-material
printing with an E-jet system. This technology platform can be seen as a stepping stone towards
significant scalability of the E-jet process into many printing nozzles. The toolbit presented in
this work is much better suited for the research laboratory where the emphasis is to understand
fundamental mechanisms of E-jet and the desire for production-level fabrication is relatively
low. However, for the E-jet process to become a true manufacturing system, it is inevitable that
it will have to operate a large number of individual nozzles and, possibly, individual print heads
containing many nozzles.
Methods to distribute the voltage and pressure signal are introduced in this work and can
be easily adapted to any multihead design. Future work associated with these thesis efforts
includes the investigation into simultaneous printing with multiple individual nozzles. This
approach will likely use the same electronics circuitry as the one used on the multisyringe toolbit
described in this thesis in order to maximize re-use of existing expertise. For these future
investigations, we will start with a limited number of nozzles to investigate interaction effects. A
candidate new toolbit design can hold up to three nozzles due to geometry constraints. The center
nozzle is stationary and serves as the reference nozzle; those on the two sides are mounted on 3
DOF metric stages for position adjustment Figure 6.1. The design is relatively simple. However,
it would provide a valuable test platform for understanding fundamental aspects such as electric
field interference between adjacent nozzles. The author feels this will be the next logical step
towards true understanding of the nozzle-nozzle interactions and scalable design of large arrays
of E-jet printing nozzles incorporated into printing heads.
Figure 6.1 Tilted Nozzle Design for Simultaneous Printing

72
List of References
[1] Meriam Webster. Meriam Webster. [Online]. http://www.merriam-
webster.com/dictionary/manufacture
[2] U.S. Department of Commerce, Manufacturing In America Report. Washington D.C., United States
of America: U.S. Government Printing Office, January 2004. [Online].
http://www.ita.doc.gov/media/Publications/pdf/manuam0104final.pdf
[3] Mark J Perry. (2011, February) The Wall Street Journal. [Online].
http://mjperry.blogspot.com/2011/02/us-manufacturing-more-output-fewer.html
[4] Marc Levinson, "“Hollowing Out” in U.S. Manufacturing: Analysis and Issues for Congress,"
Congressional Research Service, Report for Congress R41712, 2011. [Online].
http://forbes.house.gov/UploadedFiles/CRS_-_Hollowing_Out_in_U_S__Manufacturing.pdf
[5] Mauro Ferrari, "Cancer Nanotechnology: Opportunities and Challenges," Nature Reviews: Cancer,
vol. 5, pp. 161-171, 2005 2005.
[6] Phaedon Avouris, Joerg Appenzeller, Richard Martel, and Shalom J Wind, "Carbon Nanotube
Electronics," IEEE, vol. 91, no. 11, pp. 1772-1784, November 2003.
[7] Elena Serrano, Guillermo Rus, and Javier Garcia Martinez, "Nanotechnology for Sustainable
Energy," Renewable and Sustainable Energy, vol. 13, no. 9, pp. 2373-2384, June 2009.
[8] Heung Cho Ko et al., "A Hemispherical Electronic Eye Camera Based on Compressible Silicon
Optoelectronics," Nature, vol. 454, pp. 748-753, May 2008.
[9] Dae Hyeong Kim et al., "Dissolvable Films of Silk Fibroin for Ultrathin Conformal Bio-integrated
Electronics," Nature Materials, vol. 9, pp. 511-517, April 2010.
[10] Lihi Adler Abramovich and Ehud Gazit, "Controlled Patterning of Peptide Nanotubes and
Nanospheres Using Inkjet Printing Technology," Journal of Peptide Science, vol. 14, no. 2, pp. 217-
223, Septmper 2007.

73
[11] Rong Zhang, Albert Liberski, Ferdous Khan, Juan Jose Diaz Mochon, and Mark Bradley, "Inkjet
Babrication of Hydrogel Microarrays Using In Situ Nanolitre-scale Polymerisation," ChemmComm,
vol. 1317-1319, p. 19, December 2007.
[12] Mario Pagliaro, Rosaria Ciriminna, and Giovanni Palmisano, "Flexible Solar Cells," ChemSusChem,
vol. 1, no. 11, pp. 809-891, November 2008.
[13] Inhwa Jung et al., "Dynamically tunable hemispherical electronic eye camera system with adjustable
zoom capability," Proceedings of the National Academy of Sciences of the United States of America,
vol. 108, no. 5, pp. 1788-1793, February 2011.
[14] BY Ahn et al., "Omnidirectional printing of flexible, stretchable, and spanning silver
microelectrodes," Science, vol. 323, no. 5921, pp. 1590-3, 2009.
[15] Tsuyoshi Sekitani et al., "A large-area wireless power-transmission sheet using printed organic
transistors and plastic MEMS switches," Nature Materials, vol. 6, pp. 413-417, April 2007.
[16] Radoslav Parashkov, Eike Becker, Thomas Riedl, Hans Hermann Johannes, and Wolfgang
Kowalsky, "Large Area Electronics Using Printing Methods," Proceedings of the IEEE, vol. 93, no.
7, pp. 1321-1329, July 2005.
[17] Paul Calvert, "Inkjet printing for materials and devices," Chemistry of Materials, vol. 13, no. 10, pp.
3299-3305, 2001.
[18] Linda T Creagh and Marlene McDonald, "Design and performance of inkjet print heads for non-
graphic-arts applications," MRS Bulletin, vol. 28, no. 11, pp. 807-11, November 2003.
[19] H. Sirringhaus, "High-Resolution Inkjet Printing of All-Polymer Transistor Circuits," Science, vol.
290, no. 5499, pp. 2123-2126, December 2000.
[20] S Sanaur, A Whalley, B Alameddine, M Carnes, and C Nuckolls, "Jet-printed Electrodes and
Semiconducting Oligomers for Elaboration of Organic Thin-film Transistors," Organic Electronics,
vol. 7, pp. 423-427, March 2006.
[21] Jang Ung Park et al., "High-resolution electrohydrodynamic jet printing," Nature Materials, vol. 6,
no. 10, pp. 782-789, October 2007.
[22] Sandipan Mishra, Kira L Barton, Andrew G. Alleyne, Placid M. Ferreira, and John A. Rogers,
"High-speed and drop-on-demand printing with a pulsed electrohydrodynamic jet," Journal of
Micromechanics and Microengineering, vol. 20, no. 9, pp. 1-8, September 2010.
[23] Kira Barton, Sandipan Mishra, Andrew Alleyne, Ferreira Placid, and John Rogers, "Control of High-
resolution Electrohydrodynamic Jet Printing," Control Engineering Practice, 2010.

74
[24] Kira Barton et al., "A desktop electrohydrodynamic jet printing system," Mechatronics, vol. 20, no.
5, pp. 611-616, May 2010.
[25] Hewlett Packard. (2010) HP Computer Museum. [Online]. http://www.hpmuseum.net
[26] Joseph M Crowley, "Ink Jet Electrohydrodynamic Exciter," 4220958, September 2, 1980.
[27] Ivan Rezanka, "Ink Jet Printer with Integral Electrohydrodynamic Electrotes and Nozzle Plate,"
4658269, April 14, 1987.
[28] Dong Ho Choi and Ian R Smith, "Electrohydrodynamic ink jet printer and printing method," Method
5838349 , November 17, 1998.
[29] Hong Kyoon Choi, Jang Ung Park, O. Ok. Park, Placid M. Ferreira, and John G. Georgiadis,
"Scaling laws for jet pulsations associated with high-resolution electrohydrodynamic printing,"
Applied Physics Letters, vol. 92, no. 12, 2008.
[30] Philip Graf, Erick Sutanto, Kira Barton, Andrew Alleyne, and Placid Ferreira, "High-Resolution
Electrohydrodynamic Jet Printing System," in North American Manufacturing Research Conference
, Corvallis, 2011.
[31] Sawyer B Fuller, Eric J Wilhelm, and Joseph M Jacobson, "Ink-Jet Printed Nanoparticle
Microelectromechanical Systems," Journal of Microelectromechanical Systems, vol. 11, no. 1, pp.
54-60, February 2002.
[32] John Canny, "A Computational Approach to Edge Detection," Pattern Analysis and Machine
Intelligence, vol. 6, pp. 679-698, 1986.
[33] Nick Kanopoulos, Vasanthavada Nagesh, and Robert L Baker, "Design of an Image Edge Detection
Filter Using the Sobel Operator," IEE Journal of Solid State Circuits, vol. 23, no. 2, pp. 358-367,
1998.
[34] S F Graebe and A.L.B Ahlen, "Dynamic transfer among alternative controllers and its relation to
antiwindup controller design," IEEE Transactions on Control Systems Technology, vol. 1, no. 1,
January 1996.
[35] Ke Wang, Mark D Paine, and John PW Stark, "Fully voltage-controlled electrohydrodynamic jet
printing of conductive silver tracks with a sub- 100 μm linewidth," Journal of Applied Physics, vol.
106, no. 2, 2009.
[36] Mark Allen et al., "Contactless Electrical Sintering of Silver Nanoparticles on Flexible Substrates,"
IEEE Transactions On Microwave Theory And Techniques, vol. 59, no. 5, p. 1419, May 2011.

75
Appendi A
Appendix A contains drawings related to the multisyringe toolbit.

76
A.1 Angled Bracket

77
A.2 Toolbit Base

78
A.3 Rotary Mount

79
A.4 Syringe Holder Extender

80
Appendi B
Appendix B contains drawings related to the desktop system

81
B.1 Syringe Post Adapter

82
B.2 Stage Adapter

83
B.3 Camera Adapter

84
B.4 Pressure Subassembly Adapter

85
B.5 Camera Bracket

86
B.6 Top Panel

87
B.7 Side Panel

88
B.8 Back Panel

89
B.9 Aluminum Extender 1

90
B.10 Aluminum Extender 2

91
B.11 Aluminum Extender 3

92
Appendi C
Appendix C contains drawings related to the desktop system

93
C.1 Image Converter Sub-function – imageRead.m
function imout = imageRead(img_in,width)
img = img_in % Reading Image File
% ============================ DIGITIZING IMAGE =========================== level = graythresh(img % Set Grayscale Threshold img = im2bw(img,level % Convert Image to Black and White img = 255*img % White = 255 Black = 0 img = cast(img,'double' % Typecast to Double Precision %==========================================================================
%========================== SCALING PX TO MICRON ========================== x_img = size(img,2 % Length of Original Image [px] y_img = size(img,1); % Width of Original Image [px]
if(mod(y_img,2)~=0) img(y_img+1,:) = 0; end
height = ceil(y_img/x_img*width); % Width of Output Image [micron] cx = x_img/width; % Length Conversion Factor cy = y_img/height; % Width Conversion Factor imout = zeros(height,width); % Memory Allocation for Imout
% Scaling image pixel to 1 mm for i = 1:height for j = 1:width imout(i,j) = img(ceil(i*cy),ceil(j*cx)); % Pixel Mapping end end

94
C.2 Image Converter Sub-function – imageSpace.m
function imout = imageSpace(img,spacing)
height = size(img,1); % Specify Image Height width = size(img,2); % Specify Image Width
imout = 255*ones(height,width); % Creating White Image
for i=1:spacing:height imout(i,:) = img(i,:); % Spaced Image Filling end;
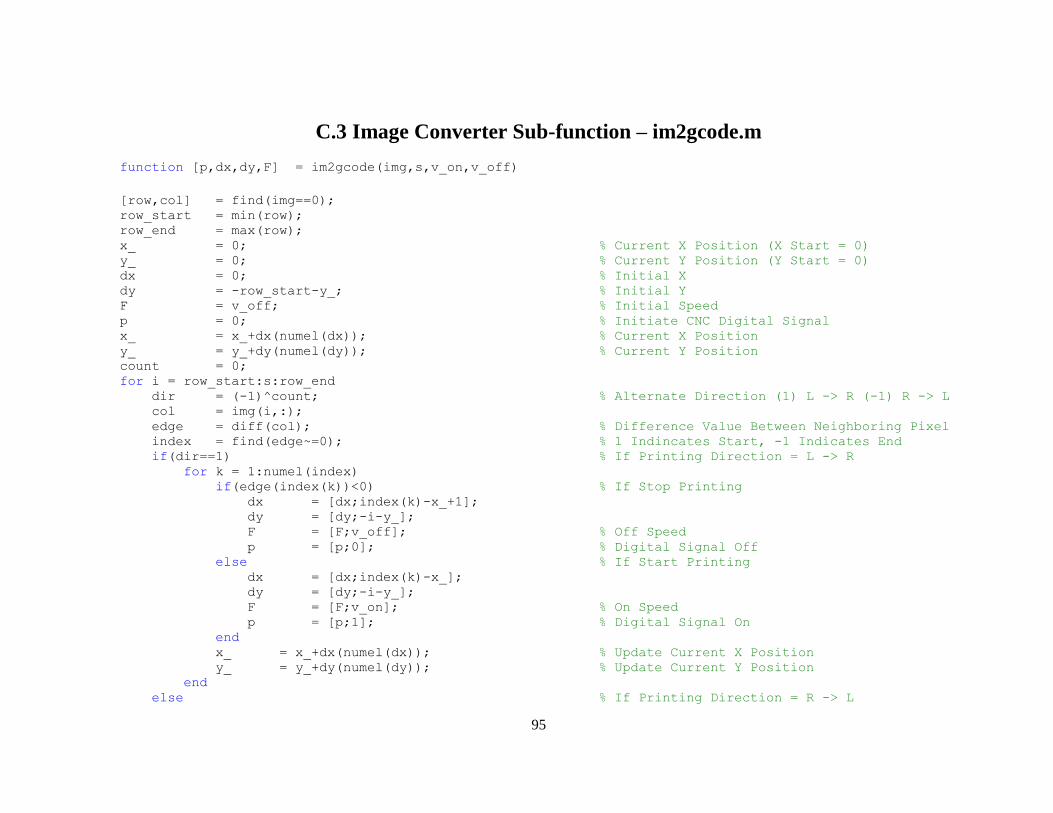
95
C.3 Image Converter Sub-function – im2gcode.m
function [p,dx,dy,F] = im2gcode(img,s,v_on,v_off)
[row,col] = find(img==0); row_start = min(row); row_end = max(row); x_ = 0; % Current X Position (X Start = 0) y_ = 0; % Current Y Position (Y Start = 0) dx = 0; % Initial X dy = -row_start-y_; % Initial Y F = v_off; % Initial Speed p = 0; % Initiate CNC Digital Signal x_ = x_+dx(numel(dx)); % Current X Position y_ = y_+dy(numel(dy)); % Current Y Position count = 0; for i = row_start:s:row_end dir = (-1)^count; % Alternate Direction (1) L -> R (-1) R -> L col = img(i,:); edge = diff(col); % Difference Value Between Neighboring Pixel index = find(edge~=0); % 1 Indincates Start, -1 Indicates End if(dir==1) % If Printing Direction = L -> R for k = 1:numel(index) if(edge(index(k))<0) % If Stop Printing dx = [dx;index(k)-x_+1]; dy = [dy;-i-y_]; F = [F;v_off]; % Off Speed p = [p;0]; % Digital Signal Off else % If Start Printing dx = [dx;index(k)-x_]; dy = [dy;-i-y_]; F = [F;v_on]; % On Speed p = [p;1]; % Digital Signal On end x_ = x_+dx(numel(dx)); % Update Current X Position y_ = y_+dy(numel(dy)); % Update Current Y Position end else % If Printing Direction = R -> L

96
index = fliplr(index); % Flip index edge = -edge; % Flip start and stop for k = 1:numel(index) if(edge(index(k))<0) % If Stop Printing dx = [dx;index(k)-x_]; dy = [dy;-i-y_]; F = [F;v_off]; % Off Speed p = [p;0]; % Digital Signal Off else % If Start Printing dx = [dx;index(k)-x_+1]; dy = [dy;-i-y_]; F = [F;v_on]; % On Speed p = [p;1]; % Digital Signal On end x_ = x_+dx(numel(dx)); % Update Current X Position y_ = y_+dy(numel(dy)); % Update Current Y Position end end count = count+1; % Increment Counter end
% Go back to 0,0 dx = 0.001*[dx;-sum(dx)]; % Convert Position Pixel -> mm dy = 0.001*[dy;-sum(dy)]; % Convert Position Pixel -> mm F = 0.001*[F;v_off]; % Convert Speed um/s -> mm/s p = [p;0]; % Digital Signal Off

97
C.4 Image Converter Sub-function – generate_gcode.m
function generate_gcode(img,p,x,y,F,v_on,t_on,t_off,file,frame,LAP) fid = fopen(file,'w'); % Open Text File fprintf(fid, 'PSOOUTPUT X CONTROL 0 1\n'); % Initiate Controller
% LAP is Large Area Printing Indicator
% Printing Image Border if(frame==1) if(LAP==1) fprintf(fid, 'G1\tX %.3f\tY +%.3f\tF %.3f\n',-size(img,2)/2*1E-3*10^LAP,size(img,1)/2*1E-
3*10^LAP,v_on*1E-3); end fprintf(fid, 'PSOCONTROL X ON\n'); fprintf(fid, 'DWELL %.3f\n', t_on); fprintf(fid, 'G1\tX +%.3f\tY +%.3f\tF %.3f\n',size(img,2)*1E-3*10^LAP,0,v_on*1E-3); fprintf(fid, 'G1\tX +%.3f\tY %.3f\tF %.3f\n',0,-size(img,1)*1E-3*10^LAP,v_on*1E-3); fprintf(fid, 'G1\tX %.3f\tY +%.3f\tF %.3f\n',-size(img,2)*1E-3*10^LAP,0,v_on*1E-3); fprintf(fid, 'G1\tX +%.3f\tY +%.3f\tF %.3f\n',0,size(img,1)*1E-3*10^LAP,v_on*1E-3); fprintf(fid, 'PSOCONTROL X OFF\n'); fprintf(fid, 'DWELL %.3f\n\n\n', t_off); end
% Formatting to G-code for k = 1:numel(p) if(p(k)==1) fprintf(fid, 'PSOCONTROL X ON\n'); fprintf(fid, 'DWELL %.3f\n', t_on); if(x(k)>=0) if(y(k)>=0) fprintf(fid, 'G1\tX +%.3f\tY +%.3f\tF %.3f\n',x(k)*10^LAP,y(k)*10^LAP,F(k)); else fprintf(fid, 'G1\tX +%.3f\tY %.3f\tF %.3f\n',x(k)*10^LAP,y(k)*10^LAP,F(k)); end else if(y(k)>=0) fprintf(fid, 'G1\tX %.3f\tY +%.3f\tF %.3f\n',x(k)*10^LAP,y(k)*10^LAP,F(k));

98
else fprintf(fid, 'G1\tX %.3f\tY %.3f\tF %.3f\n',x(k)*10^LAP,y(k)*10^LAP,F(k)); end end fprintf(fid, 'PSOCONTROL X OFF\n'); fprintf(fid, 'DWELL %.3f\n', t_off); else if(x(k)>=0) if(y(k)>=0) fprintf(fid, 'G1\tX +%.3f\tY +%.3f\tF %.3f\n',x(k)*10^LAP,y(k)*10^LAP,F(k)); else fprintf(fid, 'G1\tX +%.3f\tY %.3f\tF %.3f\n',x(k)*10^LAP,y(k)*10^LAP,F(k)); end else if(y(k)>=0) fprintf(fid, 'G1\tX %.3f\tY +%.3f\tF %.3f\n',x(k)*10^LAP,y(k)*10^LAP,F(k)); else fprintf(fid, 'G1\tX %.3f\tY %.3f\tF %.3f\n',x(k)*10^LAP,y(k)*10^LAP,F(k)); end end end end fclose(fid); % Close Text File

99
C.5 Image Converter Sub-function – generate_gcode.m
function varargout = RUN(varargin)
% Begin initialization code - DO NOT EDIT gui_Singleton = 1; gui_State = struct('gui_Name', mfilename, ... 'gui_Singleton', gui_Singleton, ... 'gui_OpeningFcn', @RUN_OpeningFcn, ... 'gui_OutputFcn', @RUN_OutputFcn, ... 'gui_LayoutFcn', [] , ... 'gui_Callback', []); if nargin && ischar(varargin{1}) gui_State.gui_Callback = str2func(varargin{1}); end
if nargout [varargout{1:nargout}] = gui_mainfcn(gui_State, varargin{:}); else gui_mainfcn(gui_State, varargin{:}); end % End initialization code - DO NOT EDIT
% --- Executes just before RUN is made visible. function RUN_OpeningFcn(hObject, eventdata, handles, varargin)
handles.output = hObject;
% Update handles structure guidata(hObject, handles);
nanocemms_logo = imread('nano_cemms_logo.jpg'); axes(handles.nano_cemms); imshow(nanocemms_logo);
nsf_logo = imread('nsf.jpg');

100
axes(handles.nsf); imshow(nsf_logo);
% UIWAIT makes RUN wait for user response (see UIRESUME) % uiwait(handles.figure1);
% --- Outputs from this function are returned to the command line. function varargout = RUN_OutputFcn(hObject, eventdata, handles)
varargout{1} = handles.output;
function input_file_Callback(hObject, eventdata, handles)
% --- Executes during object creation, after setting all properties. function input_file_CreateFcn(hObject, eventdata, handles)
if ispc && isequal(get(hObject,'BackgroundColor'), get(0,'defaultUicontrolBackgroundColor')) set(hObject,'BackgroundColor','white'); end
function image_length_Callback(hObject, eventdata, handles)
% --- Executes during object creation, after setting all properties. function image_length_CreateFcn(hObject, eventdata, handles)
if ispc && isequal(get(hObject,'BackgroundColor'), get(0,'defaultUicontrolBackgroundColor')) set(hObject,'BackgroundColor','white'); end

101
function time_on_Callback(hObject, eventdata, handles)
% --- Executes during object creation, after setting all properties. function time_on_CreateFcn(hObject, eventdata, handles)
if ispc && isequal(get(hObject,'BackgroundColor'), get(0,'defaultUicontrolBackgroundColor')) set(hObject,'BackgroundColor','white'); end
function image_spacing_Callback(hObject, eventdata, handles)
% --- Executes during object creation, after setting all properties. function asdasdasd_CreateFcn(hObject, eventdata, handles)
if ispc && isequal(get(hObject,'BackgroundColor'), get(0,'defaultUicontrolBackgroundColor')) set(hObject,'BackgroundColor','white'); end
function time_off_Callback(hObject, eventdata, handles)
% --- Executes during object creation, after setting all properties. function time_off_CreateFcn(hObject, eventdata, handles)
if ispc && isequal(get(hObject,'BackgroundColor'), get(0,'defaultUicontrolBackgroundColor')) set(hObject,'BackgroundColor','white'); end
function speed_on_Callback(hObject, eventdata, handles)
% --- Executes during object creation, after setting all properties. function speed_on_CreateFcn(hObject, eventdata, handles)

102
if ispc && isequal(get(hObject,'BackgroundColor'), get(0,'defaultUicontrolBackgroundColor')) set(hObject,'BackgroundColor','white'); end
function speed_off_Callback(hObject, eventdata, handles)
% --- Executes during object creation, after setting all properties. function speed_off_CreateFcn(hObject, eventdata, handles)
if ispc && isequal(get(hObject,'BackgroundColor'), get(0,'defaultUicontrolBackgroundColor')) set(hObject,'BackgroundColor','white'); end
function output_file_Callback(hObject, eventdata, handles)
% --- Executes during object creation, after setting all properties. function output_file_CreateFcn(hObject, eventdata, handles)
if ispc && isequal(get(hObject,'BackgroundColor'), get(0,'defaultUicontrolBackgroundColor')) set(hObject,'BackgroundColor','white'); end
% --- Executes on button press in browse. function browse_Callback(hObject, eventdata, handles) global savefile; global img; filename = uigetfile('*.jpg', 'Select a MATLAB code file'); set(handles.input_file,'string',filename); img = imread(filename); axes(handles.picture) imshow(img); savefile = strcat(strtok(filename,'.'),'.txt'); set(handles.output_file,'string',savefile);
% --- Executes on button press in generate. function generate_Callback(hObject, eventdata, handles) % hObject handle to generate (see GCBO) % eventdata reserved - to be defined in a future version of MATLAB

103
% handles structure with handles and user data (see GUIDATA) global img; global savefile; global frame; clc; size = str2num(get(handles.image_length,'string')); s = str2num(get(handles.image_spacing,'string')); t_on = str2num(get(handles.time_on,'string')); t_off = str2num(get(handles.time_off,'string')); v_on = str2num(get(handles.speed_on,'string')); v_off = str2num(get(handles.speed_off,'string')); img1 = imageRead(img,size); % Read Image img2 = imageSpace(img1,s); % Set Spacing frame = get(handles.print_frame,'value'); LAP = 0;
if(get(handles.LAP1,'value')||get(handles.LAP2,'value')) LAP = 1; end [p,x,y,F] = im2gcode(img2,s,v_on,v_off); % Converting Image to G_Code
generate_gcode(img2,p,x,y,F,v_on,t_on,v_off,t_off,savefile,frame,LAP); % Saving G_Code to file t = 0; for k = 1:length(p) dist = x(k)^2+y(k)^2; dt = dist/F(k); t = t+dt; end on = find(p==0); off = find(p==1); t = t+length(on)*t_on+length(off)*t_off; set(handles.total_time,'string',t); open(savefile) clear all; clc;
% --- Executes on button press in preview. function preview_Callback(hObject, eventdata, handles) % hObject handle to preview (see GCBO)

104
% eventdata reserved - to be defined in a future version of MATLAB % handles structure with handles and user data (see GUIDATA) global img; axes(handles.picture) imshow(img);
function edit12_Callback(hObject, eventdata, handles)
% --- Executes during object creation, after setting all properties. function edit12_CreateFcn(hObject, eventdata, handles)
if ispc && isequal(get(hObject,'BackgroundColor'), get(0,'defaultUicontrolBackgroundColor')) set(hObject,'BackgroundColor','white'); end
% --- Executes during object creation, after setting all properties. function picture_CreateFcn(hObject, eventdata, handles)
% --- Executes during object creation, after setting all properties. function image_spacing_CreateFcn(hObject, eventdata, handles)
if ispc && isequal(get(hObject,'BackgroundColor'), get(0,'defaultUicontrolBackgroundColor')) set(hObject,'BackgroundColor','white'); end
function total_time_Callback(hObject, eventdata, handles)
% --- Executes during object creation, after setting all properties. function total_time_CreateFcn(hObject, eventdata, handles)
if ispc && isequal(get(hObject,'BackgroundColor'), get(0,'defaultUicontrolBackgroundColor')) set(hObject,'BackgroundColor','white'); end
% --- Executes on button press in print_frame. function print_frame_Callback(hObject, eventdata, handles)

105
% --- Executes on button press in LAP2. function LAP1_Callback(hObject, eventdata, handles)
if(get(handles.LAP1,'value')) set(handles.LAP2,'value',0); set(handles.image_length,'string',2500); set(handles.image_length,'enable','off'); set(handles.image_spacing,'string',5); set(handles.image_spacing,'enable','off'); set(handles.speed_on,'string',5000); set(handles.speed_off,'string',5000); else set(handles.image_length,'string',1000); set(handles.image_length,'enable','on'); set(handles.image_spacing,'string',5); set(handles.image_spacing,'enable','on'); set(handles.speed_on,'string',500); set(handles.speed_off,'string',500); end
% --- Executes on button press in LAP2. function LAP2_Callback(hObject, eventdata, handles)
if(get(handles.LAP2,'value')) set(handles.LAP1,'value',0); set(handles.image_length,'string',5000); set(handles.image_length,'enable','off'); set(handles.image_spacing,'string',5); set(handles.image_spacing,'enable','off'); set(handles.speed_on,'string',5000); set(handles.speed_off,'string',5000); else set(handles.image_length,'string',1000); set(handles.image_length,'enable','on'); set(handles.image_spacing,'string',10); set(handles.image_spacing,'enable','on'); set(handles.speed_on,'string',500); set(handles.speed_off,'string',500); end


