2 Wireless ® 1 Identify existing wiring Two switches control the lights (3-way installation) 2 What you need for a 3-way installation + WARNING! Shock Hazard. May result in serious injury or death. Turn off power at circuit breaker before installing the unit. 4 Turn power off at circuit breaker 5 Remove existing switch from wall 6 Tag and disconnect wires from the existing switch Place tag - to identify wire on different color screw Different Color Screw Ground (Green / Bare Copper) 3-Way Installation - Caséta Wireless In-Wall Dimmer with Pico Remote Control Location 1 Location 2 In-wall dimmer PD-6WCL Pico® remote control with wall-mounting kit PJ2-WALL - If one switch controls the lights (single-pole installation) See quick-start guide that came with your dimmer - If three or more switches control the lights (multi-location installation) See page 31 for details Important note: 3 Choose a location for your Caséta Wireless dimmer Choose which location you want the Caséta Wireless dimmer installed in. This will be Location 1. Location 1 Location 1 Claro Wallplate CW-1 +
Transcript
2
Wireless®
1 Identify existing wiring
Two switches control the lights (3-way installation)
2 What you need for a 3-way installation
+
WARNING! Shock Hazard. May result in serious injury or death. Turn off power at circuit breaker before installing the unit.
4 Turn power off at circuit breaker
5 Remove existing switch from wall
6 Tag and disconnect wires from the existing switch
Place tag - to identify wire on different color screw
Different Color Screw
Ground(Green / Bare Copper)
3-Way Installation - Caséta � Wireless In-Wall Dimmer with Pico � Remote Control
Location 1 Location 2
In-wall dimmerPD-6WCL
Pico® remote control with wall-mounting kitPJ2-WALL
- If one switch controls the lights (single-pole installation)
See quick-start guide that came with your dimmer
- If three or more switches control the lights
(multi-location installation) See page 31 for details
Important note:
3 Choose a location for your Caséta� Wireless dimmer
Choose which location you want the Caséta� Wireless dimmer installed in. This will be Location 1.
Location 1
Location 1
Claro� Wallplate CW-1
+
3
Wireless®
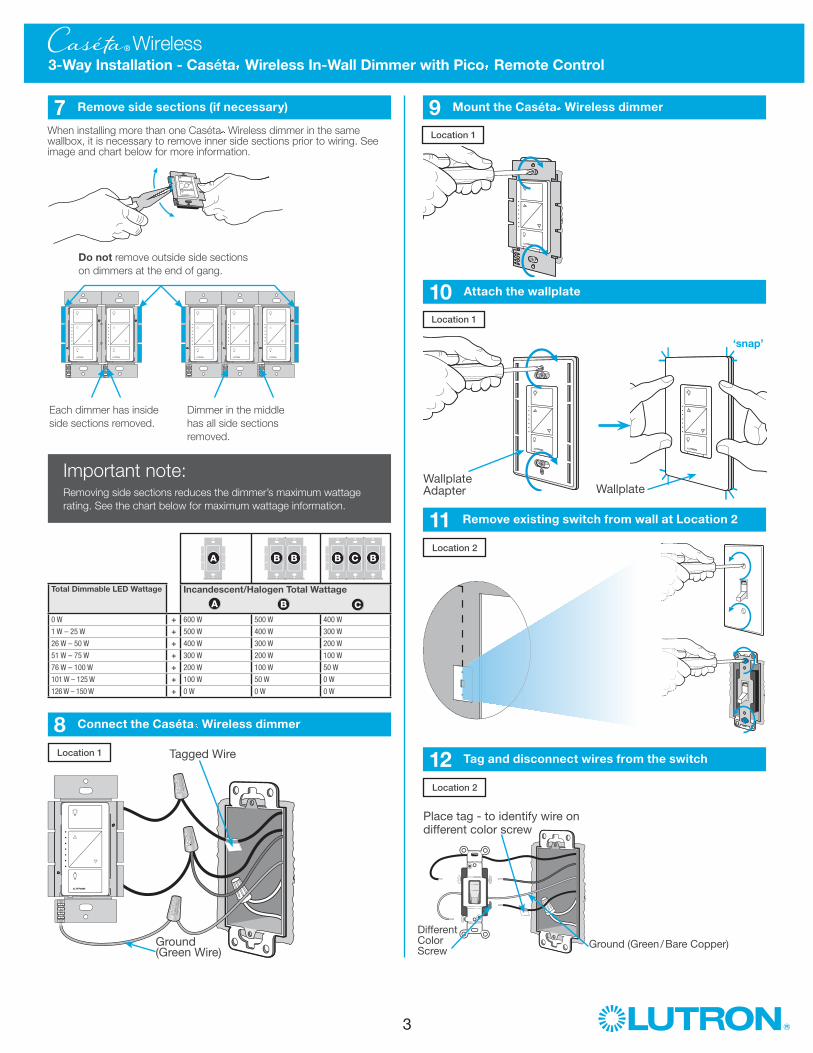
7 Remove side sections (if necessary)
Do not remove outside side sections
on dimmers at the end of gang.
Each dimmer has inside
side sections removed.
Dimmer in the middle
has all side sections
removed.
Total Dimmable LED Wattage Incandescent/Halogen Total Wattage
0 W + 600 W 500 W 400 W
1 W – 25 W + 500 W 400 W 300 W
26 W – 50 W + 400 W 300 W 200 W
51 W – 75 W + 300 W 200 W 100 W
76 W – 100 W + 200 W 100 W 50 W
101 W – 125 W + 100 W 50 W 0 W
126 W – 150 W + 0 W 0 W 0 W
A B C
B B B C BA
8 Connect the Caséta� Wireless dimmer
Tagged Wire
Ground(Green Wire)
9 Mount the Caséta� Wireless dimmer
10 Attach the wallplate
‘snap’
11 Remove existing switch from wall at Location 2
3-Way Installation - Caséta � Wireless In-Wall Dimmer with Pico � Remote Control
12 Tag and disconnect wires from the switch
Ground (Green / Bare Copper)
Different Color Screw
Important note:Removing side sections reduces the dimmer’s maximum wattage
rating. See the chart below for maximum wattage information.
When installing more than one Caséta� Wireless dimmer in the same wallbox, it is necessary to remove inner side sections prior to wiring. See image and chart below for more information.
Wallplate Adapter Wallplate
Location 1
Location 1
Location 2
Place tag - to identify wire on different color screw
Location 2
Location 1
4
Wireless®
13 Connect the wires
Ground
14 Attach the wallplate bracket and Pico� remote control
15 Attach the wallplate
‘snap’
16 Turn power on at circuit breaker
3-Way Installation - Caséta � Wireless In-Wall Dimmer with Pico � Remote Control
Pairing the dimmer and Pico� remote control
17 Press and hold "Off" button on dimmer
05
10
15
6 sec.
UNTIL
HOLD
Status LEDs flash
18 Press and hold "Off" button on remote control
Lights flash three times
05
10
15
6 sec.
UNTIL
Wallplate Adapter Wallplate
Location 2
Tagged Wire
Location 2
Location 2
Location 2
Location 1
Repeat steps 17 and 18 to pair additional remote controls.
19 Pair additional remote controls
HOLD
3x
5
Wireless®
3-Way Installation - Caséta � Wireless In-Wall Dimmer with Pico � Remote Control
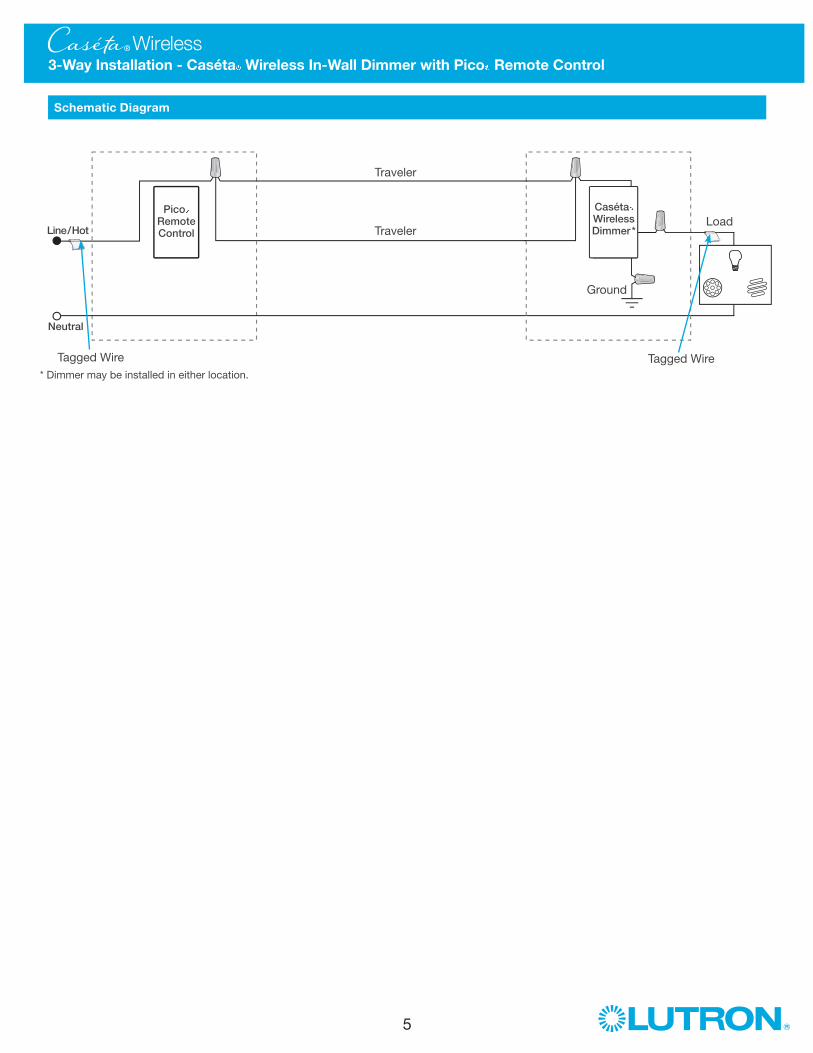
Neutral
Pico�
Remote ControlLine / Hot
Traveler
Caséta�
Wireless Dimmer *
Ground
Load
LE
DELLFC
CF
AFC
INC
HAL
Schematic Diagram
Traveler
* Dimmer may be installed in either location.
Tagged WireTagged Wire
6
Wireless®
1 Identify existing wiring
Two switches control the lights (3-way installation)
2 What you need for a 3-way installation
WARNING! Shock Hazard. May result in serious injury or death. Turn off power at circuit breaker before installing the unit.
4 Turn power off at circuit breaker
5 Remove existing switch from wall
6 Tag and disconnect wires from the existing switch
Place tag - to identify wire on different color screw
Different Color Screw
Ground(Green / Bare Copper)
3-Way Installation - Caséta � Wireless In-Wall Switch with Pico � Remote Control
Location 1 Location 2
- If one switch controls the lights (single-pole installation)
See quick-start guide that came with your switch
- If three or more switches control the lights
(multi-location installation) See page 41 for details
Important note:
3 Choose a location for your Caséta� Wireless switch
Choose which location you want the Caséta� Wireless switch installed in. This will be Location 1.
Location 1
Location 1
+
In-wall switchPD-5WS-DV
Pico� remote control PJ2-2B
+
Wallplate BracketPICO-WBX-ADAPT
+
Two Claro� Wallplates CW-1
7
Wireless®
7 Remove side sections (if necessary)
Do not remove outside side sections
on switches at the end of gang.
Each switch has inside
side sections removed.
Switch in the middle has
all side sections removed.
8 Connect the new Caséta® Wireless switch
Tagged Wire
Ground(Green Wire)
9 Mount the Caséta® Wireless switch
10 Attach the wallplate
‘snap’
11 Remove existing switch from wall at Location 2
3-Way Installation - Caséta® Wireless In-Wall Switch with Pico® Remote Control
12 Tag and disconnect wires from the existing switch
Ground (Green / Bare Copper)
Different Color Screw
When installing more than one Caséta® Wireless switch in the same wallbox, it is necessary to remove inner side sections prior to wiring. See image and chart below for more information.
Wallplate Adapter Wallplate
Location 1
Location 1
Location 2
Place tag - to identify wire on different color screw
Location 2
Location 1
Important note:Removing side sections reduces the switch’s maximum wattage
rating. See the chart below for maximum wattage information.
B B B C BA
PD-5WS-DV (120 V�
)
LED 5 A 4 A 3 A
Halogen / incandescent 600 W 450 W 350 W
Electronic Low-Voltage 600 W 450 W 350 W
Magnetic Low-Voltage 1 600 VA / 475 W 450 VA / 350 W 350 VA / 275 W
Fluorescent 2 5 A 4 A 3 A
General Purpose Fan 3 A 3 A 3 A
PD-5WS-DV ( 277 V�
)
LED 5 A 4 A 3 A
Halogen / incandescent 1350 W 1100 W 800 W
Electronic Low-Voltage 1350 W 1100 W 800 W
Magnetic Low-Voltage 1 1350 VA / 1075 W 1100 VA / 875 W 800 VA / 625 W
Fluorescent2 5 A 4 A 3 A
A B C
A B C
1 The maximum lamp wattage is determined by the efficiency of the transformer, with 70% – 85% as typical. For actual transformer efficiency, contact either the fixture or transformer manufacturer. The total VA rating of the transformer(s) shall not exceed the VA rating of the in-wall switch.
2 The in-wall switch is UL� Listed for use with all magnetic and electronic fluorescent ballasts.
Black
Blue
Black
8
Wireless®
13 Connect the wires
Ground
14 Attach the wallplate bracket and Pico® remote control
15 Attach the wallplate
‘snap’
16 Turn power on at circuit breaker
3-Way Installation - Caséta® Wireless In-Wall Switch with Pico® Remote Control
Pairing the switch and Pico� remote control
17 Press and hold "Off" button on switch
05
10
15
6 sec.
UNTIL
HOLD
Status LED flashes
18 Press and hold "Off" button on remote control
Lights flash three times
05
10
15
6 sec.
UNTIL
Wallplate Adapter Wallplate
Location 2
Tagged Wire
Location 2
Location 2
Location 2
Location 1
Repeat steps 17 and 18 to pair additional remote controls.
19 Pair additional remote controls
HOLD
3x
9
Wireless®
3-Way Installation - Caséta® Wireless In-Wall Switch with Pico® Remote Control
Neutral
Pico®
Remote Control
Line / Hot
Traveler
Caséta®
Wireless Switch *
Ground (Green)
Load
LE
DELLFC
CF
AFC
INC
HAL
Schematic Diagram
Traveler
* Switch may be installed in either location.
Tagged WireTagged Wire
Black
BlueBlack
10
Wireless®
1 Identify existing wiring
Two switches control the lights (3-way installation)
2 What you need for a 3-way installation
+
WARNING! Shock Hazard. May result in serious injury or death. Turn off power at circuit breaker before installing the unit.
4 Turn power off at circuit breaker
5 Remove existing switch from wall
6 Tag and disconnect wires from the existing switch
Place tag - to identify wire on different color screw
Different Color Screw
Ground(Green / Bare Copper)
3-Way Installation - Caséta® Wireless In-Wall PRO Dimmer with Pico® Remote Control
Location 1 Location 2
In-wall PRO dimmerPD-10NXD
Pico® remote control with wall-mounting kitPJ2-WALL
- If one switch controls the lights (single-pole installation)
See quick-start guide that came with your dimmer
- If three or more switches control the lights
(multi-location installation) See page 36 for details
Important note:
3 Choose a location for your Caséta® Wireless dimmer
Choose which location you want the Caséta® Wireless dimmer installed in. This will be Location 1.
Location 1
Location 1
Claro® Wallplate CW-1
+
11
Wireless®
7 Remove side sections (if necessary)
Do not remove outside side sections
on dimmers at the end of gang.
Each dimmer has inside
side sections removed.
Dimmer in the middle has all
side sections removed.
Total Dimmable LED Wattage Incandescent/Halogen Total Wattage
0 W + 1000 W 800 W 600 W
1 W – 25 W + 900 W 750 W 550 W
26 W – 50 W + 800 W 700 W 500 W
51 W – 75 W + 700 W 600 W 450 W
76 W – 100 W + 600 W 500 W 400 W
101 W – 125 W + 500 W 400 W 300 W
126 W – 150 W + 400 W 300 W 200 W
151 W – 175 W + 300 W 200 W 100 W
176 W – 200 W + 200 W 100 W 50 W
201 W – 225 W + 100 W 50 W 0 W
226 W – 250 W + 0 W 0 W 0 W
A B C
B B B C BA
8 Connect the Caséta® Wireless dimmer
Tagged Wire
Ground(Green Wire)
Red
White *
* If available,
connect the
neutral wire from
the wallbox to the
white wire on the
dimmer. If neutral
is not available,
cap the white
wire with a wire
connector.
Neutral required
for: MLV loads,
LED drivers,
PHPM-PA,
PHPM-3F,
GRX-TVI.
Black
Blue
9 Mount the Caséta® Wireless dimmer
10 Attach the wallplate
‘snap’
11 Remove existing switch from wall at Location 2
3-Way Installation - Caséta® Wireless In-Wall PRO Dimmer with Pico® Remote Control
12 Tag and disconnect wires from the switch
Ground (Green / Bare Copper)
Different Color Screw
Important note:Removing side sections reduces the dimmer’s maximum wattage
rating. See the chart below for maximum wattage information.
When installing more than one Caséta® Wireless dimmer in the same wallbox, it is necessary to remove inner side sections prior to wiring. See image and chart below for more information.
Wallplate Adapter Wallplate
Location 1
Location 1
Location 2
Place tag - to identify wire on different color screw
Location 2
Location 1
12
Wireless®
13 Connect the wires
Ground
14 Attach the wallplate bracket and Pico® remote control
15 Attach the wallplate
‘snap’
16 Turn power on at circuit breaker
3-Way Installation - Caséta® Wireless In-Wall PRO Dimmer with Pico® Remote Control
Pairing the dimmer and Pico� remote control
17 Press and hold "Off" button on dimmer
05
10
15
6 sec.
UNTIL
HOLD
Status LEDs flash
18 Press and hold "Off" button on remote control
Lights flash three times
05
10
15
6 sec.
UNTIL
Wallplate Adapter Wallplate
Location 2
Tagged Wire
Location 2
Location 2
Location 2
Location 1
Repeat steps 17 and 18 to pair additional remote controls.
19 Pair additional remote controls
HOLD
3x
13
Wireless®
3-Way Installation - Caséta® Wireless In-Wall PRO Dimmer with Pico® Remote Control
Neutral
Pico®
Remote ControlLine / Hot
Traveler
Caséta®
Wireless Dimmer *
Ground
Load
LE
DELLFC
CF
AFC
INC
HAL
Schematic Diagram
Traveler
* Dimmer may be installed in either location.
Tagged WireTagged Wire
Black White (optional)
RedBlue
If available, connect the neutral wire
from the wallbox to the white wire on the
dimmer. If neutral is not available, cap the
white wire with a wire connector.
Neutral required for: MLV loads, LED
drivers, PHPM-PA, PHPM-3F, GRX-TVI.
14
Wireless®
1 Identify existing wiring
Two switches control the lights (3-way installation)
2 What you need for a 3-way installation
WARNING! Shock Hazard. May result in serious injury or death. Turn off power at circuit breaker before installing the unit.
4 Turn power off at circuit breaker
5 Remove existing switch from wall
6 Tag and disconnect wires from the existing switch
Place tag - to identify wire on different color screw
Different Color Screw
Ground(Green / Bare Copper)
3-Way Installation - Caséta® Wireless In-Wall Neutral Switch with Pico® Remote Control
Location 1 Location 2
- If one switch controls the lights (single-pole installation)
See quick-start guide that came with your switch
- If three or more switches control the lights
(multi-location installation) See page 46 for details
Important note:
3 Choose a location for your Caséta® Wireless switch
Choose which location you want the Caséta® Wireless switch installed in. This will be Location 1.
Location 1
Location 1
+
In-wall switchPD-6ANS
Pico® remote control PJ2-2B
+
Wallplate BracketPICO-WBX-ADAPT
+
Two Claro® Wallplates CW-1
Neutral connection required
15
Wireless®
7 Remove side sections (if necessary)
Do not remove outside side sections
on switches at the end of gang.
Each switch has inside
side sections removed.
Switch in the middle has
all side sections removed.
8 Connect the new Caséta® Wireless neutral switch
Tagged Wire
Ground(Green Wire)
9 Mount the Caséta® Wireless neutral switch
10 Attach the wallplate
‘snap’
11 Remove existing switch from wall at Location 2
3-Way Installation - Caséta® Wireless In-Wall Neutral Switch with Pico® Remote Control
12 Tag and disconnect wires from the existing switch
Ground (Green / Bare Copper)
Different Color Screw
When installing more than one Caséta® Wireless switch in the same wallbox, it is necessary to remove inner side sections prior to wiring. See image and chart below for more information.
Wallplate Adapter Wallplate
Location 1
Location 1
Location 2
Place tag - to identify wire on different color screw
Location 2
Location 1
Important note:Removing side sections reduces the switch’s maximum wattage
rating. See the chart below for maximum wattage information.
1 Neutral required.
2 The maximum lamp wattage is determined by the efficiency of the transformer, with 70% – 85% as typical. For actual transformer efficiency, contact either the fixture or transformer manufacturer. The total VA rating of the transformer(s) shall not exceed the VA rating of the in-wall switch.
3 The in-wall switch is UL� Listed for use with all magnetic and electronic fluorescent ballasts.
Red
Blue
Black
B B B C BA
PD-6ANS (120 V�
) 1
LED 6 A 6 A 5 A
Halogen / incandescent 720 W 720 W 600 W
Electronic Low-Voltage 720 VA 720 VA 600 VA
Magnetic Low-Voltage 2 720 VA 720 VA 600 VA
Fluorescent 3 6 A 6 A 5 A
General Purpose Fan 3.6 A 3.6 A 3.6 A
A B C
White
Neutral connection required
16
Wireless®
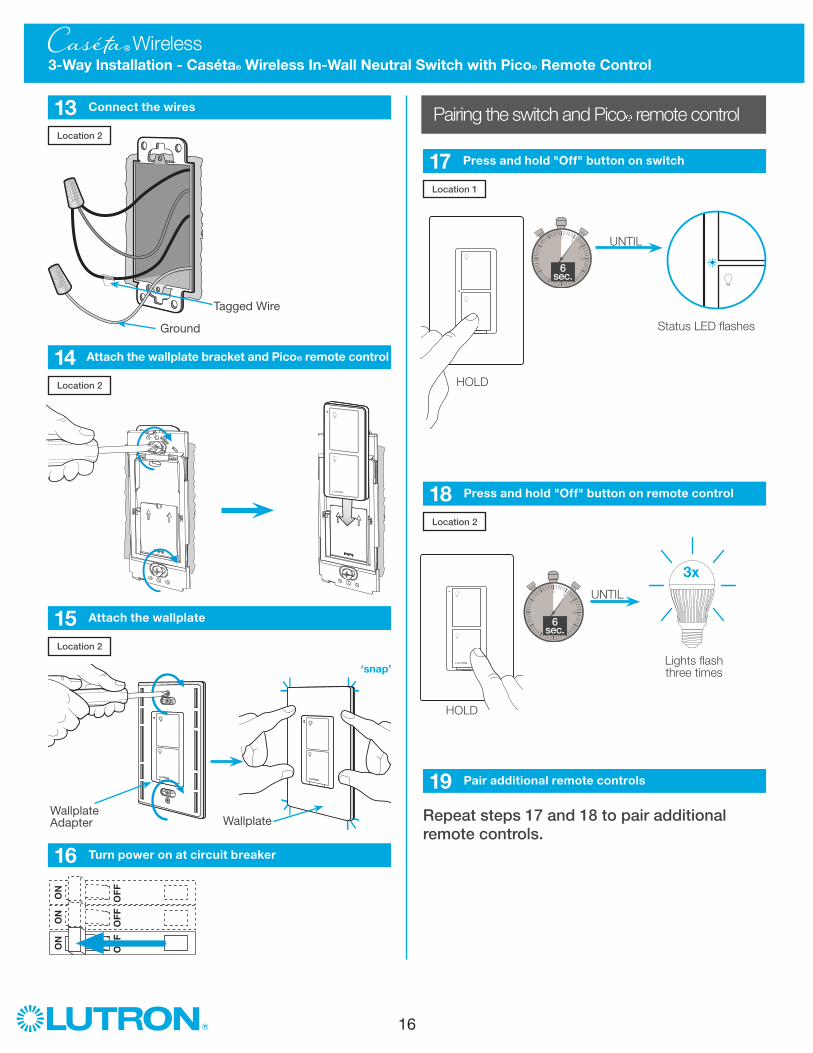
13 Connect the wires
Ground
14 Attach the wallplate bracket and Pico® remote control
15 Attach the wallplate
‘snap’
16 Turn power on at circuit breaker
3-Way Installation - Caséta® Wireless In-Wall Neutral Switch with Pico® Remote Control
Pairing the switch and Pico� remote control
17 Press and hold "Off" button on switch
05
10
15
6 sec.
UNTIL
HOLD
Status LED flashes
18 Press and hold "Off" button on remote control
Lights flash three times
05
10
15
6 sec.
UNTIL
Wallplate Adapter Wallplate
Location 2
Tagged Wire
Location 2
Location 2
Location 2
Location 1
Repeat steps 17 and 18 to pair additional remote controls.
19 Pair additional remote controls
HOLD
3x
17
Wireless®
3-Way Installation - Caséta® Wireless In-Wall Neutral Switch with Pico® Remote Control
Neutral
Pico®
Remote Control
Line / Hot
Traveler
Caséta®
Wireless Switch *
Ground (Green)
Load
LE
DEL
INC
HAL
Schematic Diagram
Traveler
* Switch may be installed in either location. Note: The red wire must be connected to the load and the black wire must be connected to Line/Hot. The product will not work if the wires
are reversed.
Tagged WireTagged Wire
Red
BlueBlack
White
18
Wireless®
1 Identify existing wiring
Two switches control the lights (3-way installation)
2 What you need for a 3-way installation
+
WARNING! Shock Hazard. May result in serious injury or death. Turn off power at circuit breaker before installing the unit.
4 Turn power off at circuit breaker
5 Remove existing switch from wall
6 Tag and disconnect wires from the existing switch
Place tag - to identify wire on different color screw
Different Color Screw
Access to Neutral is required
Ground(Green / Bare Copper)
3-Way Installation - Caséta® Wireless In-Wall ELV+ Dimmer with Pico® Remote Control
Location 1 Location 2
ELV+ dimmerPD-5NE
Pico® remote control with wall-mounting kitPJ2-WALL
- If one switch controls the lights (single-pole installation)
See quick-start guide that came with your dimmer
- If three or more switches control the lights
(multi-location installation) See page 51 for details
Important note:
3 Choose a location for your Caséta® Wireless dimmer
Choose which location you want the Caséta® Wireless dimmer installed in. This will be Location 1.
Location 1
Location 1
Claro® Wallplate CW-1
+
19
Wireless®
7 Remove side sections (if necessary)
Do not remove outside side sections
on dimmers at the end of gang.
Each dimmer has inside
side sections removed.
Dimmer in the middle
has all side sections
removed.
PD-5NE (120 V�
)1
Incandescent/Halogen Total Wattage
LED 250 W 250 W 250 W
Halogen / Incandescent 500 W 400 W 300 W
Electronics Low-Voltage 500 W 400 W 300 W
Magnetic Low Voltage 400 VA 400 VA 400 VA
A B C
B B B C BA
8 Connect the Caséta® Wireless dimmer
Tagged Wire
Black Wire
Red Wire
White Wire (Neutral Required)
Ground(Green Wire)
9 Mount the Caséta® Wireless dimmer
10 Attach the wallplate
‘snap’
11 Remove existing switch from wall at Location 2
3-Way Installation - Caséta® Wireless In-Wall ELV+ Dimmer with Pico® Remote Control
12 Tag and disconnect wires from the switch
Ground (Green / Bare Copper)
Different Color Screw
Important note:Removing side sections reduces the dimmer’s maximum wattage
rating. See the chart below for maximum wattage information.
When installing more than one Caséta® Wireless dimmer in the same wallbox, it is necessary to remove inner side sections prior to wiring. See image and chart below for more information.
Wallplate Adapter Wallplate
Location 1
Location 1
Location 2
Place tag - to identify wire on different color screw
Location 2
Location 1
20
Wireless®
13 Connect the wires
Ground
14 Attach the wallplate bracket and Pico® remote control
15 Attach the wallplate
‘snap’
16 Turn power on at circuit breaker
3-Way Installation - Caséta® Wireless In-Wall ELV+ Dimmer with Pico® Remote Control
Pairing the dimmer and Pico� remote control
17 Press and hold "Off" button on dimmer
05
10
15
6 sec.
UNTIL
HOLD
Status LEDs flash
18 Press and hold "Off" button on remote control
Lights flash three times
05
10
15
6 sec.
UNTIL
Wallplate Adapter Wallplate
Location 2
Tagged Wire
Location 2
Location 2
Location 2
Location 1
Repeat steps 17 and 18 to pair additional remote controls.
19 Pair additional remote controls
HOLD
3x
21
Wireless®
3-Way Installation - Caséta® Wireless In-Wall ELV+ Dimmer with Pico® Remote Control
Schematic Diagram
Black
White
Pico®
Remote Control
Caséta®
Wireless Dimmer
LFC
CF
AFC
INC
HAL
LE
DEL
Line / Hot
Neutral
Traveler
Traveler
Ground
Tagged Wire
Tagged Wire
Location 1 Location 2
Neutral
Pico®
Remote ControlLine / Hot
Traveler
Caséta®
Wireless Dimmer
Ground
Load
LE
DEL
INC
HAL
Traveler
Tagged WireTagged Wire
Black
Red
White
Location 1 Location 2
LFC
CF
AFC
22
Wireless®
1 Identify existing wiring
Two switches control the lights (3-way installation)
2 What you need for a 3-way installation
WARNING! Shock Hazard. May result in serious injury or death. Turn off power at circuit breaker before installing the unit.
4 Turn power off at circuit breaker
5 Remove existing switch from wall
6 Tag and disconnect wires from the existing switch
Place tag - to identify wire on different color screw
When installing more than one Caséta® Wireless switch in the same wallbox, it is necessary to remove inner side sections prior to wiring. See image and chart below for more information.
Wallplate Adapter Wallplate
Location 1
Location 1
Location 2
Add jumper wire as shownLocation 2
Location 1
Important note:Removing side sections reduces the switch’s maximum wattage
rating. See the chart below for maximum wattage information.
B B B C BA
PD-5WS-DV (120 V�
)
LED 5 A 4 A 3 A
Halogen/incandescent 600 W 450 W 350 W
Electronic Low-Voltage 600 W 450 W 350 W
Magnetic Low-Voltage 1 600 VA / 475 W 450 VA / 350 W 350 VA / 275 W
Fluorescent 2 5 A 4 A 3 A
General Purpose Fan 3 A 3 A 3 A
PD-5WS-DV (277 V�
)
LED 5 A 4 A 3 A
Halogen/incandescent 1350 W 1100 W 800 W
Electronic Low-Voltage 1350 W 1100 W 800 W
Magnetic Low-Voltage 1 1350 VA / 1075 W 1100 VA / 875 W 800 VA / 625 W
Fluorescent2 5 A 4 A 3 A
A B C
A B C
1 The maximum lamp wattage is determined by the efficiency of the transformer, with 70% – 85% as typical. For actual transformer efficiency, contact either the fixture or transformer manufacturer. The total VA rating of the transformer(s) shall not exceed the VA rating of the in-wall switch.
2 The in-wall switch is UL� Listed for use with all magnetic and electronic fluorescent ballasts.
Black
Blue
Black
Different Color Screw
Non-Black Wire
24
Wireless®
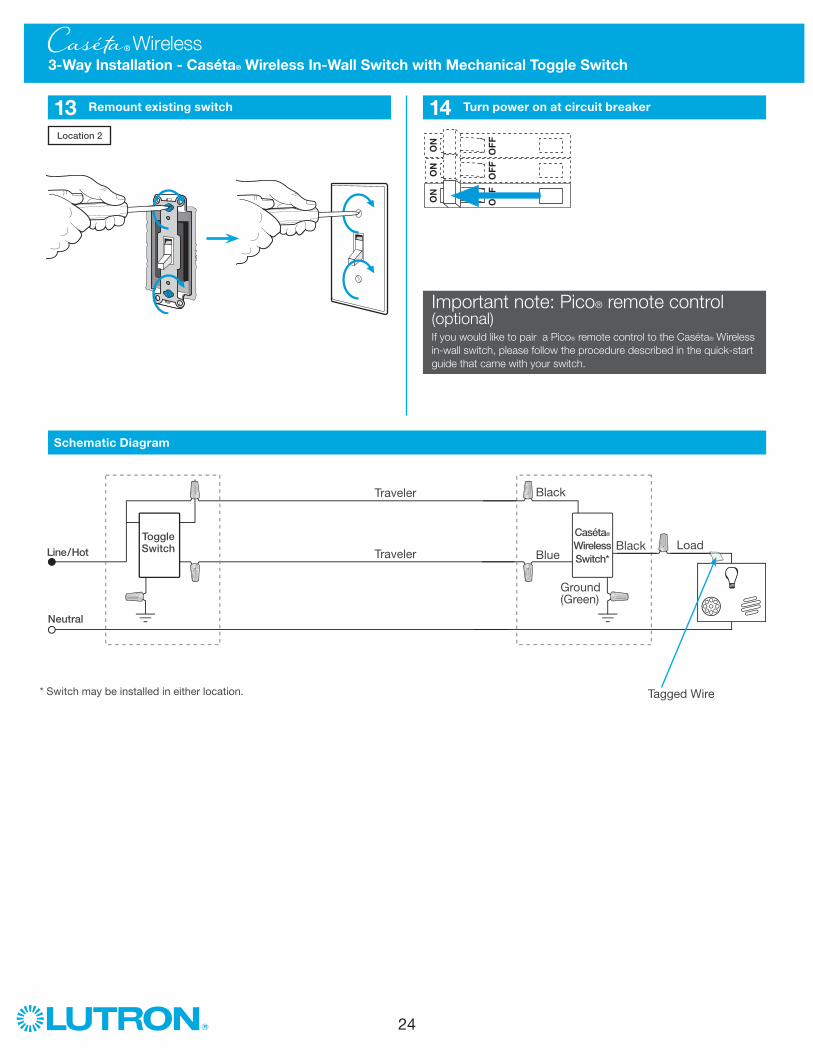
13 Remount existing switch 14 Turn power on at circuit breaker
* Switch may be installed in either location. Tagged Wire
Ground (Green)
BlackBlue
Black
Important note: Pico® remote control (optional)If you would like to pair a Pico® remote control to the Caséta® Wireless
in-wall switch, please follow the procedure described in the quick-start
guide that came with your switch.
25
Wireless®
1 Identify existing wiring
Two switches control the lights (3-way installation)
2 What you need for a 3-way installation
WARNING! Shock Hazard. May result in serious injury or death. Turn off power at circuit breaker before installing the unit.
4 Turn power off at circuit breaker
5 Remove existing switch from wall
6 Tag and disconnect wires from the existing switch
Place tag - to identify wire on different color screw
Different Color Screw
Ground(Green / Bare Copper)
3-Way Installation - Caséta® Wireless In-Wall PRO Dimmer with Mechanical Toggle Switch
Location 1 Location 2
- If one switch controls the lights (single-pole installation)
See quick-start guide that came with your switch
- If three or more switches control the lights
(multi-location installation) See page 36 for details
Important note:
3 Choose a location for your Caséta® Wireless dimmer
Choose which location you want the Caséta® Wireless dimmer installed in. This will be Location 1.
Location 1
Location 1
+
In-wall PRO dimmer PD-10NXD
Existing mechanical toggle switch
+
Claro® Wallplate CW-1
26
Wireless®
7 Remove side sections (if necessary)
Do not remove outside side sections
on switches at the end of gang.
Each dimmer has inside
side sections removed.
Dimmer in the middle has
all side sections removed.
8 Connect the new Caséta® Wireless dimmer
Tagged Wire
Note wire color tied to blue wire
Ground(Green Wire)
White *
9 Mount the Caséta® Wireless dimmer
10 Attach the wallplate
11 Remove existing toggle switch from wall at Location 2
3-Way Installation - Caséta® Wireless In-Wall PRO Dimmer with Mechanical Toggle Switch
12a Modify wiring for existing toggle switch
When installing more than one Caséta® Wireless dimmer in the same wallbox, it is necessary to remove inner side sections prior to wiring. See image and chart below for more information.
Location 1
Location 2
Location 1
Red
Blue
Black
‘snap’
Wallplate Adapter Wallplate
Location 1
* If available,
connect the
neutral wire from
the wallbox to the
white wire on the
dimmer. If neutral
is not available,
cap the white
wire with a wire
connector.
Neutral required
for: MLV loads,
LED drivers,
PHPM-PA,
PHPM-3F,
GRX-TVI.
Total Dimmable LED Wattage Incandescent/Halogen Total Wattage
0 W + 1000 W 800 W 600 W
1 W – 25 W + 900 W 750 W 550 W
26 W – 50 W + 800 W 700 W 500 W
51 W – 75 W + 700 W 600 W 450 W
76 W – 100 W + 600 W 500 W 400 W
101 W – 125 W + 500 W 400 W 300 W
126 W – 150 W + 400 W 300 W 200 W
151 W – 175 W + 300 W 200 W 100 W
176 W – 200 W + 200 W 100 W 50 W
201 W – 225 W + 100 W 50 W 0 W
226 W – 250 W + 0 W 0 W 0 W
A B C
B B B C BA
Important note:Removing side sections reduces the dimmer’s maximum wattage
rating. See the chart below for maximum wattage information.
Ground - Green / Bare Copper(keep connected to switch)
Different Color Screw / Tagged Wire (disconnect from switch)
Noted wire color from Step 8 (keep connected to switch)
Location 2Remaining Wire (disconnect from switch)
27
Wireless®
13 Remount existing switch
14 Turn power on at circuit breaker
3-Way Installation - Caséta® Wireless In-Wall PRO Dimmer with Mechanical Toggle Switch
Location 2
Neutral
Toggle SwitchLine / Hot
Traveler
Caséta®
Wireless
Dimmer*
Load
LE
DELLFC
CF
AFC
INC
HAL
Schematic Diagram
Traveler
* Dimmer may be installed in either location.
Tagged Wire
Ground (Green)
Red
WhiteBlue
Black
Important note: Pico® remote control (optional)If you would like to pair a Pico® remote control to the Caséta® Wireless
in-wall dimmer, please follow the procedure described in the quick-start
guide that came with your dimmer.
If available, connect the neutral wire
from the wallbox to the white wire on the
dimmer. If neutral is not available, cap the
white wire with a wire connector.
Neutral required for: MLV loads, LED
drivers, PHPM-PA, PHPM-3F, GRX-TVI.
12b Modify wiring for existing toggle switch
Location 2
Different Color Screw / Tagged Wire
Jumper wire (included in box)
Noted wire color from Step 8
Remaining wire
Ground (Green / Bare Copper)
28
Wireless®
1 Identify existing wiring
Two switches control the lights (3-way installation)
2 What you need for a 3-way installation
WARNING! Shock Hazard. May result in serious injury or death. Turn off power at circuit breaker before installing the unit.
4 Turn power off at circuit breaker
5 Remove existing switch from wall
6 Tag and disconnect wires from the existing switch
Place tag - to identify wire on different color screw
Ground - Green / Bare Copper(keep connected to switch)
Different Color Screw / Tagged Wire (disconnect from switch)
Noted wire color from Step 8 (keep connected to switch)
When installing more than one Caséta® Wireless switch in the same wallbox, it is necessary to remove inner side sections prior to wiring. See image and chart below for more information.
Location 2
Location 2
Location 1
Red
Blue
Black
Important note:Removing side sections reduces the switch’s maximum wattage
rating. See the chart below for maximum wattage information.
Neutral connection required
1 Neutral required.
2 The maximum lamp wattage is determined by the efficiency of the transformer, with 70% – 85% as typical. For actual transformer efficiency, contact either the fixture or transformer manufacturer. The total VA rating of the transformer(s) shall not exceed the VA rating of the in-wall switch.
3 The in-wall switch is UL� Listed for use with all magnetic and electronic fluorescent ballasts.
Important note: Pico® remote control (optional)If you would like to pair a Pico® remote control to the Caséta® Wireless
in-wall switch, please follow the procedure described in the quick-start
guide that came with your switch.
12b Modify wiring for existing toggle switch
Different Color Screw / Tagged Wire
Jumper wire (included in box)
Noted wire color from Step 8
Remaining wire
Ground (Green / Bare Copper)
* Switch may be installed in either location. Note: The red wire must be connected to the load and the black wire must be connected to Line/Hot. The product will not work if the wires