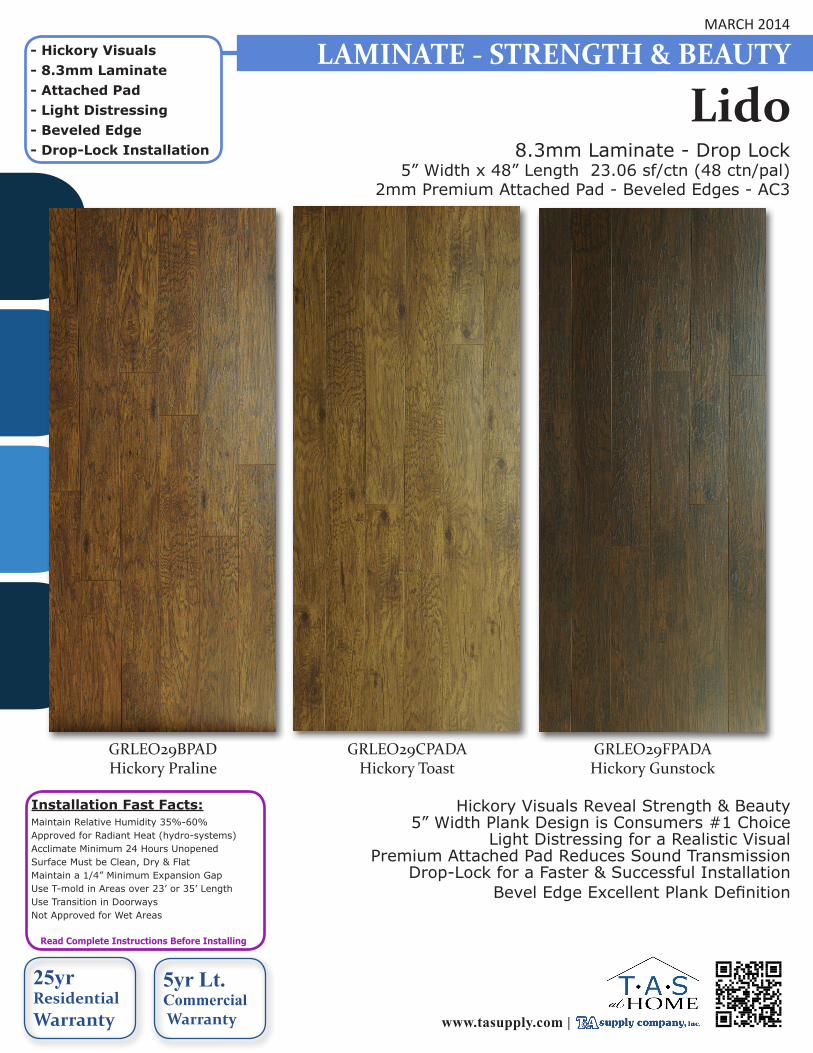
Light Distressing for a Realistic Visual Premium Attached Pad Reduces Sound Transmission
Drop-Lock for a Faster & Successful InstallationBevel Edge Excellent Plank Definition
8.3mm Laminate - Drop Lock 5” Width x 48” Length 23.06 sf/ctn (48 ctn/pal)
2mm Premium Attached Pad - Beveled Edges - AC3
Lido
MARCH 2014
Read Complete Instructions Before Installing
Installation Fast Facts:Maintain Relative Humidity 35%-60%Approved for Radiant Heat (hydro-systems)Acclimate Minimum 24 Hours Unopened Surface Must be Clean, Dry & FlatMaintain a 1/4” Minimum Expansion GapUse T-mold in Areas over 23’ or 35’ Length Use Transition in DoorwaysNot Approved for Wet Areas
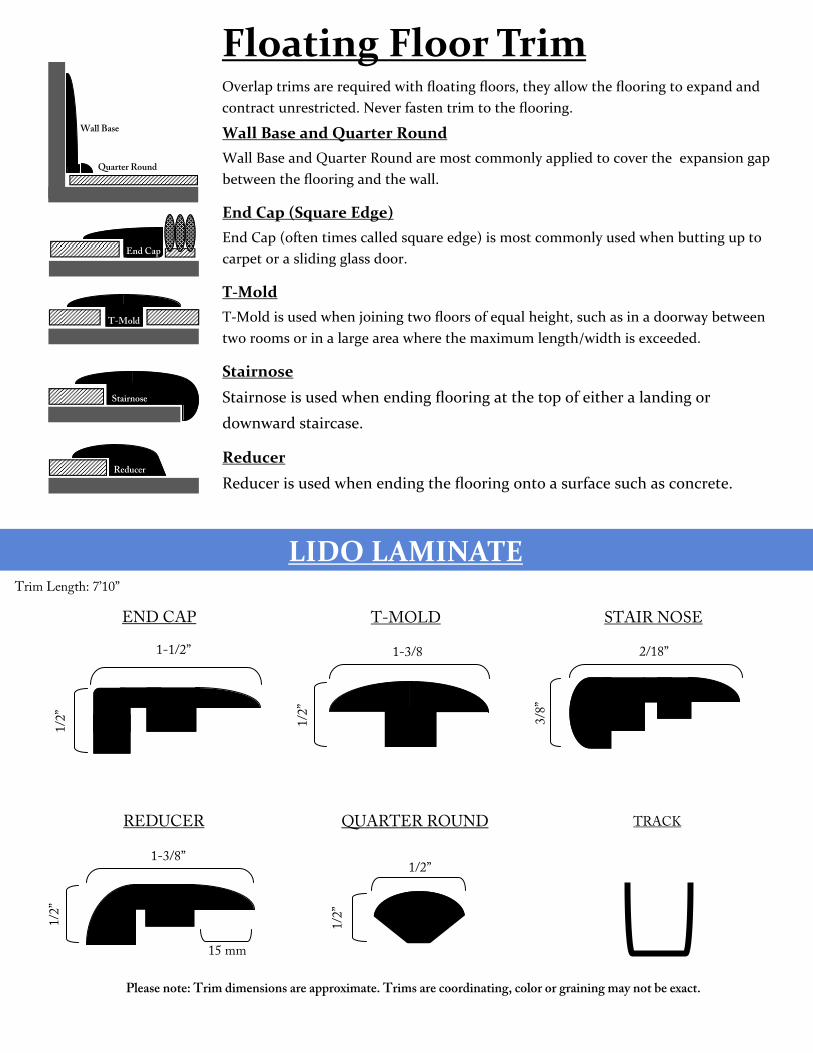
Floating Floor Trim Overlap trims are required with floating floors, they allow the flooring to expand and
contract unrestricted. Never fasten trim to the flooring.
Wall Base and Quarter Round
Wall Base and Quarter Round are most commonly applied to cover the expansion gap
between the flooring and the wall.
End Cap (Square Edge)
End Cap (often times called square edge) is most commonly used when butting up to
carpet or a sliding glass door.
T‐Mold
T‐Mold is used when joining two floors of equal height, such as in a doorway between
two rooms or in a large area where the maximum length/width is exceeded.
Stairnose
Stairnose is used when ending flooring at the top of either a landing or
downward staircase.
Reducer
Reducer is used when ending the flooring onto a surface such as concrete.
Wall Base
Quarter Round
End Cap
Stairnose
Reducer
T-Mold
LIDO LAMINATE
END CAP T-MOLD STAIR NOSE
REDUCER QUARTER ROUND
1/2
”
1-3/8”
15 mm
TRACK
1-3/8
1/2
”
1-1/2”
1/2
”
2/18”
3/8
”
1/2”
1/2
”
Please note: Trim dimensions are approximate. Trims are coordinating, color or graining may not be exact.
Trim Length: 7’10”
LIDOLaminate
GREENFIELD IMPORTS
WARRANTY
GREENFIELD COVERAGE:Greenfield warrants that for 25 years from the date of original purchase, and for 5 years from the date of origi-nal purchase under light commercial use*, this laminate floor:
• Will not stain from normal household consumable items such as food or drink.
• Will not wear through the decorative surface (scratches or reduction in gloss level is not considered wear).
• Will not fade as a result of direct sunlight or household lighting.
• Will be free of manufacturing defects.
* Light commercial is defined as enviornments which do not have heavy commercial traffic, where the flooring is not exposed to a heavy commercial maintenance sched-ule and where the interior temperature and humidity can be controlled and maintained. If there is any question as to whether the site is determined to be light commercial, contact your local Greenfield distributor.
MOISTURE WARRANTYGreenfield warrants the laminate flooring in its orginal manufactured state to the original purchaser from the date of purchase, under normal residential use and light commercial use, that the surface, when properly in-stalled, shall be resistant to damage from normal spills resulting in discoloration or structural decomposition. The Moisture Warranty does not cover flooding, stand-ing water, leaking pipes, household mechanical failures, appliance leaks or pet urine.
RADIANT HEAT (UNDERFLOOR) INSTALLATION:We warrant to you (the original purchaser) that Green-field Laminate may be installed over water-based radi-ant-heated subfloors, provided the surface temperature
of the system does not exceed 81 degrees Fahrenheit (27 degrees celsius), and the relative humidity levels are maintained between 35% and 55%.
IMPORTANT: Due to the speed of sudden tempera-ture changes, which has potential to negatively affect laminate flooring construction, it is not recommended to install Greenfield laminate with electrical radiant heat systems. This will not be covered by the manufacturer’s warranty. Radiant heating system using water are accept-able.
Before installating over newly constructed radiant heat systems, operate the system at maximum capacity to force any residual moisture from the cementitious top-ping of the radiant heat system. Then set the thermostat to a comfortable room temperature for the installation. It is recommended that the radiant heat be applied in a gradual manner after installing the laminate flooring. Refer to the radiant heat system’s manufacturer recom-mendations for additional guidance.
WHAT YOU SHOULD DO IF ANY OF THE ABOVE LISTED PROBLEMS OCCUR:
The original residential and commercial purchaser should notify their authorized Greenfield dealer from which the original purchase was made of any defect no later than 30 days after discovering the defect, but within the same time period of this limited warranty. The origi-nal residential or commercial purchase must present to that Authorized Greenfield dealer the following items for a limited warranty claim to be considered:
• A valid proof of purchase in the form of sales receipt which establishes proof of purchase;
• A detailed description of the problem and/or a photo-graph/sample that clearly shows the warranty problem.
25 YEAR RESIDENTIAL WARRANTY & 5 YEAR LIGHT COMMERCIAL WARRANTY
Page 1
WHAT GREENFIELD WILL DO:If Greenfield honors a claim under this limited warranty, it will authorize repair or replacement at the pro-rated percentage cost of the material. This percentage is deter-mined by the number of years remaining on the warranty and the length of the warranty. For example; if the claim is made 5 years after purchase on a Greenfield product warranted for 25 years, then Greenfield will pay 80% (20/25th) of the material.
If professionally installed by a certified laminate installer, Greenfield will pay the reasonable labor costs to perform the replacement or repair during the first 3 years from the date of the original purchase. No labor is included for claims later than 36 months after original purchase.
LIMITATIONS AND EXCLUSIONS:If the original design/color/style is no longer available, Greenfield reserves the right to substitute another Green-field design or similar structure and value from which the consumer may select.
This warranty does not apply to any products or products designated or sold as “B” grade, cabin grades, seconds, closeouts or non-standard items. This warranty does not apply to any products designated or sold “As Is”.
This limited warranty is valid only in North America, is not transferable and extends only to the original purchaser of flooring installed in the location for which was original-ly installed. The affected area must be visible and cover an area greater than one square inch. The flooring must be installed in accordance with Greenfield recommended installation instructions. This limited warranty will not ap-ply to damage arising from any of the following:
• Accidents, abuse or misuse;
• Extreme heat or cold;
• Scratching, impact or cutting;
• Improper workmanship or installation not in accordance with Greenfield installation instructions;
• Improper maintenance;
• Improper fabrication;
• Freight damange;
• Damages by acts of God;
• Water damage from excessive moisture in a concrete slab, hydrostatic pressure, flooding caused by ice makers, refrigerators, sinks, dishwashers, leaking pipes, flood-ing, standing water, spills when not promptly removed; household mechanical failures, damage caused by water underneath the flooring, including damage from subfloor
hydrostatic pressure of other conditions that result in wa-ter being below the flooring or natural disasters;
• Planks coming apart at the seams because they have been engaged/disengaged more than three times;
• Installation cost of flooring that contains any manufac-turing defect is not covered by this warranty.
Greenfield excludes and will not pay incidental or con-squential damages under this warranty. By this we mean any loss, expense, or damages other than to the flooring itself that may result from a defect in the flooring. No implied warranties extend beyond the term of this written warranty.
Greenfield assumes no liability for incidental or conse-quential damages. Some states do not allow the exclusion of limitation for incidental or consequential damages. In that case, these exclusions may not apply to you. This warranty gives you specific legal rights, and you may also have other rights that vary from state to state. Greenfield reserves the right to have a representative inspect the floor and remove samples for additonal evaluation if needed. Greenfield may repair, replace, or refinish any defective product at its sole discretion. As the sole remedy provided by this warranty, any attempt to repair, replace, or refin-ish prior to Greenfield’s optional inspection will void this warranty. No installer, retailer, agent or employee of Greenfield has the authority to increase or alter the obliga-tion or limitation of this warranty.
Please contact us if you have any quesitons. Customer Service: 1-800-562-2857.
Page 2
INSTALLATION INSTRUCTIONS
LIDOGREENFIELD IMPORTS
Laminate
Always check panels for defects such as chips and color or sheen differences under good light conditions. Also check that the channel is clean and free of debris.
For best color match when using panels from two or more pack-ages, check to be sure all the patterns are the same. Be sure to use laminate out of more than one box.
Your laminate flooring MUST be allowed to acclimate to the environment of the installation area. Leave the closed packages in a horizontal position in the room for 48 hours prior to instal-lation. Preferable temperature should be approximately 17-23° C (62-73° F) with relative humidity of 45-60 percent. Humidity should never be allowed to drop below 30% as this may cause gapping.
If existing baseboard moldings are difficult to remove, they may be left in place. Quarter round molding is all that is needed to cover the expansion space between flooring and baseboard.
TOOLS AND SUPPLIES REQUIRED ARE:• Foam underlay, pressure sensitive polypropylene adhe-sive tape such as Tuck Tape or equivalent, spaces, ham-mer, utility knife, pencil, tape measure, ruler.
• If installing over a crawlspace or on a concrete floor, you must also install a 4 mil (or thicker) polyethylene barrier under your foam underlay or use a convenient 2-in-1 foam underlay that has a vapor barrier built-in. When installing 2-in-1 foam underlay, butt seams and then completely seal seams using Tuck Tape.
SUITABLE TYPES OF SUBFLOORS & FLOOR PREPERATION
• The underfloor or subfloor must be thoroughly even, dry, clean and solid. Carpet staples or glue residue must be removed and floor must be clean to ensure proper instal-lation.
• To check for evenness, hammer a nail into the center of the floor. Tie a string to the nail and push the knot against the floor. Pull the string tight to the farthest corner of the room and examine the floor at eye level for any gaps
between the string and floor. Move the string around the perimeter of the room noting any gaps larger than 4.8mm (3/16”). Any floor unevenness of more than 4.8mm (3/16”) per 3m (10 ft) must be sanded down or filled in with an appropriate filler.
• Floors must be carefully checked for moisture problems. Any moisture problems need to be solved before instal-lation. New concrete needs to cure for at least 60 days before installation.
THIS PRODUCT IS NOT SUITABLE FOR DAMP ROOMS SUCH AS BATHROOMS, SAUNAS, ROOMS WITH DAMP CONCRETE, ROOMS WITH FLOOR
DRAINS OR ROOMS THAT COULD POTENTIALLY FLOOD.
BASIC INSTALLATION• For installation on concrete floors or any floors over a crawl space, a vapor barrier MUST be laid down first. Use 4 mil poly. Run the poly 5cm (2”) up walls and overlap seams 45cm (18”). Tape seams together. Diagram 1.
• All flooring installation requires foam underlay. Run the foam underlay in the same direction as the laminate panels. Underlay should be butted side by side with no overlap. Tape seams together. Diagram 2.
**Please note: Additional foam is not required if foam is already attached to laminate.**
• You will need to remove the tongue, on the long side of the panels that face the wall, from the appropriate amount of panels for your first row. This is to ensure that the decorative surface of the laminate is well under the finish trim when installed. Use a utility knife to score through the tongue several times until it easily snaps off. Diagram 3.
• Start in a corner by placing the first panel with its trimmed side facing the wall. Use spacers along each wall to maintain an expansion space of 8-12mm (5/16”-3/8”) between the wall and the flooring. Diagram 4.
PLEASE READ ALL INSTRUCTIONS CAREFULLY, BEFORE YOU BEGIN INSTALLATION. IMPROPER INSTALLATION WILL VOID WARRANTY.
Page 1
Revised 7/22/13
REMEMEBER THAT THIS PRODUCT IS PRIMARILY WOOD AND NEEDS ROOM TO EXPAND AND CON-TRACT. AT NO POINT SHOULD YOU ATTACH THE
FLOOR TO ANY SURFACE.
• To attach your second panel, lower and lock the end tongue of the second panel into the end groove of the first panel. Line up edges carefully. The panels should be flat to the floor. Diagram 5.
• Continue connecting the first row until you reach the last full panel. Fit the last panel by rotating 180° degrees with the pattern side upward, place beside row, mark and then saw off excess. Attach as described above. Diagram 6.
• When using a handsaw cut on the decorative surface. If you are using a jig or circular saw, cut with the decorative side down to avoid chipping.
• Begin the next row with the cut off piece from the previous row to stagger the pattern. Pieces should be a minimum of 20cm (8”) long and joint offset should be at least 40cm (16”). Diagram 7.
• To start your second row, tilt and push the side tongue of the panel into the side groove of the very first panel at about 30o de-grees. When lowered, the plank will click into place. Diagram 8.
• Attach the second panel of the new row first on the long side. Tilt and push this panel as close as possible to the previous row at 30° degress. Make sure edges are lined up. Lower panel to the floor, locking the end tongue into the end groove of the first panel. Continue laying remaining panels in this manner. Diagram 9.
• To fit the last row, lay a panel on top of the previous row. With the tongue to the wall, lay another panel upside down on the one to be measured and use it as a ruler. Don’t forget to allow room for spacers. Cut the panel and attach into position. Diagram 10.
• Door frames and heating vents also require expansion room. First cut the panel to the correct length. Then place the cut panel next to its actual position and use a ruler to measure the areas to be cut out and mark them. Cut out the marked points allowing the necessary expansion distance on each side. Diagram 11.
• You can trim door frames by turning a panel upside down and using a handsaw to cut away the necessary height so that panels slide easily under the frames. Diagram 12.
FINISHING MOLDING• Reducer molding is used to finish flooring when the adjoining surface is lower than the laminate flooring or when the flooring meets carpet. Position the U track 7mm (1.4”) between each edge of the flooring. Screw, nail or glue down the track directly to the subfloor and then insert the reducing strip into the track.
• T-molding is used to finish flooring when two level surfaces meet in doorways or for expansion joints. Install same as above. If your room is more than 7m (23’) wide you will need to allow for an expansion joint.
• Landing molding is used to finish flooring on landings or stair edges. Moldings need to be glued and screwed down to the subfloor for safety and stability. Color fill should be used to cover counter sunk screws.
• To finish the perimeter of the room install quarter round mold-ing using finishing nails. Quarter round molding is nailed directly into the baseboard.
Page 2
MAINTENANCE AND CLEANING• Preferable temperature should be approximately 17-23° C (62-73° F) with relative humidity of 45-60 percent. Humidity should never be allowed to drop below 30% as this may cause gapping.
• Do not use a wet spray micro fiber mop. Never use wax, polish or scouring agents as they may dull or distort the finish.
• You can use an alcohol based cleaner specially formulated for laminate flooring. Spray a small amount onto a dry cloth or mop to clean up any dirt and footprints but avoid using excessive moisture. Too much moisture can cause warping which is not covered under warranty. All spills should be cleaned up immedi-ately.
• It’s a good idea to save a few boards in case of accidental dam-age. Boards can be replaced or repaired by flooring professionals.
Please contact us if you have any quesitons. Customer Service: 1-800-562-2857.
Page 3
INSTALLATION METHODDrop Lock2mm Attached Pad
PROFILEBevel Edge
FINISHLight Distressing
PACKAGING23.06 sf/ctn | 48 ctns/plt
DIMENSIONS8.3mm t x 5” w x 48” l
ITEM #GRLEO29BPAD
COLORHickory Praline
Read Complete Instructions Before Installing
www.tasupply.com |
25yrResidential Warranty
Installation Fast Facts:Maintain Relative Humidity 35%-60%Approved for Radiant Heat (hydro-systems)Acclimate Minimum 24 Hours Unopened Surface Must be Clean, Dry & FlatMaintain a 1/4” Minimum Expansion GapUse T-mold in Areas over 23’ or 35’ Length Use Transition in DoorwaysNot Approved for Wet Areas
Light Distressing for a Realistic Visual Premium Attached Pad Reduces Sound Transmission
Drop-Lock for a Faster & Successful InstallationBevel Edge - Excellent Plank Definition
INSTALLATION METHODDrop Lock2mm Attached Pad
PROFILEBevel Edge
FINISHLight Distressing
PACKAGING23.06 sf/ctn | 48 ctns/plt
DIMENSIONS8.3mm t x 5” w x 48” l
ITEM #GRLEO29CPADA
COLORHickory Toast
Read Complete Instructions Before Installing
www.tasupply.com |
Installation Fast Facts:Maintain Relative Humidity 35%-60%Approved for Radiant Heat (hydro-systems)Acclimate Minimum 24 Hours Unopened Surface Must be Clean, Dry & FlatMaintain a 1/4” Minimum Expansion GapUse T-mold in Areas over 23’ or 35’ Length Use Transition in DoorwaysNot Approved for Wet Areas
Light Distressing for a Realistic Visual Premium Attached Pad Reduces Sound Transmission
Drop-Lock for a Faster & Successful InstallationBevel Edge - Excellent Plank Definition
INSTALLATION METHODDrop Lock2mm Attached Pad
PROFILEBevel Edge
FINISHLight Distressing
PACKAGING23.06 sf/ctn | 48 ctns/plt
DIMENSIONS8.3mm t x 5” w x 48” l
ITEM #GRLEO29FPADA
COLORHickory Gunstock
Read Complete Instructions Before Installing
www.tasupply.com |
Installation Fast Facts:Maintain Relative Humidity 35%-60%Approved for Radiant Heat (hydro-systems)Acclimate Minimum 24 Hours Unopened Surface Must be Clean, Dry & FlatMaintain a 1/4” Minimum Expansion GapUse T-mold in Areas over 23’ or 35’ Length Use Transition in DoorwaysNot Approved for Wet Areas
Light Distressing for a Realistic Visual Premium Attached Pad Reduces Sound Transmission
Drop-Lock for a Faster & Successful InstallationBevel Edge - Excellent Plank Definition
Installation Fast Facts:Maintain Relative Humidity 35%-60%Approved for Radiant Heat (hydro-systems)Acclimate Minimum 24 Hours Unopened Surface Must be Clean, Dry & FlatMaintain a 1/4” Minimum Expansion GapUse T-mold in Areas over 23’ or 35’ Length Use Transition in DoorwaysNot Approved for Wet Areas