WOOCOMMERCE MULTI LOCATIONS INVENTORY MANAGEMENT -: GENERAL:- WooCommerce Multi Locations Inventory Management Plugin provides an option to manage Product Stock from Multiple Locations for your WooCommerce Store. Customers can check the product’s availability based on the location of a product. Plugin availability detects the nearest product location and availability based on the shipping address. -: KEY FEATURES:- ✔ Manage Products stock across multiple locations, Warehouses, or Stores. ✔ Allow visitors to choose preferred location on Product page ✔ Allow visitors to choose preferred location globally using shortcode ✔ Option to Automatically choose the nearest product location based on the user's address. (Requires Google Map API key ) ✔ Displays product Quantity or Availability based on the location ✔ Supports Multi Locations for Simple as well as Variable product type ✔ Adds each location’s Inventory to your default Woocommerce inventory ✔ Option to assign shipping zones to locations ✔ Visitors can see the selected warehouse / location on the checkout and cart page. ✔ Option to add Location-wise Price ✔ Multi-Location Shipping Support. ✔ Compatible with WooCommerce Shipping Pro for UPS & WooCommerce Shipping Pro for FedEx ✔ Show Distance to Selected Location in Kilometer or Miles
Transcript
WOOCOMMERCE MULTI LOCATIONS INVENTORY MANAGEMENT
-: GENERAL:-
WooCommerce Multi Locations Inventory Management Plugin provides an optionto manage Product Stock from Multiple Locations for your WooCommerce Store.
Customers can check the product’s availability based on the location of aproduct. Plugin availability detects the nearest product location and availabilitybased on the shipping address.
-: KEY FEATURES:-
✔ Manage Products stock across multiple locations, Warehouses, or Stores.
✔ Allow visitors to choose preferred location on Product page
✔ Allow visitors to choose preferred location globally using shortcode
✔ Option to Automatically choose the nearest product location based on theuser's address. (Requires Google Map API key )
✔ Displays product Quantity or Availability based on the location
✔ Supports Multi Locations for Simple as well as Variable product type
✔ Adds each location’s Inventory to your default Woocommerce inventory
✔ Option to assign shipping zones to locations
✔ Visitors can see the selected warehouse / location on the checkout and cartpage.
✔ Option to add Location-wise Price
✔ Multi-Location Shipping Support.
✔ Compatible with WooCommerce Shipping Pro for UPS & WooCommerceShipping Pro for FedEx
✔ Show Distance to Selected Location in Kilometer or Miles
✔ Add Unlimited Warehouse or Locations easily without any extra cost
✔ No Monthly / Yearly Fees.
-: REQUIREMENT:-
1. WordPress 4.6 or higher2. WooCommerce 3.6 or higher3. WordPress Theme
-: SUPPORT:-
All of our items come with support, and we have an advanced ticket systemto handle your requests. Our plugins come with 6-month free support. Wealso provide Paid support for code customizations or third-party plugins. Ifyou need help with anything other than minor customizations of your plugin,we suggest enlisting the help of a developer.
How To Receive Free SupportStep 1 – Refer to this link: https://techspawn.com/connect-with-techspawn/Step 2 – Provide all required information: Product Name, Purchase Code,and URL to your page to verify your license.Step 3 – Provide more details about the problem, describe, screenshot …Step 4 – Submit a ticket and wait for our response (within 14-24 hours)
1. Purchase the multi inventory plugin from codecanyon(link:https://codecanyon.net/item/woocommerce-multi-locations-a-management/28949586).2. After purchasing the plugin, download the zip folder of multi inventoryplugin.3. Save the multi inventory plugin zip folder on your device.
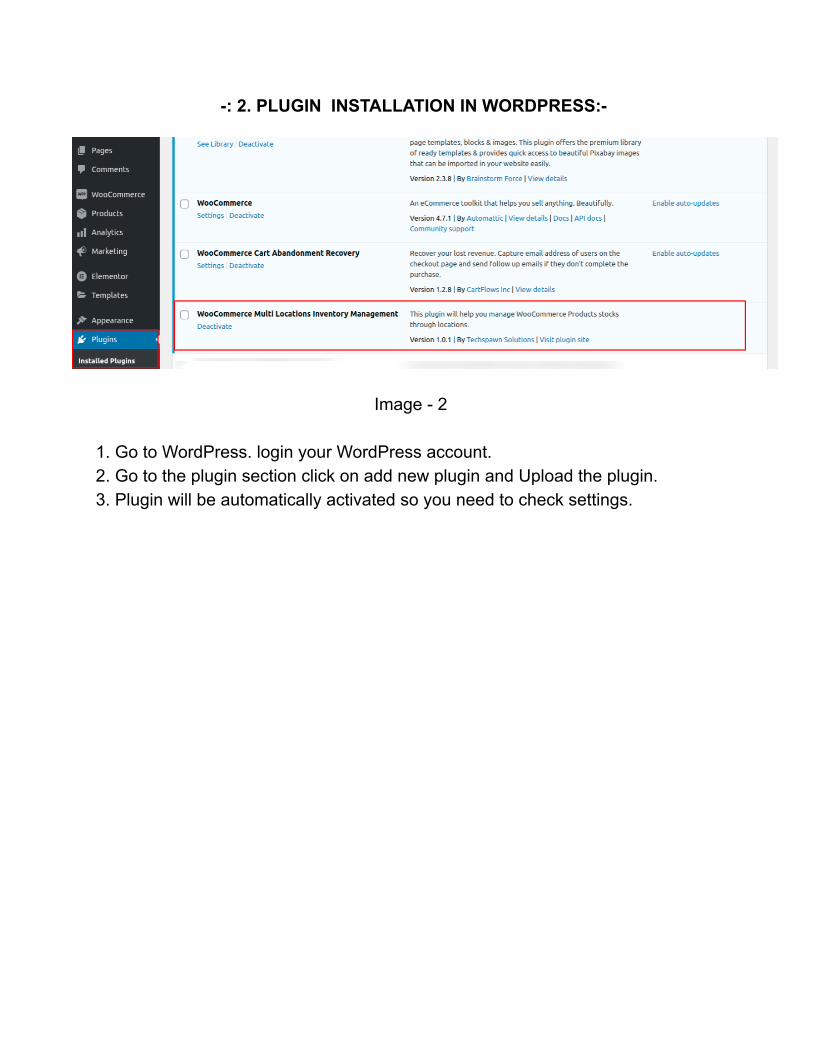
-: 2. PLUGIN INSTALLATION IN WORDPRESS:-
Image - 2
1. Go to WordPress. login your WordPress account.2. Go to the plugin section click on add new plugin and Upload the plugin.3. Plugin will be automatically activated so you need to check settings.
3. PLUGIN FUNCTIONALITY:- 3.1 GENERAL SETTING DETAILS EXPLAINEDSTEP BY STEP
Image - 3
This is a multi inventory general setting page, we will each setting one by one.
1. Nearby location finder:- If you are using geolocation functionality via google MapsAPI key then enable this nearby location finder function.(Note: You need first google map API key then, it will work)
2. Enter your API key:- Enter your generated google Maps API key over here.Requires the activation of Places API, Distance Matrix API, Geocoding API, MapsJavaScript API. In the given input inbox. We need the above API enabled and enterAPI.
3. Regular and sale price for each location:- When we enable this function,location wise we can set regular price and sales price on the product page.(Please Refer Image – 4)
Image - 4
4. Hide location dropdown on the product page:- When this function isenabled you can not see the Location drop-down on the website product page.If this function is disabled you can see the Location drop-down on the websiteproduct page. It will look like this image given below.
(Please Refer Image – 5)
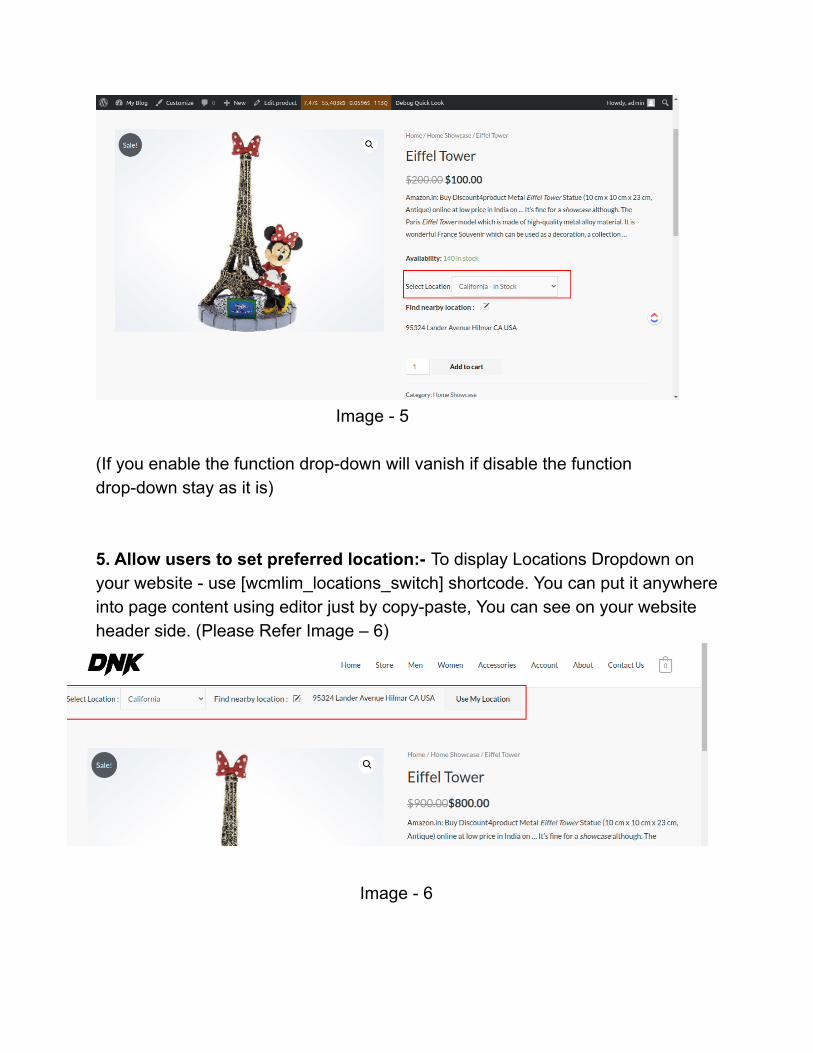
Image - 5
(If you enable the function drop-down will vanish if disable the functiondrop-down stay as it is)
5. Allow users to set preferred location:- To display Locations Dropdown onyour website - use [wcmlim_locations_switch] shortcode. You can put it anywhereinto page content using editor just by copy-paste, You can see on your websiteheader side. (Please Refer Image – 6)
Image - 6
6. Set shipping zones to each location:- If the function is enabled you canassign shipping zones to the location. We need to just create a shipping zoneparticular area wise then we can assign it to our Location. So the rate will bedisplayed according to the shipping zone. (Please Refer Image- 7,8,9,10)
Image - 7 (Shipping zone created area wise)
Image - 8
Image – 9 (Location-wise you can assign shipping zone, in Location edit section)
Image – 10 (we can see the shipping rates on the cart page.)
7. Show locations name and stock on shop page:- 1. If this function isenabled, you can see stock and location on the store page below that product.2. If we keep disable we can not see anything below that product.(Please Refer The Image – 11)
Image - 11 (Stock and Location names display on the shop page)
8. Enable use my location:- One pop-up will come when we click on use mylocation on our website in the header section If you enable this function.This will track your current location.
9. Restrict customer/admin users to specific:- When you enable this option,you can show that the user only assigned location products,s, on the website.(Process: Enable this option, then go to the user then check the locationdrop-down, then select the location as per your requirement for the user. Whenthe user login to the wordpress, user can see only the allocated location productson the website.)(Refer Image -12)
Image - 12
10. Set Location Cookie Time = this feature extended cookies time as per userrequirement. for hold, long time data of locations for better user experience onyour store extend cookies time, so the user doesn’t miss the last selectedlocation in the long run
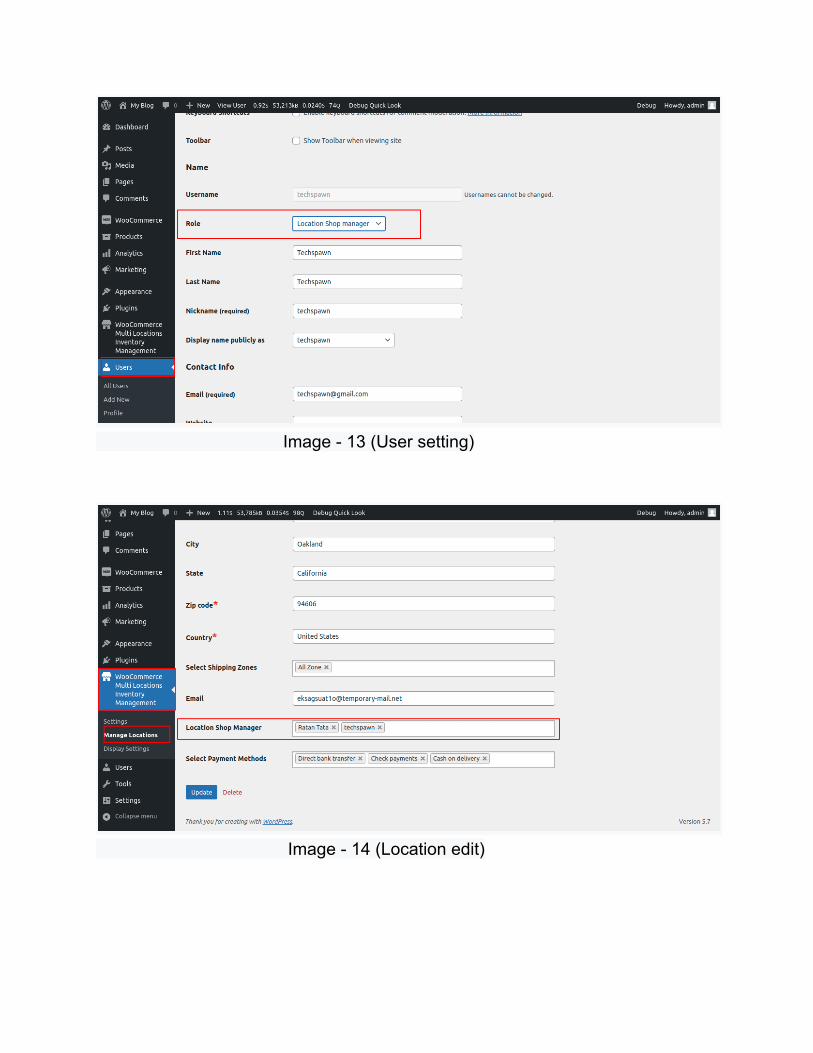
11. Location Shop Manager = This function allows you to create and assignlocation shop managers to specific locations. Only orders from assignedlocations are visible to the location shop manager on the WooCommerce Orderpage. On the product edit page, you can only change the stock of assignedlocations.(Process: Enable this option location shop manager, then create a user assignthem location shop manager role save the user. Go to manage locationsub-menu then edit the warehouse and bottom side you will see option locationshop manager drop-down, as per your requirement select location shop managerthen location shop manager can log in to wordpress then they can see allocatedwarehouse data.) (Refer to the image - 13,14)
Image - 13 (User setting)
Image - 14 (Location edit)
12. Set payment methods to the location:- The setting to apply paymentmethods for locations. Each location can have various availed payment methods(From woocommerce available payment methods). Users can set paymentmethods to location which will be used for placing an order. if ordering productsfrom different locations the mutual payment methods from the selectedproduct's location will be shown.
Eg. Location California’s location has STRIPE and PAYPAL payment methods.Florida has a STRIPE Payment method, in this case, Stripe Gateway will beavailable to place an order
13. Allow adding items from a similar location:- Setting has been added tocontrol order from different locations. If this setting is enabled, users could notadd items from a different location than the cart item location.
Eg - Cart contains an item from California then the only product from theCalifornia location can be added to the cart.
3.2 MANAGE LOCATION EXPLAINED IN DETAIL STEP BY STEP
Image -15
1.Name:- Give the name to the warehouse.
2.Slug:- Enter the slug.
3. Parent Item:- Select the parent location from the drop-down.
(Explanation of sublocation feature -> When you create one parent location,under parent location you can create sub-location.How it will work -> When we create parent location and sub-location, then thisparent location and Sublocation will display in product edit section, then you needto add stock quantity in sub-location then automatically sub-location stockquantity addition will reflect in parent location, but on the website, customer cannot see this sub-location this feature has specially developed for admin.For example -> I have created California as a parent location and twosub-location under California, Los angeles and san Diego. Then I will go to theproduct edit section and add stock quantity in Los Angeles as 4 and in san,Diego as 3 additions of both sublocation stock quantities will reflect in Californiaas 7, But on the website, customers can see only California location andCalifornia stock quantity total 7. They can not see this sublocation )
4. Enter Address:- Enter the address and the address will automatically fetchfrom Google Maps. If you want to add an address manually you can add justremove auto-fill data.
5. Street Address:- Enter street address.
6. Route:- Route automatically filled by google Maps when you select theaddress from address google map dropdown. If you want to enter manually youcan remove auto-fill data and enter your route.
7. City:- City automatically filled by google Maps when you select the addressfrom address google map dropdown. If you want to enter manually you canremove auto-fill data and enter your city.
8. State:- State automatically filled by google Maps when you select the addressfrom address google map dropdown. If you want to enter manually you canremove auto-fill data and enter your state.
9. Zip Code:- zip code automatically filled by google Maps when you select theaddress from address google map dropdown. If you want to enter manually youcan remove auto-fill data and enter your zip code.
10. Country:- Country automatically filled by google Maps when you select theaddress from address google map dropdown. If you want to enter manually youcan remove auto-fill data and enter your Country.
11. Email:- Enter the email address.
12. Location Shop Manager:- Select the shop manager from the drop-down.(Note: All created location shop managers will display here.)
13. Select Payment method:- Select the payment method from the drop-down.(Noted: All available payment methods from your wordpress will reflect in thisdropdown. )
3.3 DISPLAY SETTING EXPLAINED IN DETAIL STEP BY STEP
Image - 16
1. Show Location Distance:- Select one option, after this selection on thewebsite distance will display miles or kilometers or none of the above.
2. Exclude Location from Frontend:- If you want to hide any location fromthe website you need just select here location name from the drop-down.(Example:- Suppose I select here California location, then I can not seeCalifornia location on the website.)
3.5 HOW TO USE THE REST API
Please enable the Legacy API.
To enable the legacy REST API within WooCommerce, go to WooCommerce >Settings > Advanced > Legacy API and tick the Enable the legacy REST APIcheckbox.
Note: legacy REST API was found at WooCommerce > Settings > API prior toWooCommerce 3.4.
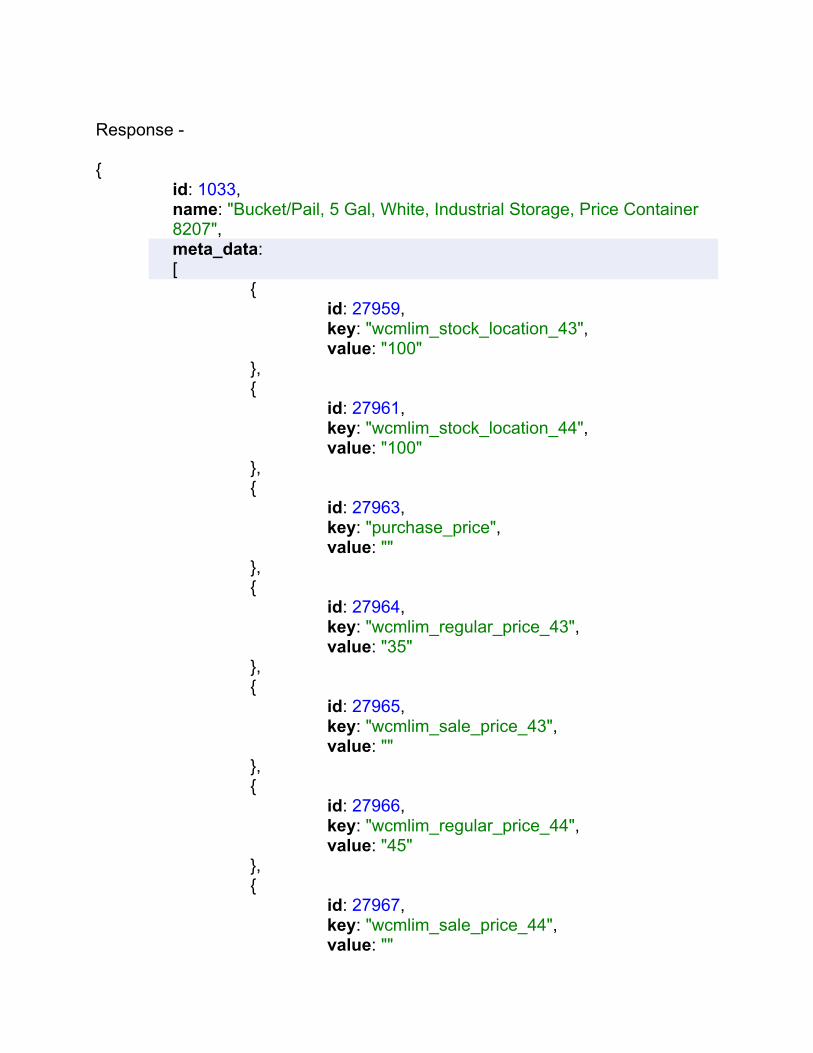
REST API endpoints (both accept GET and PUT requests):
/wp-json/wc/v3/products/id
/wp-json/wc/v3/products/id/variations/id (first ID is for parent product, the second one forthe variation ID)