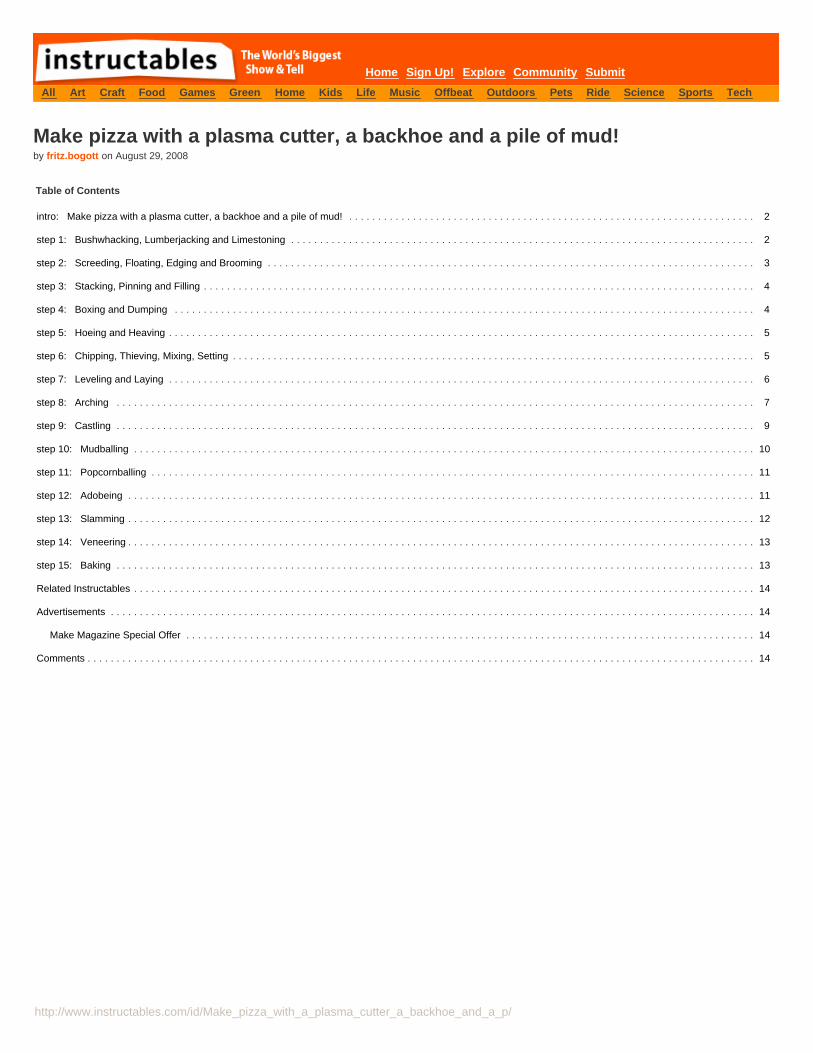
intro: Make pizza with a plasma cutter, a backhoe and a pile of mud!After several years of baking in North House Folk School's wood-fired brick oven, I decided to build an oven of my own. I went a little crazy with extra features (slabfoundation, arches, ash dump, chimney, doors, wood storage) and decorations (limestone around the foundation), but you can make a very usable version in a weekendwith salvaged materials and a couple of friends.
The place to start is Kiko Denzer's "Build Your Own Earth Oven".
I also made extensive use of Daniel Wing and Alan Scott's "The Bread Builders", which is a great resource even if you're baking bread in a regular electric oven.
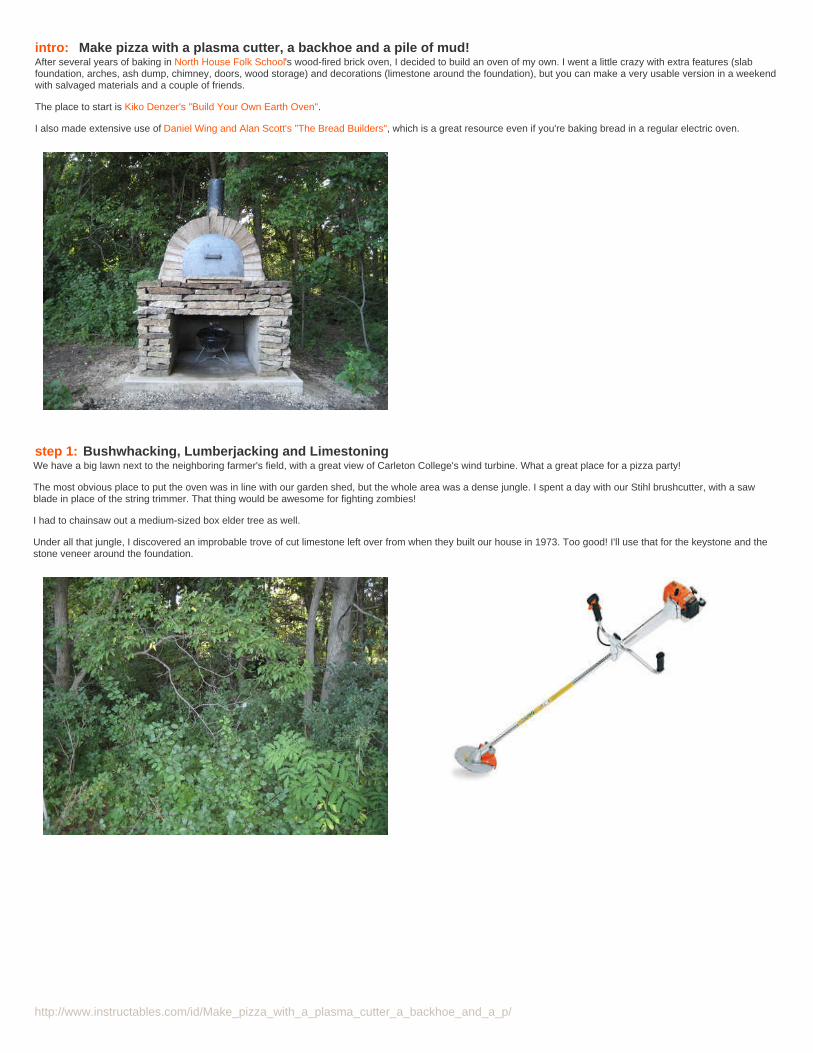
step 1: Bushwhacking, Lumberjacking and LimestoningWe have a big lawn next to the neighboring farmer's field, with a great view of Carleton College's wind turbine. What a great place for a pizza party!
The most obvious place to put the oven was in line with our garden shed, but the whole area was a dense jungle. I spent a day with our Stihl brushcutter, with a sawblade in place of the string trimmer. That thing would be awesome for fighting zombies!
I had to chainsaw out a medium-sized box elder tree as well.
Under all that jungle, I discovered an improbable trove of cut limestone left over from when they built our house in 1973. Too good! I'll use that for the keystone and thestone veneer around the foundation.
step 2: Screeding, Floating, Edging and BroomingI decided to start with a concrete slab foundation.
My brother-in-law spent the spring of 2007 building park structures and sidewalks with the Gulf Coast Community Design Studio in Biloxi, Mississippi, so he was fresh onall the aspects of concrete work.
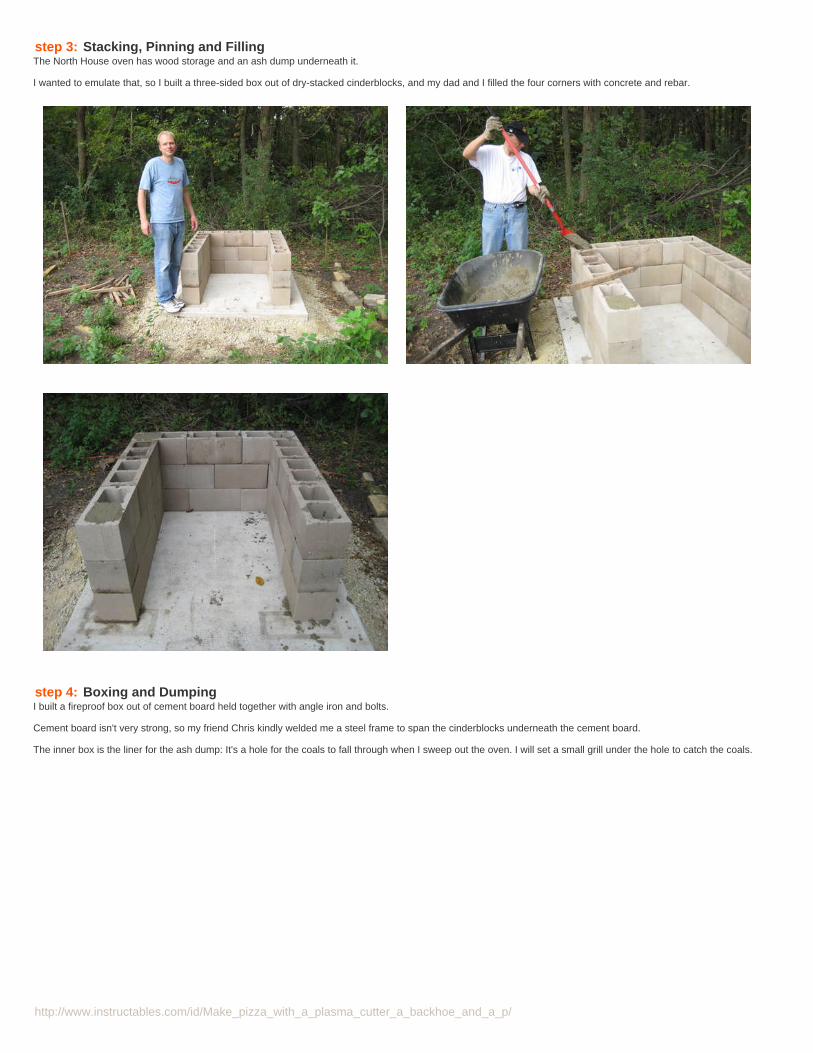
step 3: Stacking, Pinning and FillingThe North House oven has wood storage and an ash dump underneath it.
I wanted to emulate that, so I built a three-sided box out of dry-stacked cinderblocks, and my dad and I filled the four corners with concrete and rebar.
step 4: Boxing and DumpingI built a fireproof box out of cement board held together with angle iron and bolts.
Cement board isn't very strong, so my friend Chris kindly welded me a steel frame to span the cinderblocks underneath the cement board.
The inner box is the liner for the ash dump: It's a hole for the coals to fall through when I sweep out the oven. I will set a small grill under the hole to catch the coals.
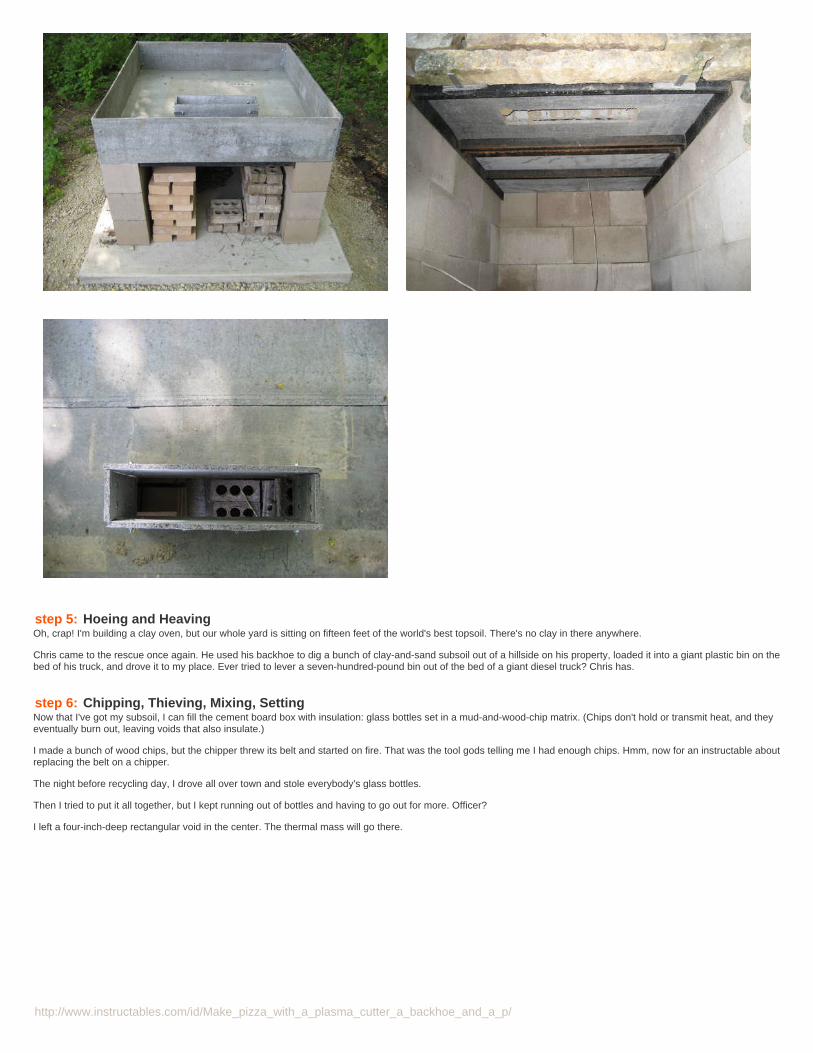
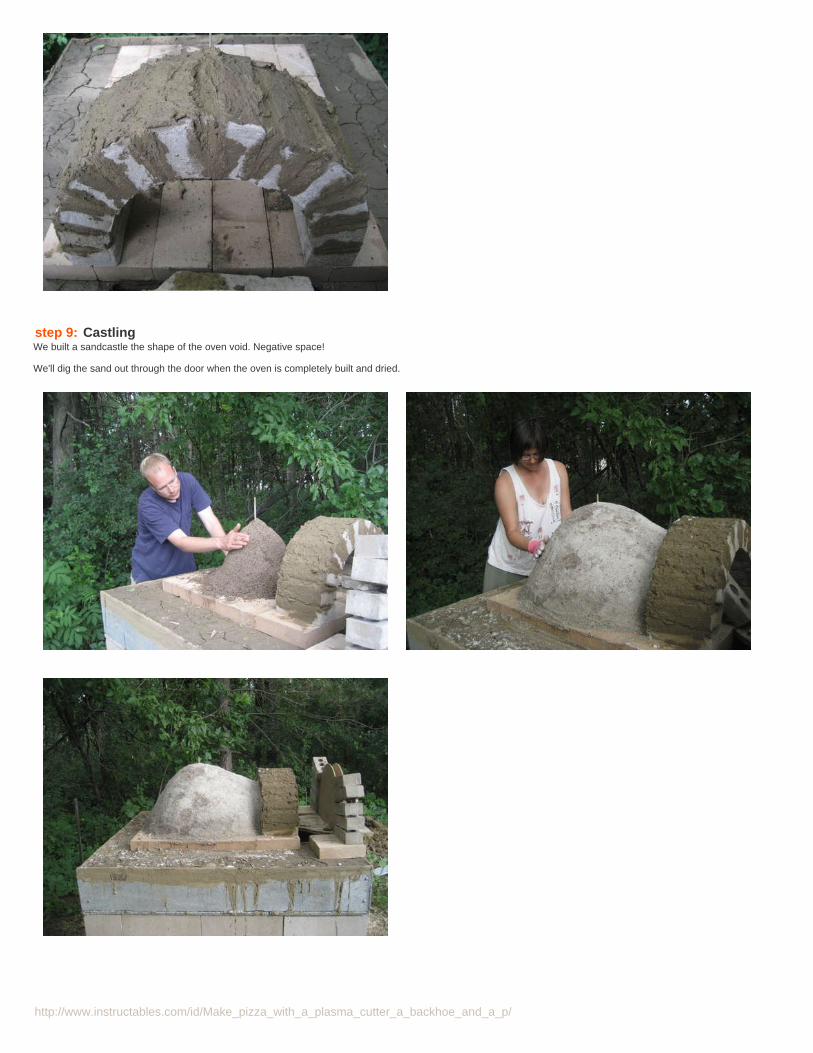
step 5: Hoeing and HeavingOh, crap! I'm building a clay oven, but our whole yard is sitting on fifteen feet of the world's best topsoil. There's no clay in there anywhere.
Chris came to the rescue once again. He used his backhoe to dig a bunch of clay-and-sand subsoil out of a hillside on his property, loaded it into a giant plastic bin on thebed of his truck, and drove it to my place. Ever tried to lever a seven-hundred-pound bin out of the bed of a giant diesel truck? Chris has.
step 6: Chipping, Thieving, Mixing, SettingNow that I've got my subsoil, I can fill the cement board box with insulation: glass bottles set in a mud-and-wood-chip matrix. (Chips don't hold or transmit heat, and theyeventually burn out, leaving voids that also insulate.)
I made a bunch of wood chips, but the chipper threw its belt and started on fire. That was the tool gods telling me I had enough chips. Hmm, now for an instructable aboutreplacing the belt on a chipper.
The night before recycling day, I drove all over town and stole everybody's glass bottles.
Then I tried to put it all together, but I kept running out of bottles and having to go out for more. Officer?
I left a four-inch-deep rectangular void in the center. The thermal mass will go there.
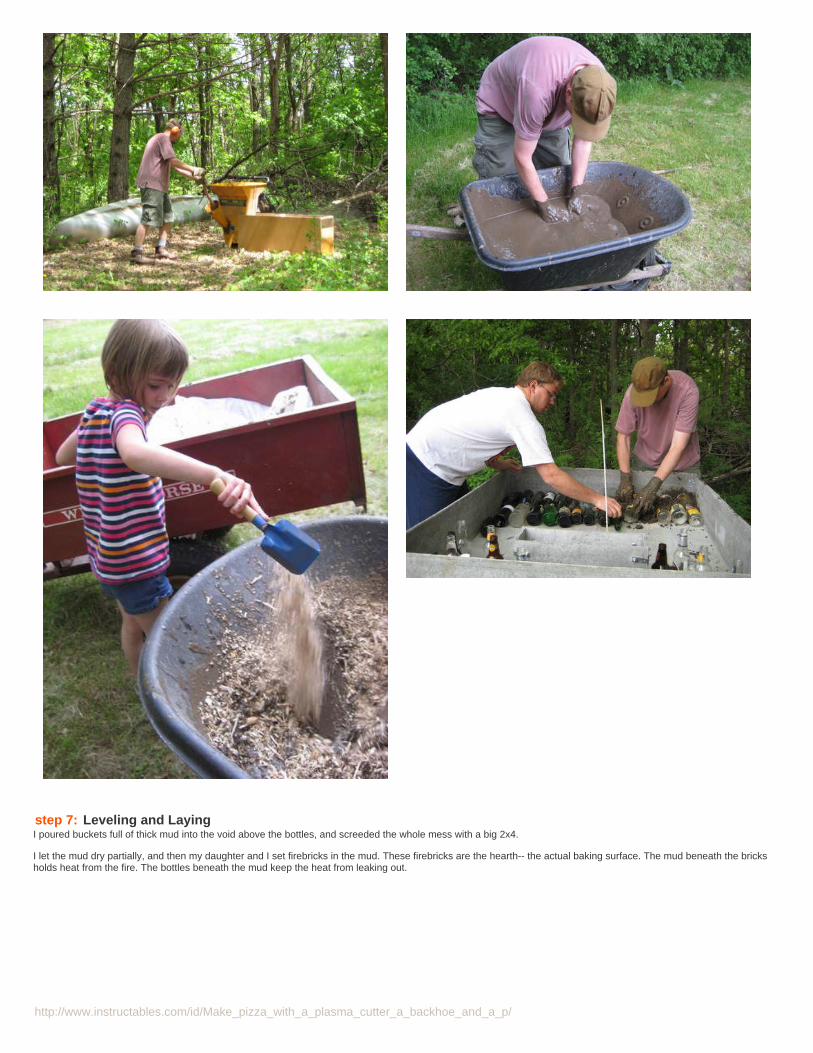
step 7: Leveling and LayingI poured buckets full of thick mud into the void above the bottles, and screeded the whole mess with a big 2x4.
I let the mud dry partially, and then my daughter and I set firebricks in the mud. These firebricks are the hearth-- the actual baking surface. The mud beneath the bricksholds heat from the fire. The bottles beneath the mud keep the heat from leaking out.
step 8: ArchingI went over to Chris and Tina's, and we laid bricks on the floor in arch-shapes. We laid out two arches: One smaller rowlock arch to frame the inner door and one largersoldier arch to frame the outer door.
Tina took photos of the arches, and then traced the outline of the inside of the arches in Adobe Illustrator. Chris plotted the outlines on his big plotter, taped the plots tomasonite, and bandsawed the masonite.
I took the masonite and stapled it to some short sections of 2x4, making one masonite-2x4-masonite sandwich for each arch. At this point I had two arch forms.
I set an arch forms on chopsticks on the hearth and balanced bricks on the forms. Then I took a deep breath and yanked the chopsticks. The form dropped and the archsettled but did not fall. I pushed the form out and filled the gaps in the arch bricks with mud.
step 11: PopcornballingHaving no more wood chips, I made the next insulation layer out of mud mixed with vermiculite. Had exactly the texture of popcorn balls.
I stacked popcorn balls all around the oven dome, smooshing each ball down as before.
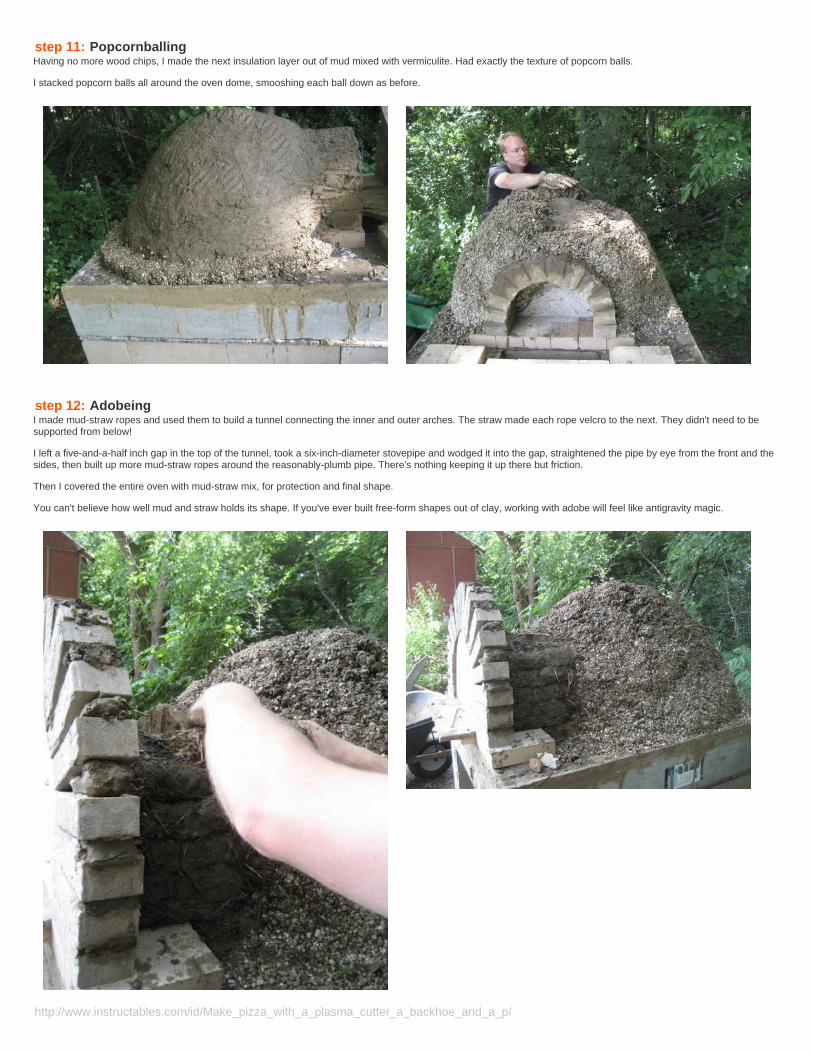
step 12: AdobeingI made mud-straw ropes and used them to build a tunnel connecting the inner and outer arches. The straw made each rope velcro to the next. They didn't need to besupported from below!
I left a five-and-a-half inch gap in the top of the tunnel, took a six-inch-diameter stovepipe and wodged it into the gap, straightened the pipe by eye from the front and thesides, then built up more mud-straw ropes around the reasonably-plumb pipe. There's nothing keeping it up there but friction.
Then I covered the entire oven with mud-straw mix, for protection and final shape.
You can't believe how well mud and straw holds its shape. If you've ever built free-form shapes out of clay, working with adobe will feel like antigravity magic.
step 13: SlammingTina called me up one morning to say they had some vacant space on a steel panel on its way to the CNC plasma cutter, and would I like anything cut?
Well yeah, oven doors!
Chris took the arch drawings, smoothed and enlarged them, and had them cut out of heavy-gauge steel. He added flanges and handles, and I insulated the inner doorwith plaster of paris mixed with vermiculite.
step 14: VeneeringI dry-stacked limestone blocks around the front and sides of the oven, just for looks.
The blocks across the top of the hollow space are held up by a couple of bolted-in L-brackets. I'm surprised they hold, but they were the simplest thing that could possiblywork.
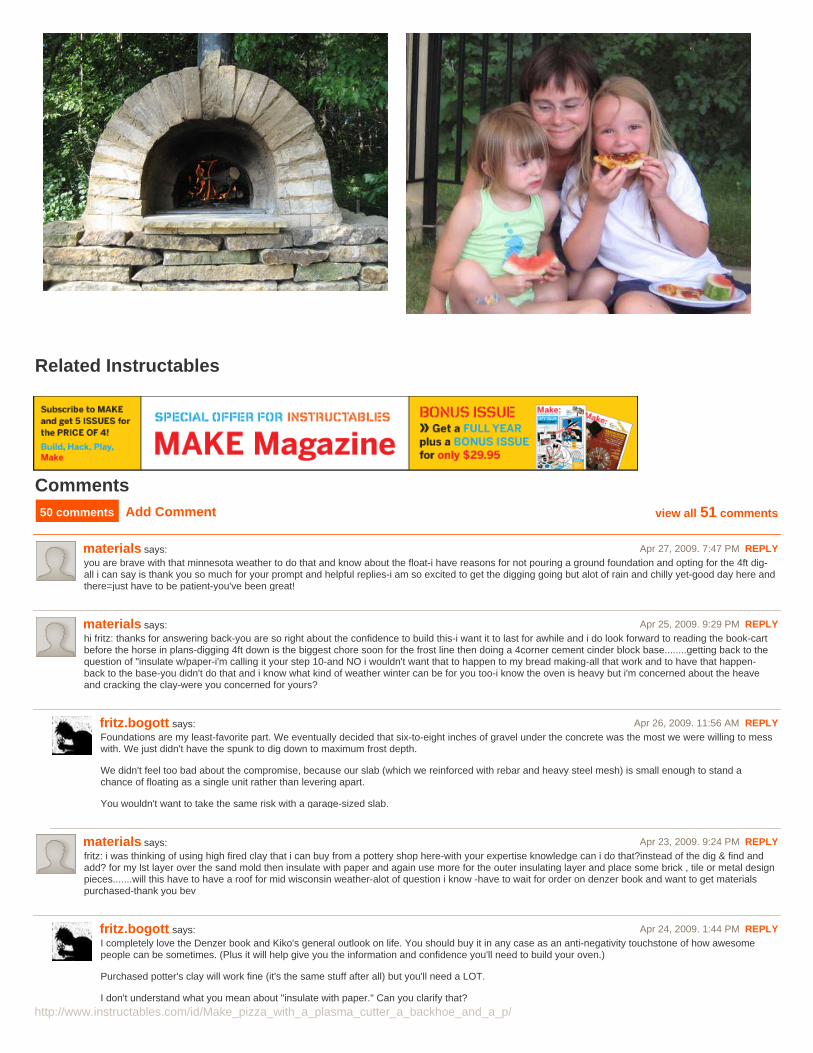
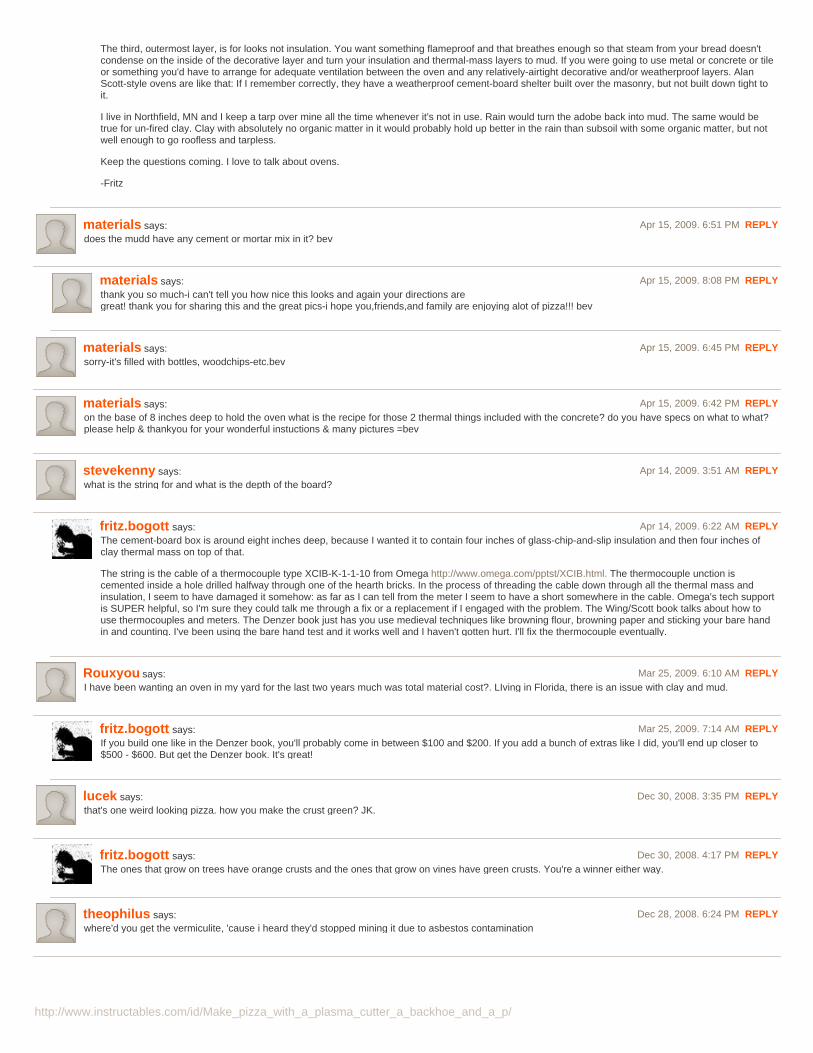
step 15: BakingI have to fire the oven for about two hours to get it up to temp: I fire it until the soot burns off the ceiling, then for about another half an hour, and then it's hot enough forpizza-- somewhere above 800 degrees. I push the coals off to the side with a weed-whip, then mop the exposed floor with a damp rag wrapped around the weed-whip.Then we're ready to bake.
Related InstructablesAdvertisementsMake Magazine Special Offer
Comments50 comments Add Comment view all 51 comments
materials says: Apr 27, 2009. 7:47 PM REPLYyou are brave with that minnesota weather to do that and know about the float-i have reasons for not pouring a ground foundation and opting for the 4ft dig-all i can say is thank you so much for your prompt and helpful replies-i am so excited to get the digging going but alot of rain and chilly yet-good day here andthere=just have to be patient-you've been great!
materials says: Apr 25, 2009. 9:29 PM REPLYhi fritz: thanks for answering back-you are so right about the confidence to build this-i want it to last for awhile and i do look forward to reading the book-cartbefore the horse in plans-digging 4ft down is the biggest chore soon for the frost line then doing a 4corner cement cinder block base........getting back to thequestion of "insulate w/paper-i'm calling it your step 10-and NO i wouldn't want that to happen to my bread making-all that work and to have that happen-back to the base-you didn't do that and i know what kind of weather winter can be for you too-i know the oven is heavy but i'm concerned about the heaveand cracking the clay-were you concerned for yours?
fritz.bogott says: Apr 26, 2009. 11:56 AM REPLYFoundations are my least-favorite part. We eventually decided that six-to-eight inches of gravel under the concrete was the most we were willing to messwith. We just didn't have the spunk to dig down to maximum frost depth.
We didn't feel too bad about the compromise, because our slab (which we reinforced with rebar and heavy steel mesh) is small enough to stand achance of floating as a single unit rather than levering apart.
You wouldn't want to take the same risk with a garage-sized slab.
materials says: Apr 23, 2009. 9:24 PM REPLYfritz: i was thinking of using high fired clay that i can buy from a pottery shop here-with your expertise knowledge can i do that?instead of the dig & find andadd? for my lst layer over the sand mold then insulate with paper and again use more for the outer insulating layer and place some brick , tile or metal designpieces.......will this have to have a roof for mid wisconsin weather-alot of question i know -have to wait for order on denzer book and want to get materialspurchased-thank you bev
fritz.bogott says: Apr 24, 2009. 1:44 PM REPLYI completely love the Denzer book and Kiko's general outlook on life. You should buy it in any case as an anti-negativity touchstone of how awesomepeople can be sometimes. (Plus it will help give you the information and confidence you'll need to build your oven.)
Purchased potter's clay will work fine (it's the same stuff after all) but you'll need a LOT.
I don't understand what you mean about "insulate with paper." Can you clarify that?
The third, outermost layer, is for looks not insulation. You want something flameproof and that breathes enough so that steam from your bread doesn'tcondense on the inside of the decorative layer and turn your insulation and thermal-mass layers to mud. If you were going to use metal or concrete or tileor something you'd have to arrange for adequate ventilation between the oven and any relatively-airtight decorative and/or weatherproof layers. AlanScott-style ovens are like that: If I remember correctly, they have a weatherproof cement-board shelter built over the masonry, but not built down tight toit.
I live in Northfield, MN and I keep a tarp over mine all the time whenever it's not in use. Rain would turn the adobe back into mud. The same would betrue for un-fired clay. Clay with absolutely no organic matter in it would probably hold up better in the rain than subsoil with some organic matter, but notwell enough to go roofless and tarpless.
Keep the questions coming. I love to talk about ovens.
-Fritz
materials says: Apr 15, 2009. 6:51 PM REPLYdoes the mudd have any cement or mortar mix in it? bev
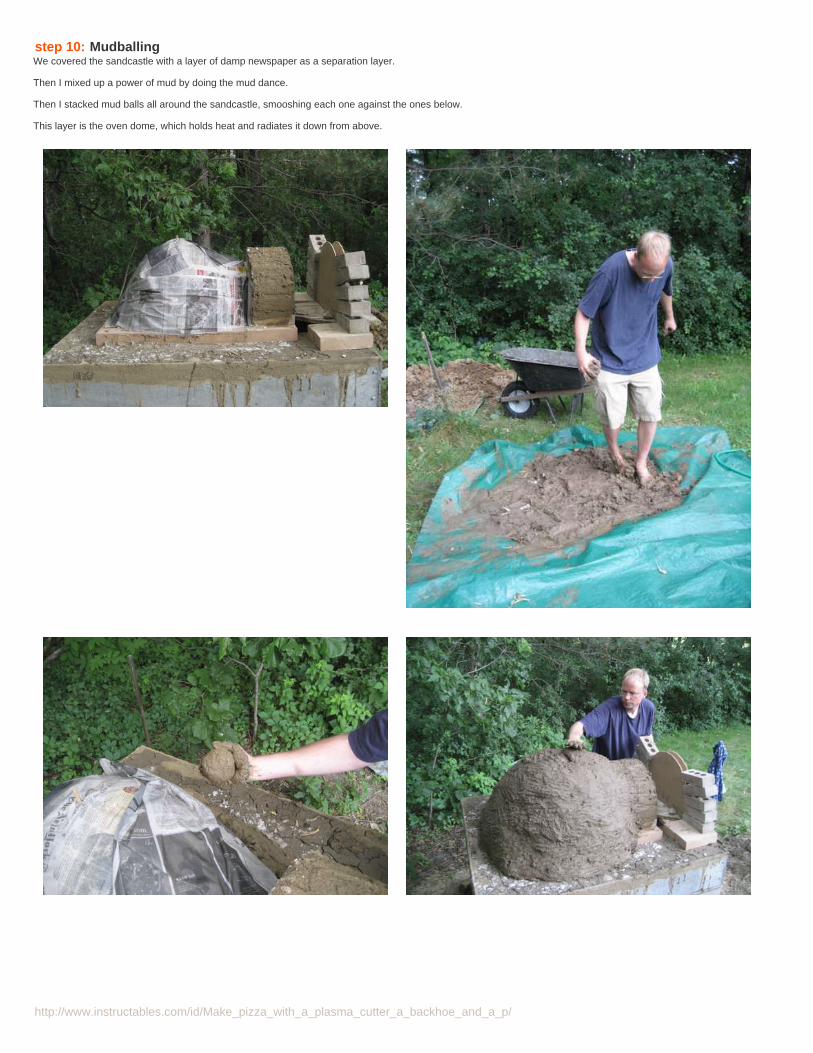
materials says: Apr 15, 2009. 8:08 PM REPLYthank you so much-i can't tell you how nice this looks and again your directions aregreat! thank you for sharing this and the great pics-i hope you,friends,and family are enjoying alot of pizza!!! bev
materials says: Apr 15, 2009. 6:42 PM REPLYon the base of 8 inches deep to hold the oven what is the recipe for those 2 thermal things included with the concrete? do you have specs on what to what?please help & thankyou for your wonderful instuctions & many pictures =bev
stevekenny says: Apr 14, 2009. 3:51 AM REPLYwhat is the string for and what is the depth of the board?
fritz.bogott says: Apr 14, 2009. 6:22 AM REPLYThe cement-board box is around eight inches deep, because I wanted it to contain four inches of glass-chip-and-slip insulation and then four inches ofclay thermal mass on top of that.
The string is the cable of a thermocouple type XCIB-K-1-1-10 from Omega http://www.omega.com/pptst/XCIB.html. The thermocouple unction iscemented inside a hole drilled halfway through one of the hearth bricks. In the process of threading the cable down through all the thermal mass andinsulation, I seem to have damaged it somehow: as far as I can tell from the meter I seem to have a short somewhere in the cable. Omega's tech supportis SUPER helpful, so I'm sure they could talk me through a fix or a replacement if I engaged with the problem. The Wing/Scott book talks about how touse thermocouples and meters. The Denzer book just has you use medieval techniques like browning flour, browning paper and sticking your bare handin and counting. I've been using the bare hand test and it works well and I haven't gotten hurt. I'll fix the thermocouple eventually.
Rouxyou says: Mar 25, 2009. 6:10 AM REPLYI have been wanting an oven in my yard for the last two years much was total material cost?. LIving in Florida, there is an issue with clay and mud.
fritz.bogott says: Mar 25, 2009. 7:14 AM REPLYIf you build one like in the Denzer book, you'll probably come in between $100 and $200. If you add a bunch of extras like I did, you'll end up closer to$500 - $600. But get the Denzer book. It's great!
lucek says: Dec 30, 2008. 3:35 PM REPLYthat's one weird looking pizza. how you make the crust green? JK.
fritz.bogott says: Dec 30, 2008. 4:17 PM REPLYThe ones that grow on trees have orange crusts and the ones that grow on vines have green crusts. You're a winner either way.
theophilus says: Dec 28, 2008. 6:24 PM REPLYwhere'd you get the vermiculite, 'cause i heard they'd stopped mining it due to asbestos contamination
fritz.bogott says: Dec 30, 2008. 2:47 PM REPLYI get it in giant sacks at the local lumberyard. According to the Square Foot Gardening book, there was an issue with one mine years ago, but it hasn'taffected other sources. It's easy to find. It's probably safest to wear a mask when you work with it, as would be true for any mineral dust. I didn't worryabout it much, since I was outdoors and upwind.
Wendyr says: Sep 25, 2008. 5:32 PM REPLYThis idea is so great. i will be trying to build it this weekend as a christmas gift for myself
thanks
colinsmith says: Sep 4, 2008. 10:30 PM REPLYFantastic job. I'm going to make one. One question: looks like you have a chimney in it, is that right? And if so, when does that get put in, and doesn't a lot ofheat escape thru it after the burn?
fritz.bogott says: Sep 5, 2008. 6:30 AM REPLYIt's much easier to build one without a chimney and just let the smoke and sparks come out the front door-- but it's less kid-friendly that way so I went tothe trouble of building the anteroom, the outer arch and the chimney.
Start by drawing the floor-plan of an igloo on a piece of paper. See how there's the main, round room with a rectangular anteroom poking out?
Now draw a line across each end of the anteroom, and label the inside line "small inner arch / baking door" and the outside line "large outer arch / firingdoor".
Now draw a small circle in the middle of the anteroom. That's where the chimney is.
When you're firing, you leave the baking door out and (optionally) partially close the firing door to keep gusts of wind out. You never close the firing doorcompletely. On still days I don't use it at all; on windy days I set it on some rocks and let air come in under it. You could use a sheet of plywood or atrash-can lid as a firing door.
When you're baking pizza, you keep a fire burning inside the oven, leave both doors off, and don't worry about heat-loss.
When bread is baking inside the oven, first you sweep all the fire and coals and ashes out, then you mop, then you let the heat equalize for twentyminutes or so, then you load your bread, then you install the insulated baking door. At that point the oven is completely sealed off from the outside worldincluding the anteroom and the chimney. You can make a baking door out of scrap wood, but then you have to soak it in a bucket for a while before youuse it so it doesn't char. A soaked wood door also injects some steam into the oven, which is nice.
Did that help?
colinsmith says: Sep 5, 2008. 11:18 AM REPLYThanks Fritz, yes that helps a lot. I see how it works. Sounds like a good idea to do the chimney, as you say, to save the dog and kids ;-)
RepairmanSki says: Sep 5, 2008. 9:58 AM REPLYThe instructions are fantastic and something I have been considering for some time. I have one question however, in step 14 we see the sudden appearanceof a chimney, is it just rammed through the dome created in previous steps?
fritz.bogott says: Sep 5, 2008. 11:01 AM REPLYYes, I didn't explain that very well.
No, the anteroom ceiling was built up around the stovepipe in Step 12 (I left a rectangular hole in the ceiling just large enough to allow me to insert thepipe, and then I filled in the gaps with adobe. It shouldn't have worked as well as it did. By rights I should have had to support the pipe from belowsomehow while the adobe dried around it. In the event it held itself up there by friction and/or magic.
sjzabel says: Sep 5, 2008. 8:29 AM REPLYThat was a fantastic Instructable Fritz! The combination of detailed instructions, excellent pictures make it very easy to follow :) I also like that you left in thenames of friends and family as well as the random finds and happenings that make projects like this worth doing.
Thank you for the inspiration!
Stephen
dquenneville says: Sep 5, 2008. 6:42 AM REPLYFritz, How much did you spend on this project? Looks great and seems like you kept the cost down.
fritz.bogott says: Sep 5, 2008. 7:37 AM REPLYBetween $200 and $300, I think. For the simplest Denzer-style oven, firebricks are about all you'd have to shell out for ($60?). You could do the rest withrubble and mud and scrap wood.
silver912targa says: Sep 5, 2008. 4:33 AM REPLYWow, I really love this 'ible!! Thanks for sharing.Could you share the recipes of the mud and other layers please?
I have no feeling with these "nature" things. I almost immediately go to cement with sand, which is definitely wrong here.
MichelPortugal
fritz.bogott says: Sep 5, 2008. 6:49 AM REPLYThe Denzer book is incredibly great on how to test and amend your local soil. You and your kids (or borrowed kids) could have a great time just goingthrough the soil tests in the book, even if you weren't planning to build anything. They're crazy fun and interesting.
In my case, I drove all over the county with my geologist-turned-architect brother-in-law (the one in the photos). We went to every ditch and gravel pit andexcavator's dump we could find and he told me about the geological history and chemical makeup of the soil. We couldn't find enough clay anywhere.
I gave up.
Then Chris called and said that he was doing some excavating and the subsoil he was hitting was sandy and goopy and stuck to everything. Right on!
I just used that stuff raw.
So, um (and bearing in mind that my kids and I did this with a competely naive, playful attitude of "does this feel right?" "nah, spray the hose in theresome more.")
Woodchip dough: Take clayey subsoil and mix it with water till it's the texture of heavy cream. Then have a kid mix that with pea-sized woodchips untilyou can make balls with it: Not so dry that it's powdery; not so wet that it's runny.
Thermal mass and oven dome: Take clayey subsoil and mix it with water till it's the texture of the clay you used to make coil pots in art class. Maybe alittle soggier.
Popcorn balls: Same as for woodchip dough except use pea-sized perlite or vermiculite ("Micaflake" brand, in my case) instead of woodchips.
Adobe: Arrange a barter deal with the students at Farmhouse so you get half a bale of rotten straw in return for a pizza-promissory note. Then dumpfistfuls of straw into some soppy mud until the mixture is fun to play with. Then mash that into shape and smooth it down with the palms of your handsuntil you are completely at peace. (Check out the book Built by Hand for brilliant houses, mosques, etc. built this way.)
Mud mortar: Take clayey subsoil and mix it with water till it's the texture of mortar.
You get the picture.
silver912targa says: Sep 5, 2008. 7:34 AM REPLYWow thanks Fritz, seems like you need to have some feeling with it. Suppose you just have to do it instead of only thinking.
MichelPortugal (we have lots of clay here :-)
cpotoso says: Sep 3, 2008. 8:22 PM REPLYMy father in law also uses a brick oven to cook all sorts of things. It is excellent for chicken, pork, lamb, pies, etc. Experiment with it...
fritz.bogott says: Sep 4, 2008. 6:31 PM REPLYt.rohner says he makes flammkuchen in his.
fritz.bogott says: Sep 4, 2008. 9:39 AM REPLYMy kids are especially looking forward to sopa sens aigua, foch, ni olla!
monsamga says: Sep 4, 2008. 4:41 PM REPLYSo, you're into catalan cuisine too?Congratulations for your awesome instructable!
fritz.bogott says: Sep 4, 2008. 5:54 PM REPLYI could have titled this "Make coques with a plasma cutter," or simply, "tens foc?" Missed opportunities...
monsamga says: Sep 4, 2008. 6:50 PM REPLYNow, that's inspiring! I would kill to eat a nice "coca de recapte" ... for not talking about the luxurious "coca de sant Joan". God, I miss "casameva":-D
jasonmrye says: Sep 4, 2008. 2:42 PM REPLYAwesome! I have priced these new in kit form and your way isn't that much more work, but way less money.One question, though. What is this "weed whip" of which you speak in the last step? I read through kind of quickly, so if the definition is in there, just tell meand I'll read more carefully.Thanks,Jason
fritz.bogott says: Sep 4, 2008. 5:49 PM REPLYIt's a strip of steel with a bend at one end. Any long-handled fire-resistant raking implement would work fine. You could even make an L- or a T-shape outof wood, if you didn't leave it in there too long.
boocat says: Sep 4, 2008. 3:58 PM REPLYFantastic Instructable! This is so exciting. Thanks for sharing with us.
Rishnai says: Sep 2, 2008. 9:51 PM REPLYYou had me at "plasma cutter." I was expecting something similar to roasting a marshmallow with an oxyacetelyne torch, but this looks just as fun!
murex says: Sep 2, 2008. 10:49 AM REPLYGreat instructuble! i was planning to make one ... when i find time for that
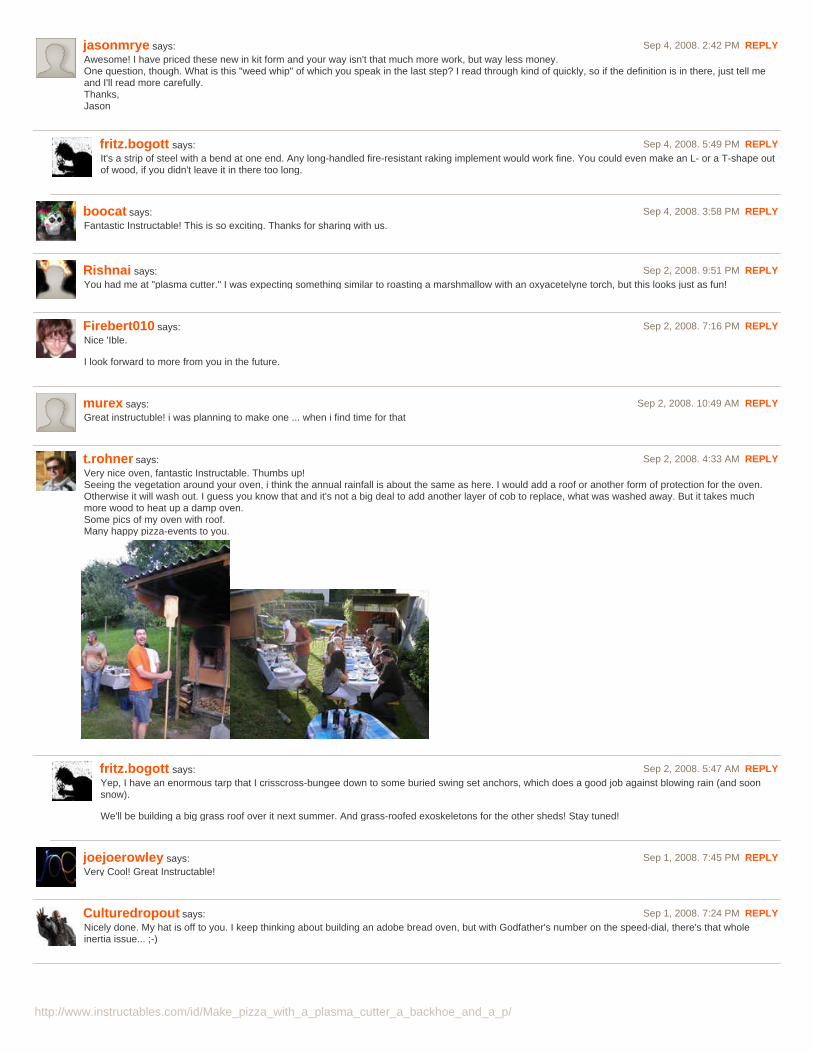
t.rohner says: Sep 2, 2008. 4:33 AM REPLYVery nice oven, fantastic Instructable. Thumbs up!Seeing the vegetation around your oven, i think the annual rainfall is about the same as here. I would add a roof or another form of protection for the oven.Otherwise it will wash out. I guess you know that and it's not a big deal to add another layer of cob to replace, what was washed away. But it takes muchmore wood to heat up a damp oven.Some pics of my oven with roof.Many happy pizza-events to you.
fritz.bogott says: Sep 2, 2008. 5:47 AM REPLYYep, I have an enormous tarp that I crisscross-bungee down to some buried swing set anchors, which does a good job against blowing rain (and soonsnow).
We'll be building a big grass roof over it next summer. And grass-roofed exoskeletons for the other sheds! Stay tuned!
Culturedropout says: Sep 1, 2008. 7:24 PM REPLYNicely done. My hat is off to you. I keep thinking about building an adobe bread oven, but with Godfather's number on the speed-dial, there's that wholeinertia issue... ;-)