/ Perfect Welding / Solar Energy / Perfect Charging 1 Set the synergic welding process When setting a welding power parameter, the remaining parameters are set automatically MMA welding TIG Welding The welding power parameters can be adjusted individually 2 Set the filler metal and shielding gas 2. 1. 3. 3 Set the operating mode 2-step mode: short weld seams, tacking work 4-step mode: longer weld seams, high level of comfort Special 4-step mode: additional settings for starting and final current Spot welding: for overlapping sheets / stitch welding: light-gauge sheet metal welding and air-gap bridging 4 Set the welding power Sheet thickness Welding current Wire speed select desired parameter set desired parameter 5 Set the correction parameters Arc length correction Welding voltage Arc-force dynamic select desired parameter set desired parameter 6 Optimize welding results 1. Measure the welding circuit resistance r 2. Set the mains fuse so that the device switches off before the mains fuse trips. The description of the aforementioned measures can be found in the Operating Instructions of the power source TransSteel 2200 Quick Guide to Synergic Welding SAFETY Before working with the device, ensure that you have read and understood all the documents provided in hard copy and online. This document does not describe all the functions of the device. For a complete description of the device, refer to the Operating Instructions. 42,0426,0263,EA 005-25102021 Operating Instructions: https://manuals.fronius.com/html/4204260241
Transcript
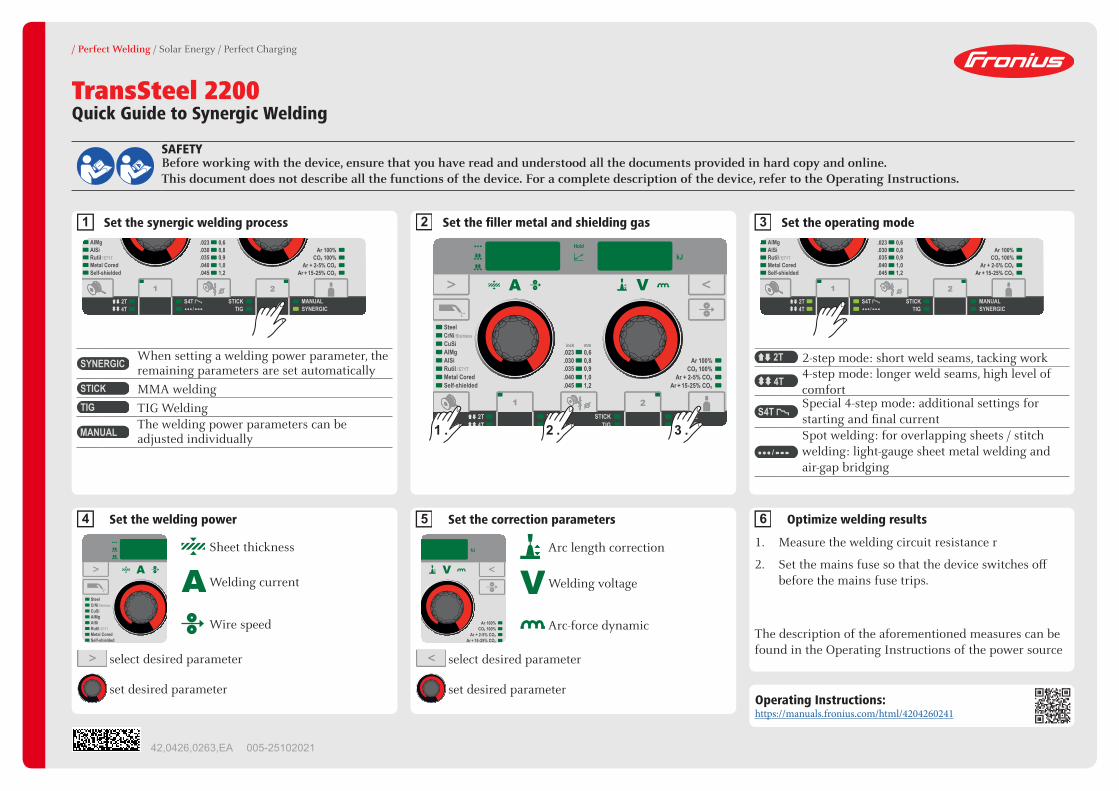
/ Perfect Welding / Solar Energy / Perfect Charging
1 Set the synergic welding process
When setting a welding power parameter, the remaining parameters are set automaticallyMMA weldingTIG WeldingThe welding power parameters can beadjusted individually
2 Set the filler metal and shielding gas
2 .1 . 3 .
3 Set the operating mode
2-step mode: short weld seams, tacking work4-step mode: longer weld seams, high level of comfortSpecial 4-step mode: additional settings for starting and final currentSpot welding: for overlapping sheets / stitchwelding: light-gauge sheet metal welding and air-gap bridging
4 Set the welding power
Sheet thickness
Welding current
Wire speed
select desired parameter
set desired parameter
5 Set the correction parameters
Arc length correction
Welding voltage
Arc-force dynamic
select desired parameter
set desired parameter
6 Optimize welding results
1. Measure the welding circuit resistance r
2. Set the mains fuse so that the device switches off before the mains fuse trips.
The description of the aforementioned measures can be found in the Operating Instructions of the power source
TransSteel 2200Quick Guide to Synergic Welding
SAFETYBefore working with the device, ensure that you have read and understood all the documents provided in hard copy and online.This document does not describe all the functions of the device. For a complete description of the device, refer to the Operating Instructions.
Available parameters: Example of display:Firmware version
Welding program configuration
Current welding program
Arc time in hours
Motor current for wire drive in amperes
2nd menu level (service)
MIG/MAG Synergic Setup Menu
1 . 2 . 2 .Setup Menu 1st Level
Gas pre-flow timeGas post-flow timeSlope (2-step, special 4-step)Starting current (2-step, special 4-step)Final current (2-step, special 4-step)Starting current duration (2-step)Final current duration (2-step)Wire threading speedLength of wire that is fed before the safety cut-out tripsSpot welding time/stitch welding timeInterval pause timeOperating mode for stitch weldingRestore factory setup
Setup Menu 2nd LevelCountry-specific settingWelding circuit resistanceWelding circuit inductivityReal Energy InputMains fuse protectionArc length correction display
MIG/MAG Manual Setup Menu
2 .1 . 2 .Setup Menu 1st Level
Gas pre-flow timeGas post-flow timeWire threading speedTrigger currentLength of wire that is fed before the safety cut-out tripsSpot welding time/stitch welding timeInterval pause timeOperating mode for stitch weldingRestore factory setup
Setup Menu 2nd LevelCountry-specific settingWelding circuit resistanceWelding circuit inductivityReal Energy InputMains fuse protection