SCD 6504MR SCD 6514MR EN CZ SK HU PL CAR PLAYER CD/MP3/USB/SD AUTORÁDIO S PŘEHRÁVAČEM CD/MP3/USB/SD AUTORÁDIO S PREHRÁVAČOM CD/MP3/USB/SD AUTÓRÁDIÓ CD/MP3/USB/SD LEJÁTSZÓVAL RADIO SAMOCHODOWE Z ODTWARZACZEM CD/MP3/USB/SD
Thank you for purchasing this product. We wish you many pleasant hours of listening to your favorite music. Personal Safety has been taken in consideration in the design and manufacturing this product, however any improper use or operation may result in an electrical shock, fi re and/or any other hazards. To prevent these hazards it is strongly recommended to read this manual thoroughly and adhere to the following precautions.
IMPORTANT SAFETY INSTRUCTIONS
SAFETY INSTRUCTIONS- To prevent a risk of electric shock, do not open the housing of the unit. There are not parts inside the unit repairable or
adjustable by a user. Should the device require adjustment or repair, contact a professional service centre.- Do not expose the unit to dropping or splashing water or any other liquid. In no cases spill any liquid onto or in the unit. Do
not operate the product when your hands are wet. Do not use an unit in a humid environment, near places of water like pools or ponds.
- Never operate the product if it is moved from a cold environment to a warm one and vice versa. Moisture may form inside of the unit and as a result it may not operate properly. In this case, turn on the power, take out the disc and wait at least 60-90 minutes for the moisture to evaporate.
- To clean the unit or its accessories, do not use abrasive detergent, bensine or diluent. Clean the unit with a soft and dry cloth and only when the unit is disconnected from the power source.
- For safe driving, set volume level in order to concentrate on traffi c and road condition. For safety reason do not operate the device while driving.
- Never put foreign objects into the CD disc opening, or in any other opening of the unit, to prevent damage and electric shocks.
CAUTION:THE UNIT EMPLOYS A LASER SYSTEM. TO ENSURE THE PROPER USE OF THE UNIT, READ THIS MANUAL CAREFULLY AND KEEP IT FOR FUTURE REFERENCE. IF THE UNIT REQUIRES SERVICING, CONTACT THE SELLER. TO PREVENT DIRECT EXPOSURE TO THE LASER RADIATION, DO NOT OPEN THE CABINET. VISIBLE LASER MAY RADIATE WHEN THE CABINET IS OPENED OR THE INTERLOCKS ARE DEFEATED. DO NOT STARE INTO THE LASER BEAMS.CAUTION:THE DEVICE IS A CLASS 1 LASER PRODUCT. USE OF CONTROLS OR ADJUSTMENTS OR PERFORMANCE OF PROCEDURES OTHER THAN THOSE SPECIFIED HEREIN MAY RESULT IN HAZARDOUS RADIATION EXPOSURE. AS THE LASER BEAM USED IN THIS DEVICE IS HARMFUL TO THE EYES, DO NOT ATTEMPT TO DISASSEMBLE THE CABINET. REFER SERVICING TO QUALIFIED PERSONNEL ONLY.
OPERATION PRECAUTIONS- Only connect to a 12V DC battery and negative grounding.- Do not expose the unit to high temperatures nor direct sunshine or high humidity (přes 90%), do not place on dusty
surfaces. In case of high temperatures, cool down the car interior by means of ventilation or air-conditioning.- Operate in well ventilated areas.- Do not turn on or off the product in short intervals. When turning the unit off, wait for at least 10 seconds prior to turning the
unit on again.
NOTE- Please dispose empty batteries according the regulations in your country.- All pictures will be based on the English version.- Design and Specifi cations may vary in the manual from the actual product in use.
EN-3
BEFORE USING THE CAR RADIO
Unpacking and checking the accessoriesPlease check if the following items and accessories are included in the received package:
Car Radio
1x Protective Carrying Case for detachable front panel.
1x Mounting Bracket1x Assemble Bar1x Screw Bt5x204x Bolt M51x Nut M51x Flat washer1x Spring washer2x Unit ejection bars
User Manual
EN-4
DEVICE DESCRIPTION
Car radio
1. POWER BUTTON / MUTE2. MODE BUTTON (RADIO, CD, SD, USB, AUX) 3. SEL BUTTON (SELECTION)4. BAND (FM 1/ FM2 / FM3) / TA-TP BUTTON5. VOLUME KNOB 6. BUTTON (TUNE UP / TRACK-NEXT / FAST FORWARD)7. BUTTON (TUNE DOWN / TRACK-PREVIOUS / FAST REVERSE) 8. LCD DISPLAY9. AUX INPUT 3.5mm10. MEMORY / STORE BUTTON11. OK BUTTON (OK / ENTER / PTY)12. OPEN BUTTON13. USB CONNECTION 14. SD CARD SLOT 15. DISC EJECT16. ANTI-THEFT LED17. DISC SLOT 18. RESET 19. CONTACTS
EN-5
DISPLAY
The icons are explained throughout this document. For example: WMA will light up when WMA audio is played back and MP3 will light up when MP3 audio is played back.The Stereo icon will light up when a radio station is emitting in Stereo. Not all icons are in use or will be displayed.
Removing and Attaching the front panel
RemovingOpen the front to min 45 degrees or to its fold down position. Gently press the right side towards the left and gently remove the faceplate by pulling it towards you.
AttachingGently place the left side of the front onto the locking pin, then gently click the right side onto the locking pin and close the front until you hear a click.
CAUTION: DO NOT insert the front panel into the right side. It can damage the front panel. Never use force or a tight grip onto the buttons or the information display when removing or attaching the front Panel. The front panel can easily be damaged by shocks. To avoid damage or potential theft remove the front panel, place it into the protective case and be careful not to drop it or subject it to strong shocks. The rear connector that connects between the main unit and the control panel is an extremely important part. Be careful not to damage it by pressing on it with fi ngernails, pens, screwdrivers, etc.
EN-6
WIRING DIAGRAM
The Car Radio comes complete with built-in ISO connector and installation brackets and is easily fi tted into your car. Hereunder you will fi nd the diagram of the ISO connection, which is used in the majority of the cars. If your vehicle is not fi tted with an ISO connection, you can optionally purchase a female-ISO contra connector with separate wires and connect the wires according the description of the ISO connector.
Note: Never connect cables to the system while it is connected to the battery power. Whenever the unit is disconnected from the battery, the preset memory will be erased and the unit will go back to its factory defaults.
Right (Red) Left (White)
Subwoofer (Blue)
Fuse (15Amp.) ISOANTENNEconnection
1. Line OUTPUT Left + Right2. Subwoofer
Note on ISO-A Connector: The pin layout displayed here is the most commonly used, but some car manufacturers (like VW, Audi, Opel, Vauxhall) swap connection point A7 and A4, which results in Memory lost of the preset channels and settings when the ignition key is switched OFF. Please refer to your car manual for correct connection of the ISO connector in your car.
INTERNAL ISO CONNECTOR
ISO-A
A4 YELLOW B+. Always 12Vdc, direct to battery.
A5 BLUE To system control terminal of an external amplifi er or Automatic Antenna (max. 100mA / 12V DC).
A7 RED ACC. Connect to the 12Vdc controlled by the ignition key / switch.
A8 GND. (Ground). Connect to clean, exposed and unpainted metal parts of the car chassis to make a good ground connection.
ISO-B
FRONT SPEAKER
B3 Right + (Grey)B4 Right – (Grey/Black)B5 Left + (White)B6 Left – (White/Black)
REAR SPEAKER
B1 Right + (Violet)B2 Right – (Violet/Black)B7 Left + (Green)B8 Left – (Green/Black)
EN-7
Note:- Only use groundless loudspeakers.- Use only loudspeakers of minimal 30Watt, using fewer watts may result in damaging your loudspeakers at higher
volumes.- Use 4~8 Ω (Ohm impedance) loudspeakers only, using higher or lesser impedance may damage the unit.- Do not use 3-cable loudspeakers and do not connect the loudspeakers minus (-) to the car body (GND). The Car Radio
is using a BTL circuit and each loudspeaker must be connected with insulated cables according the diagram.- Loudspeaker cables and/or optional external power amplifi ers must always be about 30cm away from the antenna and/
or antenna extension parts.
Connect the speakers according the following diagram, incorrect connections will damage the unit or your loudspeakers and void warranty.
Left front
Right front
Left rear
Right rear
Correct connection Incorrect connections
3.5mm AUX INPUT FRONTThe 3.5mm AUX input can be used to connect external audio devices via their headphone output or their AUX output to the unit. Devices such as MP3 players, mobile telephones with MP3 player function, cassette tape player, minidisk player, etc. can be connected to the unit. For the FRONT connection, a 3.5mm Mini Jack to 3.5mm Mini jack cable is needed to connect these devices to this AUX input port.
EN-8
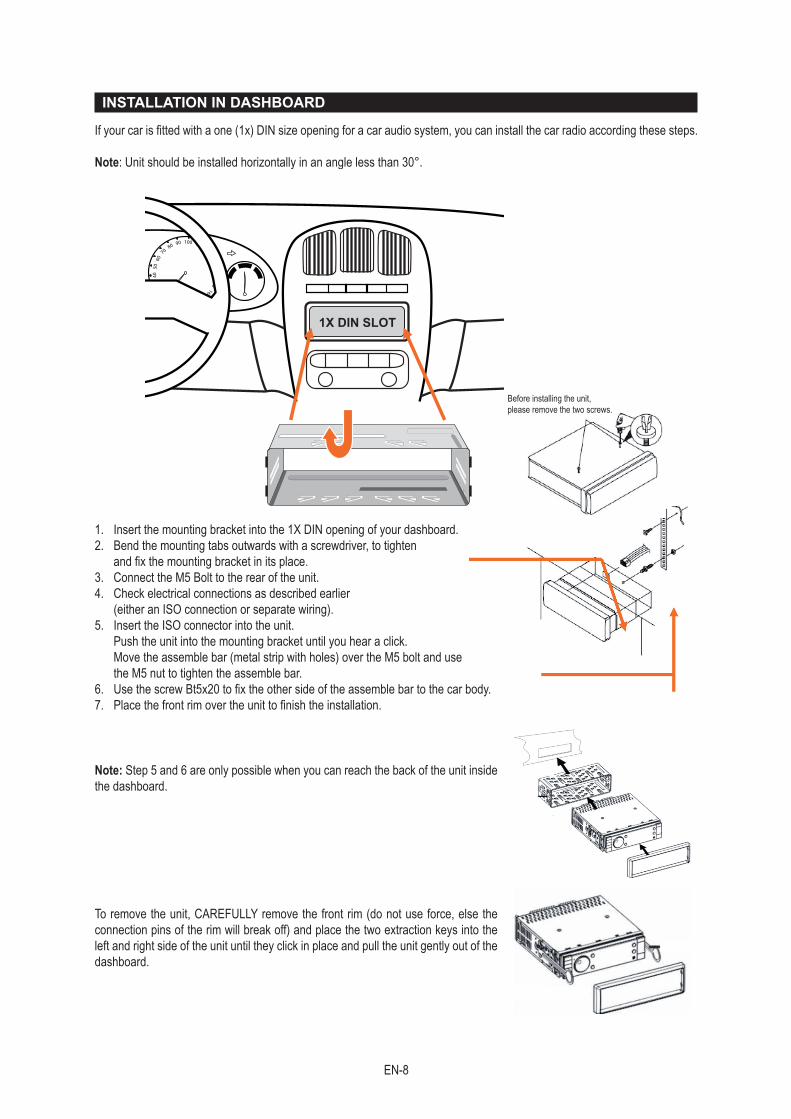
INSTALLATION IN DASHBOARD
If your car is fi tted with a one (1x) DIN size opening for a car audio system, you can install the car radio according these steps.
Note: Unit should be installed horizontally in an angle less than 30°.
Before installing the unit, please remove the two screws.
0 10
30
40
50
60
7
0 80 90 100 110 120 130 140 150 160 0030352.602
1X DIN SLOT
1. Insert the mounting bracket into the 1X DIN opening of your dashboard.2. Bend the mounting tabs outwards with a screwdriver, to tighten
and fi x the mounting bracket in its place.3. Connect the M5 Bolt to the rear of the unit.4. Check electrical connections as described earlier
(either an ISO connection or separate wiring).5. Insert the ISO connector into the unit. Push the unit into the mounting bracket until you hear a click. Move the assemble bar (metal strip with holes) over the M5 bolt and use
the M5 nut to tighten the assemble bar.6. Use the screw Bt5x20 to fi x the other side of the assemble bar to the car body.7. Place the front rim over the unit to fi nish the installation.
Note: Step 5 and 6 are only possible when you can reach the back of the unit inside the dashboard.
To remove the unit, CAREFULLY remove the front rim (do not use force, else the connection pins of the rim will break off) and place the two extraction keys into the left and right side of the unit until they click in place and pull the unit gently out of the dashboard.
EN-9
BASIC OPERATIONS
Power / MUTE button Press the power button to switch the unit ON. Long press again to switch it OFF. Press the button briefl y to Mute. Please note that the volume will be muted on all audio output connectors. The MUTE icon will be seen on the information display. To resume playing, press the button briefl y again.
Volume knob Increase or decrease the volume by turning the Volume knob clockwise or counterclockwise. When the unit is switched off, it will start on the INVOL volume level next time it is switched on.
System SettingsIncrease or decrease the volume by turning the Volume knob clockwise or counterclockwise. When the volume level is below 20 and the unit is switched off, the unit will default set the volume at 20 the next time it is switched on. When the volume level is higher than 20, the unit will default set the volume at 20 the next time it is switched on.
Short press SEL button to select the Audio functions in the following sequence: VOLUME → BASS → TREBLE → BALANCE → FADER → CURRENT MODE
When BASS or TREBLE is selected, rotate the volume knob clockwise to boost Bass or Treble, rotate the volume knob counterclockwise to decrease Bass or Treble.When BALANCE is selected, rotate the volume knob clockwise to boost the volume to the right (R), rotate the volume knob counterclockwise to boost the volume to the left (L).When FADER is selected, rotate the volume knob clockwise to boost the volume to the rear (R), rotate the volume knob counterclockwise to boost the volume to the front (F).
In Radio mode Press the SEL button for over 2 seconds to enter the setup menu. Press each time for a following selection: (AF → INVOL → ADJ → 12/24HOUR → TAVOL → EON → PTY →REG → LOC → MONO → LOUD → SUB → BEEP → DSP→ EXIT).
When AF is selected, rotate the volume knob to select AF OFF or ON.Rotate the volume knob counterclockwise to decrease the default startup volume.When ADJ is selected, rotate the volume knob clockwise to set the time.When 12/24HOUR is selected, rotate the volume knob to change to 12 or 24 Hour format.When TAVOL is selected, rotate the volume knob clockwise to boost the TA volume, rotate the volume knob counterclockwise to decrease the TA volume.When EON is selected (ON is default), rotate the volume knob to select ON or OFF. When PTY is selected, rotate the volume knob to select PTY ON or OFF.When REG is selected , rotate the volume knob to select REG ON or OFF.When LOC is selected, rotate the volume knob to select ON or OFF. ON to select the short distance or local radio station mode (LOC) or select OFF for long distance radio stations.When MONO is selected, rotate the volume knob to select OFF (Stereo) or ON (Mono).When LOUD (Loudness) is selected, rotate the volume knob to select ON, or OFF (default). When SUB is selected , rotate the volume knob to select ON or OFFWhen BEEP is selected, rotate the volume knob to select ON or OFF.When DIGITAL SOUND PROCESSOR (DSP) is selected, rotate the volume knob to select a predefi ned equalizer sound effect according your liking in the following sequence:NONE → POP → ROCK → CLASSIC → FLAT → NONE
Note: After 5 seconds of non operation the display will return to the default of the selected mode. If the clock display is enabled the unit will show the clock in standby mode.
EN-10
Programming Preset StationsSearch a station by Manual or Automatic Tuning. When the desired station and frequency is found, press the OK button, now rotate the Volume knob to choose 1-6, press the OK button to confi rm and store the station. This sequence can be repeated for every available BAND. Just press the BAND button to select the next available band and repeat the above sequence.
Selecting Preset StationsSelect the desired BAND. Now press the button or the button to choose the station.
AS (Auto Store) / PS (Preset Scan)In Tuner mode, select an available BAND, then press the MEM button for longer than 2 seconds to enable the Auto Search and Store function. The unit will search for stations of the selected frequency band and will store up to 6 stations into the preset memory. The search will stop automatically when the whole frequency spectrum has been search, when the preset stations are stored or when the MEM button is pressed again. PS: Press the MEM button shortly in the TUNER mode to scan the preset stations in the memory of the current selected frequency band. Each preset station will be heard for 5 seconds. Press the MEM button to stop the Preset Scan.
File / Folder SearchIn MP3/USB/SD/CD mode: Press the MEM button to enter into the search mode (press the button in sequence to toggle between the following search modes): FILE NUMBER → FILE NAME → FOLDER (Note: Audio CD discs only support Track Number search mode)
Track number searchA “0” digit will blink in the LCD, Enter the track digits by turning the Volume button clock or counter clockwise. Press the Volume button to enter the selected digit and confi rm by pressing the SEL button. Repeat this sequence until the wished track number is displayed. Now press the OK button to start playing the desired track. If the track cannot be found, the last played track will be played and the search function will be cancelled. Track name searchIn MP3/USB/SD/CD mode: Press the MEM button repeatedly to enter into the search track name mode. The character A * * - - - - - will be displayed.
Enter the track characters by turning the Volume button clock or counter clockwise and toggle between “A” through “Z” and “0” through “9”. Confi rm the blinking character by pressing on the SEL knob. Repeat this sequence until the wished characters are displayed. Now press OK to start playing the desired track. When multiple fi les are found, toggle between the fi les by turning the volume knob clock or counter clockwise, then press the OK button to confi rm the selected song. If the track cannot be found, an error message will be displayed and thereafter A * * - - - - - and the fi le name search sequence can be repeated.
Folder searchIn MP3/USB/SD/CD mode: Press the MEM button repeatedly until ROOT will be shown on the LCD, to enter the Folder Search mode. ROOT will be displayed and if there are sub folders rotate the Volume knob to move to the subfolders and press the OK button to enter the subfolder. The unit will now starts playing the songs from this subfolder.
EN-11
Note: Function not available for Commercial Audio CD’s. After 5 seconds of non operation the display will return to the default of the selected mode. If the clock display is enabled the unit will show the clock for several seconds and then returns to the normal display info.
TA / TPLong press the BAND button in the TUNER mode to enable or disable Travel Announcement / Travel Program. The default status is off. When there is a TA or TP signal available from the radio station that is tuned-in, the TP icon will be shown on the information display. When TA/TP is enabled (on), but no travel announcement is transmitted, the TA icon is off. When a travel announcement is transmitted the TA icon is on. In case TA/TP is enabled (on) but no RDS signal is present, the TP icon will blink in the information display. (see more under RDS operation).
AF Switch the AF ON or OFF as described in the System Settings chapter. Default status is ON, When AF is enabled (on) and available with the current radio station, the AF icon will be on, if it is not available the AF icon will blink. When the unit is constantly searching for alternative frequencies, it may be caused due to bad reception area and it is advised to set AF to OFF.
REGSwitch the REG ON or OFF as described in the System Settings chapter. Default status is OFF (see RDS chapter for more info on REG).
PTYLong press the OK button in the TUNER mode to enable or disable Program Type. Default status is off. When PTY is enabled (on) and the selected program type matches, the PTY information is displayed. If the PTY information is different or not available the PTY icon blinks. Press any button to stop the PTY search. (see more under RDS operation).
ModePress the Mode button to toggle between the available audio sources in the following sequence: TUNER → CD → SD → USB → AUX → TUNER.
/ Automatic Station searchIn TUNER mode press and hold button (frequency increase) or (frequency decrease) button to search a station automatically. The frequency search will stop when a station is found or when the buttons are pressed again.
Next trackWhile a song is playing from the disc press the (NEXT ) button to skip to the next track. No sound will be reproduced during this operation.
Previous trackWhile a song is playing from the disc press the (PREVIOUS ) button to skip to the previous track. No sound will be reproduced during this operation.
Fast ForwardWhile a song is playing from the disc press and hold the button for longer than 2 seconds to Fast Forward (FFWD) within the current track. No sound will be reproduced during this operation.
Fast ReverseWhile a song is playing from the disc press and hold the button for longer than 2 seconds to Fast Reverse (FREV) within the current track. No sound will be reproduced during this operation.
EN-12
Play/PauseIn CD/MP3/SD/USB mode press the OK button to pause a song press it again to resume playing.
RepeatMP3/USB/SD/CD mode press the BAND button repeatedly to choose RPT play, then press OK. The RPT icon is shown on the information display. To cancel the repeat mode press the button again. The RPT icon will go off and the current song continues to play.
IntroMP3/USB/SD/CD mode press the BAND button repeatedly to choose INT play, then press OK to scan the media for each song, the song will be played for 10 seconds. The INT icon is shown on the information display. To cancel the scan mode press the button again. The INT icon will go off and the current song continues to play.
RandomMP3/USB/SD/CD mode press the BAND button repeatedly to choose RDM play, then press OK to shuffl e play (random order) each song. The RDM icon is shown on the information display. To cancel the scan mode press the button again. The RDM icon will go off and the current song continues to play.
Band Press the Band button to select your frequency band of choice in the following sequence:FM 1 → FM 2 → FM 3 → AM 1 → AM 2. When a new frequency band is selected, the last chosen frequency / station of that frequency band will be heard.
Reset to factory defaultsPress the OPEN button on the unit and then remove the front panel. Then with a tip of a bend paperclip, press the small RESET button to set the unit back to the factory default settings.
Disc Loading and ejecting• Press the OPEN button on the unit to open and the front panel for loading or unloading a disc.• Load one disc with the label side facing upwards.• Press the EJECT button in case there is already a disc inside the unit. • Gently load a disc inside the unit and do not apply any force to the disc, it will automatically be loaded.
Note:• Finger prints and dust on the disc surface can affect the sound quality. Clean the discs regularly with a soft cotton cloth from
the disc center to the outside of the disc but do not clean in circular motions.• Do not use any kind of solvent, such as diluting agent, gasoline, liquid detergent, gasoline liquid detergent antistatic aerosol
used for vinyl, this may cause serious disc damage.• Keep discs away from direct sunlight or any heat source.• Do not stick any paper or stickers on a disc.• Only use 12cm and round discs, do not insert any other type or size of discs.• If a 12cm CD is ejected but not removed within 15 seconds, it will be reloaded automatically, but will not resume playing.
8cm CD’s will not be reloaded automatically, please remove them before closing the faceplate. Once the disc is loaded, the unit will automatically start reading the disk and it will take a few seconds to download the disc initial data, thereafter the unit will start playing the disc.
Note: When the unit is on standby and a disc is loaded/unloaded, the unit will turn ON automatically.
SD Card Slot Insert a Secure Digital Memory card or SDHC card into this slot to listen to the stored MP3-WMA songs. The SD-CARD icon will be seen on the information display. Note: it sometimes takes several seconds before the card is indexed. When the MODE button is pressed and the SD card is selected, but the unit turns back to the Radio automatically, then this means the card is not indexed yet. Wait a few seconds before pressing the MODE button again to select the SD card, DO NOT eject the SD card, as it may damage the fi le content.
RDS
Radio Data System (RDS) enables you to make the best use of your RDS equipped unit. RDS allow radio stations to transmit data that will make use easier. The radio stations can send short messages on RDS and provide additional information about the programs being transmitted, weather, general information, traffi c jams, the title of a record or a 'phone-in number, etc. RDS information is transmitted with many radio stations that broadcast on the FM band.
PS (Program Service Name)The unit is supplied with a character display that will show the name of the selected radio station. When you program your favorite radio stations into the preset station numbers, it is not just the frequency that is stored, but also the station's identifi cation. If you have set RADIO-ONE to be on button number one, then pressing this button will always give you RADIO-ONE wherever you are in the country.
AF (Alternative Frequency) Automatic Tuning The unit receives information about the frequencies of nearby transmitters. This enables it to choose the strongest FM signal for the selected station. This is particularly useful and safe for you as a driver, you no longer have to re-tune when driving between different transmitter coverage areas.
Regional Links (REG On/Off)Many local radio stations only have a couple of different frequencies, and their coverage area is limited. Some local stations are linked together according to their region, so that if the signal from a local radio station becomes weak, the unit can switch to another local station in the same region. If you wish the radio to stay tuned to the same local station regardless of the signal strength or quality, then you should turn the Regional facility ON, as described in the previous pages.
EN-14
TA and TP (Travel Announcements / Travel Program Identifi cation)When a local radio station broadcasts a traffi c report, the unit is informed. This information can be used to provide you with travel information without having to listen to that particular radio station all of the time. When the travel announcement is broadcast the unit will interrupt the AUX or CD that is playing and will automatically switch to the announcement. At the end of the announcement the unit returns to its former state by switching back to the SD, USB AUX, or CD.
For this to work, the travel announcement function must be switched on. The unit will only allow you to tune to a station which is capable of sending the relevant RDS travel announcement information.
If the signal of the selected radio station becomes weak, the unit should re-tune itself to another station that has the RDS travel information. The TP symbol will ignite on the information display, when a TP station is found or selected.
EON (Enhanced Other Networks)The unit is equipped with the Enhanced Other Network (EON) function, and can switch from a national Network station (eg RADIO ONE) to a Local Radio travel announcement, and then back to the national station at the end of the announcement. For example, the unit is tuned to RADIO FOUR, and the TA Travel function is switched on. You may be listening to RADIO FOUR or to a track, or you could have the volume turned down. When a nearby local radio station, such as RADIO LOCAL, is about to make a travel announcement, an RDS signal transmitted on RADIO FOUR tells the unit to tune to RADIO LOCAL for the announcement. The unit will already know the frequency of RADIO LOACAL in that area. The unit will fi rst check that it can receive RADIO LOCAL satisfactorily and, if so, will switch from RADIO FOUR, turn up the volume, or interrupt the playback for the duration of the announcement. At the end of the announcement the unit returns to its previous state ready for the next announcement. With EON, the unit is told about the frequencies of other radio stations in the area, both local and national. If you change stations, the unit will know immediately which frequencies to try fi rst.
PTY (Program Type)Many radio stations give codes to individual programs according to their type. The unit allow you to select the type of program required, and will search for a station broadcasting that type of program. The following program types are available: Speech, News, Current Affairs, Information, Sport, Education, Drama, Culture, Science, Varied Speech (quizzes/comedy), Pop Music, Rock Music, M.O.R.M. Easy Listening, Classical, Other Music types, Weather, Finance, Children, Social, Religion, Phone in, Travel, Leisure, Jazz, Country, National, Oldies, Folk Music and Documentations.
To switch PTY ON, press the OK button for more than two seconds on the unit. The current selected PTY type will be shown on the information display. When no special type is selected PTY NONE will be shown. To switch PTY OFF, press the OK button again. Default PTY is “News”.
Turn the volume knob left or right to scroll through the available PTY types, and then press the OK button again, the unit will now automatically start searching for a radio station with the selected PTY code.
Time and Date (CT-Clock Time)Part of the RDS data is used to transmit the current time and date. The clock on the unit never has to be adjusted, and will automatically set itself for summer and winter time changes. It will also take account of leap years and, if traveling in a foreign country, will adjust between different time zones.
EN-15
TECHNICAL SPECIFICATIONS
Enjoy listening to your musicAn outstanding stylish designed Automotive 1x DIN CD player, with FM RDS EON Radio. This easy to install system comes complete with a fold-down faceplate which is detachable for theft prevention. The built-in 4x40 Watt Power Amplifi er is offering brilliant HiFi sound characteristics. Operating information and station information obtained from the RDS function is shown on the information display. As much as 18 FM radio stations can be programmed as preset channels. Operation is easy with the user-friendly access buttons.
Including:• Protective control panel carrying case• Installation bracket and fi xings• Built-in ISO connector• User Manual
Specifi cations:Power supply 12 V (10.5 ─ 16V allowable)Maximal Current <10 AmpereDimension 1x DIN (178mm [W] × 175mm [D] × 50mm [H])Laser Semi-conductor laser, wave length 650nm, 780nmCD Frequency range 48KHz pulse modulation 20Hz─20KHzCD S/N Ratio 60dB CD Harmonic Distortion THD <0,5%Audio S/N Ratio and Dynamic Range ≥80dBHarmonic Distortion THD 0,1%Amplifi er Output 4 x 40 Watt (Max)Load Impedance 4 - 8 ΩFM Frequency range 87.5 ─ 108 MHzAntenna Impedance 50 ΩAUX IN Frequency Response 20 ─ 20.000HzAUX IN Input Impedance 10KΩAUX IN S/N Ratio 70dBAUX IN Input Level 200mV (2V maximal)Audio RCA output 2,0V (1KHz .0dB) ±0,2VOperation Temperature Temp: -20˚C ─ +60˚C Storage Temperature Temp: -30˚C ─ +80˚C
EN-16
ADDITIONAL IMPORTANT NOTES
• Do not use the unit for a long time without running the vehicle’s engine, it will drain the battery preventing a correct start of the engine and it will reduce the lifecycle of the battery.
• If possible ask qualifi ed professionals to install the unit.• Before fi nal installation of the unit into the 1x DIN size opening of your dashboard, connect the wiring and make sure
everything is connected and is working properly.• Use only the parts included with the unit to ensure proper installation. The use of unauthorized parts may and can cause
malfunctions.• Consult your nearest car dealer if the installation requires to drill holes or other modifi cations need to be made to your car.• Install the unit where it does not get in the driver’s way and cannot injure the passenger in case there is a sudden
emergency stop.• With some USB memory sticks, you may not be able to use certain functions.• This unit is for vehicles with a 12-volt battery and negative grounding. Before installing it in a recreational vehicle, truck, or
bus, check the battery voltage.• To avoid shorts in the electrical system, be sure to disconnect the battery cable before beginning any installation.• Refer to this manual for details on connecting the power amp and other units.• Secure the wiring with cable clamps or adhesive tape. To protect the wiring, wrap adhesive tape around them where they
lie against metal parts.• Route and secure all wiring so it cannot touch any moving parts, such as the gear shift, handbrake and seat rails.• Do not route wiring in places that get hot ,such as near the heater outlet, if the insulation of the wiring melts or gets torn,
there is a danger of the wiring short-circuiting to the vehicle body .• Do not shorten any leads. if you do ,the protection circuit may fail to work when it should.• Never feed power to other equipment by cutting the insulation of the power supply lead of the unit and tapping into the lead.
The current capacity of the lead will be exceeded, causing overheating• When replacing fuse, be sure to use only fuse of the same rating prescribed on this unit.• Speakers connected to this unit must be high-power types with minimum rating of 30W and impedance of 4-8 ohms.
Connecting speakers with output and/or impedance values other than those noted here, may result in the speakers catching fi re, emitting smoke, or becoming damaged.
• When this product’s source is switched ON, a control signal is output through the blue lead. Connect to an external power amp’s system remote control or the car’s Auto-antenna relay control terminal (max.100 mA 12 V DC). If the car features a glass antenna, connect to the antenna booster power supply terminal.
• When an external power amplifi er is being used with this system, be sure not to connect the blue lead to the amplifi ers power terminal. Likewise, do not connect the blue lead to the power terminal of the auto-antenna. Such connection could cause excessive current drain and malfunction.
• To avoid short-circuiting, cover the disconnected lead with insulating tape. Especially insulate the unused speaker leads without failure. There is a possibility of short -circuiting if the leads are not insulated.
• Dirt or condensation on the lens inside this unit may prevent playback.• Playback of discs recorded with a PC using the correct format is possible but depending on the application software,
environmental settings and other factors playback may not be possible (For details , inquire at the store or dealer where you purchased the application software.)
• CD-Extra discs can be played back as music CDs.• Normal playback of CD-R/CD-RW discs other than those recorded with a music CD recorder may not be possible.• Playback of music CD-R/CD-RW discs even those recorded with a music CD recorder, may not be possible with this unit
due to disc characteristics or dirt on the disc. Dirt or condensation on the lens inside this unit may also prevent playback.• Titles and other text information recorded on CD-R/CD-RW discs (ID3TAG) can be displayed by this unit. • If you insert a CD-RW disc into this unit time to playback will be longer than when you insert a conventional CD or CD-R
disc. Read the precautions with the CD-R/CD-RW discs before using.• Driving and having a Telephone conversation at the same time is dangerous, please park your car before having a telephone
conversation. The supplier waves any and all liability when this warning is not followed.
EN-17
DISPOSING OF THE BATTERY / BATTERIESPlease check local regulations for disposal of batteries or call your local city offi ce or your household waste disposal service or the shop where you purchased the product.
The battery / batteries should never be placed in municipal waste. Use a battery disposal facility in your neighborhood or community, if available.
INSTRUCTIONS AND INFORMATION REGARDING THE DISPOSAL OF USED PACKAGING MATERIALSDispose of packaging material at a public waste disposal site.
DISPOSAL OF USED ELECTRICAL AND ELECTRONIC APPLIANCESThe meaning of the symbol on the product, its accessory or packaging indicates that thisproduct shall not be treated as household waste. Please, dispose of this product at your applicable collection point for the recycling of electrical & electronic equipment waste. Alternatively in some states of the European Union or other European states you may return your products to your local retailer when buying an equivalent new product. The correct disposal of this product will help save valuable natural resources and help in preventing the potential negative impact on the environment and human health, which could be caused as a result of improper liquidation of waste. Please ask your local authorities or the nearest waste collection centre for further details. The improper disposal of this type of waste may fall subject to national regulations for fi nes.
FOR BUSINESS ENTITIES IN THE EUROPEAN UNIONIf you wish to dispose of an electrical or electronic device, request the necessary information from your seller or supplier.
DISPOSAL IN OTHER COUNTRIES OUTSIDE THE EUROPEAN UNIONIf you wish to dispose of this product, request the necessary information about the correct disposal method from local government departments or from your seller.
This product meets all the basic EU regulation requirements that relate to it.
Changes to the text, design and technical specifi cations may occur without prior notice and we reserve the right to make these changes.