Savant® Wireless Thermostat (SST-W100) User Guide Date: June 2013 Part Number: 009-0957-00 Copyright 2013 Savant Systems LLC, SAVANT and RacePoint Blueprint are trademarks of Savant Systems, LLC. All brand names, product names and trademarks are the property of their respective owners. Savant Systems, LLC reserves the right to change product specifications without notice.
Transcript
Savant® Wireless Thermostat(SST-W100) User Guide
Date: June 2013Part Number: 009-0957-00
Copyright 2013 Savant Systems LLC, SAVANT and RacePoint Blueprint are trademarks of Savant Systems, LLC.All brand names, product names and trademarks are the property of their respective owners.Savant Systems, LLC reserves the right to change product specifications without notice.
ContentsTo access the hyperlinks to the topics in this document, click the topic or topic page number.
............................................................................................................................................Setting the System Mode 4
............................................................................................................................................System Status Indicators 5
............................................................................................................................................................................................Minimum Off Time 5
..........................................................................................................................................................................................Minimum Run Time 5
...........................................................................................................................................................Setting Fan Mode 7
...........................................................................................................................................................................................Optional Fan Mode 7
....................................................................................................................................................Main Menu Selection 8
...............................................................................................................................................................................................Main Menu Items 8
........................................................................................................................................................................................................Filter Service 11
.......................................................................................................................................................................................................Maint Service 11
2 of 17Savant Wireless Thermostat (SST-W100) User Guide
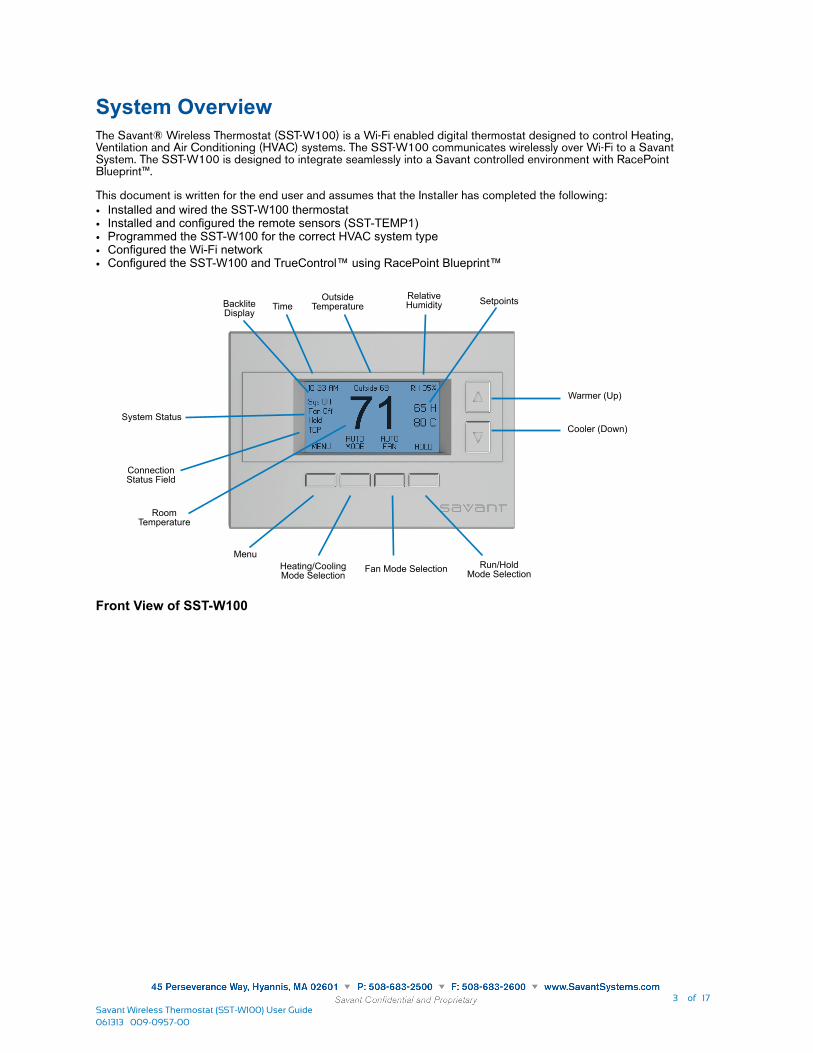
System OverviewThe Savant® Wireless Thermostat (SST-W100) is a Wi-Fi enabled digital thermostat designed to control Heating, Ventilation and Air Conditioning (HVAC) systems. The SST-W100 communicates wirelessly over Wi-Fi to a Savant System. The SST-W100 is designed to integrate seamlessly into a Savant controlled environment with RacePoint Blueprint™.
This document is written for the end user and assumes that the Installer has completed the following:
• Installed and wired the SST-W100 thermostat• Installed and configured the remote sensors (SST-TEMP1)• Programmed the SST-W100 for the correct HVAC system type • Configured the Wi-Fi network• Configured the SST-W100 and TrueControl™ using RacePoint Blueprint™
Outside Temperature
RelativeHumidity Setpoints
Warmer (Up)
Cooler (Down)
Menu
System Status
RoomTemperature
Heating/Cooling Mode Selection
Fan Mode Selection Run/HoldMode Selection
TimeBackliteDisplay
ConnectionStatus Field
Front View of SST-W100
061313 009-0957-00
3 of 17Savant Wireless Thermostat (SST-W100) User Guide
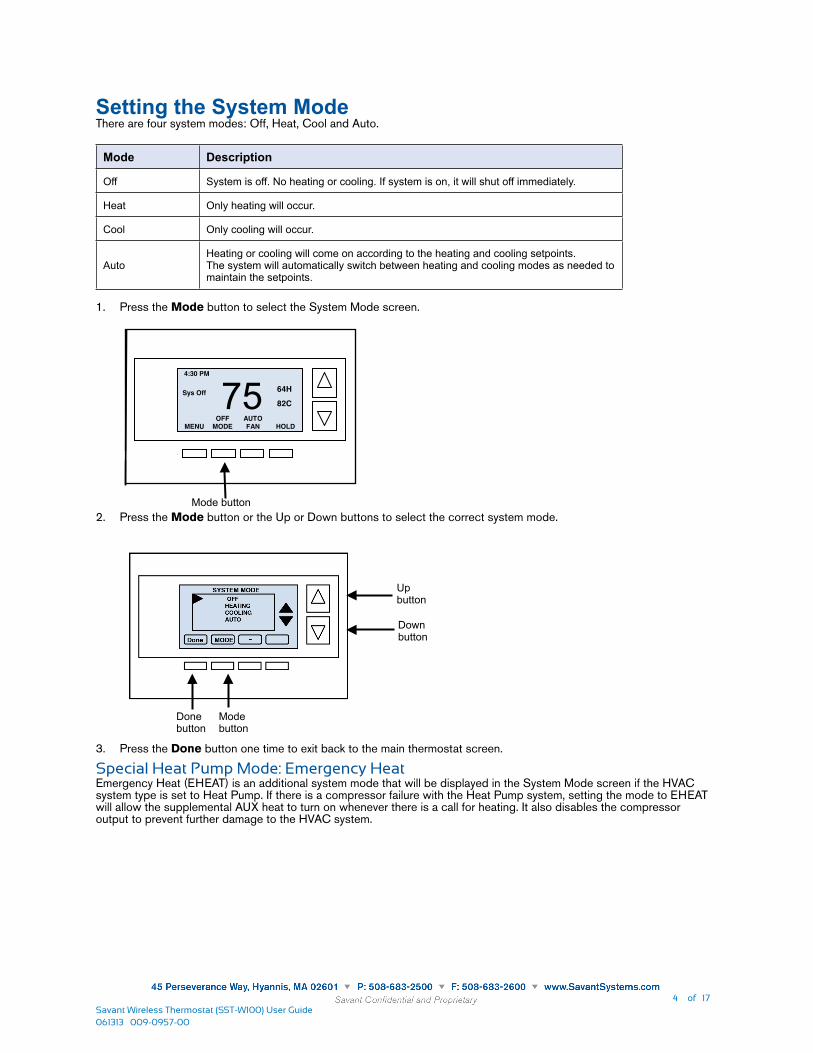
Setting the System ModeThere are four system modes: Off, Heat, Cool and Auto.
Mode Description
Off System is off. No heating or cooling. If system is on, it will shut off immediately.
Heat Only heating will occur.
Cool Only cooling will occur.
AutoHeating or cooling will come on according to the heating and cooling setpoints.The system will automatically switch between heating and cooling modes as needed to maintain the setpoints.
1. Press the Mode button to select the System Mode screen.
DCN: 141-02048-01 Page 13
INSTALLATION IMPORTANT! You must set the HVAC System type before operating the thermostat. After the thermostat is installed and powered up, check and set the HVAC system configuration setup as needed. Follow the steps below to select the correct HVAC system setup.
4:30 PM
75 MENU
OFF MODE HOLD
64H 82C
AUTO FAN
Sys Off
Thermostat Info
Done Setup
TW45 Ver: 02.04.01 WiFi Radio Version: 02.30 System Type: Standard Fan Type: Gas Network Address 1
Status
Press the MENU button to go to the main menu screen
Scroll down to the Thermostat Info using down arrow button. Press the SELECT button
Thermostat Info Screen Note the System Type displayed here. The default HVAC type is Standard Gas (single stage) If this is the correct system type, no further setup is required. Press Done to exit. If this is not the correct system type, press and HOLD the SETUP button to go to the Mechanical Settings screen.
Menu Selection
Select
Thermostat Info WiFi Network Status WiFi Setup
Done
Mode button2. Press the Mode button or the Up or Down buttons to select the correct system mode.
Mode button
Done button
Up button
Down button
3. Press the Done button one time to exit back to the main thermostat screen.
Special Heat Pump Mode: Emergency HeatEmergency Heat (EHEAT) is an additional system mode that will be displayed in the System Mode screen if the HVAC system type is set to Heat Pump. If there is a compressor failure with the Heat Pump system, setting the mode to EHEAT will allow the supplemental AUX heat to turn on whenever there is a call for heating. It also disables the compressor output to prevent further damage to the HVAC system.
061313 009-0957-00
4 of 17Savant Wireless Thermostat (SST-W100) User Guide
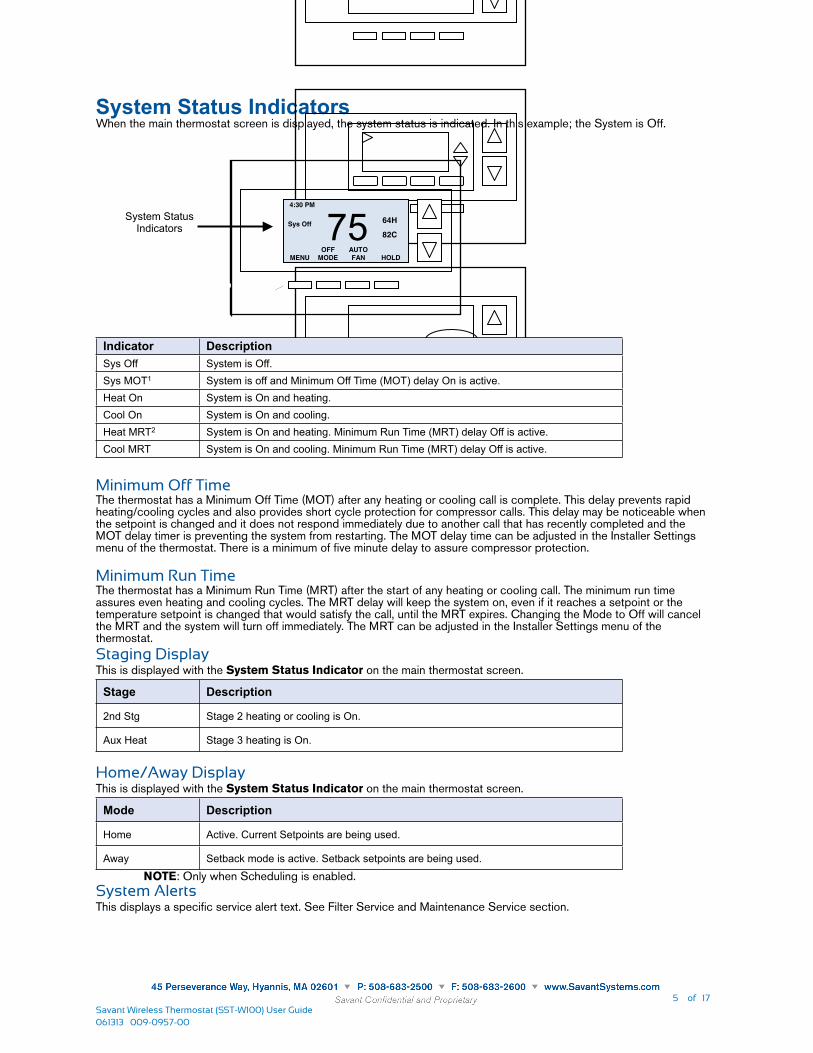
System Status IndicatorsWhen the main thermostat screen is displayed, the system status is indicated. In this example; the System is Off.
DCN: 141-02048-01 Page 13
INSTALLATION IMPORTANT! You must set the HVAC System type before operating the thermostat. After the thermostat is installed and powered up, check and set the HVAC system configuration setup as needed. Follow the steps below to select the correct HVAC system setup.
4:30 PM
75 MENU
OFF MODE HOLD
64H 82C
AUTO FAN
Sys Off
Thermostat Info
Done Setup
TW45 Ver: 02.04.01 WiFi Radio Version: 02.30 System Type: Standard Fan Type: Gas Network Address 1
Status
Press the MENU button to go to the main menu screen
Scroll down to the Thermostat Info using down arrow button. Press the SELECT button
Thermostat Info Screen Note the System Type displayed here. The default HVAC type is Standard Gas (single stage) If this is the correct system type, no further setup is required. Press Done to exit. If this is not the correct system type, press and HOLD the SETUP button to go to the Mechanical Settings screen.
Menu Selection
Select
Thermostat Info WiFi Network Status WiFi Setup
Done
Fan Mode button
System Status Indicators
DCN: 141-02048-01 Page 13
INSTALLATION IMPORTANT! You must set the HVAC System type before operating the thermostat. After the thermostat is installed and powered up, check and set the HVAC system configuration setup as needed. Follow the steps below to select the correct HVAC system setup.
4:30 PM
75 MENU
OFF MODE HOLD
64H 82C
AUTO FAN
Sys Off
Thermostat Info
Done Setup
TW45 Ver: 02.04.01 WiFi Radio Version: 02.30 System Type: Standard Fan Type: Gas Network Address 1
Status
Press the MENU button to go to the main menu screen
Scroll down to the Thermostat Info using down arrow button. Press the SELECT button
Thermostat Info Screen Note the System Type displayed here. The default HVAC type is Standard Gas (single stage) If this is the correct system type, no further setup is required. Press Done to exit. If this is not the correct system type, press and HOLD the SETUP button to go to the Mechanical Settings screen.
Menu Selection
Select
Thermostat Info WiFi Network Status WiFi Setup
Done
Indicator DescriptionSys Off System is Off.Sys MOT1 System is off and Minimum Off Time (MOT) delay On is active.Heat On System is On and heating.Cool On System is On and cooling.Heat MRT2 System is On and heating. Minimum Run Time (MRT) delay Off is active.Cool MRT System is On and cooling. Minimum Run Time (MRT) delay Off is active.
Minimum Off Time The thermostat has a Minimum Off Time (MOT) after any heating or cooling call is complete. This delay prevents rapid heating/cooling cycles and also provides short cycle protection for compressor calls. This delay may be noticeable when the setpoint is changed and it does not respond immediately due to another call that has recently completed and the MOT delay timer is preventing the system from restarting. The MOT delay time can be adjusted in the Installer Settings menu of the thermostat. There is a minimum of five minute delay to assure compressor protection.
Minimum Run TimeThe thermostat has a Minimum Run Time (MRT) after the start of any heating or cooling call. The minimum run time assures even heating and cooling cycles. The MRT delay will keep the system on, even if it reaches a setpoint or the temperature setpoint is changed that would satisfy the call, until the MRT expires. Changing the Mode to Off will cancel the MRT and the system will turn off immediately. The MRT can be adjusted in the Installer Settings menu of the thermostat.
Staging DisplayThis is displayed with the System Status Indicator on the main thermostat screen.
Stage Description
2nd Stg Stage 2 heating or cooling is On.
Aux Heat Stage 3 heating is On.
Home/Away DisplayThis is displayed with the System Status Indicator on the main thermostat screen.
Mode Description
Home Active. Current Setpoints are being used.
Away Setback mode is active. Setback setpoints are being used.
NOTE: Only when Scheduling is enabled.
System AlertsThis displays a specific service alert text. See Filter Service and Maintenance Service section.
061313 009-0957-00
5 of 17Savant Wireless Thermostat (SST-W100) User Guide
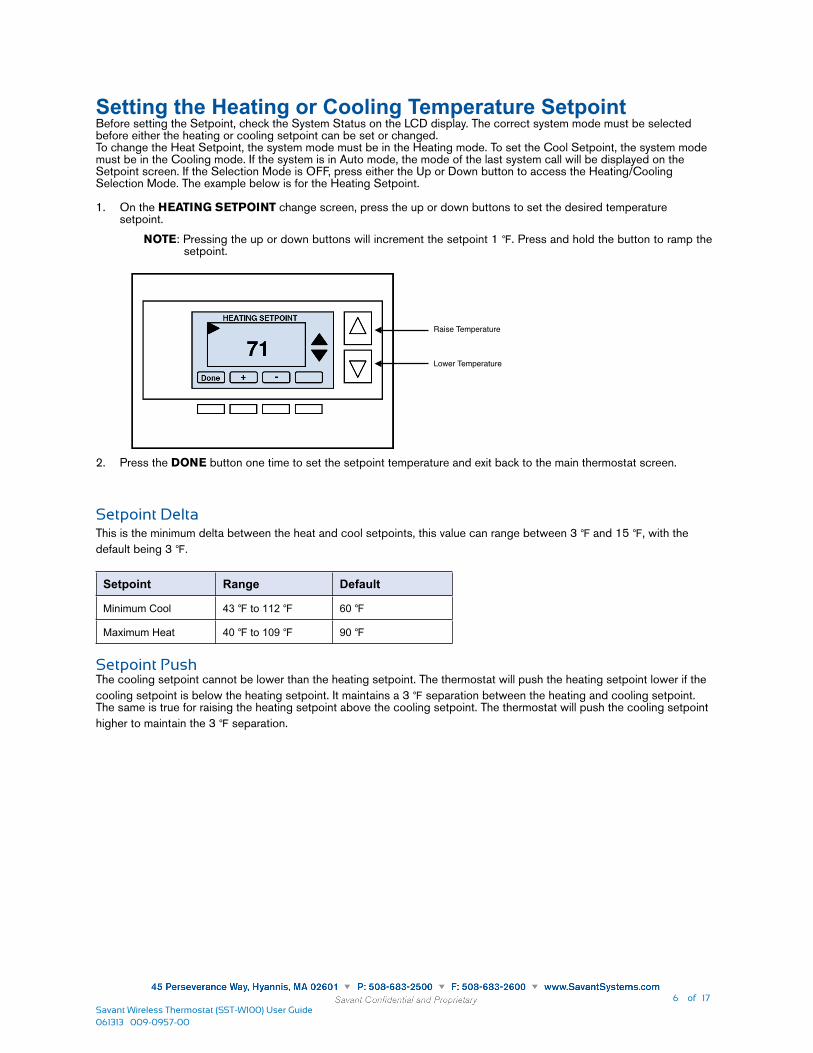
Setting the Heating or Cooling Temperature SetpointBefore setting the Setpoint, check the System Status on the LCD display. The correct system mode must be selected before either the heating or cooling setpoint can be set or changed. To change the Heat Setpoint, the system mode must be in the Heating mode. To set the Cool Setpoint, the system mode must be in the Cooling mode. If the system is in Auto mode, the mode of the last system call will be displayed on the Setpoint screen. If the Selection Mode is OFF, press either the Up or Down button to access the Heating/Cooling Selection Mode. The example below is for the Heating Setpoint.
1. On the HEATING SETPOINT change screen, press the up or down buttons to set the desired temperature setpoint.
NOTE: Pressing the up or down buttons will increment the setpoint 1 ℉. Press and hold the button to ramp the setpoint.
Raise Temperature
Lower Temperature
2. Press the DONE button one time to set the setpoint temperature and exit back to the main thermostat screen.
Setpoint DeltaThis is the minimum delta between the heat and cool setpoints, this value can range between 3 ℉ and 15 ℉, with the
default being 3 ℉.
Setpoint Range Default
Minimum Cool 43 ℉ to 112 ℉ 60 ℉
Maximum Heat 40 ℉ to 109 ℉ 90 ℉
Setpoint PushThe cooling setpoint cannot be lower than the heating setpoint. The thermostat will push the heating setpoint lower if the
cooling setpoint is below the heating setpoint. It maintains a 3 ℉ separation between the heating and cooling setpoint. The same is true for raising the heating setpoint above the cooling setpoint. The thermostat will push the cooling setpoint
higher to maintain the 3 ℉ separation.
061313 009-0957-00
6 of 17Savant Wireless Thermostat (SST-W100) User Guide
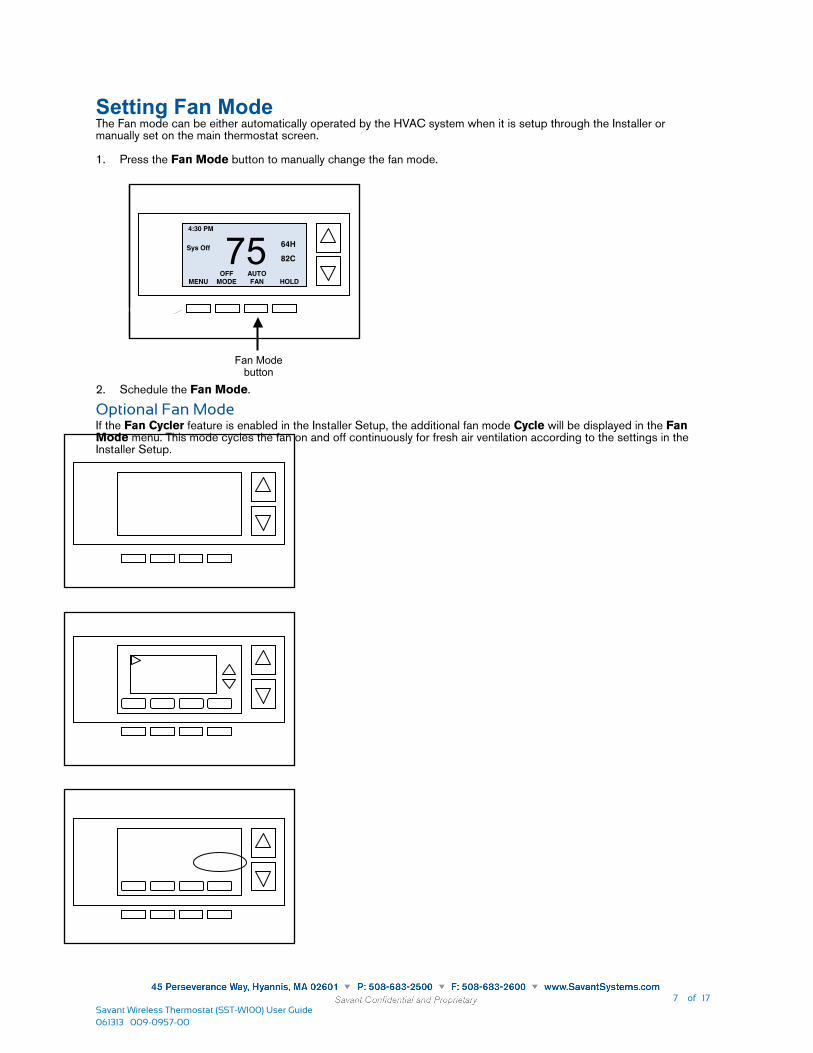
Setting Fan ModeThe Fan mode can be either automatically operated by the HVAC system when it is setup through the Installer or manually set on the main thermostat screen.
1. Press the Fan Mode button to manually change the fan mode.
DCN: 141-02048-01 Page 13
INSTALLATION IMPORTANT! You must set the HVAC System type before operating the thermostat. After the thermostat is installed and powered up, check and set the HVAC system configuration setup as needed. Follow the steps below to select the correct HVAC system setup.
4:30 PM
75 MENU
OFF MODE HOLD
64H 82C
AUTO FAN
Sys Off
Thermostat Info
Done Setup
TW45 Ver: 02.04.01 WiFi Radio Version: 02.30 System Type: Standard Fan Type: Gas Network Address 1
Status
Press the MENU button to go to the main menu screen
Scroll down to the Thermostat Info using down arrow button. Press the SELECT button
Thermostat Info Screen Note the System Type displayed here. The default HVAC type is Standard Gas (single stage) If this is the correct system type, no further setup is required. Press Done to exit. If this is not the correct system type, press and HOLD the SETUP button to go to the Mechanical Settings screen.
Menu Selection
Select
Thermostat Info WiFi Network Status WiFi Setup
Done
Fan Mode button
System Status Indicators
DCN: 141-02048-01 Page 13
INSTALLATION IMPORTANT! You must set the HVAC System type before operating the thermostat. After the thermostat is installed and powered up, check and set the HVAC system configuration setup as needed. Follow the steps below to select the correct HVAC system setup.
4:30 PM
75 MENU
OFF MODE HOLD
64H 82C
AUTO FAN
Sys Off
Thermostat Info
Done Setup
TW45 Ver: 02.04.01 WiFi Radio Version: 02.30 System Type: Standard Fan Type: Gas Network Address 1
Status
Press the MENU button to go to the main menu screen
Scroll down to the Thermostat Info using down arrow button. Press the SELECT button
Thermostat Info Screen Note the System Type displayed here. The default HVAC type is Standard Gas (single stage) If this is the correct system type, no further setup is required. Press Done to exit. If this is not the correct system type, press and HOLD the SETUP button to go to the Mechanical Settings screen.
Menu Selection
Select
Thermostat Info WiFi Network Status WiFi Setup
Done
2. Schedule the Fan Mode.
Optional Fan ModeIf the Fan Cycler feature is enabled in the Installer Setup, the additional fan mode Cycle will be displayed in the Fan Mode menu. This mode cycles the fan on and off continuously for fresh air ventilation according to the settings in the Installer Setup.
061313 009-0957-00
7 of 17Savant Wireless Thermostat (SST-W100) User Guide
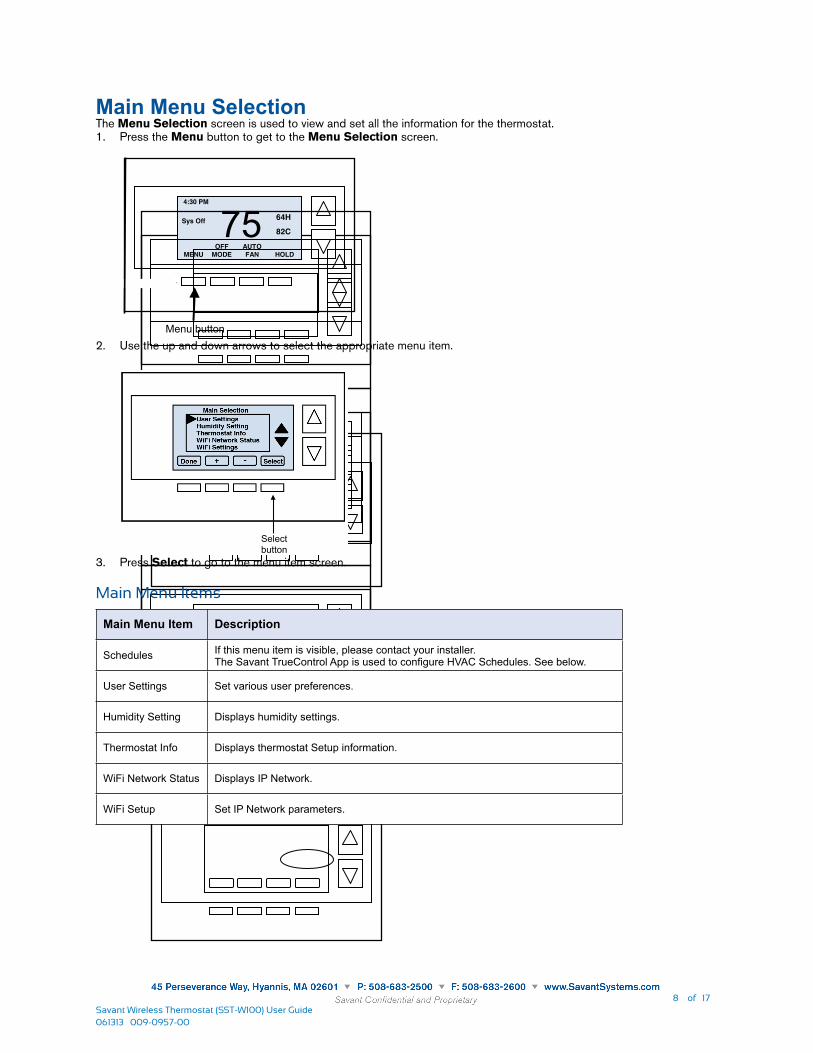
Main Menu SelectionThe Menu Selection screen is used to view and set all the information for the thermostat.1. Press the Menu button to get to the Menu Selection screen.
DCN: 141-02048-01 Page 13
INSTALLATION IMPORTANT! You must set the HVAC System type before operating the thermostat. After the thermostat is installed and powered up, check and set the HVAC system configuration setup as needed. Follow the steps below to select the correct HVAC system setup.
4:30 PM
75 MENU
OFF MODE HOLD
64H 82C
AUTO FAN
Sys Off
Thermostat Info
Done Setup
TW45 Ver: 02.04.01 WiFi Radio Version: 02.30 System Type: Standard Fan Type: Gas Network Address 1
Status
Press the MENU button to go to the main menu screen
Scroll down to the Thermostat Info using down arrow button. Press the SELECT button
Thermostat Info Screen Note the System Type displayed here. The default HVAC type is Standard Gas (single stage) If this is the correct system type, no further setup is required. Press Done to exit. If this is not the correct system type, press and HOLD the SETUP button to go to the Mechanical Settings screen.
Menu Selection
Select
Thermostat Info WiFi Network Status WiFi Setup
Done
Setup button
DCN: 141-02048-01 Page 13
INSTALLATION IMPORTANT! You must set the HVAC System type before operating the thermostat. After the thermostat is installed and powered up, check and set the HVAC system configuration setup as needed. Follow the steps below to select the correct HVAC system setup.
4:30 PM
75 MENU
OFF MODE HOLD
64H 82C
AUTO FAN
Sys Off
Thermostat Info
Done Setup
TW45 Ver: 02.04.01 WiFi Radio Version: 02.30 System Type: Standard Fan Type: Gas Network Address 1
Status
Press the MENU button to go to the main menu screen
Scroll down to the Thermostat Info using down arrow button. Press the SELECT button
Thermostat Info Screen Note the System Type displayed here. The default HVAC type is Standard Gas (single stage) If this is the correct system type, no further setup is required. Press Done to exit. If this is not the correct system type, press and HOLD the SETUP button to go to the Mechanical Settings screen.
Menu Selection
Select
Thermostat Info WiFi Network Status WiFi Setup
Done
Default HVAC type
Done button
DCN: 141-02048-01 Page 13
INSTALLATION IMPORTANT! You must set the HVAC System type before operating the thermostat. After the thermostat is installed and powered up, check and set the HVAC system configuration setup as needed. Follow the steps below to select the correct HVAC system setup.
4:30 PM
75 MENU
OFF MODE HOLD
64H 82C
AUTO FAN
Sys Off
Thermostat Info
Done Setup
TW45 Ver: 02.04.01 WiFi Radio Version: 02.30 System Type: Standard Fan Type: Gas Network Address 1
Status
Press the MENU button to go to the main menu screen
Scroll down to the Thermostat Info using down arrow button. Press the SELECT button
Thermostat Info Screen Note the System Type displayed here. The default HVAC type is Standard Gas (single stage) If this is the correct system type, no further setup is required. Press Done to exit. If this is not the correct system type, press and HOLD the SETUP button to go to the Mechanical Settings screen.
Menu Selection
Select
Thermostat Info WiFi Network Status WiFi Setup
Done
Menu button
DCN: 141-02048-01 Page 13
INSTALLATION IMPORTANT! You must set the HVAC System type before operating the thermostat. After the thermostat is installed and powered up, check and set the HVAC system configuration setup as needed. Follow the steps below to select the correct HVAC system setup.
4:30 PM
75 MENU
OFF MODE HOLD
64H 82C
AUTO FAN
Sys Off
Thermostat Info
Done Setup
TW45 Ver: 02.04.01 WiFi Radio Version: 02.30 System Type: Standard Fan Type: Gas Network Address 1
Status
Press the MENU button to go to the main menu screen
Scroll down to the Thermostat Info using down arrow button. Press the SELECT button
Thermostat Info Screen Note the System Type displayed here. The default HVAC type is Standard Gas (single stage) If this is the correct system type, no further setup is required. Press Done to exit. If this is not the correct system type, press and HOLD the SETUP button to go to the Mechanical Settings screen.
Menu Selection
Select
Thermostat Info WiFi Network Status WiFi Setup
Done
Select button
2. Use the up and down arrows to select the appropriate menu item.
Selectbutton
3. Press Select to go to the menu item screen.
Main Menu Items
Main Menu Item Description
Schedules If this menu item is visible, please contact your installer.The Savant TrueControl App is used to configure HVAC Schedules. See below.
User Settings Set various user preferences.
Humidity Setting Displays humidity settings.
Thermostat Info Displays thermostat Setup information.
WiFi Network Status Displays IP Network.
WiFi Setup Set IP Network parameters.
061313 009-0957-00
8 of 17Savant Wireless Thermostat (SST-W100) User Guide
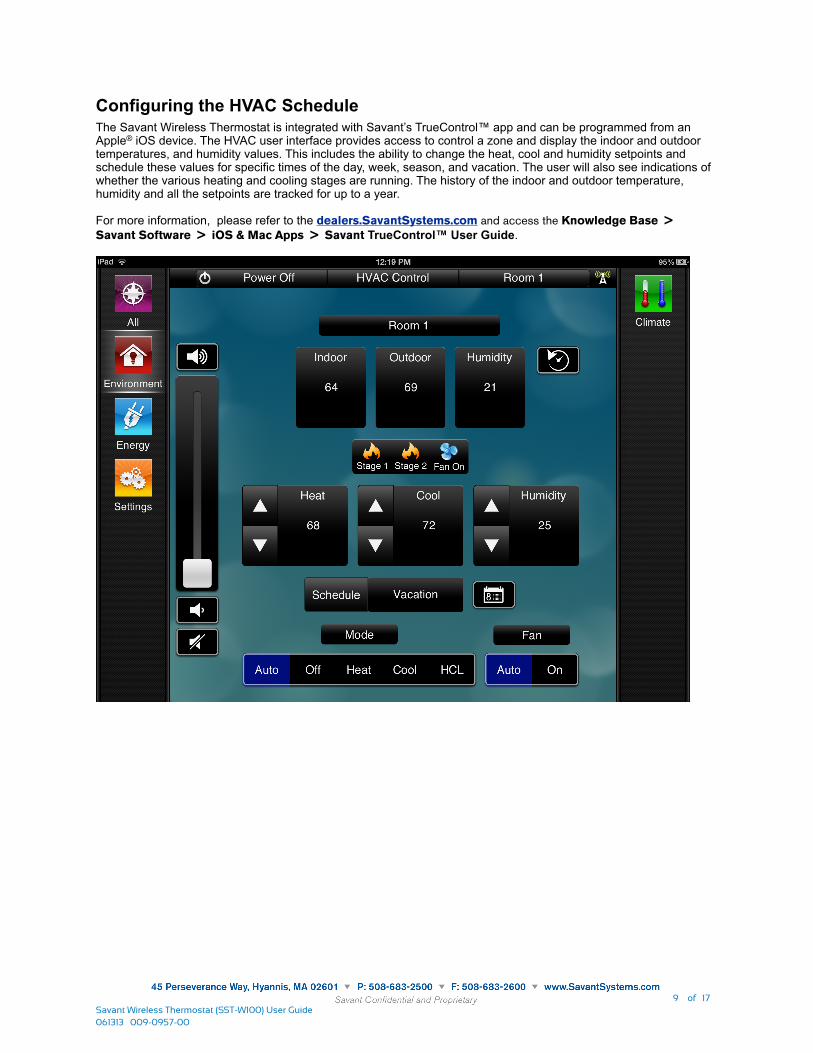
Configuring the HVAC ScheduleThe Savant Wireless Thermostat is integrated with Savant’s TrueControl™ app and can be programmed from an Apple® iOS device. The HVAC user interface provides access to control a zone and display the indoor and outdoor temperatures, and humidity values. This includes the ability to change the heat, cool and humidity setpoints and schedule these values for specific times of the day, week, season, and vacation. The user will also see indications of whether the various heating and cooling stages are running. The history of the indoor and outdoor temperature, humidity and all the setpoints are tracked for up to a year.
For more information, please refer to the dealers.SavantSystems.com and access the Knowledge Base >
Savant Software > iOS & Mac Apps > Savant TrueControl™ User Guide.
061313 009-0957-00
9 of 17Savant Wireless Thermostat (SST-W100) User Guide
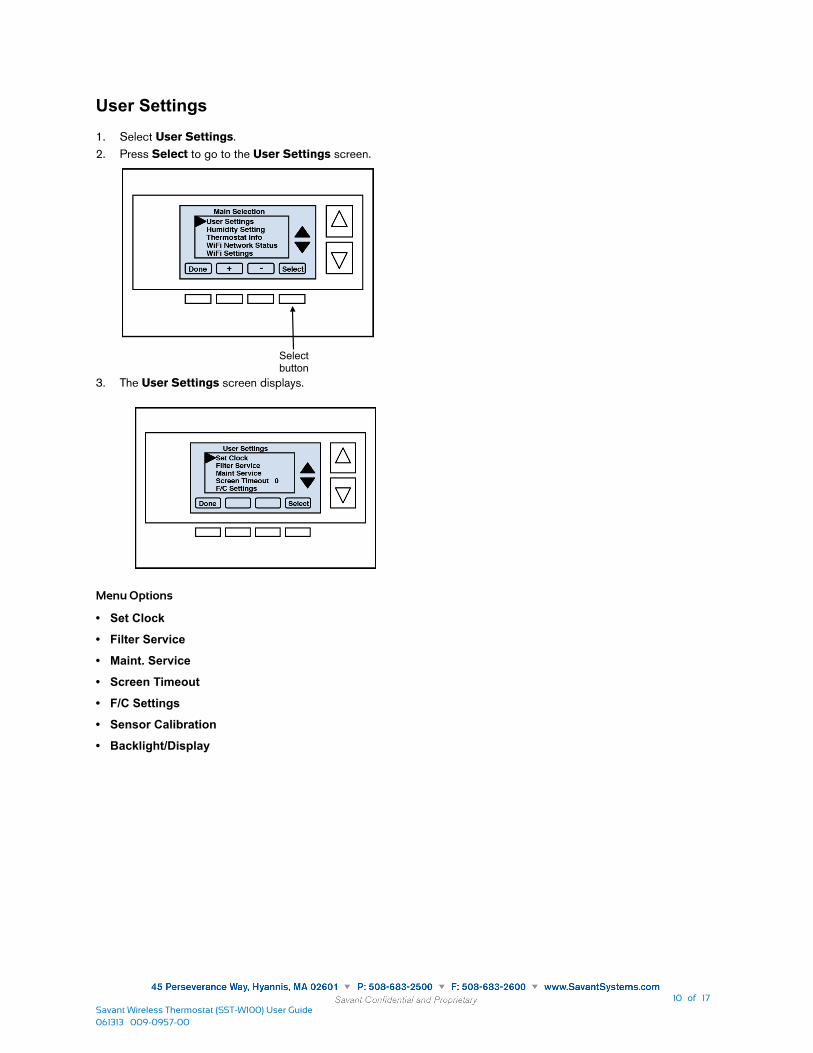
2. Press Select to go to the User Settings screen.
Selectbutton
3. The User Settings screen displays.
Menu Options
• Set Clock
• Filter Service
• Maint. Service
• Screen Timeout
• F/C Settings
• Sensor Calibration
• Backlight/Display
061313 009-0957-00
10 of 17Savant Wireless Thermostat (SST-W100) User Guide
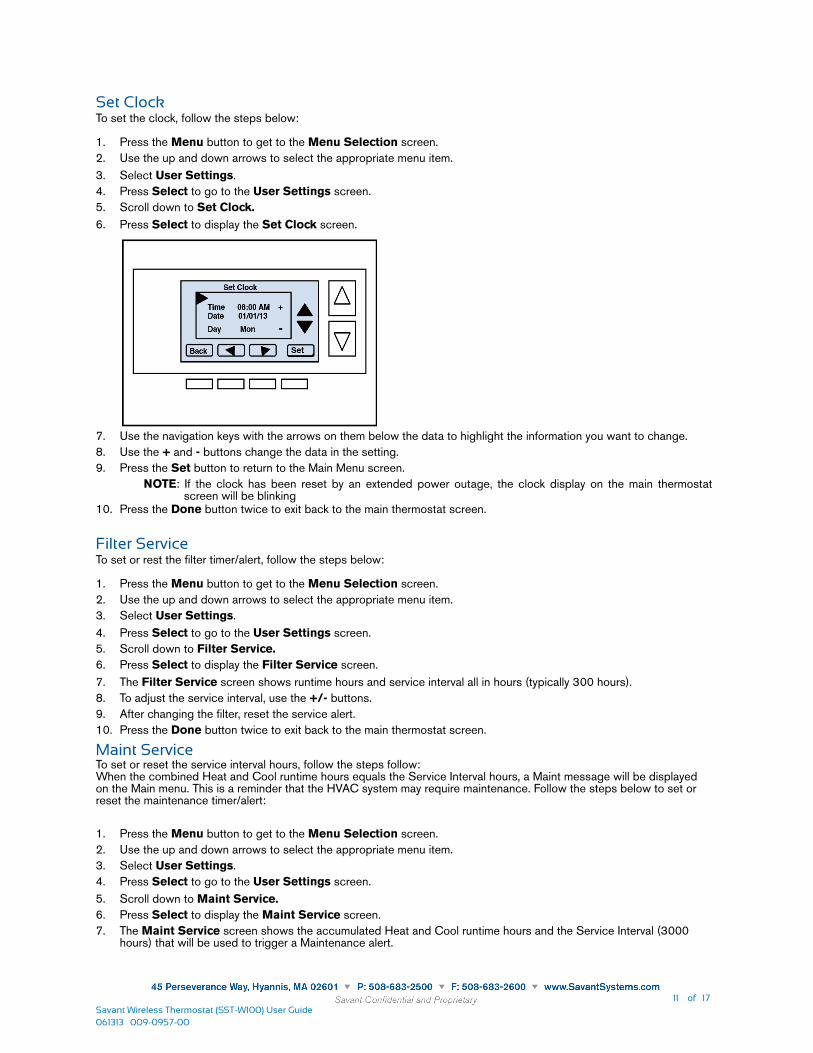
Set ClockTo set the clock, follow the steps below:
1. Press the Menu button to get to the Menu Selection screen.
2. Use the up and down arrows to select the appropriate menu item.
3. Select User Settings.
4. Press Select to go to the User Settings screen.
5. Scroll down to Set Clock.
6. Press Select to display the Set Clock screen.
7. Use the navigation keys with the arrows on them below the data to highlight the information you want to change.
8. Use the + and - buttons change the data in the setting.
9. Press the Set button to return to the Main Menu screen.
NOTE: If the clock has been reset by an extended power outage, the clock display on the main thermostat screen will be blinking
10. Press the Done button twice to exit back to the main thermostat screen.
Filter ServiceTo set or rest the filter timer/alert, follow the steps below:
1. Press the Menu button to get to the Menu Selection screen.
2. Use the up and down arrows to select the appropriate menu item.
3. Select User Settings.
4. Press Select to go to the User Settings screen.
5. Scroll down to Filter Service.
6. Press Select to display the Filter Service screen.
7. The Filter Service screen shows runtime hours and service interval all in hours (typically 300 hours).
8. To adjust the service interval, use the +/- buttons.
9. After changing the filter, reset the service alert.
10. Press the Done button twice to exit back to the main thermostat screen.
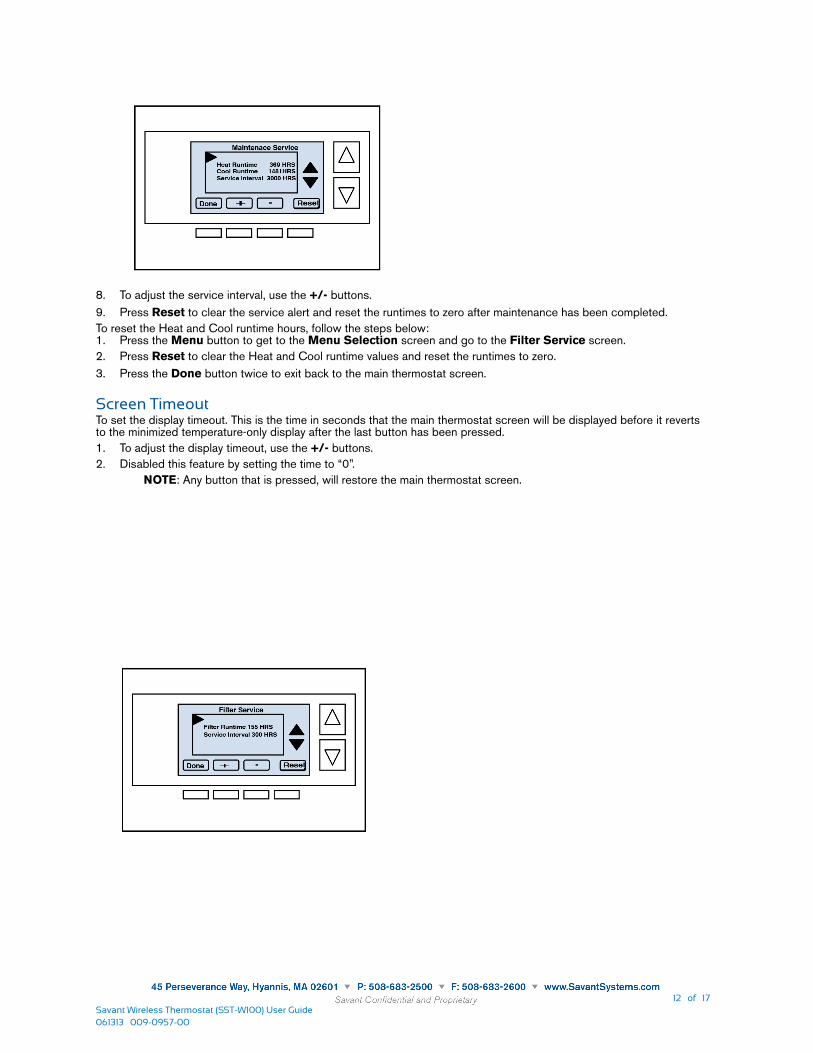
Maint ServiceTo set or reset the service interval hours, follow the steps follow:When the combined Heat and Cool runtime hours equals the Service Interval hours, a Maint message will be displayed on the Main menu. This is a reminder that the HVAC system may require maintenance. Follow the steps below to set or reset the maintenance timer/alert:
1. Press the Menu button to get to the Menu Selection screen.
2. Use the up and down arrows to select the appropriate menu item.
3. Select User Settings.
4. Press Select to go to the User Settings screen.
5. Scroll down to Maint Service.
6. Press Select to display the Maint Service screen.
7. The Maint Service screen shows the accumulated Heat and Cool runtime hours and the Service Interval (3000 hours) that will be used to trigger a Maintenance alert.
061313 009-0957-00
11 of 17Savant Wireless Thermostat (SST-W100) User Guide
8. To adjust the service interval, use the +/- buttons.
9. Press Reset to clear the service alert and reset the runtimes to zero after maintenance has been completed.
To reset the Heat and Cool runtime hours, follow the steps below:1. Press the Menu button to get to the Menu Selection screen and go to the Filter Service screen.
2. Press Reset to clear the Heat and Cool runtime values and reset the runtimes to zero.
3. Press the Done button twice to exit back to the main thermostat screen.
Screen TimeoutTo set the display timeout. This is the time in seconds that the main thermostat screen will be displayed before it reverts to the minimized temperature-only display after the last button has been pressed.
1. To adjust the display timeout, use the +/- buttons.
2. Disabled this feature by setting the time to “0”.
NOTE: Any button that is pressed, will restore the main thermostat screen.
061313 009-0957-00
12 of 17Savant Wireless Thermostat (SST-W100) User Guide
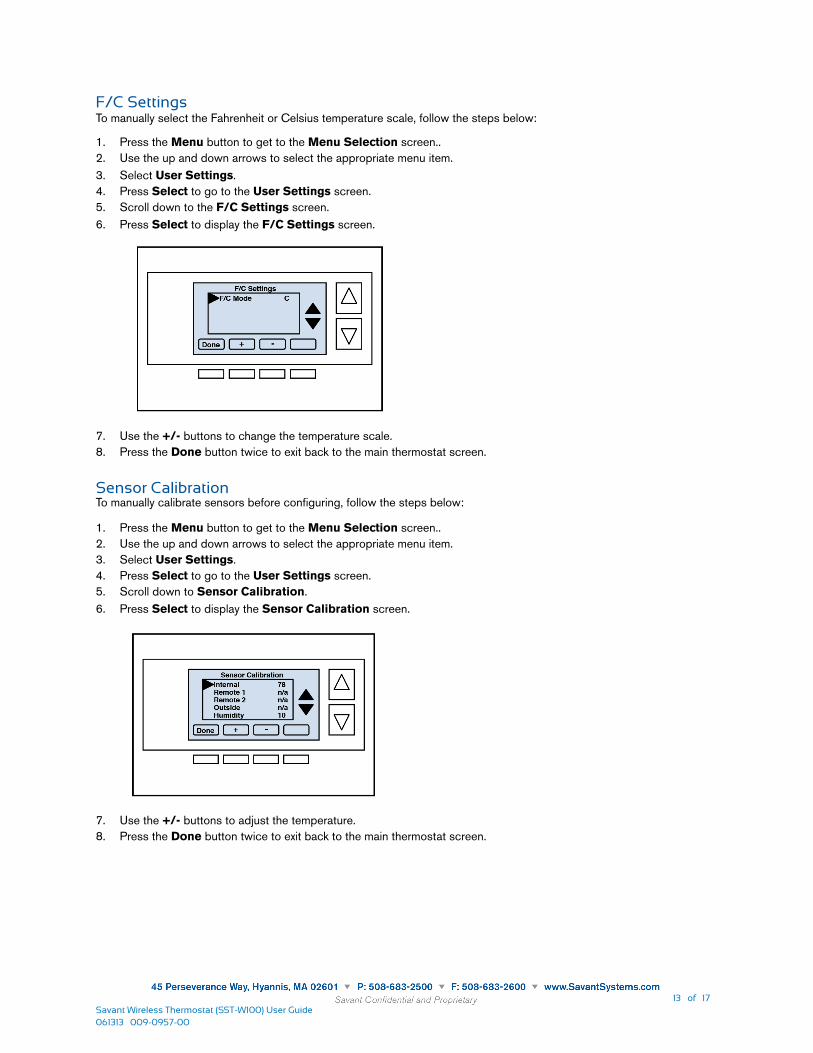
F/C SettingsTo manually select the Fahrenheit or Celsius temperature scale, follow the steps below:
1. Press the Menu button to get to the Menu Selection screen..
2. Use the up and down arrows to select the appropriate menu item.
3. Select User Settings.
4. Press Select to go to the User Settings screen.
5. Scroll down to the F/C Settings screen.
6. Press Select to display the F/C Settings screen.
7. Use the +/- buttons to change the temperature scale.
8. Press the Done button twice to exit back to the main thermostat screen.
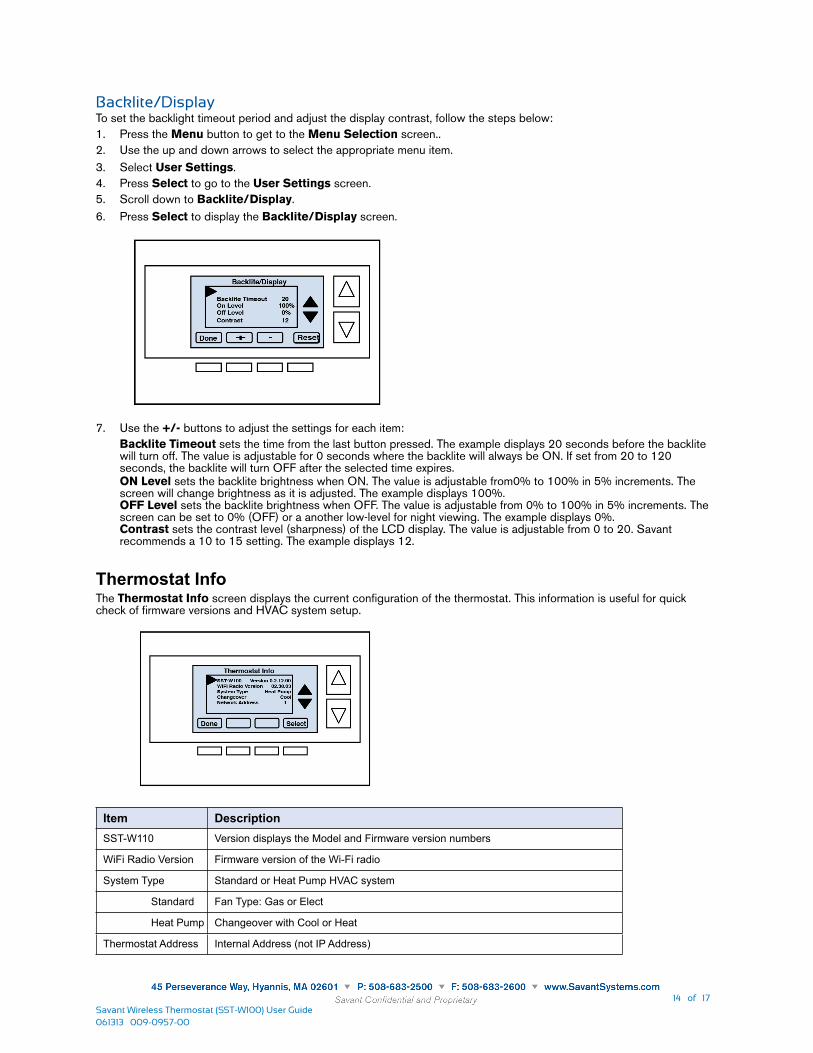
Sensor CalibrationTo manually calibrate sensors before configuring, follow the steps below:
1. Press the Menu button to get to the Menu Selection screen..
2. Use the up and down arrows to select the appropriate menu item.
3. Select User Settings.
4. Press Select to go to the User Settings screen.
5. Scroll down to Sensor Calibration.
6. Press Select to display the Sensor Calibration screen.
7. Use the +/- buttons to adjust the temperature.
8. Press the Done button twice to exit back to the main thermostat screen.
061313 009-0957-00
13 of 17Savant Wireless Thermostat (SST-W100) User Guide
Backlite/DisplayTo set the backlight timeout period and adjust the display contrast, follow the steps below:
1. Press the Menu button to get to the Menu Selection screen..
2. Use the up and down arrows to select the appropriate menu item.
3. Select User Settings.
4. Press Select to go to the User Settings screen.
5. Scroll down to Backlite/Display.
6. Press Select to display the Backlite/Display screen.
7. Use the +/- buttons to adjust the settings for each item:
Backlite Timeout sets the time from the last button pressed. The example displays 20 seconds before the backlite will turn off. The value is adjustable for 0 seconds where the backlite will always be ON. If set from 20 to 120 seconds, the backlite will turn OFF after the selected time expires.ON Level sets the backlite brightness when ON. The value is adjustable from0% to 100% in 5% increments. The screen will change brightness as it is adjusted. The example displays 100%.OFF Level sets the backlite brightness when OFF. The value is adjustable from 0% to 100% in 5% increments. The screen can be set to 0% (OFF) or a another low-level for night viewing. The example displays 0%.Contrast sets the contrast level (sharpness) of the LCD display. The value is adjustable from 0 to 20. Savant recommends a 10 to 15 setting. The example displays 12.
Thermostat InfoThe Thermostat Info screen displays the current configuration of the thermostat. This information is useful for quick check of firmware versions and HVAC system setup.
Item DescriptionSST-W110 Version displays the Model and Firmware version numbers
WiFi Radio Version Firmware version of the Wi-Fi radio
System Type Standard or Heat Pump HVAC system
Standard Fan Type: Gas or Elect
Heat Pump Changeover with Cool or Heat
Thermostat Address Internal Address (not IP Address)
061313 009-0957-00
14 of 17Savant Wireless Thermostat (SST-W100) User Guide
Important Notice
DisclaimerThe contents of this document are subject to change without notice; therefore, the information presented herein shall not be construed as a commitment or warranty. Savant Systems, LLC shall not be liable for any technical or editorial errors or omissions contained herein or for incidental or consequential damages resulting from the performance, furnishing, reliance on, or use of this material.
PatentsCertain equipment and software described in this document is protected by issued and pending U.S. and foreign patents.All products and services are trademarks or registered trademarks of their respective manufacturer.
CopyrightThis document contains confidential and proprietary information protected by copyright. All rights reserved. Copying or other reproduction of all or parts of this document is prohibited without the permission of Savant Systems.
TrademarksRacePoint Blueprint™, NOW YOU CAN™, and SAVANT® are trademarks of Savant Systems, LLCApple®, Apple® AirPort Express®, Apple® AirPort Extreme®, Apple TV®, Apple Remote Desktop™, iMac®, iTunes®, iPad®, iPhone®, iPod touch®, MacBook® and .Mac® are registered trademarks or trade names of Apple Inc.All other brand names, product names and trademarks are the property of their respective owners.
Technical Support Savant Systems, LLC is dedicated to providing prompt and effective support.
In order to do this in a timely and efficient manner:
1. Access the Savant Dealers website: dealers.SavantSystems.com
2. Enter User Name and Password and click Login.
3. The Support Center screen appears.
4. Select Support Request box.
5. The Submit a Ticket window appears.
6. Complete the information and click Finish.
SalesSavant Systems, LLC is dedicated to providing prompt and effective sales support.Residential: www.SavantSystems.com/residential_sales.aspx
Before installing, configuring and operating SAVANT® equipment and other vendor equipment, SAVANT® recommends that each dealer, installer, etc. access and read all the required technical documentation. The SAVANT® technical documentation is located on the SAVANT® Dealer Portal. Vendor documentation is supplied with the equipment.
Read and understand all safety instructions, cautions and warnings in this document and the labels on the equipment.
About Note, Important, Caution and Warning Classifications
Note and Important: In this document, Note and Important provides special information for installing, configuring and operating the equipment.
Caution: In this document, Caution describes a situation that may cause damage to the equipment.
Warning: In this document, Warning describes a situation that may present a physical danger to the installer or end-user.
Electric Shock Prevention
ELECTRIC SHOCK: The 100-240V AC, 50-60 Hz source power poses an electric shock hazard that has the potential to cause serious injury to installers and end-users.
ELECTRICAL DISCONNECT: The 100-240V AC, 50-60 Hz source power outlet and power supply input power sockets should be easily accessible to disconnect power in the event of an electrical hazard or malfunction.
Weight Injury Prevention
WEIGHT INJURY: Installing some of the Savant controllers require two installers to ensure safe handling during installation. Failure to use two installers may result in injury.
061313 009-0957-00
16 of 17Savant Wireless Thermostat (SST-W100) User Guide
Safety StatementsFollow all of the safety instructions listed below and apply where applicable. Additional safety information will be included where applicable and listed below.
1. Read these instructions.
2. Keep these instructions.
3. Heed all warnings.
4. Follow all instructions.
5. Do not use this apparatus near water.
6. Clean only with dry cloth.
7. Do not block any ventilation openings. Install in accordance with the manufacturer's instructions.
8. Do not install near any heat sources such as radiators, heat registers, stoves or other apparatus (including amplifiers) that produce heat.
9. Do not defeat the safety purpose of the polarized or grounding-type plug. A polarized plug has two blades with one wider than the other. A grounding type plug has two blades and a third grounding prong. The wide blade or the third prong is provided for your safety. If the provided plug does not fit into your outlet, consult an electrician for replacement of the obsolete outlet.
10. Protect the power cord from being walked on or pinched particularly at plugs, convenience receptacles, and the point where they exit from the apparatus.
11. Only use attachments/accessories specified by the manufacturer.
12. Use only with the cart, stand, tripod, bracket, or table specified by the manufacturer, or sold with the apparatus. When a cart is used, use caution when moving the cart/apparatus combination to avoid injury from tip-over.
13. Unplug this apparatus during lightning storms or when unused for long periods of time.
14. Refer all servicing to qualified service personnel. Servicing is required when the apparatus has been damaged in any way, such as power-supply cord or plug is damaged, liquid has been spilled or objects have fallen into the apparatus, the apparatus has been exposed to rain or moisture, does not operate normally, or has been dropped.
061313 009-0957-00
17 of 17Savant Wireless Thermostat (SST-W100) User Guide


![HKSF-W100 E[1] Auma](https://static.documents.pub/doc/80x56/55cf9caf550346d033aaad55/hksf-w100-e1-auma.jpg)


