.................................................................................................................................................Before You Begin 5
........................................................................................................................................Ethernet Connection 10...................................................................................................Audio and Display Output Connections 10
.....................................................................................................................................AC Power Connection 10
5. Rules for Deploying Smart Hosts 11
6. Blueprint Configuration 12...........................................................................................................Replacing a Host in a Configuration 12
..................................................................................................Adding a Smart Host to a Configuration 13....................................Adding a Doorbell or Door Station Using Audio Interrupt Service (AIS) 14
7. Smart Host Configuration 15......................................................................Querying and Configuring IP Address and DNS Server 15
.................................................................................................................Change the Host User Password 16............................................................................................................................Setting Up Remote Access 17
.....................................................................................Setting Up Mail (Gmail Only) for Notifications 17
Important Safety Information - Read FirstBefore installing, configuring and operating Savant equipment and other vendor equipment, Savant recommends that each dealer, installer, etc. access and read all the required technical documentation. Savant technical documentation can be located by visiting Savant.com. Vendor documentation is supplied with the equipment.
Read and understand all safety instructions, cautions, and warnings in this document and the labels on the equipment.
Safety Classifications In this Document
Note: Provides special information for installing, configuring, and operating the equipment.
IMPORTANT!Provides special information that is critical to installing, configuring, and operating the equipment.
CAUTION!Provides special information for avoiding situations that may cause damage to equipment.
WARNING!Provides special information for avoiding situations that may cause physical danger to the installer, end user, etc.
Electric Shock Prevention ELECTRIC SHOCK! The source power poses an electric shock hazard that has the potential to cause
serious injury to installers and end users.
ELECTRICAL DISCONNECT: The source power outlet and power supply input power sockets should be easily accessible to disconnect power in the event of an electrical hazard or malfunction.
Weight Injury Prevention WEIGHT INJURY! Installing some of the Savant equipment requires two installers to ensure safe
handling during installation. Failure to use two installers may result in injury.
Safety StatementsFollow all of the safety instructions listed below and apply where applicable. Additional safety information will be included where applicable.
1. Read these instructions.2. Keep these instructions.3. Heed all warnings.4. Follow all instructions.5. Do not use this apparatus near water.6. Clean only with dry cloth.7. Do not block any ventilation openings. Install in accordance with the manufacturer's instructions.8. Do not install near any heat sources such as radiators, heat registers, stoves, or other apparatus
(including amplifiers) that produce heat.9. Do not defeat the safety purpose of the polarized or grounding-type plug. A polarized plug has two
blades with one wider than the other. A grounding type plug has two blades and a third grounding prong. The wide blade or the third prong is provided for your safety. If the provided plug does not fit into your outlet, consult an electrician for replacement of the obsolete outlet.
10. Protect the power cord from being walked on or pinched particularly at plugs, convenience receptacles, and the point where they exit from the apparatus.
11. Only use attachments/accessories specified by the manufacturer.12. Use only with the cart, stand, tripod, bracket, or table specified by the manufacturer, or sold with the
apparatus. When a cart is used, use caution when moving the cart/apparatus combination to avoid injury from tip over.
13. Unplug this apparatus during lightning storms or when unused for long periods of time.14. Refer all servicing to qualified service personnel. Servicing is required when the apparatus has been
damaged in any way, such as power supply cord or plug is damaged, liquid has been spilled or objects have fallen into the apparatus, the apparatus has been exposed to rain or moisture, does not operate normally, or has been dropped.
15. To completely disconnect this equipment from the AC mains, disconnect the power supply cord plug from the AC receptacle.
Deployment Guide OverviewThis document will guide the installer through the steps required to deploy the Smart Host within a system.
Before You BeginRead through this document in its entirety and ensure that the following required items are available:
.......................................................................................Savant Smart Host (SVR-SMRTD-00 or SVR-SMRTD-10)
.................................................................................................................................da Vinci Runtime for Host Upgrade 6.0 or higher for SVR-SMRTD-007.0 or higher for SVR-SMRTD-10
........................................................................................................................................................Smart Standard License 6.0 or higher for SVR-SMRTD-007.0 or higher for SVR-SMRTD-10
..............................................................................................Unique ID (UID) and MAC Address of the Smart Host
................................................................................................Savant Development Environment (SDE/MacBook®) RacePoint Blueprint® da Vinci 6.0 or higher for SVR-SMRTD-00.RacePoint Blueprint® da Vinci 7.0 or higher for SVR-SMRTD-10.
........................................................................................................Ethernet network meeting Savant requirements See Appendix A: Network Requirements
2. Deployment StepsFollow these steps to successfully deploy a Savant Smart Host. This page can be used as a checklist to record which steps have been completed.
1. ............................................................................Review product specifications and connection details See Smart Host Overview
2. ............................................................................................................................................Install the Smart Host See Installation
3. ......................................................................Upgrade the Smart Host to the latest version of da Vinci Follow the instructions contained in the da Vinci Installation and Upgrade Deployment Guide located on the Savant Customer Community to upgrade the Smart Host.
4. .........................................................................Add the host into a RacePoint Blueprint® configuration See Blueprint Configuration
5. ....................................Perform additional configuration to the Smart Host using System Monitor See Smart Host Configuration
6. ....................................................................................................Install an OS Runtime License on the host See Savant Runtime Operating System Licensing Application Note located on the Savant Customer Community.
Box Contents and SpecificationsRefer to the Quick Reference Guide for this product located on the Savant Customer Community for Box Contents and Specifications.
SVR-SMRTD-00 Front Panel
USB 2.0 Port Connection for USB devices such as keyboards/mouse or USB memory stick.
SVR-SMRTD-00 Rear Panel
DC Power In Connect to 19V 3.42A DC power supply (Included).
USB 2.0 Ports Connection for USB devices such as keyboards/mouse or USB memory stick.
Cooling Vents Provides cooling for the internal components.WARNING! DO NOT block vents in order to maintain proper cooling.
HDMI Outputs Left HDMI: Use for doorbell Audio Interrupt Service (AIS) with Savant controllers with a Host input and for diagnostic purposes.Right HDMI: Used for diagnostic purposes only.
Ethernet 10/100/1000 Base-T auto-negotiating port with Link/Activity LEDs.See items F and G for LED functionality.
Link LEDOff: Ethernet link is not established.Green Solid: Ethernet link is established.Green Blinking: Ethernet activity is occurring
Box Contents and SpecificationsRefer to the Quick Reference Guide for this product located on the Savant Customer Community for Box Contents and Specifications.
SVR-SMRTD-10 Front Panel
Power Button Use to power the HST On or Off.White indicates the unit is powered on.
HDD LED This LED is has no function. Flash Memory is used in place of a Hard Disk Drive.
SVR-SMRTD-10 Rear Panel
Power Input 12V DC 3A - Connect to the included power supply.
Ethernet 10/100/1000 Base-T auto-negotiating port with Link/Activity LEDs.See items C and D for LED functionality.
Data Rate LEDOff: 10 Mbps data rateGreen: 100 Mbps data rateYellow: 1000 Mbps data rate
Link LEDOff: Ethernet link is not established.Green Solid: Ethernet link is established.Green Blinking: Ethernet activity is occurring.
Audio OutUse for Audio Interrupt Service (AIS) with Savant controllers with an Analog Audio Input.3.5 mm (1/8 in) Stereo jack.
Note:Connections not identified in the diagrams above are not functional within a Savant Configuration/Installation.
Chassis InstallationThe Smart Host can be installed on a solid, flat, level surface such as a table, cabinet or shelf, or wall mounted using the included bracket. The location should be dry, well ventilated, and out of direct sunlight.
Ethernet ConnectionThe Smart Host communicates with the devices on the network via the wired Ethernet connection.See Appendix A: Network Requirements for more information on configuring Smart Host network settings.
Audio and Display Output ConnectionsThe audio and display outputs on the host are used for the Audio Interrupt Service (AIS) that will interrupt the currently playing audio when a doorbell is pressed. Connection to this output varies based on the Savant Audio Matrix or 3rd party switcher being used.
Refer to the following sections within this document and documents located on the Savant Customer Community for more information on using the Display Output connections.
• Audio Interrupt Service (AIS) Configuration for Doorbells Application Note (Audio Output)
AC Power Connection SURGE PROTECTION!
Use a surge-protected circuit for all components and power supplies requiring 100-240V AC 50/60 Hz source power.
ELECTRICAL DISCONNECT!The source power outlet and power supply input power sockets should be easily accessible to disconnect power in the event of an electrical hazard or malfunction.
Power Management RecommendationsSavant recommends a pure sine wave uninterruptible power supply (UPS) with the ability to shut down the Savant Host before the battery runs out of power. Never remove power from the Savant Host before shutting it down.
5. Rules for Deploying Smart HostsWhile Blueprint will enforce various restrictions for placing a Smart Host onto a configuration, rules listed below will not contain warning messages within Blueprint. Read through this section carefully before starting or updating a configuration to ensure that the system will function once the configuration is uploaded.
Device Features and Zones Supported by Smart Hosts• Refer to the Savant Host Comparison Guide located on the Savant Customer Community for a list of the
available features before starting Blueprint configuration.
Use of Custom Automator Workflows and Applescripting• Only Savant Automator actions, Apple's Pause, or Run Shell Script actions can be used. All other actions
will be ignored.
Note:Functions such as email can be programmed using the Run Shell Script action.See Setting Up Mail (Gmail Only) for Notifications for more information.
• Applescripting is not supported on Smart Hosts. Another scripting language and the Savant Command Line Interface Bridge (sclibridge) must be used.
See Running Scripts for more details.
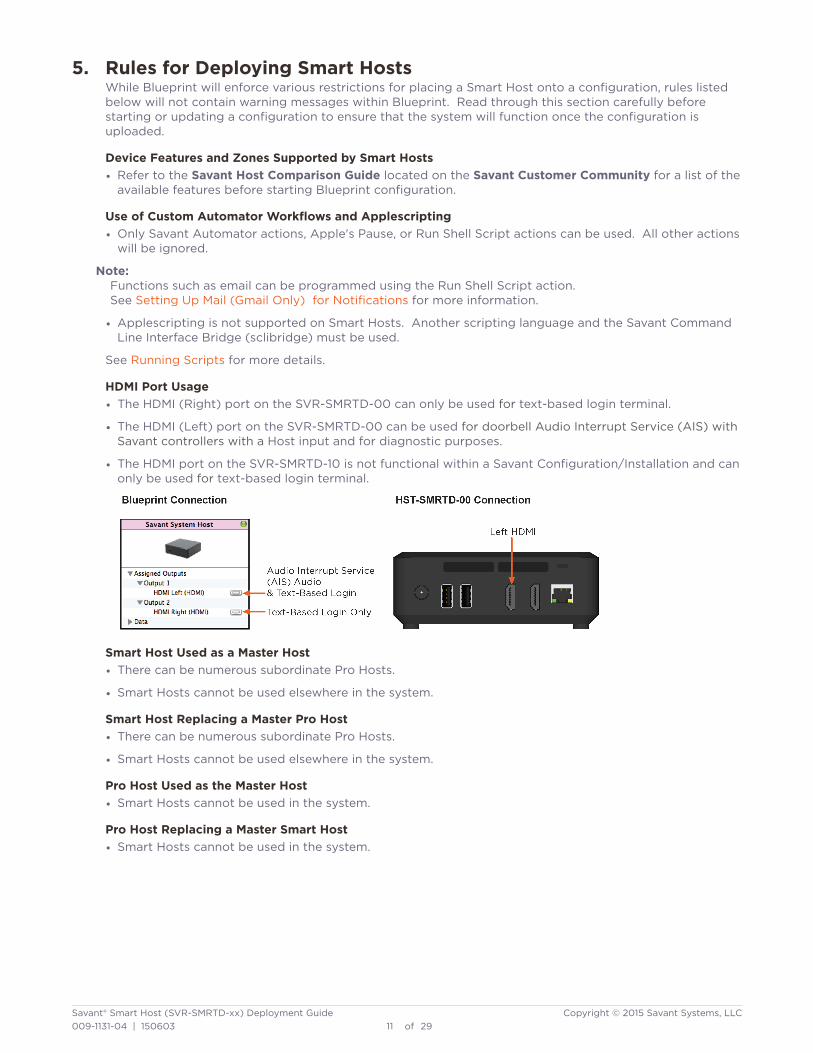
HDMI Port Usage• The HDMI (Right) port on the SVR-SMRTD-00 can only be used for text-based login terminal.
• The HDMI (Left) port on the SVR-SMRTD-00 can be used for doorbell Audio Interrupt Service (AIS) with Savant controllers with a Host input and for diagnostic purposes.
• The HDMI port on the SVR-SMRTD-10 is not functional within a Savant Configuration/Installation and can only be used for text-based login terminal.
Smart Host Used as a Master Host• There can be numerous subordinate Pro Hosts.
• Smart Hosts cannot be used elsewhere in the system.
Smart Host Replacing a Master Pro Host• There can be numerous subordinate Pro Hosts.
• Smart Hosts cannot be used elsewhere in the system.
Pro Host Used as the Master Host• Smart Hosts cannot be used in the system.
Pro Host Replacing a Master Smart Host• Smart Hosts cannot be used in the system.
6. Blueprint ConfigurationWhen a Blueprint configuration is created, a host is automatically added to the Zone Component List, however it is not added to the Layout view. The host for configuration must be placed in the Layout view in order for services to be generated.
Note:If the host at the top of the Zone Component List is not a Smart Host, follow the steps outlined in Replacing a Host in a Configuration before adding the host to the Layout view.
Replacing a Host in a ConfigurationStarting with da Vinci 6.0, the type of host that is used when a new configuration is created can be set to either a Pro Host or a Smart Host. If a Pro Host or a different model Smart Host exists in the Layout view, follow these steps to replace the existing master host with an Savant Smart Host.
1. In an open Blueprint configuration, open the Component Library by navigating to:View > Show Component Library
2. Enter SMRTD into the Search field.3. Select the Savant Host in the list and drag it onto the host at the top of the Zone Component List.
4. Select Replace when prompted.5. At the top of the Zone Component List, select the host and drag it onto the Layout view.6. Enter the unique Device Name and the Savant ID for the the host.
The Savant ID is used to identify the host on the network so that a configuration may be uploaded to the host.A. Select the host in the Layout view and open the Inspector by navigating to:
View > Show InspectorB. Enter a Device Name that is unique to the system.
Tip:Savant recommends using the customer’s last name and a number unique to the customer followed by Savant Host.Example: Jones45 Savant Host
Adding a Smart Host to a ConfigurationConfigurations containing a host other than a Smart Host will need to have the host replaced prior to placing it in the Layout view. If the host at the top of the Zone Component List is not a Smart Host, follow the steps outlined in Replacing a Host in a Configuration before proceeding with the following steps.
1. In an open Blueprint configuration, select the host at the top of the Zone Component List and drag it onto the Layout view.
2. Enter the unique Device Name and the Savant ID for the the host.The Savant ID is used to identify the host on the network so that a configuration may be uploaded to the host.A. Select the host in the Layout view and open the Inspector by navigating to:
View > Show InspectorB. Enter a Device Name that is unique to the system.
Tip:Savant recommends using the customer’s last name and a number unique to the customer followed by Savant Host.Example: Jones45 Savant Host
Adding a Doorbell or Door Station Using Audio Interrupt Service (AIS)The Smart Host supports the Audio Interrupt Service (AIS) which is used to interrupt the currently playing audio with a doorbell chime alerting the user that a doorbell has been pressed. This service requires a connection between the Smart Host and a Savant Audio Matrix or 3rd party audio matrix.
Refer to the Audio Interrupt Service (AIS) Configuration for Doorbell Application Note located on the Savant Customer Community for information on using AIS.
7. Smart Host ConfigurationDue to the Smart Host not containing a Graphical User Interface (GUI) for configuration, items that are configured via share screen on a Pro Host require the use of Secure Shell (SSH) commands that are entered into Terminal. This section explains the commands and how they are used within Terminal.
Note:This section contains commands to enter into Terminal and other applications. Copying this content from this document may change the formatting required by the application. Verify the command after copying to ensure that the command will function as required.
Querying and Configuring IP Address and DNS ServerBy default the Smart Host is set to DHCP, changing this to static requires accessing the Smart Host via Terminal.
Note:DNS Server addresses can only be added to Smart Hosts with static IP Addresses. DHCP will override any custom DNS Addresses.
1. Launch the Savant Application Manager (SAM).2. Select the appropriate da Vinci release for the host and click Activate.3. Open System Monitor by selecting it in the right side menu.4. In an open System Scanner window, select the Savant Smart Host.5. Click Terminal in the menu bar to open a session to the selected host.
6. When prompted, enter the password for the host.Default: RPM
7. In the open Terminal window enter a command to perform from the list below:
Set to static IP: setIPAddress -‐static -‐address x.x.x.x -‐netmask x.x.x.x -‐gateway x.x.x.x
Substitute x.x.x.x with the appropriate addresses.
A message will appear to confirm the requested change. After confirming (y), the connection to the host will be lost as the IP Address has changed. Close the Terminal window after confirming and entering password for host RPM user.
A message will appear to confirm the requested change. After confirming (y), the connection to the host will be lost as the IP Address has changed. Close the Terminal window after confirming and entering password for host RPM user.
Add a DNS Server Address to the list:
setDNSServer -‐add -‐address x.x.x.x
Remove a DNS Server Address from the list:
setDNSServer -‐remove -‐address x.x.x.x
Query Current DNS Server Information:
setDNSServer
Example of Terminal Window: servername 8.8.8.8
servername 8.8.4.4
Change the Host User PasswordFor security purposes, especially with remote access for dealers, Savant is providing a command line utility to easily change the password of the Smart Host.
Note:Passwords should be at least 10 characters long and include numbers, symbols, and capital letters.
1. Launch the Savant Application Manager (SAM).2. Select the appropriate da Vinci release for the host and click Activate.3. Open System Monitor by selecting it in the right side menu.4. In an open System Scanner window, select Savant Smart Host.5. Click Terminal in the menu bar to open a session on the selected host.6. In the open Terminal window type:
savantSetPassword
7. When prompted, enter the current password.8. When prompted, enter the new password.9. Once the password has been changed, reboot the Smart Host to ensure the security changes are
Setting Up Remote AccessBy enabling remote access, the host can be accessed remotely from outside the local network. This can come in handy to troubleshoot or upgrade a system from a remote location.
IMPORTANT!Savant strongly recommends that the host’s password is changed from the default when enabling Remote Access. Once enabled, the host will be on the Internet and accessible from outside the local network.
1. Change the user password. Follow the steps in section Change the Host User Password.2. Setup firewall to forward TCP port 22 to the host.
IMPORTANT!Savant very strongly recommends the public port on the firewall is not set to port 22 as it is used by the host. Instead, map a non-standard public port (for example, any number between 2000-10000) to port 22. This will result in better network security.
Once remote access is enabled and the ports forwarded in the firewall, the host can be accessed using Secure Communication Mode within System Monitor.
Secure Communication Mode selected in System Monitor
.
Enter in the IP Address or Internet DNS name of the home system. When using a non-standard SSH port, append the port to the host name as :<port number> (colon, then port number). So if you use public port 2149 on the firewall, then the host would be Host:2149
When prompted, enter the username (RPM) and password of the host.
Setting Up Mail (Gmail Only) for NotificationsThe Smart Host may be setup to send notifications via email or text using workflows. Refer to the How to Configure a Host to Send an Email/SMS Text Notification from a Triggered Workflow located on the Savant Customer Community for more information.
8. Running ScriptsCustom workflows and scripts created within Blueprint are copied to the host when the configuration is uploaded. However, scripts that are created outside of Blueprint using Automator or Linux will need to be copied to the host for the system to access them. These items will need to be placed on the Smart Host by using SSH commands.
Note:This section contains commands to enter into Terminal and other applications. Copying this content from this document may change the formatting required by the application. Verify the command after copying to ensure that the command will function as required.
IMPORTANT!Smart Hosts can only run scripts containing Savant Commands located under Actions > Other within Automator. Do not copy scripts containing MAC commands as they will not function on a Smart Host and may render the system unresponsive.
Recalling Script FilesIf you are currently running scripts added by using the Customer Files folder in the Tools > Customer and Provider Info dialog, the location of these files is different on a Smart Host.
Refer to Tools Menu - Channel Listings Editor, Customer and Provider Information: RacePoint Blueprint Programming Guide located on the Savant Customer Community for details on adding Customer Files.
Files that have been added to Customer Files are located under the following path on a Smart Host:/home/RPM/GNUstep/Library/ApplicationSupport/RacePointMedia/userConfig.rpmConfig/CustomerFiles
Executing Scripts on the Mastersclibridge is a command line program on the host used to interact with the Savant control system for advanced customization.
Custom scripts and workflows need to be aware of this difference. You can use a common UNIX utility called `uname` to determine which platform your script is running on and adjust accordingly.
#!/usr/bin/perl -‐w
$osType = `uname`;chomp($osType);
$sclibridge = undef;
if($osType eq "Linux OS"){ print "Running on Linux\n"; $sclibridge = "/usr/local/bin/sclibridge";}elsif($osType eq "Mac OS"){ print "Running on Darwin\n"; $sclibridge = "/Users/RPM/Applications/RacePointMedia/sclibridge";}else{ print "Running on Unknown: $sclibridge\n";}
9. TroubleshootingWhen a problem with the operation of a host is discovered, logs can be pulled that contain information about the host and what action was being performed when the problem occurred. These logs are used by Savant Support to help locate the problem and provide a solution quickly.
Retrieving Logs1. Launch the Savant Application Manager (SAM) on the SDE, and click Activate next to the desired
release if necessary.2. Open System Monitor by selecting it in the right side menu.3. Select the Savant Smart Host in the list.4. Click Get Logs on the top menu bar.
5. A dialog window will open to save the report that provides the following options:
A. Save As: Select a name that identifies the file.Example: TechPubsSmartHost_2014-01-25-102552_DiagnosticReports
B. Where: Location to Save the report.C. Clear Reports: When checked, all reports on the host will be cleared after saving the log file.D. Download: Click to download the report.
Downloading Files for DebuggingThe host stores debug files that report the status of a process and other items during system crash. These files can be downloaded from a host to the SDE by entering commands into an open Terminal session. A Savant Technical Assistance Center (TAC) representative will provide information on the location of these files when diagnosing a system.
Stop/Start the HostDuring troubleshooting, stopping the host by stopping the OS may be required.
Stopping the Host via System Monitor Processes Tab
Note:Before stopping the host using this method, write down the IP Address so that it can be restarted using the Command Line method below.
1. Launch the Savant Application Manager (SAM).2. Select the appropriate da Vinci release for the host and click Activate.3. Open System Monitor by selecting it in the right side menu.4. In an open System Scanner window, select the Savant Smart Host.5. Click Connect, or double-click the selected host.6. In an open System Dashboard window, select the Processes tab on the left.7. In the Remote Management section, select System Stop to stop the host.
Stopping and Starting via Command Line1. Launch the Savant Application Manager (SAM).2. Select the appropriate da Vinci release for the host and click Activate.3. Open System Monitor by selecting it in the right side menu.4. In an open System Scanner window, select the Savant Smart Host.5. Click Terminal in the menu bar to open a session on the selected host.6. At the command prompt, type one of the following commands:
To Stop the Host: stopSavantSystem
To Start the Host: startSavantSystem
Stopping Processes 1. Launch the Savant Application Manager (SAM).2. Select the appropriate da Vinci release for the host and click Activate.3. Open System Monitor by selecting it in the right side menu.4. In an open System Scanner window, select the Smart Host.5. Click Connect, or double-click the selected host.6. Select the Processes tab on the left.7. In the System Applications area, select the appropriate process to Stop or Start the Host. Then right
Uploading Configuration to the HostThe preferred method for uploading configurations to the host is using the Up Load to Master button in Blueprint or the Upload button in System Monitor. When a connection to the host in Blueprint or System Monitor is not available, Terminal may be used as an alternative.
1. Launch the Savant Application Manager (SAM).2. Select the appropriate da Vinci release for the host and click Activate.3. Open System Monitor by selecting it in the right side menu.4. In an open System Scanner window, select the Savant Smart Host.5. Click Upload to start the upload process.6. Click Browse, and then navigate to the SDE folder containing the configuration file to upload.7. Select the configuration file in the folder and click Open.8. In the open dialog showing the selected file, click Upload.
Copying the Configuration File to the SDEThe preferred method for downloading configurations to the SDE is using the Get Config button in System Monitor. When a connection to the host in System Monitor is not available, Terminal may be used as an alternative.
Copying the Configuration Using TerminalNote:
In order to copy a configuration to the SDE, Remote Login must be enabled.
Enable Remote Access on the SDE1. Open System Preferences in the SDE.2. Select Sharing.
Copy the Configuration File to the SDE1. Follow the steps defined in Enable Remote Access on the SDE to enable remote access on the SDE.2. Launch the Savant Application Manager (SAM).3. Select the appropriate da Vinci release for the host and click Activate.4. Open System Monitor by selecting it in the right side menu.5. In an open System Scanner window, select the Savant Smart Host.6. Click Terminal to open a session on the selected host.7. Enter the host’s password.8. At the command prompt, type the following:
Note:The above command needs to be written as a single line.
Testing Component Actions Without AutomatorComponent actions may be tested directly from the host without using Automator by running a command. Refer to the Testing Component Actions Without Automator Application Note located on the Savant Customer Community for details.
Appendix A: Network RequirementsSavant requires the use of business class/commercial grade network equipment throughout the network to ensure the reliability of communication between devices. These higher quality components also allow for more accurate troubleshooting when needed.
Device Network ConnectionsConnect all Savant devices to the same local area network (LAN) or subnet as the host. Savant recommends not implementing any type of traffic or packet shaping in your network topology for the Savant devices as this may interfere with performance.
Managing IP AddressesTo ensure that the IP Address will not change due to a power outage, a static IP Address or DHCP reservation should be configured. Savant recommends using DHCP reservation within the router. By using this method, static IP Addresses for all devices can be managed from a single UI avoiding the need to access devices individually.
Setting a Static IP AddressRefer to Querying and Configuring IP Address for details on how to set a static IP Address.
Setting DHCP ReservationSetting DHCP reservation varies from router to router. Refer to the documentation for the router to configure DHCP reservation.
Network ChangesSavant recommends performing one of the following steps to refresh the IP connection after connecting to a new network, changing routers, or if the IP Address range is changed in the current router. This will reset any IP connection and ensure that the host is communicating with the network correctly.
• Cycle Power
1. Press Power to power Off the Smart Host.2. After 10 seconds, verify that the Power LED is not illuminated indicating that shutdown has
completed.3. Press Power to power On the Smart Host.
• Hot Plug the Ethernet (LAN) Connection
1. Disconnect the Ethernet (LAN) connection from the controller.2. Wait 15 seconds and then reconnect.
Querying and Configuring IP Address and DNS Server
Added new commands to setDNSServer addresses using terminal for Smart Host with static IP Addresses. Section name is new to accommodate the additional material.
009-1131-03 - May 2015Section Update
Installation New section.
Blueprint Configuration Updated content for improved clarity.
Setting Up Mail (Gmail Only) for Notifications Updated content for improved clarity.
Copying the Configuration File to the SDE
Updated content for improved clarity.
Retrieving Smart Host DNS Server Names New section.
Testing Component Actions Without Automator
New section.
Appendix A: Network Requirements Updated content for improved clarity.
Appendix C: Host Output Connection Matrix
New section.
Important Notice Updated service and support contact method.
009-1131-02 - November 2014Section Update
SVR-SMRTD-10 Overview New section describing the functionality of the SVR-SMRTD-10 Smart Host
Audio Interrupt Service (AIS) Configuration Expanded to include AIS functionality on the SVR-SMRTD-10
DisclaimerThe contents of this document are subject to change without notice; therefore, the information presented herein shall not be construed as a commitment or warranty.
Savant Systems, LLC shall not be liable for any technical or editorial errors or omissions contained herein or for incidental or consequential damages resulting from the performance, furnishing, reliance on, or use of this material.
PatentsCertain equipment and software described in this document is protected by issued and pending U.S. and foreign patents.
All products and services are trademarks or registered trademarks of their respective manufacturer.
CopyrightThis document contains confidential and proprietary information protected by copyright. All rights reserved. Copying or other reproduction of all or parts of this document is prohibited without the permission of Savant Systems.
TrademarksSavant®, RacePoint Blueprint®, Now You Can®, and LiteWare® are trademarks of Savant Systems, LLC.
AirPlay®, Apple®, AirPort Express®, AirPort Extreme®, Apple TV®, Apple Remote Desktop™, FireWire®, iMac®, iTunes®, iPad®, iPad mini™, iPad Air™, iPhone®, iPod touch®, MacBook®, Mac® and OS X® are trademarks or trade names of Apple Inc., registered in the U.S. and other countries.
iOS® is a trademark of Cisco®
Android® is a trademark of Google, Inc.
Wi-Fi® is a trademark of the Wi-Fi Alliance.
HDMI® is a trademark of HDMI Licensing, LLC.
Dolby® and the double-D symbol are registered trademarks of Dolby® Laboratories.
DTS® is a registered trademark and DTS logos and symbols are trademarks of DTS, Inc.
Thunderbolt™ is a trademark of Intel Corporation.
HDBaseT™ is a trademark of the HDBaseT Alliance.
All brand names, product names and trademarks are the property of their respective owners.
Technical and Sales SupportSavant Systems, LLC is dedicated to providing prompt and effective support in a timely and efficient manner.
• To contact Savant Support, access the Savant Customer Community and enter a support Case ticket.
• To contact Savant Sales, visit Savant.com and select Contact Us to locate a local sales representative in your area.