1.1 Introduction to M-Alarm MultimediaWelcome to M-Alarm Multimedia (M-Alarm MMX), a stand-alone product that allowsyou to configure alarms using several different media to notify anyone, anywhere, ofan occurring alarm. M-Alarm Multimedia provides multimedia technology for remotealarm notification. Various multimedia "agents" are provided, including:
• Pager with support for Simple Message Server (SMS)/Tele AlphanumericProtocol (TAP) and two-way paging
• Phone with call-in and call-out support
• E-mail
• Fax
• Voice annunciation of alarms via text-to-speech
• Voice annunciation of alarms via recorded .wav files
• Video
• Pop-up windows
• Computer screen marquee
• Instant messaging
2 M-Alarm Multimedia User’s Guide
1.1 M-Alarm Multimedia OverviewFigure 1.1 provides an overview of how M-Alarm Multimedia enables you to sendand receive alarms using various multimedia agents. The Multimedia Configurator isa database-generating tool that allows you to configure alarms, alarm action sets,multimedia agents, and alarm acknowledgement codes. You can also use theMultimedia Configurator to create subscriptions to OLE for Process Controls (OPC)Alarm and Event (AE) servers. In addition, you can configure schedules anddestinations for alarm notification messages.
When your database configuration is completed and you start the Multimedia Server,the following occurs:
1. When the Multimedia Server enters runtime mode, it reads all the alarmconfigurations in the multimedia configuration database.
2. The Multimedia Server then subscribes to OPC AE servers based on thesubscriptions that you created in the configuration database.
Figure 1.1. Overview of M-Alarm Multimedia
3. In turn, the OPC AE servers generate alarms back to the Multimedia Server.
4. When the Multimedia Server receives alarms, it responds to those alarmsaccording to the settings and alarm action sets that you configured in yourdatabase.
5. Based on these action sets, the notification messages are then sent to a recipient(an operator or a group) via the configured multimedia agent.
Introduction 3
6. The recipient of the alarm message can then acknowledge the alarms using theconfigured multimedia device by entering an acknowledge code.
1.2 Installing M-Alarm MultimediaThis section describes the system requirements and steps for installing M-AlarmMultimedia. Be sure to close any other applications before installing M-AlarmMultimedia.
1.2.1 System RequirementsTo use this software, you must have the following minimum system requirements:
• 8X speed CD-ROM
• 125 MB of disk space
Note: This is the recommended amount of disk space for the Multimedia installationonly. This does not include hardware drivers. Also, as the size of the databasesincreases over time, additional space may be needed.)
• VGA video card; 256 or more colors for best results.
• Microsoft® Internet Explorer Version 5.0.
• Microsoft Windows® 98 2nd Edition, Windows 2000 with Service Pack 2, orWindows NT® 4.0 with Service Pack 6a.
IMPORTANT: You must have a voice board installed on the computer on which youare running the Phone Agents (both Call-in and Call-out). M-Alarm Multimediasupports Intel® Dialogic® boards. Dialogic boards do not work for Windows 98operating system, so neither the Call-in Agent nor the Call-out Agent will workon Windows 98 operating system. You also need to have an analog phone lineconnected to the board. (Digital lines are not supported.) Only Dialogic boards aresupported for the current version of M-Alarm Multimedia. Please see Appendix B:Advanced Telephony Settings (LIT-1201407) for information about installing andconfiguring Intel Dialogic boards. For more information about purchasing andinstalling Intel Dialogic boards, please visit the Intel Web site atwww.intel.com/network/csp/products/index_vp.htm.
Central Processing Unit (CPU) and Random Access Memory(RAM)
Minimum computer CPU and RAM requirements depend on the application andoperating system, as shown below.
Operating System Application Size Processor RAMWindows 98 Small 233 MHz 64 MBWindows 98 Medium/Large 400 MHz 128 MBWindows NT/
Windows 2000Small 300 MHz 128 MB
Windows NT/Windows 2000
Medium/Large 650 MHz 256 MB
The actual amount of RAM and/or processor speed varies, depending upon theInput/Output (I/O) counts, networking, logging, and alarming requirements, etc. Todetermine which type of computer best fits your application, set up a test applicationstation.
1. Insert the product CD. If your computer does not have "autostart" enabled,browse to your CD drive and open the "Runme.bat" file. The introduction screenappears, as shown in Figure 1.2. The Setup dialog box, as shown in Figure 1.3,follows this.
Figure 1.2. Introduction Screen
2. Click the Next button to continue.
Note: The Multimedia installation wizard then checks to see if Microsoft DataAccess Components (MDAC) Version 2.6 is installed on your system. If MDAC isinstalled, the setup proceeds to the next step. If it is not installed, you are promptedto install MDAC 2.6. If the system prompts you to install MDAC 2.6, follow theinstructions on the subsequent dialog boxes.
Note: If you are installing M-Alarm Multimedia on a Windows 98 operating system,the Multimedia setup may also prompt you to install Distributed Component ObjectModel (DCOM).
Introduction 5
Figure 1.3. Multimedia Setup
3. The License Agreement appears, as shown in Figure 1.4. Carefully read theLicense Agreement. If you agree with the terms and conditions, click Yes tocontinue.
Figure 1.4. License Agreement
6 M-Alarm Multimedia User’s Guide
4. The User Information dialog box appears, as shown in Figure 1.5. Type your(the user's) name in the Name field and your company's name in the Companyfield.
6. Customize your installation by selecting which agents to install. This ishelpful if you have limited space on your hard disk or if you do not expect touse one or more multimedia agents. Click on the appropriate boxes to selectthe agents that you wish to install. The space required on your installationdirectory (as well as the space available on the directory) is displayed at thebottom of the dialog box. Once you have made your selections, click theNext button to continue. The Select Program Folder dialog box appears(Figure 1.7).
Note: Please see Appendix A: Pager Configuration (LIT-1201406) forinformation about SMS and TAP pager services configuration. SeeAppendix B: Advanced Telephony Settings (LIT-1201407) for informationabout installing and configuring Intel® Dialogic® boards for the Phone Agent.See Chapter 4: Multimedia Agents (LIT-1201172) for information aboutconfiguring multimedia agents.
Introduction 7
Figure 1.6. Selecting Multimedia Agents to Install
7. Either type the name of a new program folder in the Program Folders fieldor select the program folder of your choice from the list in the pane below.Click the Next button to continue. The Microsoft Agent 2.0 LicenseAgreement appears (Figure 1.8).
Figure 1.7. Selecting the Installation Location
8 M-Alarm Multimedia User’s Guide
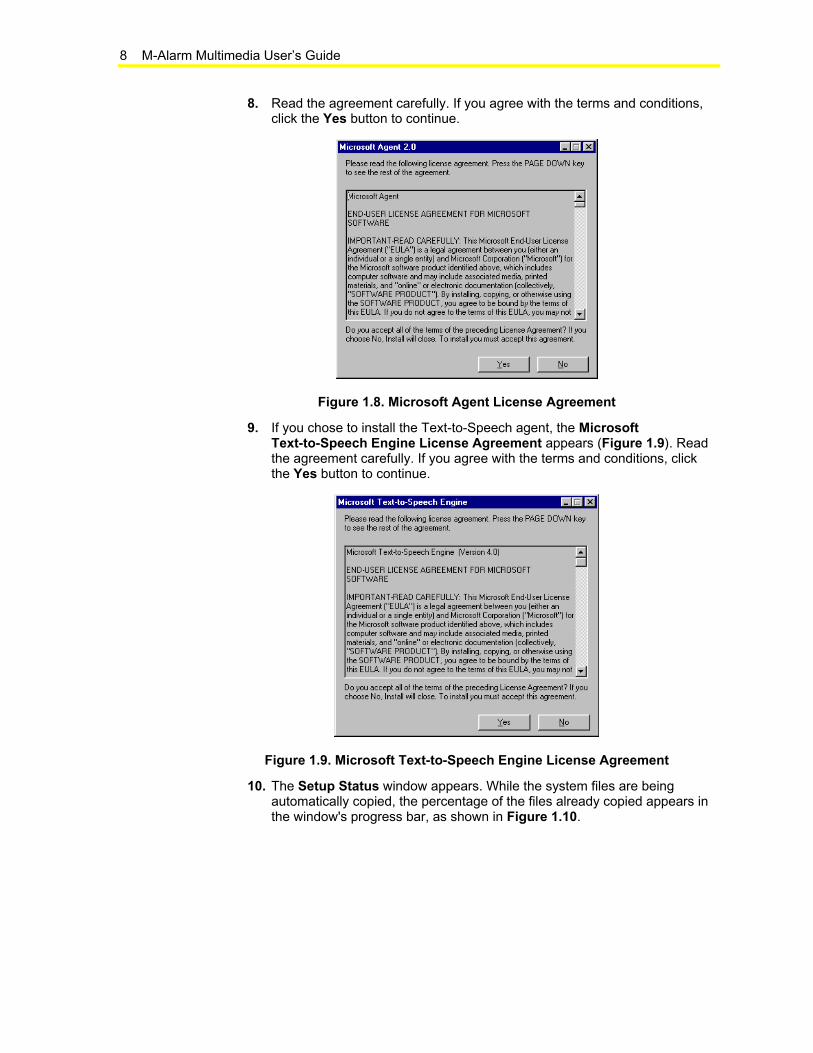
8. Read the agreement carefully. If you agree with the terms and conditions,click the Yes button to continue.
Figure 1.8. Microsoft Agent License Agreement
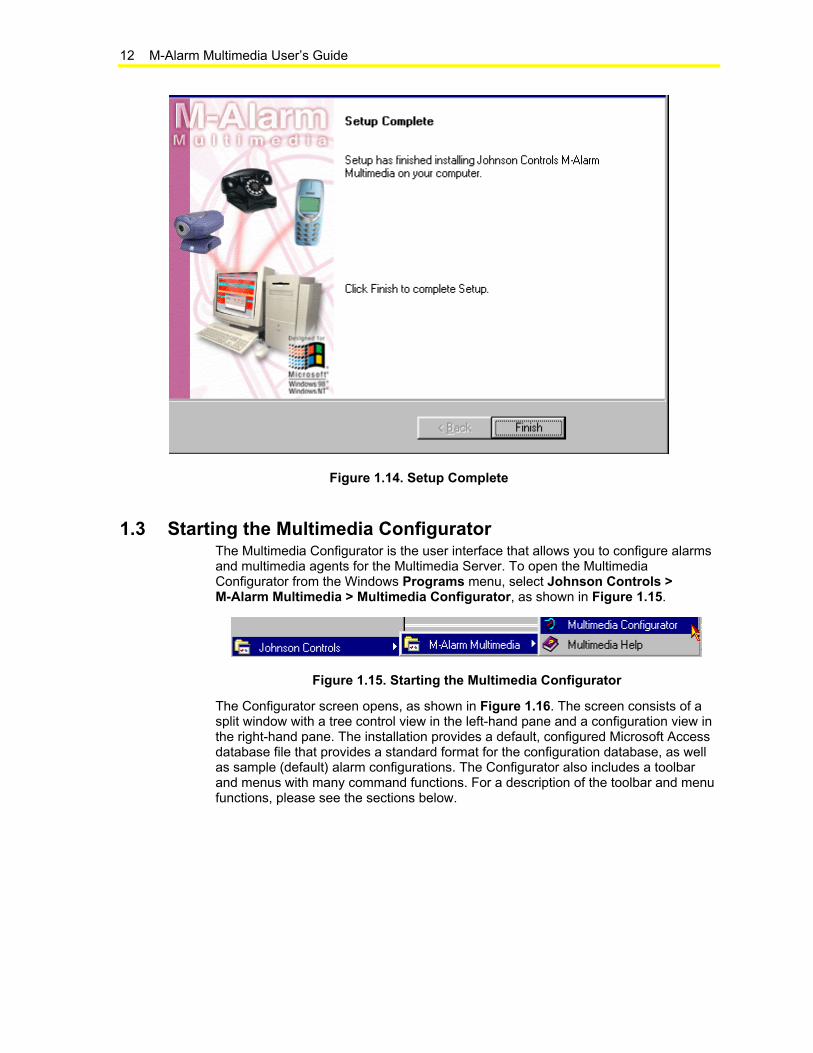
9. If you chose to install the Text-to-Speech agent, the MicrosoftText-to-Speech Engine License Agreement appears (Figure 1.9). Readthe agreement carefully. If you agree with the terms and conditions, clickthe Yes button to continue.
Figure 1.9. Microsoft Text-to-Speech Engine License Agreement
10. The Setup Status window appears. While the system files are beingautomatically copied, the percentage of the files already copied appears inthe window's progress bar, as shown in Figure 1.10.
Introduction 9
Figure 1.10. Setup Status Window
11. The Fonts window, shown in Figure 1.11, is open during the process ofinstallation, but it will not stop the installation. The installation opens thiswindow to configure Marquee Agent dotted fonts. You can ignore thiswindow and close it at any time.
10 M-Alarm Multimedia User’s Guide
Figure 1.11. Fonts Window
12. The M-Alarm Multimedia installation includes a Pager Agent that connectsto a wide variety of pager services and supports the most popular pagingprotocols:
• Tele Alphanumeric Protocol (TAP)
• Simple Messaging Service (SMS)
Note: During the installation of Multimedia, after checking the box to include thePager Agent, you can select which paging services to include with the installation.There are two separate lists: one for the Modem/Integrated Services DigitalNetwork (ISDN) (TAP) pagers, as shown in Figure 1.12, and one for Global Systemfor Network Communications (GSM) / Personal Communications Service (PCS)(SMS) pagers, as shown in Figure 1.13. It is recommended that you select allcarriers in each list so that they will be available in the Multimedia configuration. ClickOK.
Note: Please see Appendix A: Pager Configuration (LIT-1201406) forinformation about SMS and TAP pager services configuration.
Introduction 11
Figure 1.12. Modem/ISDN Carrier Setup
Figure 1.13. GSM/PCS Carrier Setup
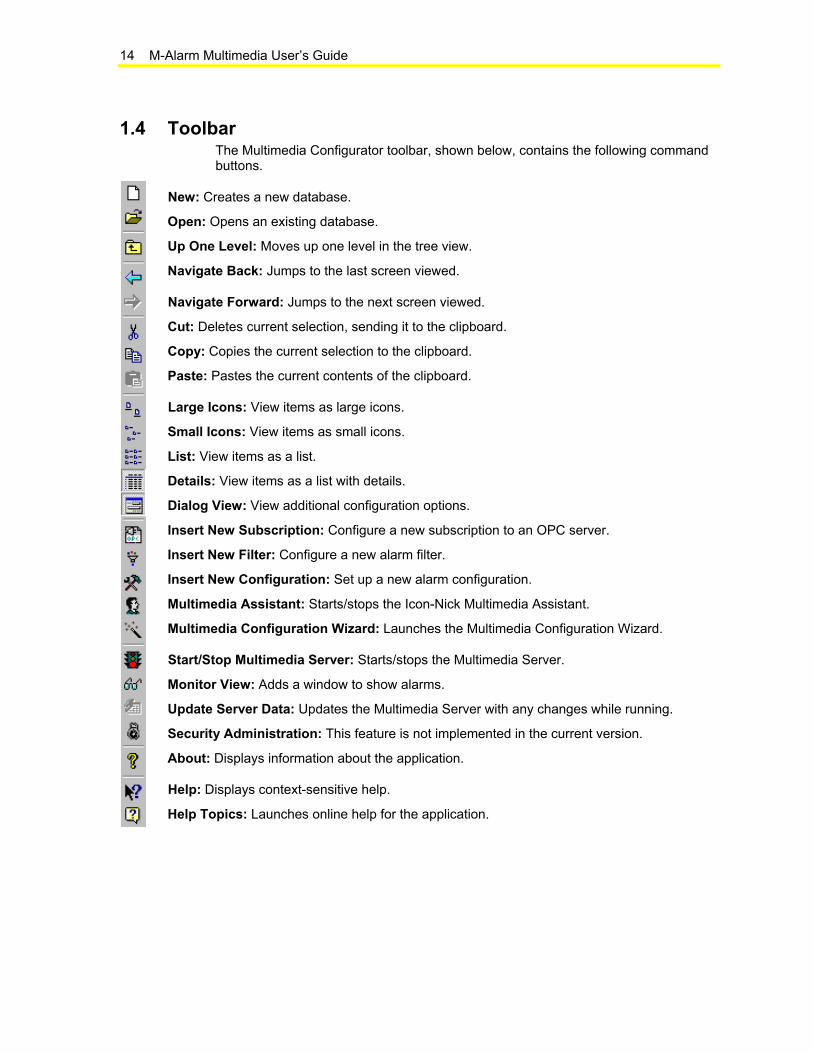
13. The Setup Complete dialog box appears, as shown in Figure 1.14. Clickthe Finish button to complete the installation. When you have finishedinstalling Multimedia, restart your computer.
12 M-Alarm Multimedia User’s Guide
Figure 1.14. Setup Complete
1.3 Starting the Multimedia ConfiguratorThe Multimedia Configurator is the user interface that allows you to configure alarmsand multimedia agents for the Multimedia Server. To open the MultimediaConfigurator from the Windows Programs menu, select Johnson Controls >M-Alarm Multimedia > Multimedia Configurator, as shown in Figure 1.15.
Figure 1.15. Starting the Multimedia Configurator
The Configurator screen opens, as shown in Figure 1.16. The screen consists of asplit window with a tree control view in the left-hand pane and a configuration view inthe right-hand pane. The installation provides a default, configured Microsoft Accessdatabase file that provides a standard format for the configuration database, as wellas sample (default) alarm configurations. The Configurator also includes a toolbarand menus with many command functions. For a description of the toolbar and menufunctions, please see the sections below.
Introduction 13
Figure 1.16. Multimedia Configurator Screen
14 M-Alarm Multimedia User’s Guide
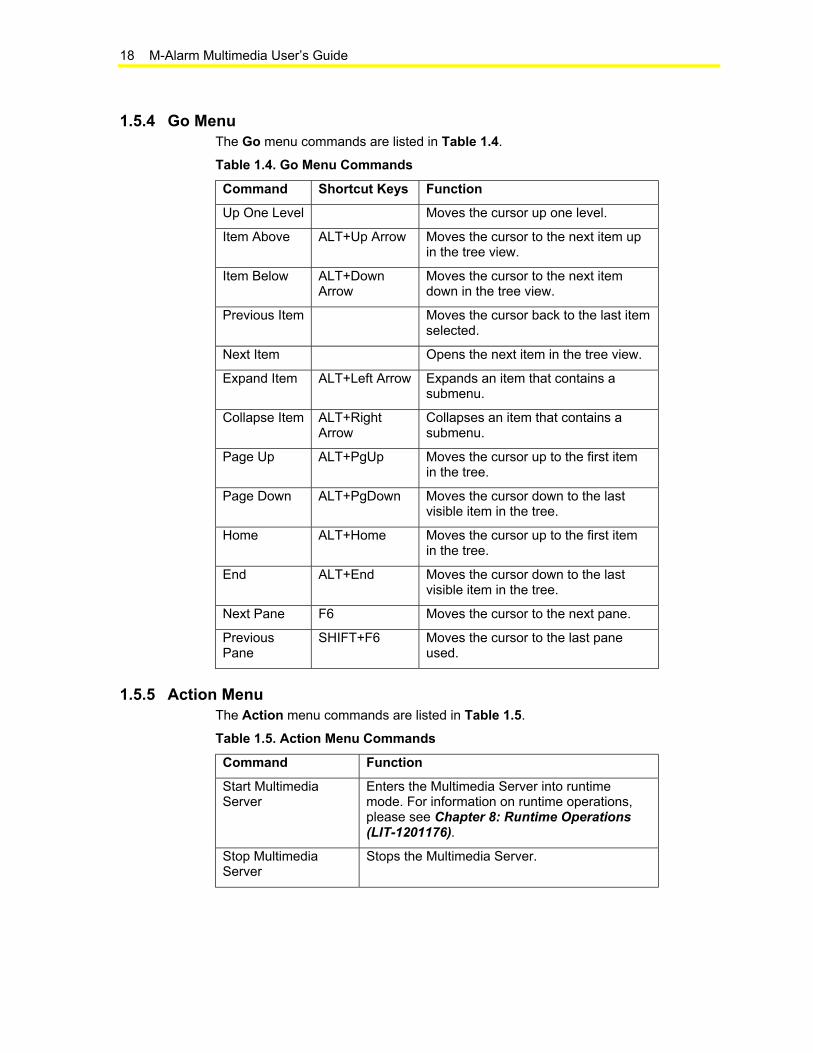
1.4 ToolbarThe Multimedia Configurator toolbar, shown below, contains the following commandbuttons.
New: Creates a new database.
Open: Opens an existing database.
Up One Level: Moves up one level in the tree view.
Navigate Back: Jumps to the last screen viewed.
Navigate Forward: Jumps to the next screen viewed.
Cut: Deletes current selection, sending it to the clipboard.
Copy: Copies the current selection to the clipboard.
Paste: Pastes the current contents of the clipboard.
Insert New Subscription: Configure a new subscription to an OPC server.
Insert New Filter: Configure a new alarm filter.
Insert New Configuration: Set up a new alarm configuration.
Multimedia Assistant: Starts/stops the Icon-Nick Multimedia Assistant.
Multimedia Configuration Wizard: Launches the Multimedia Configuration Wizard.
Start/Stop Multimedia Server: Starts/stops the Multimedia Server.
Monitor View: Adds a window to show alarms.
Update Server Data: Updates the Multimedia Server with any changes while running.
Security Administration: This feature is not implemented in the current version.
About: Displays information about the application.
Help: Displays context-sensitive help.
Help Topics: Launches online help for the application.
Introduction 15
1.5 MenusThe menu bar of the Multimedia Configurator contains the following menus:
• File
• Edit
• View
• Go
• Action
• Tools
• Help
1.5.1 File MenuThe File menu commands are listed in Table 1.1.
Table 1.1. File Menu Commands
Command Shortcut Keys Function
New CTRL+N Creates a new Microsoft Access(.mdb) database file.
Open CTRL+O Opens a Microsoft Access (.mdb)database file.
Save As Saves the current database as aMicrosoft Access (.mdb) file.
Make Active Makes the current database active. Ifthis command is not available, thenthe current database is already theactive database. See Chapter 2:Creating Alarm Configurations(LIT-1201170).
Export CSV This feature is not implemented in thecurrent version.
Import CSV This feature is not implemented in thecurrent version.
Exit Closes the application.
16 M-Alarm Multimedia User’s Guide
1.5.2 Edit MenuThe Edit menu commands are listed in Table 1.2.
Table 1.2. Edit Menu Commands
Command Shortcut Keys Function
New Creates a new item depending onwhat is selected in the tree view.
Rename CTRL+R Renames the selected object.
Multiply CTRL+M Multiplies the selected object or item.See Chapter 7: Additional Features(LIT-1201175) for details.
Delete CTRL+DEL Deletes the selected object.
Cut CTRL+X Cuts the selected object from the viewand places it on the clipboard.
Copy CTRL+C Copies the selected object to theclipboard.
Paste CTRL+V Pastes the last object placed on theclipboard.
Select All CTRL+A Selects all objects in a list. Theselection is shown in the upperright-hand section of the viewer.
InvertSelection
Unselects all selected items andselects all unselected items in a list inthe upper right-hand section of theviewer.
Introduction 17
1.5.3 View MenuThe View menu commands are listed in Table 1.3.
Table 1.3. View Menu Commands
Command Shortcut Keys Function
Toolbar Displays the toolbar.
Status Bar Toggles the status bar.
Large Icons F7 Displays the items in the list as largeicons.
Small Icons F8 Displays the items in the list as smallicons.
List F9 Displays the items in a list.
Details F10 Displays the items along with detailedinformation about the configuration ofeach item.
Dialog View F11 Toggles the configuration window(right-hand pane).
Monitor View F12 Shows/hides the Multimedia Serverruntime monitor. See Chapter 8:Runtime Operations (LIT-1201176).
Sort By Displays a list of options for sortingthe columns in the right-hand pane ofthe screen. The options listed dependon the level within the view.
Show/HideColumns
Displays a list of options that you canchoose to show or hide in the view.
SelectLanguage
Not available at this time.
GlobalRefresh
F5 Refreshes the data for the entireConfigurator screen.
SubtreeRefresh
CTRL+F5 Refreshes only the data contained inthe currently selected subtree.
18 M-Alarm Multimedia User’s Guide
1.5.4 Go MenuThe Go menu commands are listed in Table 1.4.
Table 1.4. Go Menu Commands
Command Shortcut Keys Function
Up One Level Moves the cursor up one level.
Item Above ALT+Up Arrow Moves the cursor to the next item upin the tree view.
Item Below ALT+DownArrow
Moves the cursor to the next itemdown in the tree view.
Previous Item Moves the cursor back to the last itemselected.
Next Item Opens the next item in the tree view.
Expand Item ALT+Left Arrow Expands an item that contains asubmenu.
Collapse Item ALT+RightArrow
Collapses an item that contains asubmenu.
Page Up ALT+PgUp Moves the cursor up to the first itemin the tree.
Page Down ALT+PgDown Moves the cursor down to the lastvisible item in the tree.
Home ALT+Home Moves the cursor up to the first itemin the tree.
End ALT+End Moves the cursor down to the lastvisible item in the tree.
Next Pane F6 Moves the cursor to the next pane.
PreviousPane
SHIFT+F6 Moves the cursor to the last paneused.
1.5.5 Action MenuThe Action menu commands are listed in Table 1.5.
Table 1.5. Action Menu Commands
Command Function
Start MultimediaServer
Enters the Multimedia Server into runtimemode. For information on runtime operations,please see Chapter 8: Runtime Operations(LIT-1201176).
Stop MultimediaServer
Stops the Multimedia Server.
Introduction 19
1.5.6 Tools MenuThe Tools menu commands are listed in Table 1.6.
Table 1.6. Tools Menu Commands
Command Function
Options Launches the Options dialog box. For moreinformation about the Options dialog box,please see Chapter 7: Additional Features(LIT-1201175).
MultimediaConfiguration Wizard
Launches the Alarm Configuration Wizard,which guides you through the steps for alarmconfiguration. See Chapter 3: MultimediaConfiguration Wizard (LIT-1201171) fordetails.
Compact/Repair MSAccess Database
Opens the Compact/Repair MS AccessDatabase dialog box (see below).
Compacting and Repairing Microsoft Access DatabasesYou can compact Microsoft Access databases, which can be either configurationdatabases or historical databases, using the Compact/Repair MS Access Databasedialog box, shown in Figure 1.17. To open this dialog box, select Compact/RepairMS Access Database from the Tools menu. Microsoft Access based databases aresubject to database fragmentation over time, and the support for the database willcompact the target database, reclaim unused space, and drastically improvedatabase performance.
Figure 1.17. Compact/Repair MS Access Database Dialog Box
Note: It is critical that no users or client applications are connected to the databaseat the time of compacting and that, if the Backup Original Database option isselected, you have sufficient hard disk space to make a backup copy.
20 M-Alarm Multimedia User’s Guide
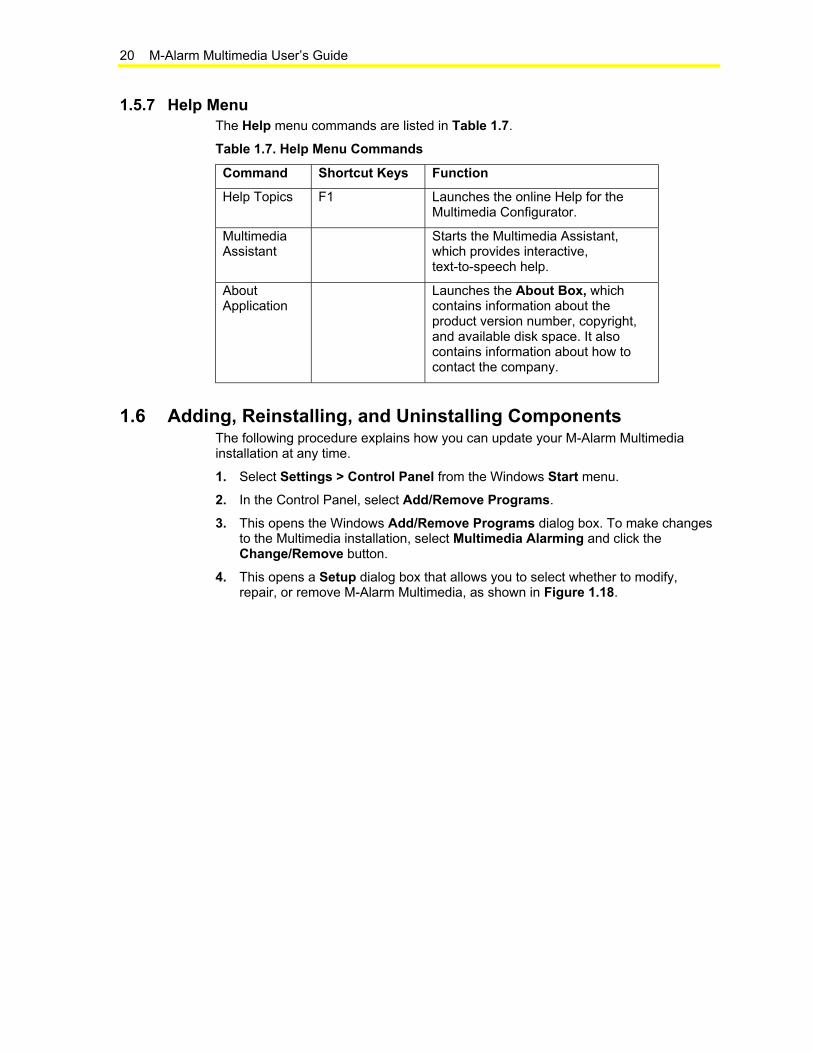
1.5.7 Help MenuThe Help menu commands are listed in Table 1.7.
Table 1.7. Help Menu Commands
Command Shortcut Keys Function
Help Topics F1 Launches the online Help for theMultimedia Configurator.
MultimediaAssistant
Starts the Multimedia Assistant,which provides interactive,text-to-speech help.
AboutApplication
Launches the About Box, whichcontains information about theproduct version number, copyright,and available disk space. It alsocontains information about how tocontact the company.
1.6 Adding, Reinstalling, and Uninstalling ComponentsThe following procedure explains how you can update your M-Alarm Multimediainstallation at any time.
1. Select Settings > Control Panel from the Windows Start menu.
2. In the Control Panel, select Add/Remove Programs.
3. This opens the Windows Add/Remove Programs dialog box. To make changesto the Multimedia installation, select Multimedia Alarming and click theChange/Remove button.
4. This opens a Setup dialog box that allows you to select whether to modify,repair, or remove M-Alarm Multimedia, as shown in Figure 1.18.
Introduction 21
Figure 1.18. Windows Add/Remove Programs Dialog Box
5. To add or remove specific program components, select Modify and then click theNext button, as shown in Figure 1.18. This opens the Select Componentsdialog box (refer to Figure 1.6), where you can select which agents to add to orremove from the installation.
6. To repair a corrupted installation, select Repair from the Setup dialog box shownin Figure 1.18. Then click Next to reinstall all program components.
7. To uninstall all program components, select Remove from the Setup dialog box.Then click the Next button. A dialog box then asks you if you wish to uninstallM-Alarm Multimedia. Click OK to uninstall the application.
8. When you have finished modifying, repairing, or uninstalling components, theMaintenance Complete dialog box appears, as shown in Figure 1.19.
22 M-Alarm Multimedia User’s Guide
Figure 1.19. Maintenance Complete
Controls Group507 E. Michigan StreetP.O. Box 423 www.johnsoncontrols.comMilwaukee, WI 53201 Printed in U.S.A.