21
02-21-17 CPE for Lunch Getting More out of Dynamics GP Accounts Payable Webinar Presented by Fil Schwartz

02-21-17 CPE for Lunch
Getting More out of Dynamics GP
Accounts Payable Webinar
Presented by Fil Schwartz

INTRODUCTION
Overview: We’re going cover 10 Payables topics today in about 50 minutes with some time for Q&A.
Pace: I’m going to move through this webinar at a moderately fast pace. Some of these features we
could spend 2 or 3 hours talking about. My goal today is to present a buffet of options so that you can
see what’s available. There are instructions for these features that you can download for todays’ topics.
In addition the help screens within GP explain the setup options in more detail. Hopefully you’ll learn a
few things that will make your job easier and save time.
If you leave me some feedback about which of these features or other features you’d like to see in more
depth, we can try to cover them in a future seminar.
Disclaimers: Some features may need to be installed. Some features may require additional security
rights. I’ll be using GP 2016, but all these topics are available for GP2013 & GP2015.

TOPICS
1. Expense Deferral – Transaction Entry.
2. Customer Refunds.
3. Vendor Modifier.
4. Document Attachment – Transaction Entry.
5. Modify columns in Edit Check Batch.
6. Use Navigation Pane to Lookup Payables Transactions.
7. Modify the 1096 Form.
8. Create One Check Per Vendor and One Check Per Invoice in the Same Check Run.
9. Use SmartList Reminders to Track Missing Invoices.
10. Mekorma: Blank Check Stock, Check Stubs, PDF Copies, Thresholds by User.

1. Expense Deferral – Transaction Entry
Initial Setup: Financial> Setup> Financial> Deferral
Initial Setup: Financial> Setup> Financial> Deferral Profile
Allow user access to the STANDARD profile or setup a specific profile and allow user access.

Application: From the Payables Transaction Entry screen, fill in all the invoice information and click on
the distribution button. From the Distribution screen choose the distribution line that you want to
defer, then click on the Additional icon at top and choose Deferral.
From the Deferral Entry screen, enter the Start and End Periods that you want to spread the deferral
over. Enter the Amount to Apportion, the Cost Recognition account (usually your expense account) and
review the distribution dates and amounts and the bottom.

2. Customer Refunds
Initial Setup: Sales> Setup> Refund Checks
Application: Sales> Transactions> Refund Checks
From the Refund Check screen, create a Payables Batch ID and enter a posting date for the Receivables
entries. You can either create payments for all customers with a credit balance or you can select specific
customers to refund.
To create a refund for specific customers choose the Specific Documents option. Enter a customer, then
click on the Insert Button and choose the document(s) from the Edit Refund Checks screen which will
open. If the vendor is not already setup, click the Create Vendor button, make any changes to the
vendor maintenance screen that will pop up and save the new vendor. Repeat these steps to add
additional customer refund checks.
Click the Process icon to create the posting entries in Receivables Management and to create the
Payables check batch. If the Auto-open Print Payables Checks option was selected on the setup screen,
the Payables print checks screen will appear and you can print the refund checks. Otherwise a batch will
be available in Payables Management to be selected and paid later.


3. Vendor Modifier
Application: Purchasing> Utilities> Vendor Combiner and Modifier
Choose Vendor Combiner to merge a Vendor ID and all history for that Vendor with another Vendor. In
this sample all the history for Office Max will become part of Office Depot and the Vendor ID Office Max
will no longer exist. WARNING: choosing Combine is non reversible, you should back up before using
this feature.
Choose Vendor Modifier to change a Vendor ID to a new Vendor ID that never existed in the system
before. In this sample all past activity and future activity for vendor ID ATT000001 will now be accessed
by choosing vendor ID AT&T.
Note: Both Vendor Combiner and Vendor Modifier allow multiple vendors to be modified at the same
time. This can be done by manually entering additional entries or by importing a CSV list with Source
Vendor ID’s and Destination Vendor ID’s. WARNING: choosing Combine when you meant to choose
Modify is non reversible, you should back up before using this feature.
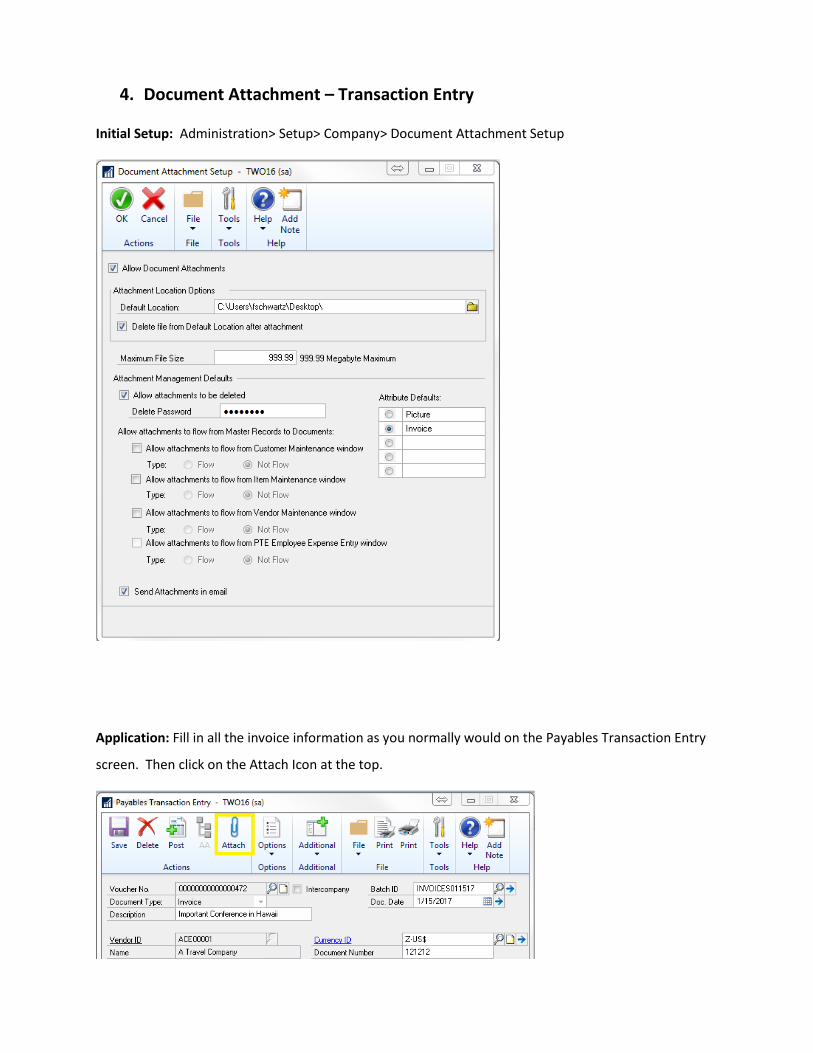
4. Document Attachment – Transaction Entry
Initial Setup: Administration> Setup> Company> Document Attachment Setup
Application: Fill in all the invoice information as you normally would on the Payables Transaction Entry
screen. Then click on the Attach Icon at the top.

From the Document Attachment Management screen choose the Scan button at the bottom if you have
a WIA compliant scanner attached to your PC or choose the Attach button at the bottom to locate a
document on your network. Multiple documents can be attached and viewed as a permanent part of
this transaction.
Note: Documents can be attached to most master records and transactions in GP.

5. Modify Columns in Edit Check Batch
Choose Columns (yellow Highlight) to display different fields.
Click Field (green highlight) to sort Vendors and Transactions.
Drag blue divider lines to change column size.

6. Use Navigation Pane to Lookup Payables Transactions
Clicking on Payables Transactions in the Navigation Pane will bring up transactions based on the default
settings. These settings can be modified and saved with new titles for each set of modifications. In the
Action Pane can change the date range and whether to include historical transactions. In the filter you
can further restrict the output such as to only show Invoices or only show Payments. After making
changes click on the Invoices drop down menu (highlighted with blue box) and save these modification
with a new name.
When you choose the new report from the Navigation Pane you can make additional changes by
accessing the Invoices drop down menu and choosing Customize.

This will bring up the List View Customization and choosing Columns will bring up the Column Details
where you can add, delete or modify columns to be displayed. When done click OK and then Save in the
List View Customization screen.
When you access this report in the future you can restrict the transactions by Vendor by typing in the
Vendor ID in the filter box on the right of the screen. You can doulble click on any transaction to drill
back to the transaction or you could select multiple transactions and send the list to Excel using the Go
To option in the Action Pane.

7. Modify the 1096 Form
Application: Purchasing> Routines> Print 1099
From the Print 1099 screen choose 1096 Form and then click on Print Forms File.
Print the report to Screen. From the Screen Output, choose Modify.
This will open up the form in Report Writer and you can move the fields around. Often on the 1096
form you will have to move the check box that marks what type of 1099 your filing. Click on the
appropriate box and use your arrow keys to move it. When done, click on the red exit in the top corner
to close the Report Layout and Save the changes. Then click the red X in the top corner of the Report
Definition screen and click save. Then from the menu bar at top choose file and from the drop down
menu choose Microsoft Dynamics GP.

Activate the modified version: Administration> Setup> System> Alternate/Modified Forms and Reports
GP always has an original version of every report that can’t be changed. When you modify a report, GP
creates a modified version of the original. In order to use the modified version you must set that
preference in the Alternate/Modified Forms and Report file for the ID assigned to your user profile. In
most but not all cases this is the DEFAULTUSER ID.

8. Create One Check Per Vendor and One Check Per Invoice in Same Batch
Setup Vendors:
From the vendor card choose Options and enter a designated number such as 1, in the Payment
Priority field for all vendors that should get One Check per Invoice.
Select Checks:
Enter a new Batch name in the Batch ID field. Restrict the batch by Payment Priority = and enter
the number you choose to identify One Check per Invoice vendors (1 in this example) then insert
the restriction. You can add additional restrictions as well. Change the One Check Per drop
down menu to “Invoice” and click Build Batch.
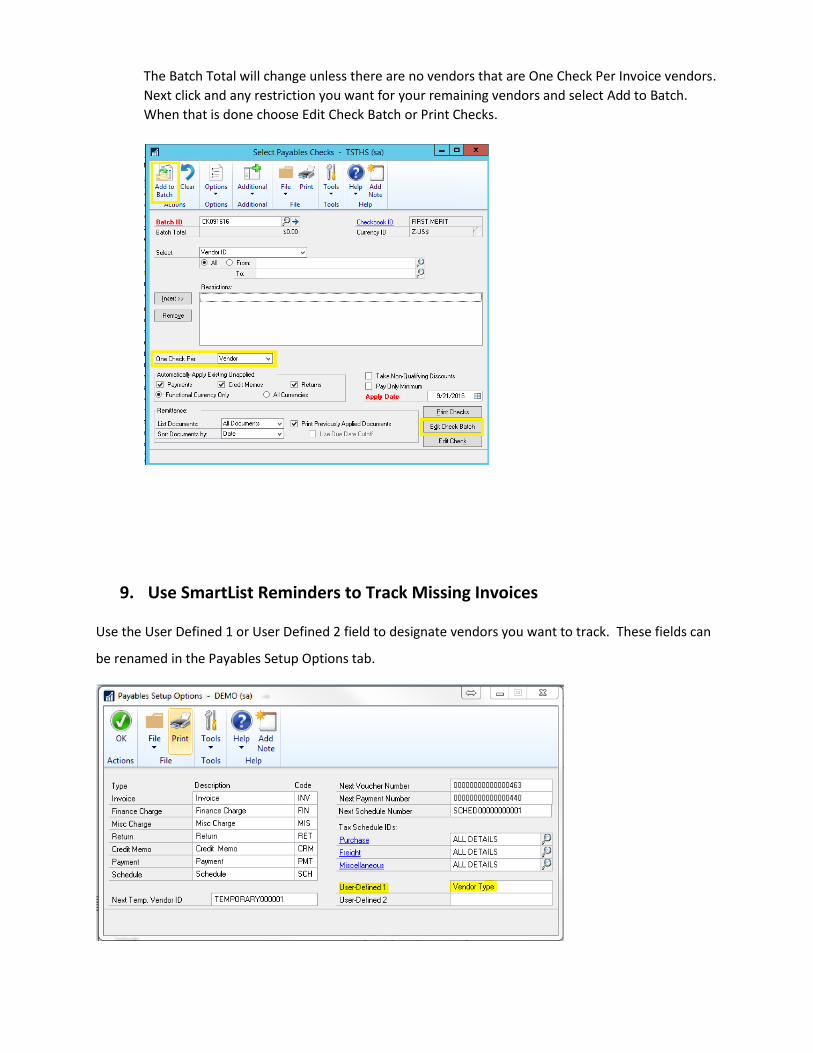
The Batch Total will change unless there are no vendors that are One Check Per Invoice vendors.
Next click and any restriction you want for your remaining vendors and select Add to Batch.
When that is done choose Edit Check Batch or Print Checks.
9. Use SmartList Reminders to Track Missing Invoices
Use the User Defined 1 or User Defined 2 field to designate vendors you want to track. These fields can
be renamed in the Payables Setup Options tab.

Use the Vendor SmartList and delete all columns except Vendor ID and Vendor Name. Then add the Last
Purchase Date and the renamed User Defined 1 field. From the Search screen, set the renamed User
Defined 1 field in this case Vendor Type equals Expense Report and Last Purchase Date is less than
Beginning of Month.
Choose OK to run the Smartlist. From the menu bar choose the Favorites icon.
Enter a Name and click Add. Choose Add favorite and reminder.
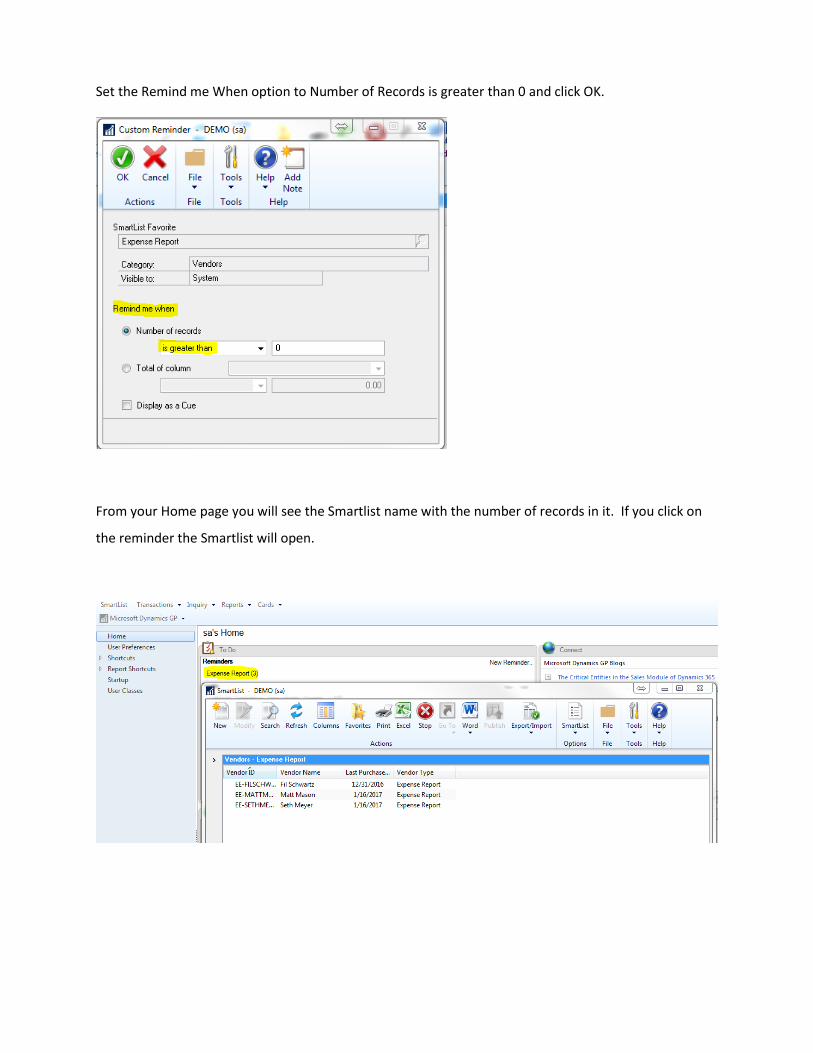
Set the Remind me When option to Number of Records is greater than 0 and click OK.
From your Home page you will see the Smartlist name with the number of records in it. If you click on
the reminder the Smartlist will open.

10. Mekorma (3rd party check printing software)
Blank Check Stock
GL Distribution on Check Stubs

PDF Check and Remittance Copies
Allow Different Thresholds and Signature Requirements by User.


