30
Sharepoint 2013 Administration -Sarath Chandra Aravapalli
| Date post: | 21-Jul-2015 |
| Category: |
Education |
| Upload: | sarath-chandra-aravapalli |
| View: | 104 times |
| Download: | 0 times |
Sharepoint 2013 Administration
-Sarath Chandra Aravapalli

Setting up the Domain ControllerWhat do you need for this exercise :
• A Virtual Machine
• ISO Image file of DVD containing
Windows 2012 Server [Not R2]
• Assign Static IP Address
Steps for Preparing the Domain Controller :
• Prepare the VM
• Install Windows 2012 Server
• Install the ADDS Service
• Promote the Server to a Domain Controller

Why do we need so many servers and How do they communicate ?
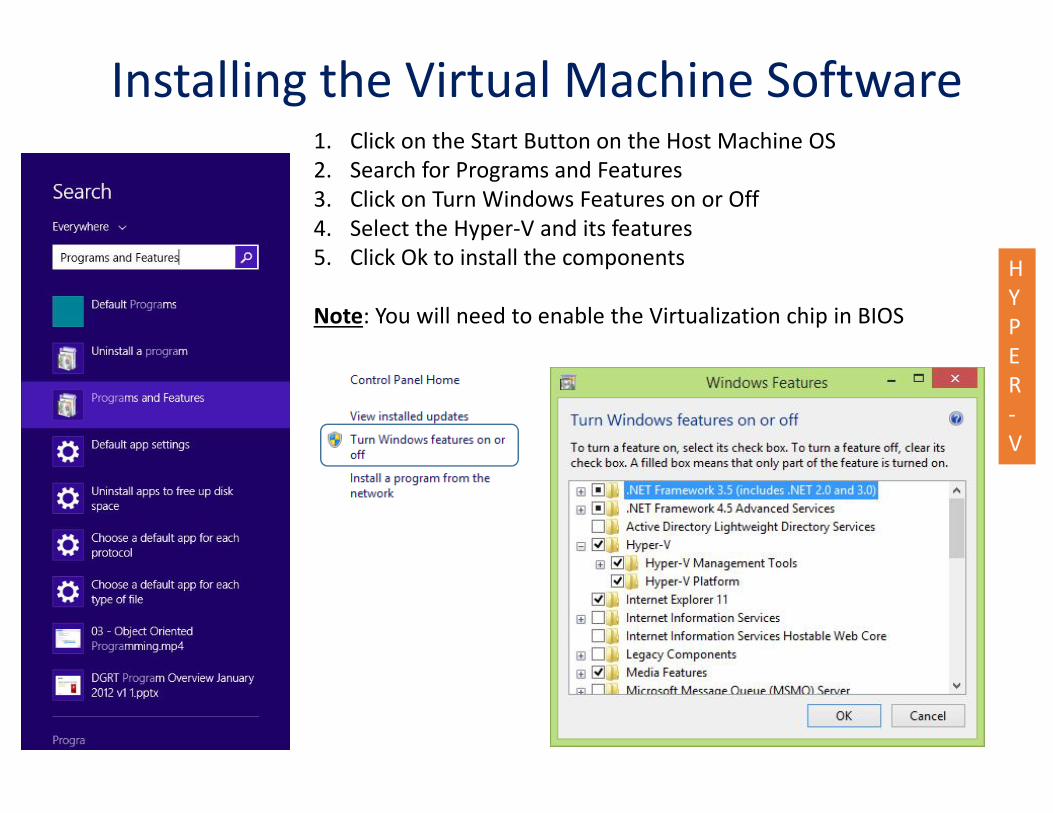
Installing the Virtual Machine Software
HYPER-V
1. Click on the Start Button on the Host Machine OS2. Search for Programs and Features3. Click on Turn Windows Features on or Off4. Select the Hyper-V and its features 5. Click Ok to install the components
Note: You will need to enable the Virtualization chip in BIOS

1. Click on the Start Button on the Host Machine OS2. Search for Hype-V Manager [only for windows 8.1 or Windows
2012 or 2012 R23. Launch the Hyper-V Manager
Setting up the Virtual Machine

Setting up the Virtual Machine1. Click on Virtual Switch
Manager2. Create an Internal Switch
by Selecting Internal Option and select Create Switch
3. You will be prompted to enter the Name for the Virtual Switch

Setting up the Virtual Machine4. Enter the Name that you
can remember and will be easy to identify for later use.
Note: This switch will be used for VM to VM Communication and will be assigned a Static IP post installation of the OS.
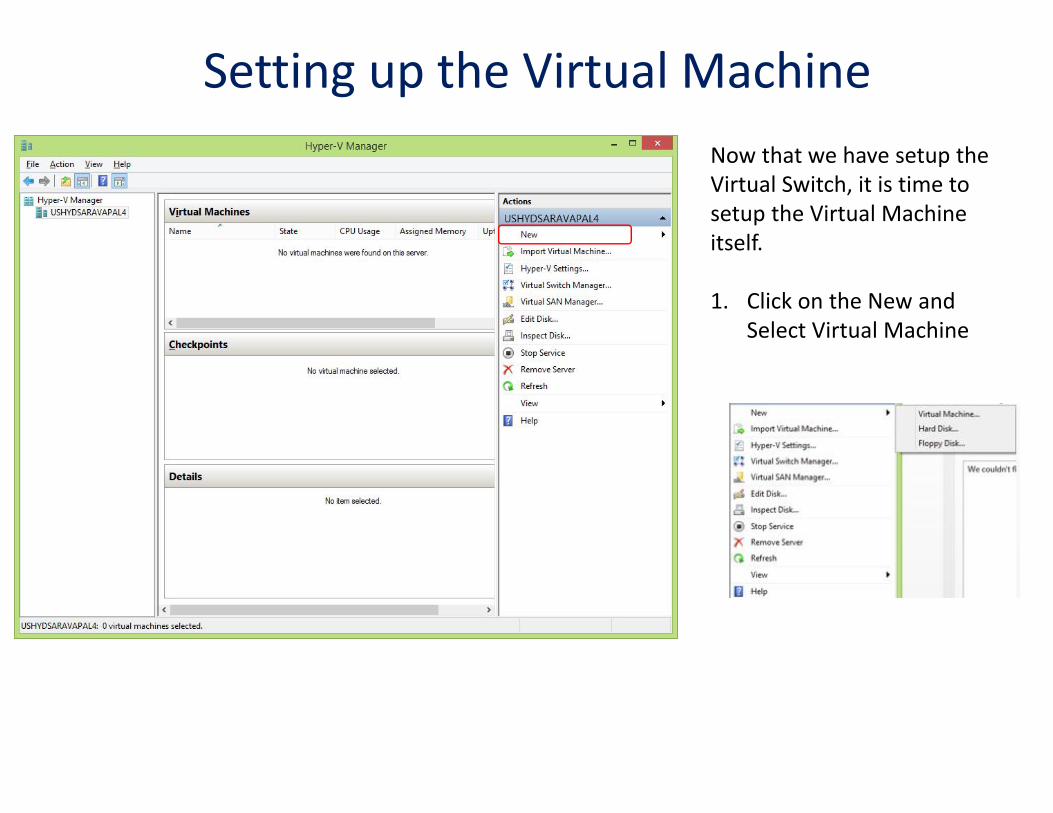
Setting up the Virtual MachineNow that we have setup the Virtual Switch, it is time to setup the Virtual Machine itself.
1. Click on the New and Select Virtual Machine
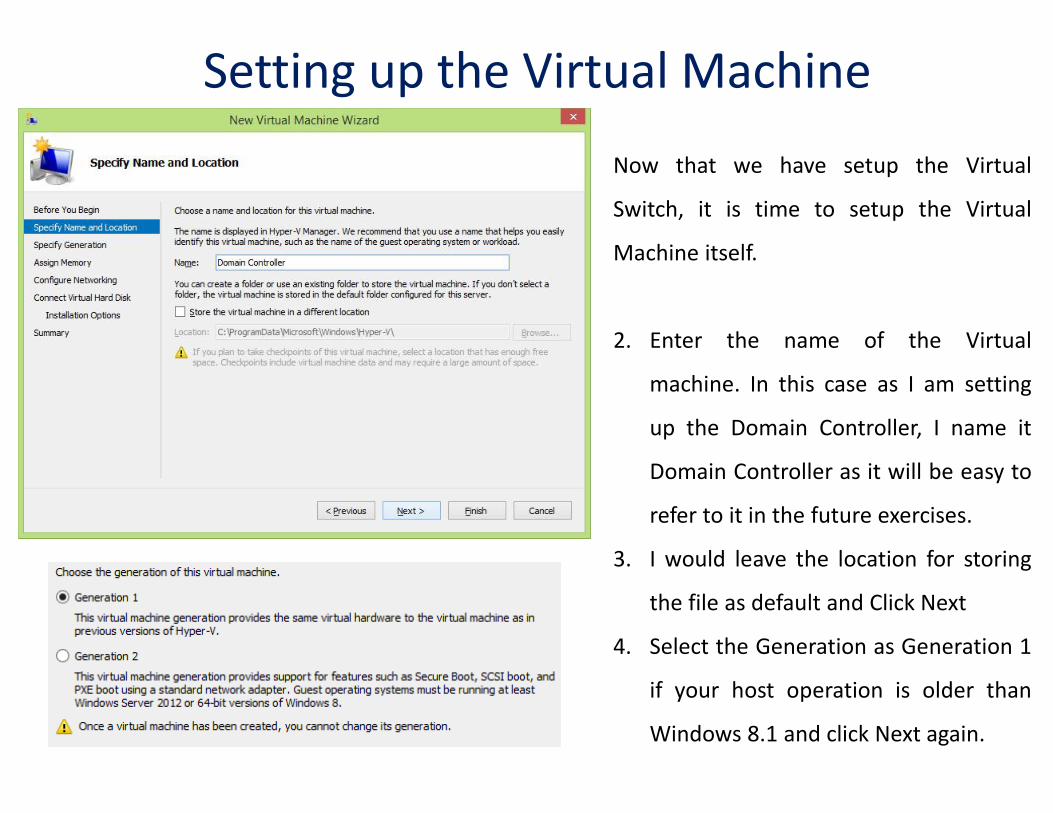
Setting up the Virtual MachineNow that we have setup the Virtual
Switch, it is time to setup the Virtual
Machine itself.
2. Enter the name of the Virtual
machine. In this case as I am setting
up the Domain Controller, I name it
Domain Controller as it will be easy to
refer to it in the future exercises.
3. I would leave the location for storing
the file as default and Click Next
4. Select the Generation as Generation 1
if your host operation is older than
Windows 8.1 and click Next again.

Setting up the Virtual Machine5. Assign the required amount of RAM.
In this scenario, although domain
controller will not need more than 1.5
GB of RAM, I have allocated about
3GB which will be used by Sharepoint
Server.
Note: We will be installing the Sharepoint
Server on the top of Domain Controller in
our exercises.
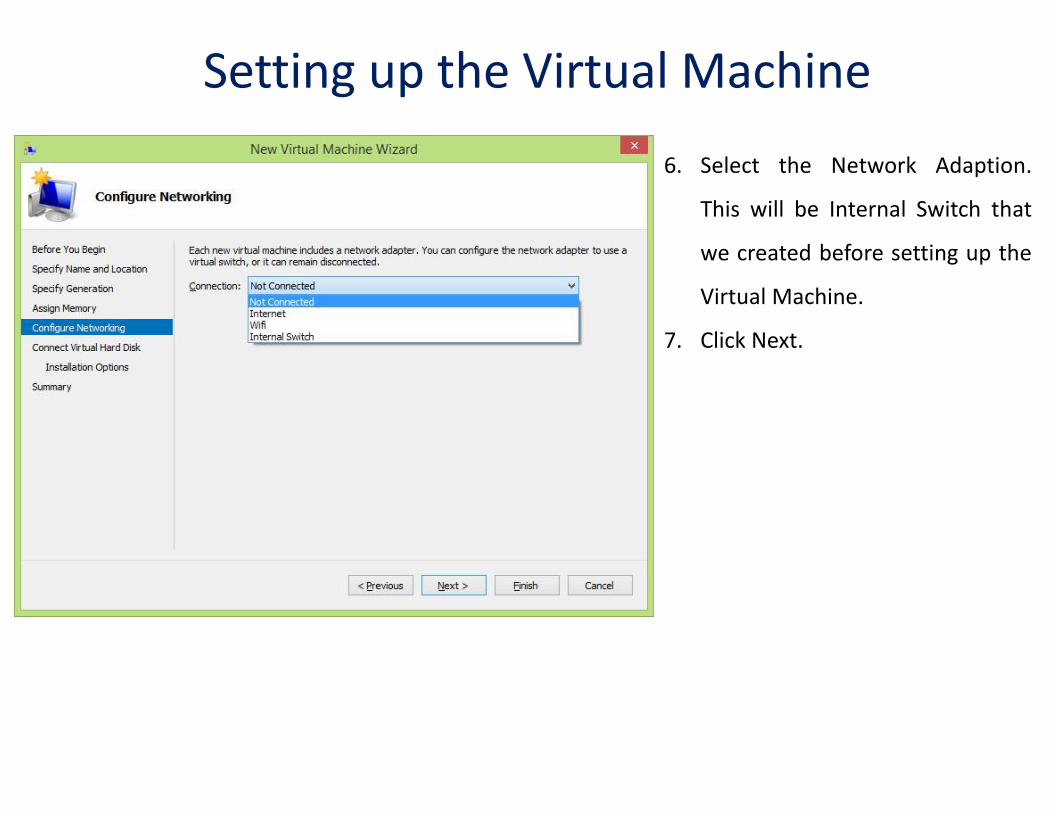
Setting up the Virtual Machine6. Select the Network Adaption.
This will be Internal Switch that
we created before setting up the
Virtual Machine.
7. Click Next.
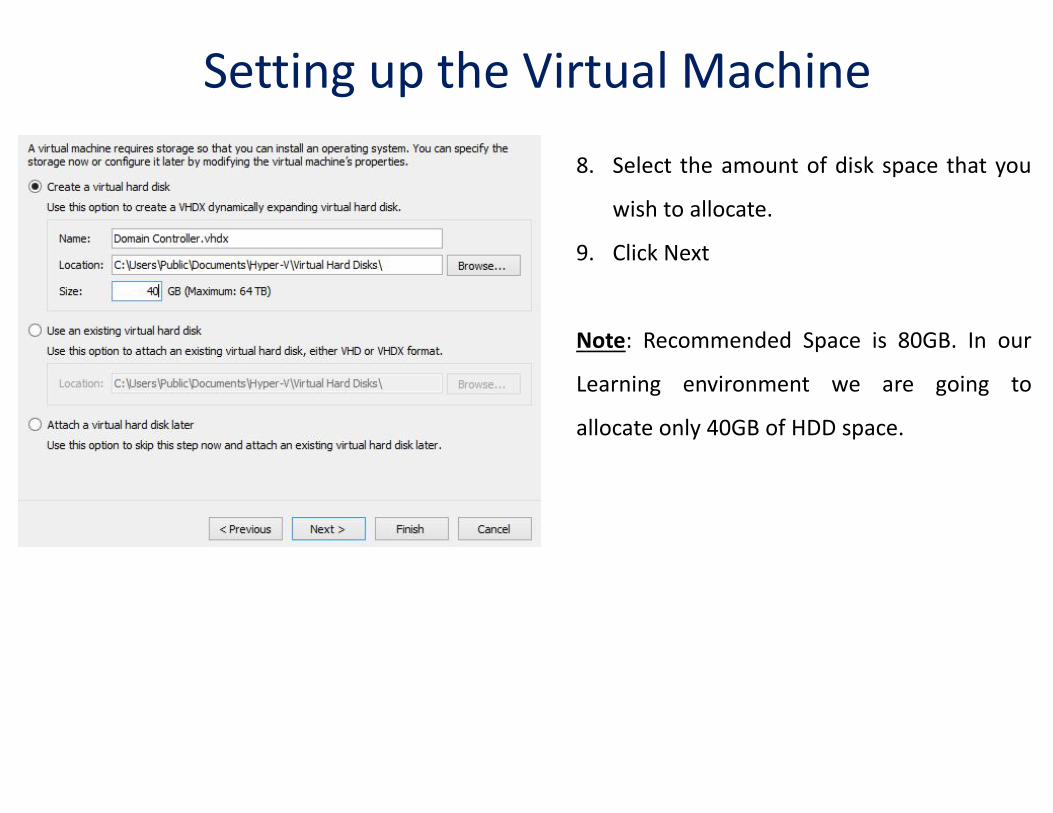
Setting up the Virtual Machine8. Select the amount of disk space that you
wish to allocate.
9. Click Next
Note: Recommended Space is 80GB. In our
Learning environment we are going to
allocate only 40GB of HDD space.

Setting up the Virtual Machine10. Select the Location of the ISO [Windows
2012 Server Image File]
11. Click Next
12. Review the Summary and Click on Finish
13. You will now see the VM that is created.
You can double click on click on the power
on Icon to start the VM.

Installing Windows Server 20121. Double click on the VM from the list.
You will see this window on the left
2. Click on the Green power on button
to start the VM.
3. It will select the ISO Image and will
start the Windows Server Installation.

Installing Windows Server 20124. Select the Language for Installation and,
Time Format and the Keyboard input
method and click on Next.
5. Click on Install Now.
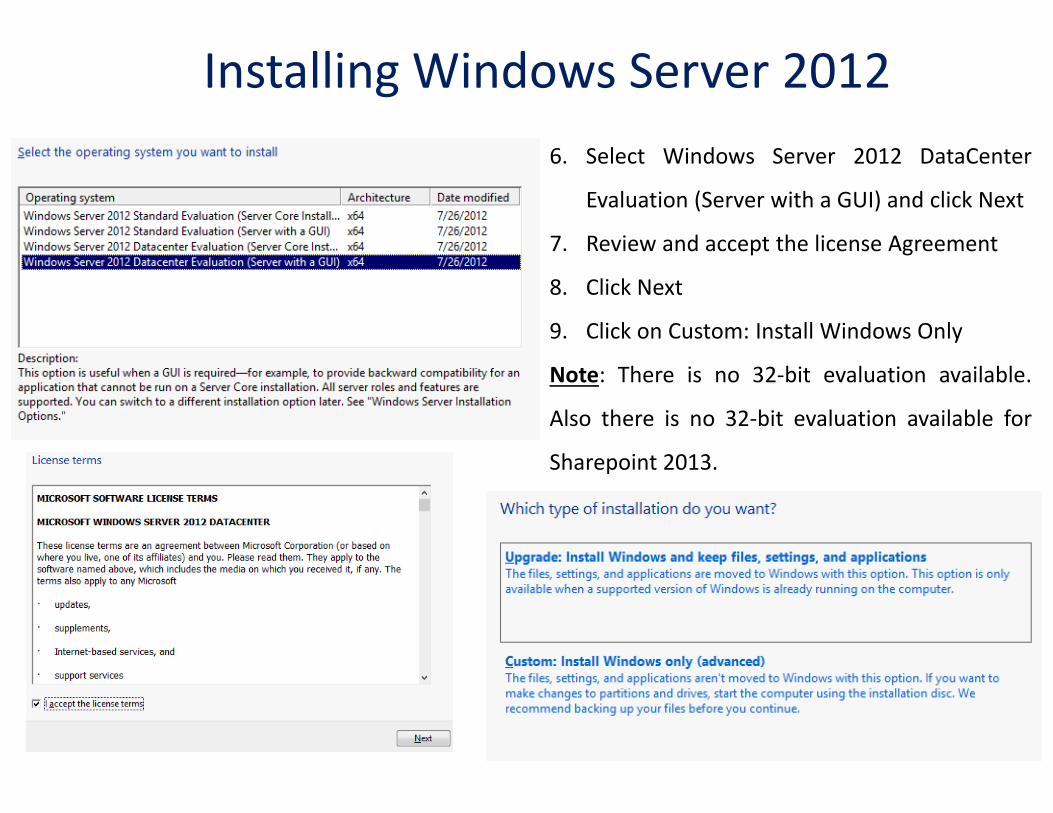
Installing Windows Server 20126. Select Windows Server 2012 DataCenter
Evaluation (Server with a GUI) and click Next
7. Review and accept the license Agreement
8. Click Next
9. Click on Custom: Install Windows Only
Note: There is no 32-bit evaluation available.
Also there is no 32-bit evaluation available for
Sharepoint 2013.

Installing Windows Server 201210. Select the Drive for installing Windows
Server 2012 and Click Next.
11. The Installation of windows will start and
unlike it’s predecessors, there will not be any
human intervention needed during the
installation.
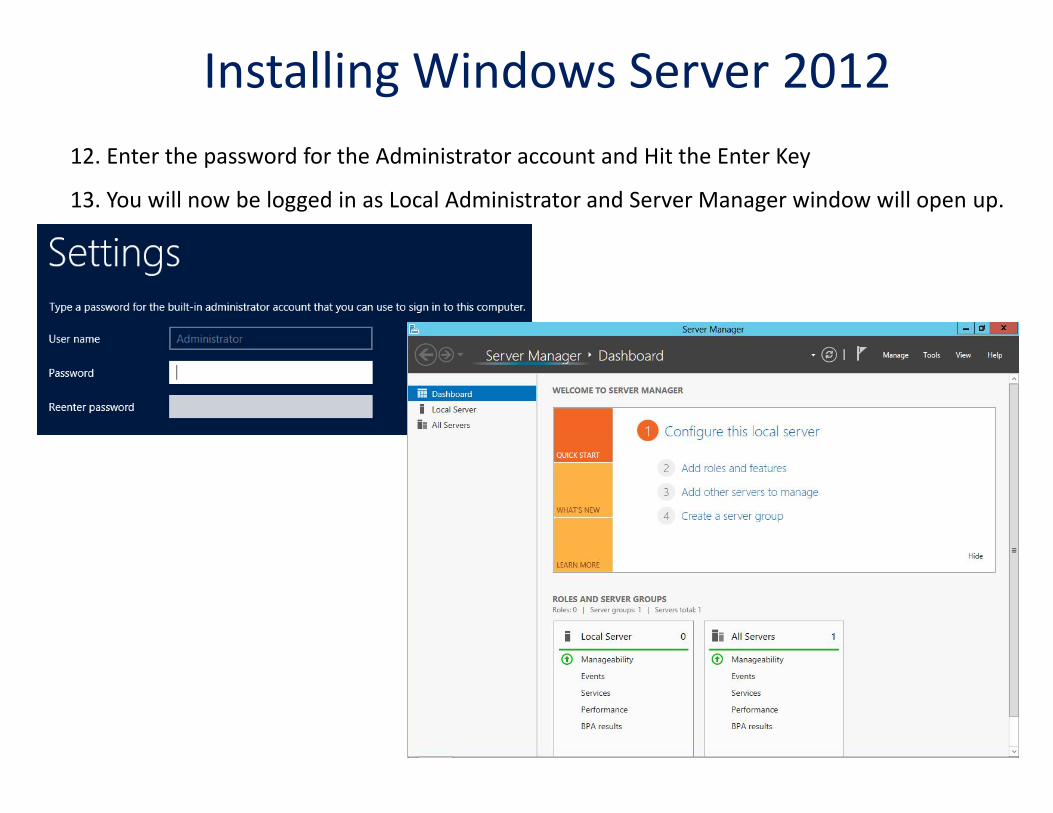
12. Enter the password for the Administrator account and Hit the Enter Key
13. You will now be logged in as Local Administrator and Server Manager window will open up.
Installing Windows Server 2012

Promoting the Server to DC [Domain Controller]1. Assign the Static IP to the Virtual Network adapter.
2. Right click on the network icon on the lower right hand
side on the VM Window.
3. Select Open Network and Sharing Center
4. Click on Change Adapter Settings
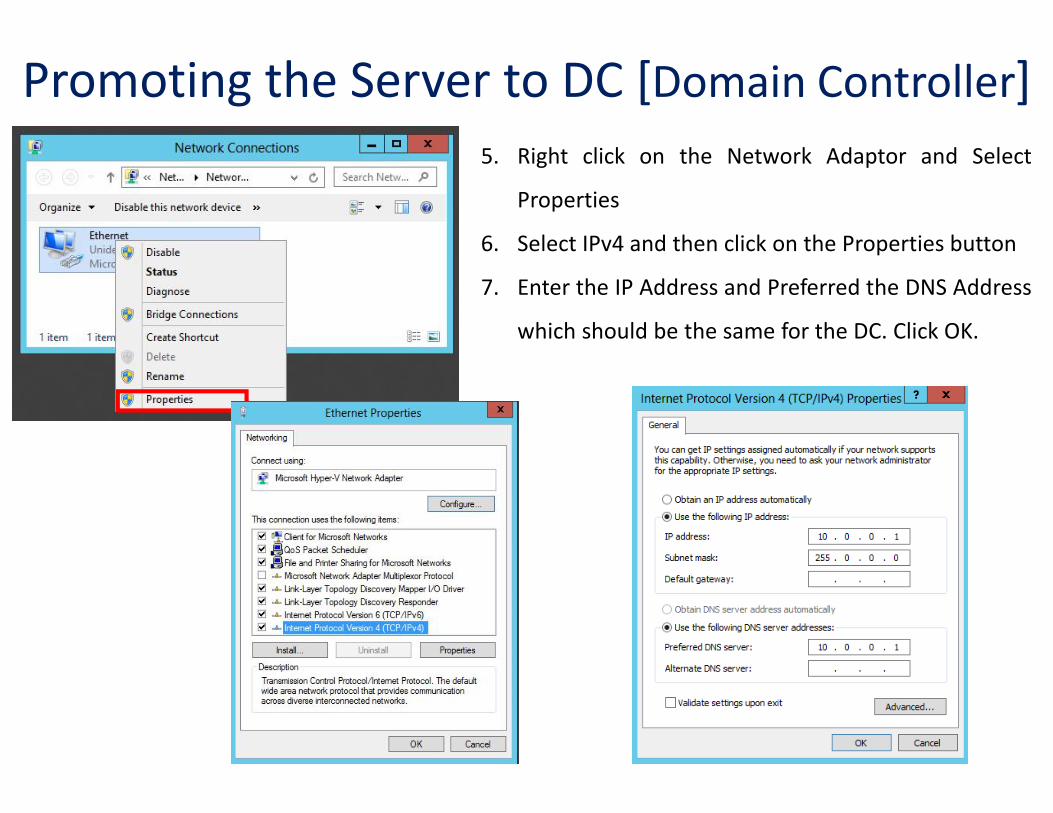
Promoting the Server to DC [Domain Controller]5. Right click on the Network Adaptor and Select
Properties
6. Select IPv4 and then click on the Properties button
7. Enter the IP Address and Preferred the DNS Address
which should be the same for the DC. Click OK.

Promoting the Server to DC [Domain Controller]1. Open the Server Manager and Click on
the Manage
2. Select Add Roles and Features
3. You will get the Add Roles and Features
Wizard. Click Next on the Initial Screen
that gives information.

Promoting the Server to DC [Domain Controller]4. Select Role-based or feature-based Installation and click Next
5. Select the Server [ usually the only one available ] and Click Next

Promoting the Server to DC [Domain Controller]6. Select Active Directory Domain Services
7. Click on the Add Features button when you see a pop-up. Click Next
8. Click Next on the Features Screen as the required features were already select in the previous
step.

Promoting the Server to DC [Domain Controller]9. Review the information given about Active Directory Domain Services and click Next
10. Select the Box for Restart the destination server automatically if required. Click Yes.
11. Click on Install.

Promoting the Server to DC [Domain Controller]
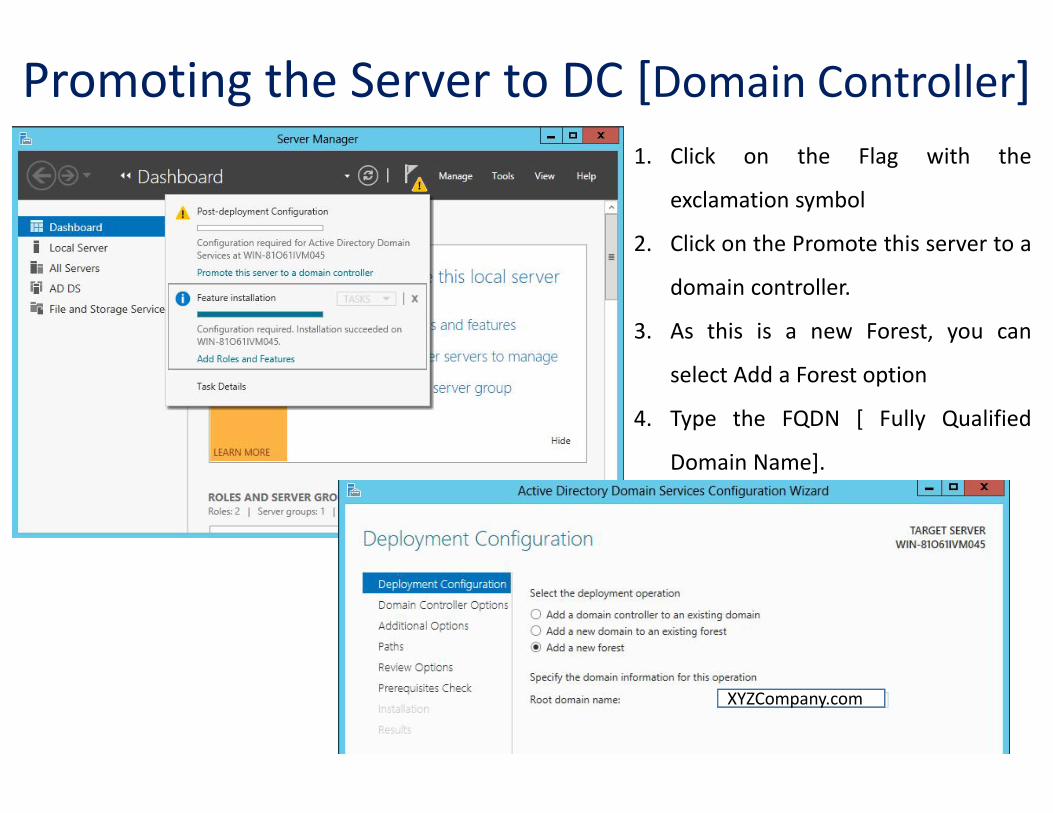
Promoting the Server to DC [Domain Controller]1. Click on the Flag with the
exclamation symbol
2. Click on the Promote this server to a
domain controller.
3. As this is a new Forest, you can
select Add a Forest option
4. Type the FQDN [ Fully Qualified
Domain Name].
XYZCompany.com
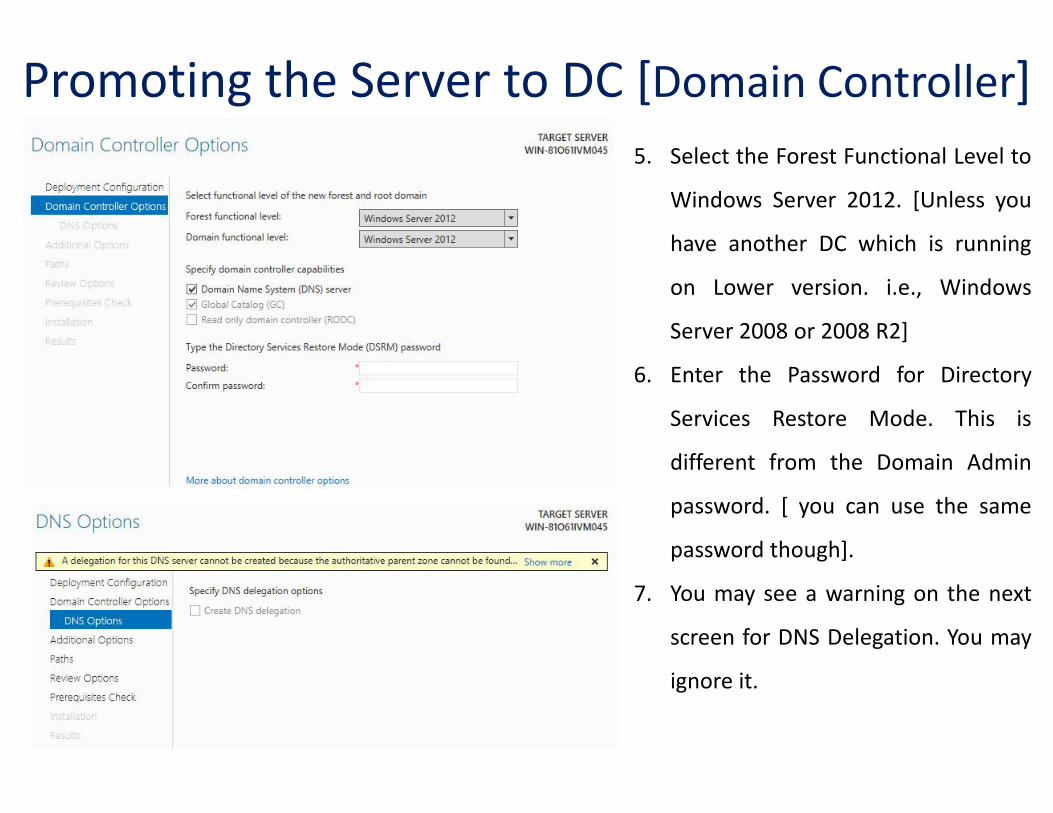
Promoting the Server to DC [Domain Controller]5. Select the Forest Functional Level to
Windows Server 2012. [Unless you
have another DC which is running
on Lower version. i.e., Windows
Server 2008 or 2008 R2]
6. Enter the Password for Directory
Services Restore Mode. This is
different from the Domain Admin
password. [ you can use the same
password though].
7. You may see a warning on the next
screen for DNS Delegation. You may
ignore it.
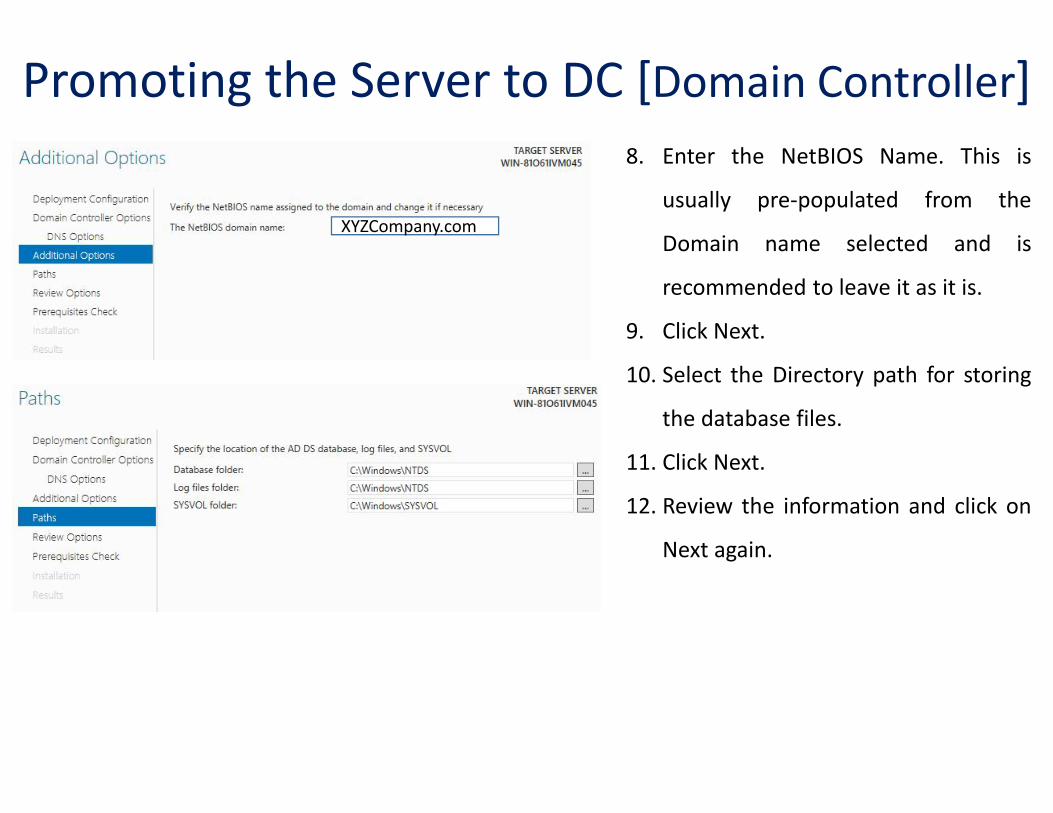
Promoting the Server to DC [Domain Controller]8. Enter the NetBIOS Name. This is
usually pre-populated from the
Domain name selected and is
recommended to leave it as it is.
9. Click Next.
10. Select the Directory path for storing
the database files.
11. Click Next.
12. Review the information and click on
Next again.
XYZCompany.com

Promoting the Server to DC [Domain Controller]13. On the next screen, you will see the
Pre-requisite check trying to check
for the requirements for promoting
the server to DC. This includes the
static IP. You will get errors or
warnings if you do not have the
Static IP assigned.
14. Once Pre-requisite checker is
complete, you will see result as
passed and with some warnings
related to DNS. These can be
ignored.
15. Click Install

Promoting the Server to DC [Domain Controller]16. Once the setup is complete, you will be get a
message about system restart.
17. Your VM will reboot automatically.
18. Login now as a Domain Administrator.


