Page 1
24/08/13 The NetBeans E-commerce Tutorial - Adding Entity Classes and Session Beans
https://netbeans.org/kb/docs/javaee/ecommerce/entity-session.html?print=yes 1/23
Tutorial Contents
1. Introduction
2. Designing the Application
3. Setting up the Development Environment
4. Designing the Data Model
5. Preparing the Page Views and Controller Servlet
6. Connecting the Application to the Database
7. Adding Entity Classes and Session Beans
What are EJB and JPA Technologies?
What are Session Beans?
About Specifications and Implementations
Adding Entity Classes
Adding Session Beans
Accessing Data with EJBs
See Also
8. Managing Sessions
9. Integrating Transactional Business Logic
10. Adding Language Support
11. Securing the Application
12. Testing and Profiling
13. Conclusion
The NetBeans E-commerce Tutorial - Adding Entity Classes and Session Beans
This tutorial unit introduces the Enterprise
JavaBeans (EJB) and Java Persistence
(JPA) technologies. In it, you use two of the
IDE's wizards that are essential to Java EE
development. These are:
Entity Classes from Database wizard:
Creates a Java Persistence API entity class for each selected
database table, complete with named query annotations, fields
representing columns, and relationships representing foreign
keys.
Session Beans for Entity Classes wizard: Creates an EJB
session facade for each entity class with basic access
methods.
These two wizards provide an efficient way for you to quickly set up
the model for your application. If you reexamine the MVC diagram
for the application you are building, you can see where EJB
session beans and JPA entity classes fit into its structure.
In this unit, the entity classes you create form a Java-based representation of the affablebean database. While each entity
class represents a database table, instances of entity classes correspond to records that can be saved (i.e., persisted) to the
database. The business logic of the application is encapsulated by session beans, which can either be used as facade classes
that enable CRUD (Create-Read-Update-Delete) access to entities (as demonstrated here), or they can contain code that
implements actions specific to your application. (An example of this is provided in Unit 9: Integrating Transactional Business
Logic).
You can view a live demo of the application that you build in this tutorial: NetBeans E-commerce Tutorial Demo Application.
Page 2
24/08/13 The NetBeans E-commerce Tutorial - Adding Entity Classes and Session Beans
https://netbeans.org/kb/docs/javaee/ecommerce/entity-session.html?print=yes 2/23
Software or Resource Version Required
NetBeans IDE Java bundle, 6.8 or 6.9
Java Development Kit (JDK) version 6
GlassFish server v3 or Open Source Edition 3.0.1
MySQL database server version 5.1
AffableBean project snapshot 3
Notes:
The NetBeans IDE requires the Java Development Kit (JDK) to run properly. If you do not have any of the resources listed
above, the JDK should be the first item that you download and install.
The NetBeans IDE Java Bundle includes Java Web and EE technologies, which are required for the application you build
in this tutorial.
The NetBeans IDE Java Bundle also includes the GlassFish server, which you require for this tutorial. You could download
the GlassFish server independently, but the version provided with the NetBeans download has the added benefit of being
automatically registered with the IDE.
You can follow this tutorial unit without having completed previous units. To do so, see the setup instructions, which
describe how to prepare the database and establish connectivity between the IDE, GlassFish, and MySQL.
Snapshot 4 of the AffableBean project is available for download and corresponds to state the project after completing
this unit using NetBeans IDE 6.9.
What are EJB and JPA Technologies?
Up until now, the project that you've been developing in this tutorial could be run in a web server with a servlet container, such as
Apache Tomcat. After all, you've so far only made use of JSTL and servlet technologies, and are connecting to the database
directly using JDBC. In fact, you could theoretically continue to develop the application using just these technologies, while
manually coding for all aspects of your application, including thread-safety, transactions, and security. However, using Enterprise
beans with JPA entity classes allows you focus on the business logic of your application while relying on solutions that have
already been tried and tested. The following sections introduce the two technologies and define their role in EE development.
Enterprise JavaBeans
Java Persistence
Enterprise JavaBeans
The official EJB product page describes EnterPrise JavaBeans technology as a "server-side component architecture" that
"enables rapid and simplified development of distributed, transactional, secure and portable applications." You can apply
EJBs (i.e., Enterprise beans) to your projects, and the services provided by the technology remain transparent to you as a
developer, thus eliminating the tedious and often error-prone task of adding a lot of boiler plate code which would otherwise
be required. If you are new to EE development, you may question the need for EJBs in your Java web application. The book
EJB 3 In Action, by Debu Panda, Reza Rahman and Derek Lane, paraphrases the role of EJB technology nicely:
Although many people think EJBs are overkill for developing relatively simple web applications of moderate
size, nothing could be further from the truth. When you build a house, you don't build everything from scratch.
Instead, you buy materials or even the services of a contractor as you need it. It isn't too practical to build an
enterprise application from scratch either. Most server-side applications have a lot in common, including
churning business logic, managing application state, storing and retrieving information from a relational
database, managing transactions, implementing security, performing asynchronous processing, integrating
systems, and so on.
As a framework, the EJB container provides these kinds of common functionality as out-of-the-box services so
that your EJB components can use them in your applications without reinventing the wheel. For instance, let's
say that when you build a credit card module in your web application, you write a lot of complex and error-prone
code to manage transactions and security access control. You could have avoided that by using the declarative
Page 3
24/08/13 The NetBeans E-commerce Tutorial - Adding Entity Classes and Session Beans
https://netbeans.org/kb/docs/javaee/ecommerce/entity-session.html?print=yes 3/23
transaction and security services provided by the EJB container. These services as well as many others are
availab le to EJB components when they are deployed in an EJB container. This means writing high-quality,
feature-rich applications much faster than you might think.[1]
You can think of EJB both as components, or Java classes that are incorporated in your project, as well as a framework that
provides numerous enterprise-related services. Some of the services that we take advantage of in this tutorial are described
in EJB 3 In Action as follows:
Pooling: For each EJB component, the EJB platform creates a pool of component instances that are shared by clients.
At any point in time, each pooled instance is only allowed to be used by a single client. As soon as an instance is
finished servicing a client, it is returned to the pool for reuse instead of being frivolously discarded for the garbage
collector to reclaim.
Thread Safety: EJB makes all components thread-safe and highly performant in ways athat are completely invisible.
This means that you can write your server components as if you were developing a single-threaded desktop
application. It doesn't matter how complex the component itself is; EJB will make sure it is thread-safe.
Transactions: EJB supports declarative transaction management that helps you add transactional behavior to
components using simple configuration instead of code. In effect, you can designate any component method to be
transactional. If the method completes normally, EJB commits the transaction and makes the data changes made by
the method permanent. Otherwise the transaction is rolled back. Container-managed EJB transactions are
demonstrated in Unit 9, Integrating Transactional Business Logic.
Security: EJB supports integration with the Java Authentication and Authorization Service (JAAS) API, so it is easy to
completely externalize security and secure an application using simple configuration instead of cluttering up your
application with security code.[2] In Unit 11, Securing the Application, a demonstration of EJB's @RolesAllowed
annotation is provided.
Java Persistence
In the context of Java Enterprise, persistence refers to the act of automatically storing data contained in Java objects into a
relational database. The Java Persistence API (JPA) is an object-relational mapping (ORM) technology that enables
applications to manage data between Java objects and a relational database in a way that is transparent to the developer.
This means that you can apply JPA to your projects by creating and configuring a set of Java classes (entities) that mirror your
data model. Your application can then access these entities as though it were directly accessing the database.
There are various benefits to using JPA in your projects:
JPA has its own rich, SQL-like query language for static and dynamic queries. Using the Java Persistence Query
Language (JPQL), your applications remain portable across different database vendors.
You can avoid the task of writing low-level, verbose and error-prone JDBC/SQL code.
JPA transparently provides services for data caching and performance optimization.
What are Session Beans?
Enterprise session beans are invoked by a client in order to perform a specific business operation. The name session implies
that a bean instance is available for the duration of a "unit of work". The EJB 3.1 specification describes a typical session object
as having the following characteristics:
Executes on behalf of a single client
Can be transaction-aware
Updates shared data in an underlying database
Does not represent directly shared data in the database, although it may access and update such data
Is relatively short-lived
Is removed when the EJB container crashes. The client has to re-establish a new session object to continue
computation.
EJB provides three types of session beans: stateful, stateless, and singleton. The following descriptions are adapted from the
Java EE 6 Tutorial.
Page 4
24/08/13 The NetBeans E-commerce Tutorial - Adding Entity Classes and Session Beans
https://netbeans.org/kb/docs/javaee/ecommerce/entity-session.html?print=yes 4/23
Stateful: The state of the bean is maintained across multiple method calls. The "state" refers to the values of its instance
variables. Because the client interacts with the bean, this state is often called the conversational state.
Stateless: Stateless beans are used for operations that can occur in a single method call. When the method finishes
processing, the client-specific state of the bean is not retained. A stateless session bean therefore does not maintain a
conversational state with the client.
Singleton: A singleton session bean is instantiated once per application, and exists for the lifecycle of the application.
Singleton session beans are designed for circumstances where a single enterprise bean instance is shared across and
concurrently accessed by clients.
For more information on EJB session beans, see the Java EE 6 Tutorial: What is a Session Bean?.
For purposes of developing the e-commerce application in this tutorial, we will only be working with stateless session beans.
About Specifications and Implementations
EJB and JPA technologies are defined by the following specifications:
JSR 317: Java Persistence 2.0
JSR 318: Enterprise JavaBeans 3.1
These specifications define the technologies. To apply a technology to your project however, you must use an implementation of
the specification. When a specification becomes finalized, it includes a reference implementation, which is a free implementation
of the technology. If you find this concept confusing, consider the following analogy: A musical composition (i.e., the notes on a
page) defines a piece of music. When a musician learns the composition and records her performance, she provides an
interpretation of the piece. In this manner the musical composition is likened to the technical specification, and the musician's
recording corresponds to the specification's implementation.
See What is the Java Community Process? for an explanation of Java technical specifications, and how they are formally
standardized.
If you examine the download pages for the final releases of the EJB and JPA specifications, you'll find links to the following
reference implementations:
JPA: http://www.eclipse.org/eclipselink/downloads/ri.php
EJB: http://glassfish.dev.java.net/downloads/ri
Implementations of the JPA specification are dubbed persistence providers, and the persistence provider which has been chosen
as the reference implementation for the JPA 2.0 specification is EclipseLink.
If you examine the link for the EJB reference implementation, you'll come to a page that lists not only the implementation for EJB,
but for all reference implementations provided by Project GlassFish. The reason for this is that Project GlassFish forms the
reference implementation of the Java EE 6 platform specification (JSR 316). The GlassFish v3 application server (or the Open
Source Edition), which you are using to build the e-commerce project in this tutorial, contains the reference implementations of all
technologies developed under Project GlassFish. As such, it is referred to as a Java EE 6 container.
A Java EE container contains three essential components: a web (i.e., servlet) container, an EJB container, and a persistence
provider. The deployment scenario for the e-commerce application is displayed in the diagram below. Entity classes that you
create in this unit are managed by the persistence provider. The session beans that you create in this unit are managed by the
EJB container. Views are rendered in JSP pages, which are managed by the web container.
Page 5
24/08/13 The NetBeans E-commerce Tutorial - Adding Entity Classes and Session Beans
https://netbeans.org/kb/docs/javaee/ecommerce/entity-session.html?print=yes 5/23
Adding Entity Classes
Begin by using the IDE's Entity Classes from Database wizard to generate entity classes based on the affablebean schema.
The wizard relies on the underlying persistence provider to accomplish this task.
1. Open the project snapshot in the IDE. In the IDE, press Ctrl-Shift-O (�-Shift-O on Mac) and navigate to the location on
your computer where you unzipped the downloaded file.
2. Press Ctrl-N (⌘-N on Mac) to open the File wizard.
3. Select the Persistence category, then select Entity Classes from Database. Click Next.
4. In Step 2: Database Tables, choose jdbc/affablebean from the Data Source drop-down list. The drop-down list is
populated by data sources registered with the application server.
When you choose the jdbc/affablebean data source, the IDE scans the database and lists the database tables in
the Available Tables pane.
Page 6
24/08/13 The NetBeans E-commerce Tutorial - Adding Entity Classes and Session Beans
https://netbeans.org/kb/docs/javaee/ecommerce/entity-session.html?print=yes 6/23
5. Click the Add All button, then click Next.
6. Step 3 of the Entity Classes from Database wizard differs slightly between NetBeans IDE 6.8 and 6.9. Depending on the
version IDE you are using, perform the following steps.
NetBeans IDE 6.8
NetBeans IDE 6.9
NetBeans IDE 6.8
1. Type in entity in the Package field. The wizard will create a new package for the entity classes upon completing.
2. Click the Create Persistence Unit button. The Create Persistence Unit dialog opens.
A persistence unit refers to a collection of entity classes that exist in an application. The above dialog generates a
persistence.xml file, which is used by your persistence provider to specify configuration settings for the
persistence unit. Note that 'EclipseLink (JPA 2.0)' is the default selection for the server associated with the project.
Leave 'Table Generation Strategy' set to 'None'. This prevents the persistence provider from affecting your
database. (For example, if you want the persistence provider to delete then recreate the database based on the
existing entity classes, you could set the strategy to 'Drop and Create'. This action would then be taken each
time the project is deployed.)
Page 7
24/08/13 The NetBeans E-commerce Tutorial - Adding Entity Classes and Session Beans
https://netbeans.org/kb/docs/javaee/ecommerce/entity-session.html?print=yes 7/23
3. Click Create.
4. Back in Step 3: Entity Classes, note that the class names for the entities are based on database tables. For
example, the CustomerOrder entity is mapped to the customer_order database table. Also note that the
'Generate Named Query Annotations for Persistent Fields' option is selected by default. We will be using various
named queries later in the tutorial.
5. Continue to step 7 below.
NetBeans IDE 6.9
1. Type in entity in the Package field. The wizard will create a new package for the entity classes upon completing.
2. Note the following:
The class names for the entities are based on database tables. For example, the CustomerOrder entity will
be mapped to the customer_order database table.
The 'Generate Named Query Annotations for Persistent Fields' option is selected by default. We will be using
various named queries later in the tutorial.
The 'Create Persistence Unit' option is selected by default. A persistence unit is a collection of entity classes that
exist in an application. The persistence unit is defined by a persistence.xml configuration file, which is
read by your persistence provider. Enabling this option therefore means that the wizard will also generate a
persistence.xml file and populate it with default settings.
7. Click Finish. The JPA entity classes are generated, based on the affablebean database tables. You can examine the
entity classes in the Projects window by expanding the newly created entity package. Also, note that the new
persistence unit exists under the Configuration Files node.
Page 8
24/08/13 The NetBeans E-commerce Tutorial - Adding Entity Classes and Session Beans
https://netbeans.org/kb/docs/javaee/ecommerce/entity-session.html?print=yes 8/23
Note that the wizard generated an additional entity class, OrderedProductPK. Recall that the data model's
ordered_product table uses a composite primary key that comprises the primary keys of both the
customer_order and product tables. (See Designing the Data Model - Creating Many-To-Many Relationships.)
Because of this, the persistence provider creates a separate entity class for the composite key, and embeds it into the
OrderedProduct entity. You can open OrderedProduct in the editor to inspect it. JPA uses the @EmbeddedId
annotation to signify that the embeddable class is a composite primary key.
public class OrderedProduct implements Serializable {
private static final long serialVersionUID = 1L;
@EmbeddedId
protected OrderedProductPK orderedProductPK;
Press Ctrl-Space on the @EmbeddedId annotation to invoke the API documentation.
Page 9
24/08/13 The NetBeans E-commerce Tutorial - Adding Entity Classes and Session Beans
https://netbeans.org/kb/docs/javaee/ecommerce/entity-session.html?print=yes 9/23
8. Open the persistence unit (persistence.xml) in the editor. The IDE provides a Design view for persistence units, in
addition to the XML view. The Design view provides a convenient way to make configuration changes to the persistence
provider's management of the project.
Page 10
24/08/13 The NetBeans E-commerce Tutorial - Adding Entity Classes and Session Beans
https://netbeans.org/kb/docs/javaee/ecommerce/entity-session.html?print=yes 10/23
9. Click the XML tab at the top of the AffableBeanPU persistence unit to open the XML view. Add the following property to
the file.
<persistence-unit name="AffableBeanPU" transaction-type="JTA">
<jta-data-source>jdbc/affablebean</jta-data-source>
<properties>
<property name="eclipselink.logging.level" value="FINEST"/>
</properties>
</persistence-unit>
You set the logging level property to FINEST so that you can view all possible output produced by the persistence provider
when the application runs. This enables you to see the SQL that the persistence provider is using on the database, and
can facilitate in any required debugging.
See the official EclipseLink documentation for an explanation of logging and a list of all logging values: How To
Configure Logging
Adding Session Beans
In this section, we use the IDE's Session Beans for Entity Classes wizard to generate an EJB session facade for each of the entity
classes that you just created. Each session bean will contain basic access methods for its respective entity class.
A session facade is a design pattern advertised in the Enterprise BluePrints program. As stated in the Core J2EE Pattern Catalog,
it attempts to resolve common problems that arise in a multi-tiered application environment, such as:
Page 11
24/08/13 The NetBeans E-commerce Tutorial - Adding Entity Classes and Session Beans
https://netbeans.org/kb/docs/javaee/ecommerce/entity-session.html?print=yes 11/23
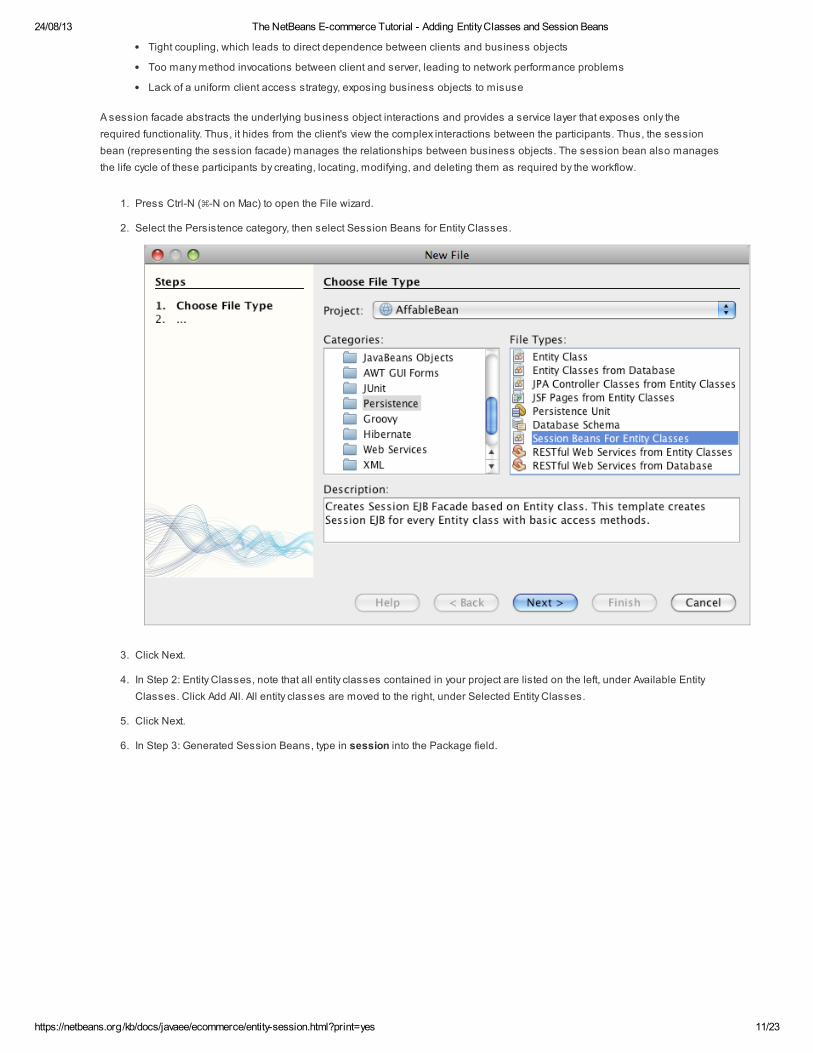
Tight coupling, which leads to direct dependence between clients and business objects
Too many method invocations between client and server, leading to network performance problems
Lack of a uniform client access strategy, exposing business objects to misuse
A session facade abstracts the underlying business object interactions and provides a service layer that exposes only the
required functionality. Thus, it hides from the client's view the complex interactions between the participants. Thus, the session
bean (representing the session facade) manages the relationships between business objects. The session bean also manages
the life cycle of these participants by creating, locating, modifying, and deleting them as required by the workflow.
1. Press Ctrl-N (⌘-N on Mac) to open the File wizard.
2. Select the Persistence category, then select Session Beans for Entity Classes.
3. Click Next.
4. In Step 2: Entity Classes, note that all entity classes contained in your project are listed on the left, under Available Entity
Classes. Click Add All. All entity classes are moved to the right, under Selected Entity Classes.
5. Click Next.
6. In Step 3: Generated Session Beans, type in session into the Package field.
Page 12
24/08/13 The NetBeans E-commerce Tutorial - Adding Entity Classes and Session Beans
https://netbeans.org/kb/docs/javaee/ecommerce/entity-session.html?print=yes 12/23
Note: You can use the wizard to generate local and remote interfaces for the session beans. While there is benefit to
programming session beans to interfaces (For example, hiding business object interactions behind an interface
enables you to further decouple the client from your business logic. This also means that you can code multiple
implementations of the interface for your application, should the need arise.), this lies outside the scope of the
tutorial. Note that EJB versions prior to 3.1 require that you implement an interface for each session bean.
7. Click Finish. The IDE generates session beans for each of the entity classes contained in your project. In the Projects
window, expand the new session package to examine the session beans.
NetBeans 6.8 NetBeans 6.9
Page 13
24/08/13 The NetBeans E-commerce Tutorial - Adding Entity Classes and Session Beans
https://netbeans.org/kb/docs/javaee/ecommerce/entity-session.html?print=yes 13/23
Note: As shown above, NetBeans IDE 6.9 provides slight improvements in the way the Session Beans for Entity
Classes wizard generates facade classes. Namely, boiler-plate code that is common to all classes is factored out
into an abstract class named AbstractFacade. If you are working in version 6.9, open any of the facade classes
that have been generated (aside from AbstractFacade). You'll see that the class extends AbstractFacade.
8. Open a session facade in the editor, for example, ProductFacade. All of the generated session facades instantiate an
EntityManager using the @PersistenceContext annotation.
@PersistenceContext(unitName = "AffableBeanPU")
private EntityManager em;
The @PersistenceContext annotation is used to inject a container-managed EntityManager into the class. In
other words, we rely on GlassFish' EJB container to open and close EntityManagers as and when needed. The
unitName element specifies the AffableBeanPU persistence unit, which has been defined in the application's
persistence.xml file.
The EntityManager is an integral component of the Java Persistence API, and is responsible for performing
persistence actions on the database. The book EJB 3 In Action describes the EntityManager as follows:
The JPA EntityManager interface manages entities in terms of actually providing persistence services.
While entities tell a JPA provider how they map to the database, they do not persist themselves. The
EntityManager interface reads the ORM metadata for an entity and performs persistence operations.
Your application now contains a persistence model of the affablebean database in the form of JPA entity classes. It also
contains a session facade consisting of Enterprise beans that can be used to access the entity classes. The next section
demonstrates how you can access the database using the session beans and entity classes.
Accessing Data with EJBs
In the previous tutorial unit, you learned how to access the database from the application by configuring a data source on
GlassFish, adding a resource reference to the application's deployment descriptor, and using JSTL <sql> tags in the
application's JSP pages. This is a valuable technique, as it allows you to quickly set up prototypes that include data from the
database. However, this is not a realistic scenario for medium to large-sized applications, or applications managed by a team of
developers, as it would prove difficult to maintain or scale. Furthermore, if you are developing the application into multiple tiers or
are adhering to the MVC pattern, you would not want to keep data-access code in your front-end. Using Enterprise beans with a
persistence model enables you better conform to the MVC pattern by effectively decoupling the presentation and model
components.
The following instructions demonstrate how to begin using the session and entity beans in the AffableBean project. You are
going to remove the JSTL data access logic that you previously set up for the index and category pages. In its place, you'll utilize
the data access methods provided by the session beans, and store the data in scoped variables so that it can be retrieved from
front-end page views. We'll tackle the index page first, then move on to the more complicated category page.
index page
category page
index page
The index page requires data for the four product categories. In our current setup, the JSTL <sql> tags query the database
for category details each time the index page is requested. Since this information is rarely modified, it makes more sense
Page 14
24/08/13 The NetBeans E-commerce Tutorial - Adding Entity Classes and Session Beans
https://netbeans.org/kb/docs/javaee/ecommerce/entity-session.html?print=yes 14/23
from a performance standpoint to perform the query only once after the application has been deployed, and store the data in
an application-scoped attribute. We can accomplish this by adding this code to the ControllerServlet's init method.
1. In the Projects window, double-click the Source Packages > controller > ControllerServlet node to open it
in the editor.
2. Declare an instance of CategoryFacade, and apply the @EJB annotation to the instance.
public class ControllerServlet extends HttpServlet {
@EJB
private CategoryFacade categoryFacade;
...
}
The @EJB annotation instructs the EJB container to instantiate the categoryFacade variable with the EJB named
CategoryFacade.
3. Use the IDE's hints to add import statements for:
javax.ejb.EJB
session.CategoryFacade
Pressing Ctrl-Shift-I (⌘-Shift-I on Mac) automatically adds required imports to your class.
4. Add the following init method to the class. The web container initializes the servlet by calling its init method. This
occurs only once, after the servlet is loaded and before it begins servicing requests.
public class ControllerServlet extends HttpServlet {
@EJB
private CategoryFacade categoryFacade;
public void init() throws ServletException {
// store category list in servlet context
getServletContext().setAttribute("categories", categoryFacade.findAll());
}
...
}
Here, you apply the facade class' findAll method to query the database for all records of Category. You then set
the resulting List of Category objects as an attribute that can be referenced by the "categories" string. Placing
the reference in the ServletContext means that the reference exists in a scope that is application-wide.
To quickly determine the method signature of the findAll method, hover your mouse over the method while
holding down the Ctrl key (⌘ on Mac). (The image below displays the popup that appears using NetBeans IDE
6.8.)
Clicking the hyperlink enables you to navigate directly to the method.
Page 15
24/08/13 The NetBeans E-commerce Tutorial - Adding Entity Classes and Session Beans
https://netbeans.org/kb/docs/javaee/ecommerce/entity-session.html?print=yes 15/23
5. Use the IDE's hint to add the @Overrides annotation. The init method is defined by HttpServlet's
superclass, GenericServlet.
Adding the annotation is not required, however it does provide several advantages:
It enables you to use compiler checking to ensure that you are actually overriding a method that you assume you
are overriding.
It improves readability, as it becomes clear when methods in your source code are being overridden.
For more information on annotations, see the Java Tutorials: Annotations.
6. Now that you have set up an application-scoped attribute that contains a list of categories, modify the index page to
access the newly created attribute.
Double-click the Web Pages > index.jsp node in the Projects window to open the file in the editor.
7. Comment out (or delete) the <sql:query> statement that is listed at the top of the file. To comment out code in the
editor, highlight the code, then press Ctrl-/ (⌘-/ on Mac).
8. Modify the opening <c:forEach> tag so that its items attribute references the new application-scoped
categories attribute.
<c:forEach var="category" items="${categories}">
9. Open the project's web deployment descriptor. Press Alt-Shift-O (Ctrl-Shift-O on Mac) and in the Go to File dialog, type
'web', then click OK.
10. Comment out (or delete) the <resource-ref> entry. The entry was required for the <sql> tags in order to identify
the data source registered on the server. We are now relying on JPA to access the database, and the
jdbc/affablebean data source has already been specified in the persistence unit. (Refer to the Design view of
the project's persistence unit above.)
Page 16
24/08/13 The NetBeans E-commerce Tutorial - Adding Entity Classes and Session Beans
https://netbeans.org/kb/docs/javaee/ecommerce/entity-session.html?print=yes 16/23
Highlight the entire <resource-ref> entry, then press Ctrl-/ (⌘-/ on Mac).
<!-- <resource-ref>
<description>Connects to database for AffableBean application</description>
<res-ref-name>jdbc/affablebean</res-ref-name>
<res-type>javax.sql.DataSource</res-type>
<res-auth>Container</res-auth>
<res-sharing-scope>Shareable</res-sharing-scope>
</resource-ref> -->
11. Run the project. Click the Run Project ( ) button. The project's index page opens in the browser, and you see that all
four category names and images display.
category page
The category page requires three pieces of data in order to render properly:
1. category data: for left column category buttons
2. selected category: the selected category is highlighted in the left column, and the name of the selected category
displays above the product table
3. product data for selected category: for products displayed in the product table
Let's approach each of the three pieces of data individually.
category data
Page 17
24/08/13 The NetBeans E-commerce Tutorial - Adding Entity Classes and Session Beans
https://netbeans.org/kb/docs/javaee/ecommerce/entity-session.html?print=yes 17/23
selected category
product data for selected category
category data
To account for category data, we can reuse the application-scoped categories attribute that we created for the index page.
1. Open category.jsp in the editor, and comment out (Ctrl-/; ⌘-/ on Mac) the JSTL <sql> statements that are listed
at the top of the file.
2. Modify the opening <c:forEach> tag so that its items attribute references the application-scoped categories
attribute. (This is identical to what you did above for index.jsp.)
<c:forEach var="category" items="${categories}">
3. Run the project to examine the current state of the category page. Click the Run Project ( ) button. When the project's
index page opens in the browser, click any of the four categories. The category buttons in the left column display and
function as expected.
Page 18
24/08/13 The NetBeans E-commerce Tutorial - Adding Entity Classes and Session Beans
https://netbeans.org/kb/docs/javaee/ecommerce/entity-session.html?print=yes 18/23
selected category
To retrieve the selected category, we can use the categoryFacade that we already created to find the Category whose
ID matches the request query string.
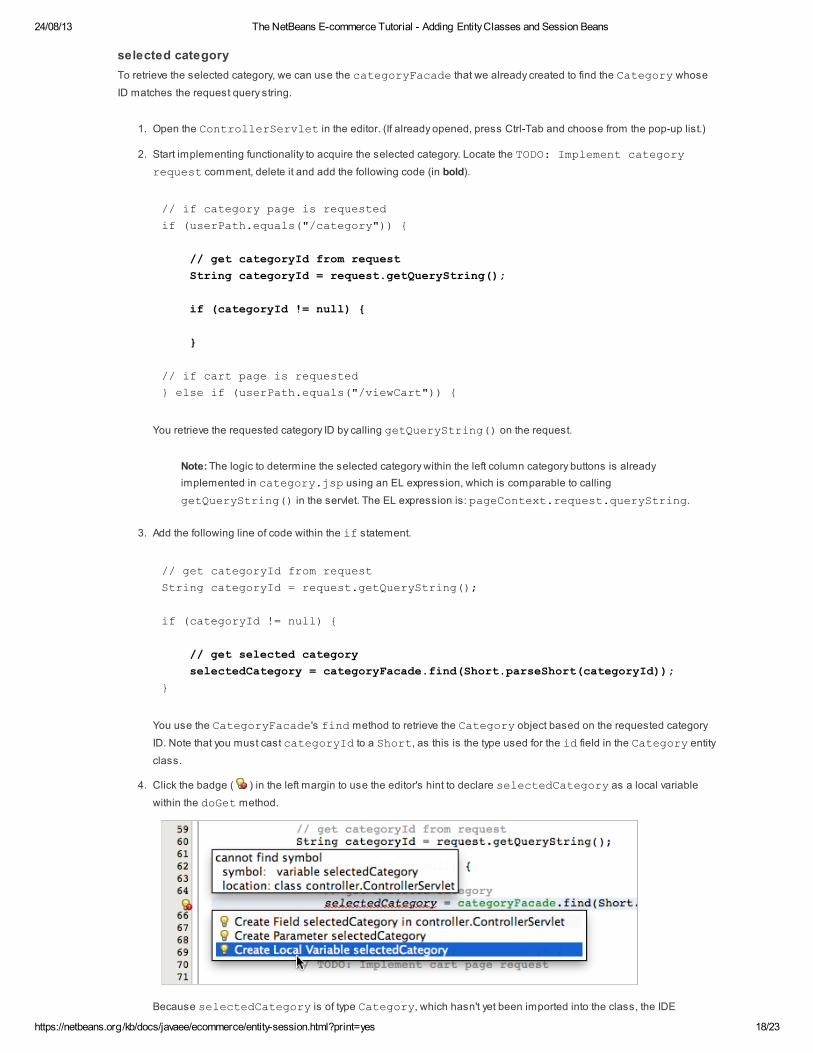
1. Open the ControllerServlet in the editor. (If already opened, press Ctrl-Tab and choose from the pop-up list.)
2. Start implementing functionality to acquire the selected category. Locate the TODO: Implement category
request comment, delete it and add the following code (in bold).
// if category page is requested
if (userPath.equals("/category")) {
// get categoryId from request
String categoryId = request.getQueryString();
if (categoryId != null) {
}
// if cart page is requested
} else if (userPath.equals("/viewCart")) {
You retrieve the requested category ID by calling getQueryString() on the request.
Note: The logic to determine the selected category within the left column category buttons is already
implemented in category.jsp using an EL expression, which is comparable to calling
getQueryString() in the servlet. The EL expression is: pageContext.request.queryString.
3. Add the following line of code within the if statement.
// get categoryId from request
String categoryId = request.getQueryString();
if (categoryId != null) {
// get selected category
selectedCategory = categoryFacade.find(Short.parseShort(categoryId));
}
You use the CategoryFacade's find method to retrieve the Category object based on the requested category
ID. Note that you must cast categoryId to a Short, as this is the type used for the id field in the Category entity
class.
4. Click the badge ( ) in the left margin to use the editor's hint to declare selectedCategory as a local variable
within the doGet method.
Because selectedCategory is of type Category, which hasn't yet been imported into the class, the IDE
Page 19
24/08/13 The NetBeans E-commerce Tutorial - Adding Entity Classes and Session Beans
https://netbeans.org/kb/docs/javaee/ecommerce/entity-session.html?print=yes 19/23
automatically adds an import statement for entity.Category to the top of the file.
5. Add the following line to place the retrieved Category object in the request scope.
// get categoryId from request
String categoryId = request.getQueryString();
if (categoryId != null) {
// get selected category
selectedCategory = categoryFacade.find(Short.parseShort(categoryId));
// place selected category in request scope
request.setAttribute("selectedCategory", selectedCategory);
}
6. In the editor, switch to category.jsp. (Press Ctrl-Tab and choose from the pop-up list.)
7. Locate <p id="categoryTitle"> and make the following change.
<p id="categoryTitle">
<span style="background-color: #f5eabe; padding: 7px;">${selectedCategory.name}
</span>
</p>
You are now using the selectedCategory attribute, which you just placed in the request scope from the
ControllerServlet. Using '.name' within the EL expression calls the getName method on the given
Category object.
8. Switch back to the browser and refresh the category page. The name of the selected category now displays in the
page.
Page 20
24/08/13 The NetBeans E-commerce Tutorial - Adding Entity Classes and Session Beans
https://netbeans.org/kb/docs/javaee/ecommerce/entity-session.html?print=yes 20/23
product data for selected category
In order to retrieve all products for a selected category, we'll make use of the Category entity's
getProductCollection() method. Start by calling this method on selectedCategory to get a collection of all
Products associated with the selectedCategory. Then store the collection of products as an attribute in the request
scope, and finally reference the scoped attribute from the category.jsp page view.
1. In the ControllerServlet, add the following statement to the code that manages the category request.
// if category page is requested
if (userPath.equals("/category")) {
// get categoryId from request
String categoryId = request.getQueryString();
if (categoryId != null) {
// get selected category
selectedCategory = categoryFacade.find(Short.parseShort(categoryId));
// place selected category in request scope
request.setAttribute("selectedCategory", selectedCategory);
// get all products for selected category
categoryProducts = selectedCategory.getProductCollection();
}
Calling getProductCollection() here enables us to get a collection of all Products associated with the
selectedCategory.
2. Use the editor's hint to define categoryProducts as a local variable for the doGet method.
3. Place the collection of Products in the request scope so that it can be retrieved from the application's front-end.
// if category page is requested
if (userPath.equals("/category")) {
// get categoryId from request
String categoryId = request.getQueryString();
if (categoryId != null) {
// get selected category
selectedCategory = categoryFacade.find(Short.parseShort(categoryId));
// place selected category in request scope
request.setAttribute("selectedCategory", selectedCategory);
Page 21
24/08/13 The NetBeans E-commerce Tutorial - Adding Entity Classes and Session Beans
https://netbeans.org/kb/docs/javaee/ecommerce/entity-session.html?print=yes 21/23
// get all products for selected category
categoryProducts = selectedCategory.getProductCollection();
// place category products in request scope
request.setAttribute("categoryProducts", categoryProducts);
}
4. Open the category.jsp file in the editor and make the following change to the product table.
<table id="productTable">
<c:forEach var="product" items="${categoryProducts}" varStatus="iter">
The <c:forEach> tag now references the categoryProducts collection. The c:forEach loop will now iterate
over each Product object contained in the collection, and extract data accordingly.
5. Press F6 (fn-F6 on Mac) to run the project. Navigate to the category page in the browser and note that all products now
display for each category.
This tutorial unit provided a brief introduction to JPA and EJB technologies. It also described the role of Java specifications, and
how their reference implementations are used by the GlassFish application server. It then demonstrated how to create a set of
JPA entity classes that provide a Java implementation of the project database. Then, following the session facade pattern, it
showed how to create a set of EJB session beans that exist on top of the entity classes and enable convenient access to them.
Finally, you modified the AffableBean project to utilize the new session beans and entities for database access required in the
index and category pages.
You can download snapshot 4 of the AffableBean project, which corresponds to state the project after completing this unit
using NetBeans IDE 6.9.
Page 22
24/08/13 The NetBeans E-commerce Tutorial - Adding Entity Classes and Session Beans
https://netbeans.org/kb/docs/javaee/ecommerce/entity-session.html?print=yes 22/23
Send Us Your Feedback
In the next unit you explore session management, and how to enable the application to remember a user's actions as he or she
clicks through the site. This is key to implementing a shopping cart mechanism in an e-commerce application.
See Also
NetBeans Resources
Java EE & Java Web Learning Trail
Introduction to Java EE Technology
Getting Started with Java EE 6 Applications
Building Secure Enterprise Beans in Java EE
Creating an Enterprise Application with EJB 3.1
Using JPA Support with EclipseLink [screencast]
Video Tutorials and Demos for NetBeans IDE
NetBeans Java Editor 6.8 Reference Card
EJB Resources
Product Page: Enterprise JavaBeans Technology
Specification Download: JSR 318: EJB 3.1 Final Release
Reference Implementation: http://glassfish.dev.java.net/downloads/ri
Official Forum: Enterprise Technologies - Enterprise JavaBeans
Java EE 6 Tutorial: Part IV - Enterprise Beans
JPA Resources
Product Page: Java Persistence API
Specification Download: JSR 317: Java Persistence 2.0 Final Release
Reference Implementation: http://www.eclipse.org/eclipselink/downloads/ri.php
Java EE 6 Tutorial: Part VI - Persistence
GlassFish Resources
GlassFish v3 Documentation
Learning GlassFish for Tomcat Users
GlassFish Project - Java Persistence Example
Your First Cup: An Introduction to the Java EE Platform
Reference Implementation Downloads
Technical Articles
New Features in EJB 3.1
EJB Best Practices: Entity Bean Protection
Core J2EE Patterns - Session Facade
Rules and Patterns for Session Facades
Design Pattern Sample Application - Session Facade
Page 23
24/08/13 The NetBeans E-commerce Tutorial - Adding Entity Classes and Session Beans
https://netbeans.org/kb/docs/javaee/ecommerce/entity-session.html?print=yes 23/23
Best Practice: Using HttpServlet init Method
Books
Beginning Java EE 6 with GlassFish 3
Java EE 6 with GlassFish 3 Application Server
Pro NetBeans IDE 6 Rich Client Platform Edition
Real World Java EE Patterns Rethinking Best Practices
Patterns of Enterprise Application Architecture
Domain-Driven Design: Tackling Complexity in the Heart of Software
References
1. ̂Adapted from EJB 3 In Action Chapter 1, section 1.1.2: EJB as a framework.
2. ̂There are many other services provided by EJB. For a more comprehensive list, see EJB 3 In Action, Chapter 1, section
1.3.3: Gaining functionality with EJB services.