Installation description 2-1 Please proceed as follows ❶ ❷ ❸ ❶ ❸ ❷ ❹ ❺ ❹ ❺ NOTE Please refer to the icon to disassemble. And install according to the reverse order of disassembly. Bracket Bushing (Accessories 2) Collar (Accessories 3) LCD Meter (Accessories 1) M5nut(Accessories 5) M5 washer(Accessories 4) Accessories 1 1 2 3 5 M5 nut X3 4 M5 washer X3 Collar X1 Bracket Bushing X2 LCD Meter X1 NOTE Contact your local distributor, if the items received in the box are not the same as the items listed above. ● Thank you for purchasing the TNT-B meter for Yamaha Bolt ® . Before installing, please read the instruction carefully and keep it for future reference. ● For installation, please follow the steps described in manual. Any damage caused by wrong installation shall be imputed to the users. ● Don't break or modify the wire. To avoid the short circuit, please don't pull the wire when installing. ● Do not disassemble or change any parts excluding the manual description. ● The interior examination or maintenance should be executed by our professionals. Attention! ◎MARK MEANING: Some processes must be followed to avoid the damage to the vehicle. Some processes must be followed to avoid the affection caused by wrong installation. Some processes must be followed to avoid damages to yourself or the public. WARNING! CAUTION! NOTE You could get the installation details from the information behind the mark. PRESS THE BUTTON ONCE PRESS THE BUTTON 3 SECONDS FLASH LIGHT ON
Transcript
Installation description2-1
Please proceed as follows❶❷❸
❶
❸
❷
❹❺
❹❺NOTE Please refer to the icon to disassemble. And install according to
the reverse order of disassembly.
Bracket Bushing (Accessories 2)Collar (Accessories 3)LCD Meter (Accessories 1)
M5nut(Accessories 5)M5 washer(Accessories 4)
Accessories11 2 3
5 M5 nut X3
4 M5 washer X3Collar X1Bracket Bushing X2LCD Meter X1
NOTE Contact your local distributor, if the items received in the box are not the same as the items listed above.
● Thank you for purchasing the TNT-B meter for Yamaha Bolt®. Before installing, please read the instruction carefully and keep it for future reference.
● For installation, please follow the steps described in manual. Any damage caused by wrong installation shall be imputed to the users.● Don't break or modify the wire. To avoid the short circuit, please don't pull the wire when installing.● Do not disassemble or change any parts excluding the manual description.● The interior examination or maintenance should be executed by our professionals.
Attention!
◎MARK MEANING:
Some processes must be followed to avoid the damage to the vehicle.
Some processes must be followed to avoid the affection caused by wrong installation. Some processes must be followed to avoid damages to yourself or the public.WARNING!
CAUTION!
NOTE You could get the installation details from the information behind the mark.
PRESS THEBUTTON
ONCE
PRESS THEBUTTON 3SECONDS
FLASH LIGHT ON
2-3 Wiring installation instructions
Original main wire
Installation description2-2
Please proceed as followsBracket Bushing (Accessories 2)Collar (Accessories 3)
M5 washer(Accessories 4)
❶❷
LCD Meter (Accessories 1)❸❹
M5 nut(Accessories 5)❺
❶
❹
❸
❺
❷NOTE Please refer to the icon to disassemble. And install according to
the reverse order of disassembly.
wh051ba15a
2-4
1 2 3
3.Wrap up insulation tape on waterproof cover, wiring PVC pipe and the gap between the waterproof cover and original waterproof cover,as shown in the red circled part.
❶
❶
❷
❷
1.Push the waterproof cover of the KOSO BOLT Meter ❶ until the connector ❷ is exposed outside the cover.
2.❶ plug the connector in with the vehicle main harness connector.❷ The pull back the waterproof cover to fully cover the both connectors & vehicle main harness connector). waterproof cover from KOSO BOLT Meter needs to be overlapped with vehicle main harness rubber connector cover.
Actual wire installation precautions
NOTE
3-3 Main menu functions●
●
In the total mileage screen, press the SELECT button once to switch to Trip A screen.。
●Trip A screen, press the SELECT button once to switch to Trip B screen.
● Hold the SELECT button for 3 seconds to clear the Trip A recordings.
3-2 Function, setting instructionsDisplay range:0 ~ 360 km (0 ~ 225 miles)Display unit:1 km (mile)Display range:<0.5secSetting range:30 ~ 360 km (19 ~ 225 miles) when above (including) setting value, warning light will light onSetting unit:1 km (mile)Display range : 0 ~ 360 km (0 ~ 225 miles)Display range:0 ~ 999,999 km (miles)Display unit:1 km (mile)Display range:0 ~ 9,999.9 km (miles)Display unit:0.1 km (mile)Setting range:Close / 500 ~ 16,000 km (300 ~ 10,000 miles)Setting unit:100 km (miles)Display range : 0 ~ 9999.9 km (miles)Display unit : 0.1 km (mile)Setting range:50 ~ 200%Setting unit:1%Display range : - (No display), N, 1 ~ 5 gear levelDisplay range:< 0.5 secDisplay range : - (No display), N, 1 ~ 5 gear levelRecord gear level when at maximum RPMDisplay range:0 ~ 8,000 RPMDisplay unit:100 RPMDisplay range:<0.5 sec.Setting range:1,000 ~ 8,000 RPM when above (including) setting value, warning light will light onSetting unit:100 RPMDisplay range : 0 ~ 8,000 RPM Display unit : 100 RPM
●Speedometer
○Display interval○Overspeed warning setting
○Max.speed record○Odometer
○Trip meterA/B
○Motor oil maintenance
○Fuel reserve tripmeter
●Tire percentage
●Gear meter○Display interval○Max. gear level record
Motor oil maintenance mileage ●Display range:User settings (500 ~ 16000 km / 300 ~ 10000 miles) ~ -999 km (miles), decrease according to the increase in total mileage●Display unit:1 km (mile)Clock ●Display range:12 / 24 hour formatEngine temp.●Display range:-30 ~ 225 °C (-22 ~ 437 °F)Voltmeter●Display range:8 ~ 18 V
Speedometer●Speedometer:0~360 km (0~225 miles)●Display unit:1 km (mile) Tachometer
●Display range:0 ~ 8,000 RPM
Gear meter●Display range:off,highest gear, N and highest gear, show all (N / 1 ~ 5)
Indicator●Round ●High beam●Engine Check
●ABS
Fuel Level●Display range:ON / OFF / Flash
Odometer●Display range:000000 ~ 999999 km (miles) returns to zero upon exceed●Setting unit:1 km (mile)Trip meter A/B●Display range:0000.0 ~ 9999.9 km (miles) returns to zero upon exceed●Setting unit:0.1 km (mile)
Fuel reserve tripmeter (TRIP-F)●Display range:0000.0 ~ 9999.9 km (miles) returns to zero upon exceed●Display unit:0.1 km (mile)Max. speed record●Display range:0 ~ 360 km (0 ~ 255 miles)●Display unit:1 km (mile)
Max. RPM●Display range:0 ~ 8,000 RPM●Display unit:100 RPMMax. temperature record●Display range:-30 ~ 225 °C (-22 ~ 437 ºF)●Display unit:0.1 km (mile)Max gear level record●Display range:- (No display), N, 1 ~ 5 gear level ●Record gear level when at maximum RPM
●Turn signal●Immobilizer system●Oil
Basic function instruction3-1
When the engine switch is on OFF condition, hold the SELECT button for 3 seconds to enter settings.(Please refer to video operation settings)
●If fuel volume warning symbol is displayed, press the SELECT button to switch to fuel reserve screen.
●
●Hold the SELECT button for 3 seconds toclear the Trip B recordings.
Trip B screen, press the SELECT button once to switch to the mileage maintenancescreen.
●In the temperature screen, press the SELECTbutton once to switch to the voltage screen.
●In the Max. Speed record displayscreen, press the SELECT button once to return to total mileage screen.
●Hold the SELECT button for 3 seconds to clear the Max. Speed Record display.
F F
F
◦◦
◦
In the 0 second, startholding the button. In the 3rd second, theinform feature will blinkonce.
On the 8th second,the mileage maintenancerecord is cleared.
◦During 4 ~ 7 seconds, releasing the button will cancel the process.
●In the mileage maintenance screen, press the SELECT button once to switch to the clock screen. ●Mileage maintenance will count down from setting value, when it reaches 0, the screen will blink to indicate the mileage reached.
●Hold the SELECT button for 8 seconds to clear the mileage maintenance recordings.
●In the clock screen, press the SELECT button once to switch to the temperature screen. ●Hold the SELECT button for 3 seconds to enter the time setting screen.
●In the voltage screen, press the SELECT button once to switch to the Max. Speed Record display screen.
When main switch is turned on, the fuel volume warning symbol will automatically switch to fuel reserved screen.When finished refuel, the fuel volume warning symbol will disappear. If do not clear out reserved fuel manually, it will automatically clear out the reserved fuel after driving a certain distance.
In fuel reserved screen, press the SELECT button to switch to MAX record screen.Hold the SELECT button for 3 seconds to clear out fuel reserved records.
Motor oil maintenance mileage ●Display range:User settings (500 ~ 16000 km / 300 ~ 10000 miles) ~ -999 km (miles), decrease according to the increase in total mileage●Display unit:1 km (mile)
wh051ba15a
●
P.S.
4-2 Tire percentage settings
●
●
● In tire percentage screen, press and hold the SELECT button for 3 seconds to enter settings screen.
Cursor's order :hundred > ten > digit
NOTE
EX. The new tire circumference is2180 mm. The calculation equationis as below.The new tire circumference 2180 mm ÷ the original tirecircumference 2080 mm X (100%) =The setting value (105 %).Press and hold the SELECT button for 3 seconds and release it until it moveto the setting digital you want.
●You could define the valve as the starting point and measure the wheel circumference with a measuring tape.
P.S.
Press the SELECT button to change the value.
●EX. The tire percentage setting is changed from 100 % to 105 %.
Setting range : 50 ~ 200 .NOTE
Press the SELECT button to enter the gear learning setting screen.
Please reset this setting value when you change a different size tire.
4-3 Gear level learning settings
●Press the SELECT button once to chooseturn on or off the gear indicator display.
If any changes happen to tirescircumference then the gear indicator will need to re-learn the gear positioning.
NOTE
Setting range : ON、OFF 。NOTE
●
●
●
●
●
When switching gear or tire size, can adjust the tire percentage (%) parameter to calibrate speed.
1. When switching tire size
Tire percentage (%)
= X 100 =10521802080
Tire percentage (%)
= X 100 = 95 %19762080
Standard
1976mm2080mm2180mm Tire size from small to large
Tire size from large to small
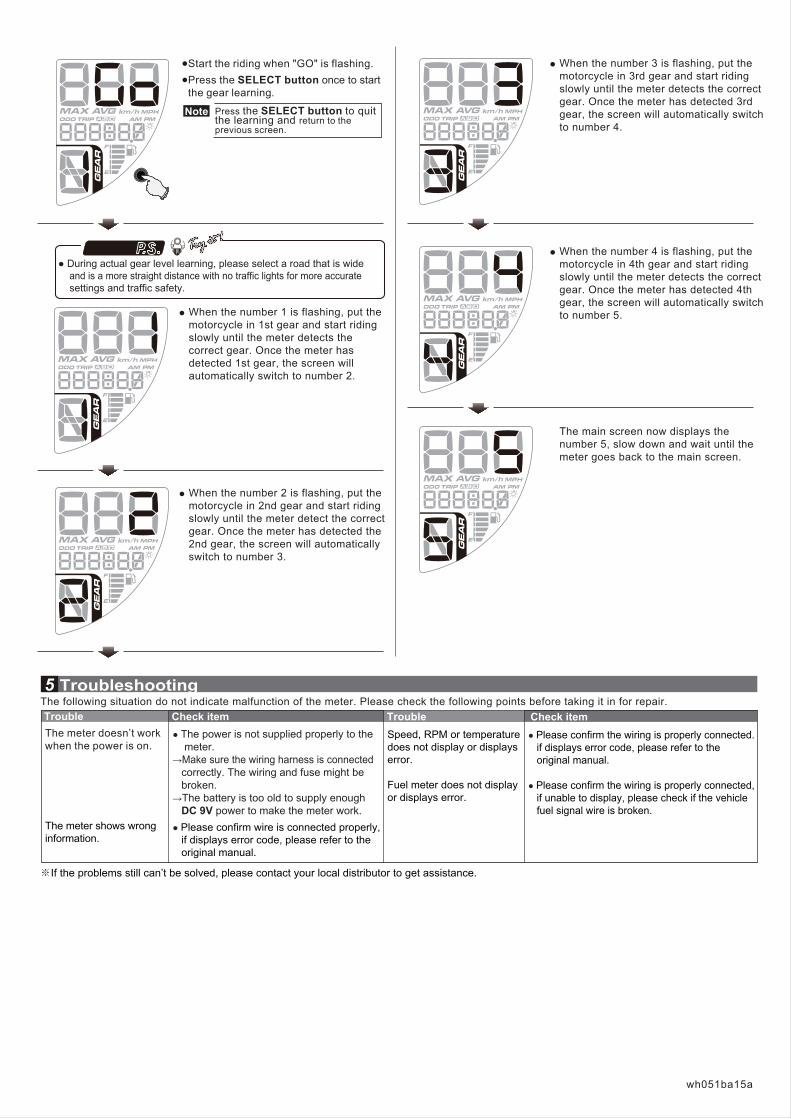
Note Press and hold the SELECT button for 3 seconds to quit the learning and return to the previous screen.
Press the SELECT button once to start the gear learning.
● In gear learning screen, press and hold the SELECT button for 3 seconds to enter settings screen.
When gear level display is "ON", hold the SELECT button for 3 seconds to enter gear level learning screen.When gear level display is "OFF", hold theSELECT button for 3 seconds to return to gear level learning setting screen.EX. Setting gear display from "OFF" to "ON".
EX. When chronograph display LEArN, it will blink.
P.S.
The meter doesn’t workwhen the power is on.
The meter shows wrong information.
The following situation do not indicate malfunction of the meter. Please check the following points before taking it in for repair.Troubleshooting5
● The power is not supplied properly to the meter. →Make sure the wiring harness is connected correctly. The wiring and fuse might be broken. →The battery is too old to supply enough DC 9V power to make the meter work.● Please confirm wire is connected properly, if displays error code, please refer to the original manual.
Speed, RPM or temperature does not display or displays error.
Fuel meter does not display or displays error.
● Please confirm the wiring is properly connected. if displays error code, please refer to the original manual.
● Please confirm the wiring is properly connected, if unable to display, please check if the vehicle fuel signal wire is broken.
Trouble Check item Trouble Check item
●Start the riding when "GO" is flashing. ●Press the SELECT button once to start
the gear learning.
●
● During actual gear level learning, please select a road that is wide and is a more straight distance with no traffic lights for more accurate settings and traffic safety.
● When the number 3 is flashing, put the motorcycle in 3rd gear and start riding slowly until the meter detects the correct gear. Once the meter has detected 3rd gear, the screen will automatically switch to number 4.
● When the number 4 is flashing, put the motorcycle in 4th gear and start riding slowly until the meter detects the correct gear. Once the meter has detected 4th gear, the screen will automatically switch to number 5.
When the number 1 is flashing, put the motorcycle in 1st gear and start riding slowly until the meter detects the correct gear. Once the meter has detected 1st gear, the screen will automatically switch to number 2.
● When the number 2 is flashing, put the motorcycle in 2nd gear and start riding slowly until the meter detect the correct gear. Once the meter has detected the 2nd gear, the screen will automatically switch to number 3.
The main screen now displays the number 5, slow down and wait until the meter goes back to the main screen.
Note Press the SELECT button to quitthe learning and return to the previous screen.
※If the problems still can’t be solved, please contact your local distributor to get assistance.