Terason t3200 Ultrasound System User Guide 15 1 About the Terason Ultrasound System The Terason Ultrasound System is an easy-to-use, portable ultrasound system that produces high resolution images. The microminiaturized ultrasound system runs under the standard Windows interface for easy navigation. You can also connect the computer to a VCR or a printer for image output. This section of the Terason User’s Guide includes the following topics: • About Ultrasound Modes on page 15 • DICOM Image Transfer on page 22 • Support for Medical Procedures on page 22 • Terason Probes on page 23 • Imaging, Patient, Report, and Review Windows on page 23 • The Terason Console on page 26 • Beep Codes on page 30 • Equipment List on page 31 • System Warranty on page 31 About Ultrasound Modes Ultrasound is primarily an operator-dependent imaging technology. The quality of images and the ability to make a correct diagnosis based on scans depend on precise image adjustments and adequate control settings applied during the exam. The Terason software provides tools to optimize the image quality during a patient scan for all image modes. Caution: Some actions can expose the Ultrasound System computer to attack by viruses. These actions include: installing non-Terason software, connecting a USB drive, and connecting the system to a network. If you intend to perform any of those actions, or any other action that might expose the computer to a virus, Terason strongly recommends that you install an effective anti-virus software package. Terason has found that Norton AntiVirus v.9 or above and Microsoft Security Essentials are compatible with the Terason Ultrasound System. Caution: Do not enable Windows automatic updating. The software that is shipped on the system has been safety tested and approved.
Transcript
Terason t3200 Ultrasound System User Guide 15
1 About the Terason Ultrasound System
The Terason Ultrasound System is an easy-to-use, portable ultrasound system that produces high resolution images.
The microminiaturized ultrasound system runs under the standard Windows interface for easy navigation. You can also connect the computer to a VCR or a printer for image output.
This section of the Terason User’s Guide includes the following topics:
• About Ultrasound Modes on page 15• DICOM Image Transfer on page 22• Support for Medical Procedures on page 22• Terason Probes on page 23• Imaging, Patient, Report, and Review Windows on page 23• The Terason Console on page 26• Beep Codes on page 30• Equipment List on page 31• System Warranty on page 31
About Ultrasound ModesUltrasound is primarily an operator-dependent imaging technology. The quality of images and the ability to make a correct diagnosis based on scans depend on precise image adjustments and adequate control settings applied during the exam. The Terason software provides tools to optimize the image quality during a patient scan for all image modes.
Caution: Some actions can expose the Ultrasound System computer to attack by viruses. These actions include: installing non-Terason software, connecting a USB drive, and connecting the system to a network. If you intend to perform any of those actions, or any other action that might expose the computer to a virus, Terason strongly recommends that you install an effective anti-virus software package. Terason has found that Norton AntiVirus v.9 or above and Microsoft Security Essentials are compatible with the Terason Ultrasound System.
Caution: Do not enable Windows automatic updating. The software that is shipped on the system has been safety tested and approved.
Chapter 1 - About the Terason Ultrasound System About Ultrasound Modes
Terason t3200 Ultrasound System User Guide 16
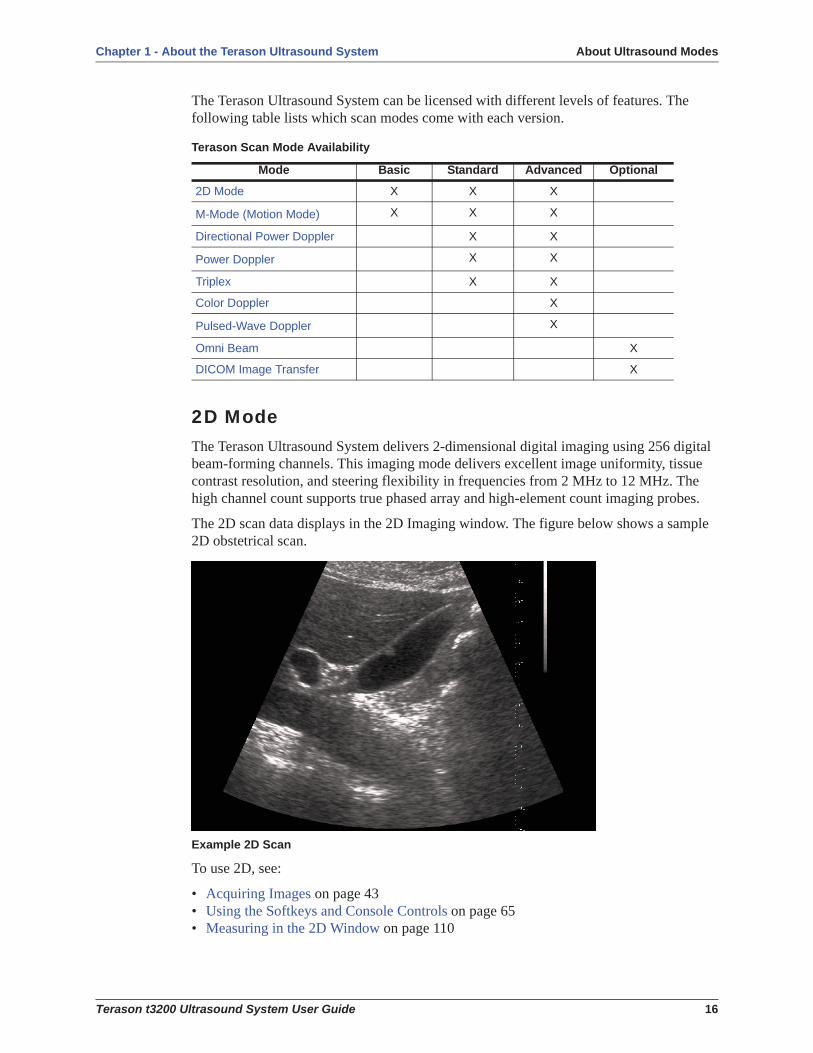
The Terason Ultrasound System can be licensed with different levels of features. The following table lists which scan modes come with each version.
2D ModeThe Terason Ultrasound System delivers 2-dimensional digital imaging using 256 digital beam-forming channels. This imaging mode delivers excellent image uniformity, tissue contrast resolution, and steering flexibility in frequencies from 2 MHz to 12 MHz. The high channel count supports true phased array and high-element count imaging probes.
The 2D scan data displays in the 2D Imaging window. The figure below shows a sample 2D obstetrical scan.
Example 2D Scan
To use 2D, see:
• Acquiring Images on page 43• Using the Softkeys and Console Controls on page 65• Measuring in the 2D Window on page 110
Terason Scan Mode Availability
Mode Basic Standard Advanced Optional
2D Mode X X X
M-Mode (Motion Mode) X X X
Directional Power Doppler X X
Power Doppler X X
Triplex X X
Color Doppler X
Pulsed-Wave Doppler X
Omni Beam X
DICOM Image Transfer X
Chapter 1 - About the Terason Ultrasound System About Ultrasound Modes
Terason t3200 Ultrasound System User Guide 17
M-Mode (Motion Mode)The Terason Ultrasound System provides simultaneous 2-dimensional (2D mode) and M-Mode imaging. This combination is valuable for the efficient assessment of moving structures.
Use M-Mode to determine patterns of motion for objects within the ultrasound beam. Typically, this mode is used for viewing motion patterns of the heart.
M-Mode displays scan data of the anatomy in the 2D Imaging window, and the motion scan in the Time Series window. The following figure shows a sample M-Mode scan.
Example M-Mode Scan
For more information on using M-mode, see:
• Acquiring Images on page 43• Using M-Mode Image Controls on page 73• Measuring in the M-Mode Window on page 115
Power DopplerConventional Power Doppler shows blood flow by displaying the density of red blood cells, as opposed to their velocity. Large amplitude signals are assigned a bright hue, and weak signals are assigned a dim hue. For example, the jugular vein is shown in brighter colors than the carotid artery because the jugular vein contains more red blood cells at any given time than does the carotid artery. All flows display in shades of the same color; no directional information is provided. You also can choose to apply a high frame rate or high resolution to control the quality of the scan.
Chapter 1 - About the Terason Ultrasound System About Ultrasound Modes
Terason t3200 Ultrasound System User Guide 18
In general, Power Doppler is more sensitive than Color Doppler. Amplitude estimation is less noisy than a mean frequency estimate. Therefore, Power Doppler detects and displays more real signal. Power Doppler is more sensitive to low flow than Color or Directional Power Doppler. The increased sensitivity means that Power Doppler is less angle-dependent than Color Doppler, and does not alias.
Power Doppler is the preferred mode to show perfusion and contour of vessel lumen.
The Power Doppler scan data displays in the 2D Imaging window as shown in the following figure.
Example Power Doppler Scan
For more information on using Power Doppler mode, see:
• Acquiring Images on page 43• Using Color and Power Doppler Image Controls on page 82
Color DopplerColor Doppler mode is used to detect the presence, direction, and relative velocity of blood flow by assigning color-coded information to these parameters. The color is depicted in a region of interest (ROI) that is overlaid on the 2D image. Non-inverted flow towards the probe is assigned shades of red, and flow away from the probe displays in shades of blue. The mean Doppler shift is then displayed against a grayscale scan of the structures.
All forms of ultrasound-based imaging of red blood cells are derived from the received echo of the transmitted signal. The primary characteristics of this echo signal are its frequency and its amplitude (or power). The frequency shift is determined by the movement of the red blood cells relative to the probe – flow towards the probe produces a higher-frequency signal than flow away from the probe. Amplitude depends on the amount of moving blood within the volume sampled by the ultrasound beam. You can also apply a high frame rate or high resolution to control the quality of the scan.
Chapter 1 - About the Terason Ultrasound System About Ultrasound Modes
Terason t3200 Ultrasound System User Guide 19
Higher frequencies generated by rapid flow are displayed in lighter colors, and lower frequencies in darker colors. For example, the proximal carotid artery is normally displayed in bright red and orange, because the flow is toward the probe, and the frequency (velocity) of flow in this artery is relatively high. By comparison, the flow in the jugular vein displays as blue because it flows away from the probe.
The Color Doppler scan data displays in the 2D Imaging window. The following figure shows a sample Color Doppler scan.
Example Color Doppler Scan
For more information on using Color Doppler, see:
• Acquiring Images on page 43• Using Color and Power Doppler Image Controls on page 82
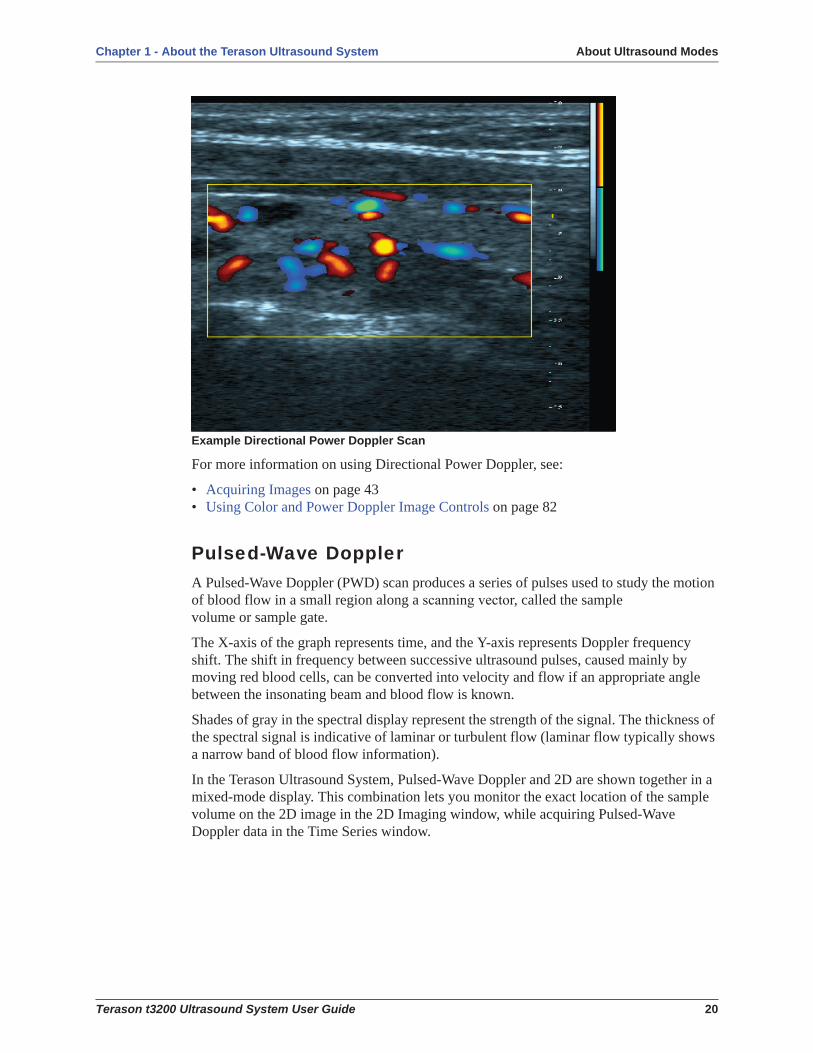
Directional Power DopplerDirectional Power Doppler (DirPwr) is a combination of some features of conventional Power Doppler and of Color Doppler. It provides the increased sensitivity of conventional Power Doppler, plus the directional information derived from Color Doppler.
Directional Power Doppler does not provide an estimate of blood flow velocity. The color palette is proportional to the strength of the Doppler signal. This mode allows you to obtain good-quality images of deep arteries and other tissue. You can also apply a high frame rate or high resolution to control the quality of the scan.
The Directional Power Doppler scan data displays in the 2D Imaging window.
Chapter 1 - About the Terason Ultrasound System About Ultrasound Modes
Terason t3200 Ultrasound System User Guide 20
Example Directional Power Doppler Scan
For more information on using Directional Power Doppler, see:
• Acquiring Images on page 43 • Using Color and Power Doppler Image Controls on page 82
Pulsed-Wave DopplerA Pulsed-Wave Doppler (PWD) scan produces a series of pulses used to study the motion of blood flow in a small region along a , called the sample volume or sample gate.
The X-axis of the graph represents time, and the Y-axis represents Doppler frequency shift. The shift in frequency between successive ultrasound pulses, caused mainly by moving red blood cells, can be converted into velocity and flow if an appropriate angle between the insonating beam and blood flow is known.
Shades of gray in the spectral display represent the strength of the signal. The thickness of the spectral signal is indicative of laminar or turbulent flow (laminar flow typically shows a narrow band of blood flow information).
In the Terason Ultrasound System, Pulsed-Wave Doppler and 2D are shown together in a mixed-mode display. This combination lets you monitor the exact location of the sample volume on the 2D image in the 2D Imaging window, while acquiring Pulsed-Wave Doppler data in the Time Series window.
Chapter 1 - About the Terason Ultrasound System About Ultrasound Modes
Terason t3200 Ultrasound System User Guide 21
Example Pulsed-Wave Doppler Scan
In the 2D scan, the long line lets you adjust the ultrasound cursor position, the two parallel lines (that look like =) let you adjust the sample volume (SV) size and depth, and the line that crosses them lets you adjust the correction angle.
For more information on using Pulsed Wave Spectral Doppler, see:
• Acquiring Images on page 43• Using Spectral Doppler Image Controls on page 75 • Measuring in Spectral Doppler Modes on page 116
TriplexTriplex scan mode is available only with the Advanced version of the Terason software. Triplex scan mode combines simultaneous or non-simultaneous Doppler imaging (Color Doppler, Directional Power Doppler, or Power Doppler) with Pulsed-Wave Doppler imaging to view arterial or venous velocity and flow data. Triplex allows you to perform range-gated assessment of flow.
Triplex applications include vascular studies, phlebology, perinatal, and radiology. The following triplex image example shows the greater saphenous vein.
Chapter 1 - About the Terason Ultrasound System DICOM Image Transfer
Terason t3200 Ultrasound System User Guide 22
Example Triplex Scan
For more information on using Triplex mode, see:
• Acquiring Images on page 43 • Scanning in Triplex Mode on page 87
TeraVisionTeraVision is an optional image-optimization package that sharpens images produced by the Terason Ultrasound system.
See Enhancing the Image Using TeraVision™ Optimization on page 53
DICOM Image TransferTo understand using DICOM image transfer, see Using Studies with a DICOM Server on page 148.
Support for Medical ProceduresThe Terason Ultrasound System can be configured with needle guides used for tissue biopsy, fluid aspriation, amniocentesis, and catheter placement. The system can also be incorporated into cryoablation (or targeted ablation) and brachytherapy products from other vendors. The Terason Ultrasound System scans the anatomy or vessel for size, location, and patency, and provides guide lines between which the needle will appear.
Chapter 1 - About the Terason Ultrasound System Terason Probes
Terason t3200 Ultrasound System User Guide 23
For biopsy and vascular puncture applications, a needle guide kit directs needles to the proper location for percutaneous vascular punctures and nerve blocks. The needle guide allows you to direct the needle into the center of a vessel or tissue mass, helping to avoid adjacent vital tissue. You can see the anatomy in real time before, during, and after the procedure, and can save images and Cine loops for future reference.
For cryoablation or brachytherapy applications, the system may include an insertion template and a stepper or stabilizer. The procedure for these applications is defined by the company that provides those systems. The Terason software displays the insertion grid and needles on the scan to show the progress of the procedure.
You can use the needle guides in the following modes:
• 2D Mode, see page 16• Color Doppler, see page 18• Directional Power Doppler, see page 19• M-Mode (Motion Mode), see page 17
See Performing Medical Procedures on page 127 for information on using the Terason Ultrasound System to perform biopsies.
Terason ProbesThe Terason Ultrasound System consists of the probe, electronics envelope, and the Terason software. All of the Terason probes can be used with all scan modes.
For a list and specifications of the probes supported by the module you have purchased, see the Module User Guide supplied with the system. Also see “System Specifications” and “Indications For Use” in the Terason Technical Manual
Imaging, Patient, Report, and Review WindowsThese windows use the same space on the computer screen. Click a button to open that window.
To use these windows, see:
• Imaging Window on page 23• Status Bar on page 25• Working With Scan Modes on page 65• Setting Up Patient Information on page 32• Reviewing Patient Studies on page 92
Imaging WindowWhen you start the Terason software, the Imaging window displays.
Chapter 1 - About the Terason Ultrasound System Imaging, Patient, Report, and Review Windows
Terason t3200 Ultrasound System User Guide 24
Terason Imaging Window
The Imaging window consists of the 2D window above the Time Series window (if the selected scan mode generates a Time Series window). The 2D window displays in all scan modes; the Time Series window displays only when scanning in M-Mode, PWD mode, or Triplex mode.
If a control, button, or menu shows in gray, it usually means that the function is not available for the current circumstances.
For details of the imaging information display, see Status Bar on page 25 and Scan Properties Display on page 25.
Softkey control selector
Status barExam Date
Imaging window
Orientation icon
Setup window
Imaging information
Gain knob status
Softkey controls
Patient Info
Preset menu
Exam type
Patient info, Review, and Report windows
Thumbnail area
Frozen image indicatorFocal depth
Chapter 1 - About the Terason Ultrasound System Imaging, Patient, Report, and Review Windows
Terason t3200 Ultrasound System User Guide 25
Status BarThe Imaging screen includes a status bar at the upper right corner.
Status Bar
The status bar displays the following indicators, from left to right:
Help button - click this to open the Help file.
Network connection - shows if the computer is connected to a network. If there is no connection, a red X shows on the indicator.
Disk free space - shows how much free space is left on the computer hard drive.
DICOM status - shows whether the connection to a DICOM server is active, and whether sending of any studies to the DICOM server has failed. See DICOM Status Indicator on page 149 for a full explanation of this indicator.
Battery charge - shows the remaining charge of the system battery, when the AC power supply is disconnected. In the illustration, the battery is fully charged. As the battery discharges, the green bands disappear, from the top down. When the battery is almost fully discharged, a single red band shows at the bottom of the indicator. When the battery is partly discharged and the AC power supply is connected, a yellow lightning bolt shows on the battery icon. When the battery is full charged and the AC power supply is connected, a red power plug icon displays in place of the battery icon.
Minimize button - click this to minimize the Terason Ultrasound screen and view the Windows desktop. To return to the Terason Ultrasound screen, press alt-tab on the computer keyboard.
Exit button - click this to exit the Terason Ultrasound program. To restart the Terason Ultrasound program, double-click the ultrasound icon on the Windows desktop.
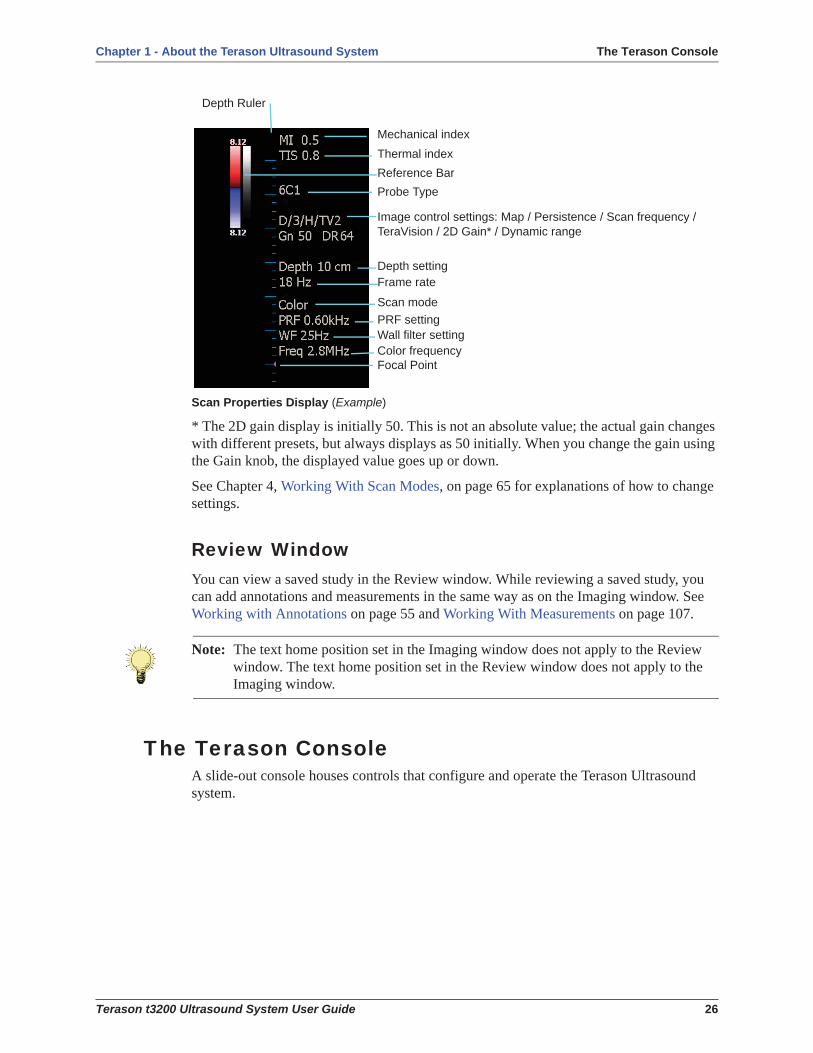
Scan Properties DisplayThe Imaging window includes a text display that shows information about the current scan. The image control settings displayed vary, depending on the scan mode and other factors.
Chapter 1 - About the Terason Ultrasound System The Terason Console
Terason t3200 Ultrasound System User Guide 26
Scan Properties Display (Example)
* The 2D gain display is initially 50. This is not an absolute value; the actual gain changes with different presets, but always displays as 50 initially. When you change the gain using the Gain knob, the displayed value goes up or down.
See Chapter 4, Working With Scan Modes, on page 65 for explanations of how to change settings.
Review WindowYou can view a saved study in the Review window. While reviewing a saved study, you can add annotations and measurements in the same way as on the Imaging window. See Working with Annotations on page 55 and Working With Measurements on page 107.
The Terason ConsoleA slide-out console houses controls that configure and operate the Terason Ultrasound system.
Note: The text home position set in the Imaging window does not apply to the Review window. The text home position set in the Review window does not apply to the Imaging window.
Image control settings: Map / Persistence / Scan frequency / TeraVision / 2D Gain* / Dynamic range
Depth Ruler
Reference BarProbe Type
Focal Point
Depth settingFrame rate
Scan modePRF setting
Mechanical indexThermal index
Wall filter settingColor frequency
Chapter 1 - About the Terason Ultrasound System The Terason Console
Terason t3200 Ultrasound System User Guide 27
Terason Console
Console ControlsThe controls on the console are arranged in three groups: left, center, and right.
Left Control GroupSoft keys ^ V – Four sets of up and down arrow keys control the settings displayed in
buttons at the bottom of the Imaging window. See Softkeys and Gain Knob Menus on page 29.
Softkey Set Selector keys < > – A pair of left and right arrow keys change the controls displayed in the buttons at the bottom of the Imaging window. Pressing one of the keys populates the buttons with a different set of controls. A display between the second and third button set indicates which set of controls are displayed.A maximum of four sets are possible.
Mode keys – Five keys select the scan modes.
Center Control GroupTrackball – The trackball in the middle of the console takes the place of a computer mouse. It moves the onscreen cursor or a selected feature in the same way a mouse would.
Left key – The key just to the left of the trackball performs the same functions as the left button on a mouse. When the ultrasound cursor is selected, clicking this key deselects the cursor.
Right key – When the image is frozen, the key just to the right of the trackball performs the same functions as the right button on a mouse. Clicking this key during live scanning selects the ultrasound cursor, so that the trackball controls the cursor position.
Trackball
Live/Freeze key
Mode keysSoftkey set selector keys
Soft keysTGC sliders
Gain control knob
Trackball arbitration key
Update key
Save loop key
Frequency keysFocus depth keys
Scan depth keys
Text keySave image key
Left key Right key
Chapter 1 - About the Terason Ultrasound System The Terason Console
Terason t3200 Ultrasound System User Guide 28
Live/Freeze key – The key just below the trackball toggles between live imaging and frozen image.
Trackball Arbitration key – The key just above the trackball selects what the trackball controls, if there is more than one option. When live imaging, the bar just above the softkey display shows what options are available for trackball control. If more than one option is available, the currently selected option is blue.
Save Loop key –The key below and to the right of the Live/Freeze key saves a loop to a file.
Save Image key –The key to the right of the Save Loop key saves an image to a file.
Text key –The key just above the Save Image key toggles the text entry functions on and off.
Update key – The key to the left of the Live/Freeze key toggles the update function on and off. See Updating the Displays on page 81.
Right Control GroupGain Control Knob – The knob near the bottom right of the console controls gain. If the selected scan mode has different Gain knob functions, pushing the knob down toggles it to control other available functions. A legend next to the gain knob icon below the depth scale on the Imaging display says which function is currently controlled by the Gain knob. See Softkeys and Gain Knob Menus on page 29.
Example: in Color mode, the Gain knob normally controls color gain, and the onscreen legend reads Color Gain. Pushing the knob down changes the control to 2D gain, and the legend reads 2D Gain. Pushing the knob a second time changes the control and display to Zoom.
When you press the Gain knob down for two seconds during live imaging, all settings revert to the default presets.
When the scan is frozen in Doppler modes, the Gain knob normally scrolls the Time-Series loop, and the onscreen legend reads Time Scroll. Pushing the knob down changes it to scroll the 2D loop, and the onscreen legend reads Frame Scroll.
Sliders – Eight sliders at the right end of the console control time gain compensation (TGC) at various scan depths. See Adjusting Time Gain Compensation on page 69.
When you turn the system on, select an exam, or press the Gain knob for two seconds to reset, the presets are applied, independent of the slider positions. If you have a slider all the way to the right or left when the presets are applied, you will only be able to adjust that TGC value in one direction.
Frequency keys – Two keys just to the left of the TGC sliders select different sets of frequency presets, depending on the scan mode and exam type.
Focus Depth keys – Two keys just to the left of the Frequency keys set the focus depth.
Chapter 1 - About the Terason Ultrasound System The Terason Console
Terason t3200 Ultrasound System User Guide 29
Scan Depth keys – Two keys just to the left of the Focus Depth keys set the scan depth.
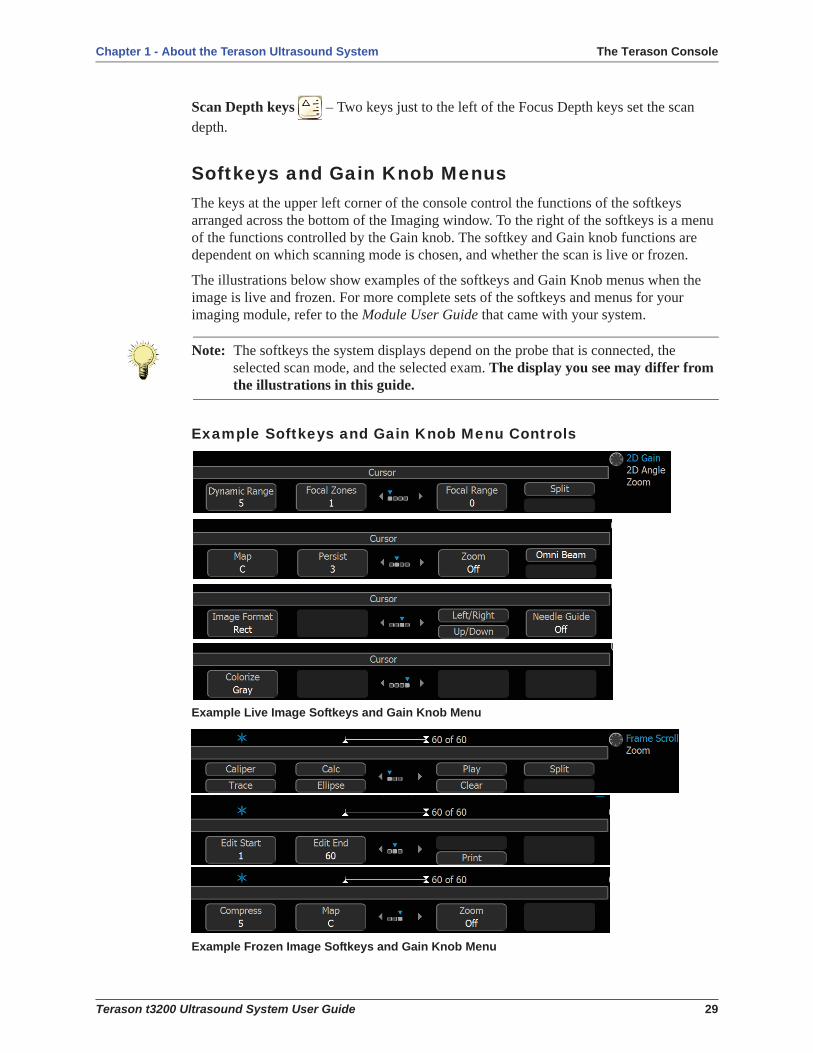
Softkeys and Gain Knob MenusThe keys at the upper left corner of the console control the functions of the softkeys arranged across the bottom of the Imaging window. To the right of the softkeys is a menu of the functions controlled by the Gain knob. The softkey and Gain knob functions are dependent on which scanning mode is chosen, and whether the scan is live or frozen.
The illustrations below show examples of the softkeys and Gain Knob menus when the image is live and frozen. For more complete sets of the softkeys and menus for your imaging module, refer to the Module User Guide that came with your system.
Example Softkeys and Gain Knob Menu Controls
Example Live Image Softkeys and Gain Knob Menu
Example Frozen Image Softkeys and Gain Knob Menu
Note: The softkeys the system displays depend on the probe that is connected, the selected scan mode, and the selected exam. The display you see may differ from the illustrations in this guide.
Chapter 1 - About the Terason Ultrasound System Beep Codes
Terason t3200 Ultrasound System User Guide 30
Beep CodesThe Terason Ultrasound system produces beeps when certain events occur. The following list explains the meaning of the different beep codes.
• Two short beeps: Produced when a probe is connected or disconnected, or when the system is started with a probe already connected.This is only a notification; it is safe to use the system.
• Eight beeps: Produced when communication between the computer and the ultrasound engine is lost.If the imaging function resumes, it is safe to use the system. If the imaging function does not resume, restart the ultrasound software. If the error persists, stop using the system and contact Terason Technical Support.
• Two-tone beeps: Indicates that the system detected and corrected an internal transmitter timing error.It is safe to continue using the system. Freezing or unfreezing the scan turns the beeping off. If this occurs frequently, contact Terason Technical Support.
• Continuous short beeps: Produced when the system reaches an internal temperature of 72° C. The beeping stops when the internal temperature falls to less than 72° C.It is safe to continue using the system, but if the internal temperature rises to 80° C, the system shuts down.
Note: If the system continues to emit continuous short beeps even after it has cooled down, disconnect the power-supply cord from the computer. Wait a few minutes, then reconnect the power-supply cord.
Chapter 1 - About the Terason Ultrasound System Equipment List
Terason t3200 Ultrasound System User Guide 31
Equipment ListThe Terason Ultrasound System may be shipped with the following hardware:
• Terason t3200 Ultrasound System, consisting of laptop computer mounted on a base that contains a user console and ultrasound imaging engine.
• Laptop computer user guide• Online Terason Ultrasound System User Guide (this document)• CD-ROMs containing the operating system and Terason ultrasound imaging software• One (1) power cord• Medical grade AC/DC power adapter• ECG• ECG lead set - 10 sets of electrodes• Cart• Footswitch• Printer• One or more probes:
For a list of probes supported by your imaging module, see the Module User Guide that came with your system.
System WarrantyThe warranty period for the Terason Ultrasound System is twelve (12) months, but you can purchase an extended warranty. To obtain warranty service, U.S. customers call Terason at 1-866-TERASON (1-866-837-2766); International customers call 781-270-4143.
The warranty on the Terason Ultrasound System is voided if unauthorized personnel perform service or maintenance on the ultrasound system, except for those service or maintenance actions specifically designated for local service technicians. To ensure correct system performance and to protect your warranty, contact Terason for service.
Warning: Using accessories, probes, or cables other than those specified, with the exception of those sold by the manufacturer as replacement parts for internal components, may result in increased electromagnetic emissions or decreased EMI immunity of the Terason Ultrasound System.