80
Mauritius Contributions Network Project Web System (Phase 1) Payer’s User Manual Mauritius Network Services Ltd © 2009

Mauritius Contributions Network Project Web System
(Phase 1) Payer’s User Manual
Mauritius Network Services Ltd © 2009
User Guide for WEB-CNP Payer System Release 4.2 March 2009
Mauritius Network Services Ltd Page I
CONTENT
CHAPTER 1 INTRODUCTION ....................................................... 1-1 WHAT IS WEB-CNP PAYER SYSTEM? .........................................................................................................1-1 FUNCTIONS OF WEB-CNP PAYER SYSTEM.................................................................................................1-1 CAPABILITIES OF WEB-CNP PAYER SYSTEM..............................................................................................1-2 WEB BROWSER FUNDAMENTALS .................................................................................................................1-2
CHAPTER 2 STARTING WEB-CNP PAYER SYSTEM ................. 2-1 LOGIN SCREEN..............................................................................................................................................2-1 LIST OF SERVICES SCREEN............................................................................................................................2-2
CHAPTER 3 THE MAIN MENU.................................................... 3-1 MAIN MENU SCREEN ....................................................................................................................................3-1 MAIN MENU ITEMS........................................................................................................................................3-1
CHAPTER 4 MESSAGES............................................................... 4-1 INTRODUCTION .............................................................................................................................................4-1 COMMON FEATURES .....................................................................................................................................4-1 NPF RETURN ................................................................................................................................................4-2
Create a New NPF Return.......................................................................................................................4-2 Surcharges ...............................................................................................................................................4-3 Employee Information .............................................................................................................................4-3 Bank Payment Information......................................................................................................................4-4
PAYE RETURN ............................................................................................................................................4-5 Create a New PAYE Return.....................................................................................................................4-5 Bank Payment Information......................................................................................................................4-6
VAT RETURN................................................................................................................................................4-8 Create a New VAT Return .......................................................................................................................4-8
ENTERING VAT BANK INFORMATION .........................................................................................................4-9 VAT Bank Output .....................................................................................................................................4-9 VAT Bank Input......................................................................................................................................4-10 VAT Bank Account.................................................................................................................................4-11
ENTERING VAT INFORMATION...................................................................................................................4-12 VAT Output ............................................................................................................................................4-12 VAT Input ...............................................................................................................................................4-12 VAT Account ..........................................................................................................................................4-14 Particulars of Solidarity Levy ..............................................................................................................4-15 Bank Payment Information....................................................................................................................4-16
UPDATE/VIEW A RETURN ...........................................................................................................................4-16 DELETE RETURN .........................................................................................................................................4-17 DUPLICATE A RETURN ................................................................................................................................4-18 MEMO TEXT................................................................................................................................................4-20
Create a NEW Memo Text .....................................................................................................................4-20 Update/View a Memo Text document....................................................................................................4-21 Delete Memo Text document .................................................................................................................4-21
CHAPTER 5 COMMUNICATION................................................... 5-1 INTRODUCTION .............................................................................................................................................5-1 SEND RETURN ............................................................................................................................................5-1 RECEIVE MESSAGES .....................................................................................................................................5-2 SEND EMPLOYEE DETAILS TO NPF ..............................................................................................................5-3 RESET SEND STATUS ....................................................................................................................................5-4 IMPORT VAT.................................................................................................................................................5-5 EXPORT RETURN TO HOST............................................................................................................................5-6 VIEW MESSAGES RECEIVED .........................................................................................................................5-7

User Guide for WEB-CNP Payer System Release 4.2 March 2009
Mauritius Network Services Ltd Page II
CHAPTER 6 UTILITIES ................................................................ 6-1 INTRODUCTION .............................................................................................................................................6-1 USER MAINTENANCE.....................................................................................................................................6-1
Updating a user profile............................................................................................................................6-1 Giving user access rights.........................................................................................................................6-2 Printing user profile ................................................................................................................................6-2
SYSTEM SETTING ..........................................................................................................................................6-3 IMPORT EMPLOYEE DETAILS ........................................................................................................................6-4 RESET RETURN ENTRY STATUS....................................................................................................................6-7
CHAPTER 7 CODE MAINTENANCE ............................................. 7-1 INTRODUCTION .............................................................................................................................................7-1 EMPLOYER ....................................................................................................................................................7-1
To create a new employer record............................................................................................................7-1 To update the employer details ...............................................................................................................7-2 To delete an employer..............................................................................................................................7-2 To add employee records.........................................................................................................................7-2 To update / delete employee records.......................................................................................................7-3 To print employee records.......................................................................................................................7-4
CHAPTER 8 REPORTS ................................................................. 8-1 INTRODUCTION .............................................................................................................................................8-1 MESSAGES RECEIVED ...................................................................................................................................8-1 MESSAGES SENT ...........................................................................................................................................8-1 AUDIT TRAIL.................................................................................................................................................8-2 ERROR LOG...................................................................................................................................................8-2 BANK / BRANCH LIST ...................................................................................................................................8-3 CONTRIBUTION REPORT................................................................................................................................8-3 COUNTRY REPORT ........................................................................................................................................8-4 OCCUPATION REPORT...................................................................................................................................8-4 WAGE REPORT..............................................................................................................................................8-4
APPENDIX A STATUS & FORMAT APPENDIX B REPORT PREVIEW SCREEN APPENDIX C SAMPLE REPORT LISTING RETURN REPORT
NPF RETURN REPORT PAYE RETURN REPORT VAT RETURN REPORT
VAT BANK RETURN REPORT OTHER REPORTS
EMPLOYER CODE REPORT MEMO TEXT REPORT
APPENDIX D ASCII FILE LAYOUTS IMPORT FILE LAYOUTS VAT ASCII FILE LAYOUT EXPORT FILE LAYOUTS CONTENTS OF THE NPF ASCII FILE CONTENTS OF THE PAYE ASCII FILE CONTENTS OF THE VAT ASCII FILE CONTENTS OF THE VAT BANK ASCII FILE
User Guide for WEB-CNP Payer System Release 4.2 March 2009
Mauritius Network Services Ltd Page 1-1
Chapter 1 Introduction
What is WEB-CNP Payer System?
The WEB-CNP system is an initiative of the Ministry Of Finance. It represents an increase in efficiency and effectiveness compared to the current manual process. This is in line with the Government’s and private sector’s objective of modernizing the economy and enhancing productivity. WEB-CNP Payer System allows users to transmit electronic documents to or from the relevant parties; i.e. Value Added Tax, Income Tax, Large Tax Payer’s Departments and Ministry of Social Security and banks. Effectively, this eliminates the paper process in submitting the various returns to the Government agencies. Furthermore, Payment Instructions (PI) are also sent electronically to the banks for them to effect payments as specified by the payers.
Functions of WEB-CNP Payer System
WEB-CNP Payer system provides functions to prepare VAT, PAYE and NPF returns as well as electronic payments of taxes due. The various returns and Payment Instructions are electronically transmitted through the network operated by Mauritius Network Services (MNS). The returns will be sent to the VAT, PAYE, NPF and LTP departments. The Payment Instructions will be sent to the banks specified by the payer. The VAT, PAYE, NPF and LTP departments upon receiving the returns will send back acknowledgements to the sender of the returns. They will also send electronic receipts after receiving the payers’ tax payments from the banks.
User Guide for WEB-CNP Payer System Release 4.2 March 2009
Mauritius Network Services Ltd Page 1-2
Capabilities of WEB-CNP Payer System
WEB-CNP Payer System has the following capabilities: Data Entry The system allows the preparation of the following tax returns: • VAT • PAYE • NPF VAT This return includes the following messages: • VAT returns • Bank Payment Instructions PAYE This return includes the following messages: • PAYE Returns • Bank Payment Instructions NPF This return includes the following messages: • NPF Returns (includes Levy) • Bank Payment Instructions Electronic Submission of Tax Returns and Payment Instructions The system can send returns and Payment Instructions electronically via the MNS network to the respective departments and the various banks.
Web Browser Fundamentals
Browsers present web pages to you in a consistent way. Every web page that runs under Windows uses the browser interface. So the browser that you see for one program will have similarities to every other program. A browser has the following common features :
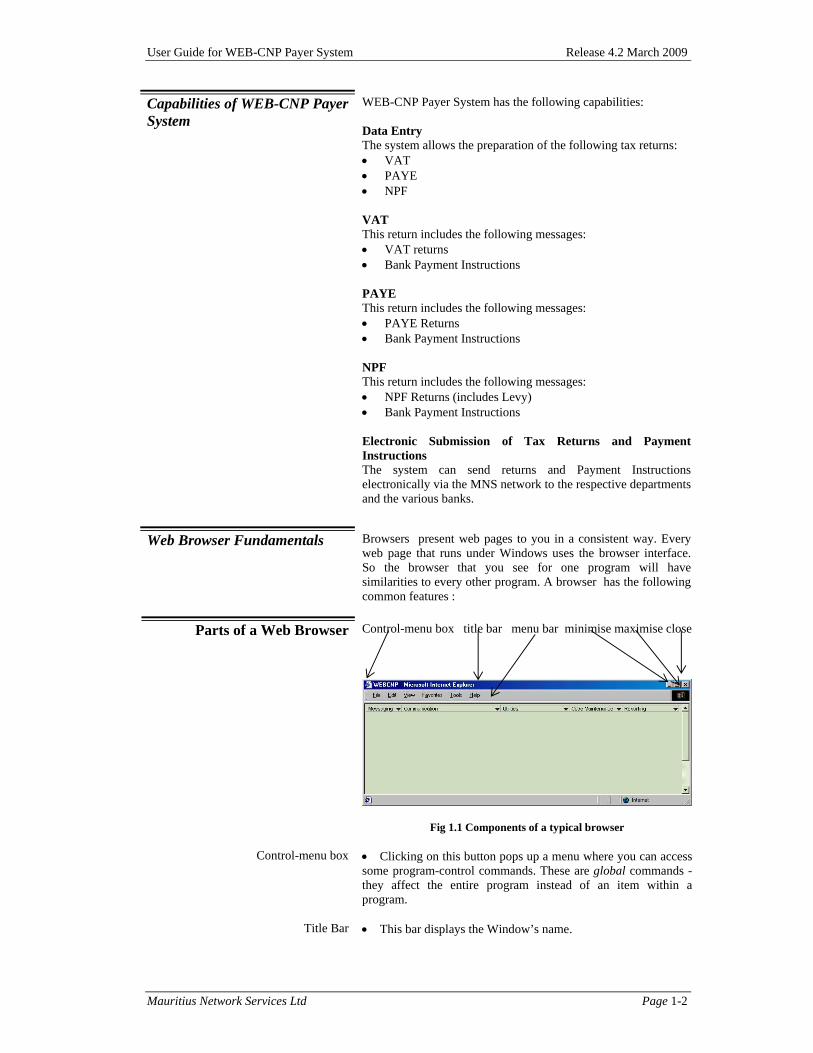
Parts of a Web Browser Control-menu box title bar menu bar minimise maximise close
Fig 1.1 Components of a typical browser
Control-menu box • Clicking on this button pops up a menu where you can access some program-control commands. These are global commands - they affect the entire program instead of an item within a program.
Title Bar • This bar displays the Window’s name.
User Guide for WEB-CNP Payer System Release 4.2 March 2009
Mauritius Network Services Ltd Page 1-3
Menu Bar • This bar displays the Menu items of the application. You can access most of an application program’s commands from the menu bar. • In Fig 1.1 the Menu bar displays the Menu items of the program window
Minimise button • Clicking on this shrinks the window to a button on the task bar. This is the reverse of maximising the window.
Restore button • This button is available only in the maximised screen. Clicking on this makes the window shrink to a smaller size (its original size), so that it occupies only a portion of the screen.
Maximise button • Clicking on maximise makes the window spread across the whole screen.
Close button • Clicking on close button will close the active window.
Borders • The outside edges of the window for the borders.
Scroll Bars • Scroll bars are provided to view the contents of the window that do not fit into the window. When the contents of the window consist of more than one screen, the scroll bars are added automatically. To view the contents beyond the screen size of the window, click on the arrows of the scroll bars.
Workspace • The area inside the window constitutes the workspace.
How to use Screens, Check Boxes and Buttons
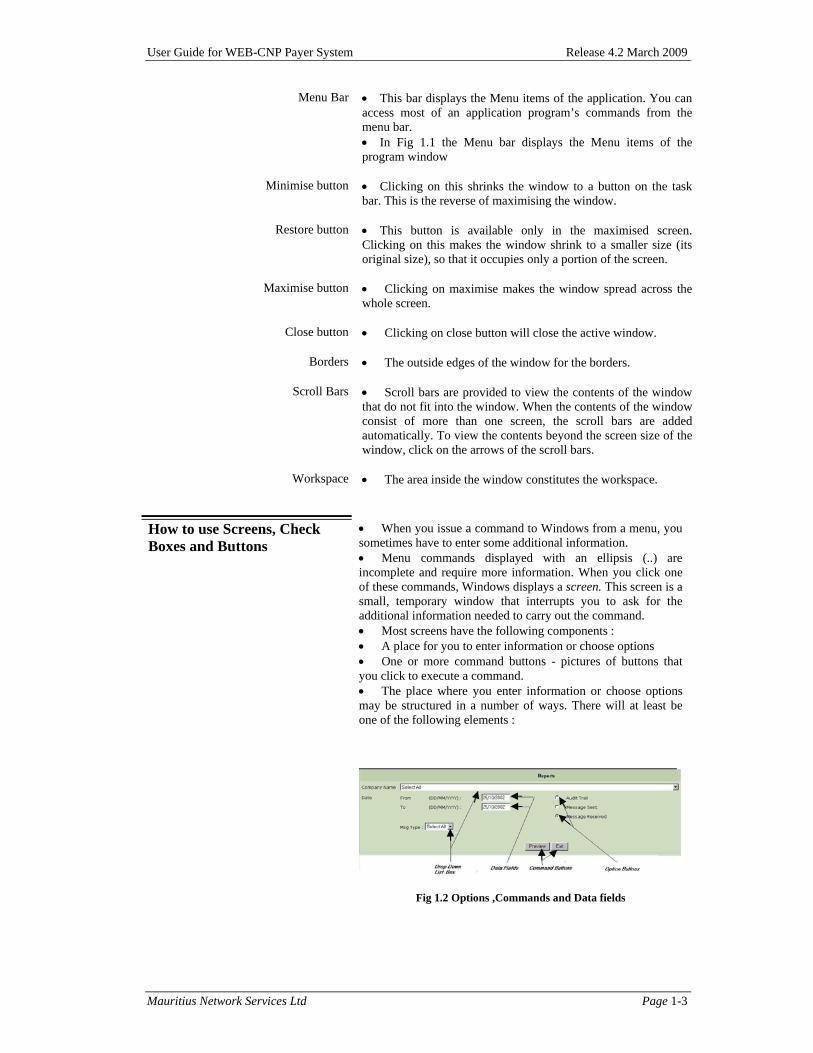
• When you issue a command to Windows from a menu, you sometimes have to enter some additional information. • Menu commands displayed with an ellipsis (..) are incomplete and require more information. When you click one of these commands, Windows displays a screen. This screen is a small, temporary window that interrupts you to ask for the additional information needed to carry out the command. • Most screens have the following components : • A place for you to enter information or choose options • One or more command buttons - pictures of buttons that you click to execute a command. • The place where you enter information or choose options may be structured in a number of ways. There will at least be one of the following elements :
Fig 1.2 Options ,Commands and Data fields

User Guide for WEB-CNP Payer System Release 4.2 March 2009
Mauritius Network Services Ltd Page 1-4
Data Fields • Refer to Fig 1.2 Data fields are used to give the application the information it prompts for. To fill text in a data field, click on the field and start typing the text. Fig 1.3 shows a single line data field. There exist multi-line data fields also.
Option Buttons (Radio Buttons)
• Refer to Fig 1.2 Option buttons (Radio buttons) are used to select any one of the options presented in that group. For e.g. in Fig 1.3 three options are presented, out of which the user can select any one option.
Drop-Down List box (Combo Box) • Refer to Fig 1.2 & 1.3 Drop–Down List Boxes (Combo boxes) are used to display a list of items, upon the user's request. Click on the arrow of the Combo box to view the list. From this list you can make a selection by clicking on the required item. Note that a vertical scroll bar is added in the list box since the number of items is more than the List box can hold. See Fig 1.3.
Fig 1.3 Drop – down list box ( Combo box )
Command Buttons • Refer to Fig 1.2
Command buttons are used to represent a Command graphically. Clicking on these buttons executes the associated command.
Fig 1.4 Check boxes
Check boxes
• Refer Fig to 1.4 Check boxes are similar to Option buttons, the only difference being that more than one or all the check boxes in a group can be selected.
To Resize a Web Browser Window
• Refer to Fig 1.5 A Web Browser Window can be resized according to your requirements. If you want to have two or more windows on your screen at the same time, then the windows must be resized accordingly. • Place the mouse pointer on one of the edges of the window. The mouse pointer's shape changes to a double-sided pointer. • Drag the mouse to the new position and release.

User Guide for WEB-CNP Payer System Release 4.2 March 2009
Mauritius Network Services Ltd Page 1-5
Double Headed Pointer
Fig 1.5 Resizing a Window
To Move a Web Browser Window
• Place the mouse pointer over the title bar of the window you want to Move. • Drag the mouse to the new position and release.
To Close a Web Browser • Refer to Fig 1.1 • Click on the Close button of the window. You can also click on the Control Menu box and select Close.
Some Buttons Used
Click on this button to view the Acknowledgment details for a particular return.
Click on this button to view the Receipts details for a particular return.
Click on this button to view/update PAYE/NPF Employees details.
Click on this button to view/update the Access Rights to Menu Items for a user.
Click on this button to view/update the Access Rights to Companies for a user.
This button allows you to retrieve a file. A windows search screen will be displayed to enable the search and selection of a file.
This button allows you to import a specified file.
Click on this button to Confirm the current operation.
Click on this button to Cancel the current operation. In some instances, this button also stand for ‘No’.
Click on this button to Exit the current screen.
Check/Uncheck this box to select / deselect all the records in the form.
User Guide for WEB-CNP Payer System Release 4.2 March 2009
Mauritius Network Services Ltd Page 2-1
Chapter 2 Starting WEB-CNP Payer System
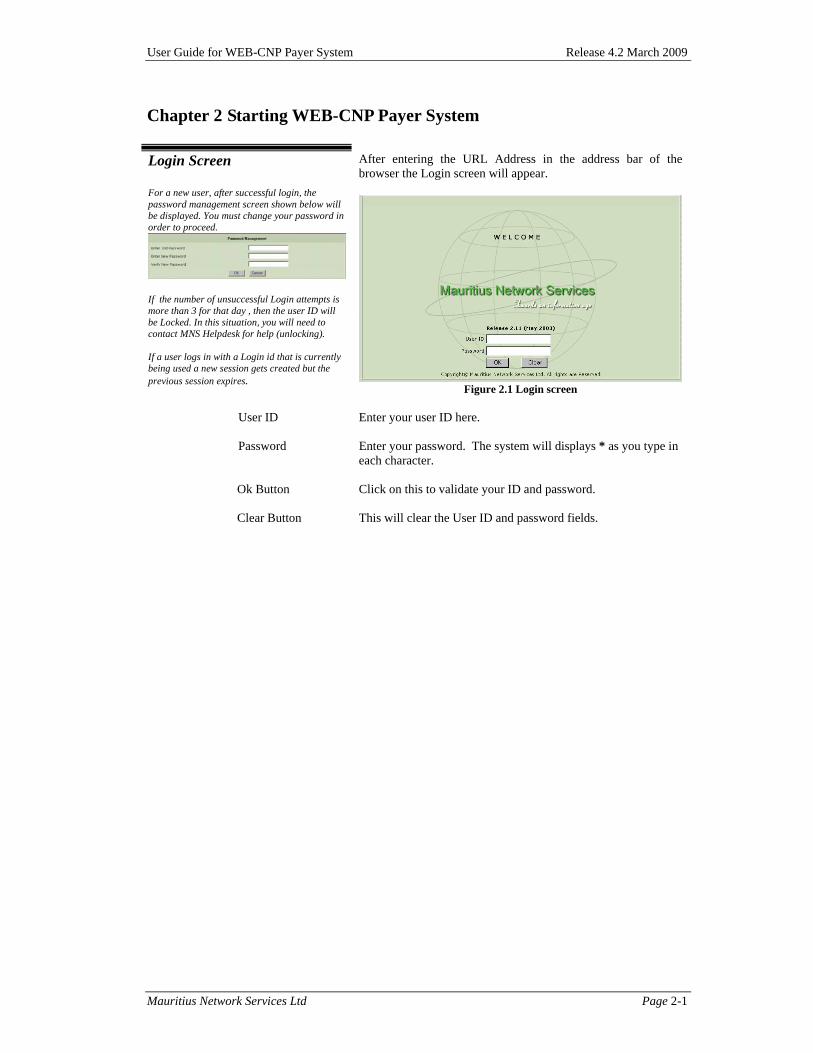
Login Screen For a new user, after successful login, the password management screen shown below will be displayed. You must change your password in order to proceed.
If the number of unsuccessful Login attempts is more than 3 for that day , then the user ID will be Locked. In this situation, you will need to contact MNS Helpdesk for help (unlocking). If a user logs in with a Login id that is currently being used a new session gets created but the previous session expires.
After entering the URL Address in the address bar of the browser the Login screen will appear.
Figure 2.1 Login screen
User ID Enter your user ID here.
Password Enter your password. The system will displays * as you type in
each character.
Ok Button Click on this to validate your ID and password. Clear Button
This will clear the User ID and password fields.
User Guide for WEB-CNP Payer System Release 4.2 March 2009
Mauritius Network Services Ltd Page 2-2
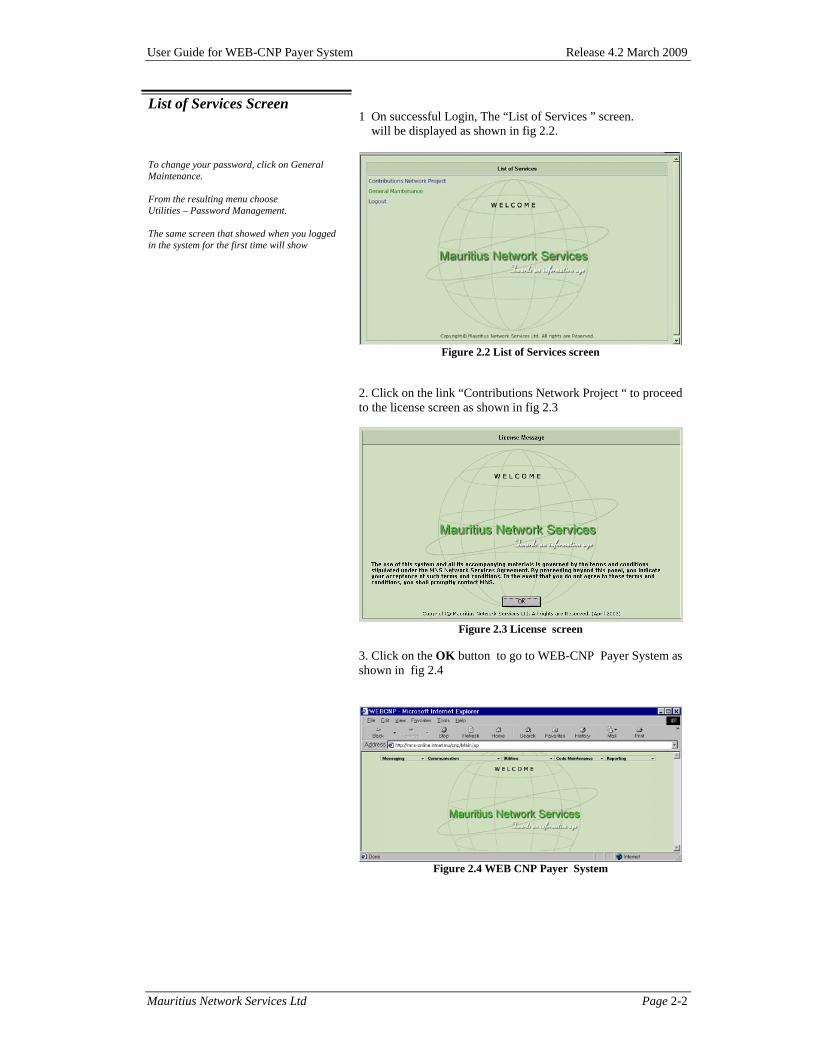
List of Services Screen To change your password, click on General Maintenance. From the resulting menu choose Utilities – Password Management. The same screen that showed when you logged in the system for the first time will show
1 On successful Login, The “List of Services ” screen. will be displayed as shown in fig 2.2.
Figure 2.2 List of Services screen
2. Click on the link “Contributions Network Project “ to proceed to the license screen as shown in fig 2.3
Figure 2.3 License screen
3. Click on the OK button to go to WEB-CNP Payer System as shown in fig 2.4
Figure 2.4 WEB CNP Payer System
User Guide for WEB-CNP Payer System Release 4.2 March 2009
Mauritius Network Services Ltd Page 3-1
Chapter 3 The Main Menu
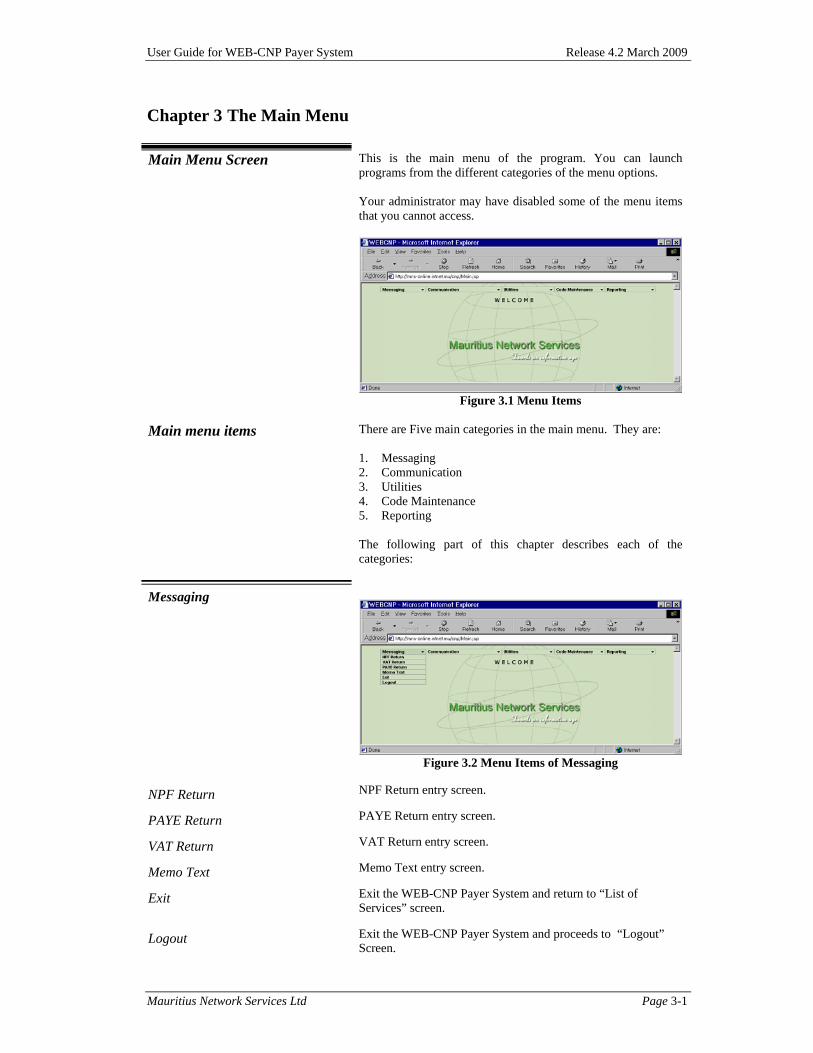
Main Menu Screen This is the main menu of the program. You can launch programs from the different categories of the menu options. Your administrator may have disabled some of the menu items that you cannot access.
Figure 3.1 Menu Items
Main menu items There are Five main categories in the main menu. They are: 1. Messaging 2. Communication 3. Utilities 4. Code Maintenance 5. Reporting
The following part of this chapter describes each of the categories:
Messaging
Figure 3.2 Menu Items of Messaging
NPF Return NPF Return entry screen.
PAYE Return PAYE Return entry screen.
VAT Return VAT Return entry screen.
Memo Text Memo Text entry screen.
Exit Exit the WEB-CNP Payer System and return to “List of Services” screen.
Logout Exit the WEB-CNP Payer System and proceeds to “Logout” Screen.

User Guide for WEB-CNP Payer System Release 4.2 March 2009
Mauritius Network Services Ltd Page 3-2
Communication
Figure 3.3 Menu Items of Communication
Send Return Displays a search page that enables you to select the records to be sent.
Receive Acknowledgment / Receipt Connects to your mailbox to receive any messages residing there
Send Employee Details to NPF Allows you to select employee records to be sent to NPF department.
View Messages Received Allows viewing of Messages received (except Memotext) for a range of date
Reset Send Status Displays a search screen where you can reset records sent status for sending again.
Import VAT Allows you to import VAT details for a particular month from an external file.
Export Return to Host Allows you to export NPF, PAYE and VAT return details to the Host.
Utilities
Figure 3.4 Menu Items of Utilities
User Maintenance Allows the general user to check his/her access rights to menu items and companies and the administrator to manage user profiles.
System Setting Allows you to view system parameters and change values like VAT percentages and Levy Rate.
Import Employee Details Allows you to import employee details from an ASCII file according to a specific layout.
Reset Return Entry Status Allows you to Reset the returns that are in Entry status (‘E’) to Incomplete status (‘I’). This item can only be accessed by administrators.
User Guide for WEB-CNP Payer System Release 4.2 March 2009
Mauritius Network Services Ltd Page 3-3
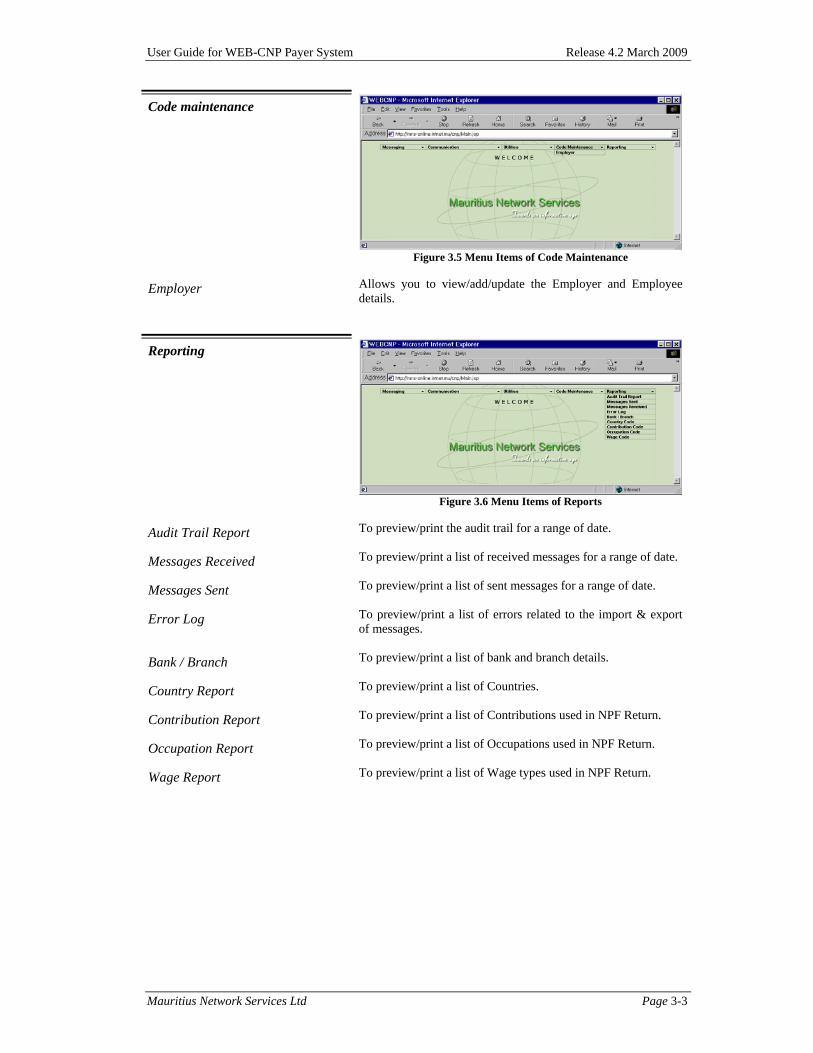
Code maintenance
Figure 3.5 Menu Items of Code Maintenance
Employer Allows you to view/add/update the Employer and Employee details.
Reporting
Figure 3.6 Menu Items of Reports
Audit Trail Report To preview/print the audit trail for a range of date.
Messages Received To preview/print a list of received messages for a range of date.
Messages Sent To preview/print a list of sent messages for a range of date.
Error Log To preview/print a list of errors related to the import & export of messages.
Bank / Branch To preview/print a list of bank and branch details.
Country Report To preview/print a list of Countries.
Contribution Report To preview/print a list of Contributions used in NPF Return.
Occupation Report To preview/print a list of Occupations used in NPF Return.
Wage Report To preview/print a list of Wage types used in NPF Return.
User Guide for WEB-CNP Payer System Release 4.2 March 2009
Mauritius Network Services Ltd Page 4-1
Chapter 4 Messages
Introduction
This chapter will guide you through the necessary steps to prepare, update, delete and print messages. The different types of messages include : • NPF return • PAYE return • VAT return • Memo Text
Common Features The three returns screens have some common features that will be explained here.
Figure 4.1 Toolbar
Refer to APPENDIX A for details on Job Number, Completeness Status and Application Status.
This toolbar is located at the top of the screen window. There are also data fields to indicate the Job Number, Completeness Status and Application Status.
Figure 4.2 Status Bar
This status bar is located at the bottom of the browser.
It indicates the download status.

User Guide for WEB-CNP Payer System Release 4.2 March 2009
Mauritius Network Services Ltd Page 4-2
NPF Return This screen allows the preparation of NPF return. You can create, edit, delete, send or print NPF documents using this screen. On clicking NPF Return option from the Messaging item from the Main Menu, the neutral page is displayed, as shown in fig 4.3.
Figure 4.3 NPF Return – Neutral Mode
Create a New NPF Return
Steps to create a new document: 1. Refer to Fig. 4.3. Click on New. A screen will display asking you to enter the Taxable Period as shown in Fig 4.4.
Taxable period should be within the current financial year. The system will also check if the same taxable period has already been entered previously.
Figure 4.4 Taxable period Entry Screen
The above screen displays if you are trying to create a return for the current month. This is to ensure that you are aware what period your current return should be.
2. Enter a valid taxable period in YYYYMM format e.g 200305 for May 2003. Click on the OK button to proceed.
3. You will notice that a new Job Number has been generated, with the completeness status as “Incomplete” and application status as “Create” – Refer to Fig 4.5. The screen is now ready for you to enter the different type of information needed for the NPF return.
Figure 4.5 NPF Return entry screen
Levy = Round ( (Total Basic Wage Bill* Levy Rate)/100)
4. To enter/edit NPF employee information, click on the Employees buttons ( refer to page 4-4 for detailed steps ). For entering Surcharges see below for detailed steps. The Total Wage Bill and Levy fields should also be entered.
User Guide for WEB-CNP Payer System Release 4.2 March 2009
Mauritius Network Services Ltd Page 4-3
If there are any late bank payments, the NPS and NSF Surcharge should be greater than 0 if any NPS or NSF amount is payable.
5. To enter/edit bank payment details, refer to page 4-4 for detailed steps. The payment type (if required) is set to “Electronic via MNS”.
If you have left out certain information (e.g. Employee, Levy & Surcharges or Bank Payment), the document will always be saved as an Incomplete document. On the other hand, having entered all the information, you will have an option to save it as an Incomplete or Complete document.
6. After entering all the information. You may choose to clear or to save them. 7. In both cases, the screen will return to its Neutral mode ready for the next operation.
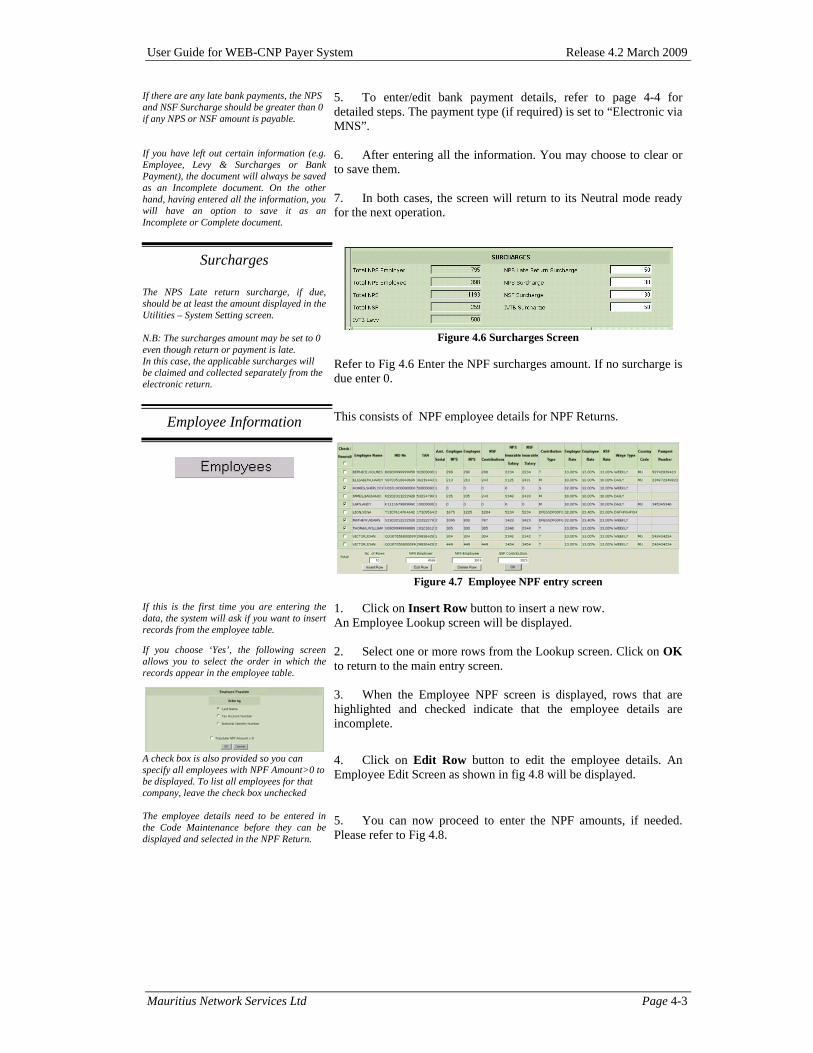
Figure 4.6 Surcharges Screen
Surcharges
The NPS Late return surcharge, if due, should be at least the amount displayed in the Utilities – System Setting screen. N.B: The surcharges amount may be set to 0 even though return or payment is late. In this case, the applicable surcharges will be claimed and collected separately from the electronic return.
Refer to Fig 4.6 Enter the NPF surcharges amount. If no surcharge is due enter 0.
Employee Information This consists of NPF employee details for NPF Returns.
Figure 4.7 Employee NPF entry screen
If this is the first time you are entering the data, the system will ask if you want to insert records from the employee table.
1. Click on Insert Row button to insert a new row. An Employee Lookup screen will be displayed.
If you choose ‘Yes’, the following screen allows you to select the order in which the records appear in the employee table.
2. Select one or more rows from the Lookup screen. Click on OK to return to the main entry screen.
3. When the Employee NPF screen is displayed, rows that are highlighted and checked indicate that the employee details are incomplete.
A check box is also provided so you can specify all employees with NPF Amount>0 to be displayed. To list all employees for that company, leave the check box unchecked
4. Click on Edit Row button to edit the employee details. An Employee Edit Screen as shown in fig 4.8 will be displayed.
The employee details need to be entered in the Code Maintenance before they can be displayed and selected in the NPF Return.
5. You can now proceed to enter the NPF amounts, if needed. Please refer to Fig 4.8.

User Guide for WEB-CNP Payer System Release 4.2 March 2009
Mauritius Network Services Ltd Page 4-4
The system will only allow the user to save as complete if Empee NPS = Round ( (NPS Insurable Salary * Empee NPS Rate)/100) Emper NPS = Round ( (NPS Insurable Salary * Emper NPS Rate)/100) NSF Amt = Round ( (NSF Insurable Salary * NSF Rate)/100) From Period 200902, NPS Insurable has to equal NSF Insurable Salary and If NSF Rate = 3.5% NSF Amt = Round ( (NSF Ins. Salary * Employer NSF Rate : 2.5)/100) + Round ( (NSF Ins. Salary * Employee NSF Rate : 1)/100) Otherwise NSF Amt = Round ( (NSF Insurable Salary * NSF Rate)/100)
6. The NPS and NSF Insurable Salary for each employee has to be greater than the sum of NPS and NSF amount payable respectively.
Figure 4.8 Edit Employee screen
7. When you click OK in fig 4.8, it will check if the values
entered tally according to the contribution rates of each employee as defined in the system. If not you will get a prompt to inform you. 8. Referring to fig 4.7, you can delete rows by selecting the checkbox on the left of the record and clicking on the Delete Row button. 9. Finally, click on OK to save all information.
Bank Payment Information
This allows the entry of the Payment Instructions to banks for NPF Return.
If Bank Payment Details have been set in the Code Maintenance – Employer screen, clicking on Populate First Row button will populate the Bank, branch and Debit A/c No column of the first payment details record with the values set in Employer Code Maintenance screen. The Debit Date and Debit amount columns for this first record can then be filled.
Figure 4.9 Bank Payment screen
Debit date should not be earlier than today’s date. The system will check if the total debit amount is equal to the total amount payable. A warning message will be displayed if they are not equal. N.B: To remove a payment instruction, clear all fields in the row. For the Bank and Branch fields, choose ‘None’ from the list.
1. Click on the Bank and Branch column where a list of Banks with corresponding Branches is available for selection. Please refer to figure on the left.
2. Next, enter the Debit date. 3. Enter the Debit Account Number.
4. Enter the Debit amount.
5. Click on Insert Row button only when all the five rows have been filled and you want to enter more bank payments. When clicked, an alert will ask for confirmation to save the return as ‘Incomplete’. Click on Ok button to proceed.

User Guide for WEB-CNP Payer System Release 4.2 March 2009
Mauritius Network Services Ltd Page 4-5
PAYE Return
This screen allows the preparation of PAYE return. You can create, edit, delete, send or print PAYE documents using this screen. When PAYE Return option is chosen from the Messaging item from the Main Menu, the neutral page is displayed, as shown as in fig 4.10.
Figure 4.10 PAYE Return – Neutral Mode
Figure 4.11 PAYE Return entry screen
Create a New PAYE Return Steps to create a new document:
1. Refer to Fig. 4.10. Click on New. A screen will display, asking you to enter the Taxable Period as shown in Fig 4.12.
Taxable period should be within the current financial year. The system will also check if the same taxable period has already been entered previously and has not yet been sent.
The above screen displays if you are trying to create a return for the current month. This is to ensure that you are aware what period your current return should be.
Figure 4.12 Taxable period entry screen
2. Enter a valid taxable period in YYYYMM format. Click on
OK to proceed.

User Guide for WEB-CNP Payer System Release 4.2 March 2009
Mauritius Network Services Ltd Page 4-6
3. A new Job Number will be generated, with the completeness status as “Incomplete” and application status as “Create”. The screen is now ready for you to enter the different types of information.
4. To enter/edit PAYE employee information enter the values in
the appropriate fields. 5. The Penalty for Late Payment and Interest on Unpaid Tax
fields are only enabled if payment made is after deadline.
Figure 4.13 PAYE details
If there are any late bank payments, the PAYE penalty field must be greater than 0.
6. To enter/edit bank payment details, refer to section below for detailed steps. The payment type is “Electronic via MNS”.
If you leave out certain information (e.g. Bank Payment), the document will always be saved as an Incomplete document. On the other hand, having entered all the information, you will have an option to save it as an Incomplete or Complete document.
7. After entering all the information. You may choose to Clear or to Save, Send or Print them.
8. Except for the Print option, the screen will return to its Neutral
mode ready for the next operation. Exit will return to the Main Menu.
Bank Payment Information
This allows the entry of the Payment Instructions to banks for PAYE Return.
If Bank Payment Details have been set in the Code Maintenance – Employer screen, clicking on Populate First Row button will populate the Bank, branch and Debit A/c No column of the first payment details record with the values set in Employer Code Maintenance screen. The Debit Date and Debit amount columns for this first record can then be filled.
Figure 4.14 Bank Payment screen

User Guide for WEB-CNP Payer System Release 4.2 March 2009
Mauritius Network Services Ltd Page 4-7
Debit date should not be earlier than today’s date. The system will check if the total debit amount is equal to the total amount payable. A warning message will be displayed if they are not equal. N.B: To remove a payment instruction, clear all fields in the row. For the Bank and Branch fields, choose ‘None’ from the list.
6. Click on the Bank and Branch column where a list of Banks with corresponding Branches is available for selection. Please refer to figure on the left.
7. Next, enter the Debit date. 8. Enter the Debit Account Number.
9. Enter the Debit amount.
10. Click on Insert Row button only when all the five rows have been filled and you want to enter more bank payments. When clicked, an alert will ask for confirmation to save the return as ‘Incomplete’. Click on Ok button to proceed.
User Guide for WEB-CNP Payer System Release 4.2 March 2009
Mauritius Network Services Ltd Page 4-8
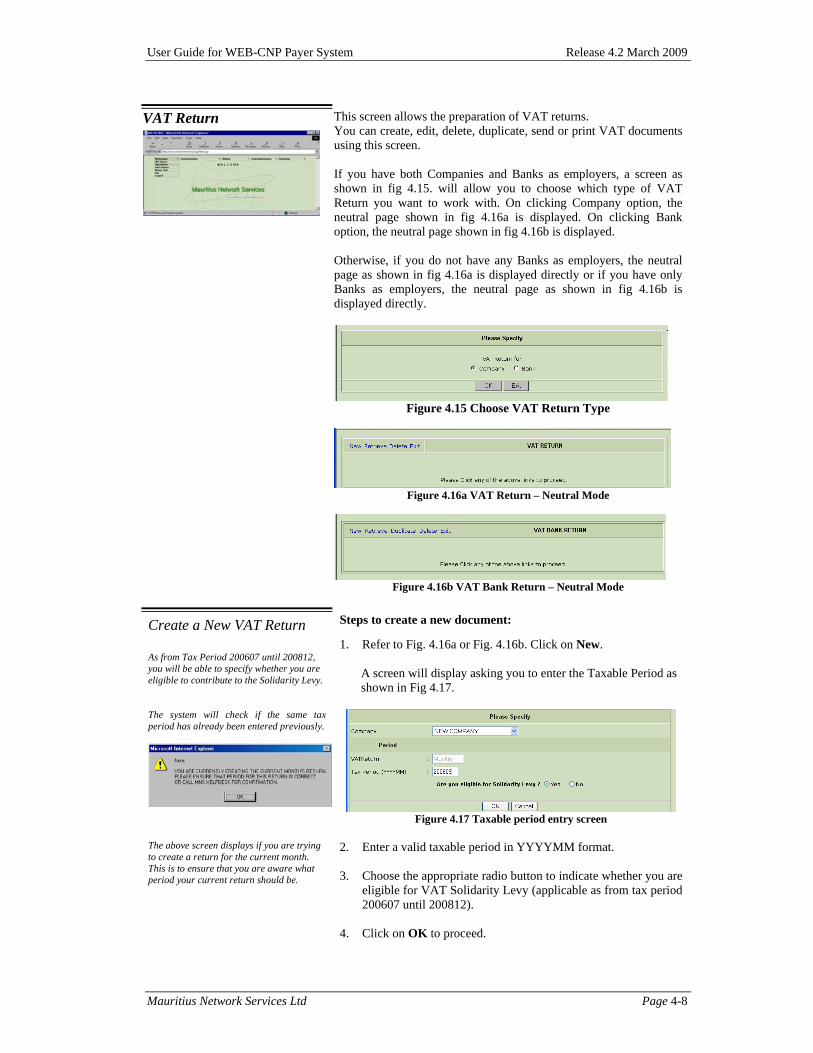
VAT Return
This screen allows the preparation of VAT returns. You can create, edit, delete, duplicate, send or print VAT documents using this screen. If you have both Companies and Banks as employers, a screen as shown in fig 4.15. will allow you to choose which type of VAT Return you want to work with. On clicking Company option, the neutral page shown in fig 4.16a is displayed. On clicking Bank option, the neutral page shown in fig 4.16b is displayed. Otherwise, if you do not have any Banks as employers, the neutral page as shown in fig 4.16a is displayed directly or if you have only Banks as employers, the neutral page as shown in fig 4.16b is displayed directly.
Figure 4.15 Choose VAT Return Type
Figure 4.16a VAT Return – Neutral Mode
Figure 4.16b VAT Bank Return – Neutral Mode
Create a New VAT Return Steps to create a new document:
As from Tax Period 200607 until 200812, you will be able to specify whether you are eligible to contribute to the Solidarity Levy.
1. Refer to Fig. 4.16a or Fig. 4.16b. Click on New.
A screen will display asking you to enter the Taxable Period as shown in Fig 4.17.
The system will check if the same tax period has already been entered previously.
Figure 4.17 Taxable period entry screen
The above screen displays if you are trying to create a return for the current month. This is to ensure that you are aware what period your current return should be.
2. Enter a valid taxable period in YYYYMM format. 3. Choose the appropriate radio button to indicate whether you are
eligible for VAT Solidarity Levy (applicable as from tax period 200607 until 200812).
4. Click on OK to proceed.

User Guide for WEB-CNP Payer System Release 4.2 March 2009
Mauritius Network Services Ltd Page 4-9
5. You will notice that a new Job Number has been generated, with the completeness status as “Incomplete” and application status as “Create” – refer to Fig 4.18a/b. The screen is now ready for you to enter the different types of information. Depending on the employer type the respective VAT return will be available.
Figure 4.18a VAT return entry screen
Figure 4.18b VAT Bank return entry screen
6. To enter/edit VAT Bank information refer to page 4-11 for
detailed steps. 7. To enter/edit VAT information refer to page 4-12, 4-13 & 4-14
for detailed steps.
8. To enter/edit bank payment details refer to page 4-15 for detailed steps.
9. The payment type (if required) is set to “Electronic via MNS”.
If you have left out certain information (e.g. Bank Payment), the document will always be saved as an Incomplete document. On the other hand, having entered all the information, you will have an option to save it as an Incomplete or Complete document.
10. After entering all the information. You may choose to Clear or to Save them.
11. In both cases, the screen will return to its Neutral mode ready
for the next operation.
Entering VAT Bank information
VAT Bank Output
The VAT Bank return is divided into VAT Output, VAT Input and VAT Account sections. Each of these sections consists of different items. Each item may have a Value, VAT or both amounts.
Figure 4.19 VAT Bank Output entry screen
1.1 Zero supplies Enter values 0 or greater.
User Guide for WEB-CNP Payer System Release 4.2 March 2009
Mauritius Network Services Ltd Page 4-10
1.2 To exempt bodies or persons Enter values 0 or greater.
1.3 Services in respect of
1.3.1 Payments by credit and debit cards
Enter values 0 or greater. The system will verify the VAT amount against the Payments by credit and debit cards. Will prompt user if VAT amount is not correct. Refer to Fig 4.23.
1.3.2 Safe deposits lockers
Enter values 0 or greater. The system will verify the VAT amount against the Safe deposit lockers. Will prompt user if VAT amount is not correct. Refer to Fig 4.23.
1.3.3 Issue and renewal of credit cards and debit cards
Enter values 0 or greater. The system will verify the VAT amount against the Issue and renewal of credit cards and debit cards. Will prompt user if VAT amount is not correct. Refer to Fig 4.23.
1.4 Other taxable supplies
Enter value 0 or greater. The system will verify the VAT amount against the Other taxable supplies. Will prompt user if VAT amount is not correct. Refer to Fig 4.23.
2. Exempt supplies
Enter values 0 or greater.
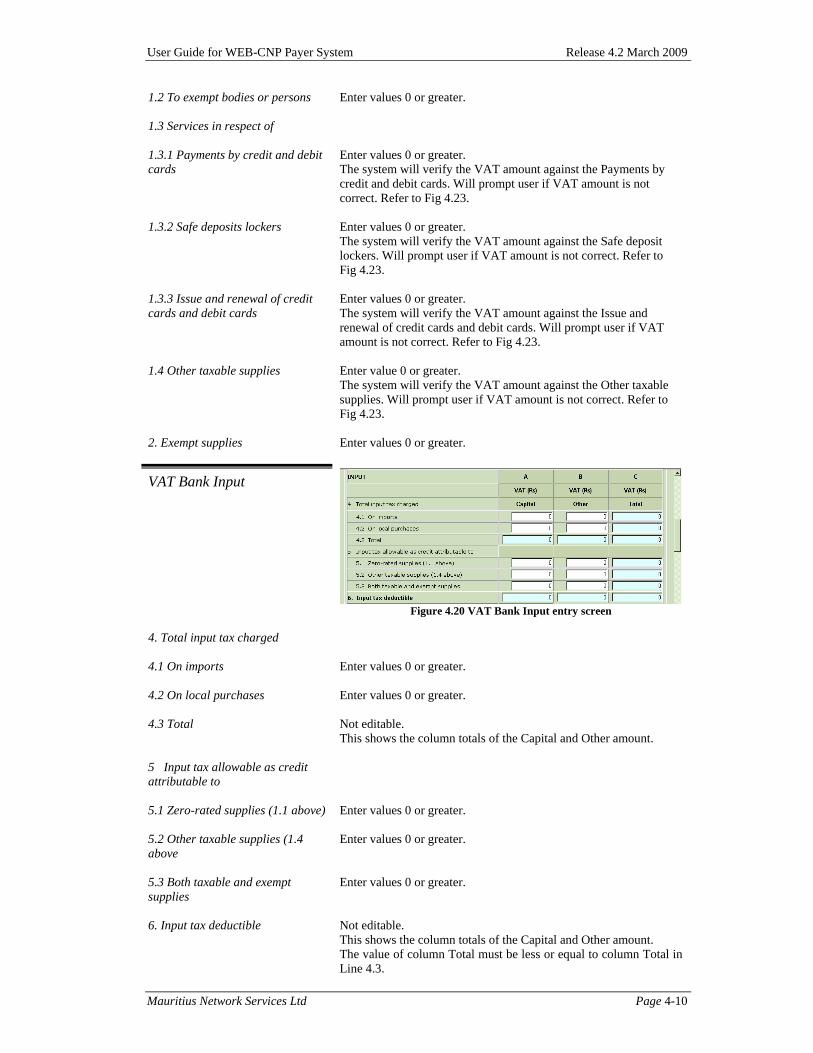
VAT Bank Input
Figure 4.20 VAT Bank Input entry screen
4. Total input tax charged
4.1 On imports Enter values 0 or greater.
4.2 On local purchases Enter values 0 or greater.
4.3 Total
Not editable. This shows the column totals of the Capital and Other amount.
5 Input tax allowable as credit attributable to
5.1 Zero-rated supplies (1.1 above) Enter values 0 or greater.
5.2 Other taxable supplies (1.4 above
Enter values 0 or greater.
5.3 Both taxable and exempt supplies
Enter values 0 or greater.
6. Input tax deductible
Not editable. This shows the column totals of the Capital and Other amount. The value of column Total must be less or equal to column Total in Line 4.3.
User Guide for WEB-CNP Payer System Release 4.2 March 2009
Mauritius Network Services Ltd Page 4-11
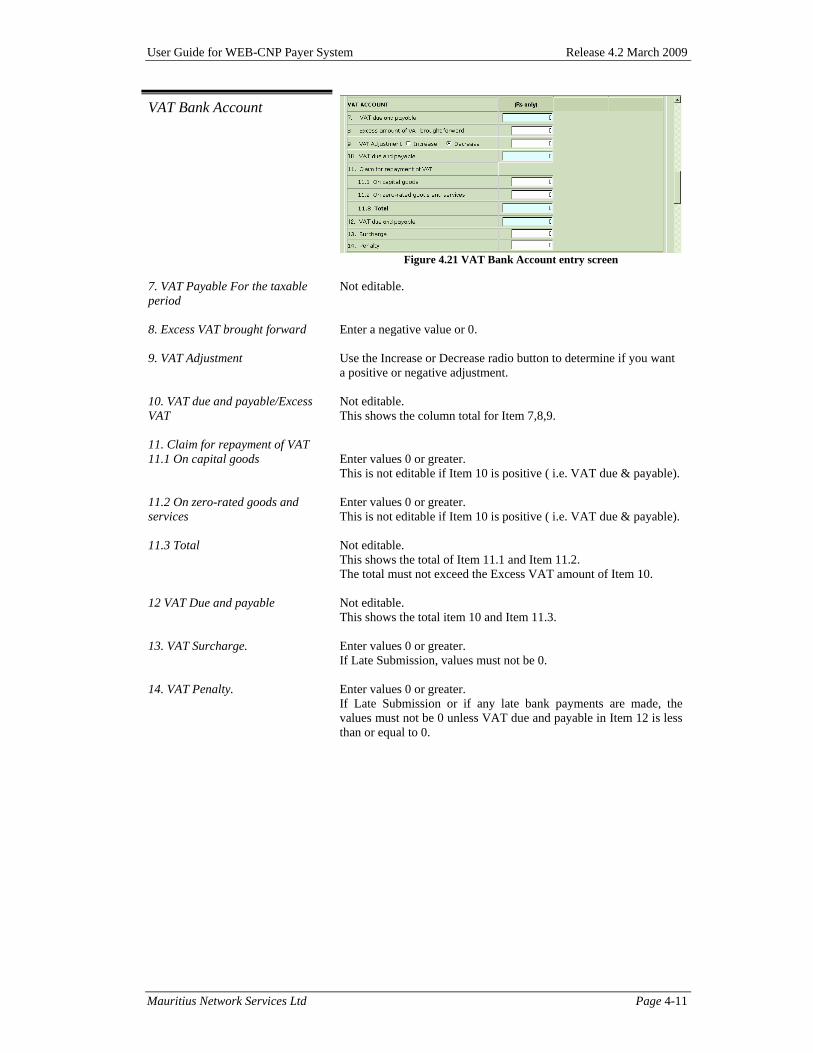
VAT Bank Account
Figure 4.21 VAT Bank Account entry screen
7. VAT Payable For the taxable period
Not editable.
8. Excess VAT brought forward Enter a negative value or 0.
9. VAT Adjustment Use the Increase or Decrease radio button to determine if you want a positive or negative adjustment.
10. VAT due and payable/Excess VAT
Not editable. This shows the column total for Item 7,8,9.
11. Claim for repayment of VAT 11.1 On capital goods Enter values 0 or greater.
This is not editable if Item 10 is positive ( i.e. VAT due & payable).
11.2 On zero-rated goods and services
Enter values 0 or greater. This is not editable if Item 10 is positive ( i.e. VAT due & payable).
11.3 Total Not editable. This shows the total of Item 11.1 and Item 11.2. The total must not exceed the Excess VAT amount of Item 10.
12 VAT Due and payable Not editable. This shows the total item 10 and Item 11.3.
13. VAT Surcharge. Enter values 0 or greater. If Late Submission, values must not be 0.
14. VAT Penalty. Enter values 0 or greater. If Late Submission or if any late bank payments are made, the values must not be 0 unless VAT due and payable in Item 12 is less than or equal to 0.
User Guide for WEB-CNP Payer System Release 4.2 March 2009
Mauritius Network Services Ltd Page 4-12
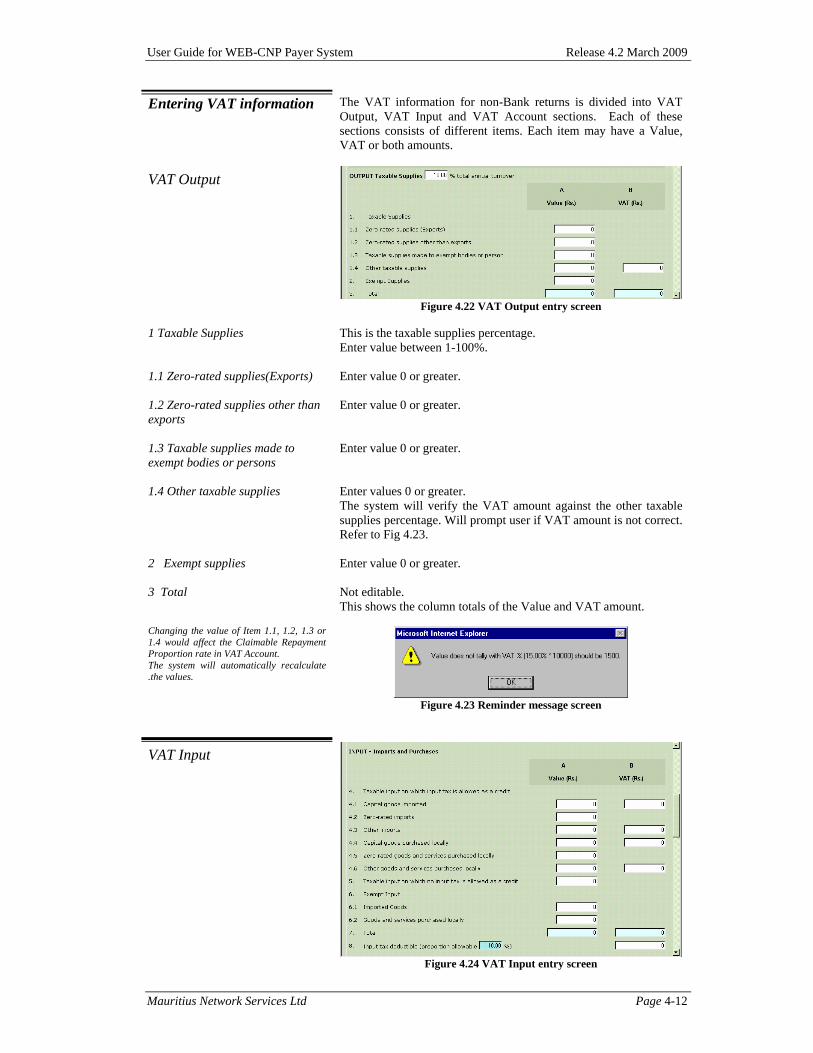
Entering VAT information The VAT information for non-Bank returns is divided into VAT Output, VAT Input and VAT Account sections. Each of these sections consists of different items. Each item may have a Value, VAT or both amounts.
VAT Output
Figure 4.22 VAT Output entry screen
1 Taxable Supplies This is the taxable supplies percentage.
Enter value between 1-100%.
1.1 Zero-rated supplies(Exports) Enter value 0 or greater.
1.2 Zero-rated supplies other than exports
Enter value 0 or greater.
1.3 Taxable supplies made to exempt bodies or persons
Enter value 0 or greater.
1.4 Other taxable supplies Enter values 0 or greater. The system will verify the VAT amount against the other taxable supplies percentage. Will prompt user if VAT amount is not correct. Refer to Fig 4.23.
2 Exempt supplies Enter value 0 or greater.
3 Total Not editable. This shows the column totals of the Value and VAT amount.
Changing the value of Item 1.1, 1.2, 1.3 or 1.4 would affect the Claimable Repayment Proportion rate in VAT Account. The system will automatically recalculate .the values.
Figure 4.23 Reminder message screen
VAT Input
Figure 4.24 VAT Input entry screen
User Guide for WEB-CNP Payer System Release 4.2 March 2009
Mauritius Network Services Ltd Page 4-13
4.1 Capital goods imported Enter values 0 or greater. The system will verify the VAT amount against the Capital goods imported percentage. It will also prompt a message if VAT amount is not correct. Refer to Fig 4.23.
4.2 Zero-rated Imports Enter values 0 or greater.
4.3 Other imports Enter values 0 or greater. The system will verify the VAT amount against the Other imports percentage. It will also prompt a message if VAT amount is not correct. Refer to Fig 4.23.
4.4 Capital goods purchased locally.
Enter values 0 or greater. The system will verify the VAT amount against the Capital goods purchased locally percentage. It will also prompt a message if VAT amount is not correct. Refer to Fig 4.23.
4.5 Zero-rated goods and services purchased locally.
Enter values 0 or greater.
4.6 Other goods and services purchased locally.
Enter values 0 or greater. The system will verify the VAT amount against the Other goods and services purchased locally percentage. It will also prompt a message if VAT amount is not correct. Refer to Fig 4.23.
5. Taxable input on which no input tax is allowed as a credit.
Enter values 0 or greater.
6.1 Imported Goods Enter values 0 or greater.
6.2 Goods and services purchased locally.
Enter values 0 or greater.
7. Total Not editable. This shows the column totals of the Value and VAT amount.
Proportion allowable percentage This is the same as the taxable supplies percentage in the VAT Output.
8. Input tax deductible This is not editable if the Proportion allowable percentage is 100%. In other case, the value can be changed to up to the VAT amount of Item 7.
Changing the value of Item 4.1, 4.3, 4.4 or 4.6 will affect the Items in the VAT Account screen. The system will automatically recalculate the values
User Guide for WEB-CNP Payer System Release 4.2 March 2009
Mauritius Network Services Ltd Page 4-14
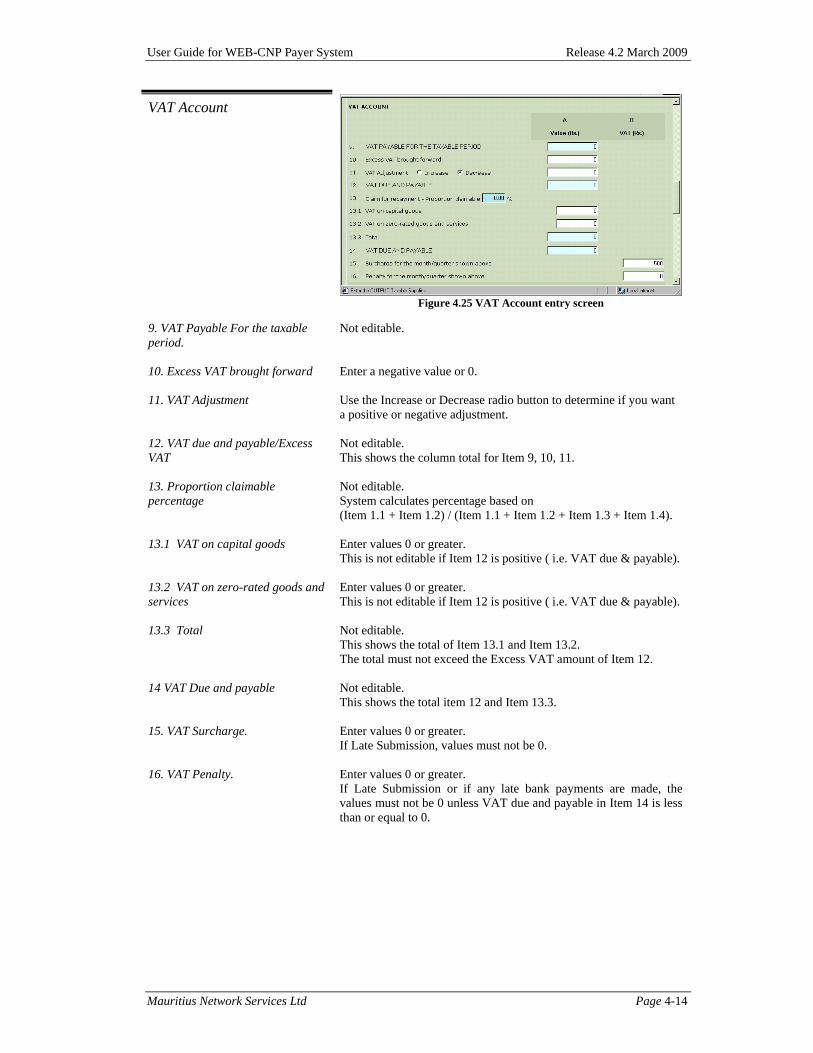
VAT Account
Figure 4.25 VAT Account entry screen
9. VAT Payable For the taxable period.
Not editable.
10. Excess VAT brought forward Enter a negative value or 0.
11. VAT Adjustment Use the Increase or Decrease radio button to determine if you want a positive or negative adjustment.
12. VAT due and payable/Excess VAT
Not editable. This shows the column total for Item 9, 10, 11.
13. Proportion claimable percentage
Not editable. System calculates percentage based on (Item 1.1 + Item 1.2) / (Item 1.1 + Item 1.2 + Item 1.3 + Item 1.4).
13.1 VAT on capital goods Enter values 0 or greater. This is not editable if Item 12 is positive ( i.e. VAT due & payable).
13.2 VAT on zero-rated goods and services
Enter values 0 or greater. This is not editable if Item 12 is positive ( i.e. VAT due & payable).
13.3 Total Not editable. This shows the total of Item 13.1 and Item 13.2. The total must not exceed the Excess VAT amount of Item 12.
14 VAT Due and payable Not editable. This shows the total item 12 and Item 13.3.
15. VAT Surcharge. Enter values 0 or greater. If Late Submission, values must not be 0.
16. VAT Penalty. Enter values 0 or greater. If Late Submission or if any late bank payments are made, the values must not be 0 unless VAT due and payable in Item 14 is less than or equal to 0.
User Guide for WEB-CNP Payer System Release 4.2 March 2009
Mauritius Network Services Ltd Page 4-15
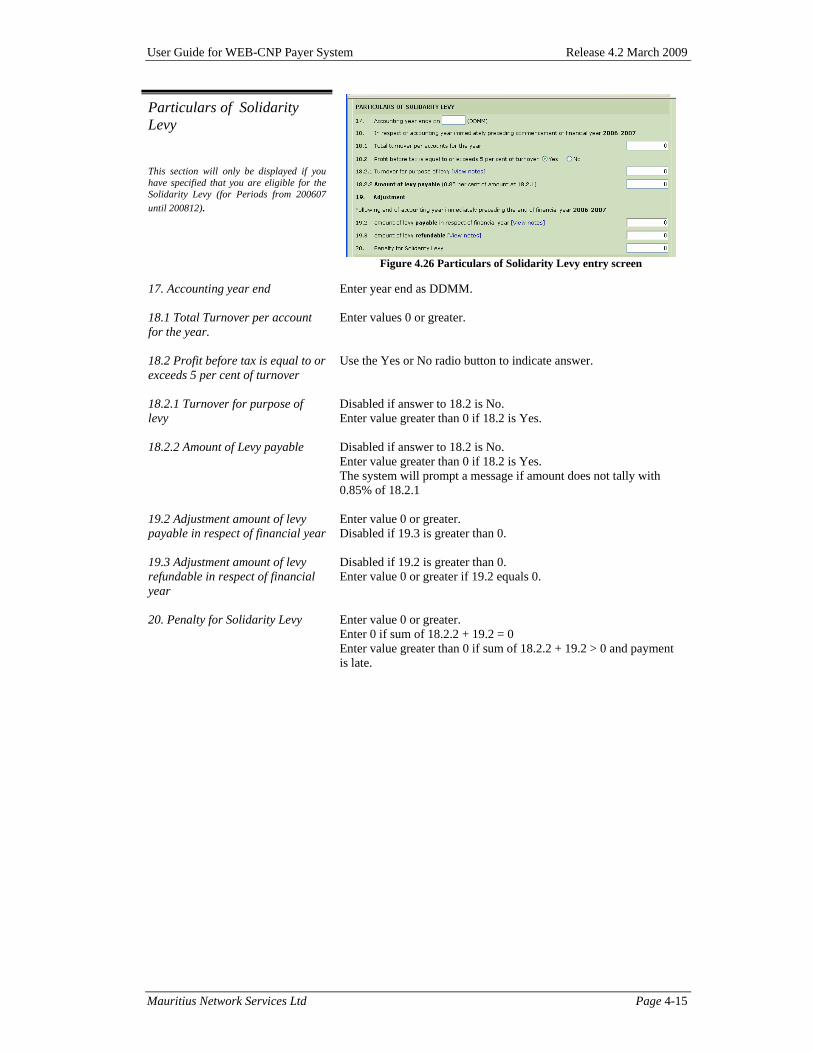
Particulars of Solidarity Levy
This section will only be displayed if you have specified that you are eligible for the Solidarity Levy (for Periods from 200607 until 200812).
Figure 4.26 Particulars of Solidarity Levy entry screen
17. Accounting year end Enter year end as DDMM.
18.1 Total Turnover per account for the year.
Enter values 0 or greater.
18.2 Profit before tax is equal to or exceeds 5 per cent of turnover
Use the Yes or No radio button to indicate answer.
18.2.1 Turnover for purpose of levy
Disabled if answer to 18.2 is No. Enter value greater than 0 if 18.2 is Yes.
18.2.2 Amount of Levy payable Disabled if answer to 18.2 is No. Enter value greater than 0 if 18.2 is Yes. The system will prompt a message if amount does not tally with 0.85% of 18.2.1
19.2 Adjustment amount of levy payable in respect of financial year
Enter value 0 or greater. Disabled if 19.3 is greater than 0.
19.3 Adjustment amount of levy refundable in respect of financial year
Disabled if 19.2 is greater than 0. Enter value 0 or greater if 19.2 equals 0.
20. Penalty for Solidarity Levy Enter value 0 or greater. Enter 0 if sum of 18.2.2 + 19.2 = 0 Enter value greater than 0 if sum of 18.2.2 + 19.2 > 0 and payment is late.
User Guide for WEB-CNP Payer System Release 4.2 March 2009
Mauritius Network Services Ltd Page 4-16
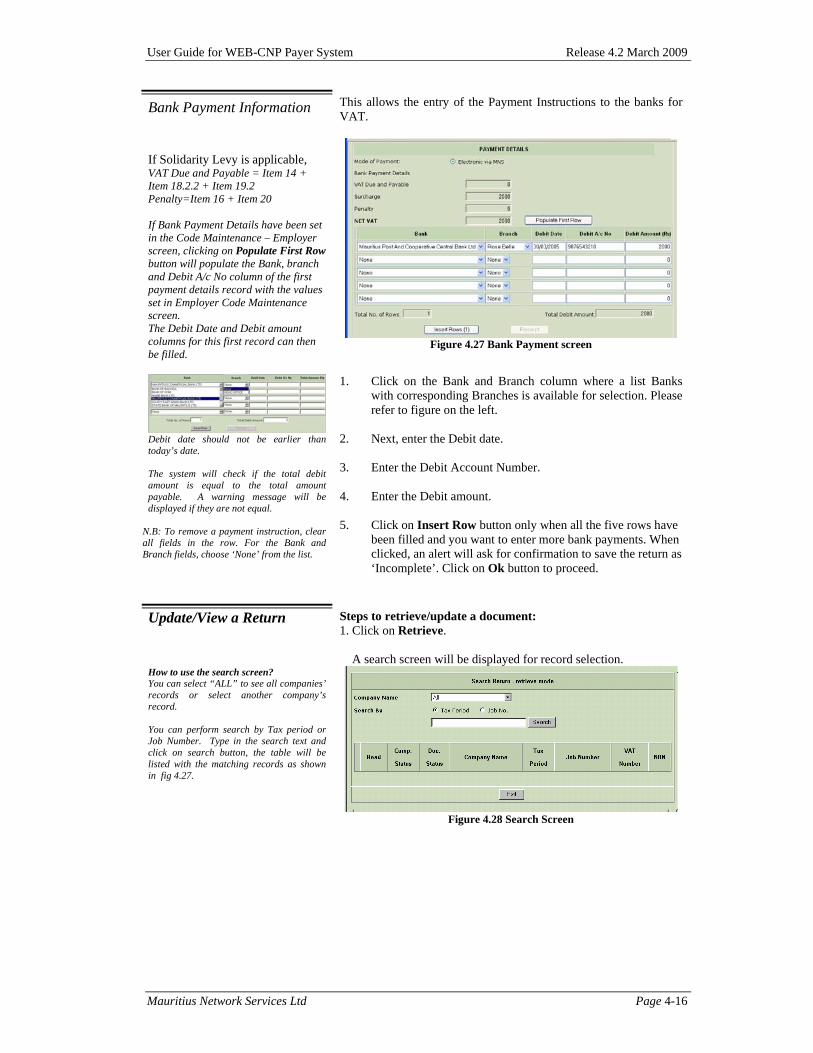
Bank Payment Information
This allows the entry of the Payment Instructions to the banks for VAT.
If Solidarity Levy is applicable, VAT Due and Payable = Item 14 + Item 18.2.2 + Item 19.2 Penalty=Item 16 + Item 20 If Bank Payment Details have been set in the Code Maintenance – Employer screen, clicking on Populate First Row button will populate the Bank, branch and Debit A/c No column of the first payment details record with the values set in Employer Code Maintenance screen. The Debit Date and Debit amount columns for this first record can then be filled.
Figure 4.27 Bank Payment screen
Debit date should not be earlier than today’s date. The system will check if the total debit amount is equal to the total amount payable. A warning message will be displayed if they are not equal.
N.B: To remove a payment instruction, clear all fields in the row. For the Bank and Branch fields, choose ‘None’ from the list.
1. Click on the Bank and Branch column where a list Banks with corresponding Branches is available for selection. Please refer to figure on the left.
2. Next, enter the Debit date.
3. Enter the Debit Account Number. 4. Enter the Debit amount. 5. Click on Insert Row button only when all the five rows have
been filled and you want to enter more bank payments. When clicked, an alert will ask for confirmation to save the return as ‘Incomplete’. Click on Ok button to proceed.
Update/View a Return
Steps to retrieve/update a document: 1. Click on Retrieve. A search screen will be displayed for record selection.
How to use the search screen? You can select “ALL” to see all companies’ records or select another company’s record. You can perform search by Tax period or Job Number. Type in the search text and click on search button, the table will be listed with the matching records as shown in fig 4.27.
Figure 4.28 Search Screen
User Guide for WEB-CNP Payer System Release 4.2 March 2009
Mauritius Network Services Ltd Page 4-17
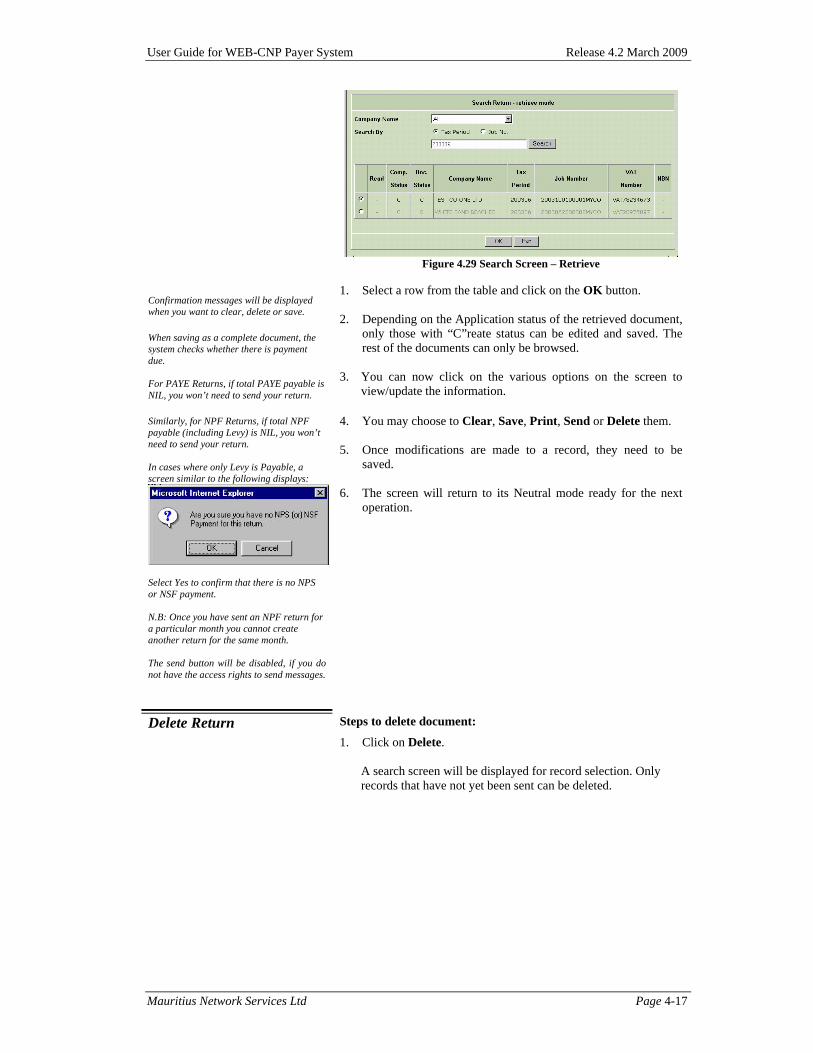
Figure 4.29 Search Screen – Retrieve
1. Select a row from the table and click on the OK button. 2. Depending on the Application status of the retrieved document,
only those with “C”reate status can be edited and saved. The rest of the documents can only be browsed.
3. You can now click on the various options on the screen to
view/update the information.
Confirmation messages will be displayed when you want to clear, delete or save. When saving as a complete document, the system checks whether there is payment due. For PAYE Returns, if total PAYE payable is NIL, you won’t need to send your return. Similarly, for NPF Returns, if total NPF payable (including Levy) is NIL, you won’t need to send your return. In cases where only Levy is Payable, a screen similar to the following displays:
Select Yes to confirm that there is no NPS or NSF payment. N.B: Once you have sent an NPF return for a particular month you cannot create another return for the same month. The send button will be disabled, if you do not have the access rights to send messages.
4. You may choose to Clear, Save, Print, Send or Delete them. 5. Once modifications are made to a record, they need to be
saved. 6. The screen will return to its Neutral mode ready for the next
operation.
Delete Return Steps to delete document:
1. Click on Delete. A search screen will be displayed for record selection. Only records that have not yet been sent can be deleted.

User Guide for WEB-CNP Payer System Release 4.2 March 2009
Mauritius Network Services Ltd Page 4-18
How to use the search screen? You can select ‘All’ to see all companies’ records or select a company’s record. You can perform search by Tax period or Job Number. Type in the search text and on click of search button a table will be listed with the matching records as shown in fig 4.30. To select/deselect all records, click on the check box on the left of the Read column.
Figure 4.30 Search Screen –Delete
Figure 4.31 Search Screen –Delete
2. Select one or more rows from the table by checking the check
box on the left of the record(s) to be deleted and click on the OK button.
3. A message will be displayed to confirm deletion of the selected
records. Click on OK to confirm.
4. The screen will return to its Neutral mode ready for the next operation.
Duplicate a Return Steps to duplicate a document:
1. Click on Duplicate.
A search screen will be displayed for record selection.
How to use the search screen? You can select ‘ALL’ to see all companies’ records or select another company’s record. You can perform search by Tax period or Job Number. Type in the search text and the table will be listed with the matching records as shown in fig 4.30.
Figure 4.32 Search screen – Duplicate
2. Select a row from the table and click on the OK button.
3. A screen will be displayed asking you to enter the Taxable
Period. You can refer to Fig 4.5.
User Guide for WEB-CNP Payer System Release 4.2 March 2009
Mauritius Network Services Ltd Page 4-19
For NPF, PAYE and VAT Company Returns, with the new formats, duplicate function has been removed. Duplicate option is available for VAT Bank Returns only.
4. The screen will return to editing mode, ready for you to enter
information. 5. After entering, you can save, print, send, and clear or exit the
screen.

User Guide for WEB-CNP Payer System Release 4.2 March 2009
Mauritius Network Services Ltd Page 4-20
Memo Text
This option allows the preparation of Memo Text to be sent to government departments within the CNP System as well as the reading of memo text received from those departments . You can create, edit, delete, send or print Memo Text using this screen. On clicking Memo Text Return option from the Messaging item from the Main Menu the following page is shown as in fig 4.33
Figure 4.33 Memo Text – Neutral Mode
The Memo Text enables you:
• To read a memo from the VAT, PAYE, NPF, LTP departments and MNS.
• To create and send a memo text to NPF, VAT, PAYE or LTP departments for any queries or clarifications regarding the submission of Returns.
Note : The “Receive Acknowledgment/Receipt Messages” option in the Communication Menu will invoke the retrieving process of the Memo Text.
When a Memo Text is received, the application will inform you in the following way: 1. On WEB-CNP Payer System login; when you login to WEB-
CNP Payer System, the system will inform you that you have unread Memo Text. Please refer to Fig 4.34 below.
Figure 4.34 Unread Messages alert
2. If you click on OK button, the system will invoke the Memo Text screen for you to read the Memo.
Create a NEW Memo Text Steps to create a new document:
1. Refer to fig 4.33. Click on New. 2. Fill in the Memo Text. If the Memo text is ready for sending,
remember to tick the Complete checkbox. Please refer to Fig 4.35.
Figure 4.35 Memo Text entry screen

User Guide for WEB-CNP Payer System Release 4.2 March 2009
Mauritius Network Services Ltd Page 4-21
1. After entering data, you may choose to Clear, Save, Send or Print.
2. In all cases, the screen will return to Neutral mode ready for the
next operation.
Update/View a Memo Text document
Steps to retrieve/update a document:
1. Refer to fig 4.33. Click on Retrieve. 2. A search screen displays for record selection.
How to use the search screen? You can perform search by Job Number, Subject, Sender, Recipient, From and To Date. Type in the search text in the appropriate fields and on clicking search button a table will be listed with the matching records as shown in fig 4.37 .
Figure 4.36 Search screen – Retrieve
3. Select a row from the table and click on the OK button.
Confirmation messages will be displayed when you want to clear, delete or save.
4. Depending on the status of the retrieved record, you may choose to Clear, Save, Print, Send or Delete the retrieved record.
5. The screen will return to its Neutral mode ready for the next operation.
Delete Memo Text document Steps to delete one or more memo text:
1. Refer to fig 4.33. Click on Delete. 2. A search screen will be displayed for record selection.
How to use the search screen? You can perform search by Job Number, Subject, Sender, Recipient, From and To Date. Type in the search text in the appropriate fields and on clicking the search button a table will be listed with the matching records as shown in fig 4.38.
Figure 4.37 Search Screen – Delete 3. Select one or more rows from the table and click on the OK
button. 4. A confirmation message will display to confirm the deletion of
the selected records. 5. The screen will return to its Neutral mode ready for the next
operation.
User Guide for WEB-CNP Payer System Release 4.2 March 2009
Mauritius Network Services Ltd Page 5-1
Chapter 5 Communication
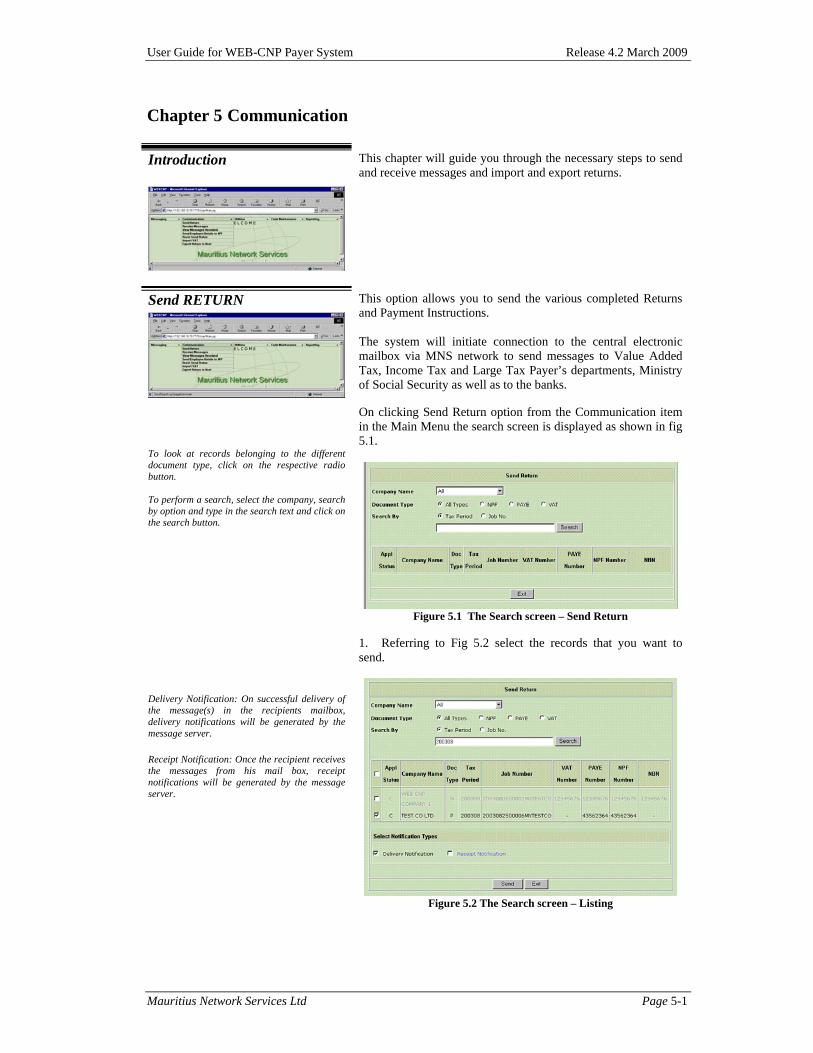
Introduction
This chapter will guide you through the necessary steps to send and receive messages and import and export returns.
Send RETURN
This option allows you to send the various completed Returns and Payment Instructions. The system will initiate connection to the central electronic mailbox via MNS network to send messages to Value Added Tax, Income Tax and Large Tax Payer’s departments, Ministry of Social Security as well as to the banks.
To look at records belonging to the different document type, click on the respective radio button. To perform a search, select the company, search by option and type in the search text and click on the search button.
On clicking Send Return option from the Communication item in the Main Menu the search screen is displayed as shown in fig 5.1.
Figure 5.1 The Search screen – Send Return
1. Referring to Fig 5.2 select the records that you want to
send.
Delivery Notification: On successful delivery of the message(s) in the recipients mailbox, delivery notifications will be generated by the message server. Receipt Notification: Once the recipient receives the messages from his mail box, receipt notifications will be generated by the message server.
Figure 5.2 The Search screen – Listing

User Guide for WEB-CNP Payer System Release 4.2 March 2009
Mauritius Network Services Ltd Page 5-2
2. Check the Delivery Notification and Receipt Notification if required. 3. Click on the OK button. 4. The Message Send Status Screen is displayed as shown in fig 5.3.
Figure 5.3 Message Send Status Screen
Receive Messages
This option allows you to retrieve all messages from the mailbox. These messages include Acknowledgements and Receipts from VAT, Income Tax, LTP and NPF departments and the delivery/receipt/non-delivery/non-receipt notifications for the Returns and Payment Instructions as well as Memo Text messages.
Figure 5.3 Result of receive process
1. The messages received are displayed in the screen. Click on
the Exit button to go to Main Menu. Please refer to Fig 5.3.
3. You can view any Acknowledgment or Receipt details received by retrieving your Return and clicking on the corresponding button. Note that Receipt details may also be printed.
4. Information on messages received can also be viewed in
Communication – View Messages Received (except for MEMOTEXT) or in Report – Messages Received.
User Guide for WEB-CNP Payer System Release 4.2 March 2009
Mauritius Network Services Ltd Page 5-3
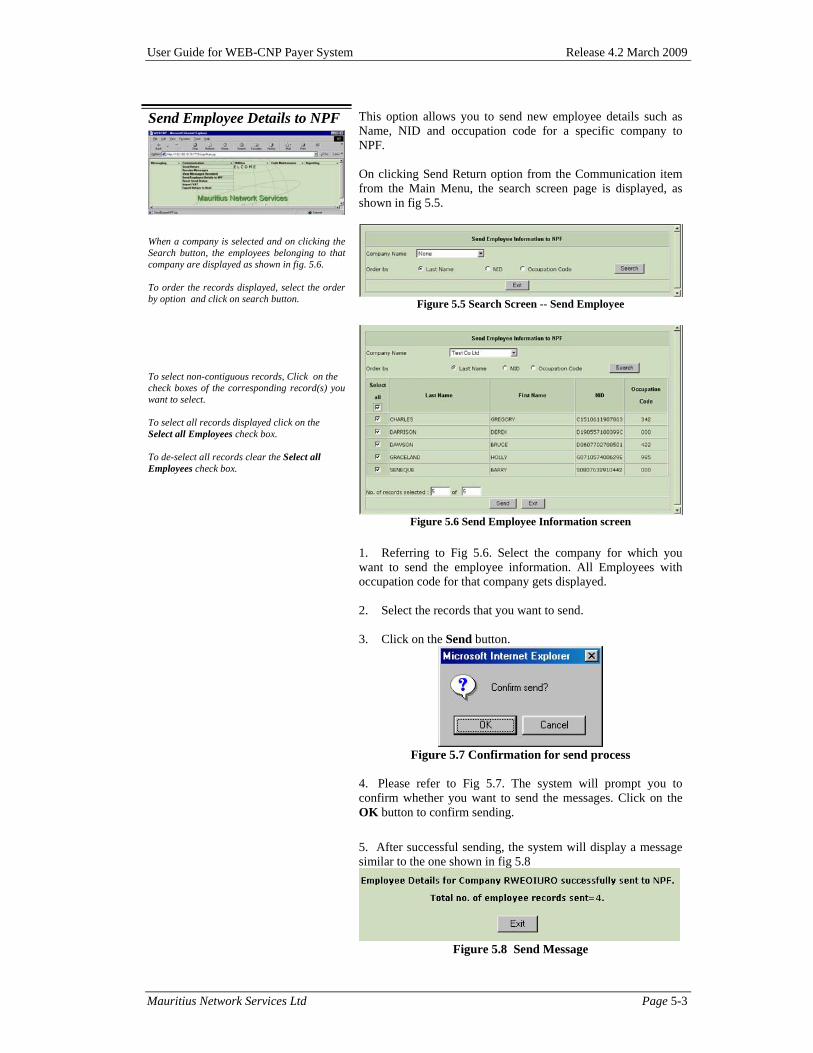
Send Employee Details to NPF
This option allows you to send new employee details such as Name, NID and occupation code for a specific company to NPF. On clicking Send Return option from the Communication item from the Main Menu, the search screen page is displayed, as shown in fig 5.5.
When a company is selected and on clicking the Search button, the employees belonging to that company are displayed as shown in fig. 5.6. To order the records displayed, select the order by option and click on search button.
Figure 5.5 Search Screen -- Send Employee
To select non-contiguous records, Click on the check boxes of the corresponding record(s) you want to select. To select all records displayed click on the Select all Employees check box. To de-select all records clear the Select all Employees check box.
Figure 5.6 Send Employee Information screen
1. Referring to Fig 5.6. Select the company for which you
want to send the employee information. All Employees with occupation code for that company gets displayed. 2. Select the records that you want to send. 3. Click on the Send button.
Figure 5.7 Confirmation for send process
4. Please refer to Fig 5.7. The system will prompt you to
confirm whether you want to send the messages. Click on the OK button to confirm sending.
5. After successful sending, the system will display a message similar to the one shown in fig 5.8
Figure 5.8 Send Message
User Guide for WEB-CNP Payer System Release 4.2 March 2009
Mauritius Network Services Ltd Page 5-4
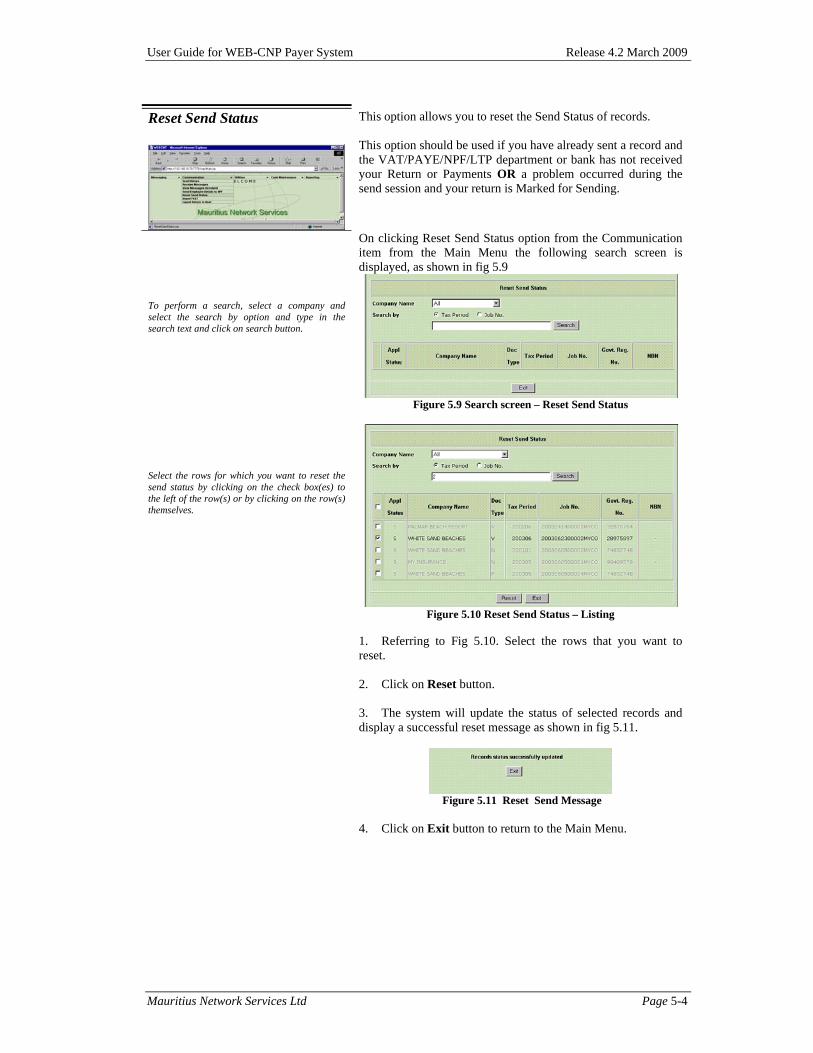
Reset Send Status
This option allows you to reset the Send Status of records. This option should be used if you have already sent a record and the VAT/PAYE/NPF/LTP department or bank has not received your Return or Payments OR a problem occurred during the send session and your return is Marked for Sending.
To perform a search, select a company and select the search by option and type in the search text and click on search button.
On clicking Reset Send Status option from the Communication item from the Main Menu the following search screen is displayed, as shown in fig 5.9
Figure 5.9 Search screen – Reset Send Status
Select the rows for which you want to reset the send status by clicking on the check box(es) to the left of the row(s) or by clicking on the row(s) themselves.
Figure 5.10 Reset Send Status – Listing
1. Referring to Fig 5.10. Select the rows that you want to
reset. 2. Click on Reset button. 3. The system will update the status of selected records and display a successful reset message as shown in fig 5.11.
Figure 5.11 Reset Send Message
4. Click on Exit button to return to the Main Menu.

User Guide for WEB-CNP Payer System Release 4.2 March 2009
Mauritius Network Services Ltd Page 5-5
Import VAT
This option allows the import of VAT (non-VAT Bank) returns into the WEB-CNP Payer System. For import to be successfully processed, the data file must be of the correct format. Refer to Appendix D for the format of the import file.
Figure 5.12 Import VAT Return
Solidarity Levy information is not included in the import VAT utility. If no error has occurred you will be returned to the Main Menu. Otherwise you will be notified that import has been unsuccessful with the error message. Refer to the Error Log option in the Report Menu to find out more about this.
1. If you know the import filename, you can type it in or click
on the Browse… button and select the file from the file browser.
Note that only files with a ‘.txt’ extension can be selected. 2. Click on Import button.
3. The system will read the import file and update the database.
User Guide for WEB-CNP Payer System Release 4.2 March 2009
Mauritius Network Services Ltd Page 5-6
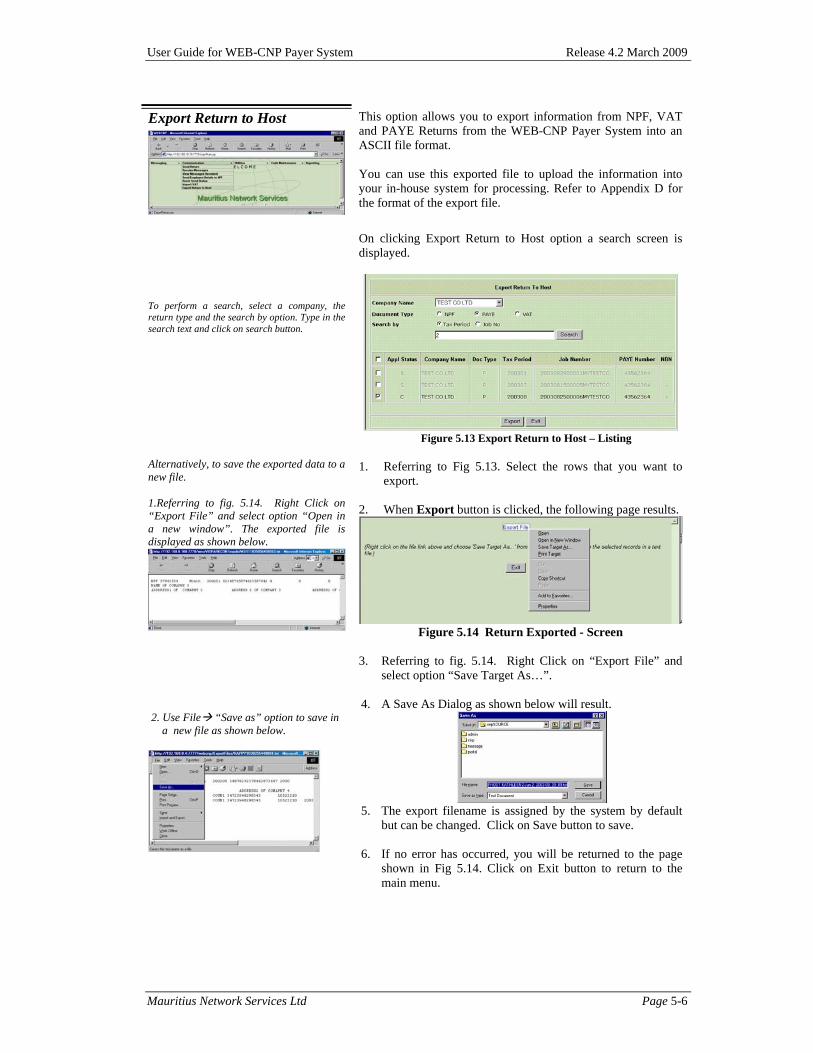
Export Return to Host
This option allows you to export information from NPF, VAT and PAYE Returns from the WEB-CNP Payer System into an ASCII file format. You can use this exported file to upload the information into your in-house system for processing. Refer to Appendix D for the format of the export file.
To perform a search, select a company, the return type and the search by option. Type in the search text and click on search button.
On clicking Export Return to Host option a search screen is displayed.
Figure 5.13 Export Return to Host – Listing
Alternatively, to save the exported data to a new file. 1.Referring to fig. 5.14. Right Click on “Export File” and select option “Open in a new window”. The exported file is displayed as shown below.
1. Referring to Fig 5.13. Select the rows that you want to
export. 2. When Export button is clicked, the following page results.
Figure 5.14 Return Exported - Screen
3. Referring to fig. 5.14. Right Click on “Export File” and
select option “Save Target As…”. 4. A Save As Dialog as shown below will result.
2. Use File “Save as” option to save in a new file as shown below.
5. The export filename is assigned by the system by default
but can be changed. Click on Save button to save. 6. If no error has occurred, you will be returned to the page
shown in Fig 5.14. Click on Exit button to return to the main menu.

User Guide for WEB-CNP Payer System Release 4.2 March 2009
Mauritius Network Services Ltd Page 5-7
View Messages Received
This option allows you view messages received from the various government departments except for MEMOTXT. This information can also be obtained from the Report – Messages Received.
To perform a search, select a message type and From Date and To Date and click on search button.
1. On clicking View Messages option from the Communication item from the Main Menu the following search screen is displayed.
Figure 5.15 Search Screen
2. Select the Message Type to view and enter the range of
date for which you wish to view received messages. 3. Click on Search button,
4. Records matching your search criteria will be listed.
Figure 5.16 Message Download– Listing
5. For Message Files appearing in blue, you may click on the
Message File link to view the message received. Please refer to Fig 5.16.
6. A downloaded message appears as shown in the left.

User Guide for WEB-CNP Payer System Release 4.2 March 2009
Mauritius Network Services Ltd Page 6-1
Chapter 6 Utilities
Introduction
This chapter will guide you through the necessary steps to manage the user login ids, maintain system settings as well as import employee details and reset return entry status.
User maintenance
This option allows the Administrative user (AD) to manage the profile of General users (GE) of the WEB-CNP Payer System. All users will be created by MNS. Although GE can view their access to menu items and companies if given the access rights, only an AD is allowed to update a user profile.
Updating a user profile 1. If a user of type ‘AD’ (Administrator)
logs in, the user will be given rights to update user profiles.
2. If a user of type ‘GE’ (General User) logs in, the profile for the user will be shown. No changes can be made in the access rights lists.
Figure 6.1 User Maintenance main screen
1. Click on Retrieve to continue. 2. Select a row in the user List. Please refer to Fig 6.2.
Figure 6.2 User list
3. Click on Retrieve button 4. The following screen (Fig 6.3) appears. The Menu Items
button and Companies button are enabled.
Figure 6.3 Access Rights buttons

User Guide for WEB-CNP Payer System Release 4.2 March 2009
Mauritius Network Services Ltd Page 6-2
Giving user access rights 1. Click on the Menu Items button. A table showing all the available menu items in the WEB-CNP System is displayed. All the access rights check boxes are initially unchecked. Please refer to Fig 6.4.
2. To change the access rights for a particular item, click on the row’s check box. The check box will change from unchecked to checked and vice-versa.
3. After making the necessary changes, click on the Save button or else no rights would be given to the user.
To select all rights, click on the Check All option under the Rights column header. Giving Menu Items access rights to the user means that the user can activate the particular program from the main menu. If the user has no access rights to the item, it does not display in the Main Menu.
Figure 6.4 Menu Items Access Rights screen
4. From the Access Rights section (refer to Fig. 6.3), click on
the Companies button. A table showing all the available Companies in the WEB-CNP Payer System is displayed. All the access rights check boxes are initially unchecked. Please refer to Fig 6.5.
5. To change and access right, click on the row’s check-box
and it will change from unchecked to checked and vice versa.
6. Finally you must click on the Save button or else no rights
would be given to the user.
To give rights to all companies, click on the Check All option under the Rights column header. Giving Companies access rights to the user means that the user can create records and access records of those companies. If the user has no access rights to the company, it is not displayed during company selection.
Figure 6.5 Companies Access Rights screen
Printing user profile 1. Refer to Fig 6.2. To print a user profile, select a row from the table and click on the Print button.
User Guide for WEB-CNP Payer System Release 4.2 March 2009
Mauritius Network Services Ltd Page 6-3
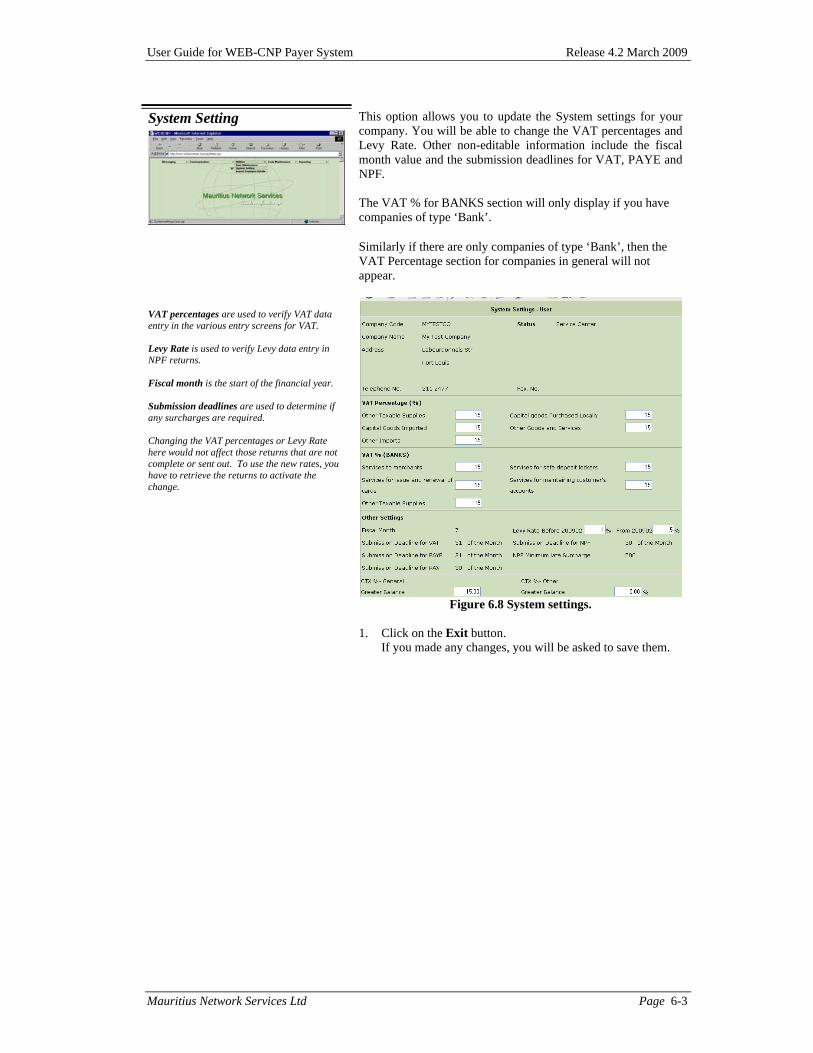
System Setting
This option allows you to update the System settings for your company. You will be able to change the VAT percentages and Levy Rate. Other non-editable information include the fiscal month value and the submission deadlines for VAT, PAYE and NPF. The VAT % for BANKS section will only display if you have companies of type ‘Bank’.
Similarly if there are only companies of type ‘Bank’, then the VAT Percentage section for companies in general will not appear.
VAT percentages are used to verify VAT data entry in the various entry screens for VAT. Levy Rate is used to verify Levy data entry in NPF returns. Fiscal month is the start of the financial year. Submission deadlines are used to determine if any surcharges are required. Changing the VAT percentages or Levy Rate here would not affect those returns that are not complete or sent out. To use the new rates, you have to retrieve the returns to activate the change.
Figure 6.8 System settings.
1. Click on the Exit button. If you made any changes, you will be asked to save them.

Import Employee Details
This option allows you to import employee details for NPF Returns into the WEB-CNP Payer System. For import to be successfully processed, the data file must be of the correct format (See ASCII File layout on next page for Period before 200902 and the page after next for Period From 200902).
With the New PAYE format(since May 2008), monthly PAYE import is no longer required.
Figure 6.9 Import Employee Details
File Name can consist of a maximum of 21 characters including the extension. Depending on the type specified there, some fields become mandatory during import. Refer to ASCII file layout specifications for further details. If the Get Occupation Code from ASCII file is checked, the program will read the Employee Occupation Code from the ASCII file being imported. This is to prevent occupation codes that have been manually entered in the system from getting overwritten. You may check the Audit Trail for employees with existing NIDs and contribution codes whose name have changed. The system allows insertion of same NID with differing contribution types.
1. If you know the import filename, you can type it in or click
on the Browse… button the select the file from the file browser. Note that only files with a ‘.txt’ extension can be selected.
2. If you click on the Set ALL amounts to zero before
import check box, this will set all existing paye, nps and nsf amount (excluding nps & nsf insurable salary) in the database to zero before importing the specified file.
N.B. : If you are importing more than one file for the same return period, this check box should be selected only for the first file imported. 3. Click on Import button. 4. The system will read the import file. For employees with
NPF return, their National ID number (NID) and contribution type will be verified (i.e existing records (depending on NID and contribution type) will be updated while new records will be inserted.
5. If no error has occurred and you will be returned to the
Main Menu. Otherwise you will be notified that import has been unsuccessful. Refer to the Error Log option in the Report Menu to find out more about this.
Mauritius Network Services Ltd Page 6-4
User Guide for WEB-CNP Payer System Release 4.2 March 2009

User Guide for WEB-CNP Payer System Release 4.2 March 2009
ASCII file Layout for Import of Employee Details Before period 200902 Line Contents 1 NID------20--------x TAN---10-x xxxxx Passport-10--------x FirstName-----
-- 35---------------x LastName-------- 35 --------------x Add1---------35--------------------x Add2---------35--------------------x Add3---------35--------------------x 999999999999999 999999999999999 999999999999999 999999999999999 999999999999999 999999999999999 xxxx xxxx xxxx 999
: :
n : Column Position Length Mandatory/Conditional NID 1 20 Mandatory for NPF details TAN 22 10 Mandatory for PAYE details
No longer required with new PAYE format (effective may 2008)
Country Code 33 5 Mandatory if Passport No. present Passport No 39 20 Mandatory if Country Code present
Has to exist in country code maintenance First Name 60 35 Mandatory Last Name 96 35 Mandatory Address Line 1 132 35 Conditional Address Line 2 168 35 Conditional Address Line 3 204 35 Conditional Total PAYE Amount (for the month of return)
240 12 Conditional – Format 999999999999 No longer required with new PAYE format (effective May 2008)
Employer NPS Amount (related to amount serial)
253 12 Conditional – Format 999999999999 (No Decimal allowed). Should tally with Round ( (NPS Ins. Salary * Employer NPS Rate)/100)
Employee NPS Amount (related to amount serial)
266 12 Conditional – Format 999999999999 (No Decimal allowed). Should tally with Round ( (NPS Ins. Salary * Employee NPS Rate)/100)
Employer NSF Amount (related to amount serial)
279 12 Conditional – Format 999999999999 (No Decimal allowed). Should tally with Round ( (NSF Ins. Salary * Employer NSF Rate)/100)
NPS Insurable Salary Amount (Remuneration) (related to amount serial)
292 12 Conditional – Format 999999999999 (No Decimal allowed) NPS Salary Amount upon which the system will calculate NPS Amounts
NSF Insurable Salary Amount (Remuneration) (related to amount serial)
305 12 Conditional – Format 999999999999 (No Decimal allowed) NSF Salary Amount upon which the system will calculate NSF Amount
Contribution Type Code 318 4 Mandatory for NPF details Has to exist in contribution type code maintenance
Wage Type Code 323 4 Mandatory for NPF details Has to exist in wage type code maintenance
Occupation 328 4 Conditional. If present, has to exist in occupation code maintenance
Amount Serial (serial to identify NPF payments for a month)
333 3 If Null, system sets to 1 by default.
N.B: If the NPS and NSF amount do not correspond to the calculated value, they will still be imported but a record will be made in the error log and you will not be able to save the NPF return as complete. The NPS & NSF Rates are derived from the specified contribution type. The amount serial and NPF Amounts will only be imported for Employee Type ‘N’PF or ‘B’oth. Mauritius Network Services Ltd Page 6-5
User Guide for WEB-CNP Payer System Release 4.2 March 2009
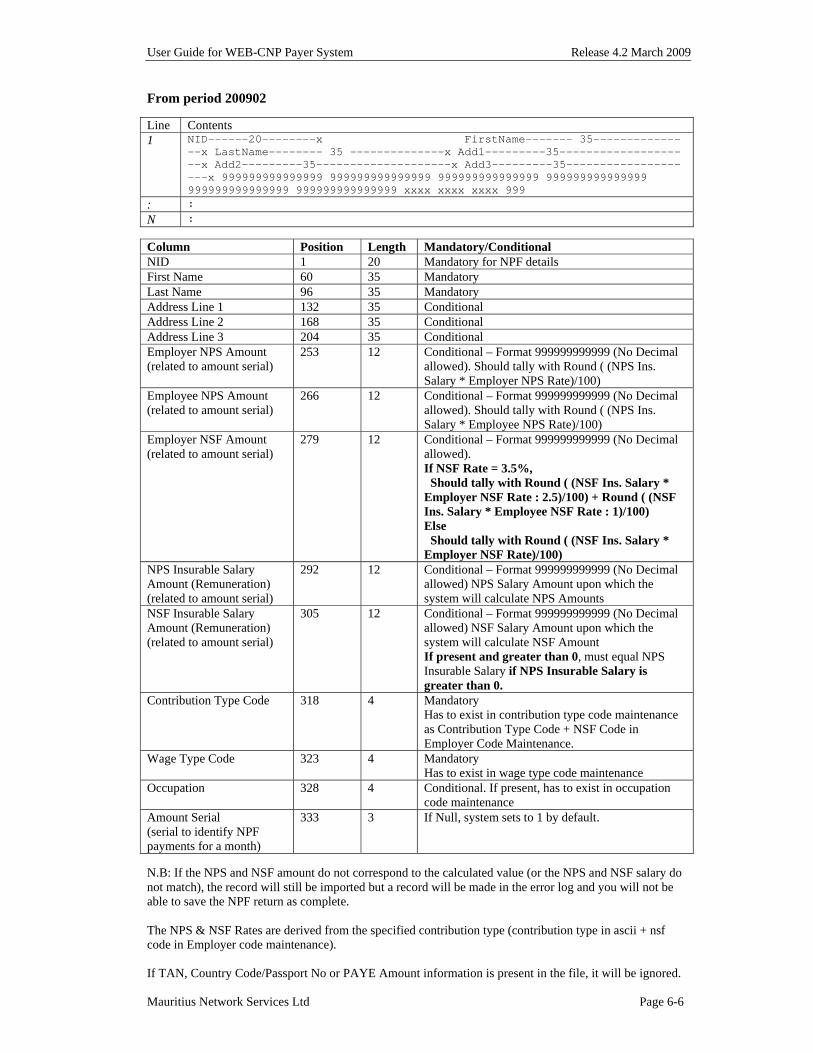
From period 200902 Line Contents 1 NID------20--------x FirstName------- 35-------------
--x LastName-------- 35 --------------x Add1---------35--------------------x Add2---------35--------------------x Add3---------35--------------------x 999999999999999 999999999999999 999999999999999 999999999999999 999999999999999 999999999999999 xxxx xxxx xxxx 999
: :
N : Column Position Length Mandatory/Conditional NID 1 20 Mandatory for NPF details First Name 60 35 Mandatory Last Name 96 35 Mandatory Address Line 1 132 35 Conditional Address Line 2 168 35 Conditional Address Line 3 204 35 Conditional Employer NPS Amount (related to amount serial)
253 12 Conditional – Format 999999999999 (No Decimal allowed). Should tally with Round ( (NPS Ins. Salary * Employer NPS Rate)/100)
Employee NPS Amount (related to amount serial)
266 12 Conditional – Format 999999999999 (No Decimal allowed). Should tally with Round ( (NPS Ins. Salary * Employee NPS Rate)/100)
Employer NSF Amount (related to amount serial)
279 12 Conditional – Format 999999999999 (No Decimal allowed). If NSF Rate = 3.5%, Should tally with Round ( (NSF Ins. Salary * Employer NSF Rate : 2.5)/100) + Round ( (NSF Ins. Salary * Employee NSF Rate : 1)/100) Else Should tally with Round ( (NSF Ins. Salary * Employer NSF Rate)/100)
NPS Insurable Salary Amount (Remuneration) (related to amount serial)
292 12 Conditional – Format 999999999999 (No Decimal allowed) NPS Salary Amount upon which the system will calculate NPS Amounts
NSF Insurable Salary Amount (Remuneration) (related to amount serial)
305 12 Conditional – Format 999999999999 (No Decimal allowed) NSF Salary Amount upon which the system will calculate NSF Amount If present and greater than 0, must equal NPS Insurable Salary if NPS Insurable Salary is greater than 0.
Contribution Type Code 318 4 Mandatory Has to exist in contribution type code maintenance as Contribution Type Code + NSF Code in Employer Code Maintenance.
Wage Type Code 323 4 Mandatory Has to exist in wage type code maintenance
Occupation 328 4 Conditional. If present, has to exist in occupation code maintenance
Amount Serial (serial to identify NPF payments for a month)
333 3 If Null, system sets to 1 by default.
N.B: If the NPS and NSF amount do not correspond to the calculated value (or the NPS and NSF salary do not match), the record will still be imported but a record will be made in the error log and you will not be able to save the NPF return as complete. The NPS & NSF Rates are derived from the specified contribution type (contribution type in ascii + nsf code in Employer code maintenance). If TAN, Country Code/Passport No or PAYE Amount information is present in the file, it will be ignored. Mauritius Network Services Ltd Page 6-6
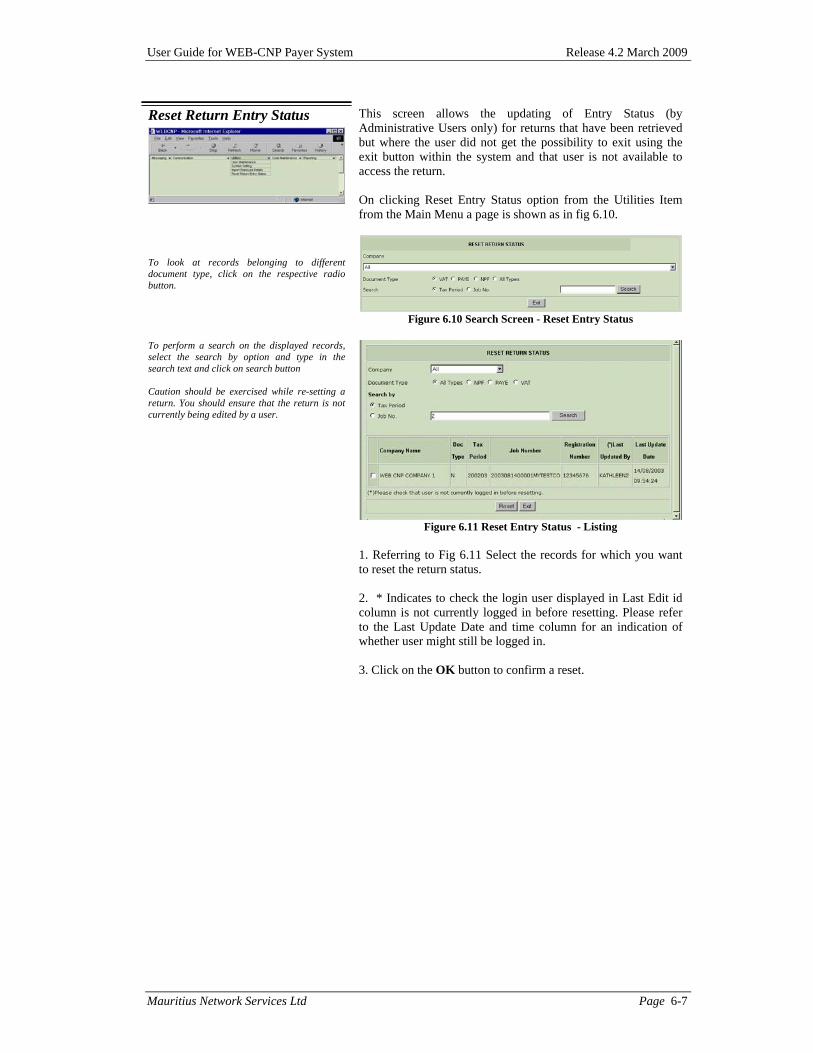
User Guide for WEB-CNP Payer System Release 4.2 March 2009
Mauritius Network Services Ltd Page 6-7
Reset Return Entry Status
This screen allows the updating of Entry Status (by Administrative Users only) for returns that have been retrieved but where the user did not get the possibility to exit using the exit button within the system and that user is not available to access the return. On clicking Reset Entry Status option from the Utilities Item from the Main Menu a page is shown as in fig 6.10.
To look at records belonging to different document type, click on the respective radio button.
Figure 6.10 Search Screen - Reset Entry Status To perform a search on the displayed records, select the search by option and type in the search text and click on search button Caution should be exercised while re-setting a return. You should ensure that the return is not currently being edited by a user.
Figure 6.11 Reset Entry Status - Listing
1. Referring to Fig 6.11 Select the records for which you want
to reset the return status. 2. * Indicates to check the login user displayed in Last Edit id column is not currently logged in before resetting. Please refer to the Last Update Date and time column for an indication of whether user might still be logged in.
3. Click on the OK button to confirm a reset.

User Guide for WEB-CNP Payer System Release 4.2 March 2009
Mauritius Network Services Ltd Page 7-1
Chapter 7 Code Maintenance
Introduction
This chapter will guide you through the necessary steps to maintain the various codes that are used by the system.
Employer This option allows you to maintain the Employer’s information.
If subscriber is a Service Center, creation and updates on Employers/Employees records are allowed. If subscriber is of type Companies with sister Company then upon entry to Employer Code Maintenance, no Creation and updates on Employers records are allowed. But Creation and updates of Employees records are Allowed.
Figure 7.1 Employer Maintenance Menu
To create a new employer record
1. Click on New. Please refer to Fig 7.1. 2. Enter Company Code and its details. Please refer to Fig 7.2 3. Click on Save.
Applicable returns refer to whether the company is submitting PAYE, VAT or NPF returns to the PAYE, VAT or NPF department. You must tick at least one of the applicable returns in order to save the record. If Company is a large Taxpayer the LTP check box should be checked. Submission mode refers to whether returns are to be submitted Monthly or Quarterly. All registration numbers must be updated as all returns are based on these registration numbers. Bank Payment Details are optional. Bank and Branch can be selected from the drop-down list and the account no entered. If details are entered, they can be retrieved for all new returns or returns that have not yet been sent by clicking on the Populate First Row button in the Payment Details section of the returns.
Figure 7.2 Employer Maintenance screen –After Entry

User Guide for WEB-CNP Payer System Release 4.2 March 2009
Mauritius Network Services Ltd Page 7-2
To update the employer details 1. Click on Retrieve.
Figure 7.3 The Employer list.
Refer to APPENDIX B for explanation on report preview window usage. Refer to APPENDIX C for report sample.
2. Select a row from the list and click on the Retrieve button.
You will only be able to edit Employer details if your subscriber is a service center. Otherwise you will be able to view the Employer details. The Employee Details button is not enabled when an employer is created. It is enabled only in the retrieve mode of employer (while editing). NSF Code can be viewed in retrieve mode only. This code is used in determining contribution code to be used for the company for NPF Returns from period 200902.
Figure 7.4 Employer – Editing.
3. Click on Save to keep changes.
To delete an employer 1. You can delete the record by clicking on Delete shown in Fig 7.4
To add employee records 1. Please refer to Fig 7.4. Click on Employee Details button.
Figure 7.5 Employee Maintenance Screen
2. Click on New to add new employee records for this employer.
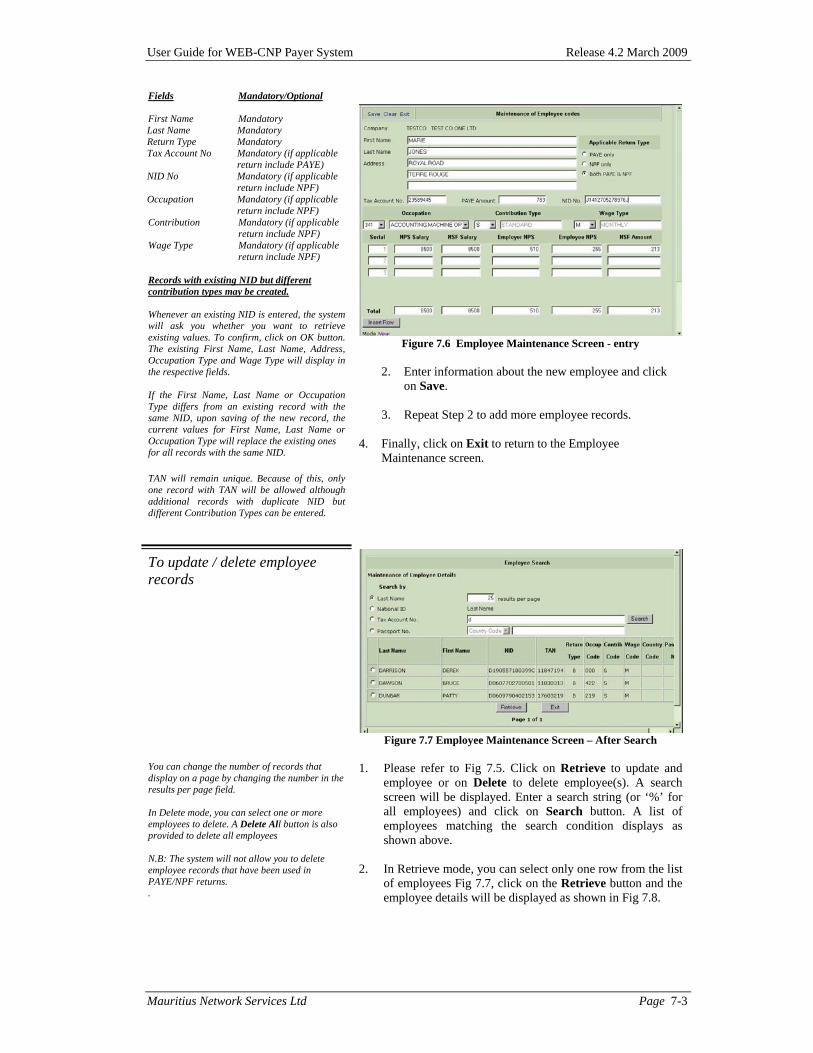
User Guide for WEB-CNP Payer System Release 4.2 March 2009
Mauritius Network Services Ltd Page 7-3
Fields Mandatory/Optional First Name Mandatory Last Name Mandatory Return Type Mandatory Tax Account No Mandatory (if applicable return include PAYE) NID No Mandatory (if applicable return include NPF) Occupation Mandatory (if applicable return include NPF) Contribution Mandatory (if applicable return include NPF) Wage Type Mandatory (if applicable return include NPF) Records with existing NID but different contribution types may be created. Whenever an existing NID is entered, the system will ask you whether you want to retrieve existing values. To confirm, click on OK button. The existing First Name, Last Name, Address, Occupation Type and Wage Type will display in the respective fields. If the First Name, Last Name or Occupation Type differs from an existing record with the same NID, upon saving of the new record, the current values for First Name, Last Name or Occupation Type will replace the existing ones for all records with the same NID. TAN will remain unique. Because of this, only one record with TAN will be allowed although additional records with duplicate NID but different Contribution Types can be entered.
Figure 7.6 Employee Maintenance Screen - entry
2. Enter information about the new employee and click
on Save.
3. Repeat Step 2 to add more employee records. 4. Finally, click on Exit to return to the Employee
Maintenance screen.
To update / delete employee records
Figure 7.7 Employee Maintenance Screen – After Search
You can change the number of records that display on a page by changing the number in the results per page field. In Delete mode, you can select one or more employees to delete. A Delete All button is also provided to delete all employees N.B: The system will not allow you to delete employee records that have been used in PAYE/NPF returns. .
1. Please refer to Fig 7.5. Click on Retrieve to update and employee or on Delete to delete employee(s). A search screen will be displayed. Enter a search string (or ‘%’ for all employees) and click on Search button. A list of employees matching the search condition displays as shown above.
2. In Retrieve mode, you can select only one row from the list
of employees Fig 7.7, click on the Retrieve button and the employee details will be displayed as shown in Fig 7.8.

User Guide for WEB-CNP Payer System Release 4.2 March 2009
Mauritius Network Services Ltd Page 7-4
Figure 7.8 Employee detail screen -Retrieve
Whenever the NPS and NSF Salary are entered, the NPS & NSF amounts are automatically calculated by the system. The amounts are derived as follows: Employee NPS = Round ( (NPS Salary * Employee NPS Rate)/100) Employer NPS = Round ( (NPS Salary * Employer NPS Rate)/100) If NSF Rate = 3.5%, NSF Amt = Round ( (NSF Ins. Salary * Employer NSF Rate : 2.5)/100) + Round ( (NSF Ins. Salary * Employee NSF Rate : 1)/100) Otherwise, NSF Amt = Round ( (NSF Ins. Salary * Employer NSF Rate)/100) NPS and NSF Rate is derived from the contribution type. If the contribution type is modified, the NPS & NSF amounts are re-calculated. NPS & NSF Salary refer to the Salary amount from which the NPS and NSF value is derived (i.e. it may not be the same as the actual salary paid to the employee). If the Return Type is set to both PAYE & NPF or to NPF only, user cannot change back to PAYE only. You can delete the NPF amount details if they are no longer applicable and choose to populate amount greater than 0 when creating your NPF return. When saving the return, if any check box is selected on the left of the NPF amount detail record, the selected amount records will be deleted.
4. To save changes click on Save. 5. To delete, click on Delete.
To print employee records Refer to APPENDIX B for explanation on report preview window usage. Refer to APPENDIX C for report sample
1. Click on Print Please refer to Fig 7.5. A search screen with a list of employees will be displayed.
4. Select the rows to be previewed/printed and click on
the Preview button.

User Guide for WEB-CNP Payer System Release 4.2 March 2009
Mauritius Network Services Ltd Page 8-1
Chapter 8 Reports Introduction
This chapter will guide you through the necessary steps to print the different types of reports.
Messages Received Select this option to preview/print a report of all messages received.
Leave the company list box “Select All” option to see all companies’ records or select a company to see its particular report.
1. The date range will be defaulted to the current date.
Enter the date range to print. Please refer to Fig 8.1.
2. Next, select the type of message that you want to print. If you do not select any item from the message type list box, a list of all messages that have been received within the date range will be printed.
Figure 8.1 Report options screen (Messages Received)
3. Click on the Preview button to continue.
Messages Sent
Select this option to preview/print a report of all messages that were sent.
Leave the company list box with “Select All” option to see all companies’ records or select a company to see its particular report.
1. The date range will be defaulted to the current date. Enter the date range to preview/print. Please refer to Fig 8.2.
Figure 8.2 Report option screen (Messages Sent)
2. Next, select the type of message that you want to print. Please refer to Fig 8.3. 3. If you do not select any item from the message type list box, a complete list of all types of messages that are sent out within the date range will be printed.

User Guide for WEB-CNP Payer System Release 4.2 March 2009
Mauritius Network Services Ltd Page 8-2
Figure 8.3 Message type list box items
Refer to APPENDIX B for explanation on report preview window usage.
4. Click on the Preview button to continue.
Audit Trail
Select this option to preview/print the audit trail. 1. The date range will default to current date. Enter the date
range to print. Please refer to Fig 8.4.
“Select All” option is disabled for Audit Trail Report. Leave the user list box “Select All” option to see all users’ records or select a user to see his particular report.
2. Next, select the User ID for which you want to print the Audit Trail Report from the User List box.
If you do not select any item from the User ID list box, a list of audit trail records for all users that are within the date range will be printed.
Figure 8.4 Report options screen (Audit Trail)
Refer to APPENDIX B for explanation on report preview window usage.
Click on the Preview button to continue.
Error Log
Select this option to print out the error log generated during import of data from files into the system. 1. Click on the error log to view (refer to Fig 8.5). The source
files that generated an error as well as the date when the error/(s) was generated are displayed on the screen.
2. Click on the Preview button to continue.
Refer to APPENDIX B for an explanation on report preview window usage.
Figure 8.5 Error Log File listing
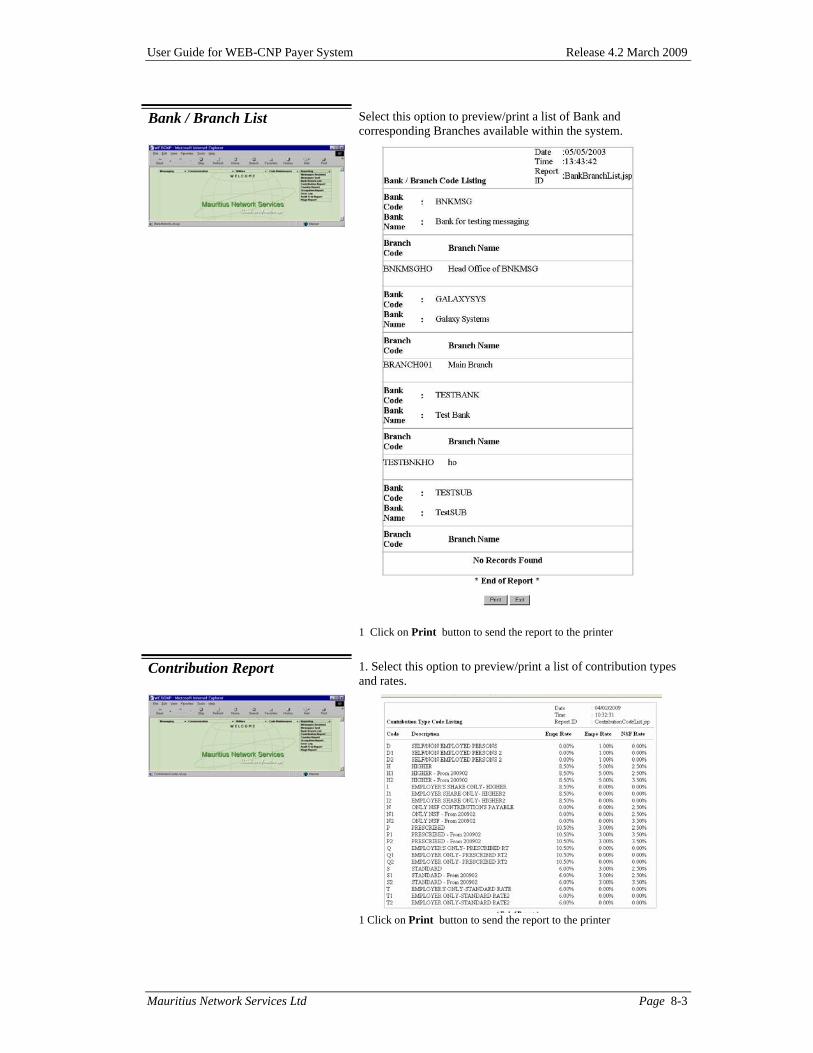
User Guide for WEB-CNP Payer System Release 4.2 March 2009
Mauritius Network Services Ltd Page 8-3
Bank / Branch List
Select this option to preview/print a list of Bank and corresponding Branches available within the system.
1 Click on Print button to send the report to the printer
Contribution Report
1. Select this option to preview/print a list of contribution types and rates.
1 Click on Print button to send the report to the printer

User Guide for WEB-CNP Payer System Release 4.2 March 2009
Mauritius Network Services Ltd Page 8-4
Country Report
Select this option to preview/print a list of all Countries.
1 Click on Print button to send the report to the printer
Occupation Report
Select this option to preview/print a report of all Occupations.
1 Click on Print button to send the report to the printer
Wage Report
Select this option to print a report of all Wage Codes.
1 Click on Print button to send the report to the printer

User Guide for WEB-CNP Payer System Release 4.2 March 2009
Mauritius Network Services Ltd Page A- 1
APPENDIX A STATUS & FORMAT Completeness Status
On Screen
Completeness Status
Descriptions
Complete C All Mandatory information has been correctly entered
Incomplete I Some information is not entered
Application Status
On Screen
Application Status
Descriptions Able to edit document ?
Create C All new document when created. Yes
Mark for sending M Indicates that the document is marked for sending. No
Sent S Indicates that the document has been already sent once. No
Partial Sending 1,2,4,7 Indicates partial sending, failed to send some more recipients.
No
Reset T Reset by user to be sent again. No
Acknowledgement Received
A Indicates acknowledgement received. Cannot be reset or resent.
No
Receipt Received R Indicates receipt received. Cannot be reset or resent.
No
Job Number Format
1……………8 9……..13 14……………23 YYYYMMDD NNNNN CCCCCCCCCC Document Creation Date
Sequence Number
Company ID
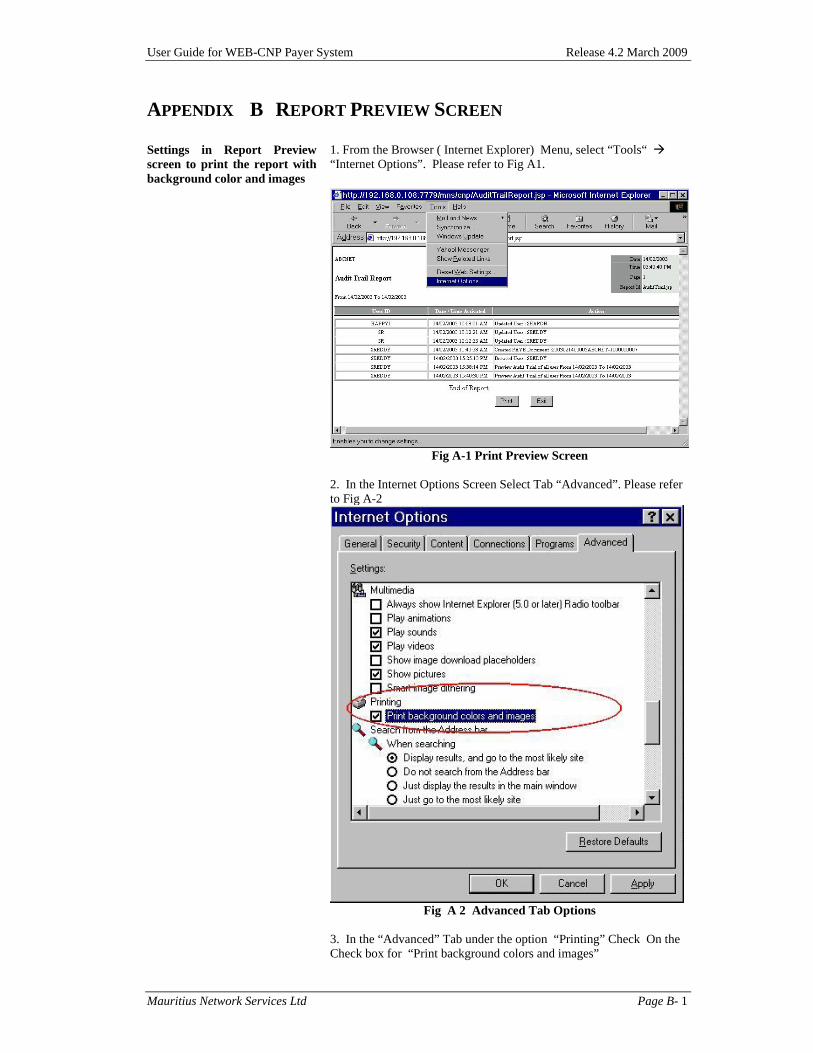
User Guide for WEB-CNP Payer System Release 4.2 March 2009
Mauritius Network Services Ltd Page B- 1
APPENDIX B REPORT PREVIEW SCREEN Settings in Report Preview screen to print the report with background color and images
1. From the Browser ( Internet Explorer) Menu, select “Tools“ “Internet Options”. Please refer to Fig A1.
Fig A-1 Print Preview Screen
2. In the Internet Options Screen Select Tab “Advanced”. Please refer to Fig A-2
Fig A 2 Advanced Tab Options
3. In the “Advanced” Tab under the option “Printing” Check On the Check box for “Print background colors and images”
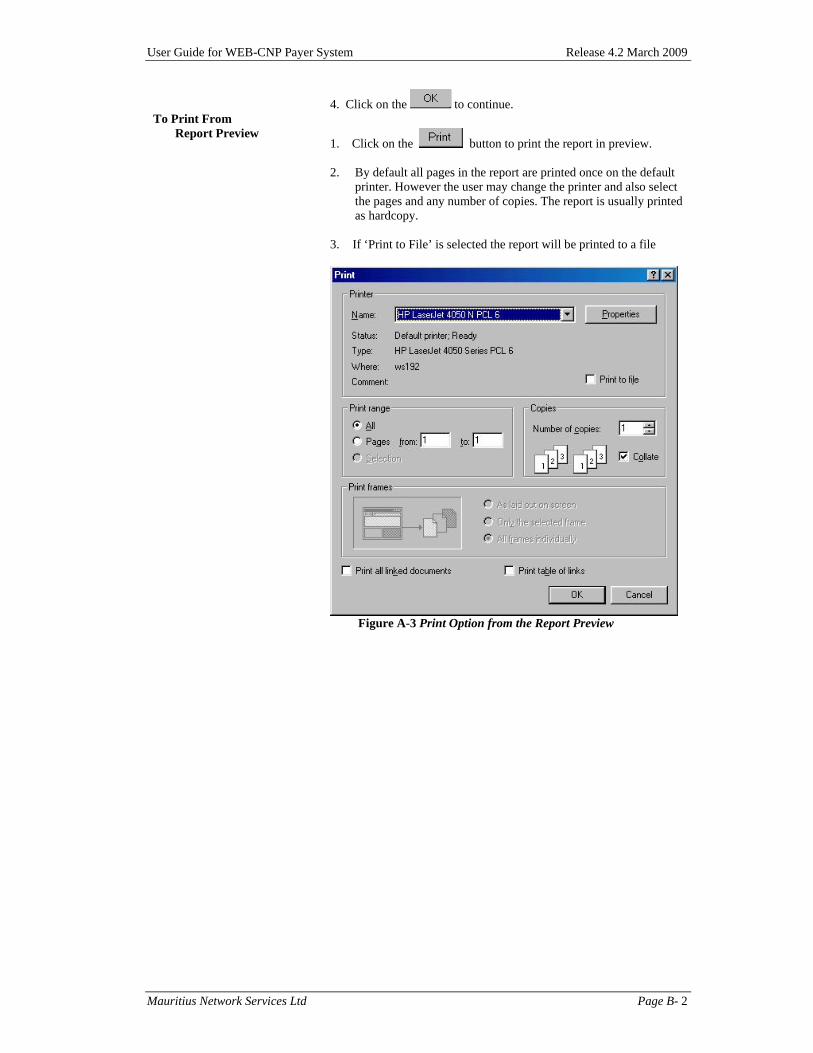
User Guide for WEB-CNP Payer System Release 4.2 March 2009
Mauritius Network Services Ltd Page B- 2
4. Click on the to continue. To Print From Report Preview
1. Click on the button to print the report in preview. 2. By default all pages in the report are printed once on the default printer. However the user may change the printer and also select the pages and any number of copies. The report is usually printed as hardcopy. 3. If ‘Print to File’ is selected the report will be printed to a file
Figure A-3 Print Option from the Report Preview
User Guide for WEB-CNP Payer System Release 4.2 March 2009
Mauritius Network Services Ltd Page C- 1
APPENDIX C SAMPLE REPORT LISTING
Return Reports
• PAYE Return • NPF Return • VAT Return • VAT Bank Return Others Reports • Employer Code Report • Memo Text Report

User Guide for WEB-CNP Payer System Release 4.2 March 2009
Mauritius Network Services Ltd Page C- 2
PAYE RETURN

User Guide for WEB-CNP Payer System Release 4.2 March 2009
Mauritius Network Services Ltd Page C- 3
NPF RETURN
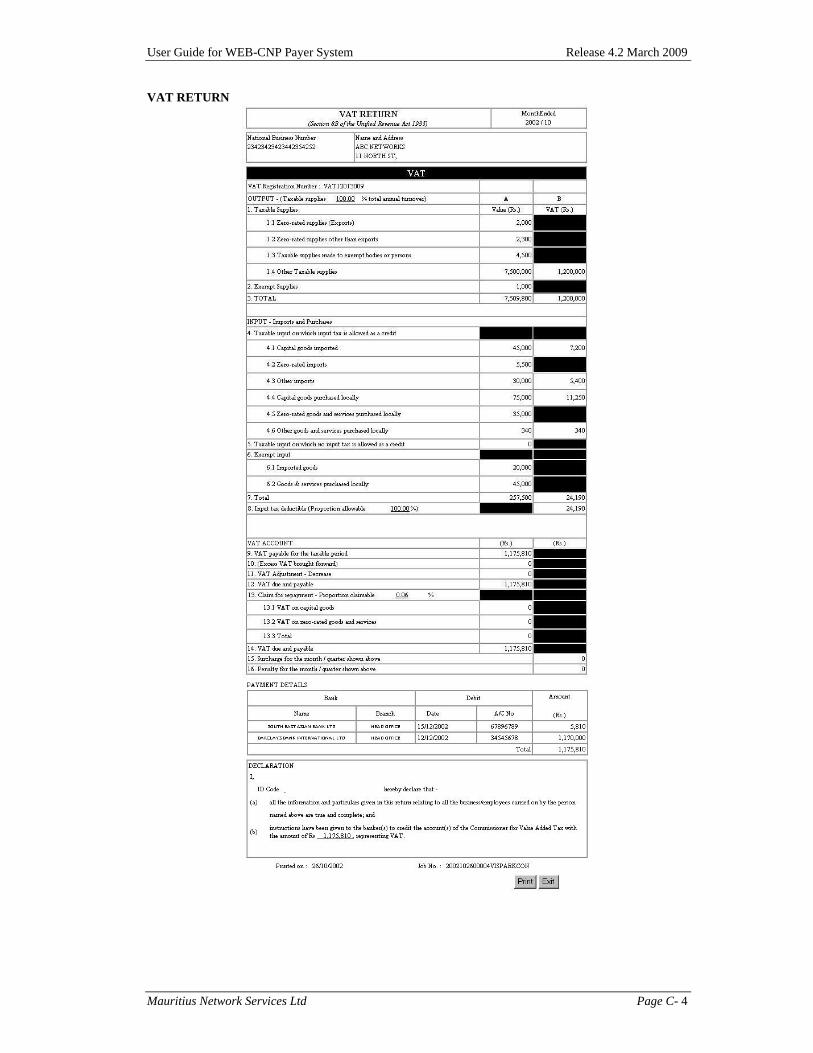
User Guide for WEB-CNP Payer System Release 4.2 March 2009
Mauritius Network Services Ltd Page C- 4
VAT RETURN
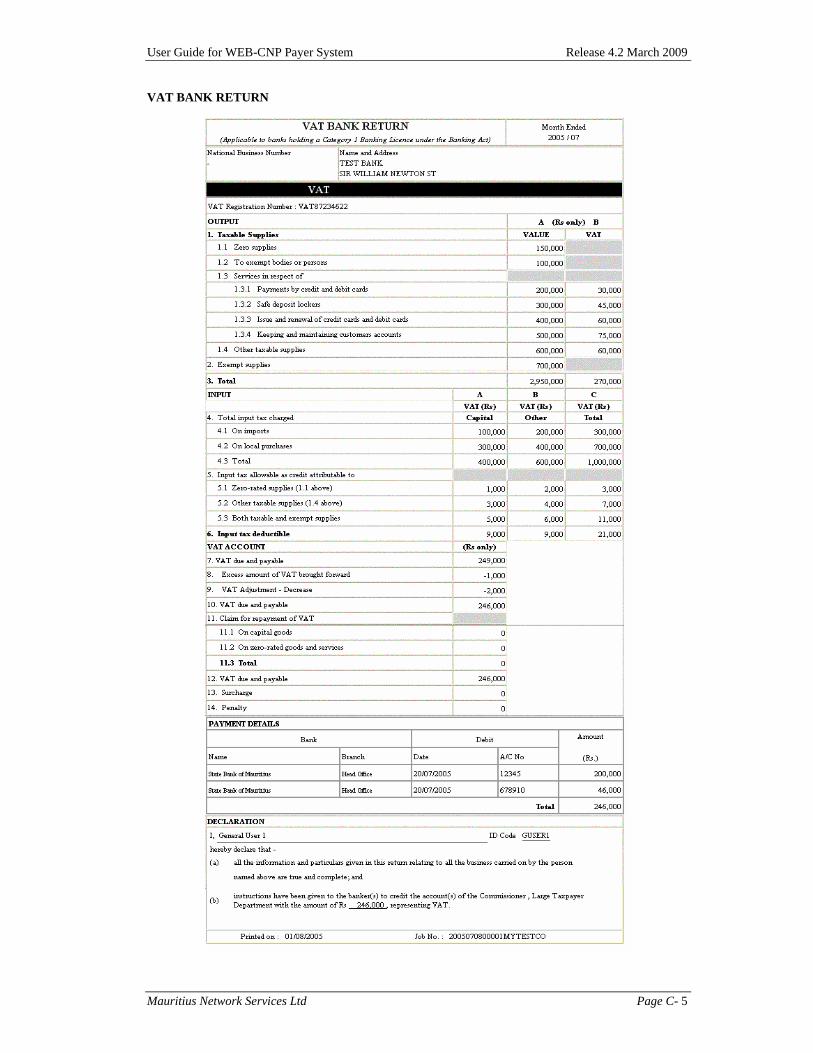
User Guide for WEB-CNP Payer System Release 4.2 March 2009
Mauritius Network Services Ltd Page C- 5
VAT BANK RETURN

User Guide for WEB-CNP Payer System Release 4.2 March 2009
Mauritius Network Services Ltd Page C- 6
Employer Code Report
Memo Text Report

User Guide for WEB-CNP Payer System Release 4.2 March 2009
Mauritius Network Services Ltd Page D- 1
APPENDIX D ASCII FILE LAYOUTS Import File Layouts • VAT ASCII File Layout
Export File Layouts • Contents of the NPF ASCII File • Contents of the PAYE ASCII File • Contents of the VAT ASCII File • Contents of the VAT Bank ASCII File

User Guide for WEB-CNP Payer System Release 4.2 March 2009
Mauritius Network Services Ltd Page D- 2
VAT Ascii File Layout Segment Name
Field Description
Starting Position
Len Format Mandatory/ Conditional
Remarks
UNH Header segment 0 5 ‘UNH’ Mandatory Record Type 19 6 ‘VATRTN’ Mandatory BGM Beginning of Message 0 5 ‘BGM’ Mandatory ‘M’: Month
‘Q’: Quarter Mode of Return 14 1 ‘M’ or ‘Q’ Mandatory DTM Date / Time/ Period Segment 0 5 ‘DTM’ Mandatory DTM Date / Time/ Period Segment 0 5 ‘DTM’ Mandatory Tax Period Qualifier 5 3 ‘131’ Mandatory Tax Period 8 6 ‘CCYYMM’ Mandatory NAD Name and Address Segment 0 5 ‘NAD’ Mandatory Payer qualifier 5 3 ‘PR’ Mandatory VAT Payer (Employer) name 49 105 Mandatory Has to match
name in front-end
NAD Name and Address Segment 0 5 ‘NAD’ Mandatory Owner qualifier 5 3 ‘DN’ Mandatory RFF Reference Segment 0 5 ‘RFF’ Mandatory VAT Reference qualifier 5 3 ‘VAT’ Mandatory VAT Registration Number 8 13 ‘VATnnnnnn
nnnn’ Mandatory Has to match
VAT no for company in front-end
RFF Reference Segment 0 5 ‘RFF’ Conditional NBN Reference qualifier 5 3 ‘XA’ Conditional NBN Registration Number 8 20 Conditional GIS General Indicator Segment 0 5 ‘GIS’ Mandatory Output Tax Indicator 5 3 ‘OUT’ Mandatory PCD Percentage Details Segment 0 5 ‘PCD’ Mandatory Percentage Qualifier 5 3 ‘TS’ Mandatory Taxable Supplies % 8 6 LIN Line Item Segment 0 5 ‘LIN’ Mandatory Zero-rated supplies (Export) 14 6 ‘OZRSEX’ Mandatory MOA Monetary Amount Segment 0 5 ‘MOA’ Mandatory Monetary Amount qualifier 5 3 ‘125’ Mandatory Value of Zero-rated supplies 8 12 Mandatory LIN Line Item Segment 0 5 ‘LIN’ Mandatory Zero-rated supplies other than
Exports 14 6 ‘OZRSNE’ Mandatory
MOA Monetary Amount Segment 0 5 ‘MOA’ Mandatory Monetary Amount qualifier 5 3 ‘125’ Mandatory Value of Zero-rated supplies
other than exports 8 12 Mandatory
LIN Line Item Segment 0 5 ‘LIN’ Mandatory Taxable supplies made to
exempt bodies or persons 14 6 ‘OTSEXM’ Mandatory
MOA Monetary Amount Segment 0 5 ‘MOA’ Mandatory Monetary Amount qualifier 5 3 ‘125’ Mandatory Value of Taxable supplies
made to exempt bodies or persons
8 12 Mandatory
LIN Line Item Segment 0 5 ‘LIN’ Mandatory Other Taxable supplies 14 6 ‘OOTHTS’ Mandatory MOA Monetary Amount Segment 0 5 ‘MOA’ Mandatory Monetary Amount qualifier 5 3 ‘125’ Mandatory Value of Other Taxable supplies 8 12 Mandatory
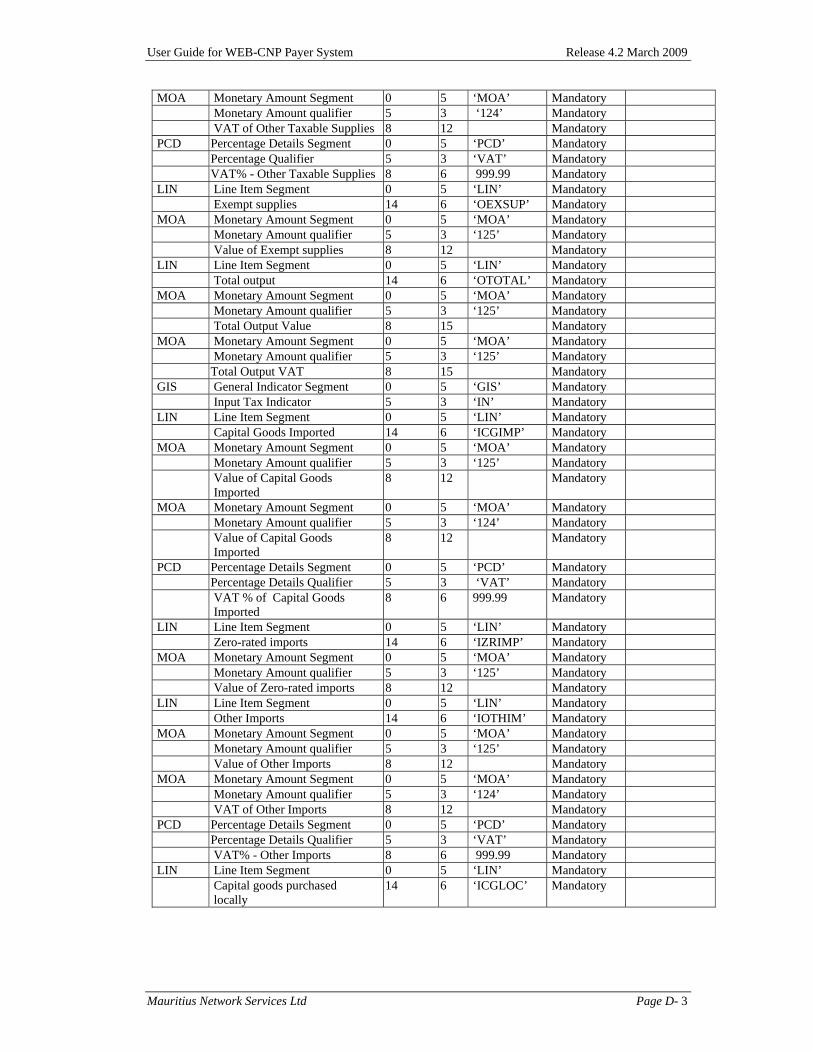
User Guide for WEB-CNP Payer System Release 4.2 March 2009
Mauritius Network Services Ltd Page D- 3
MOA Monetary Amount Segment 0 5 ‘MOA’ Mandatory Monetary Amount qualifier 5 3 ‘124’ Mandatory VAT of Other Taxable Supplies 8 12 Mandatory PCD Percentage Details Segment 0 5 ‘PCD’ Mandatory Percentage Qualifier 5 3 ‘VAT’ Mandatory VAT% - Other Taxable Supplies 8 6 999.99 Mandatory LIN Line Item Segment 0 5 ‘LIN’ Mandatory Exempt supplies 14 6 ‘OEXSUP’ Mandatory MOA Monetary Amount Segment 0 5 ‘MOA’ Mandatory Monetary Amount qualifier 5 3 ‘125’ Mandatory Value of Exempt supplies 8 12 Mandatory LIN Line Item Segment 0 5 ‘LIN’ Mandatory Total output 14 6 ‘OTOTAL’ Mandatory MOA Monetary Amount Segment 0 5 ‘MOA’ Mandatory Monetary Amount qualifier 5 3 ‘125’ Mandatory Total Output Value 8 15 Mandatory MOA Monetary Amount Segment 0 5 ‘MOA’ Mandatory Monetary Amount qualifier 5 3 ‘125’ Mandatory Total Output VAT 8 15 Mandatory GIS General Indicator Segment 0 5 ‘GIS’ Mandatory Input Tax Indicator 5 3 ‘IN’ Mandatory LIN Line Item Segment 0 5 ‘LIN’ Mandatory Capital Goods Imported 14 6 ‘ICGIMP’ Mandatory MOA Monetary Amount Segment 0 5 ‘MOA’ Mandatory Monetary Amount qualifier 5 3 ‘125’ Mandatory Value of Capital Goods
Imported 8 12 Mandatory
MOA Monetary Amount Segment 0 5 ‘MOA’ Mandatory Monetary Amount qualifier 5 3 ‘124’ Mandatory Value of Capital Goods
Imported 8 12 Mandatory
PCD Percentage Details Segment 0 5 ‘PCD’ Mandatory Percentage Details Qualifier 5 3 ‘VAT’ Mandatory VAT % of Capital Goods
Imported 8 6 999.99 Mandatory
LIN Line Item Segment 0 5 ‘LIN’ Mandatory Zero-rated imports 14 6 ‘IZRIMP’ Mandatory MOA Monetary Amount Segment 0 5 ‘MOA’ Mandatory Monetary Amount qualifier 5 3 ‘125’ Mandatory Value of Zero-rated imports 8 12 Mandatory LIN Line Item Segment 0 5 ‘LIN’ Mandatory Other Imports 14 6 ‘IOTHIM’ Mandatory MOA Monetary Amount Segment 0 5 ‘MOA’ Mandatory Monetary Amount qualifier 5 3 ‘125’ Mandatory Value of Other Imports 8 12 Mandatory MOA Monetary Amount Segment 0 5 ‘MOA’ Mandatory Monetary Amount qualifier 5 3 ‘124’ Mandatory VAT of Other Imports 8 12 Mandatory PCD Percentage Details Segment 0 5 ‘PCD’ Mandatory Percentage Details Qualifier 5 3 ‘VAT’ Mandatory VAT% - Other Imports 8 6 999.99 Mandatory LIN Line Item Segment 0 5 ‘LIN’ Mandatory Capital goods purchased
locally 14 6 ‘ICGLOC’ Mandatory

User Guide for WEB-CNP Payer System Release 4.2 March 2009
Mauritius Network Services Ltd Page D- 4
MOA Monetary Amount Segment 0 5 ‘MOA’ Mandatory Monetary Amount qualifier 5 3 ‘125’ Mandatory Value of Capital goods
purchased locally 8 12 Mandatory
MOA Monetary Amount Segment 0 5 ‘MOA’ Mandatory Monetary Amount qualifier 5 3 ‘124’ Mandatory VAT of Capital goods
Purchased locally 8 12 Mandatory
PCD Percentage Details Segment 0 5 ‘PCD’ Mandatory Percentage Details Qualifier 5 3 ‘VAT’ Mandatory VAT% - Capital goods
Purchased locally 8 6 999.99 Mandatory
LIN Line Item Segment 0 5 ‘LIN’ Mandatory Zero-rated goods and services
purchased locally 114 6 ‘IZRLOC’ Mandatory
MOA Monetary Amount Segment 0 5 ‘MOA’ Mandatory Monetary Amount qualifier 5 3 ‘125’ Mandatory Value of Zero-rated goods and
services purchased locally 8 12 Mandatory
LIN Line Item Segment 0 5 ‘LIN’ Mandatory Other goods and services
purchased locally 14 6 ‘IOGLOC’ Mandatory
MOA Monetary Amount Segment 0 5 ‘MOA’ Mandatory Monetary Amount qualifier 8 3 ‘125’ Mandatory Value of Other goods and
services purchased locally 8 12 Mandatory
MOA Monetary Amount Segment 0 4 ‘MOA’ Mandatory Monetary Amount qualifier 5 3 ‘125’ Mandatory VAT of Other goods and
services purchased locally 8 12 Mandatory
PCD Percentage Details Segment 0 5 ‘PCD’ Mandatory Percentage Details Qualifier 5 3 ‘VAT’ Mandatory VAT % of Other goods and
services purchased locally 8 6 999.99 Mandatory
LIN Line Item Segment 0 5 ‘LIN’ Mandatory Taxable input on which no
input tax is allowed as a credit 14 6 ‘ITXINP’ Mandatory
MOA Monetary Amount Segment 0 5 ‘MOA’ Mandatory Monetary Amount qualifier 5 3 ‘125’ Mandatory Value of Taxable input on
which no input tax is allowed as a credit
8 12 Mandatory
LIN Line Item Segment 0 5 ‘LIN’ Mandatory Exempt input – Imported goods 14 6 ‘IEXIMP’ Mandatory MOA Monetary Amount Segment 0 5 ‘MOA’ Mandatory Monetary Amount qualifier 5 3 ‘125’ Mandatory Value of exempted imported
goods 8 12 Mandatory
LIN Line Item Segment 0 5 ‘LIN’ Mandatory Exempt input – Goods and
services purchased locally 14 6 ‘IEXLOC’ Mandatory
MOA Monetary Amount Segment 0 5 ‘MOA’ Mandatory Monetary Amount qualifier 5 3 ‘125’ Mandatory Value of Goods and services
purchased locally 8 12 Mandatory
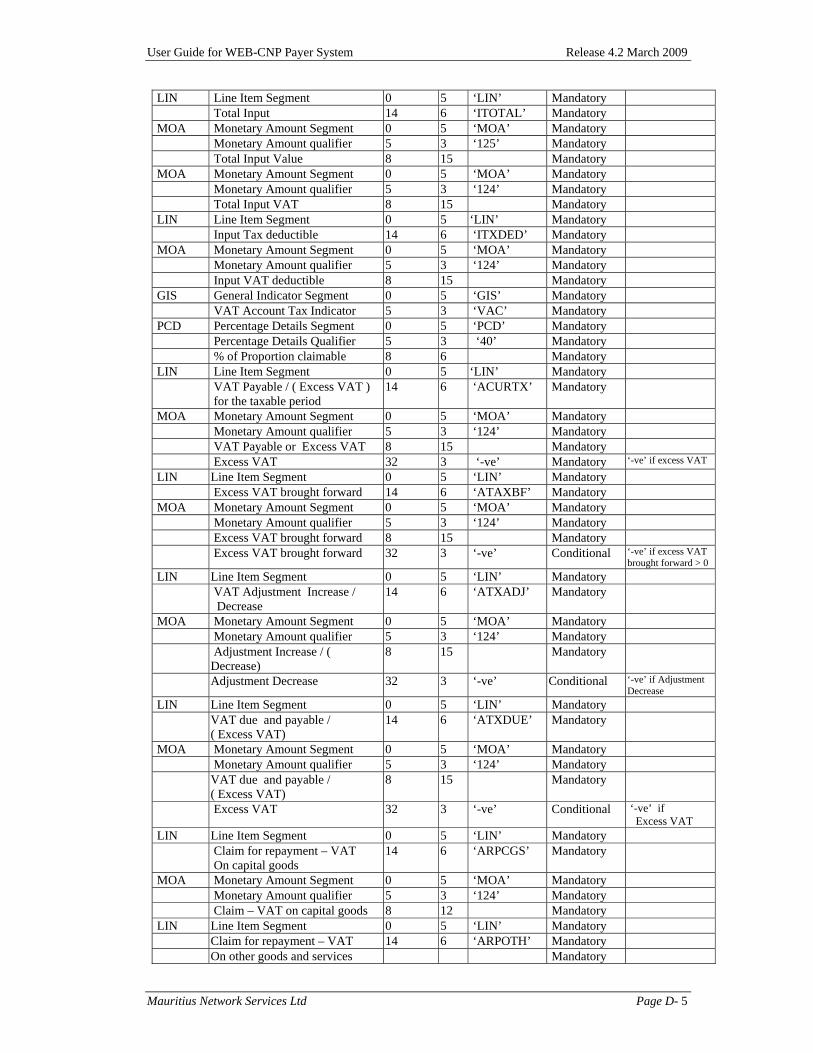
User Guide for WEB-CNP Payer System Release 4.2 March 2009
Mauritius Network Services Ltd Page D- 5
LIN Line Item Segment 0 5 ‘LIN’ Mandatory Total Input 14 6 ‘ITOTAL’ Mandatory MOA Monetary Amount Segment 0 5 ‘MOA’ Mandatory Monetary Amount qualifier 5 3 ‘125’ Mandatory Total Input Value 8 15 Mandatory MOA Monetary Amount Segment 0 5 ‘MOA’ Mandatory Monetary Amount qualifier 5 3 ‘124’ Mandatory Total Input VAT 8 15 Mandatory LIN Line Item Segment 0 5 ‘LIN’ Mandatory Input Tax deductible 14 6 ‘ITXDED’ Mandatory MOA Monetary Amount Segment 0 5 ‘MOA’ Mandatory Monetary Amount qualifier 5 3 ‘124’ Mandatory Input VAT deductible 8 15 Mandatory GIS General Indicator Segment 0 5 ‘GIS’ Mandatory VAT Account Tax Indicator 5 3 ‘VAC’ Mandatory PCD Percentage Details Segment 0 5 ‘PCD’ Mandatory Percentage Details Qualifier 5 3 ‘40’ Mandatory % of Proportion claimable 8 6 Mandatory LIN Line Item Segment 0 5 ‘LIN’ Mandatory VAT Payable / ( Excess VAT )
for the taxable period 14 6 ‘ACURTX’ Mandatory
MOA Monetary Amount Segment 0 5 ‘MOA’ Mandatory Monetary Amount qualifier 5 3 ‘124’ Mandatory VAT Payable or Excess VAT 8 15 Mandatory Excess VAT 32 3 ‘-ve’ Mandatory ‘-ve’ if excess VAT
LIN Line Item Segment 0 5 ‘LIN’ Mandatory Excess VAT brought forward 14 6 ‘ATAXBF’ Mandatory MOA Monetary Amount Segment 0 5 ‘MOA’ Mandatory Monetary Amount qualifier 5 3 ‘124’ Mandatory Excess VAT brought forward 8 15 Mandatory Excess VAT brought forward 32 3 ‘-ve’ Conditional ‘-ve’ if excess VAT
brought forward > 0 LIN Line Item Segment 0 5 ‘LIN’ Mandatory VAT Adjustment Increase /
Decrease 14 6 ‘ATXADJ’ Mandatory
MOA Monetary Amount Segment 0 5 ‘MOA’ Mandatory Monetary Amount qualifier 5 3 ‘124’ Mandatory Adjustment Increase / (
Decrease) 8 15 Mandatory
Adjustment Decrease 32 3 ‘-ve’ Conditional ‘-ve’ if Adjustment Decrease
LIN Line Item Segment 0 5 ‘LIN’ Mandatory VAT due and payable /
( Excess VAT) 14 6 ‘ATXDUE’ Mandatory
MOA Monetary Amount Segment 0 5 ‘MOA’ Mandatory Monetary Amount qualifier 5 3 ‘124’ Mandatory VAT due and payable /
( Excess VAT) 8 15 Mandatory
Excess VAT 32 3 ‘-ve’ Conditional ‘-ve’ if Excess VAT
LIN Line Item Segment 0 5 ‘LIN’ Mandatory Claim for repayment – VAT
On capital goods 14 6 ‘ARPCGS’ Mandatory
MOA Monetary Amount Segment 0 5 ‘MOA’ Mandatory Monetary Amount qualifier 5 3 ‘124’ Mandatory Claim – VAT on capital goods 8 12 Mandatory LIN Line Item Segment 0 5 ‘LIN’ Mandatory Claim for repayment – VAT 14 6 ‘ARPOTH’ Mandatory On other goods and services Mandatory
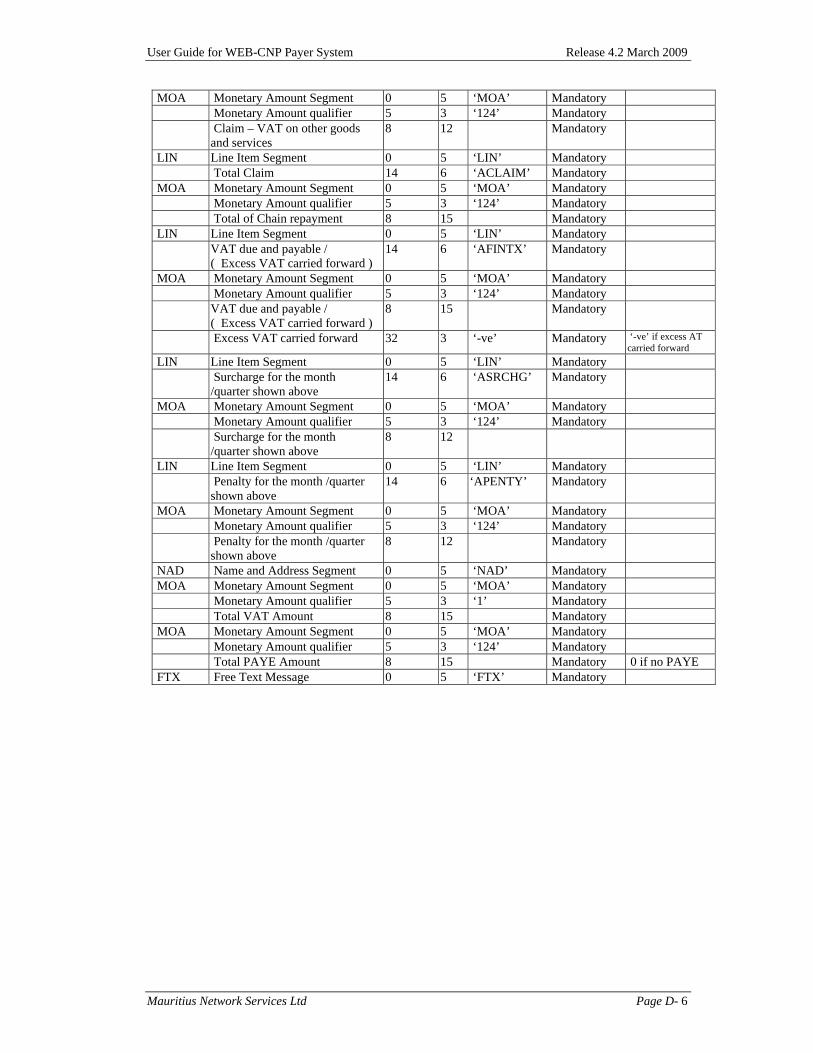
User Guide for WEB-CNP Payer System Release 4.2 March 2009
Mauritius Network Services Ltd Page D- 6
MOA Monetary Amount Segment 0 5 ‘MOA’ Mandatory Monetary Amount qualifier 5 3 ‘124’ Mandatory Claim – VAT on other goods
and services 8 12 Mandatory
LIN Line Item Segment 0 5 ‘LIN’ Mandatory Total Claim 14 6 ‘ACLAIM’ Mandatory MOA Monetary Amount Segment 0 5 ‘MOA’ Mandatory Monetary Amount qualifier 5 3 ‘124’ Mandatory Total of Chain repayment 8 15 Mandatory LIN Line Item Segment 0 5 ‘LIN’ Mandatory VAT due and payable /
( Excess VAT carried forward ) 14 6 ‘AFINTX’ Mandatory
MOA Monetary Amount Segment 0 5 ‘MOA’ Mandatory Monetary Amount qualifier 5 3 ‘124’ Mandatory VAT due and payable /
( Excess VAT carried forward ) 8 15 Mandatory
Excess VAT carried forward 32 3 ‘-ve’ Mandatory ‘-ve’ if excess AT carried forward
LIN Line Item Segment 0 5 ‘LIN’ Mandatory Surcharge for the month
/quarter shown above 14 6 ‘ASRCHG’ Mandatory
MOA Monetary Amount Segment 0 5 ‘MOA’ Mandatory Monetary Amount qualifier 5 3 ‘124’ Mandatory Surcharge for the month
/quarter shown above 8 12
LIN Line Item Segment 0 5 ‘LIN’ Mandatory Penalty for the month /quarter
shown above 14 6 ‘APENTY’ Mandatory
MOA Monetary Amount Segment 0 5 ‘MOA’ Mandatory Monetary Amount qualifier 5 3 ‘124’ Mandatory Penalty for the month /quarter
shown above 8 12 Mandatory
NAD Name and Address Segment 0 5 ‘NAD’ Mandatory MOA Monetary Amount Segment 0 5 ‘MOA’ Mandatory Monetary Amount qualifier 5 3 ‘1’ Mandatory Total VAT Amount 8 15 Mandatory MOA Monetary Amount Segment 0 5 ‘MOA’ Mandatory Monetary Amount qualifier 5 3 ‘124’ Mandatory Total PAYE Amount 8 15 Mandatory 0 if no PAYE FTX Free Text Message 0 5 ‘FTX’ Mandatory
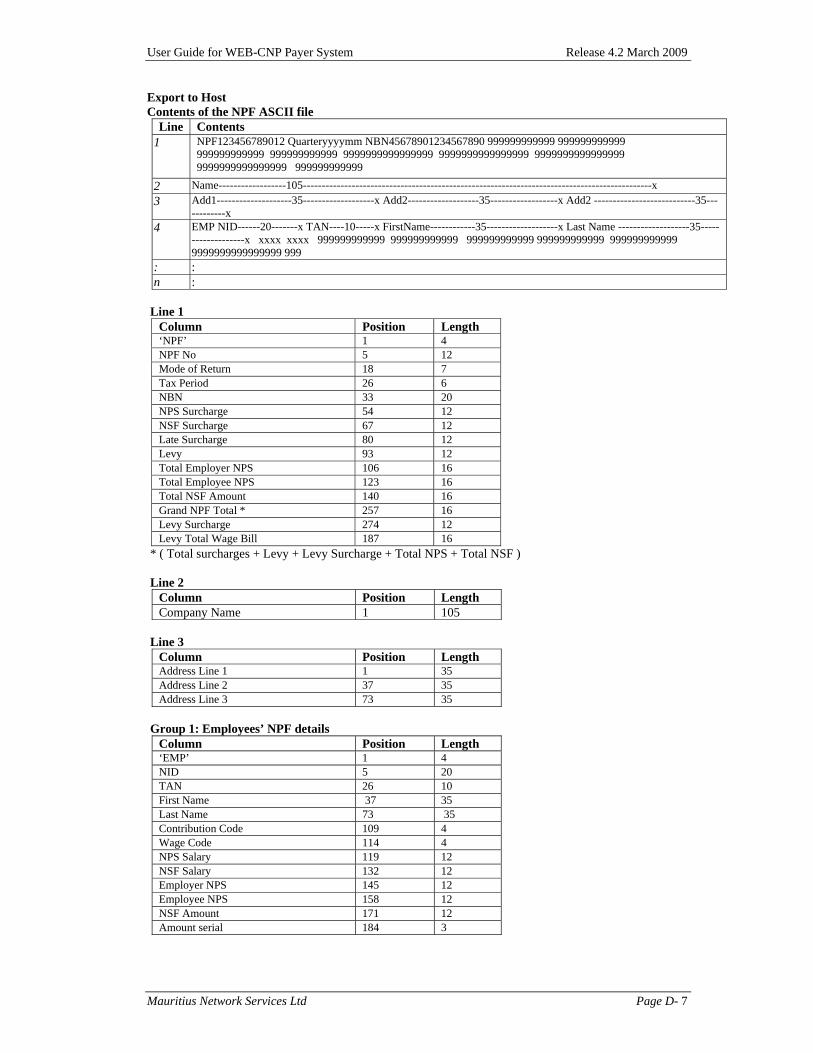
User Guide for WEB-CNP Payer System Release 4.2 March 2009
Mauritius Network Services Ltd Page D- 7
Export to Host Contents of the NPF ASCII file
Line Contents 1
NPF123456789012 Quarteryyyymm NBN45678901234567890 999999999999 999999999999 999999999999 999999999999 9999999999999999 9999999999999999 9999999999999999 9999999999999999 999999999999
2 Name------------------105---------------------------------------------------------------------------------------------x 3 Add1--------------------35-------------------x Add2-------------------35------------------x Add2 ---------------------------35---
---------x 4 EMP NID------20-------x TAN----10-----x FirstName------------35-------------------x Last Name -------------------35-----
--------------x xxxx xxxx 999999999999 999999999999 999999999999 999999999999 999999999999 9999999999999999 999
: : n :
Line 1
Column Position Length ‘NPF’ 1 4 NPF No 5 12 Mode of Return 18 7 Tax Period 26 6 NBN 33 20 NPS Surcharge 54 12 NSF Surcharge 67 12 Late Surcharge 80 12 Levy 93 12 Total Employer NPS 106 16 Total Employee NPS 123 16 Total NSF Amount 140 16 Grand NPF Total * 257 16 Levy Surcharge 274 12 Levy Total Wage Bill 187 16
* ( Total surcharges + Levy + Levy Surcharge + Total NPS + Total NSF ) Line 2
Column Position Length Company Name 1 105
Line 3
Column Position Length Address Line 1 1 35 Address Line 2 37 35 Address Line 3 73 35
Group 1: Employees’ NPF details
Column Position Length ‘EMP’ 1 4 NID 5 20 TAN 26 10 First Name 37 35 Last Name 73 35 Contribution Code 109 4 Wage Code 114 4 NPS Salary 119 12 NSF Salary 132 12 Employer NPS 145 12 Employee NPS 158 12 NSF Amount 171 12 Amount serial 184 3
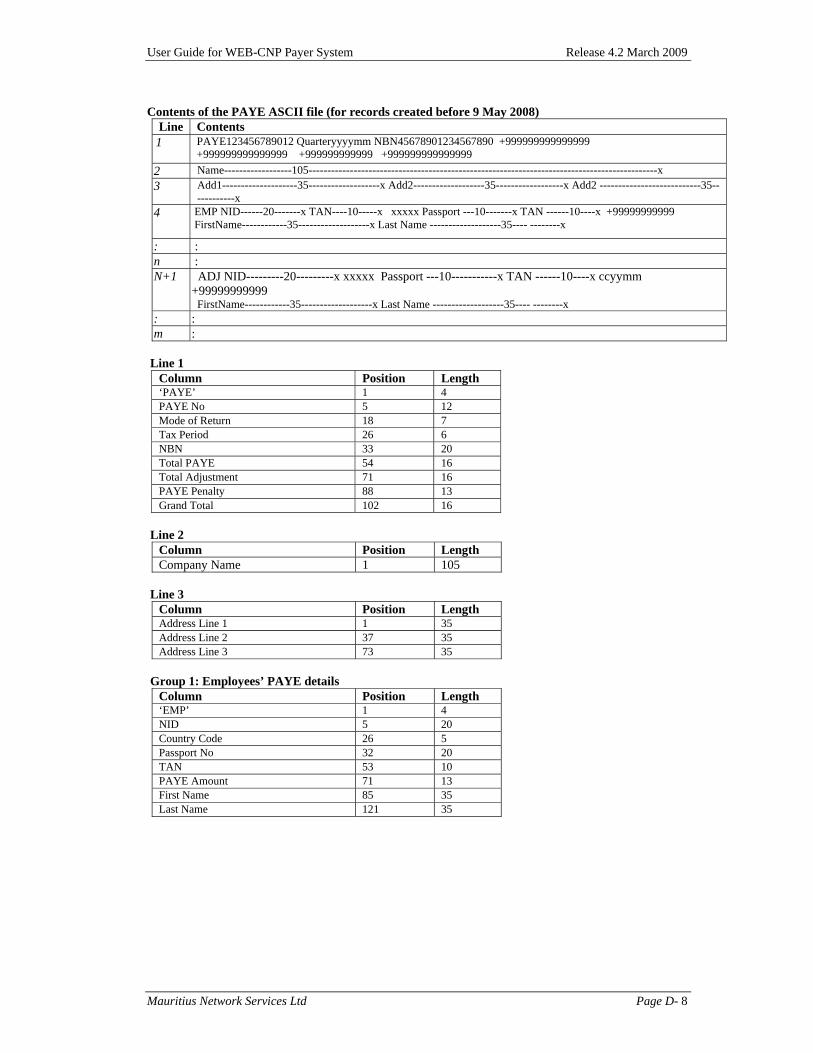
User Guide for WEB-CNP Payer System Release 4.2 March 2009
Mauritius Network Services Ltd Page D- 8
Contents of the PAYE ASCII file (for records created before 9 May 2008)
Line Contents 1 PAYE123456789012 Quarteryyyymm NBN45678901234567890 +999999999999999
+999999999999999 +999999999999 +999999999999999 2 Name------------------105---------------------------------------------------------------------------------------------x 3 Add1--------------------35-------------------x Add2-------------------35------------------x Add2 ---------------------------35--
----------x 4 EMP NID------20-------x TAN----10-----x xxxxx Passport ---10-------x TAN ------10----x +99999999999
FirstName------------35-------------------x Last Name -------------------35---- --------x
: : n : N+1 ADJ NID---------20---------x xxxxx Passport ---10-----------x TAN ------10----x ccyymm
+99999999999 FirstName------------35-------------------x Last Name -------------------35---- --------x
: : m :
Line 1
Column Position Length ‘PAYE’ 1 4 PAYE No 5 12 Mode of Return 18 7 Tax Period 26 6 NBN 33 20 Total PAYE 54 16 Total Adjustment 71 16 PAYE Penalty 88 13 Grand Total 102 16
Line 2
Column Position Length Company Name 1 105
Line 3
Column Position Length Address Line 1 1 35 Address Line 2 37 35 Address Line 3 73 35
Group 1: Employees’ PAYE details
Column Position Length ‘EMP’ 1 4 NID 5 20 Country Code 26 5 Passport No 32 20 TAN 53 10 PAYE Amount 71 13 First Name 85 35 Last Name 121 35
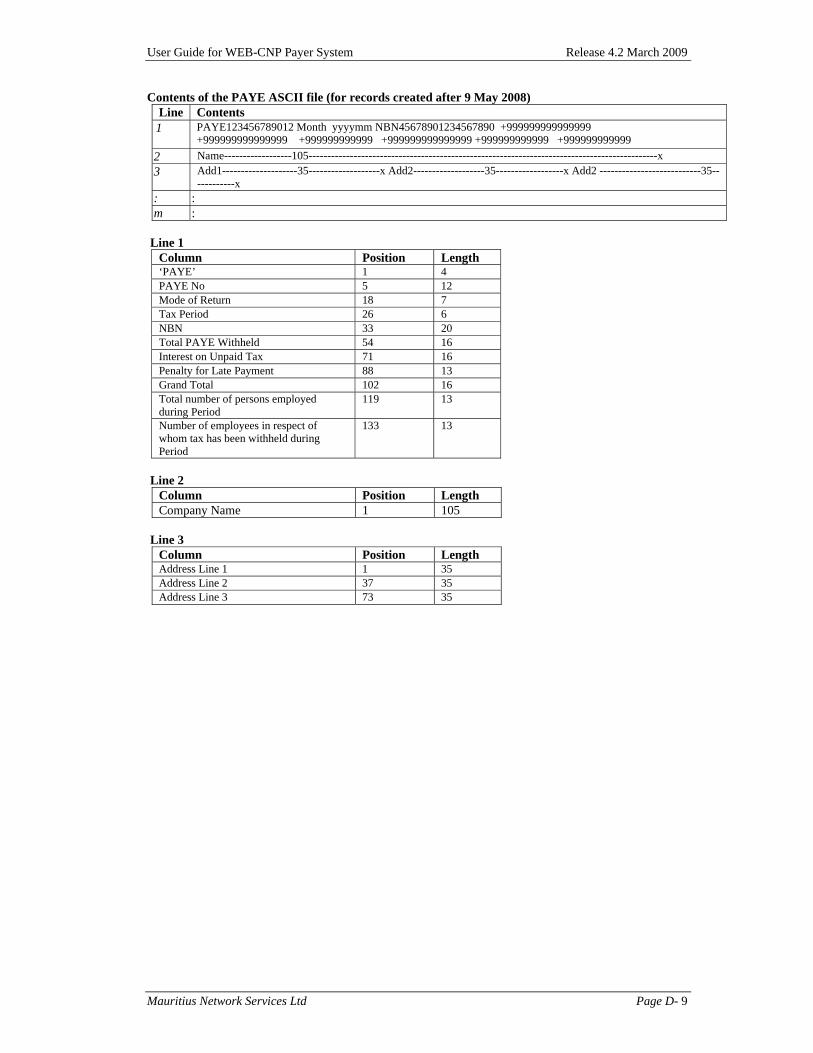
User Guide for WEB-CNP Payer System Release 4.2 March 2009
Mauritius Network Services Ltd Page D- 9
Contents of the PAYE ASCII file (for records created after 9 May 2008) Line Contents
1 PAYE123456789012 Month yyyymm NBN45678901234567890 +999999999999999 +999999999999999 +999999999999 +999999999999999 +999999999999 +999999999999
2 Name------------------105---------------------------------------------------------------------------------------------x 3 Add1--------------------35-------------------x Add2-------------------35------------------x Add2 ---------------------------35--
----------x : : m :
Line 1
Column Position Length ‘PAYE’ 1 4 PAYE No 5 12 Mode of Return 18 7 Tax Period 26 6 NBN 33 20 Total PAYE Withheld 54 16 Interest on Unpaid Tax 71 16 Penalty for Late Payment 88 13 Grand Total 102 16 Total number of persons employed during Period
119 13
Number of employees in respect of whom tax has been withheld during Period
133 13
Line 2
Column Position Length Company Name 1 105
Line 3
Column Position Length Address Line 1 1 35 Address Line 2 37 35 Address Line 3 73 35

User Guide for WEB-CNP Payer System Release 4.2 March 2009
Mauritius Network Services Ltd Page D- 10
Contents of the VAT ASCII file Line Contents
1 VAT1234567890 Quarteryyyymm NBN45678901234567890 2 Name------------------105---------------------------------------------------------------------------------------------x 3 Add1-----------------35----------------x Add2----------------35---------------x Add2 ---------------------35------------x
4 OTSPER 999.99
5 OZRSEX +999999999999
6 OZRSNE +999999999999
7 OTSSEXM +999999999999
8 OOTHTS 999.99 +999999999999 +999999999999
9 OEXSUP +999999999999
10 OTOTAL +999999999999 +999999999999
11 ICGIMP 999.99 +999999999999 +999999999999
12 IZRIMP +999999999999
13 IOTHIM 999.99 +999999999999 +999999999999
14 ICGLOC 999.99 +999999999999 +999999999999
15 IZRLOC +999999999999
16 IOGOTH +999999999999 +999999999999
17 ITXINP +999999999999
18 IEXIMP +999999999999
19 IEXLOC +999999999999
20 ITOTAL 999.99 +999999999999
21 ITXDED 999.99 +999999999999999 +999999999999999
22 ACURTX +999999999999
23 ATAXBF +999999999999
24 ATXADJ +999999999999
25 ATXDUE +999999999999
26 ARPCGS +999999999999
27 ARPOTH +999999999999
28 ACLAIM 999.99 +999999999999999
29 AFINTX +999999999999999
30 ASTCHG +999999999999
31 APENTY +999999999999
If Solidarity Levy is applicable
32 ACYRED DDMM
33 TOTOVR +999999999999
34 PRFFLG X
35 LVYTVR +999999999999
36 LVYPAY +999999999999
37 ADJPAY +999999999999
38 ADJREF +999999999999
39 SLPLTY +999999999999
Line 1
Column Position Length VAT No 1 13 Tax Period 15 7 ccyymm 22 6 NBN 29 20

User Guide for WEB-CNP Payer System Release 4.2 March 2009
Mauritius Network Services Ltd Page D- 11
Line 2 Column Position Length Company Name 1 105
Line 3 Column Position Length Address Line 1 1 35 Address Line 2 37 35 Address Line 3 73 35
Output Tax : Line 4 – Line 10
Line Column 1 Pos: 1, Len: 6
Column 2 Pos: 8, Len: 6
Column 3 Pos: 15, Len: 13
Column 4 Pos: 29, Len: 13
4 ‘OTSPER’ Taxable supplies % Null null
5 ‘OZRSEX’ null Value of zero-rated supplies (Exports)
null
6 ‘OZRSNE’ null Value of zero-rated supplies other than exports
null
7 ‘OTSEXM’ null Value of taxable supplies made To exempt bodies or persons
null
8 ‘OOTHTS’ VAT % - Other taxable supplies
Value of other taxable supplies VAT of other taxable supplies
9 ‘OEXSUP’ null Value of Exempt supplies null
10 ‘OTOTAL’ null Total Values (pos: 15,len: 16 ) Total VAT’s (pos: 32,len:16)
Input Tax : Line 11 – Line 21
Line Column 1 Pos: 1, Len: 6
Column 2 Pos: 8, Len: 6
Column 3 Pos: 15, Len: 13
Column 4 Pos: 29, Len: 13
11 ‘ICGIMP’ VAT% of Capital goods Imported
Value of capital goods imported VAT of Capital goods imported
12 ‘IZRIMP’ null Value of zero-rated imports null
13 ‘IOTHIM’ VAT% of Other imports Value of Other imports VAT of other imports
14 ‘ICGLOC’ VAT% of Capital goods Purchased locally
Value of capital goods purchased locally
VAT of Capital goods Purchased locally
15 ‘IZRLOC’ null Value of Zero-rated goods and services purchased locally
null
16 ‘IOGLOC’ VAT% of Other goods and services purchased locally
Value of Other goods and services purchased locally
VAT of Other goods and Services purchased locally
17 ‘ITXINP’ null Value of Taxable input which no Input tax is allowed as credit
null
18 ‘IEXEMP’ null Value of Exempt Input- Imported goods
null
19 ‘IEXLOC’ null Value of Exempt Input – goods and services purchased locally
null
20 ‘ITOTAL’ null Total Value Input – Imports and purchases (pos: 15, len: 16)
Total VAT of Input – Import and Purchased (pos: 32, len: 16)
21 ‘ITXDED’ % of Proportion allowable null Deductible Input VAT
VAT Account: Line 22 – Line 31
Line Column 1 Pos: 1, Len: 6
Column 2 Pos: 8, Len: 6
Column 3 Pos: 15, Len: 13
Column 4 Pos: 29, Len: 13
22 ‘ACUTRX’ null VAT payable / ( Excess VAT) for the taxable period For Excess VAT, it will be a negative value.
null
23 ‘ATAXBF’ null Excess VAT brought forward. Negative value.
null
24 ‘ATXADJ’ null VAT Adjustment – Increase / Decrease For Decrease, it will be a Negative value.
null
25 ‘ATXDUE’ null VAT due and payable ( Excess VAT) For Excess VAT, it will a Negative value.
null

User Guide for WEB-CNP Payer System Release 4.2 March 2009
Mauritius Network Services Ltd Page D- 12
26 ‘ARPCGS’ null Claim for repayment – VAT on Capital goods null
27 ‘ARPOTH’ null Claim for repayment – VAT on Other goods and services
null
28 ‘ACLAIM’ % of Proportion claimable
Total claim for repayment null
29 ‘AFINTX’ Null VAT due and payable / ( Excess VAT carried forward )
null
30 ‘ASRCHG’ null Surcharge null
31 ‘APENTY’ null Penalty on VAT due null
Solidarity Levy: Line 32 – Line 39
Line Column 1 Pos: 1, Len: 6
Column 2 Pos: 8, Len: 6
Column 3 Pos: 15, Len: 13
Column 4 Pos: 29, Len: 13
32 ‘ACYRED’ Account year end in DDMM format
Null null
33 ‘TOTOVR’ Null Total Turnover null
34 ‘PRFFLG’ Profit Flag ‘Y’ or ‘N’
Null null
35 ‘LVYTVR’ null Turnover for purpose of levy null
36 ‘LVYPAY’ null Amount of levy payable null
37 ‘ADJPAY’ null Adjustment amount of levy payable in respect of financial year
null
38 ‘ADJREF’ null Adjustment amount of levy refundable in respect of financial year
null
39 ‘SLPLTY’ null Penalty for Solidarity Levy null
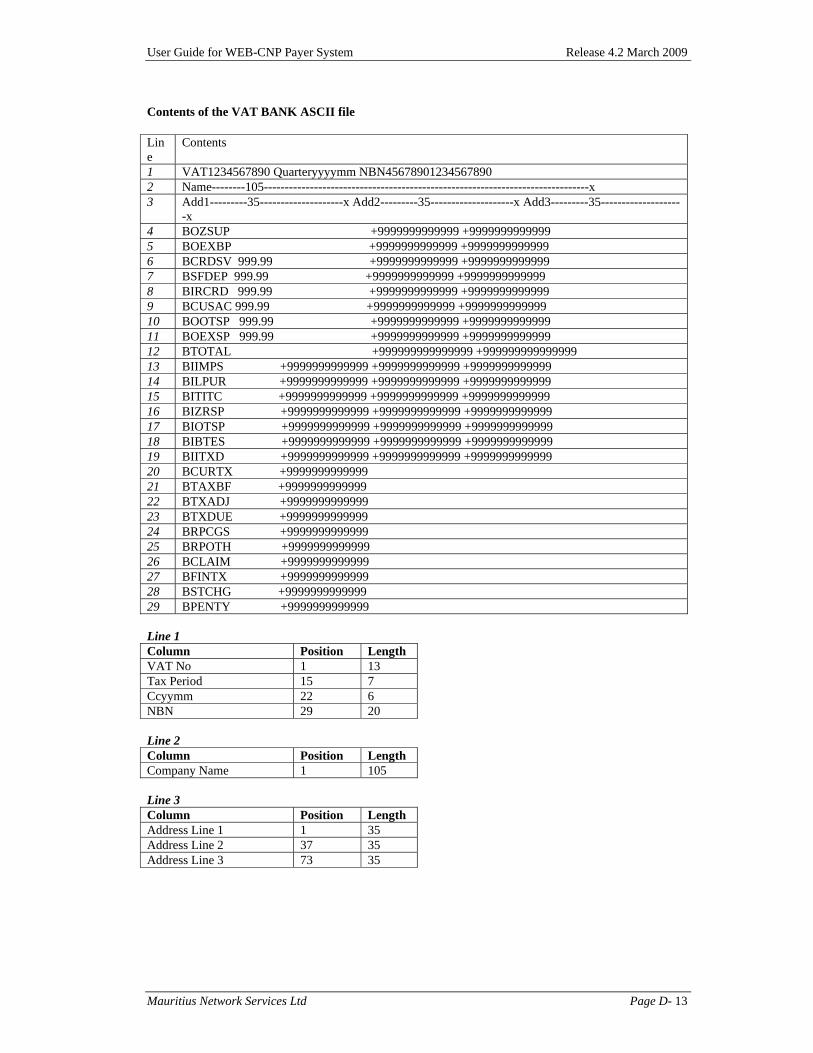
User Guide for WEB-CNP Payer System Release 4.2 March 2009
Mauritius Network Services Ltd Page D- 13
Contents of the VAT BANK ASCII file Line
Contents
1 VAT1234567890 Quarteryyyymm NBN45678901234567890 2 Name--------105------------------------------------------------------------------------------x 3 Add1---------35--------------------x Add2---------35--------------------x Add3---------35-------------------
-x 4 BOZSUP +9999999999999 +9999999999999 5 BOEXBP +9999999999999 +9999999999999 6 BCRDSV 999.99 +9999999999999 +9999999999999 7 BSFDEP 999.99 +9999999999999 +9999999999999 8 BIRCRD 999.99 +9999999999999 +9999999999999 9 BCUSAC 999.99 +9999999999999 +9999999999999 10 BOOTSP 999.99 +9999999999999 +9999999999999 11 BOEXSP 999.99 +9999999999999 +9999999999999 12 BTOTAL +999999999999999 +999999999999999 13 BIIMPS +9999999999999 +9999999999999 +9999999999999 14 BILPUR +9999999999999 +9999999999999 +9999999999999 15 BITITC +9999999999999 +9999999999999 +9999999999999 16 BIZRSP +9999999999999 +9999999999999 +9999999999999 17 BIOTSP +9999999999999 +9999999999999 +9999999999999 18 BIBTES +9999999999999 +9999999999999 +9999999999999 19 BIITXD +9999999999999 +9999999999999 +9999999999999 20 BCURTX +9999999999999 21 BTAXBF +9999999999999 22 BTXADJ +9999999999999 23 BTXDUE +9999999999999 24 BRPCGS +9999999999999 25 BRPOTH +9999999999999 26 BCLAIM +9999999999999 27 BFINTX +9999999999999 28 BSTCHG +9999999999999 29 BPENTY +9999999999999 Line 1 Column Position Length VAT No 1 13 Tax Period 15 7 Ccyymm 22 6 NBN 29 20 Line 2 Column Position Length Company Name 1 105 Line 3 Column Position Length Address Line 1 1 35 Address Line 2 37 35 Address Line 3 73 35
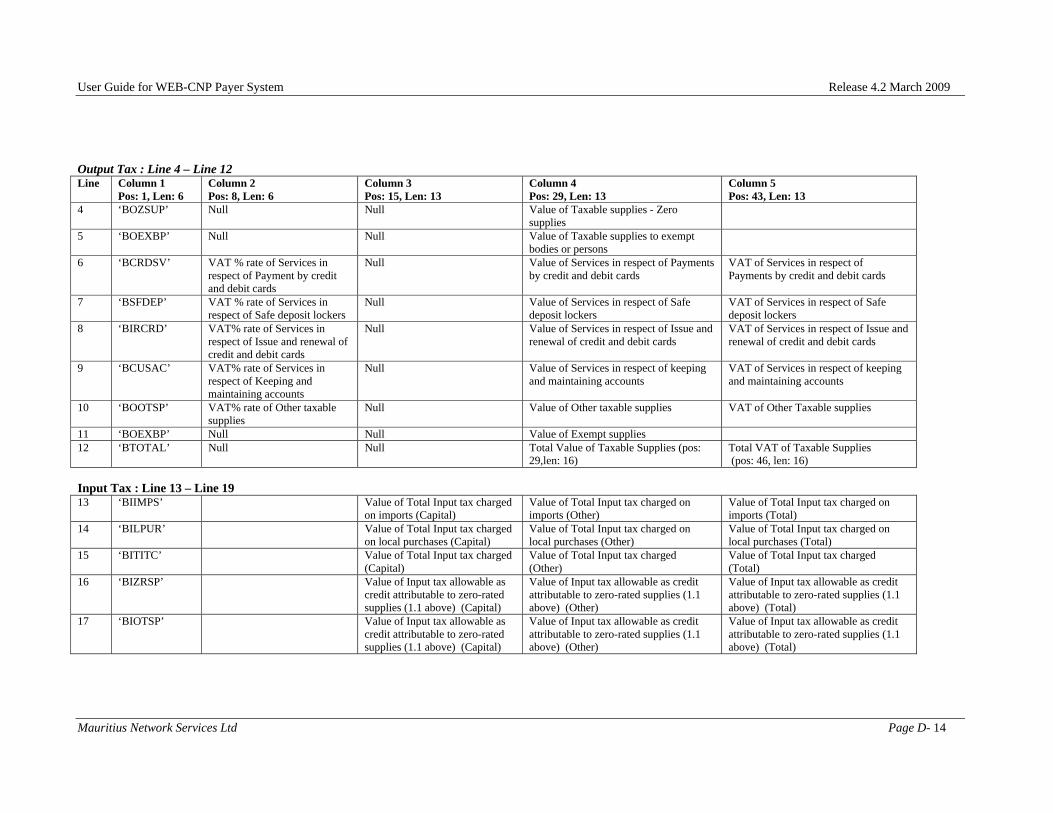
User Guide for WEB-CNP Payer System Release 4.2 March 2009
Mauritius Network Services Ltd Page D- 14
Output Tax : Line 4 – Line 12 Line Column 1
Pos: 1, Len: 6 Column 2 Pos: 8, Len: 6
Column 3 Pos: 15, Len: 13
Column 4 Pos: 29, Len: 13
Column 5 Pos: 43, Len: 13
4 ‘BOZSUP’ Null Null Value of Taxable supplies - Zero supplies
5 ‘BOEXBP’ Null Null Value of Taxable supplies to exempt bodies or persons
6 ‘BCRDSV’ VAT % rate of Services in respect of Payment by credit and debit cards
Null Value of Services in respect of Payments by credit and debit cards
VAT of Services in respect of Payments by credit and debit cards
7 ‘BSFDEP’ VAT % rate of Services in respect of Safe deposit lockers
Null Value of Services in respect of Safe deposit lockers
VAT of Services in respect of Safe deposit lockers
8 ‘BIRCRD’ VAT% rate of Services in respect of Issue and renewal of credit and debit cards
Null Value of Services in respect of Issue and renewal of credit and debit cards
VAT of Services in respect of Issue and renewal of credit and debit cards
9 ‘BCUSAC’ VAT% rate of Services in respect of Keeping and maintaining accounts
Null Value of Services in respect of keeping and maintaining accounts
VAT of Services in respect of keeping and maintaining accounts
10 ‘BOOTSP’ VAT% rate of Other taxable supplies
Null Value of Other taxable supplies VAT of Other Taxable supplies
11 ‘BOEXBP’ Null Null Value of Exempt supplies 12 ‘BTOTAL’ Null Null Total Value of Taxable Supplies (pos:
29,len: 16) Total VAT of Taxable Supplies (pos: 46, len: 16)
Input Tax : Line 13 – Line 19 13 ‘BIIMPS’ Value of Total Input tax charged
on imports (Capital) Value of Total Input tax charged on imports (Other)
Value of Total Input tax charged on imports (Total)
14 ‘BILPUR’ Value of Total Input tax charged on local purchases (Capital)
Value of Total Input tax charged on local purchases (Other)
Value of Total Input tax charged on local purchases (Total)
15 ‘BITITC’ Value of Total Input tax charged (Capital)
Value of Total Input tax charged (Other)
Value of Total Input tax charged (Total)
16 ‘BIZRSP’ Value of Input tax allowable as credit attributable to zero-rated supplies (1.1 above) (Capital)
Value of Input tax allowable as credit attributable to zero-rated supplies (1.1 above) (Other)
Value of Input tax allowable as credit attributable to zero-rated supplies (1.1 above) (Total)
17 ‘BIOTSP’ Value of Input tax allowable as credit attributable to zero-rated supplies (1.1 above) (Capital)
Value of Input tax allowable as credit attributable to zero-rated supplies (1.1 above) (Other)
Value of Input tax allowable as credit attributable to zero-rated supplies (1.1 above) (Total)
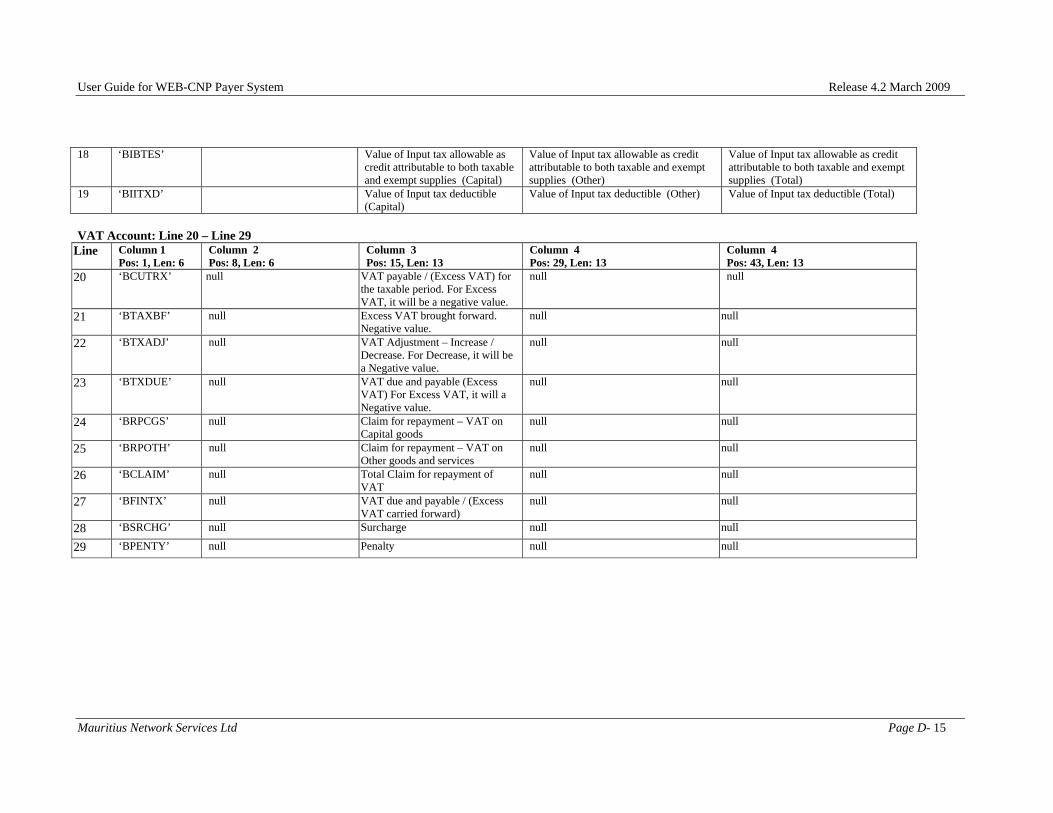
User Guide for WEB-CNP Payer System Release 4.2 March 2009
Mauritius Network Services Ltd Page D- 15
18 ‘BIBTES’ Value of Input tax allowable as credit attributable to both taxable and exempt supplies (Capital)
Value of Input tax allowable as credit attributable to both taxable and exempt supplies (Other)
Value of Input tax allowable as credit attributable to both taxable and exempt supplies (Total)
19 ‘BIITXD’ Value of Input tax deductible (Capital)
Value of Input tax deductible (Other) Value of Input tax deductible (Total)
VAT Account: Line 20 – Line 29
Line Column 1 Pos: 1, Len: 6
Column 2 Pos: 8, Len: 6
Column 3 Pos: 15, Len: 13
Column 4 Pos: 29, Len: 13
Column 4 Pos: 43, Len: 13
20 ‘BCUTRX’ null VAT payable / (Excess VAT) for the taxable period. For Excess VAT, it will be a negative value.
null null
21 ‘BTAXBF’ null Excess VAT brought forward. Negative value.
null null
22 ‘BTXADJ’ null VAT Adjustment – Increase / Decrease. For Decrease, it will be a Negative value.
null null
23 ‘BTXDUE’ null VAT due and payable (Excess VAT) For Excess VAT, it will a Negative value.
null null
24 ‘BRPCGS’ null Claim for repayment – VAT on Capital goods
null null
25 ‘BRPOTH’ null Claim for repayment – VAT on Other goods and services
null null
26 ‘BCLAIM’ null Total Claim for repayment of VAT
null null
27 ‘BFINTX’ null VAT due and payable / (Excess VAT carried forward)
null null
28 ‘BSRCHG’ null Surcharge null null
29 ‘BPENTY’ null Penalty null null


