17 May 2010 - PRELIMINARY www.audioscience.com 1 17 May 2010 ASI6316 PCI EXPRESS COBRANET SOUND CARD 1 DESCRIPTION The ASI6316 is a professional PCI Express audio adapter designed for use in the broadcast and entertainment markets. Using Cirrus Logic’s CobraNet technology for streaming audio over Ethernet, the ASI6316 provides 16 mono/8 stereo inputs and outputs. It can be connected to any CobraNet compliant device and has dual redundant CobraNet interfaces. The ASI6316 is based on the TMS320C6713 VLIW floating point DSP connected to a high-speed bus-master PCI Express interface. AudioScience MRX technology allows up to 16 streams of different formats and sample rates to be played, recorded, and mixed over CobraNet. A choice of 16bit PCM, MP3 or MPEG layer 2 compression is available on all streams. AudioScience provides ASIControl, an application that allows CobraNet routing connections to be set up between the ASI6316 and any other compliant CobraNet device on the network. Alternatively, third party CobraNet design and management software may be used. 2 FEATURES • 16 24bit CobraNet inputs and outputs on 100Mbit Ethernet operating at 48kHz with dual RJ45 connectors • 16 mono/8 stereo streams of MP3, MPEG Layer2 or PCM playback and 16 mono/8 stereo streams of record • Dedicated Word clock Sync input and output (selectable) * • Intercard Sync to support exactly aligned channels of ASIO audio * • Serial bridge exposed as a USB header * • MRX™ technology supports recording, playing and mixing of multiple stream formats and sample rates • TSX™ time scaling allows compression/expansion of play steams by up to +/-20% with no pitch shift • Low Profile PCI card allows use in 2U high rackmount computers • Up to 8 cards in one system • Windows XP/Server 2003/Server 2008/7 and Linux software drivers available * Available in driver 4.04 and later.
Transcript
17 May 2010 - PRELIMINARY
www.audioscience.com 1 17 May 2010
ASI6316 PCI EXPRESS COBRANET SOUND CARD
1 DESCRIPTION The ASI6316 is a professional PCI Express audio adapter designed for use in the broadcast and entertainment markets. Using Cirrus Logic’s CobraNet technology for streaming audio over Ethernet, the ASI6316 provides 16 mono/8 stereo inputs and outputs. It can be connected to any CobraNet compliant device and has dual redundant CobraNet interfaces. The ASI6316 is based on the TMS320C6713 VLIW floating point DSP connected to a high-speed bus-master PCI Express interface. AudioScience MRX technology allows up to 16 streams of different formats and sample rates to be played, recorded, and mixed over CobraNet. A choice of 16bit PCM, MP3 or MPEG layer 2 compression is available on all streams. AudioScience provides ASIControl, an application that allows CobraNet routing connections to be set up between the ASI6316 and any other compliant CobraNet device on the network. Alternatively, third party CobraNet design and management software may be used.
2 FEATURES • 16 24bit CobraNet inputs and outputs on 100Mbit
Ethernet operating at 48kHz with dual RJ45 connectors • 16 mono/8 stereo streams of MP3, MPEG Layer2 or
PCM playback and 16 mono/8 stereo streams of record • Dedicated Word clock Sync input and output (selectable) * • Intercard Sync to support exactly aligned channels of
ASIO audio * • Serial bridge exposed as a USB header * • MRX™ technology supports recording, playing and
mixing of multiple stream formats and sample rates • TSX™ time scaling allows compression/expansion of play
steams by up to +/-20% with no pitch shift • Low Profile PCI card allows use in 2U high rackmount
computers • Up to 8 cards in one system • Windows XP/Server 2003/Server 2008/7 and Linux
software drivers available
* Available in driver 4.04 and later.
ASI6316
www.audioscience.com 2 17 May 2010
CobraNet Play Streams 1-8 (stereo)
ASI6316 – Mode 1
Play 1
Play 2
Play 3
Play 4
Play 5
Play 6
Play 7
Play 8
Record 1
Record 2
Record 3
Record 4
Record 5
Record 6
Record 7
Record 8
CobraNet Record Streams 1-8 (stereo)
100Mbps Ethernet
RJ-4516x16
CobraNetInterface
3 SPECIFICATIONS COBRANET INPUT/OUTPUT Type 100BaseT Ethernet Connector RJ-4 Precision 16, 20 or 24bit PCM Sample Rate 48kHz Latency 1.33, 2.66 or 5.33ms Control Protocol SNMP SIGNAL PROCESSING DSP Texas Instruments TMS320C6713@300MHz Memory 8MB Audio Formats 8 bit unsigned PCM
16, 24 bit signed PCM 32 bit floating point PCM MPEG-1 Layer 2 MPEG-1 Layer 3(MP3) (MPEG Layer-3 audio coding technology licensed from Fraunhofer IIS and THOMSON multimedia)
MRX Playback sample rates 8 to 96kHz with 1Hz resolution Record sample rates 8 to 96kHz with 1Hz resolution SRC THD+N -110dB GENERAL Bus X1 PCI Express Dimensions PCI form factor – 6.1" x 3.25" x 0.5" (155mm x 82mm x 13mm) Weight 8 oz (227g) max Operating Temperature 0C to 70C Power Requirements [email protected]
4 BLOCK DIAGRAMS
ASI6316 - Mono Mode CobraNet Play Streams 1-16 (mono)
CobraNet Record Streams 1-16 (mono)
100Mbps Ethernet
RJ-4516x16
CobraNetInterface
Play 1
Play 2
Play 3
Play 4
Play 5
Play 6
Play 7
Play 8
Play 9
Play 10
Play 11
Play 12
Play 13
Play 14
Play 15
Play 16
Record 2
Record 1
Record 3
Record 4
Record 5
Record 6
Record 7
Record 8
Record 9
Record 10
Record 11
Record 12
Record 13
Record 14
Record 15
Record 16
Sample Rate Converter Record Stream
Key: Play Stream
Volume Voice Operated Switch
Mixer
Multiplexer Meter
Channel Mode
ASI6316
www.audioscience.com 3 17 May 2010
5 REVISIONS Date Description 29 May 2009 Initial. 30 October 2009 Removed rogue elements from block diagrams. 25 January 2010 Added Clock Source Configurations sections.
16 April 2010 Added Serial Bridge Connections section. Corrected power requirements and bus type.
21 April 2010 Updates to format and wording.
17 May 2010 Page 1: Added footnote that driver 4.04 or later is needed for noted functionalities.
2 FEATURES ........................................................................................................................................................ 1
10 HARDWARE INSTALLATION......................................................................................................................... 10 10.1 SETTING ADAPTER INDEX – ONE ADAPTER IN THE PC...............................................................................................10 10.2 SETTING ADAPTER INDEX - TWO OR MORE ADAPTERS IN THE PC .............................................................................11 10.3 CLOCK SOURCE CONFIGURATION...............................................................................................................................11
10.3.1 Clock Obtained from the Network and Word Clock Output ..............................................................................12 10.3.2 Clock Obtained from BNC .................................................................................................................................13 10.3.3 Clock Obtained from Adjacent ASI6316 ............................................................................................................13
10.4 SERIAL BRIDGE CONNECTIONS...................................................................................................................................14 10.5 INTERCARD SYNC .......................................................................................................................................................14
11.2 DRIVERS FOR LINUX ...................................................................................................................................................16 11.3 APPLICATIONS FOR WINDOWS....................................................................................................................................16
7 INTRODUCTION The ASI6316 is a PCI audio adapter that supports the CobraNet™ audio interface providing 16 channels of CobraNet receive and transmit. The ASI6316 features a powerful Texas Instruments 32bit floating point DSP that allows sophisticated switching and mixing. AudioScience provides application software that may be used to set up the ASI6316. ASIControl sets up all internal features of the unit such as levels also allows CobraNet routing connections to be set up between the ASI6316 and any other compliant CobraNet device on the network.
7.1 CobraNet Background CobraNet is a combination of software, hardware and network protocol that allows distribution of many channels of real-time, high quality digital audio over an Ethernet network. It was developed by Peak Audio in the 1990s and is now owned by Cirrus Logic. Interoperability between CobraNet devices from different manufacturers is supported through a standard communications protocol. CobraNet compliant devices are based on a common silicon or hardware reference design from Cirrus Logic. The Cirrus Logic website, www.cobranet.info, is dedicated to CobraNet. Wikipedia has a useful introduction to CobraNet here. CobraNet delivers audio in standard Ethernet packets over 100Mbit Fast Ethernet. Switches, hubs, media converters and other gear that operate in compliance with the IEEE 802.3u specification for Fast Ethernet, will work with CobraNet. CobraNet does not support 10Mbit Ethernet varieties (10BASE-T, Coaxial) due to their limited bandwidth. CobraNet operates at the Data Link Layer also referred to as OSI Layer 2 or MAC layer. Because it does not use the higher IP layer for audio data transport, CobraNet does not suffer from IP latency limitations. In most cases data communications and CobraNet data can coexist on the same network without QOS issues. All audio is sent inside a custom Ethernet packet whose header that tells network devices that the packet contains CobraNet audio rather than plain data. The CobraNet term for an audio packet is "Bundle". A Bundle may contain from one to eight audio channels, each channel being composed of PCM samples of 16, 20 or 24 bits in length.
7.1.1 CobraNet Routing The whole point of network audio is to route digital audio from point A to point B. CobraNet introduces a concept called a “bundle” to define virtual audio routes from one CobraNet device to another one. A bundle is a logical collection of up to 8 channels that can be sent from on device to another. Each bundle is assigned a unique number between 1 and 9999. Bundles form the heart of the CobraNet routing capability.
ASI6316
www.audioscience.com 7 17 May 2010
CobraNet Device 2
The bundle number 300 is used to describe this collection of channels coming from Device 1. s1 to s8 represent audio samples. The bundle shown above consists of 1 to 8 samples of audio each taken from different channels of Device 1.
CobraNet Device 1
Bundle #300 s1,s2,s3,s4,s5,s6,s7,s8
Illustration of a CobraNet bundle going between 2 CobraNet devices.
The above figure illustrates a bundle of audio being sent from one CobraNet device to another. Device 1 is transmitting the CobraNet bundle, while Device 2 is receiving it. In this case, both devices need to be set to bundle 300 for the audio link to be made. The CobraNet mechanism for transmitting bundles uses “transmitters”. Similarly, the mechanism for receiving bundles uses receivers. Each CobraNet device has several transmitters and receivers and so can simultaneously send and receive audio channels using several different bundle numbers. This capability supports audio links between many different CobraNet devices.
ASI6316
www.audioscience.com 8 17 May 2010
7.1.2 ASI6316 CobraNet Audio Channel Mapping Before further discussion of CobraNet transmitters and receivers, terminology useful for specifying audio channels within a bundle needs to be introduced. Somewhat obviously, these channels are called the Audio Routing Channels. On an ASI2416 audio routing channels 1 – 16 map to input channels 1 – 16. Similarly, on the output side audio routing channels 33-49 map to output channels 1 –16. On an ASI6316 audio routing channels 1-16 map to line out 1-8. Routing channel 1 maps to line out 1 left and routing channel 2 maps to line out 1 right and so on.
ASI6316 I/O CobraNet audio channel used in transmitters and receivers.
Figure 3. Mapping of ASI6316 inputs and outputs to CobraNet channels.
ASI6316
www.audioscience.com 9 17 May 2010
7.1.3 CobraNet Transmitters A CobraNet transmitter is a logical entity in the CobraNet interface that has the ability to send a bundle of audio samples on the CobraNet network. CobraNet devices typically have multiple transmitters. The ASI2416, for example, has 4 transmitters. An incomplete list of transmitter routing variables follows:
• txBundle – this variable specifies the bundle number to transmit. A value of 0 indicates that the transmitter is disabled.
• txSubMap – a sequence of up to 8 audio routing channel numbers that specify which audio samples should be placed in the bundle. A value of 0 indicates an unused slot in the bundle.
• txSubFomat – a sequence of format specifiers that define how many bits per sample are placed in the bundle.
• txSubCount – the number of channels in this bundle.
7.1.4 CobraNet Receivers A CobraNet receiver is a logical entity in the CobraNet interface that has the ability to receiver a bundle of audio samples from the CobraNet network. CobraNet devices typically have multiple receivers. The ASI2416, for example, has 4 receivers. An incomplete list of receiver routing variables follows:
• rxBundle – the number of the bundle to receive. This should be the same a bundle number being transmitted somewhere else on the network. A value of 0 indicates that the receiver is disabled.
• rxSubMap – a sequence of up to 8 audio routing channel numbers that specify where incoming bundle samples should be routed.
7.1.5 CobraNet Sample Rate and Latency The CobraNet sample rate supported by the ASI2416 and ASI6416 is fixed at 48kHz with three latency modes of 5.33ms (default), 2.67ms or 1.33ms.
7.1.6 CobraNet References This document is not intended to be an expansive guide to CobraNet networking and routing. The ASI2416 and ASI6416 adhere to the CobraNet standard through the use of off-the-self CobraNet silicon from Cirrus Logic. More detailed CobraNet information is available from them. The following links may be helpful: CobraNet Info: http://www.cobranet.info/en/support/cobranet/ CobraNet Discovery: http://www.cobranet.info/dispatch/forms/sup/boardreg/breg/BregController.jpf Audio Routing Primer: http:// www.cirrus.com/en/pubs/appNote/CobraNet_AudioRoutingPrimer.pdf Hardware manual and programmer’s reference: http://www.cobranet.info/en/support/cobranet/developer/tech_data_sheet.html
ASI6316
www.audioscience.com 10 17 May 2010
8 CONNECTORS The ASI6316 uses standard, dual RJ-45 connectors.
9 CABLES The ASI6316 is connected to a CobraNet network using a standard Ethernet cable. The Ethernet cable is not supplied with the ASI6316.
10 HARDWARE INSTALLATION This section explains how to install one or more AudioScience adapters in a computer.
10.1 Setting Adapter Index – One Adapter in the PC 1. Make sure your computer is turned off. 2. PCI adapters should be installed in any empty PCI slot and PCIe adapters should be installed in any x1 (or greater) PCIe slot. 3. Make sure the adapter jumper is set to adapter index #1, the factory default. For a new card no changes need to be made. For an AudioScience adapter from another installation, check that it is set to adapter index #1. Depending on the adapter family, there are different ways of setting the adapter index. 4. Turn on the computer and let it boot. Under Windows, a dialog box will pop up informing you that the computer has detected a new Multimedia Audio card. Cancel out of this dialog box and proceed to the software installation section of this datasheet.
Adapter Index switch set to Adapter #1
For ASI5000 and ASI6000 families, there is an adapter jumper that must be set. The left most position represents adapter index #1.
Adapter Jumper set to Adapter #1
For ASI5300, ASI6300, ASI8700, and ASI8900 families, there is a rotary switch. NOTE: Position 0 (zero) represents adapter #1, position 1 is adapter #2, etc.
ASI6316
www.audioscience.com 11 17 May 2010
10.2 Setting Adapter Index - Two or More Adapters in the PC 1. Make sure your computer is turned off. 2. PCI adapters should be installed in any empty PCI slots and PCIe adapters should be installed in any x1 (or greater) PCIe slots. Different adapter types can coexist in the same computer; for example, an ASI6416 and ASI8921 will work correctly if installed in the same PC. Different adapter types still require unique adapter index numbers. 3. Each adapter in the PC needs to have its adapter jumper/rotary switch position set to unique numbers. For example if you are installing two adapters, the first one would be set to adapter index #1 and the second to adapter index #2. For ASI5000 and ASI6000 families, the position to the right of index #1, when jumpered, represents adapter index #2. The next position represents #3, and the rightmost position, when jumpered, represents #4. For ASI5300, ASI6300, ASI8700, and ASI8900 families, rotate the rotary switch to indicate what position is required. 4. Turn on the computer and let it boot. Under Windows, a dialog box will pop up informing you that the computer has detected a new Multimedia Audio card. Cancel out of this dialog box and proceed to the software installation section of this datasheet.
10.3 Clock Source Configuration The ASI6316 can obtain its CobraNet sample clock from the following three sources:
• The CobraNet network (default)* o Set using ASIControl; see Section 9.1 below
If using BNC out, need to also jumper WCLK OUTPUT IS BNC on J12 • A word clock input through the ASI6316’s BNC connector (ASI6316 is CobraNet conductor)
o Set using ASIControl and jumpering WCLK INPUT IS BNC on J12; see Section 9.2 below • A word clock input from an adjacent ASI6316
o Set using another ASI6316 in the same PC and a 10pin ribbon cable, see Section 9.3 below *The default ASI6316 clock source configuration is “Network”, which derives the CobraNet clock from the CobraNet network. This default setting will work correctly for 90% of installation scenarios. In this scenario the BNC connector can be ignored and there is no need to adjust any of the jumpers on J12. By default, the BNC connector is configured as an input Word clock with 75ohm termination.
ASI6316
www.audioscience.com 12 17 May 2010
The following diagram shows the ASI6316 and its various connectors/jumpers and headers. Most of the components seen below are hidden by the orange ASI6316 faceplate; the labeled areas are not.
10.3.1 Clock Obtained from the Network and Word Clock Output This is the default ASI6316 clock source configuration. The ASI6316 obtains its clock from the CobraNet network as a Performer or supplies it to the network as a Conductor. The diagram below shows (in bold) the clock signal flow. If the BNC is required to output the network clock, jumper the WCLK OUTPUT IS BNC Jumper on J12.
WCLK INPUT IS BNC J12-3
WCLK OUTPUT IS BNC J12-2
BNC 75Ω TERMJ12-1
WCLK INPUT IS HEADER J12-4
INTERCARD SYNC HEADER – IN – J9
CobraNet clock
generation
CobraNet Network
To ASI6316 audio clocking
INTERCARD SYNC HEADER – OUT – J10
BNC WORD CLOCK I/O
NETWORK
WORD
NETWORK
WORD
ADAPTER INDEX
1-8
No connection
J12J12-1 - BNC 75Ω TERMJ12-2 - WCLK OUTPUT IS BNCJ12-3 - WCLK INPUT IS BNCJ12-4 - WCLK INPUT IS HEADER
Primary CobraNet
Secondary CobraNet
BNC connector
J9 INTERCARD
SYNC IN
J10 INTERCARD SYNC OUT
USB SERIAL PORT
USB-B
ASI6316
www.audioscience.com 13 17 May 2010
10.3.2 Clock Obtained from BNC In this mode, the ASI6316 takes a 48kHz word clock in on the BNC causing the CobraNet interface and the card to be synchronized. The clock is available on the INTERCARD SYNC HEADER OUT header to be sent to another ASI6316 if needed. The ASI6316 needs to be the CobraNet Conductor or the BNC clock needs to be synchronized to the CobraNet network clock.
10.3.3 Clock Obtained from Adjacent ASI6316 In this mode, one ASI6316 receives its word clock from an adjacent ASI6316 using a 10pin ribbon cable. Attach one end of the 10pin ribbon cable to J9 on one of the ASI6316s and attach the other end of the 10pin ribbon cable to J10 of the other ASI6316.
WCLK INPUT IS BNC J12-3
WCLK OUTPUT IS BNC J12-2
BNC 75Ω TERM(if needed) J12-1
WCLK INPUT IS HEADER J12-4
INTERCARD SYNC HEADER – IN – J9
CobraNet clock
generation
CobraNet Network
To ASI6316 audio clocking
INTERCARD SYNC HEADER – OUT – J10
BNC WORD CLOCK I/O
NETWORK
WORD
NETWORK
WORD
J9
J10
WCLK INPUT IS BNC J12-3
WCLK OUTPUT IS BNC J12-2
BNC 75Ω TERM (if needed) J12-1
WCLK INPUT IS HEADER J12-4
INTERCARD SYNC HEADER – IN – J9
CobraNet clock
generation
CobraNet Network
To ASI6316 audio clocking
INTERCARD SYNC HEADER – OUT – J10
BNC WORD CLOCK I/O
NETWORK
WORD
NETWORK
WORD
ASI6316
www.audioscience.com 14 17 May 2010
J9
J10
10.4 Serial Bridge Connections Most motherboards have internal USB headers. The ASI6316’s 5pin header at J8 can be connected to the motherboard’s USB header using a cable such as USB-F5RF5R from http://www.performance-pcs.com. Connection should only be made to J4 or J8 as they both interface to the same USB bus. The motherboard should have a USB header with the following pinout:
10.5 Intercard Sync Intercard Sync across multiple ASI6316s supports exactly aligned channels of ASIO audio. 10pin ribbon cables are used to connect up to 8 ASI6316s for up to 128 channels of ASIO audio. Attach the cables with the PC powered down. 1. Connect the ASI6316s. This is done by attaching one end of the 10pin ribbon cable to J9 on one of the ASI6316s and attaching the other end of the 10pin ribbon cable to J10 of the other ASI6316 as shown in the image below. If connecting more than 2 ASI6316s together, daisy chain J9 to J10 on each ASI6316 down the line.
2. Aggregate all of the ASI6316s being used by placing a checkmark next to each ASI6316 in the AsiAsio Control Panel’s Adapter and Sample Type Selection tab. The AsiAsio Control Panel can be found by going Start All Programs AudioScience AsiAsio Control Panel. In most ASIO applications, this Control Panel can also be accessed within the configuration area of the application.
11 SOFTWARE INSTALLATION AudioScience makes audio adapters and drivers for various operating systems. Enhancements to an adapter’s utility come from the integrators software that uses the audio driver to implement sophisticated audio playback and recording functions.
11.1 Drivers for Windows 7/XP/Server 2003/Server 2008 The first step is what type of driver is needed for the adapter. There are two types of drivers for Windows: The WAVE driver and the WDM driver. Typically this will be decided by the application used with the AudioScience adapter. For any application that uses DirectSound, use the WDM driver. Driver 3.10 and later present the user with three install options during installation:
• Install Standard PCI/PCIe Driver. • Install Standard + Network Audio Driver. • Remove all driver components
Traditional installs should select the first of these options. Users of AudioScience CobraNet products should select the second option with the “+Network Audio Driver.” in the text.
11.1.1 WAVE Driver Download the file named ASIWAVE_xxxxxx.EXE from www.audioscience.com and run it (_xxxxxx is the version number). After the EXE has run, reboot the computer and the audio adapter will be operational. If the cover is off the computer, one can see one or two blinking LEDs on top of the card indicating its DSP is running and communicating with the driver. Verify that the adapter is running using ASIControl (see ASIControl section in this document).
11.1.2 WDM Driver Download the file named ASIWDM_xxxxxx.EXE from www.audioscience.com and run it (_xxxxxx is the version number). After the EXE has run, reboot the computer and the audio adapter will be operational. If the cover is off the computer, one can see one or two blinking LEDs on top of the card indicating its DSP is running and communicating with the driver. Verify that the adapter is running using ASIControl (see ASIControl section in this document).
11.1.3 Combo Driver The Combo driver presents both Wave and WDM devices to the user. Download the file named ASICOMBOV_xxxxxx.EXE from www.audioscience.com and run it (_xxxxxx is the version number). After the EXE has run, reboot your computer and the audio adapter will be operational. If the cover is off the computer, one can see one or two blinking LEDs on top of the card indicating its DSP is running and communicating with the driver. Verify that the adapter is running using ASIControl (see ASIControl section in this document).
11.1.4 ASIO All AudioScience drivers also install an ASIO driver interface. It is installed by default.
11.1.5 Driver Failure In the event that an adapter’s driver fails to load correctly, the OS’s event viewer should be checked. The event log is viewed as follows: XP: The system event log is accessed from \Start\Control Panel\Administrative Tools\Event Viewer. The System view should be selected. 7: The system event log is accessed from \Start\Control Panel\System and Maintenance\Administrative Tools\Event Viewer. The Windows Logs\System view should be selected. If two or more adapters are installed in the same system, the first thing to check is that the adapters were assigned unique adapter numbers. If issues persist, please email [email protected].
ASI6316
www.audioscience.com 16 17 May 2010
11.2 Drivers for Linux The latest Linux driver can be downloaded from the AudioScience website – www.audioscience.com.
11.3 Applications for Windows AudioScience provides two application for adapter set-up and configuration: ASIControl and ASIMixer.
11.3.1 ASIControl All Windows drivers install an AudioScience application called ASIControl that can be used to setup and verify functionality of adapters. ASIControl provides a common interface for users across all driver types. The following list of controls are uniquely supported in ASIControl (as opposed to ASIMixer): ASI8700 tuner pre-emphasis ASI8900 tuner RBDS ASI8900 tuner FM stereo indication ASI8914 HD Radio PSD field ASI8914 HD Radio Digital status field ASI8914 HD Radio Digital program number selection From the Windows Start menu, navigate to Start Programs AudioScience and run the ASIControl program. When started, ASIControl will look something like the following:
11.3.2 ASIMixer ASIMixer is specific to the Wave and Combo drivers and is available from the AudioScience website. It uses the Wave/Mixer interface to control AudioScience adapters. Users of driver version 3.10 and later are encouraged to use ASIControl for manipulating adapter controls. See the list of controls in the previous section that that are only available in ASIControl.
ASI6316
www.audioscience.com 17 17 May 2010
12 OPERATION USING ASICONTROL Using ASIControl, the ASI6316 will look similar to the following:
12.1 User Interface ASIControl consists of three main windows: the adapter list in the top portion of the window, the adapter topology view on the left hand side and the node control list on the right hand side.
12.1.1 Adapter List Window The top portion of ASIControl shows a list of all the adapters that the application has found. By default, only bus based (i.e. PCI and/or PCI Express) adapters will be shown. If network support has been installed with the driver then AudioScience and other 3rd party CobraNet devices will be shown. Adapters are listed in order of adapter index. For bus-based adapters, this is determined by the adapter index jumper on the card. For AudioScience CobraNet devices such as the ASI2416 this is calculated from the units MAC address. 3rd party CobraNet devices are listed last as they have no AudioScience index.
12.1.2 Adapter Topology Window The left hand side of ASIControl contains the topology view of the adapter. It is essentially a block diagram of the device showing the available physical inputs and outputs on the right hand side. On the left hand side, bus based adapters show player and recorder streams, while CobraNet adapters show their network connections.
Adapter List Window
Node Controls Window
Adapter Topology Window
ASI6316
www.audioscience.com 18 17 May 2010
Each of these inputs and outputs is referred to as a Node and each Node contains one or more Controls on it. The topology shows each Control as a small square icon. A non-exhaustive list of nodes follows:
Line In Line Out AES/EBU In AES/EBU Out Player Recorder Tuner Clock Source In CobraNet In CobraNet Out
Hovering the mouse over a particular node will highlight it. Clicking on a node will bring up the controls resident on that node in the right hand control list. There is an adapter node in the top left corner. Clicking on this will show adapter specific controls and properties on the right hand side.
12.1.3 Node Controls Window The right hand side of ASIControl shows the controls associated with the selected node on the topology view. The controls are arranged, from top to bottom, in order of audio signal flow, i.e. the audio signal can be viewed as entering the node at the top control and leaving at the bottom control.
12.2 Controls The following subsections list all of the controls for the ASI6316. Each control’s interface as it appears in ASIControl is detailed and where applicable, the API to use the control is described.
12.2.1 Adapter Information This control displays information about the installed adapter or ASI2416.
12.2.1.1 Interface
Figure 1. Adapter information seen in right side of ASIControl. Serial Number: The serial number is displayed here. Hardware Revision: This lists the hardware revision. DSP Software Version: The DSP software version is displayed; usually the same as the driver version installed. DSP Utilization: This shows the loading of the adapter’s DSP in percent. Note: Utilization should be kept below 90%.
ASI6316
www.audioscience.com 19 17 May 2010
12.2.2 Adapter Mode The Adapter_Mode control changes the number of players/recorders/lineouts that an adapter has. Not all sample rates/formats are supported; changing the mode of the adapter allows for best functionality with certain sample rates/formats. Not all adapters have the same modes, and not all adapters have modes. Please see datasheets on specific adapters, available at www.audioscience.com, to learn more.
12.2.2.1 Interface
Figure 2. Adapter_Mode in ASIControl.
Selecting the appropriate mode from the list using the dropdown arrow changes the Adapter_Mode setting. A reboot is necessary after changing adapter mode. The mode setting is saved to the adapter’s EEPROM. The ASI6316 supports four adapter modes: 16-Play, Mode 1, Mode 2, and Mono (Mono mode added in driver 3.14.00 and later).
12.2.2.2 16-Play This mode supports 16 Play streams and 16 Record streams with restricted mixing capabilities (with driver 3.14.00 and later, there are no mixing restrictions). It is recommended that play and record formats be constrained to 48 kHz mono PCM if all 16 devices are to be used.
12.2.2.3 Mode 1 (default) – Standard Mixing This mode supports 8 Play streams and 8 Record streams with full mixing capabilities.
12.2.2.4 Mode 2 – Minimal Mixing This mode supports playback from each Play device to a single LineOut and has no LineIn to LineOut mixing capabilities. This conserves DSP MIPS. Mode 2 supports recording stereo MP2 at 48 kHz on all 8 Record streams.
12.2.2.5 Mono This mode supports 16 mono Play streams and 16 mono Record streams with full mixing capabilities. Mono mode supports PCM only. Mono mode supports mapping a single Play device to a mono CobraNet channel, allowing independent audio output on each channel.
12.2.3 Player The Player control supports playback of an audio file from the computer’s hard drive.
12.2.3.1 Interface
Figure 3. A player in ASIControl.
ASI6316
www.audioscience.com 20 17 May 2010
The first line of static text contains the selected playback file. Below the filename is the file information; playback time and playback bytes, the timescale select options, the player control buttons and the file repeat option.
12.2.3.2 How To Play a File The first step in playing a file is to select the file to play. Use the file icon button to navigate to the desired file. After opening the file, the complete filename, including the path, will appear immediately to the left of the file open icon. At this point the file information is also filled in so that it contains the following fields: “Channels”, “Rate”, “Format”, and “Bit Rate”. Most of there are self-explanatory. The “Rate” refers to the sample rate of the audio recorded in the file. The “Bit Rate” applies only to MPEG compression and is set to 0 for all other formats. At this point the percentage time scaling without pitch shift can be set if desired. The default of 0 indicates that time scaling is disabled. The valid range of settings is +/- 20 percent. The “Repeat” check box indicates whether the file should be played again after playback has completed. It can be set either before playback has begun, or while playback is underway. The file is now ready to be played. To start playback press the play button. At this point the “Time” and “Bytes” fields report playback time and the number of bytes of the file that have been played. Once playback has started, the stop and pause buttons can be used to stop or pause the playback.
12.2.3.3 Using embedded sine wave generator Manually typing in a filename of “~” and pressing play will cause a full-scale 1 kHz sine wave to be played at 48 kHz. The format of the filename string is: "~w, c,f,a,m,s,t". w = waveform = SINE (default=SINE) c = channels = 1..8 (default = 2) f = frequency = 1000 for 1kHz (default=1000) a = amplitude = -1 for -1dBFs (default=0dBFS, i.e. full scale) m = channel mask = 10 for left only, 01 for right only, 11 for stereo etc (default=1 for all channels) t = sample type = (PCM8,PCM16,PCM24,PCM32,FLOAT32), (default=FLOAT32) s = sample rate = positive integer (default=48000) [validity depends on adapter] Defaults can be used if the complete string is not specified, i.e. "~" becomes "~wSINE,c2,f1000,a0,m11,s48000,tFLOAT32" Any subset of the options may be specified, the remaining options will be set to the defaults. e.g. "~f500" = 500Hz stereo sine wave at 0dBFS, 48kHz sample rate.
12.2.3.4 Developer
12.2.3.4.1 Windows APIs Wave – waveOutOpen(), waveOutWrite(), waveOutClose() etc. HPI – Output stream functions documented here. ASX – ASX Player control functions documented here. DirectSound – TBD.
12.2.3.4.2 Linux APIs HPI – TBD.
ASI6316
www.audioscience.com 21 17 May 2010
12.2.4 Recorder The Recorder control supports recording of an audio file.
12.2.4.1 Interface
Figure 4. A recorder in ASIControl.
The first line of text contains the name given to the recorded file along with the location where it is to be saved. Below the filename is the file information, the record time and record bytes, the recorder control buttons and the file Append option.
12.2.4.2 How To Record a File The first step in recording a file is to have audio coming into the adapter. This can be from a line-in or from one of the players in ASIControl. See appropriate sections in this datasheet to accomplish this. Next, the new file needs a name and place to be saved, or an existing audio file can be selected to be overwritten or appended to. Use the file icon button to navigate to the location to create the file and to give it a name, or to open a previously recorded file to overwrite or append to it. Next, from the dropdown arrows, select the number of “Channels”, the “Sample Rate”, the “Format”, and the “Bitrate” that the file should be recorded in. Check the Append checkbox to save the audio to the end of an already existing file. The file is now ready to be recorded. To start recording, press the record button. At this point the “Time’ and “Bytes’ fields report record time and the number of bytes of the file that have been recorded. Once recording has started, the stop and pause buttons can be used to stop or pause the playback. Developer Windows APIs Wave – use waveInOpen(), waveInStart() etc. HPI – use HPI_InStreamxxx() functions. ASX – use ASX_Recorder_xxx() functions. DirectSound – TBD. Linux APIs HPI – use HPI_InStreamxxx() functions. ASX – use ASX_Recorder_xxx() functions. ALSA – TBD
ASI6316
www.audioscience.com 22 17 May 2010
12.2.5 Volume The Volume control allows the audio signal’s gain to be altered in the range of –100 to +20dB.
12.2.5.1 Interface
Figure 5. A Volume of a Player in ASIControl.
Left and Right display boxes: Displays the gain settings that the slider bars are set to. Slider Bars: Click on the bar with the mouse and drag to desired gain. Once the bars are selected, the left and right arrow keys can also be used to change the settings. Lock: When checked, locks the left and right channels to the same gain value. When unchecked, allows the left and right channels to have independent gains. Autofade: When pressed, automatically fades the volume to the opposite end of the scale.
12.2.5.2 Developer
12.2.5.2.1 Windows APIs Wave/Mixer – MIXERCONTROL_CONTROLTYPE_VOLUME This is a Windows standard volume control. Settings are in the range of 0 to 65535, where 0 completely mutes the output and 65535 is the maximum volume. HPI – HPI_Volume APIs. ASX – ASX_Volume APIs. DirectSound – TBD.
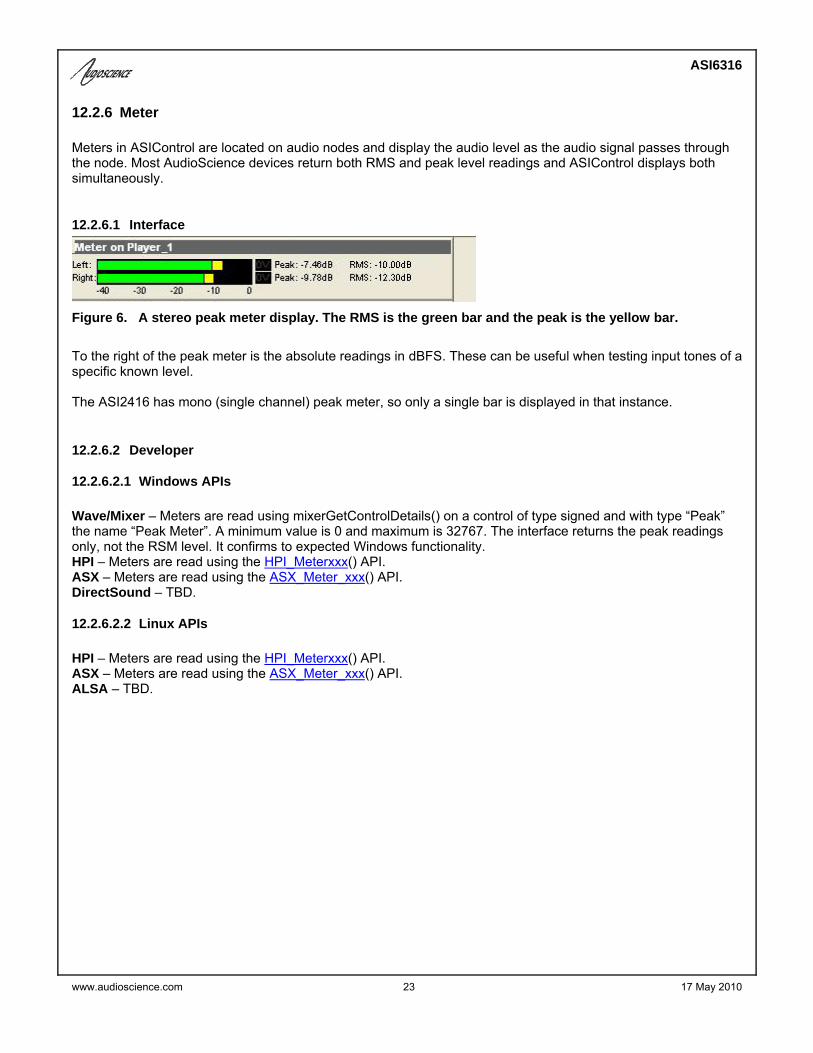
12.2.6 Meter Meters in ASIControl are located on audio nodes and display the audio level as the audio signal passes through the node. Most AudioScience devices return both RMS and peak level readings and ASIControl displays both simultaneously.
12.2.6.1 Interface
Figure 6. A stereo peak meter display. The RMS is the green bar and the peak is the yellow bar.
To the right of the peak meter is the absolute readings in dBFS. These can be useful when testing input tones of a specific known level. The ASI2416 has mono (single channel) peak meter, so only a single bar is displayed in that instance.
12.2.6.2 Developer
12.2.6.2.1 Windows APIs Wave/Mixer – Meters are read using mixerGetControlDetails() on a control of type signed and with type “Peak” the name “Peak Meter”. A minimum value is 0 and maximum is 32767. The interface returns the peak readings only, not the RSM level. It confirms to expected Windows functionality. HPI – Meters are read using the HPI_Meterxxx() API. ASX – Meters are read using the ASX_Meter_xxx() API. DirectSound – TBD.
12.2.6.2.2 Linux APIs HPI – Meters are read using the HPI_Meterxxx() API. ASX – Meters are read using the ASX_Meter_xxx() API. ALSA – TBD.
ASI6316
www.audioscience.com 24 17 May 2010
12.2.7 Channel_Mode The channel mode is a mechanism for handling mono to stereo conversions and directing the output to either left or right channels, as well as outputting left to stereo and right to stereo.
12.2.7.1 Interface
Figure 8. ASIControl view of a player’s channel mode control.
Default playback of either mono or stereo files causes audio to be output from the player on both the left and right audio channels. The channel mode control can allow the audio to be directed to either the left only or the right only. Select a channel mode setting from the dropdown list.
Valid settings are: Normal – left channel out left channel, right channel out right channel
Swap – left channel out right channel and right channel out left channel
Left_to_stereo – left channel out to both left and right channels
Right_to_stereo – right channel out to both left and right channels
Stereo_to_left – left and right channels out to left channel
Stereo_to_right – left and right channels out to right channel
The Stereo_to_left and Stereo_to_right operations perform a sum of the left and right channels and then divides the result by 2.
Left Right
Left Right
Left Right
Left Right
Left Right
Left Right
Left Right
Left Right
Left Right
Left Right +
Left Right
Left Right
+
ASI6316
www.audioscience.com 25 17 May 2010
13 ERRATA
13.1 “Buzzy” audio If “buzzy” audio is heard from an ASI6316, the following may fix it:
- (If needed, save current ASI6316 settings using ASIControl by going to menu item Adapter Save Configuration.)
- Open ASIControl and in the top pane right click on the ASI6316 to select Configure CobraNet. If Persistence is set to on, change it to off.