63
1 ENGINEER EQUIPMENT INSTRUCTION COMPANY MULTI-PIECE RIM
| Date post: | 15-Dec-2015 |
| Category: |
Documents |
| Upload: | anthony-maldonado |
| View: | 215 times |
| Download: | 1 times |

1ENGINEER EQUIPMENT INSTRUCTION COMPANY
MULTI-PIECE RIM

2ENGINEER EQUIPMENT INSTRUCTION COMPANY
OVERVIEW
• Components / Parts
• Tools and Materials
• Dismounting the Multi-Piece Rim
• Rim Maintenance
• Mounting the Multi-Piece Rim

3ENGINEER EQUIPMENT INSTRUCTION COMPANY
LEARNING OBJECTIVES
There are no Learning Objectives Associated with this Period of Instruction

4ENGINEER EQUIPMENT INSTRUCTION COMPANY
METHOD AND MEDIA
• Informal Lecture Method
• Power Point
• Student Handout
• Technical Instruction – TI 11270-OI

5ENGINEER EQUIPMENT INSTRUCTION COMPANY
ADMINISTRATIVE INSTRUCTIONS
• Complete IRF’s following the POI

6ENGINEER EQUIPMENT INSTRUCTION COMPANY
EVALUATION
• There is no Evaluation Over this Period of Instruction.

7ENGINEER EQUIPMENT INSTRUCTION COMPANY
SAFETY
• IF AT ANYTIME THERE IS A FIRE MAKE YOUR WAY OUT THE BACK DOOR AND GET IN FORMATION BY THE OAK TREES FOR ACCOUNTABILITY AND FURTHER WORD TO BE PASSED.
• IF WE SHOULD HAVE INCLEMENT WEATHER STAY IN THE CLASSROOM AND WAIT FOR FURTHER INSTRUCTIONS.

8ENGINEER EQUIPMENT INSTRUCTION COMPANY
QUESTIONS?

9ENGINEER EQUIPMENT INSTRUCTION COMPANY
COMPONENTS / PARTS

10ENGINEER EQUIPMENT INSTRUCTION COMPANY
COMPONENTS / PARTS
1. Rim
2. Air Valve
3. Tire
4. Split Rim
5. O-Ring
6. Snap Ring

11ENGINEER EQUIPMENT INSTRUCTION COMPANY
COMPONENTS / PARTS
1. Rim

12ENGINEER EQUIPMENT INSTRUCTION COMPANY
COMPONENTS / PARTS
2. Air Valve

13ENGINEER EQUIPMENT INSTRUCTION COMPANY
COMPONENTS / PARTS
3. Tire

14ENGINEER EQUIPMENT INSTRUCTION COMPANY
COMPONENTS / PARTS
4. Split Rim

15ENGINEER EQUIPMENT INSTRUCTION COMPANY
COMPONENTS / PARTS
5. O-Ring

16ENGINEER EQUIPMENT INSTRUCTION COMPANY
COMPONENTS / PARTS
6. Snap Ring

17ENGINEER EQUIPMENT INSTRUCTION COMPANY
QUESTIONS?
How Many Components / Parts Make up the Multi-Piece Rim?
Six. They are the Rim, Air Valve, Tire, Split Rim, O-Ring and Snap Ring.

18ENGINEER EQUIPMENT INSTRUCTION COMPANY
TOOLS / MATERIALS
• Tire Spoon(s)
• Tire Iron
• Sledge Hammer
• Air Compressor
• Tire Cage (10ft Stand Off)
• Repair Kit

19ENGINEER EQUIPMENT INSTRUCTION COMPANY
TOOLS / MATERIALS
• Tire Spoon(s)

20ENGINEER EQUIPMENT INSTRUCTION COMPANY
TOOLS / MATERIALS
• Tire Iron

21ENGINEER EQUIPMENT INSTRUCTION COMPANY
TOOLS / MATERIALS
• Sledge Hammer

22ENGINEER EQUIPMENT INSTRUCTION COMPANY
TOOLS / MATERIALS
• Air Compressor

23ENGINEER EQUIPMENT INSTRUCTION COMPANY
TOOLS / MATERIALS
• Tire cage

24ENGINEER EQUIPMENT INSTRUCTION COMPANY
TOOLS / MATERIALS
• Repair Kit

25ENGINEER EQUIPMENT INSTRUCTION COMPANY
QUESTIONS?
Name common tools used when performing maintenance on a multi-piece rim?
Tire Spoon, Tire Iron, Sledge Hammer, Air Compressor, Air Hose, Tire Cage and Repair Kit.

26ENGINEER EQUIPMENT INSTRUCTION COMPANY
BREAK

27ENGINEER EQUIPMENT INSTRUCTION COMPANY
MULTI-PIECE RIM
• DEMOUNTING
• RIM MAINTENANCE
• MOUNTING

28ENGINEER EQUIPMENT INSTRUCTION COMPANY
MULTI-PIECE RIM
DEMOUNTING

29ENGINEER EQUIPMENT INSTRUCTION COMPANY
STEP 1
• Remove cap (3)
• Valve core (2)
• Valve stem (1)

30ENGINEER EQUIPMENT INSTRUCTION COMPANY
STEP 2
• Loosen outer tire bead from ring flange (1) by inserting a curved bead breaker tire iron (3) between tire bead and side ring flange.

31ENGINEER EQUIPMENT INSTRUCTION COMPANY
STEP 3
• Work progressively around rim (2), rotating curved bead breaker tire iron (3) down until outer tire bead is free of ring flange (1).

32ENGINEER EQUIPMENT INSTRUCTION COMPANY
STEP 4
• Force side ring flange (1) down enough to clear lock ring (7).

33ENGINEER EQUIPMENT INSTRUCTION COMPANY
STEP 5
• Insert lock ring tire iron (5) into prying notch (6) and work lock ring (7) partly out of gutter rim (2).

34ENGINEER EQUIPMENT INSTRUCTION COMPANY
STEP 6
• Insert curved flat tire iron (4) between lock ring (7) and rim (2).

35ENGINEER EQUIPMENT INSTRUCTION COMPANY
STEP 7
• Work both curved flat tire iron (4) and lock ring tire iron (5) progressively around rim (2), removing lock ring (7).

36ENGINEER EQUIPMENT INSTRUCTION COMPANY
STEP 8
• With lock ring (7) removed, force side ring flange (1) down and remove the O-ring.

37ENGINEER EQUIPMENT INSTRUCTION COMPANY
STEP 9
• Slide ring flange (1) straight up and off the rim (2).

38ENGINEER EQUIPMENT INSTRUCTION COMPANY
STEP 10
• Turn tire and rim (2) over and loosen the inner tire bead from inner rim flange (8) by inserting a curved bead breaker tire iron (3).

39ENGINEER EQUIPMENT INSTRUCTION COMPANY
STEP 11
• Work progressively around rim (2), rotating curved bead breaker tire iron (3) down until tire bead is completely free of the rim.

40ENGINEER EQUIPMENT INSTRUCTION COMPANY
QUESTIONS?

41ENGINEER EQUIPMENT INSTRUCTION COMPANY
MULTI-PIECE RIM
BREAK

42ENGINEER EQUIPMENT INSTRUCTION COMPANY
MULTI-PIECE RIM
RIM MAINTENANCE

43ENGINEER EQUIPMENT INSTRUCTION COMPANY
RIM MAINTENANCE
• Inspect the rim, lock ring and flanges for damage and/or abnormal wear.

44ENGINEER EQUIPMENT INSTRUCTION COMPANY
RIM MAINTENANCE
• Inspect the rim components for cracks, slits and tears.

45ENGINEER EQUIPMENT INSTRUCTION COMPANY
RIM MAINTENANCE
• Remove any rust, oil, and tire and rim lubricant residue from rim.

46ENGINEER EQUIPMENT INSTRUCTION COMPANY
MULTI-PIECE RIM
MOUNTING

47ENGINEER EQUIPMENT INSTRUCTION COMPANY
STEP 1
• Place rim (2) flat on floor, lubricate beads on tire with tire and rim lubricant and place tire completely on rim.

48ENGINEER EQUIPMENT INSTRUCTION COMPANY
STEP 2
• Slide side ring flange (1) down onto rim (2) and under the bead of the tire.

49ENGINEER EQUIPMENT INSTRUCTION COMPANY
STEP 3
• Force side ring flange (1) down past gutter of rim (2) and install the O-ring in groove of the rim.

50ENGINEER EQUIPMENT INSTRUCTION COMPANY
STEP 4
• Holding side ring flange (1) down past the gutter of rim (2) place the end of the lock ring (7) without prying notch into gutter.
51ENGINEER EQUIPMENT INSTRUCTION COMPANY
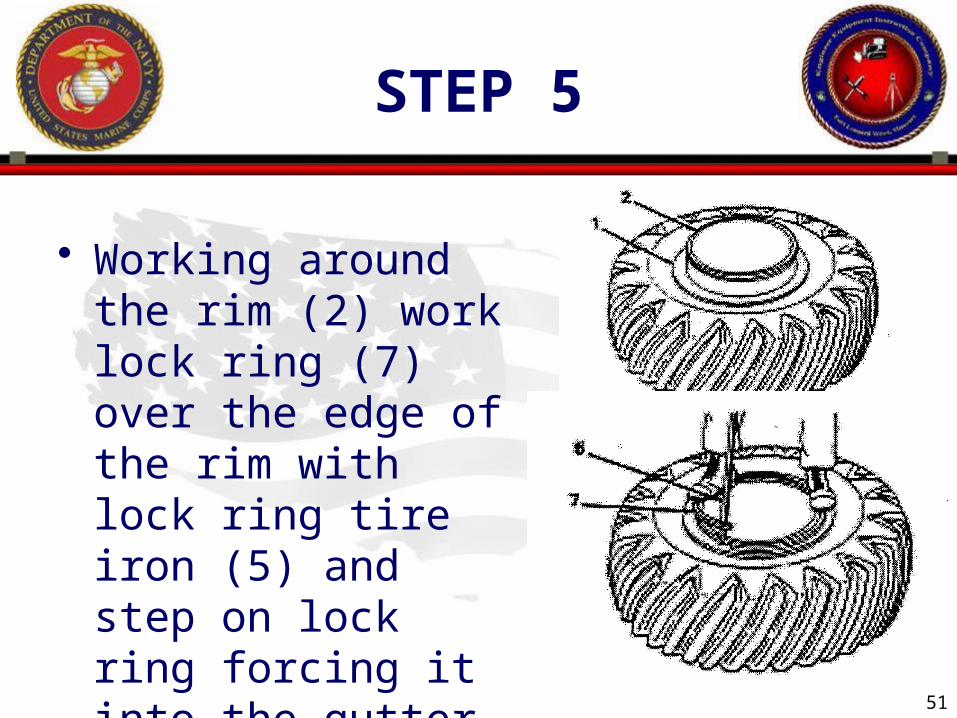
STEP 5
• Working around the rim (2) work lock ring (7) over the edge of the rim with lock ring tire iron (5) and step on lock ring forcing it into the gutter of the rim.

52ENGINEER EQUIPMENT INSTRUCTION COMPANY
STEP 6
• Ensure the O-ring is properly installed and guide the side ring flange (1) up over the O-ring and into the lock ring (7).

53ENGINEER EQUIPMENT INSTRUCTION COMPANY
STEP 7
• Inspect all rim components to ensure that they are properly seated. Place the rim and tire assembly in a tire cage.

54ENGINEER EQUIPMENT INSTRUCTION COMPANY
STEP 8
• Using a pneumatic tire hose with an in-line inflator gage, inflate the tire to 40 psi maximum to seat both tire beads.

55ENGINEER EQUIPMENT INSTRUCTION COMPANY
STEP 8
• Both tire beads should seat before reaching 40 psi. If the tire beads fail to seat, deflate the tire, determine the cause and take corrective action. If needed add additional tire and rim lubricant and repeat.

56ENGINEER EQUIPMENT INSTRUCTION COMPANY
STEP 9
• Visually inspect all rim components to ensure that they are properly seated and allow the tire to deflate.

57ENGINEER EQUIPMENT INSTRUCTION COMPANY
STEP 10
• Install the valve core (2) into valve stem (1).

58ENGINEER EQUIPMENT INSTRUCTION COMPANY
STEP 11
• Inflate the tire to the normal operating pressure (see applicable Equipment TM for proper psi). Visually inspect all rim components to ensure they are seated.

59ENGINEER EQUIPMENT INSTRUCTION COMPANY
STEP 12
• Install the valve cap (3) onto the valve stem (1) finger tight.

60ENGINEER EQUIPMENT INSTRUCTION COMPANY
STEP 13
• Remove the rim and tire assembly from the tire cage.

61ENGINEER EQUIPMENT INSTRUCTION COMPANY
QUESTIONS?
When performing rim maintenance what are you checking for when inspecting the rim components?
You are inspecting the rim components for cracks, slits, and tears.

62ENGINEER EQUIPMENT INSTRUCTION COMPANY
SUMMARY
• Components / parts
• Tools and Materials
• Dismounting the Multi-Piece Rim
• Rim Maintenance
• Mounting the Multi-Piece Rim
Slide 62

63ENGINEER EQUIPMENT INSTRUCTION COMPANY
BREAK
10min break
Slide 63


