This is a walk-through for windows machines. 1 Initialize The first thing you need to do is to download crygwin at http://cygwin.com/install.html. Download setup.exe. Once you run the setup.exe file hit next and then choose install from internet, next. Select install for all users and choose a root directory for Cygwin (i.e. where you want it installed). Next choose a download location for storing temporary files related to the setup (just go with default folder if you have no other preference). Select next Choose Direct Connection next. Choose a website to download more needed files (specifically outlined below) from. The ftp ones seemed to be quicker than the http. Select next and it should connect to the site and a select packages screen will appear. There are a number of packages that need to be installed. The four that are absolutely required are cygwin, openssh, xterm, xinit Enter each package into the highlighted search bar, as seen above. You will most likely have to run the installer for each package. The above four are required but the packages below are recommended. bash, bc, coreutils, gawk, grep, gzip, ImageMagick, less, mesa, more, opengl, tcltk, X-start-menu-icons With crygwin set up you can initialize your Wien account. In the start menu you should see two new folders, one is crygwin and the other is crygwin-X. For now we only need to open the crygwin folder. Open up the crygwin terminal program. type the command “ssh -X ph575 [email protected]” without the quote 1
Transcript
This is a walk-through for windows machines.
1 Initialize
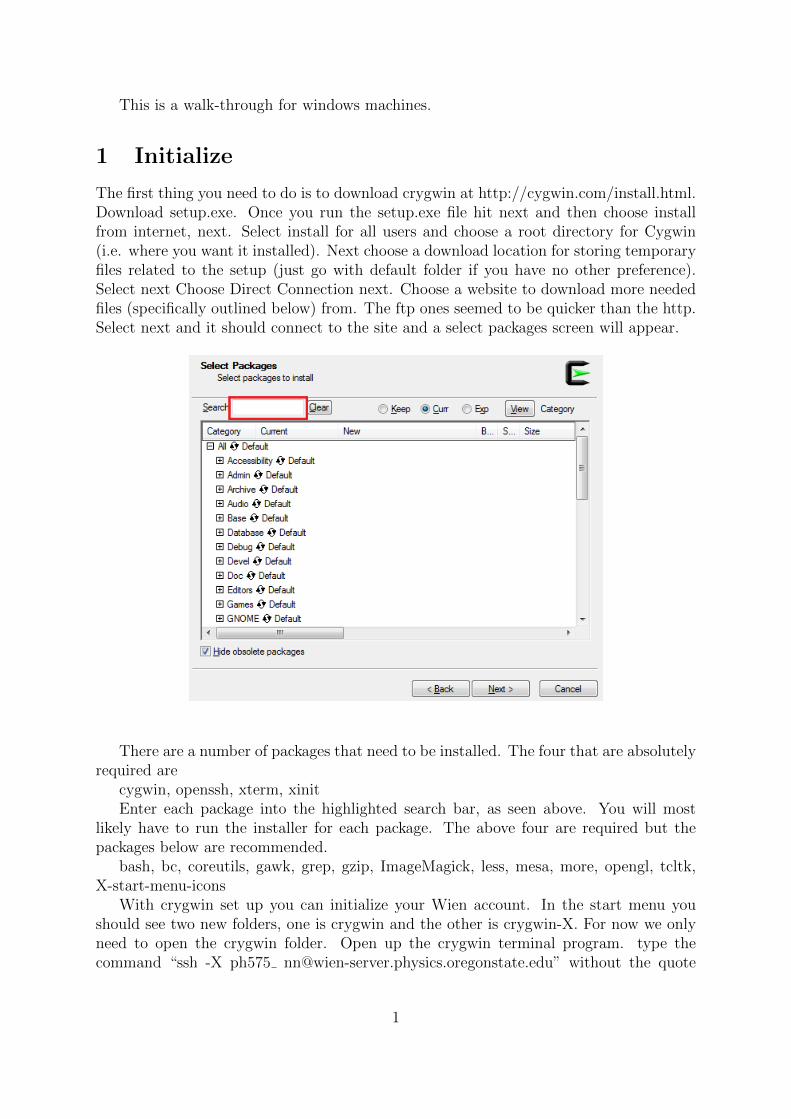
The first thing you need to do is to download crygwin at http://cygwin.com/install.html.Download setup.exe. Once you run the setup.exe file hit next and then choose installfrom internet, next. Select install for all users and choose a root directory for Cygwin(i.e. where you want it installed). Next choose a download location for storing temporaryfiles related to the setup (just go with default folder if you have no other preference).Select next Choose Direct Connection next. Choose a website to download more neededfiles (specifically outlined below) from. The ftp ones seemed to be quicker than the http.Select next and it should connect to the site and a select packages screen will appear.
There are a number of packages that need to be installed. The four that are absolutelyrequired are
cygwin, openssh, xterm, xinitEnter each package into the highlighted search bar, as seen above. You will most
likely have to run the installer for each package. The above four are required but thepackages below are recommended.
With crygwin set up you can initialize your Wien account. In the start menu youshould see two new folders, one is crygwin and the other is crygwin-X. For now we onlyneed to open the crygwin folder. Open up the crygwin terminal program. type thecommand “ssh -X ph575 [email protected]” without the quote
1
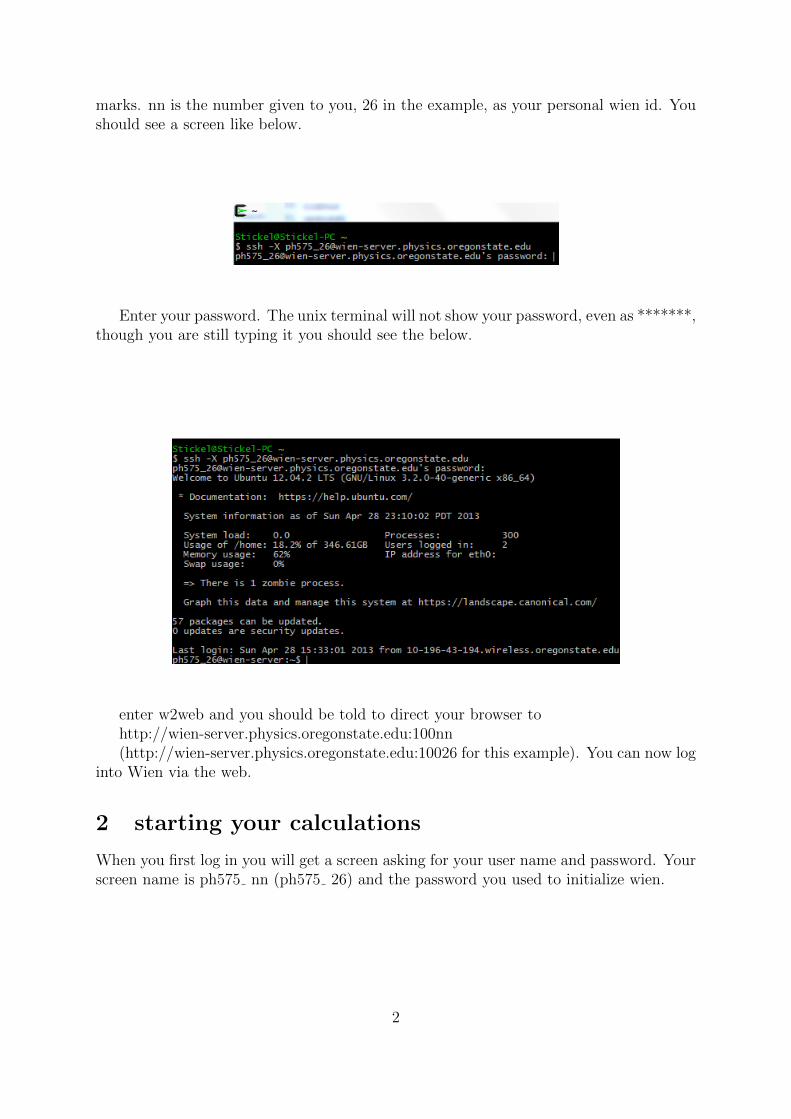
marks. nn is the number given to you, 26 in the example, as your personal wien id. Youshould see a screen like below.
Enter your password. The unix terminal will not show your password, even as *******,though you are still typing it you should see the below.
enter w2web and you should be told to direct your browser tohttp://wien-server.physics.oregonstate.edu:100nn(http://wien-server.physics.oregonstate.edu:10026 for this example). You can now log
into Wien via the web.
2 starting your calculations
When you first log in you will get a screen asking for your user name and password. Yourscreen name is ph575 nn (ph575 26) and the password you used to initialize wien.
2
You should see the main page for Wien. We are going to create a new session thatwe will title Si tutorial.
Click the create button to create the new session. You’ll see the below.
3
Click the create/change button to create a new folder. Do not leave the folder as yourhome folder. After this, select current directory. Then click to restart session. You’ll seethe home page for calculations, which is pictured below.
4
The left hand menu is where all of your calculations will take place. Start with theStructGen link. you will be asked for the number of unique atoms. For silicon this is justone; For something like NaCl, this is two. After this you will see the below screen
5
Enter the information for silicon including the space group and lattice spacing. Whenyou are done, click save. Make sure to click “set automatically RMT and continue editing”at least once. You may leave the percent at 0% . After you do the optimization oncesave file and clean up.
After you finish with that click initialize calc. on the left hand menu. You’ll see thebelow.
6
click though high lighted box. If the option to save a file ever comes up, make sureyou click to save
Click through all the the boxes. The one thing to take note of is when you get tox kgen in phase 16 you’ll need to enter the number of k points you want to calculate.Around 100 for a semiconductor or a few thousand for metals. After you have clickedthough all the steps you will be given the option to “continue with run scf” do this. Thereare many options here. Ignore all of them and just click the “start scf cycle” button atthe bottom. The screen might go white for a while, just let it load. With this done youcan now start doing actual calculations.
7
3 DOS and partial DOS
Click the tasks menu on the left. Then click DOS.
Click through this like you did with the initialize calc. above. You do not need to clickon the buttons in the dark gray boxes however. When you click configure Si tutorialmake sure it says “total 1 tot,d,d-eg,d-t2g 2 tot,s,p” as below.
The next step is were we can calculate the partial density of states. If you only wantthe total you can skip this. Click the edit Si tutorial and you will see the below.
8
You see three columns. The first starts with 1, the second with N, and the third 0.0000.The first row sets the number of partial density of states that are to be calculated. Setthe 1 that is to the left of the N to how ever many PDOS that you want to calculate.Below the first row are the most important rows. Each is its own PDOS. The first columnin each row is the atom in the crystal. For Si, there is only one atom, but for somethinglike NaCl 0 is both put together, 1 would be the first atom you put into structGen, and2 is the second and so forth. The second column tells Wien which orbital you want tocalculate. 1 is total, 2 is s, 3 is p, 4 is d and so on. The interstitial states can be calculatedby setting the number in the first column to 1 higher than total number of atoms in theunit cell, i.e. 2 for Si and 3 for NaCl. The third column is just a title for you to put toremember what each row is for. You can see above the edited file there is something thatsays “ATOM Si: 1 tot”. This is must be present for the partial density of states to work.If it is missing go back to the start of the DOS page and click through all the buttonsagain. When you click plot you’ll see something that looks like the image below
9
Select the PDOS that you want to plot. You can chose your limits as well, though ifthey are left blank the program fits the plots. Click plot and you should see a DOS plot.
4 band structure and/or spaghetti plot
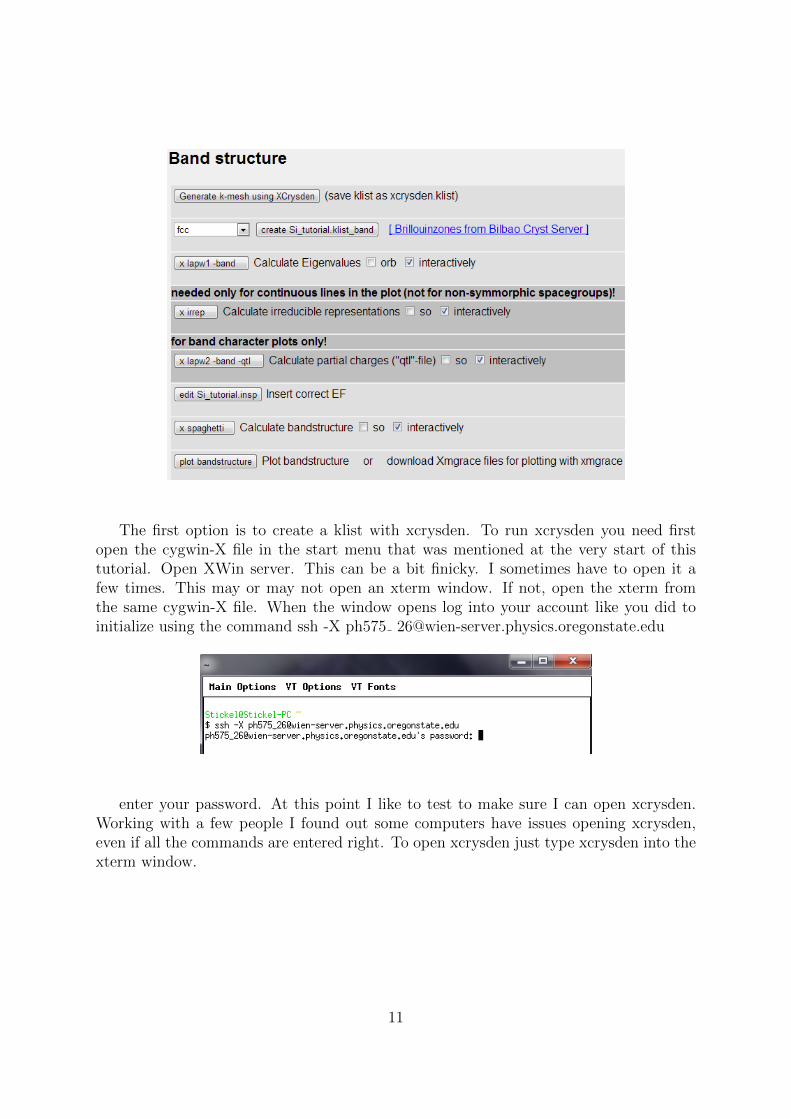
Now that the PDOS is plotted the band structure can be plotted. Click on bandstructureon the left menu. The band structurer window looks like
10
The first option is to create a klist with xcrysden. To run xcrysden you need firstopen the cygwin-X file in the start menu that was mentioned at the very start of thistutorial. Open XWin server. This can be a bit finicky. I sometimes have to open it afew times. This may or may not open an xterm window. If not, open the xterm fromthe same cygwin-X file. When the window opens log into your account like you did toinitialize using the command ssh -X ph575 [email protected]
enter your password. At this point I like to test to make sure I can open xcrysden.Working with a few people I found out some computers have issues opening xcrysden,even if all the commands are entered right. To open xcrysden just type xcrysden into thexterm window.
11
If this opens successfully head back to the web interface and your band structurercalculation. Click the generate k-mesh with xcrysden button. If you just get the message“Requires X-Windows system ...” go to the xterm window and enter the command “ps -uph575 26”. kill any process that says w2web with the command “kill # # # #” where# # # # is whatever number is next to the w2web process. Enter the “ps -u ph575 26”command again to make sure that all the w2web process are shut off. Run w2web againin the xterm window. After this, try the generate k-meh with xcrysden button again.Two windows should (eventually) open. One is just a pink text document, close it.
12
You should see an image like the below appear.
13
Each point corisponds to a high symmetry point in k-space such as the Γ point or theX point. After you have a path click ok.
14
Ignore the line that starts with M multiple.... The second line is important. The totalnumber of K-points along the path are the number of points that wien plots betweenthe k-points you selected in the above step. (too few and the band plot is just straightlines....trust me) Click ok. A third window will pop up and ask for a file name. Enterxcrysden.klist and then save. A final pink text window will appear, close it. Go backto the website and the band plot. In the second line there is a drop down menu thatstarts with fcc. Open the drop down menu and select ‘from xcrysden’ and click the createbutton next to the drop down menu. The menu will revert back to its default fcc, thisis fine, don’t worry about it. Click the third button x lapw1 -band. skip the two darkgray sections. I found that when you use these, the k-list file from xcrysden does notwork. when you get to ‘edit Si tutorial’ you’ll see a series of xxxx that I have highlightedbelow. Replace these xxxx with the number above the text box, on the right that isalso highlighted, which is the fermi energy. The highlighted number may change a bit.I’ve done this a few times and have gotten between .37 and .4 so if its not exactly thatnumber I wouldn’t worry.
15
Click save and click through till you get to the band plot. This is the band plot thatI get.
16
It is also possible to use the standard k-mesh that wien provides. Go back to theband plot menu and instead of using the ’from xcrysden’ option in the drop down menuleave it as fcc and click the generate button to the right. You’ll be asked to copy the file
click ‘copy it’ and then go through all of the buttons like you did for the xcrysdenoption, again double checking the fermi energy when you get to ‘edit Si tutorial’. You’llget a new band plot (most likely, unless you picked the exact same path as wien).
5 electron density
Now that xcrysden is working we can look at electron density. Choose “El Dens” fromthe right menu. You should see the fallowing screen
Click though the first two button. The third button had an Emin that you can set.This is used to make sure that the core electrons are removed. The two buttons above xlapw2 are supposed to tell you where to set Emin but I have yet to figure that out.
Once you have run x lapw2 skip the dark gray sections again. Click “Calculate densitywith xcrysden”. It will open up 2 windows. One xcrysden that looks familiar. The otherlooks like below (again, if you get the “Requires X-Windows system ... Calc” error fallowthe same steps as here.)
17
Choose the 2D plot. I haven’t played too much at this point, but you’ll see a screenthat looks like
In the top section choose to “set number of points along one grid-segment” and entera number. The important part is the second section. This is where you pick the threeatoms that form what area you look at for your electron density. How wien works is itmakes, or is given, three coordinates which it uses to define a plane. This plane is thecross section of the electron density that you will be looking at. What you are doing hereare picking 3 atoms that will define this plane.
In the “select plane for property evolution” section select “three atoms spanningparallelogram selection” It looks like it has already been selected but is grayed out, ithasn’t. Click it and it will open up a new window
18
At this point click over to the xcrysden window with the crystal. One atom you pickwill be the center of your electron density plot. The other two will define the plane thatyou will be looking at. Pick any three atoms you want. After you pick three atoms theabove will change to
hit the selected button. NOT NEXT, if you hit next you have to reselect the atoms.Not really a problem, just annoying if you forget and do it a few times......again, trustme. After you hit submit you’ll go back to first window where you set the number ofpoints along a grid segment. Select submit again. A new window will pop up, just hitok, and then ok once again. A new window will open up, click submit and close. Youcan go back to your browser and wien at this point. The next button is edit case.in5.This is where you can manually set the which atoms define the plane instead of clickingon them in xcrysden. It should look like
It will probably not be those exact numbers as they are specific to the atoms I chooseand to what the system is but will have that pattern of three rows and four columns with
19
the 4th column being something like just 2 or 3 or something. Click save and continue.Click x lapw5, continue, and then click phoplot. You can preview it with xcrysden, butall this does it overlay the electron density plot with the atoms. After you hit rhoplotjust click plot. You should see something that looks like
This doesn’t look like much. After some playing (an exorcise I’ll leave to the reader)you should be able to get a plot that looks something like
Now, you can go back to xcrysden and select a different set of three atoms for a newplane and a new perspective on your electron density.
20
6 XSPEC
This section will deal with XSPEC. XSPEC is a means of calculating the xray xpectrumfor your materials. Before you can run XSPEC you must have partial density of statesplotted. See section 3. Click XSPEC on the left and you will see
Skip the dark gray entries and start with xlapw2 -qtl. Click the edit next and thensave and continue. Click x xspec, and then plot. In the plot you have various options forplots, such as broadened or unbroadened. You must also choose a column. The spectrumI get is
7 Optical properties
The last of the utilities I will look at is the OPTIC which lets us looks at the opticalproperties of the material. You must also have partial DOS plotted for this (see section 3).Select OPTIC on the left menu and you should get
21
Click through the first button. The second opens up the window
This lets you pick what components you want to look at. I.e. do you want to lookat xx part or the yz. It also lets your select the real or imaginary part for complexcomponents. The number of points you can chose is the number in the third column. Itis currently set to 2. The two rows below it are which components are being selected.they are currently 1 the xx and 3 the zz. This is made clear in the table bellow thislabeled choices. Make your choices and save and continue. Do x optic. Next is editcase.injoint You will see
22
This is where you select what optical property to look at, though, at the end, it seemsall are plotable. For now you can just click save and continue. Click through the rest ofthe buttons. When you get to plot you can see a list off optical properties to plot. I haveselected epsilon and got the fallowing plot