45
RoMow Mk. II A Project Proposal and Feasibility Study Team 01 From the left: Se Ge Jung, Caleb Meindertsma, Emily Wheeler, and Aldo Daniel ENGR 339

RoMow Mk. II
A Project Proposal and Feasibility Study
Team 01From the left: Se Ge Jung, Caleb Meindertsma, Emily Wheeler, and Aldo Daniel
ENGR 339
© 2015-2016 Team 01 and Calvin College

IA Project Proposal and Feasibility Study
Team 01Aldo Daniel, E.E.Se Ge Jung, M.E.
Caleb Meindertsma, M.E.© 2015-2016, Team 01 and Calvin College
ENGR 339
© 2015 Team 01 and Calvin College

Executive SummaryTeam 01, comprised of two mechanical concentration students and two electrical concentration students, will discuss the project feasibility and design of a remote controlled platform to be used with a variety of lawn mowers. The objective for RoMow Mk. II is to design a remote controlled lighter frame platform that is adjustable in xyz directions. An on-board camera will be added with video streaming over Wi-Fi to make the user's experience more enjoyable. The team's intensive research, analysis, and consultations confirmed the feasibility of the design project. Prototype, design, testing, and optimization will begin in ENGR 340.

Table of Contents
1. Introduction................................................................................................................................1
1.1. Course...................................................................................................................................1
1.2 Team.......................................................................................................................................1
1.2.1 Aldo Daniel......................................................................................................................1
1.2.2 Se Ge Jung.......................................................................................................................2
1.2.3 Caleb Meindertsma.........................................................................................................2
1.2.4 Emily Wheeler.................................................................................................................2
1.3 Chapter Overview..................................................................................................................3
Chapter 1: Introduction............................................................................................................3
Chapter 2: Problem Definition.................................................................................................3
Chapter 3: Project Management..............................................................................................3
Chapter 4: Mechanical Design Process...................................................................................3
Chapter 5: Electrical Design Process......................................................................................3
Chapter 6: Cost........................................................................................................................3
Chapter 7: Conclusion.............................................................................................................3
Chapter 8: Acknowledgements.................................................................................................3
Chapter 9: Appendices.............................................................................................................4
2. Problem Definition.....................................................................................................................5
2.1 Need.......................................................................................................................................5
2.1.1 RC Lawn Mower Market.................................................................................................5
2.2 Customer................................................................................................................................5
2.3 Reason for Selection..............................................................................................................6
2.4 Requirements.........................................................................................................................6
2.4.1 Customer Requirements..................................................................................................6
2.4.2 Previous Team Suggestions.............................................................................................6
2.4.3 Team Requirements.........................................................................................................6
2.5 Design Norms........................................................................................................................7
2.5.1 Caring..............................................................................................................................7
2.5.2 Integrity...........................................................................................................................7

2.5.3 Trust.................................................................................................................................7
3. Project Management.................................................................................................................8
3.1 Responsibilities......................................................................................................................8
3.1.1 Design Assignments.........................................................................................................8
3.1.2 Administrative Assignments............................................................................................8
3.2 Project Status..........................................................................................................................8
3.2.1 Key Milestones................................................................................................................8
3.2.2 Time Tracking..................................................................................................................9
3.3 Course Deliverables...............................................................................................................9
3.4 Project Deliverables...............................................................................................................9
3.5 Team Meetings.......................................................................................................................9
4. Mechanical Design Process.....................................................................................................10
4.1 Frame Material Selection.....................................................................................................10
4.1.1 Steel...............................................................................................................................10
4.1.2 Aluminum.......................................................................................................................10
4.1.3 Extruded Aluminum.......................................................................................................11
4.1.4 Material Availability.....................................................................................................11
4.2 Control Box Material Selection...........................................................................................11
4.2.1 ABS Plastic....................................................................................................................11
4.2.2 Carbon Fiber.................................................................................................................11
4.2.3 Material Availability.....................................................................................................12
4.3 Motor Power Specification..................................................................................................12
4.4 Control Box Electronics Dampening...................................................................................12
4.5 Frame Design.......................................................................................................................12
4.5.1 DIY RC Lawn Mowers...................................................................................................13
4.5.2 Mounting/Unloading.....................................................................................................13
4.5.3 Height Adjustment.........................................................................................................14
4.5.4 Length & Width Adjustment..........................................................................................14
5. Electrical Design Process........................................................................................................15
5.1 Hardware..............................................................................................................................15
5.1.1 Remote Controller.........................................................................................................15

5.1.2 Motor Controller...........................................................................................................16
5.1.3 Motors...........................................................................................................................17
5.1.4 Power Supply.................................................................................................................17
5.1.5 Microcontroller.............................................................................................................18
5.1.6 Camera..........................................................................................................................19
5.1.7 Proximity Switch............................................................................................................20
5.2 Software...............................................................................................................................20
5.2.1 Remote Controller Receiver..........................................................................................20
5.2.2 Main Movement Control...............................................................................................20
5.2.3 Video Streaming............................................................................................................20
5.3 System Overview.................................................................................................................21
6. Cost............................................................................................................................................22
6.1 Budget allocated and used....................................................................................................22
6.2 Mass Production Additional Costs.......................................................................................22
7. Conclusion................................................................................................................................23
7.1 Design Decisions..................................................................................................................23
7.1.1 Mechanical Design Decisions.......................................................................................23
7.1.2 Electrical Design Decisions..........................................................................................23
7.2 Current Status.......................................................................................................................24
7.3 Risks.....................................................................................................................................24
8. Acknowledgements..................................................................................................................25
9. Appendices................................................................................................................................26
9.1 Motor Requirements............................................................................................................26

Table of Figures
Figure 1: Lawnbot400 by J D Warren..........................................................................................13
Figure 2: EvaTech RC Lawn Mower............................................................................................14
Figure 3: Width Adjustment Mechanism......................................................................................14
Figure 4: System Overview of RoMow Mk. II.............................................................................21

Table of Tables
Table 1: Products in the Market......................................................................................................5
Table 2: RoMow Mk. II Design Responsibilities...........................................................................8
Table 3: RoMow Mk. II Administrative Responsibilities...............................................................8
Table 4: General Properties of Alloy Steel...................................................................................10
Table 5: General Properties of Aluminum 6061-T6.....................................................................10
Table 6: ABS Properties...............................................................................................................11
Table 7: Remote Controller Specifications...................................................................................15
Table 8: Motor Controller Specifications.....................................................................................16
Table 9: Development Board Specifications................................................................................18
Table 10: Expected Component Costs..........................................................................................22

1. IntroductionAn electrical engineering professor at Calvin College, Yoon Kim, came to Team 01 and proposed a design project that would improve and add on to RoMow, one of Calvin College 2014-15 senior design projects. RoMow is a remote controlled lawn mower platform which would be beneficial for people with limited mobility. The first prototype of RoMow was a platform with a control box and a metal frame on which an existing lawn mower could be added without significant modifications. Team 01 will develop the next prototype that will address mechanical and electrical improvements. Mechanically, the frame will be made adjustable so that any size lawn mower can fit. Also the frame will be made lighter with other materials that can withstand the weight, vibration, and throttle of the lawn mower. Electrically, more features such as a collision sensor and remote camera.
1.1. CourseENGR 339 and ENGR 340 are Calvin College’s engineering senior capstone courses designed to prepare students to transition smoothly into their careers. Through team oriented coursework, a year-long senior design project is executed. ENGR 339 focuses on team formation, project selection, and a project plan feasibility study. ENGR 340 focuses on the development, testing, and optimization of the prototype.
1.2 Team
1.2.1 Aldo DanielAldo Daniel is an international electrical and computer engineering student from Jakarta, Indonesia who expects to graduate in May 2016. He has had an electrical engineering consulting internship in Jakarta, in which he worked on projects with companies such as Grand Hyatt and Four Seasons. He also has had experience in wireless video surveillance and programming which will benefit the project. In his free time, he enjoys playing soccer, cooking, and traveling.
111

1.2.2 Se Ge JungSe Ge is an international mechanical concentration engineering student who expects to graduate in May 2016. He has manufacturing internship experience with Innotec where he was involved in monitoring and running Honda production lines. Always striving for continuous improvement, he worked closely with the machine processes and improving PFMEA and reducing RPN. He has gained research experience in accelerated fatigue testing of a structure for the past two semesters with Professor De Jong. After graduation, Se Ge will join Innotec as a full-time manufacturing engineer. In his free time, Se Ge likes to be updated with new gadgets and commerce on ebay for electronics.
1.2.3 Caleb MeindertsmaCaleb Meindertsma is a mechanical concentration engineering and mathematics student from Fairfax, VA expecting to graduate in May 2016. He has industry experience inspecting small-scale traffic infrastructure integrity for Alpha Corporation, an Engineering firm. He also has experience in the financial sector, interning at Wall Street Emprises, LLC, and with construction, as an employee of Smeda Design Build, LLC. After graduation, Caleb wants to move back to the South and find work in the field of mechanical engineering. He is also captain of the Calvin College Men’s Swim and Dive team and is a member of the Calvin College Student-Athlete Advisory Committee.
1.2.4 Emily WheelerEmily Wheeler is an electrical and computer concentration engineering student who expects to graduate in May 2016. She has over 2 years of experience in the automotive industry at Burke E. Porter Machinery Company in Grand Rapids, MI. After graduation she plans to move to Arizona and find work as a controls engineer. In her free time Emily savors spending time with her husband and one year old son while enjoying the outdoors.

1.3 Chapter Overview
Chapter 1: IntroductionThe first chapter introduces the project and the Calvin College senior design course. It also introduces the team and gives a brief description of the design team.
Chapter 2: Problem DefinitionThe second chapter defines the design problem by outlining the requirements set by the customer, Professor Yoon Kim, and the desire for the project, both in the community and the team. It also breaks down the scope of the project, keeping in mind the chosen design norms.
Chapter 3: Project ManagementThe third chapter further breaks down the organization of the design process by dividing the assignments and organizing them according to time. It also defines the deliverables of the project.
Chapter 4: Mechanical Design ProcessThe fourth chapter organizes the mechanical design process according to the tasks associated with the mechanical concentration students involved in this project.
Chapter 5: Electrical Design ProcessThe fifth chapter organizes the electrical design process according to the tasks associated with the electrical concentration students involved in this project.
Chapter 6: Cost The sixth chapter covers the cost of the project, including the budget allocated and budget used in addition to extra costs associated with mass production.
Chapter 7: Conclusion The seventh chapter concludes the project by justifying the decisions made for the design and the risks associated with those designs. It also gives an update on the current status of the project.
Chapter 8: Acknowledgements The eighth chapter acknowledges those who helped with the project.

Chapter 9: AppendicesThe tenth and final chapter contains additional information and calculations pertinent to the project.

2. Problem Definition
2.1 NeedRoMow would benefit those who have difficulty using a standard lawn mower. Instead of hiring or physically being active, RoMow allows potential customers to control the lawn mower with the touch of a button. Safety features include collision sensors, a mounted camera, and an emergency deactivator.
The objective of the senior design project RoMow Mk. II is to improve the first prototype by providing customers an improved platform which would be mechanically more versatile and electrically more refined and upgraded with various safety features.
2.1.1 RC Lawn Mower MarketCurrently, there are a handful of remote controlled lawn mowers for both residential and commercial purposes. None of them feature a detachable lawn mower platform.
Table 1: Products in the Market
Company Product Cost [$]EvaTech1 Hybrid RCLM B class 2,199Summit Mowers2 ZTR-34 6,000Services3 1000 annually
2.2 CustomerThe project design has been governed and guided by the customer, Professor Yoon Kim. A clear set of requirements and specifications have been laid out.
1 "EVATECH OFFICIAL WEBSITE." EVATECH OFFICIAL WEBSITE. Accessed November 15, 2015. http://www.evatech.net/.2 "DIY or Hire: How Much Does Lawn Mowing Cost?" Angie's List. May 29, 2014. Accessed November 16, 2015. http://www.angieslist.com/articles/diy-or-hire-how-much-does-lawn-mowing-cost.htm.3 "2015 Summit Mowers Remote Control Slope Mowers." 2015 Summit Mowers Remote Control Slope Mowers. Accessed November 16, 2015. http://www.remotemowers.com/.

2.3 Reason for SelectionThere are several reason for selecting the RoMow project. The RoMow Mk. II project offers a balance appropriate for two electrical and two mechanical concentration students. In addition to that, the first prototype left with a lot of opportunities for growth and improvement.
2.4 Requirements
2.4.1 Customer RequirementsA set of project specifications has been outlined by the client, Professor Yoon Kim.
Lighter control box made of plastic with visible Calvin Engineering symbol Inexpensive motors with enough power specifications Mechanical touch sensor or electronic proximity sensor Modular design; easily retractable control box Adjustable frame (blade height and sizes) Camera with Wi-Fi streaming to personal device
2.4.2 Previous Team Suggestions Aluminum control box Fastened frame, instead being welded together New, standard motors Simplified electronics as the Arduino was overqualified for this project Robust wiring and mounting Automation
2.4.3 Team Requirements Zero turn radius Adjustable frame Plastic control box Electronic proximity sensor Camera and display on personal device Modular design
2.5 Design Norms
2.5.1 CaringRoMow Mk. II will show genuine love and concern for people. The physical, social, and psychological effects on the customers are one of our highest priorities.

2.5.2 IntegrityWith an older generation making up most of the target market it is essential that the design is pleasing and intuitive to use.
2.5.3 TrustLastly, the RoMow Mk. II must be dependable and reliable. It is important to establish a bond of trust with the user.

3. Project Management
3.1 Responsibilities
3.1.1 Design AssignmentsEach member strains on specific responsibility on the design of the prototype, even within the electrical and mechanical division, which is shown in Table 2. This is done so that there is no overlap between each member's work when the project is in progress.
Table 2: RoMow Mk. II Design Responsibilities
Member RoleAldo Camera, Wireless CommunicationSe Ge Frame DesignCaleb Control Box DesignEmily Circuitry, Control
3.1.2 Administrative AssignmentsTo function well as a group, administrative responsibilities have also been assigned to each member, which are detailed in Table 3.
Table 3: RoMow Mk. II Administrative Responsibilities
Member Role DescriptionAldo Financial
Manager and Webmaster
In charge of maintaining financial expenditures and budget status. He is also in charge of the website design and updates.
Se Ge Professional
Manager
In charge of maintaining document formatting and professionalism in all aspects of group work. This includes document proofreading and communication developments.
Caleb Marketing Manager
In charge of all media and public aspects of the group work. This includes posters, social media, and graphical diagrams.
Emily Team Manager In charge of keeping track of deadlines set by the faculty advisor.
3.2 Project Status
3.2.1 Key MilestonesThe group obtained an electric wheelchair in mid-October for free from Landon Potts, a classmate at Calvin College. However, the group found that there is only one motor. The design of Mk. II requires two motors and two batteries to perform adequately. The group obtained another electric wheelchair in early November for $200 from craigslist. The group discovered that the batteries, motors, and wheels meet the project design standards and are still in prime condition.
The next week, the electrical team received a Raspberry Pi B for free from the customer, Professor Yoon Kim. A Raspberry Pi is preferred instead of an Arduino Uno due to its video processing capability.
3.2.2 Time TrackingEach member tracks their own time in an online Excel spreadsheet to keep each other accountable. So far, the team has accumulated up to 130 hours.
3.3 Course DeliverablesAs detailed in the ENGR 339 course syllabus, each group has to complete project documents, especially the Project Proposal and Feasibility Study, and two verbal presentations. Moreover, each member has to complete quizzes and an individual journal that records the progress of the project. The course also pushes each group to consider Christian values to be practiced in all aspects of the project.
3.4 Project DeliverablesThe group is committed to deliver a working prototype by the end of the Spring 2016. By the end of Fall 2015, the group will complete the initial designs and create a bill of materials (BOM) that will be needed to make the product by Spring 2016.
3.5 Team MeetingsAll of the members meet Monday mornings to update each other on our progress from the week and set our goal for the next. The group uses this time to work on course deliverables. By October, the group decided that they needed another weekly meeting based on concentration. Emily and Aldo meet Tuesday mornings to decide on electrical design alternatives and occasionally meet with Professor Kim to discuss those decisions. Caleb and Se Ge meet regularly every week to develop the mechanical design of the frame and control box.

4. Mechanical Design Process
4.1 Frame Material SelectionThe platform has to withstand the weight of lawn mowers with the vibrations and throttle of the diesel engine of the lawn mower. Two feasible options are steel and aluminum.
4.1.1 SteelSteel is an alloy of iron and other materials that make up high durability and strength. It comes in many forms and types including carbon steel, alloy steel, stainless steel, and tool steel. Because of these reasons, steel is widely used for construction and railroad. Steel is generally cheaper than aluminum. Material properties for common steel can be seen in Table 4.
Table 4: General Properties of Alloy Steel4
Property Value UnitsDensity 7850 kg/m3
Tensile Strength 758-1882 MPaYield Strength 366-1793 MPa
Brinell Hardness 149-627 -
4.1.2 AluminumAluminum is ductile in nature, but strong when combined with other alloys. The major advantage of aluminum is that the weight is about one-third of that of steel. Due to the lightness, it is often used in aircrafts and high performance cars. Material properties for common aluminum can be seen in Table 5.
Table 5: General Properties of Aluminum 6061-T65
Property Value UnitsDensity 2700 kg/m3
Tensile Strength 310 MPaYield Strength 276 MPa
Brinell Hardness 95 -
4 "EFunda: Typical Properties of Steels." EFunda: Typical Properties of Steels. Accessed November 16, 2015. http://www.efunda.com/materials/alloys/alloy_home/steels_properties.cfm.5 "ASM Material Data Sheet." ASM Material Data Sheet. Accessed November 16, 2015. http://asm.matweb.com/search/SpecificMaterial.asp?bassnum=MA6061t6.

One of the requirements from the client was to make a lighter frame. The team will do this by utilizing aluminum’s lighter yet durable mechanical properties.
4.1.3 Extruded AluminumExtrusion is a process in which a material goes through a die to shape certain finished products6. The team will be using extruded aluminum with T-slots. An advantage of extruded aluminum is its high weight-to-strength ratio. Also, the slots make the assembly process easy. The team will most likely use the aluminum 6000 series, which balances strength and material cost.
4.1.4 Material AvailabilityExtruded aluminum will be available from nearby companies around Michigan. Specifically, Gentex has an inventory of materials that they are willing to donated. Phil Jasperse will organize a trip to companies and gather the needed materials.
4.2 Control Box Material SelectionRoMow Mk. I used sheet metal for the control box which interfered with the antenna signals. Mk. II hopes to improve better communication by making the control box out of plastic or carbon fiber.
4.2.1 ABS PlasticABS plastic is an inexpensive plastic that is easy to fabricate and machine. It has a high strength, is easy to paint, and has a very good impact resistance. Properties of ABS plastics are shown in Table 6.
Table 6: ABS Properties7
Property Value UnitsDensity 1080 kg/m3
Tensile Strength 44 MPaYield Strength 69 MPa
4.2.2 Carbon FiberCarbon fiber is a material consisting of mostly carbon. It is strong, low weight, has high temperature tolerance, and low thermal expansion. Carbon fiber is a better choice in many areas than ABS plastic, however, typical carbon fiber costs $10-12 per pound8. 6 Wikipedia. Accessed November 16, 2015. https://en.wikipedia.org/wiki/Extrusion.7 "ABS (Tecaran®)." ABS. Accessed November 16, 2015. http://www.plasticsintl.com/abs.htm.8 "Top Stories." Price Keeping Carbon Fiber from Mass Adoption. Accessed November 16, 2015. http://www.plasticsnews.com/article/20140805/NEWS/140809971/price-keeping-carbon-

4.2.3 Material AvailabilityProfessor Kim mentioned that the team might get a hold of carbon fiber from Gentex.
4.3 Motor Power SpecificationIn order to push a certain amount of weight up and down, motors have to meet certain power specifications. Assuming the team knows the weight of the frame and the lawn mower, and a slope of 30°, motor power specifications were calculated in Section 10.1. Simple power specifications will allow the team to know the power requirements and feasibility for RoMow Mk II.
4.4 Control Box Electronics DampeningControl box has electrical components that are sensitive to lawn mower vibrations. Dampening mechanisms will be applied inside the control box. Also the camera should have image stabilization.
4.5 Frame DesignRoMow is a unique product in that the platform is detachable from the lawn mower. Also, the frame will be adjustable in x, y, and z direction. To make the frame adjustable, several existing DIY remote controlled lawn mower designs are considered as well as new design alternatives.
fiber-from-mass-adoption.

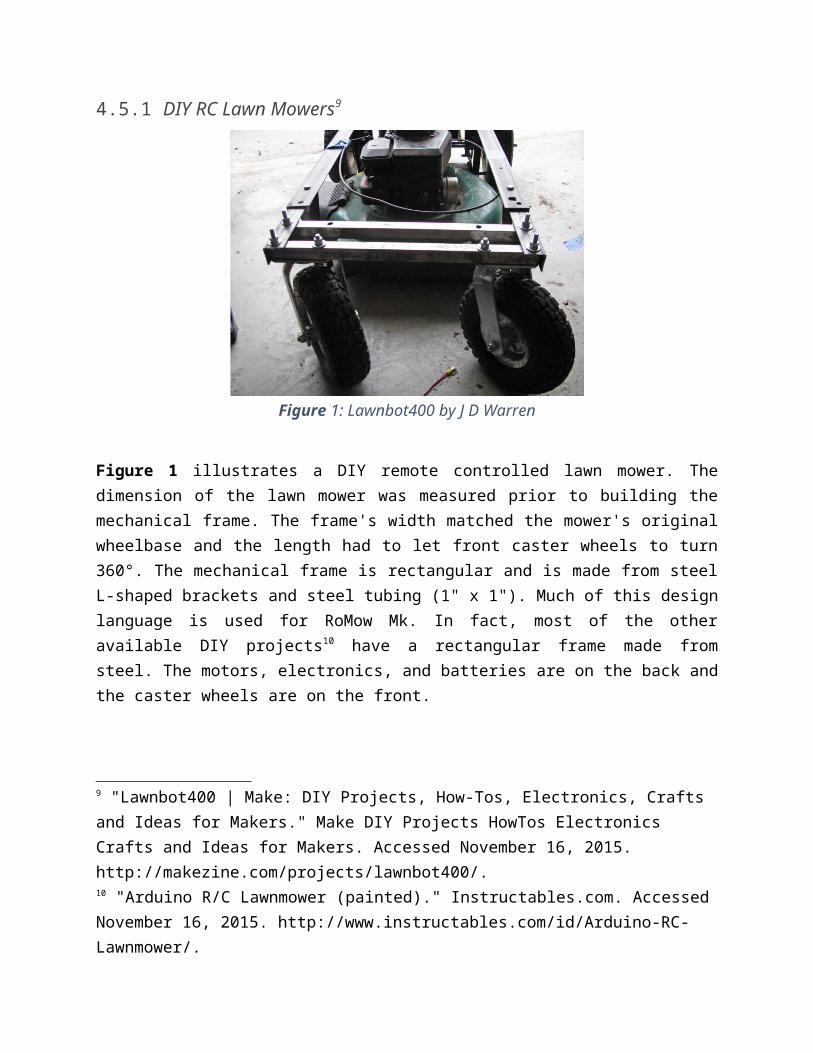
4.5.1 DIY RC Lawn Mowers9
Figure 1: Lawnbot400 by J D Warren
Figure 1 illustrates a DIY remote controlled lawn mower. The dimension of the lawn mower was measured prior to building the mechanical frame. The frame's width matched the mower's original wheelbase and the length had to let front caster wheels to turn 360°. The mechanical frame is rectangular and is made from steel L-shaped brackets and steel tubing (1" x 1"). Much of this design language is used for RoMow Mk. In fact, most of the other available DIY projects10 have a rectangular frame made from steel. The motors, electronics, and batteries are on the back and the caster wheels are on the front.
Mk. II will use extruded aluminum due to material availability and lightness, which will ease up on the motors and result in longer battery life.
4.5.2 Mounting/UnloadingRoMow Mk. II will have the same mounting mechanism as that of Mk.I. It had 6" steel brackets that folded down and made a ramp to mount the lawn mower from the back side.
4.5.3 Height AdjustmentOn the market, there are several products that have adjustable height of the lawn mower. Figure 2 shows how the height can be adjusted with a lever.
9 "Lawnbot400 | Make: DIY Projects, How-Tos, Electronics, Crafts and Ideas for Makers." Make DIY Projects HowTos Electronics Crafts and Ideas for Makers. Accessed November 16, 2015. http://makezine.com/projects/lawnbot400/.10 "Arduino R/C Lawnmower (painted)." Instructables.com. Accessed November 16, 2015. http://www.instructables.com/id/Arduino-RC-Lawnmower/.

Figure 2: EvaTech RC Lawn Mower
A similar height adjusting mechanism may be implemented for RoMow Mk. II.
4.5.4 Length & Width AdjustmentExtruded aluminum has T-slots that the team will utilize. T-slots are great for attaching or fastening. There will be extruded aluminum on each side of the frame. A sliding rack mechanism will be inserted in the T-slots, which will control the length of the frame. The width will be adjusted by L-brackets that will slide past each other.
Figure 3: Width Adjustment Mechanism

5. Electrical Design Process
5.1 Hardware
5.1.1 Remote ControllerThe remote controller will be used to direct the system.Requirements
The controller must be immune to interference from normal household signals. It must also have a range long enough for a typical homeowner's lawn, which was determined to be about 1000 feet. It must have four channels to control speed, steering, initiation of the rotation movement, and an emergency stop of the mower blades.
AlternativesThree alternatives were considered for the RC transmitter/receiver: Turnigy 6X, FlySky FS-CT6B, and the Tactic TTX403.
Decision CriterionDependability, lead time, cost, and ease of modification were considered.
DecisionThe FlySky FS-CT6B was chosen because it is dependable, has a lead time of only five to seven days, and is only ten dollars more than the cheapest option at $40. Table 7 shows the specifications for each controller.
Table 7: Remote Controller Specifications
Turnigy11 FlySky Tactic12
Dependability Previous Issues No Issues UnknownLead Time 2-4 weeks 1 week 1 week
Price ($) $30 $40 $40
ImplementationThe FlySky receiver will be wired to the Raspberry Pi board so the signal can be used to drive the electric motors.
Test
11 Brandsen, Drew, Robert Hoff, Spencer Olson, and Jared Zoodsma. "Team 08 Final Design Report." Calvin College Engineering Department. 2015. Accessed November 14, 2015. http://www.calvin.edu/academic/engineering/2013-14-team8/Team08_Final_Design_Report.pdf, 82.12 Tic Tac, . "Tactic TTX403 2.4GHz SLT 4-Ch Mini Transmitter." Amazon. Accessed November 16, 2015. http://www.amazon.com/Tactic-TTX403-2-4GHz-4-Ch-Transmitter/dp/B00GKMX0B8.

One useful test that will be done once the controller is purchased is to determine the pulse widths of each channel. This will be beneficial to confirm the differentiation between the channels.
5.1.2 Motor ControllerThe motor controller will be used to move the motors based on the information from the microcontroller.Requirements
The controller must be able to handle load current of approximately 10A and have some overload protection. It must be compatible with the power supply of 24V/31AH.
AlternativesThree alternatives were considered: RTK Raspberry Pi Motor Controller Board Kit, Sabertooth Dual 25A, and the Pololu High-Power Motor Driver.
Decision CriterionFlexibility, ease of integration, and size were considered.
DecisionTable 8 shows all of the alternatives and their respective qualities. Each category has a maximum value of 10 and was rated subjectively.
Table 8: Motor Controller Specifications
RTK Kit13 Sabertooth14 Pololu15
Flexibility 3 9 5Integration 5 7 5
Size 5 5 3
The Sabertooth Motor Driver was chosen because it can communicate with analog voltage, radio control, serial and packetized serial. Only one Sabertooth unit is needed to control two DC motors which makes the part easier to integrate than the two units that would need to be purchased with the alternatives.
13 Adafruit. "RTK Motor Controller Board Kit for Raspberry Pi." Accessed November 16, 2015. https://www.adafruit.com/products/1687.14 ebay. "Sabertooth Dual 25A 6V-24V Regenerative Motor Driver." Accessed November 16, 2015. http://www.ebay.com/itm/Sabertooth-Dual-25A-6V-24V-Regenerative-Motor-Driver-/111736714458?_trksid=p2141725.m3641.l6368.15 Pololu Robotics & Electronics. "Pololu High-Power Motor Driver 18v25." Accessed November 16, 2015. https://www.pololu.com/product/758.
ImplementationThe FlySky receiver will be wired to the Raspberry Pi board and the motors so it can act as the translator between them.
5.1.3 MotorsTwo motors will be used to drive the front wheels of the system.Requirements
The motors must require 24VDC and they need to supply 0.6 hp as determined in section 10.1.
AlternativesNew motors like a Worldwide Electric PM DC Motor16 were considered along with motors from a used electric wheelchair.
Decision CriterionCost was the most important criteria.
DecisionAn electric wheelchair can carry loads over 300 pounds and can also be found at a very low cost. It was the best option considering the $500 budget for the prototype. A Rumba electric wheelchair was purchased and it has Motion Tech Motors model number EC82M2446220L0B motors. Each motor is able to deliver 320 W which is equal to 0.57 hp. The two motors will deliver over 1 hp which meets the requirement of 0.6 hp.
ImplementationThe motors will be removed from the chair and connected to the motor controller.
5.1.4 Power SupplyBatteries must be used to provide wireless power.Requirements
With no load the motors are rated at 24V/31AH. With a range of 20 miles and max speed of 4.4 miles per hour the loaded current requirement is about 10A.
AlternativesNew 12V batteries and the batteries from a used electric wheelchair were considered.
Decision CriterionCost and usage time were the two criterion.
DecisionThe batteries with the wheelchair had a suitable battery life and were no additional cost so they were the best option for this prototype. If this product was mass produced, a low cost new battery would be selected.
Implementation
16 WorldWide Electric Corporation. "Permanent Magnet DC." Accessed November 16, 2015. http://www.worldwideelectric.net/product-category/permanent-magnet-dc/.

The batteries will be wired in series to provide the required 24V for the system.Test
In order to check the viability of the batteries they will be visually inspected to make sure no cells are completely empty. If the levels are low, water will be added according to the manufacturer's directions.
5.1.5 MicrocontrollerThe microcontroller will collect and send data within the system.Requirements
The microcontroller must be able to send a minimum 480p camera resolution. It must also be able to communicate over Wi-Fi.
AlternativesThree development boards were considered such as an Arduino, a Raspberry Pi, and a BeagleBone.
Decision CriterionAmount of RAM, quantity of I/O pins, and versatility of development environment were considered.
DecisionTable 9 shows what each board has to offer. BeagleBone and Rapsberry Pi both use a Linux type of development environment and meet the requirements. However, since the camera that easily interfaces with the Raspberry Pi is much cheaper, it is the best choice for our application.
Table 9: Development Board Specifications
Arduino17 BeagleBone18 Raspberry Pi19
Price ($) $22 $40 $40RAM (MB) <1 512 512
Number of I/0 20-60 92 20Price of Camera - $88 $30
17 Arduino. "Arduino UNO (USA ONLY) & Genuino UNO (OUTSIDE USA)." Accessed November 16, 2015. https://www.arduino.cc/en/Main/ArduinoBoardUno.18 Beagle Board. "BeagleBone Black." Accessed November 16, 2015. http://beagleboard.org/BLACK.19 Adafruit. "Raspberry Pi Model B 512MB RAM." Accessed November 16, 2015. http://www.adafruit.com/products/998.

ImplementationA Raspberry Pi model B board was donated to the project and will be used to control the system. It will be placed in an anti-vibration casing within the control box.
TestTo ensure that this board works for this application it will be tested to make sure it can stream data to the server.
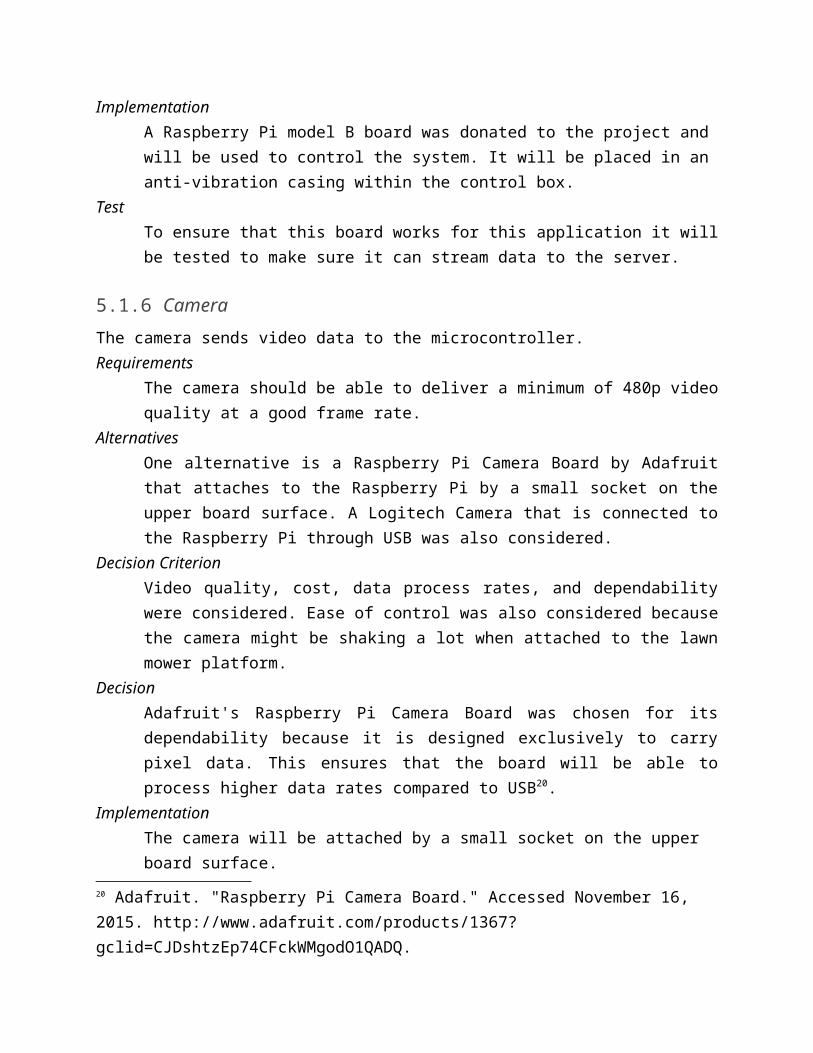
5.1.6 CameraThe camera sends video data to the microcontroller.Requirements
The camera should be able to deliver a minimum of 480p video quality at a good frame rate.
AlternativesOne alternative is a Raspberry Pi Camera Board by Adafruit that attaches to the Raspberry Pi by a small socket on the upper board surface. A Logitech Camera that is connected to the Raspberry Pi through USB was also considered.
Decision CriterionVideo quality, cost, data process rates, and dependability were considered. Ease of control was also considered because the camera might be shaking a lot when attached to the lawn mower platform.
DecisionAdafruit's Raspberry Pi Camera Board was chosen for its dependability because it is designed exclusively to carry pixel data. This ensures that the board will be able to process higher data rates compared to USB20.
ImplementationThe camera will be attached by a small socket on the upper board surface.
TestThe camera can be tested when it is connected to a computer. Different camera software can be used to examine the video quality it delivers. More tests need to be done in order to make sure that the wireless connection will be able to deliver the same quality as a wired connection does.
20 Adafruit. "Raspberry Pi Camera Board." Accessed November 16, 2015. http://www.adafruit.com/products/1367?gclid=CJDshtzEp74CFckWMgodO1QADQ.

5.1.7 Proximity SwitchThe proximity switch detects objects in the platform’s path.
RequirementsThe sensor must be small enough to mount to the front of the control box and operate on 24VDC.
AlternativesAlternatives have not been considered because the customer ensured the design team that it will be something to purchase later in the design process.
Decision CriterionSize and cost are the most important factors.
DecisionThe proximity switch has not been decided yet for the same reason as explained in the alternatives section.
ImplementationThe switch will be mounted to the front of the frame and controlled by the microcontroller.
TestEnsure that the switch sends a toggle signal to the microcontroller.
5.2 SoftwareNo code has been written or implemented at this point. Once the parts have been received, software designs will be considered.
5.2.1 Remote Controller Receiver5.2.2 Main Movement Control5.2.3 Video Streaming

5.3 System OverviewFigure 4 shows how the software and hardware are connected. The handheld remote controller and video display will communicate wirelessly with the RC receiver and Raspberry Pi, respectively. The camera is attached to the Raspberry Pi by a small socket on the board. The motor control is connected to the Raspberry Pi as well. The motor control is connected to the batteries and motors through wires.
Figure 4: System Overview of RoMow Mk. II

6. Cost
6.1 Budget allocated and used The team was allotted a budget of $500 for this project by the Calvin College Engineering department. The cost of parts is split evenly between electrical components such as the camera, microcontroller, batteries, motors and wheels salvaged from the electric wheelchair. The table below shows an approximation of the expected component costs.
Table 10: Expected Component Costs
Component Project Use CostElectric Wheelchair Motors, Batteries, wheels $200
Raspberry Pi Microcontroller ($40)*
Camera Visual Feedback $30Aluminum Frame Construction ($3/ft)* Total Cost:
ABS Plastic Control Box $0.78/kg $406Wi-Fi Dongle Wi-Fi Communication $6
Sabertooth Duel 25A Motor Driver $125FlySky FS-CT6B RC Transmitter/Receiver $40
*Note: Donated Component
6.2 Mass Production Additional CostsContinuous production of the RoMow in a commercial setting would have a different set of pricing guidelines. In addition to added financial burden and overhead costs from property and employees, several component costs would change.
For instance, Gentex, a local engineering firm, is donating large amounts of salvaged metals, including several long beams of extruded aluminum, to Calvin College for senior design project use. In the future, the RoMow team will have to purchase extruded aluminum, which retails at $3 per foot. In addition, Professor Kim donated a Raspberry Pi board to the team nullifying that expense.
The method of recycling a used wheelchair for its components would not be sustainable for mass production. For this reason, new research into low-cost, high-performance batteries, motors, and wheels to use would be needed, which would add to the total production costs of the RoMow.

7. Conclusion
7.1 Design Decisions This project is constrained primarily by price but also by the customer requirements. In some instances such as material selection, the customer requirements take precedence over the associated costs.
7.1.1 Mechanical Design DecisionsFor frame material, the team will be constructing the frame out of extruded aluminum 6105 10 series. This material has a similar strength-to-weight ratio as steel and has slots making it easy to use in a modular design. The control box housing all the electrical components as well as batteries and motors will be made from ABS plastics for its durability and low cost.
The RoMow Mk. II also needs to be adjustable to accept most sizes of push lawn mowers. The team decided that the sliding rack mechanism is the best option for this problem. This method allows for a simple adjustment interface and will not make noise as a result of the lawn mower’s vibrations.
The used electric wheelchair purchased for this project contained wheels, batteries, and motors which will be used for this project. These components were tested and inspected to make sure they still met the required specification.
7.1.2 Electrical Design DecisionsThe team had to decide on an easy way to control the RoMow Mk. II. The FlySky FS-CT6B was chosen because it is dependable and easy to use. In addition, it has a similar cost to comparable controllers.
For the motor driver, the Sabertooth was chosen because it meets the electrical requirements. In addition, it can communicate with two DC motors, allowing for an easier integration than alternatives.
The Raspberry Pi microcontroller was chosen to send the video data over Wi-Fi because of the amount of RAM and lower price of the associated camera. Adafruit's Raspberry Pi Camera Board was chosen for its dependability because it is designed exclusively to carry pixel data. This ensures that the board will be able to process higher data rates compared to USB.

7.2 Current Status This team concludes that the second iteration of the RoMow is a viable project and shall be prototyped in the Spring of 2016 semester. Currently, the team is in the process of ordering all the components to begin construction in ENGR 340.
7.3 Risks The risks associated with moving forward with this project are that the scope of the project is too broad or that some of the customer requirements are not feasible within the budget or level of expertise of the team.

8. AcknowledgementsThe team would like to acknowledge the help of several key contacts. The first of which is the customer and mentor, Calvin College electrical engineering Professor Yoon Kim. The next contact is Phil Jasperse of the Calvin College machine shop for help in fabrication advice and material acquisition. Lastly, Professor Ned Nielsen, the team’s advisor, has helped the team greatly during the design process.
9. Appendices
9.1 Motor Requirements


