Physical Access & Control (CCURE) Quick Reference Guide v5 1 The IS&T Campus Safety and Security Infrastructure Team (CSSI) provides a unified campus security infrastructure and environment, which brings together many systems under a single roof. CSSI uses the CCURE800 system to administer access to buildings, to lock and unlock doors, schedule events, and to control elevator access. This guide will describe the tasks of the Gatekeeper, the person in a DLC assigned with the task of granting and revoking card access, locking and unlocking doors, scheduling events, and controlling elevator access. These tasks include: Launch and log into Citrix and the CCURE 800 application Grant or revoke clearances (access) Run and save a clearance list Lock or unlock a door Create a one-time event Edit a recurring automatic door unlock schedule Control elevator access 1. Launch and Log into Citrix and the CCURE 800 Application These instructions apply to the Admin and Monitoring Applications The CCURE application is launched from Citrix Receiver, or simply Citrix. It allows you to access a variety of hosted applications through a single website on both the Windows and the Mac platforms. Citrix is a client application which must be downloaded and installed. This requires SysAdmin privileges. You will also need to have certificates installed on your browser. If you are logging in from off campus, you must use Cisco Any Connect, that is, vpn.mit.edu (Go to the KB page for more information: http://kb.mit.edu/confluence/x/zwBa). To become a Gatekeeper, an account must be set up for you by the IS&T Campus Safety and Security Infrastructure team. They will set up a password, separate from your Kerberos password, that gives you access to the CCURE applications. You will login first to Citrix by opening your browser to: http://citrix.mit.edu. This will open to citrixapps.mit.edu.
Transcript
Physical Access & Control (CCURE) Quick Reference Guide v5
1
The IS&T Campus Safety and Security Infrastructure Team (CSSI) provides a unified campus security infrastructure and environment, which brings together many systems under a single roof. CSSI uses the CCURE800 system to administer access to buildings, to lock and unlock doors, schedule events, and to control elevator access. This guide will describe the tasks of the Gatekeeper, the person in a DLC assigned with the task of granting and revoking card access, locking and unlocking doors, scheduling events, and controlling elevator access. These tasks include:
Launch and log into Citrix and the CCURE 800 application Grant or revoke clearances (access) Run and save a clearance list Lock or unlock a door Create a one-time event Edit a recurring automatic door unlock schedule Control elevator access
1. Launch and Log into Citrix and the CCURE 800 Application These instructions apply to the Admin and Monitoring Applications The CCURE application is launched from Citrix Receiver, or simply Citrix. It allows you to access a variety of hosted applications through a single website on both the Windows and the Mac platforms. Citrix is a client application which must be downloaded and installed. This requires SysAdmin privileges. You will also need to have certificates installed on your browser. If you are logging in from off campus, you must use Cisco Any Connect, that is, vpn.mit.edu (Go to the KB page for more information: http://kb.mit.edu/confluence/x/zwBa). To become a Gatekeeper, an account must be set up for you by the IS&T Campus Safety and Security Infrastructure team. They will set up a password, separate from your Kerberos password, that gives you access to the CCURE applications.
You will login first to Citrix by opening your browser to: http://citrix.mit.edu. This will open to citrixapps.mit.edu.
Physical Access & Control (CCURE) Quick Reference Guide v5
2
You will see the Citrix StoreFront logon screen: Enter your Kerberos ID and Kerberos password, then press Log On.
The Citrix dashboard opens. Select the CCURE folder.
A screen opens displaying the two CCURE icons.
CCURE 800 Admin is used for the tasks of looking someone up, granting and revoking building access, and running a list of clearances. CCURE 800 Monitoring is used for locking and unlocking doors, scheduling an event, and controlling elevator access. Click the appropriate icon and logon using the your CCURE password, the one you set up with the IS&T Campus Safety and Security Infrastructure team. For each application, a login dialog box appears, each is a little different:
CCURE 800 Admin login CCURE 800 Monitoring login
The second login screen automatically turns all typing to upper case. No worries!
Physical Access & Control (CCURE) Quick Reference Guide v5
3
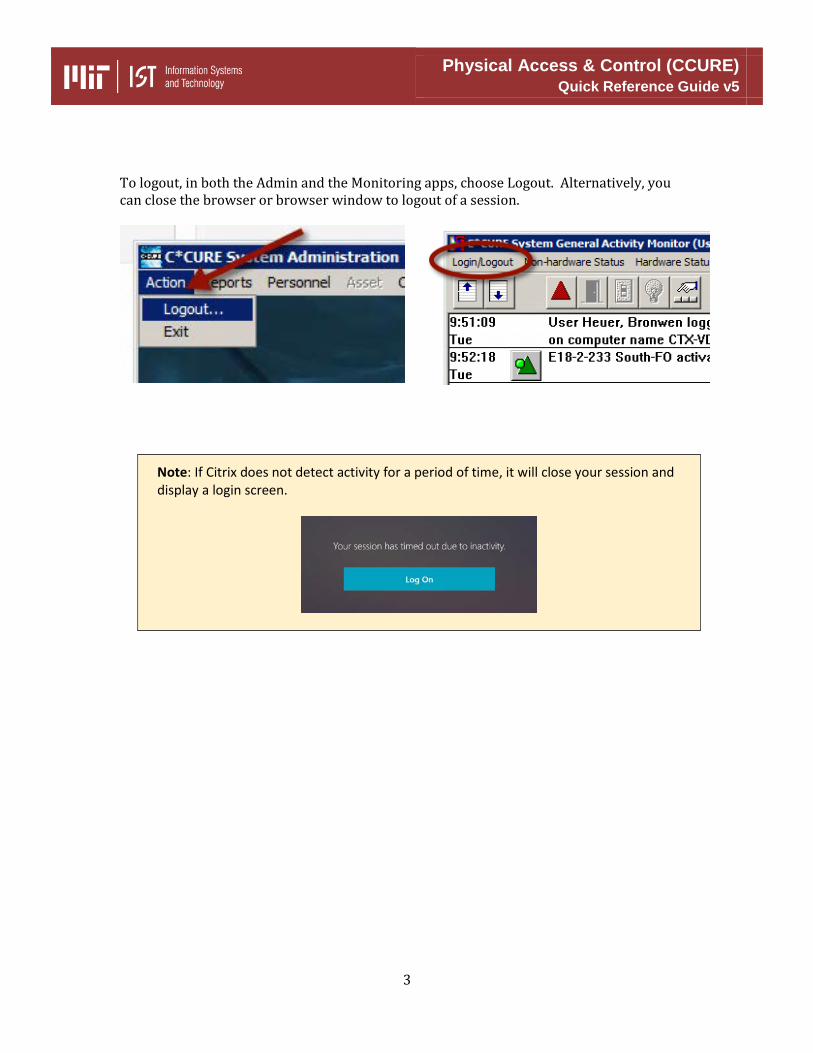
To logout, in both the Admin and the Monitoring apps, choose Logout. Alternatively, you can close the browser or browser window to logout of a session.
Note: If Citrix does not detect activity for a period of time, it will close your session and display a login screen.
Physical Access & Control (CCURE) Quick Reference Guide v5
4
2. Set Up or Modify Card Access Clearance Use the CCURE Admin Application A Card Access Clearance is what controls who can access doors which are Card Reader Equipped and when they can be accessed. A Card Access Clearance is comprised of a Door Group and a Time Specification.
Card Access Clearance = Door Group + Time Specification You can assign or revoke a Clearance or Clearances for individuals. However, only the Campus Safety and Security Infrastructure team can create or modify a Clearance. A Card Access Clearance can be named anything you’d like but should make sense to you and your operation, such as “Smith Lab” or “Main Office”. Once a name has been chosen for your clearance, a Card Reader Equipped Door or group of Doors, is added to the Clearance. A Time Specification may also be selected to restrict the time period during which the card will work on these doors. Most Gatekeepers use Always but if you wish to restrict access, you can specify a schedule for access. Examples of common Card Access Clearances are:
“Department All” which grants 24/7 access to all Card Reader Equipped Doors all of the time. “Smith Lab” which grants 24/7 access to the building perimeter and the internal door to Prof. Smith’s lab space. “Smith Lab Restricted” which grants 24/7 access to the building’s perimeter but only grants access to Prof. Smith’s lab space from 6 am to 11 pm, Monday through Friday and from 4 pm to 8 pm on Saturdays.
Please contact the Campus Safety and Security Infrastructure group at [email protected] if:
• you have existing Card Access Clearances and you’d like to know what they contain for Door Groups and Time Specifications
• you would like to modify an existing Card Access Clearance
• you would like to create new Card Access Clearance
Physical Access & Control (CCURE) Quick Reference Guide v5
5
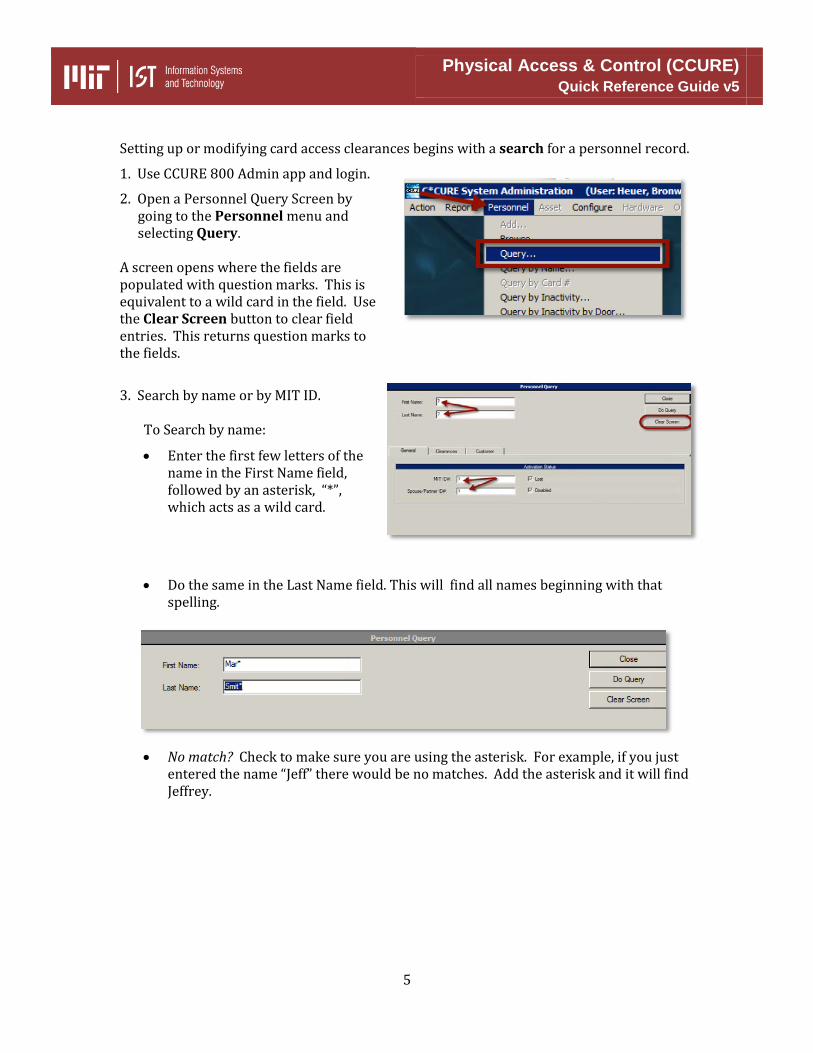
Setting up or modifying card access clearances begins with a search for a personnel record.
1. Use CCURE 800 Admin app and login.
2. Open a Personnel Query Screen by going to the Personnel menu and selecting Query.
A screen opens where the fields are populated with question marks. This is equivalent to a wild card in the field. Use the Clear Screen button to clear field entries. This returns question marks to the fields.
3. Search by name or by MIT ID.
To Search by name:
• Enter the first few letters of the name in the First Name field, followed by an asterisk, “*”, which acts as a wild card.
• Do the same in the Last Name field. This will find all names beginning with that spelling.
• No match? Check to make sure you are using the asterisk. For example, if you just
entered the name “Jeff” there would be no matches. Add the asterisk and it will find Jeffrey.
Physical Access & Control (CCURE) Quick Reference Guide v5
6
To search by MIT ID:
1. Enter the number in the MIT ID field on the General tab.
2. Click Do Query.
3. A Results list appears similar to below. Select the person’s record and either double-click, or click the Edit button. This opens the personnel record in edit mode.
Physical Access & Control (CCURE) Quick Reference Guide v5
7
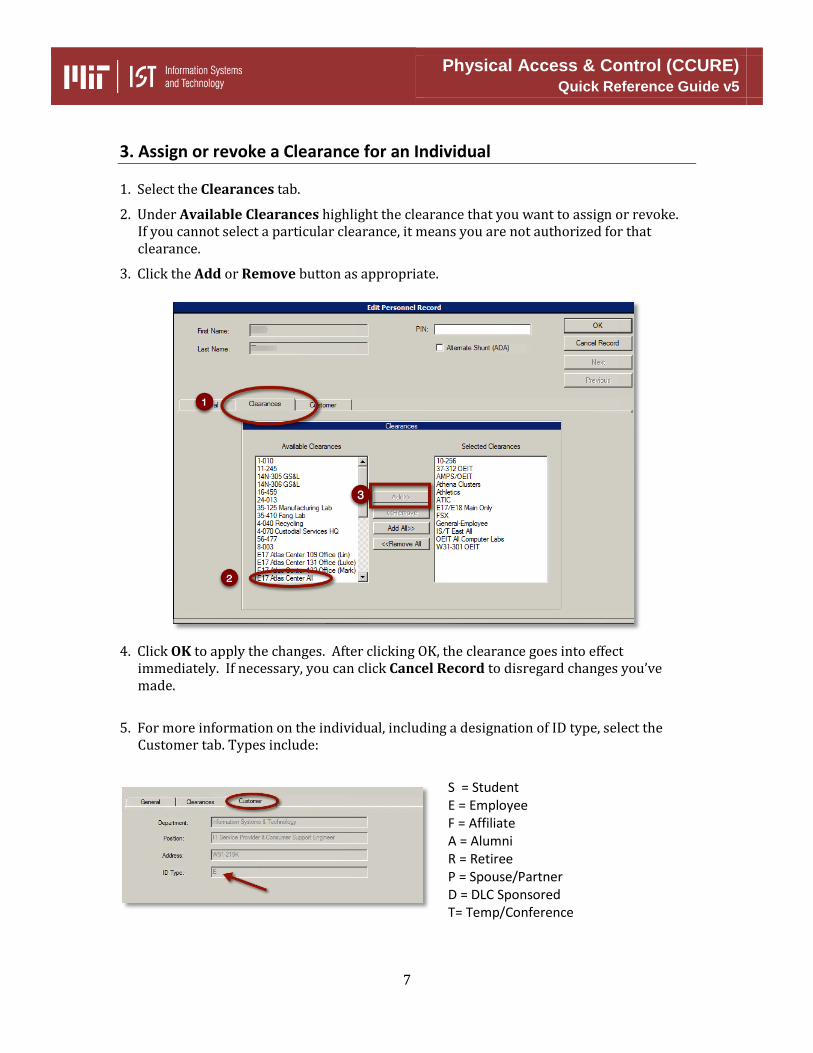
3. Assign or revoke a Clearance for an Individual
1. Select the Clearances tab.
2. Under Available Clearances highlight the clearance that you want to assign or revoke. If you cannot select a particular clearance, it means you are not authorized for that clearance.
3. Click the Add or Remove button as appropriate.
4. Click OK to apply the changes. After clicking OK, the clearance goes into effect
immediately. If necessary, you can click Cancel Record to disregard changes you’ve made.
5. For more information on the individual, including a designation of ID type, select the Customer tab. Types include:
S = Student E = Employee F = Affiliate A = Alumni R = Retiree P = Spouse/Partner D = DLC Sponsored T= Temp/Conference
Physical Access & Control (CCURE) Quick Reference Guide v5
8
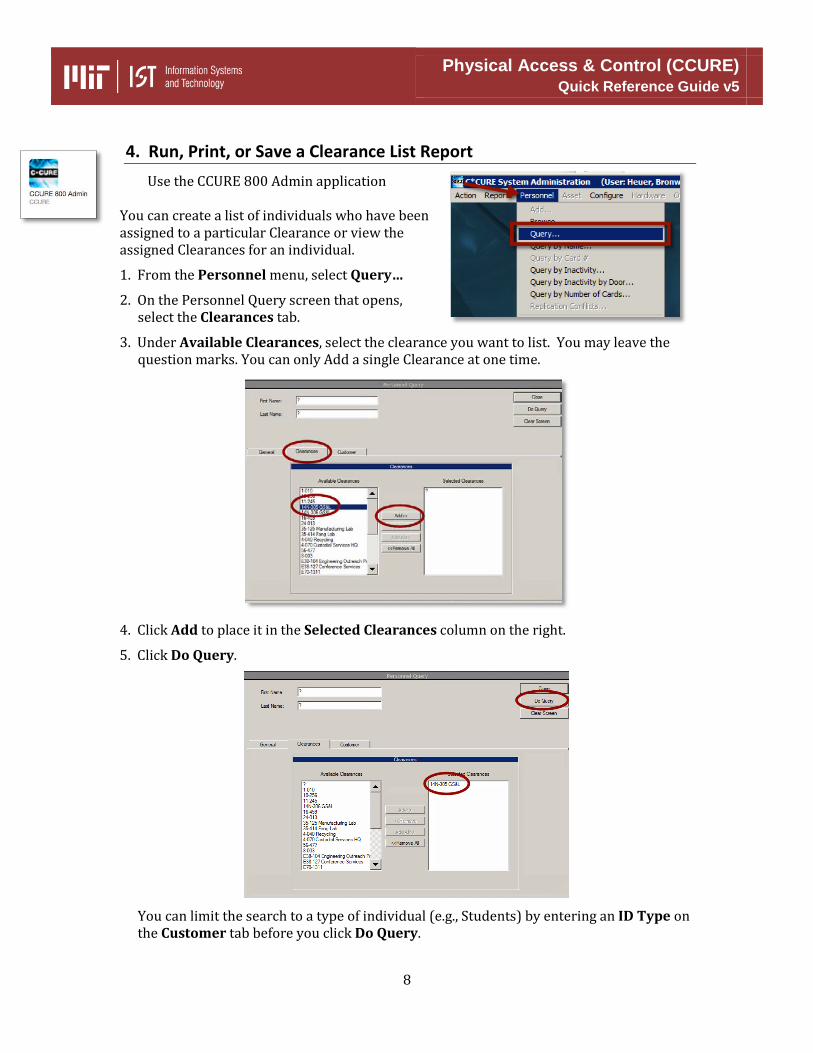
4. Run, Print, or Save a Clearance List Report Use the CCURE 800 Admin application
You can create a list of individuals who have been assigned to a particular Clearance or view the assigned Clearances for an individual.
1. From the Personnel menu, select Query…
2. On the Personnel Query screen that opens, select the Clearances tab.
3. Under Available Clearances, select the clearance you want to list. You may leave the question marks. You can only Add a single Clearance at one time.
4. Click Add to place it in the Selected Clearances column on the right.
5. Click Do Query.
You can limit the search to a type of individual (e.g., Students) by entering an ID Type on the Customer tab before you click Do Query.
Physical Access & Control (CCURE) Quick Reference Guide v5
9
6. A list of individuals assigned to this Clearance appears. Click a radio button at the top to change the sort order for your report. Then click the Report button.
You can select an individual’s name and click the View button to see a read-only list of all the Clearances for that individual.
7. The Report Generation for Personnel screen appears listing different report choices.
8. Select the desired report. Select either the Display in Excel format checkbox, or leave it
blank. Click Run Report.
In the case of Display in Excel format a spreadsheet form opens. The easiest way to use this is to select the cells, and copy and paste them into your local Excel application.
Physical Access & Control (CCURE) Quick Reference Guide v5
10
9. A report displays an alphabetical listing of all those who have access to that clearance. You can Save or Print the report. If you use a networked printer, the report will print on your local printer. Selecting Save opens a window where you navigate to the directory where you wish to save the file.
Note: Be careful when saving in CCURE! The default directory is the Citrix server you are logged into through your browser. Be sure to change the Save In to Local Disk (C: Your MachineName) on the Mac and on Windows. This is your computer’s local hard drive.
Also by default, CCURE wants to save a file of type REP. This is unreadable by our standard applications. You must change the file type when you name the file, i.e., CCURElist.txt. The “Save as type” field will stubbornly change your file to REP.
Purge your Clearance Lists Gatekeepers should periodically return to a clearance list and remove all those names for whom this clearance is no longer valid.
Physical Access & Control (CCURE) Quick Reference Guide v5
11
5. Unlock or Lock a Door Using a Manual Action or Auto Unlock Schedule Use the CCURE 800 Monitoring application
The default state of a Card Reader Equipped Door is locked and accessible to authorized card access. Often times, you would like a Card Reader Equipped Door to be unlocked so that anyone can enter to accommodate the walk-in public for open business hours or to accommodate a special, one-time event where visitors are invited. You can accomplish this in CCURE with either an Auto Unlock Schedule (for regularly recurring business hours auto unlock) or with a Manual Action (for one-time overrides to normal schedules). A Manual Action can be used to unlock a normally locked door or to lock a door that is normally unlocked at that time. Unlock a Door Using a Manual Action
1. Select the CCURE 800 Monitoring icon and log in.
2. Click the little green Doors icon in the toolbar.
3. A list of the card reader equipped doors within
your partition appears. The doors are named according to the MIT naming convention, adding the floor number between building and room.
4. Highlight the door that you want to unlock and click Unlock selected… to unlock the door manually. This is a CCURE Manual Action.
5. In the next dialog box, set start date and time, and end date and time, for unlocking the door. Note that times are expressed in military time.
Be sure to enter a note so that your fellow gatekeepers will understand why a door is programmed to be unlocked at an odd time of the day or day of the week. This avoids unnecessary confusion. Also, please include your name in the note.
6. The Show Causes… button (previous screenshot) opens a screen listing causes for activation or arm states for the selected door.
Physical Access & Control (CCURE) Quick Reference Guide v5
12
Lock a Door Using a Manual Action Locking a door is the same: Select the door in the list and click Lock selected….
Review Your Manual Actions
You can review all of the Manual Actions programmed for your doors (and events) by clicking on the Manual Actions button (the finger over the keyboard icon) in the CCURE Monitoring row of tools at the top. This will show you a list of the Manual Actions scheduled for the future with information on what the action is, who programmed it, and when it is scheduled to happen. Users can select and cancel Manual Actions from this window. Manual Actions unfortunately cannot be edited.
Set Up an Auto Unlock Schedule for Card Reader Equipped Doors The Campus Safety and Security Infrastructure group can create an auto unlock schedule for you that will enable Card Reader Equipped Doors to automatically unlock and then relock on a predetermined schedule for business hours. To setup an auto unlock schedule for your Card Reader Equipped Doors, contact the Campus Safety and Security Infrastructure group at [email protected]. Give them a list of the doors that you wish to be unlocked and the schedule during which you would like the doors to be unlocked.
Example: Monday through Friday, 6 am to 6 pm Be sure to include Saturday and/or Sunday if you require doors to auto unlock on a weekend.
Physical Access & Control (CCURE) Quick Reference Guide v5
13
Also be sure to indicate whether or not these doors should auto unlock on an Institute Holiday. Institute Holidays include the official acknowledge holidays that are announced by the Institute each year as well as special or emergency closings. For instance, when the Institute closes for a snow emergency, that is translated to an Institute Holiday in the security system so that doors that would normally be unlocked on a regular weekday will lock for the emergency closing. Contact the Campus Safety and Security Infrastructure group at [email protected] should you ever need to modify or cancel your auto unlock schedule or if you would like to know your current unlock schedule.
Physical Access & Control (CCURE) Quick Reference Guide v5
14
Advanced Actions 6. Set Up and Use an Event to Trigger Multiple Manual Actions
Use the CCURE 800 Monitoring Application
CCURE has many different types of Events. Card reader door hold open and forced open conditions create events that you can monitor in CCURE Monitoring. Auto unlock events (from the previous section) will show up in CCURE Monitoring when they are active. You can also create Events that bundle together several actions that you often have to undertake separately as Manual Actions so you can activate them all at once. For instance, if your department often hosts open house events after hours, you can setup a CCURE Event that unlocks several doors, disarms alarmed doors, and puts elevators in free access (where you have card reader controlled elevators).
To setup a CCURE Event contact the Campus Safety and Security Infrastructure group at [email protected]. Give them a list of the Manual Actions that you want to bundle together into one Event and give them a name for this Event (i.e., “Department Special Event Unlock”).
Set Up and Use an Event
1. From the toolbar at the top of the screen, click the Events icon, the small red triangle.
A menu of the types of events which you can control appears.
2. Highlight the Event Name that you want to control and choose Activate selected… to schedule the event.
Physical Access & Control (CCURE) Quick Reference Guide v5
15
This brings up a window where you can set start date and time and end date and time of the event. Time is expressed in military time.
3. Enter a note so your fellow gatekeepers will understand why an event is programmed at an odd time of the day or day of the week. Also, please include your name in the note.
Selections here will filter your search results.
Physical Access & Control (CCURE) Quick Reference Guide v5
16
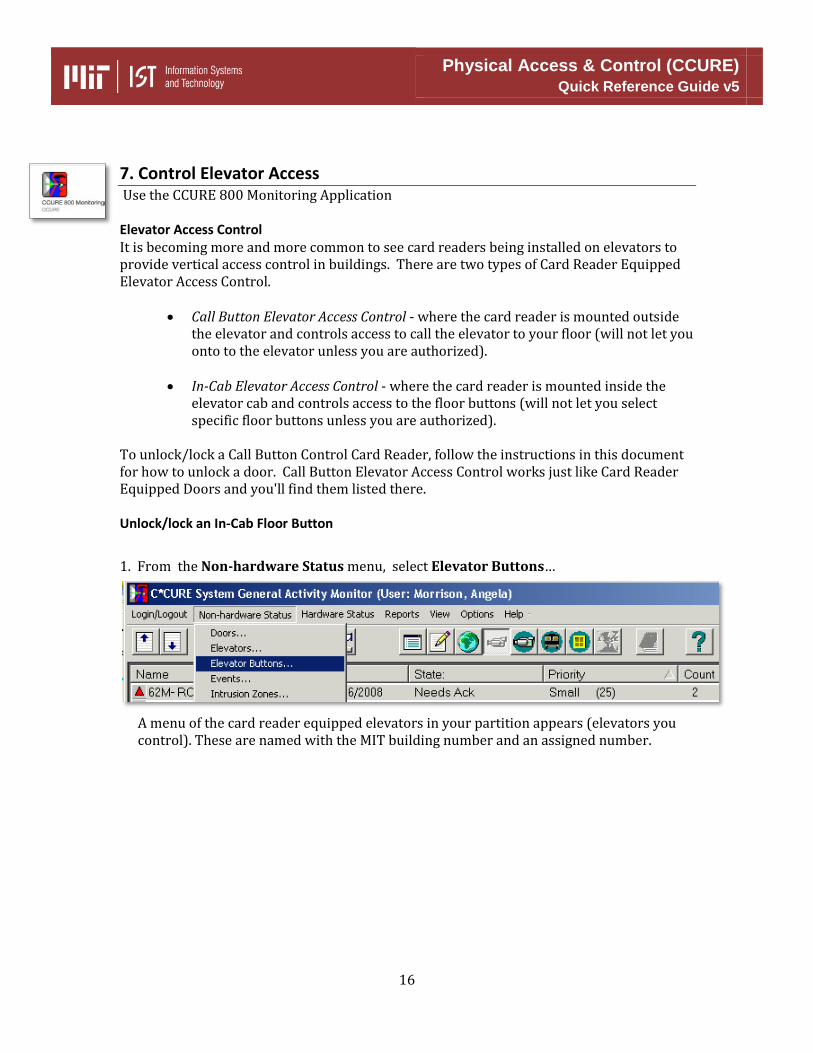
7. Control Elevator Access Use the CCURE 800 Monitoring Application Elevator Access Control It is becoming more and more common to see card readers being installed on elevators to provide vertical access control in buildings. There are two types of Card Reader Equipped Elevator Access Control.
• Call Button Elevator Access Control - where the card reader is mounted outside the elevator and controls access to call the elevator to your floor (will not let you onto to the elevator unless you are authorized).
• In-Cab Elevator Access Control - where the card reader is mounted inside the
elevator cab and controls access to the floor buttons (will not let you select specific floor buttons unless you are authorized).
To unlock/lock a Call Button Control Card Reader, follow the instructions in this document for how to unlock a door. Call Button Elevator Access Control works just like Card Reader Equipped Doors and you'll find them listed there. Unlock/lock an In-Cab Floor Button
1. From the Non-hardware Status menu, select Elevator Buttons…
A menu of the card reader equipped elevators in your partition appears (elevators you control). These are named with the MIT building number and an assigned number.
Physical Access & Control (CCURE) Quick Reference Guide v5
17
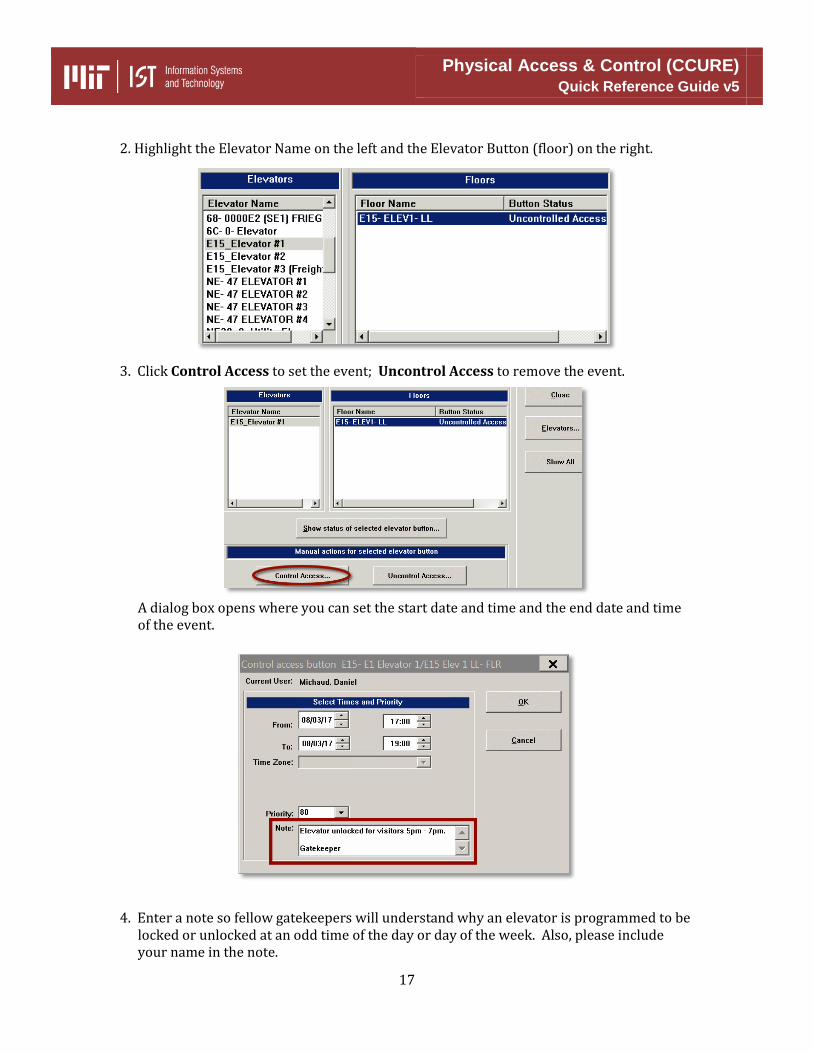
2. Highlight the Elevator Name on the left and the Elevator Button (floor) on the right.
3. Click Control Access to set the event; Uncontrol Access to remove the event.
A dialog box opens where you can set the start date and time and the end date and time of the event.
4. Enter a note so fellow gatekeepers will understand why an elevator is programmed to be locked or unlocked at an odd time of the day or day of the week. Also, please include your name in the note.
Physical Access & Control (CCURE) Quick Reference Guide v5
18
Contact Us For help and assistance contact the MIT IS&T Campus Safety and Security Infrastructure team:
This includes requesting Gatekeeper privileges and changing your CCURE password (you cannot change your own CCURE password). Some Best Practices
• Gatekeepers should periodically run a clearance list and revoke clearances from all those who no longer require access.
• Keep a supply of Temporary Access Cards on hand. See below.
The Temporary Access or “Spare Key” Card The Temporary Access Card offers a temporary solution for granting card access to someone who either doesn’t have an MIT ID (an outside contractor, vendor, or visitor) or someone whose MIT ID is not working (perhaps expired – see Troubleshooting below).
• You can obtain a supply of Temporary Access Cards from the Atlas Center (contact them in advance so your cards are ready when you go to pick them up).
• The cost is approximately $20.00 each . (The cost subject to change). • You can set the expiration date for the card to be whatever you’d like up to a
maximum of two years, and you can only renew them once. (The time period is subject to change).
• Temporary Access Cards have a unique MIT ID Number on them just like other MIT ID Cards.
Once you have a supply of Temporary Access Cards, you can activate them for access by giving them one of your Access Control Clearances. You can look up a temporary card by its unique MIT ID Number as you would for any other card. If you hand a Temporary Access Card out to a visitor or vendor and don’t get it back, you can look it up in CCURE and revoke the Access Control Clearance. What if I can’t install Citrix? Remember that you have to have Administrator access to your computer in order to install Citrix. The first time you go to citrix.mit.edu, it will look to see if you have Citrix installed. If it doesn’t find it, it provides you with a buttons to download and install. Whereas this might seem expedient, it may cause the Citrix installer to get into a loop. Instead go to the IS&T Software grid and follow the instructions for downloading and installing. If the problem continues, please contact the IS&T Service Desk ([email protected], 617-253-4101) and let them know you are having trouble installing Citrix.
Physical Access & Control (CCURE) Quick Reference Guide v5
19
What if I can’t connect to Citrix? If you are trying to connect to Citrix from off campus, remember that you need to first connect to Cisco Any Connect. If you are still having trouble, please contact the IS&T Service Desk ([email protected], 617-253-4101). What if I can’t login to CCURE? If you are able to connect to Citrix but cannot login to CCURE, please contact the Campus Safety and Security Infrastructure group at [email protected] or call 617-258-7366. What if I can’t find a Card Record in CCURE? Only active MIT ID cards appear in CCURE as Card Records. If someone has not yet obtained an MIT ID Card or if that card has been expired for more than two weeks then you may not find a Card Record for that person when you search CCURE. What if a card isn’t working? Has a card expired? Go to the General tab of an individual’s Personnel Record to find the expiration date of a person’s card:
If it is expired, make sure that the card can be renewed (student is eligible to register, employee’s appointment has been renewed, etc.) and then tell the Card Holder to visit the Atlas Center (E17-106) to renew the ID. If the card is not expired and it has the correct clearance, you can use CCURE Monitoring to test it. Login to CCURE Monitoring. Walk over to a locked Card Reader Equipped Door and present the ID Card to the Card Reader. Go back to your computer and see what shows up in CCURE Monitoring (note: this only works with locked Card Reader Equipped Doors that you can see in CCURE Monitoring). There should be a message such as “Reject:Clearance” which indicates the card does not have the correct Card Access Clearance, “Reject:Expired”,
Physical Access & Control (CCURE) Quick Reference Guide v5
20
or “Reject:Unknown Card” which indicates a problem with the card itself or with the security system’s ability to send that card data to the Card Reader. Contact the Campus Safety and Security Infrastructure group at [email protected] or call 617 258-7366. Remember, you can also offer a person a “Spare Key” card.
What if a card reader equipped door isn’t working? Contact the Campus Safety and Security Infrastructure group at [email protected] or call 617 258-7366. In an after hours emergency, please call 617-258-7366, select option #6 for an emergency and leave a message for our on-call person with a number where we can call you back. What happens to card reader doors on holidays or emergency closings? CCURE is pre-programed annually with all recognized Institute Holidays. During these holidays, doors will be locked unless otherwise requested. Special, or emergency closings are programmed to the follow Institute Holiday schedule. Any request for doors to be opened during these holidays should be directed to [email protected].


![[Citrix] Perforce Standardisation at Citrix](https://static.documents.pub/doc/80x56/545591f6b1af9f40378b492e/citrix-perforce-standardisation-at-citrix.jpg)


