24
January 2010 Page 1 TECHNICAL LEVEL I SKATING
January 2010 Page 1
TE
CH
NIC
AL
LEVEL I
SKATING
Page 2 January 2010
T
EC
HN
ICA
L
LEVEL I

January 2010 Page 3
TE
CH
NIC
AL
LEVEL I
SKATING SKILLS The game of Ice Hockey is a fast-paced, complex, team sport, which demands quick thinking, fast reactions and special athletic skills. Skating is the most important skill to be learnt by any player. Skating is to hockey what running is to soccer. Skating is the foundation upon which all other skills are built. The level of performance attained by a player in passing, shooting, checking and stick handling are directly related to one’s skating ability. The time spent improving a player’s skating is a worthwhile investment due to the carry-over value to the many other aspects of the game. Chapter Overview:
• Understand and describe the key elements of skating
• Basic stance
• Edges
• Starts and stops
• Striding
• Turning
• Pivots
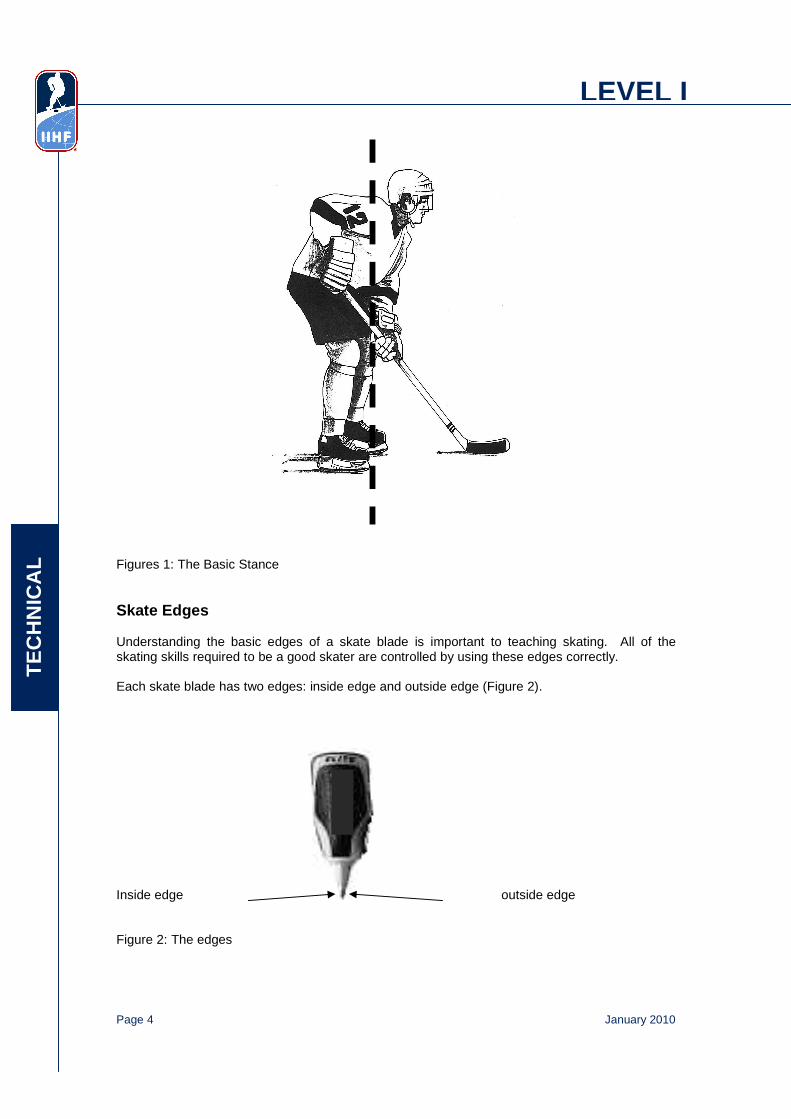
Basic Stance – Ready Position The Ready Position is where good skating starts as it permits a player to have a solid base of support and enables them to move in any direction balanced and in control. This position is also used when executing many of the basic skills such as passing, shooting, and checking. Key Points: • Feet are shoulder width apart, pointing forward. • Skate Blades are directly under feet and flat of the ice • Knees and ankles are flexed at approximately 45 degrees. • The upper body is straight and leans slightly forward (approximately 45 degrees) with the
weight of the body on the balls of the feet. In the basic stance the shoulders, knees, and toes can be joined by a straight line (Figure 1). Knees can actually be in front of the toes Head up, eyes looking forward (Figure 2). The stick is held with both hands, blade flat on the ice and slightly to the side of the body.
Page 4 January 2010
T
EC
HN
ICA
L
LEVEL I
Figures 1: The Basic Stance Skate Edges Understanding the basic edges of a skate blade is important to teaching skating. All of the skating skills required to be a good skater are controlled by using these edges correctly. Each skate blade has two edges: inside edge and outside edge (Figure 2). Inside edge outside edge Figure 2: The edges
January 2010 Page 5
TE
CH
NIC
AL
LEVEL I
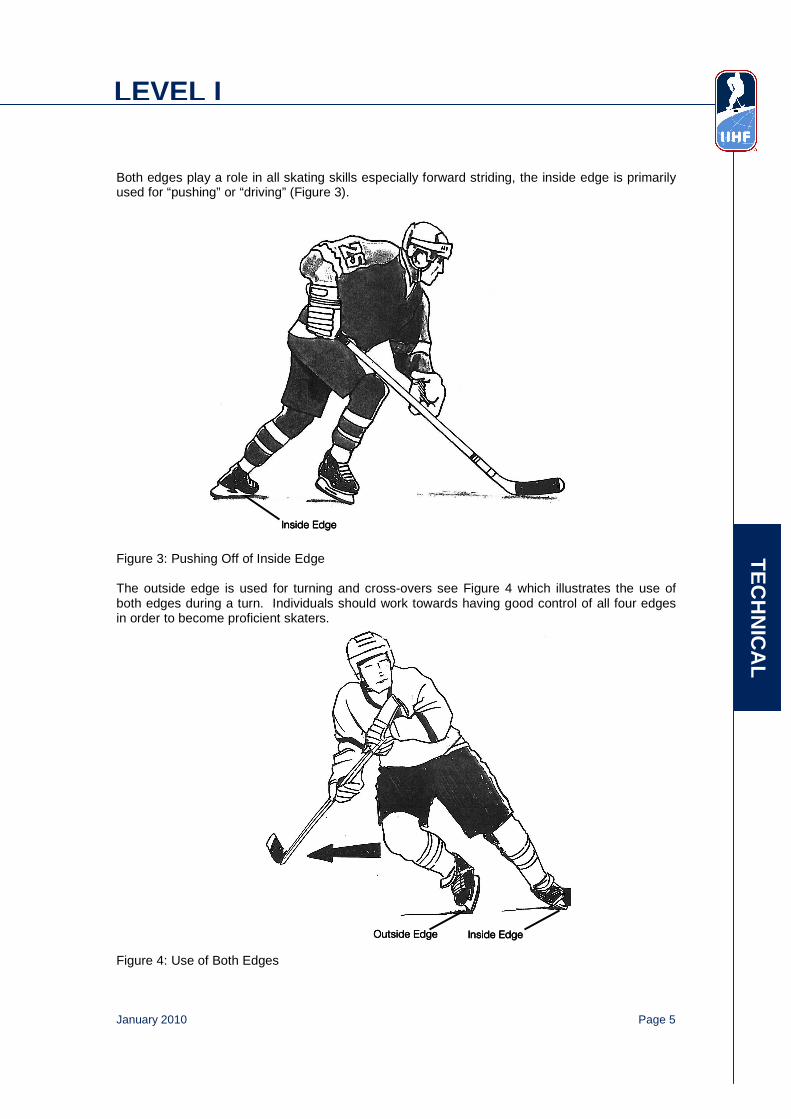
Both edges play a role in all skating skills especially forward striding, the inside edge is primarily used for “pushing” or “driving” (Figure 3).
Figure 3: Pushing Off of Inside Edge The outside edge is used for turning and cross-overs see Figure 4 which illustrates the use of both edges during a turn. Individuals should work towards having good control of all four edges in order to become proficient skaters. Figure 4: Use of Both Edges
Inside Inside Inside Inside EEEEdgedgedgedge
Inside EdgeInside EdgeInside EdgeInside Edge OutOutOutOutside Edgeside Edgeside Edgeside Edge
Page 6 January 2010
T
EC
HN
ICA
L
LEVEL I
Forward Skating - Striding The efficiency of the skating stride depends on applying a few fundamental principles and optimum development of the muscles used in skating. Careful attention should be paid to the following key points when teaching forward skating. Key Points: • Ready position is the starting point • Power comes from a full and forcefully extension of the hip, the knee and the ankle in a
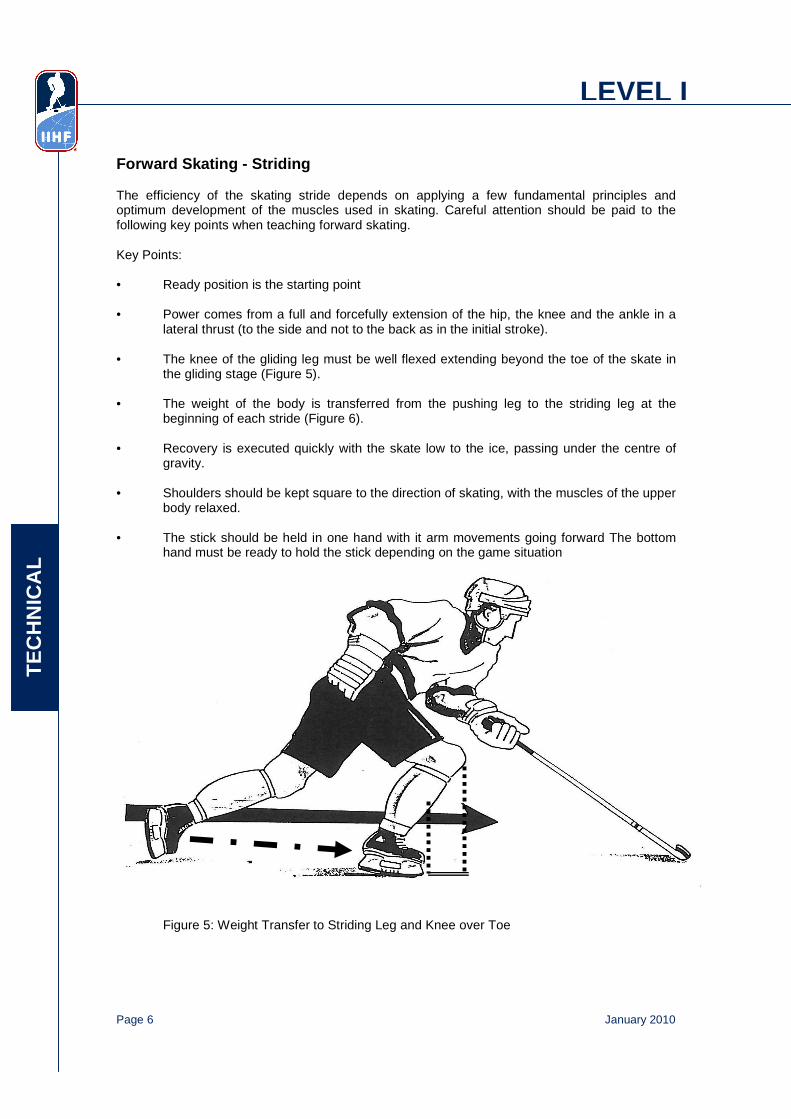
lateral thrust (to the side and not to the back as in the initial stroke). • The knee of the gliding leg must be well flexed extending beyond the toe of the skate in
the gliding stage (Figure 5). • The weight of the body is transferred from the pushing leg to the striding leg at the
beginning of each stride (Figure 6). • Recovery is executed quickly with the skate low to the ice, passing under the centre of
gravity. • Shoulders should be kept square to the direction of skating, with the muscles of the upper
body relaxed. • The stick should be held in one hand with it arm movements going forward The bottom
hand must be ready to hold the stick depending on the game situation
Figure 5: Weight Transfer to Striding Leg and Knee over Toe
January 2010 Page 7
TE
CH
NIC
AL
LEVEL I
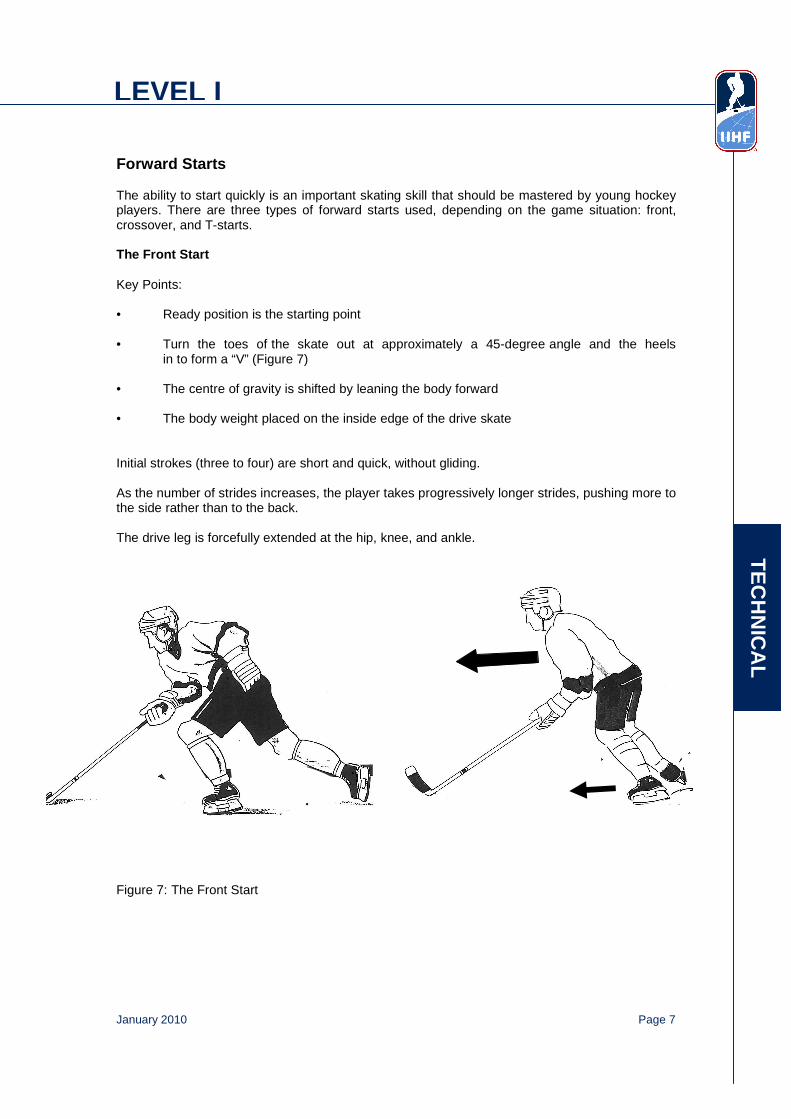
Forward Starts The ability to start quickly is an important skating skill that should be mastered by young hockey players. There are three types of forward starts used, depending on the game situation: front, crossover, and T-starts. The Front Start Key Points: • Ready position is the starting point • Turn the toes of the skate out at approximately a 45-degree angle and the heels
in to form a “V” (Figure 7) • The centre of gravity is shifted by leaning the body forward • The body weight placed on the inside edge of the drive skate Initial strokes (three to four) are short and quick, without gliding. As the number of strides increases, the player takes progressively longer strides, pushing more to the side rather than to the back. The drive leg is forcefully extended at the hip, knee, and ankle.
Figure 7: The Front Start

Page 8 January 2010
T
EC
HN
ICA
L
LEVEL I
The Crossover Start A crossover start is used when a player wishes to start rapidly after a two-foot parallel stop. It is also used when a player is sideways to the direction one wishes to go. It can be described as a front start preceded by a crossover action. Key Points: • Skates are slightly closer together than in the Ready position. • Skates at a 90 degree angle to the desired direction of travel • The head and shoulders are turned in the desired direction. • The body leans towards the desired direction. • Perform one crossover to get to the forward starting position • After the crossover, the drive skate is placed at a 90 degree angle to the desired
direction. Figure 8: The Crossover Start
January 2010 Page 9
TE
CH
NIC
AL
LEVEL I
The T-Start The T-start is used when a player is stationary and knows beforehand the direction one wishes to travel. It can be used to teach beginners starting as it is easier to master than the front start. The primary difference between the T-start and the front start is in the positioning of the skates. Key Points: • Both legs are flexed slightly. • The driving leg is positioned behind the lead foot at a 90 degree angle to the desired
direction of travel thus creating the T-start position. • The start is initiated by a thrust of the driving leg (inside edge). • Without any gliding motion, the lead foot is raised and rotated outward, ready to perform
another driving motion.
Page 10 January 2010
T
EC
HN
ICA
L
LEVEL I
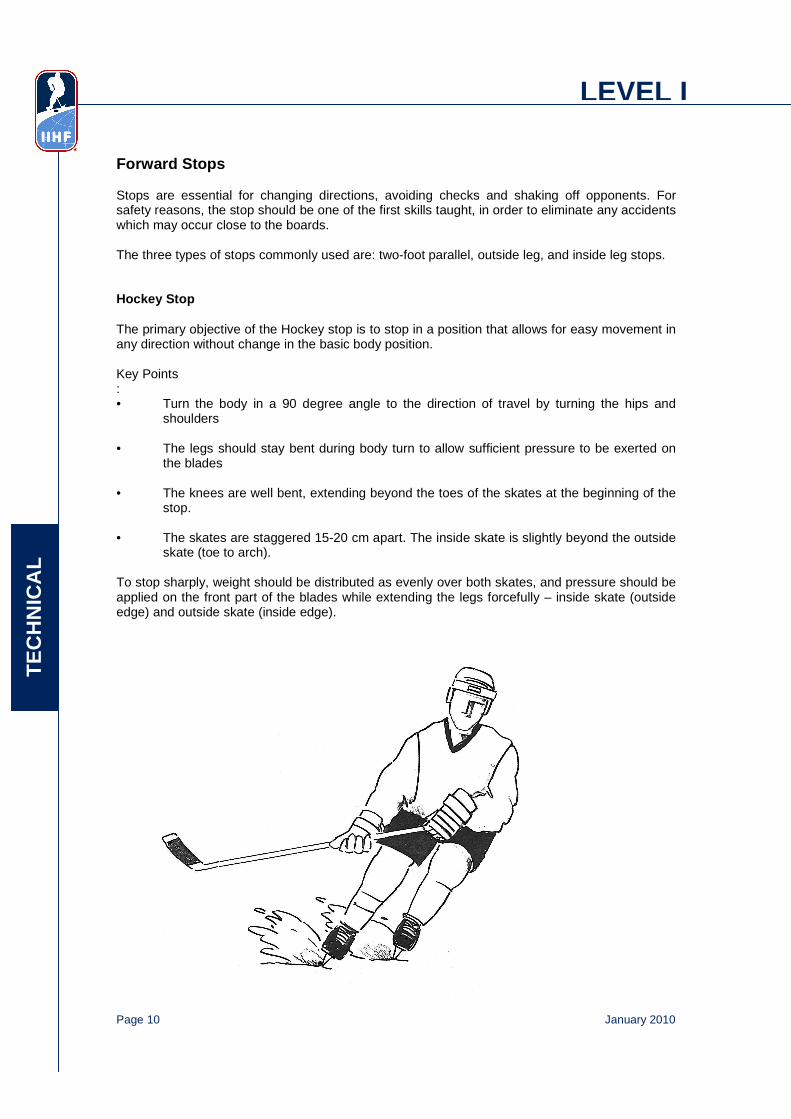
Forward Stops Stops are essential for changing directions, avoiding checks and shaking off opponents. For safety reasons, the stop should be one of the first skills taught, in order to eliminate any accidents which may occur close to the boards. The three types of stops commonly used are: two-foot parallel, outside leg, and inside leg stops. Hockey Stop The primary objective of the Hockey stop is to stop in a position that allows for easy movement in any direction without change in the basic body position. Key Points : • Turn the body in a 90 degree angle to the direction of travel by turning the hips and
shoulders • The legs should stay bent during body turn to allow sufficient pressure to be exerted on
the blades • The knees are well bent, extending beyond the toes of the skates at the beginning of the
stop. • The skates are staggered 15-20 cm apart. The inside skate is slightly beyond the outside
skate (toe to arch). To stop sharply, weight should be distributed as evenly over both skates, and pressure should be applied on the front part of the blades while extending the legs forcefully – inside skate (outside edge) and outside skate (inside edge).
January 2010 Page 11
TE
CH
NIC
AL
LEVEL I
Figure 8: Hockey Stop Inside Leg Stop The inside leg stop is used to in change directions at the same time as stopping. • Turn the body in a 90 degree angle to the direction of travel by turning the hips and
shoulders • Remove the lead skate from the ice; apply pressure on the back skate. • The back leg should be well flexed prior to initiating the stop with the body weight leaning
backwards. • Cross the lead skate back over the back skate to initiate the first stride in the opposite
direct

Page 12 January 2010
T
EC
HN
ICA
L
LEVEL I
Forward Turns In changing direction on the ice the player must turn towards the play so that they can be involved in the game. It is essential that individuals learn to turn equally well in both directions because of the nature of ice hockey (e.g., flow and rapid transition). Sharp Turn The sharp turn is an important technique to master and it is one of the most useful. The player must execute a change of direction of 180 degrees in a very limited space while attempting to maintain the highest possible speed. Key Points: • The skate on the side of the desired direction of the turn (inside skate) is placed slightly
ahead of the other skate. • The head, shoulders, arms and stick are turned in the desired direction of travel (Figure
10). • The lower body leans significantly in the desired turning direction; the upper body stays
square and leans slightly forward (Figure 11). • The outside leg then crosses over the inside leg in order to accelerate out of the turn. Weight is be placed on the outside edge of the lead foot and the inside edge of the back foot. For a sharper turn, more weight will be placed on the back of the blades (Figure 10).
Figure 10: Sharp Turn
Weight placed on the back of Weight placed on the back of Weight placed on the back of Weight placed on the back of
the bladesthe bladesthe bladesthe blades
January 2010 Page 13
TE
CH
NIC
AL
LEVEL I
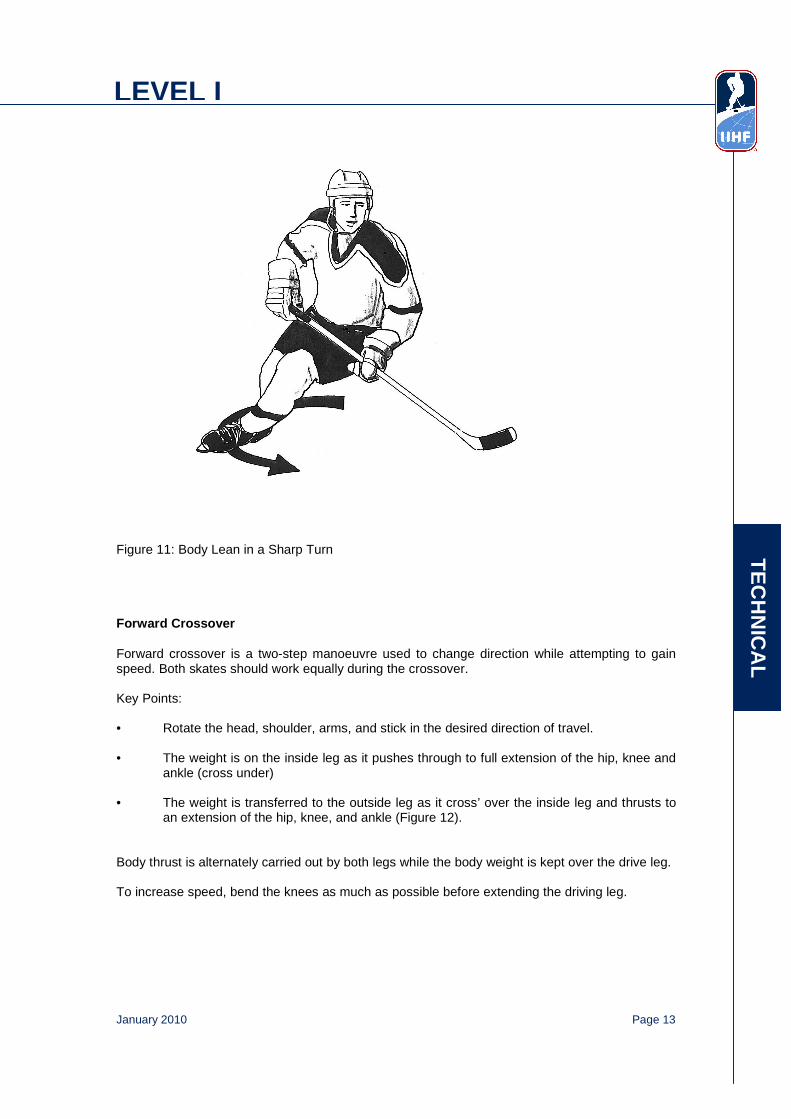
Figure 11: Body Lean in a Sharp Turn Forward Crossover Forward crossover is a two-step manoeuvre used to change direction while attempting to gain speed. Both skates should work equally during the crossover. Key Points: • Rotate the head, shoulder, arms, and stick in the desired direction of travel. • The weight is on the inside leg as it pushes through to full extension of the hip, knee and
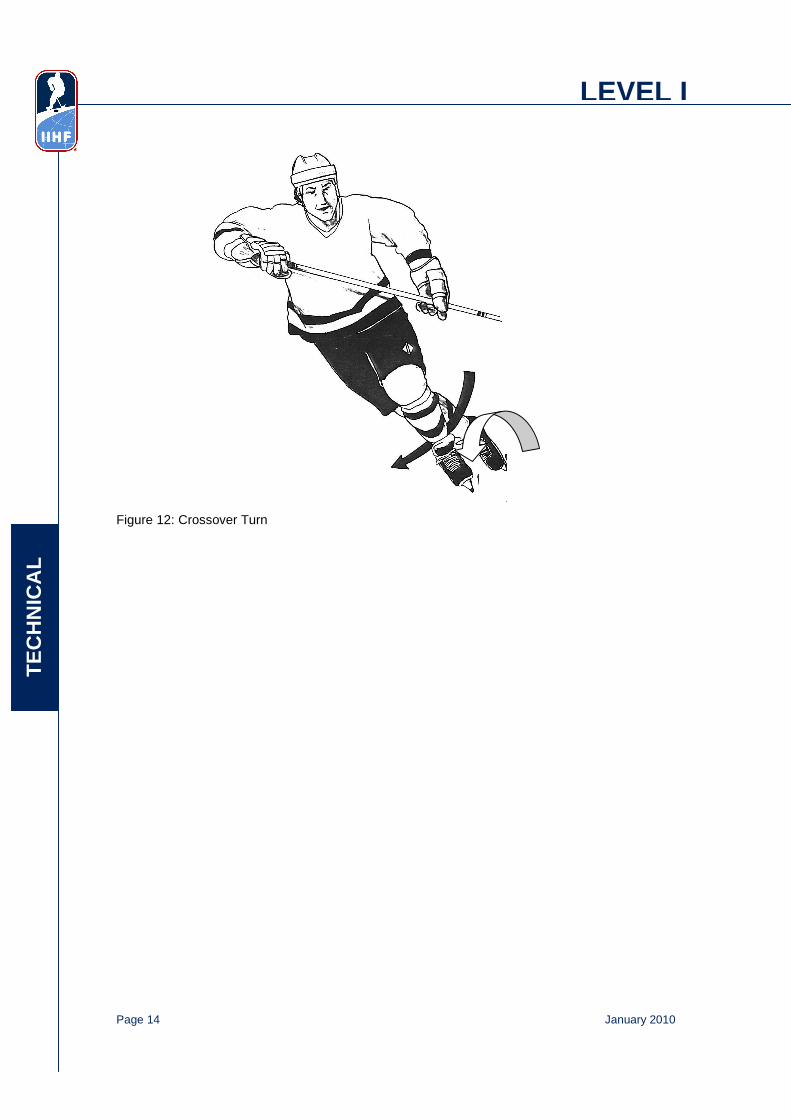
ankle (cross under) • The weight is transferred to the outside leg as it cross’ over the inside leg and thrusts to
an extension of the hip, knee, and ankle (Figure 12). Body thrust is alternately carried out by both legs while the body weight is kept over the drive leg. To increase speed, bend the knees as much as possible before extending the driving leg.
Page 14 January 2010
T
EC
HN
ICA
L
LEVEL I
Figure 12: Crossover Turn
January 2010 Page 15
TE
CH
NIC
AL
LEVEL I
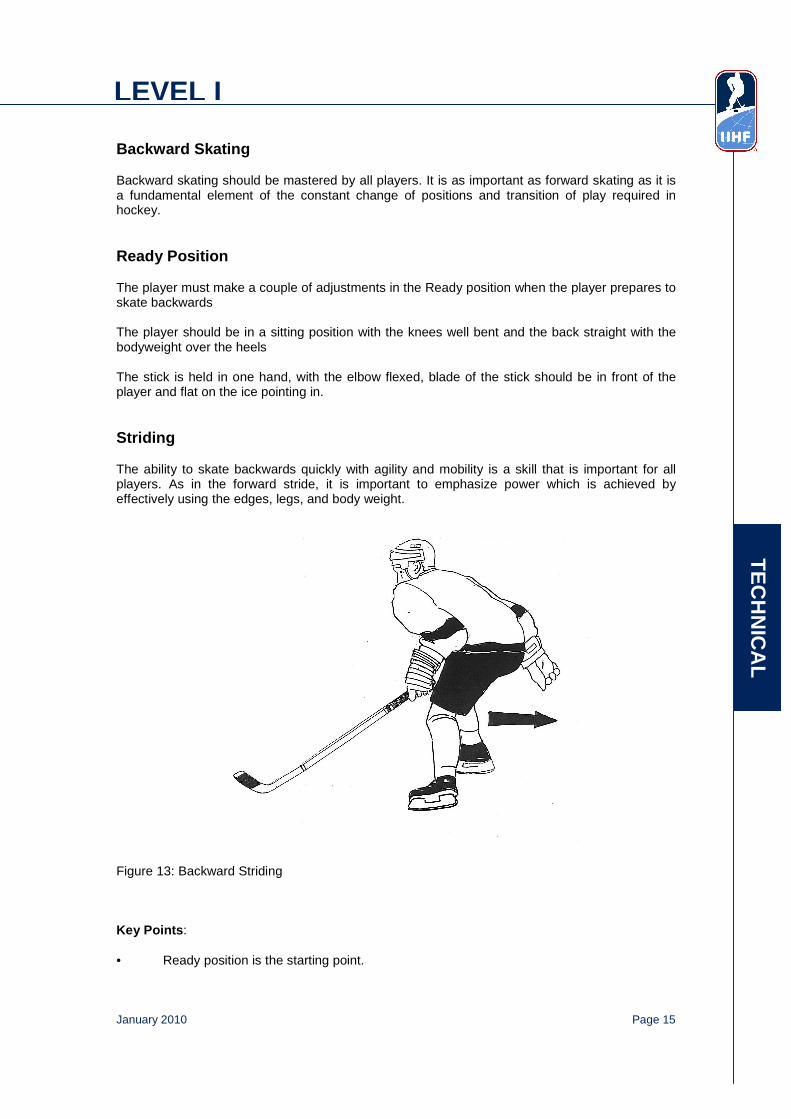
Backward Skating Backward skating should be mastered by all players. It is as important as forward skating as it is a fundamental element of the constant change of positions and transition of play required in hockey. Ready Position The player must make a couple of adjustments in the Ready position when the player prepares to skate backwards The player should be in a sitting position with the knees well bent and the back straight with the bodyweight over the heels The stick is held in one hand, with the elbow flexed, blade of the stick should be in front of the player and flat on the ice pointing in. Striding The ability to skate backwards quickly with agility and mobility is a skill that is important for all players. As in the forward stride, it is important to emphasize power which is achieved by effectively using the edges, legs, and body weight. Figure 13: Backward Striding Key Points : • Ready position is the starting point.
Page 16 January 2010
T
EC
HN
ICA
L
LEVEL I
• The heel of the driving leg is rotated outward as the hip, the knee, and the ankle are
extended forward and sideways to cut a “C” shaped arc on the ice. • During the thrust of the driving leg (inside edge), the full weight of the body is transferred
to the gliding skate and is distributed evenly on the entire blade before starting a new thrust.
The player should resist excessive forward lean and avoid swinging the hips from side to side. The knee of the gliding leg must be well flexed in order to permit a long thrust of the driving leg. When skating backwards, the stick should be held in one hand in front of the body with the arm slightly flexed. The head should be up at all times. Backward Starts The backward start is used to start backward skating from a stop position without turning ones back to oncoming play and opponents Key Points: • From a basic stance position (driving leg well flexed), the player rotates the toe of one
skate inward and heel outwards • Rotation is approximately 90 degrees to the desired direction of travel. • With a forceful extension of the hip, knee, and ankle, pressure is Applied to the inside
edge which cuts an arc on the ice. This should not be a full extension in order that recovery may be rapid.
• During the forceful push of the driving leg, body weight is transferred from the driving leg
to the gliding leg which is ready to make another stride. • The gliding leg is flexed to make possible a longer push by the driving leg. Backward Crossover Start The backward crossover start is a very effective method of accelerating rapidly from a stationary backward position. Key Points: • From a basic backward stance position, the hips and trunk turn slightly towards the
direction of the crossover; the head remains facing the oncoming opponent. • The inside leg (outside edge) now extends. • The outside leg (inside edge) crosses over in front of the inside leg as it extends and is
brought down on the ice. This stride should be short and close to the ice. • The body is driven backward by the extension of the outside leg (inside edge).
January 2010 Page 17
TE
CH
NIC
AL
LEVEL I
• The player must be take care that their skates do not get hit during the crossover and cause them to lose balance and fall
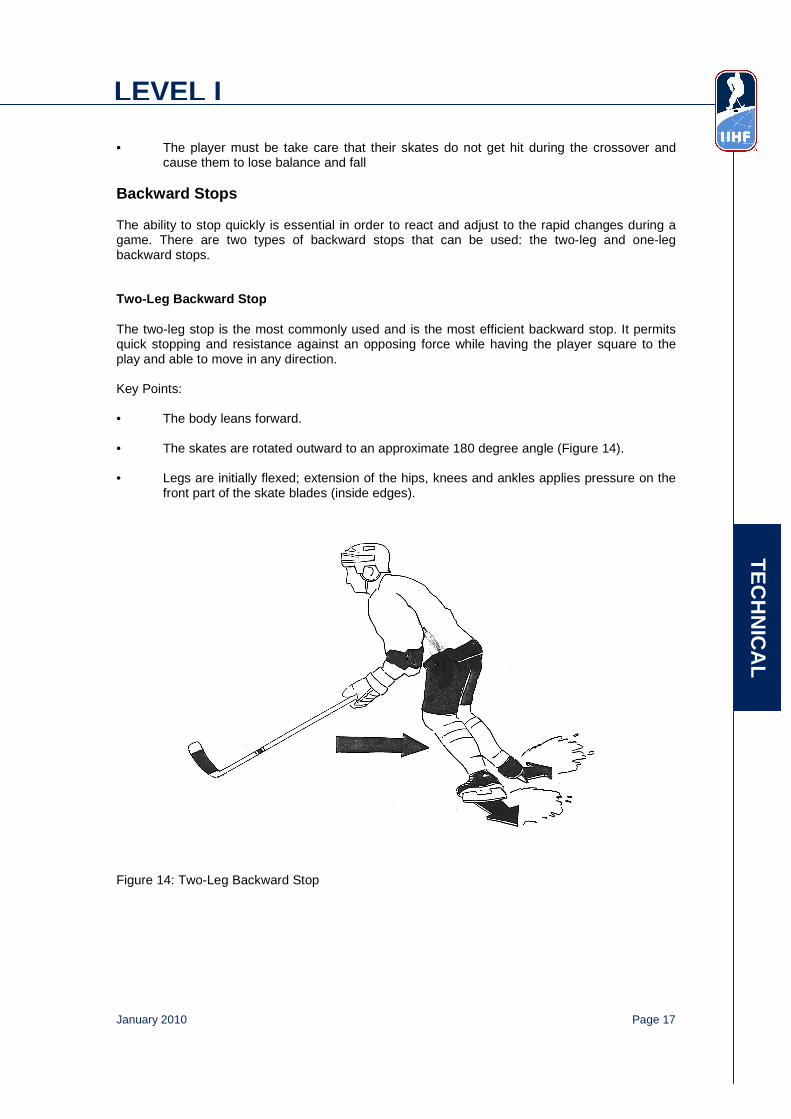
Backward Stops The ability to stop quickly is essential in order to react and adjust to the rapid changes during a game. There are two types of backward stops that can be used: the two-leg and one-leg backward stops. Two-Leg Backward Stop The two-leg stop is the most commonly used and is the most efficient backward stop. It permits quick stopping and resistance against an opposing force while having the player square to the play and able to move in any direction. Key Points: • The body leans forward. • The skates are rotated outward to an approximate 180 degree angle (Figure 14). • Legs are initially flexed; extension of the hips, knees and ankles applies pressure on the
front part of the skate blades (inside edges).
Figure 14: Two-Leg Backward Stop
Page 18 January 2010
T
EC
HN
ICA
L
LEVEL I
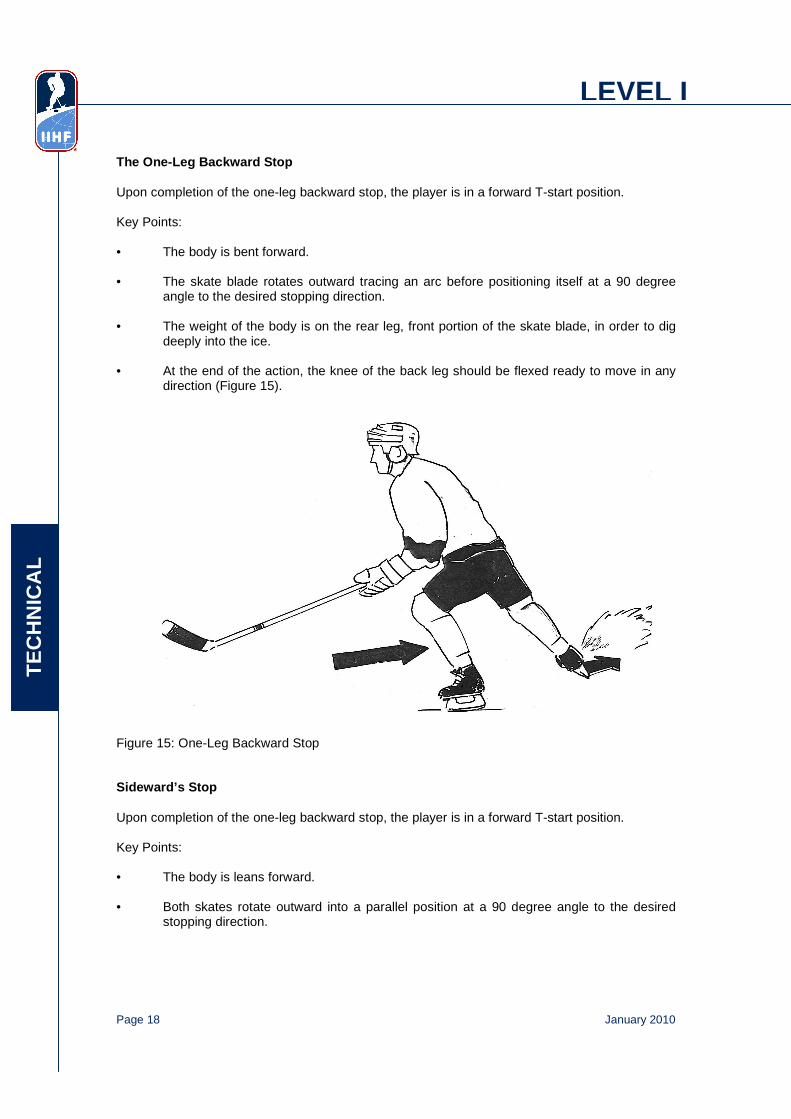
The One-Leg Backward Stop Upon completion of the one-leg backward stop, the player is in a forward T-start position. Key Points: • The body is bent forward. • The skate blade rotates outward tracing an arc before positioning itself at a 90 degree
angle to the desired stopping direction. • The weight of the body is on the rear leg, front portion of the skate blade, in order to dig
deeply into the ice. • At the end of the action, the knee of the back leg should be flexed ready to move in any
direction (Figure 15).
Figure 15: One-Leg Backward Stop Sideward’s Stop Upon completion of the one-leg backward stop, the player is in a forward T-start position. Key Points: • The body is leans forward. • Both skates rotate outward into a parallel position at a 90 degree angle to the desired
stopping direction.
January 2010 Page 19
TE
CH
NIC
AL
LEVEL I
• This position is the same as the Hockey Stop • The knees are well bent, extending beyond the toes of the skates at the beginning of the
stop. • The skates are staggered 15-20 cm apart. The inside skate is slightly beyond the outside
skate (toe to arch). Backward Turns Backward turns in both directions are essential for mobility and positioning and are skills that should be mastered by all players. Backward Lateral Crossovers Backward lateral crossovers permit a player to move laterally in order to remain in front of an attacker. They can be executed from a stopped position or while skating backward. The mechanics of this movement are similar to those used during the backward crossover start. Key Points: • Basic stance is the starting position. • The hips and trunk turn slightly towards the direction of the crossover; the head remains
straight. • Facing the play, the body is moved in the desired direction of travel by the extension of
the outside leg (inside edge), followed by an extension of the inside leg (outside edge). • The outside leg crosses over in front of the inside leg and is brought down on the ice.
This action is repeated until the desired position is attained. • The body weight is shifted to the leg that remains on the ice. Pivots Pivots allow a player to change from forward to backward or backwards to forwards quickly to gain good body position without modifying one’s speed. Pivots are usually used by defensemen but are a vital skill for all players to learn. Learning to pivoting both ways and to both sides is very important so the play is always facing the play. Forward to Backward Key Points: • Starting from a regular skating stride, the weight of the body is over the gliding leg that is
opposite to the intended direction of the pivot
Page 20 January 2010
T
EC
HN
ICA
L
LEVEL I
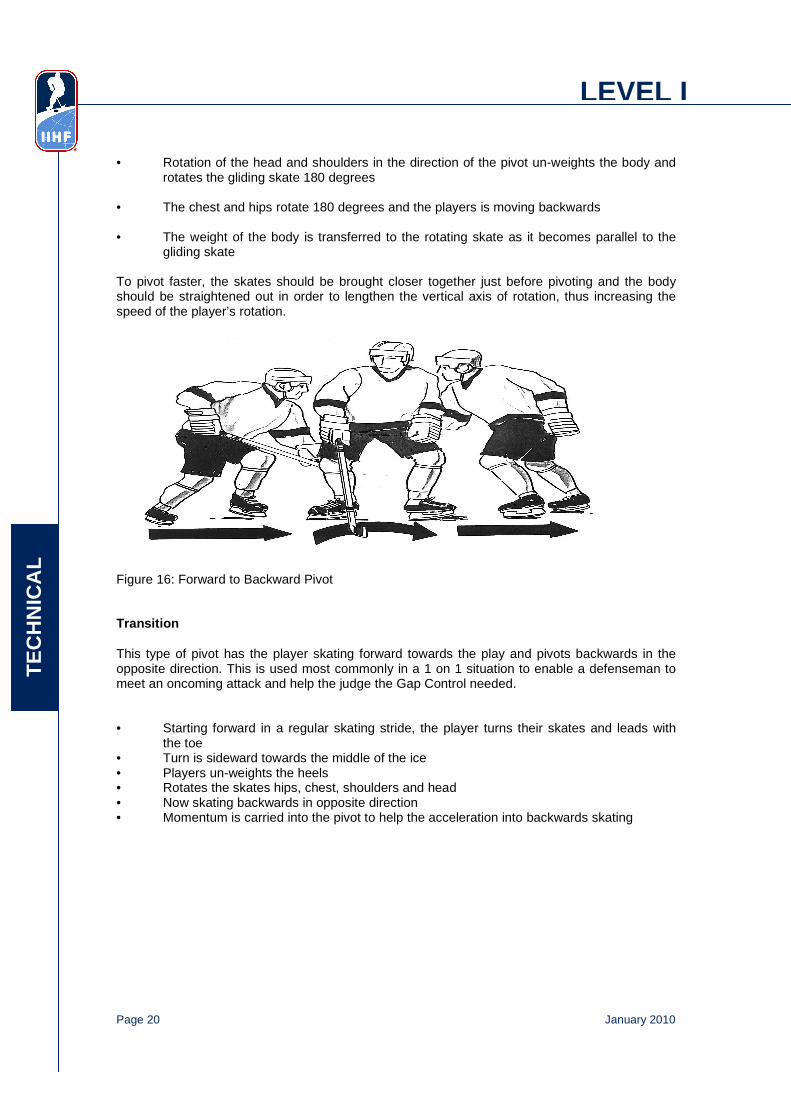
• Rotation of the head and shoulders in the direction of the pivot un-weights the body and
rotates the gliding skate 180 degrees • The chest and hips rotate 180 degrees and the players is moving backwards • The weight of the body is transferred to the rotating skate as it becomes parallel to the
gliding skate To pivot faster, the skates should be brought closer together just before pivoting and the body should be straightened out in order to lengthen the vertical axis of rotation, thus increasing the speed of the player’s rotation.
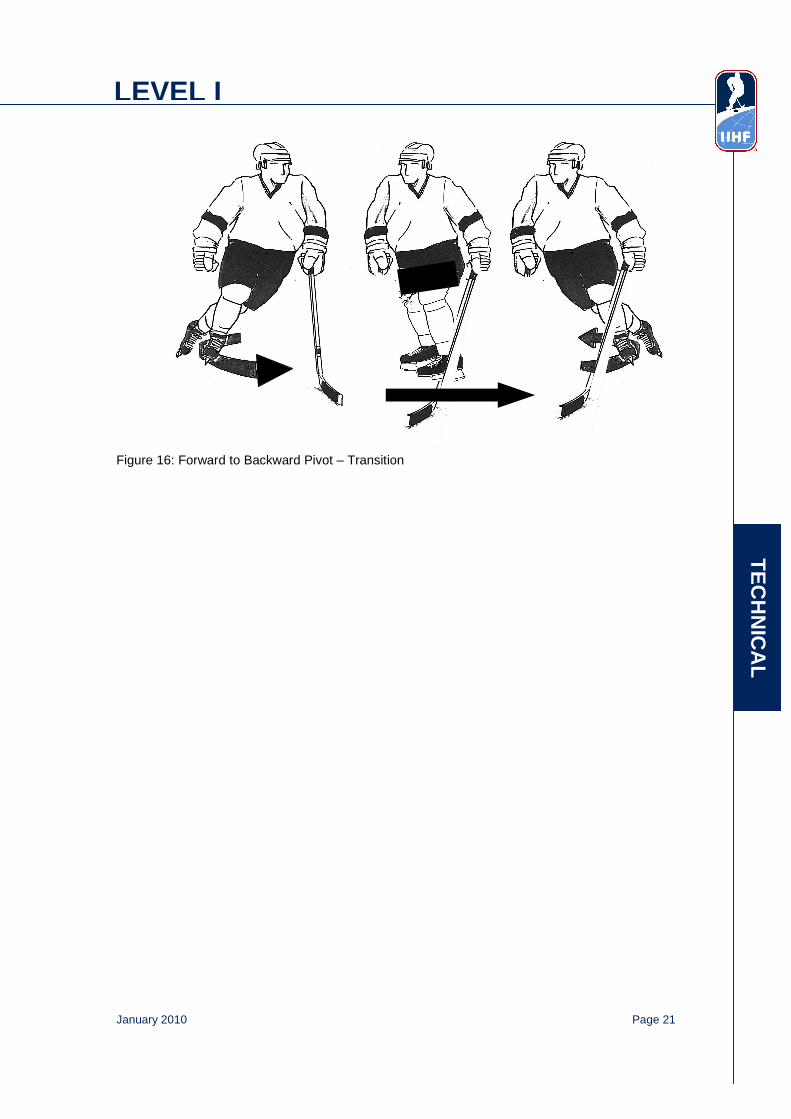
Figure 16: Forward to Backward Pivot Transition This type of pivot has the player skating forward towards the play and pivots backwards in the opposite direction. This is used most commonly in a 1 on 1 situation to enable a defenseman to meet an oncoming attack and help the judge the Gap Control needed. • Starting forward in a regular skating stride, the player turns their skates and leads with
the toe • Turn is sideward towards the middle of the ice • Players un-weights the heels • Rotates the skates hips, chest, shoulders and head • Now skating backwards in opposite direction • Momentum is carried into the pivot to help the acceleration into backwards skating
January 2010 Page 21
TE
CH
NIC
AL
LEVEL I
Figure 16: Forward to Backward Pivot – Transition
Page 22 January 2010
T
EC
HN
ICA
L
LEVEL I
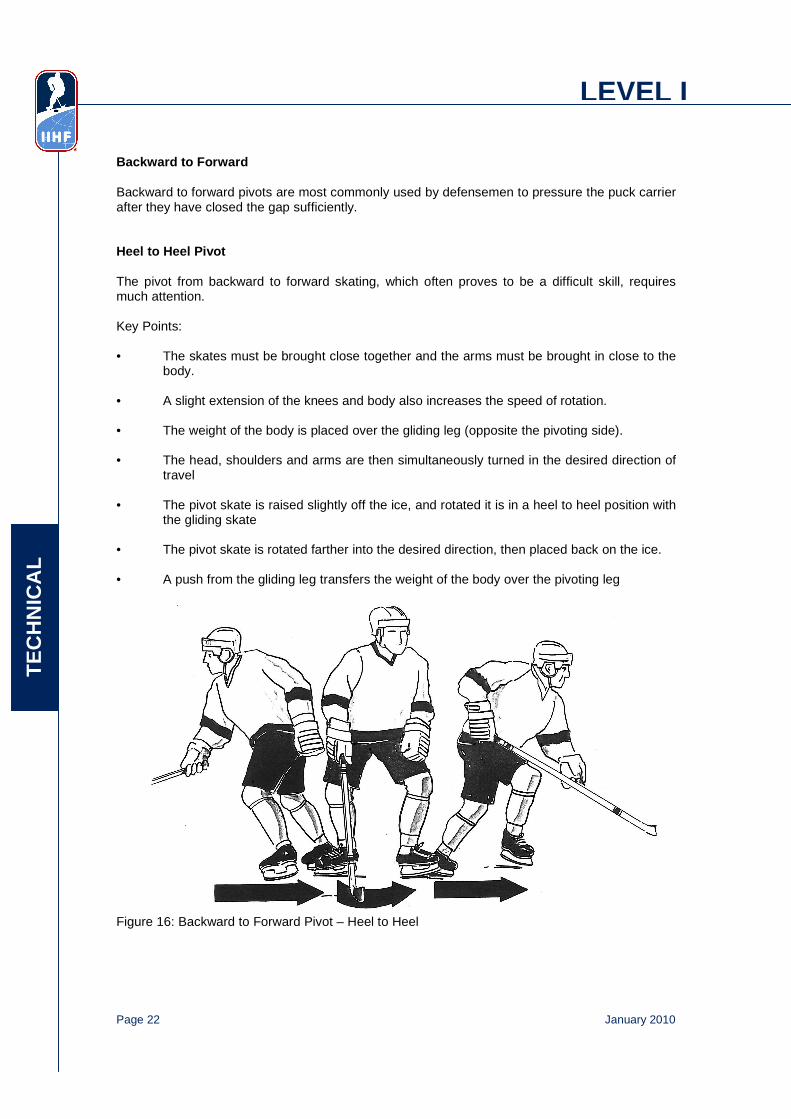
Backward to Forward Backward to forward pivots are most commonly used by defensemen to pressure the puck carrier after they have closed the gap sufficiently. Heel to Heel Pivot The pivot from backward to forward skating, which often proves to be a difficult skill, requires much attention. Key Points: • The skates must be brought close together and the arms must be brought in close to the
body. • A slight extension of the knees and body also increases the speed of rotation. • The weight of the body is placed over the gliding leg (opposite the pivoting side). • The head, shoulders and arms are then simultaneously turned in the desired direction of
travel • The pivot skate is raised slightly off the ice, and rotated it is in a heel to heel position with
the gliding skate • The pivot skate is rotated farther into the desired direction, then placed back on the ice. • A push from the gliding leg transfers the weight of the body over the pivoting leg Figure 16: Backward to Forward Pivot – Heel to Heel
January 2010 Page 23
TE
CH
NIC
AL
LEVEL I
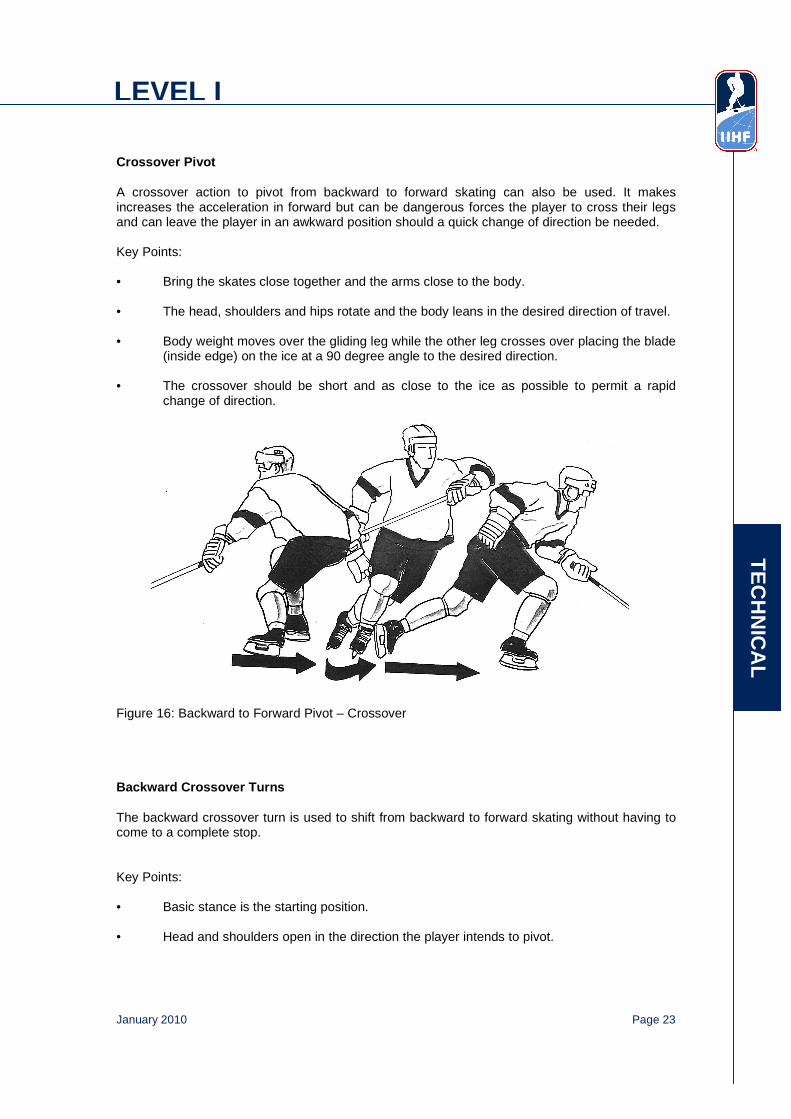
Crossover Pivot A crossover action to pivot from backward to forward skating can also be used. It makes increases the acceleration in forward but can be dangerous forces the player to cross their legs and can leave the player in an awkward position should a quick change of direction be needed. Key Points: • Bring the skates close together and the arms close to the body. • The head, shoulders and hips rotate and the body leans in the desired direction of travel. • Body weight moves over the gliding leg while the other leg crosses over placing the blade
(inside edge) on the ice at a 90 degree angle to the desired direction. • The crossover should be short and as close to the ice as possible to permit a rapid
change of direction. Figure 16: Backward to Forward Pivot – Crossover Backward Crossover Turns The backward crossover turn is used to shift from backward to forward skating without having to come to a complete stop. Key Points: • Basic stance is the starting position. • Head and shoulders open in the direction the player intends to pivot.
Page 24 January 2010
T
EC
HN
ICA
L
LEVEL I
• The outside leg extends and exerts force (inside edge) on the ice by a vigorous extension of the hip, knee, and ankle.
• The inside leg (outside edge) extends and the outside leg (inside edge) is brought back
to begin the final stage of backwards to forwards transition. • The inside leg (outside edge) completes its final thrust, the weight is now on the outside
leg (inside edge), which then pivots to assume a forward skating position.


