60
1 My first six months with ClassPa By Damien Bushby of Blackburn High School, Victori Presented at MAV Dec, 2007
| Date post: | 25-Dec-2015 |
| Category: |
Documents |
| Upload: | stuart-elliott |
| View: | 219 times |
| Download: | 0 times |

1
My first six months
with ClassPad.
By Damien Bushby of Blackburn High School, VictoriaPresented at MAV Dec, 2007
2
Which calculator?
• Continuation with current company.
• Trial of new model.
• Fat fingers and poor typing.
• Check out the opposition.
• Ease of learning.
• Company support.
• One calculator for Further and Methods.

3
Open the case with one hand. Use your other hand to hold the body.
The case will fit on the back of the body.
4
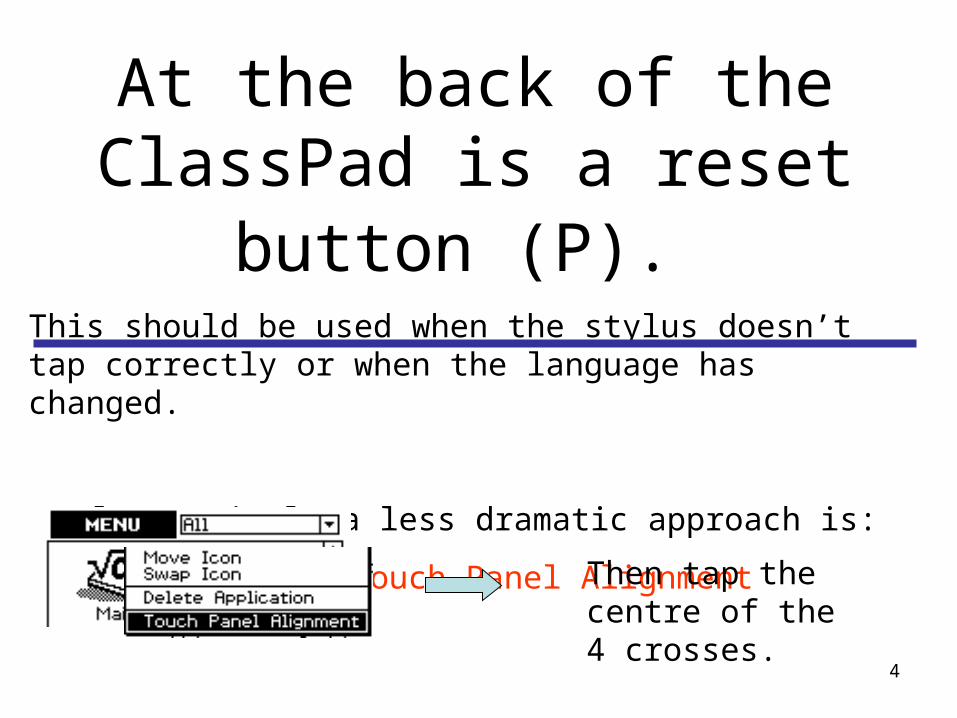
At the back of the ClassPad is a reset button (P).
This should be used when the stylus doesn’t tap correctly or when the language has changed.
Alternatively a less dramatic approach is:
MENU | Touch Panel Alignment
Then tap the centre of the 4 crosses.

5
Stylus
Mouse
Delete Left
Negative / ALT
Clear line or highlighted area
Execute
Shortcuts
usb
Calc. Link
6
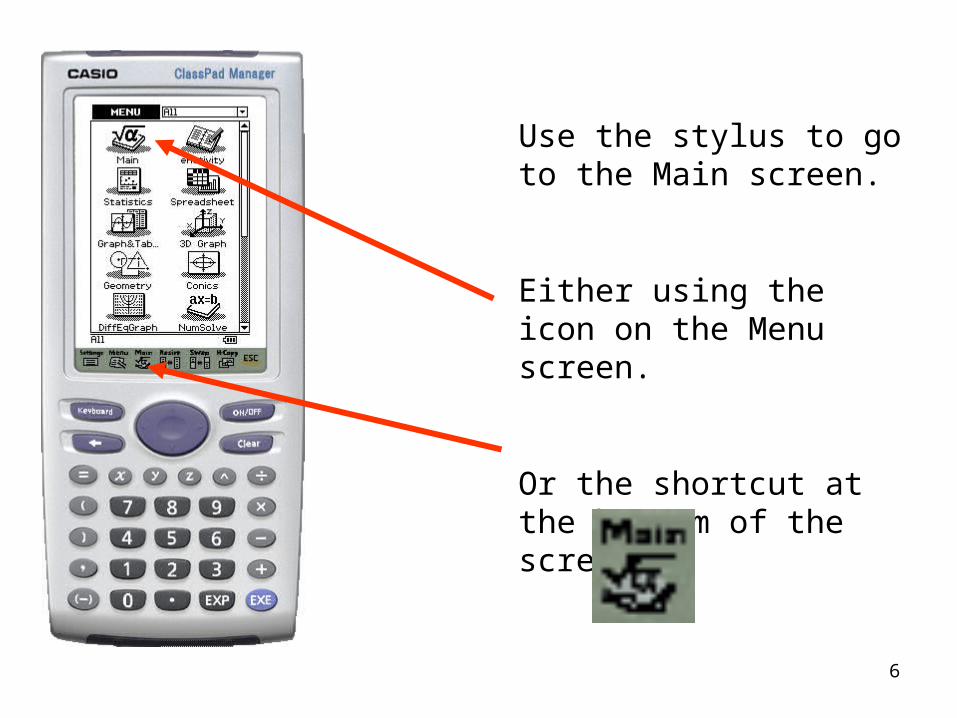
Use the stylus to go to the Main screen.
Either using the icon on the Menu screen.
Or the shortcut at the bottom of the screen.
7
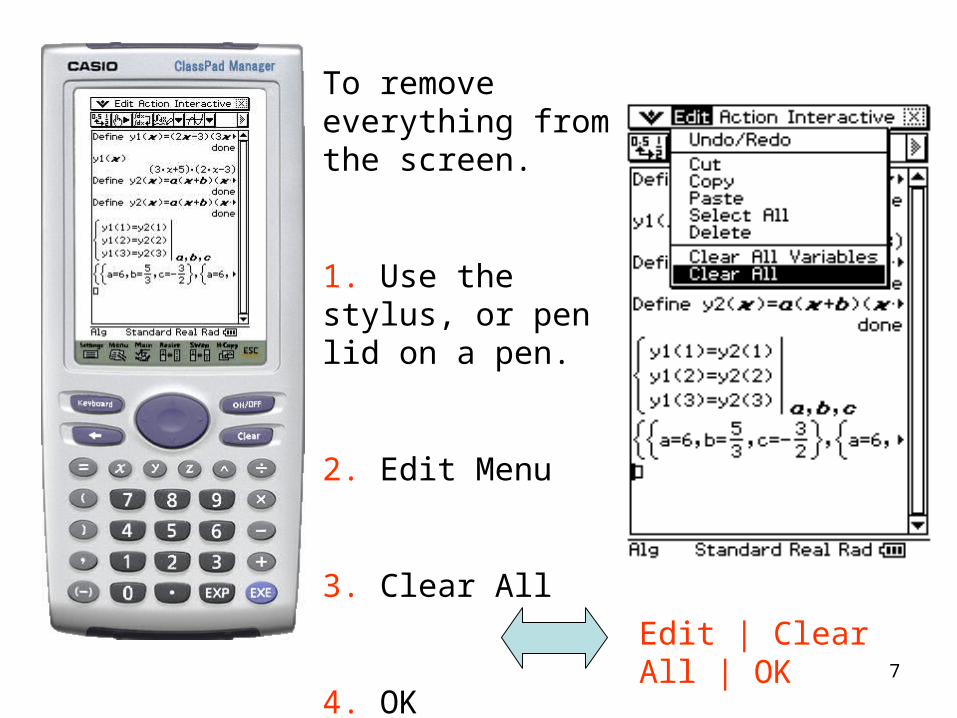
To remove everything from the screen.
1. Use the stylus, or pen lid on a pen.
2. Edit Menu
3. Clear All
4. OKEdit | Clear All | OK

8
It is also advisable to ‘Clear All Variables’ as well.
Edit | Clear All Variables | OK
This will not clear or
To do this eitherAction | Command | DelVar | f
or
1. | Variable Manager | main
2. Tick f3. Edit | Delete | OK | Close | Close

9
Ensure settings are correct.
10
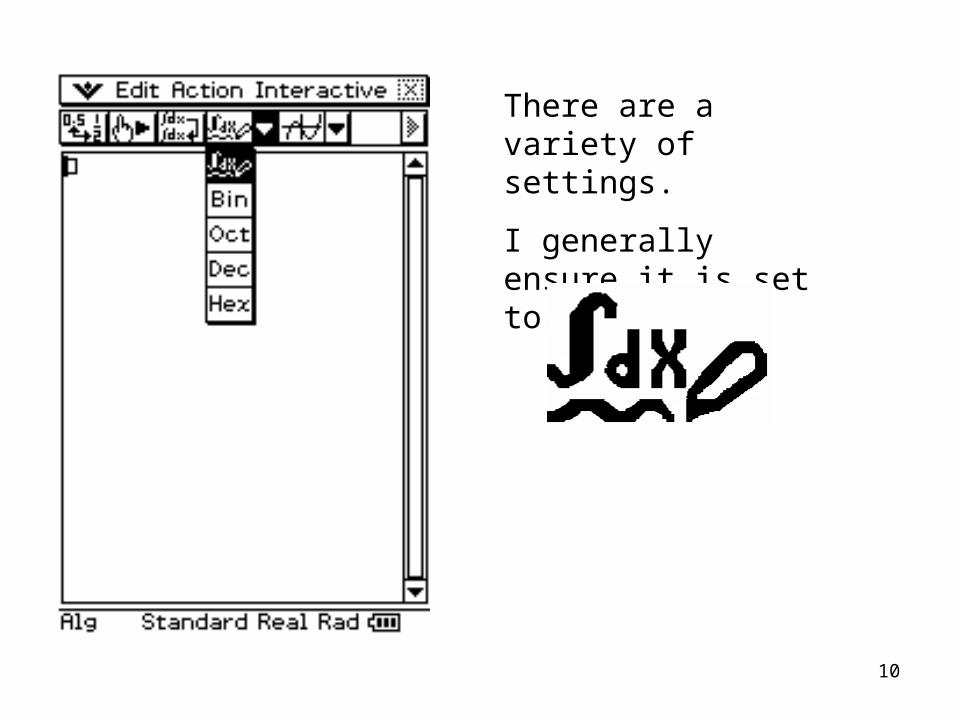
There are a variety of settings.
I generally ensure it is set to :

11
If you want binary calculations for embedded microprocessors this is useful.
The ‘Bin’ on the bottom left usually indicates the student is in the wrong setting and it should be changed.

12
The ‘Alg’ setting is the usual setting.
The ‘Assist’ setting shows the implied operations. It does not perform the algebraic calculations.
In this case I used the x from the main keyboard. Note the horizontally centred dot is not a decimal but the multiplication operand.
TAPAlg Assist
2 2x x

13
In ‘Standard’ mode answers are exact answers such as fractions and surds.
In ‘Decimal’ mode all answers are decimals.
TAPStandard Decimal

14
By highlighting the answer and pressing this button the answer changes
: to Decimal (in Standard mode)
: to Standard (in Decimal mode).

15
In ‘Real’ mode an answer containing an imaginary part will either give ‘No Solution’ or produce an error.
The ‘Cplx’ mode ensures answers with an imaginary part are included.
1 i
TAPReal Cplx
16
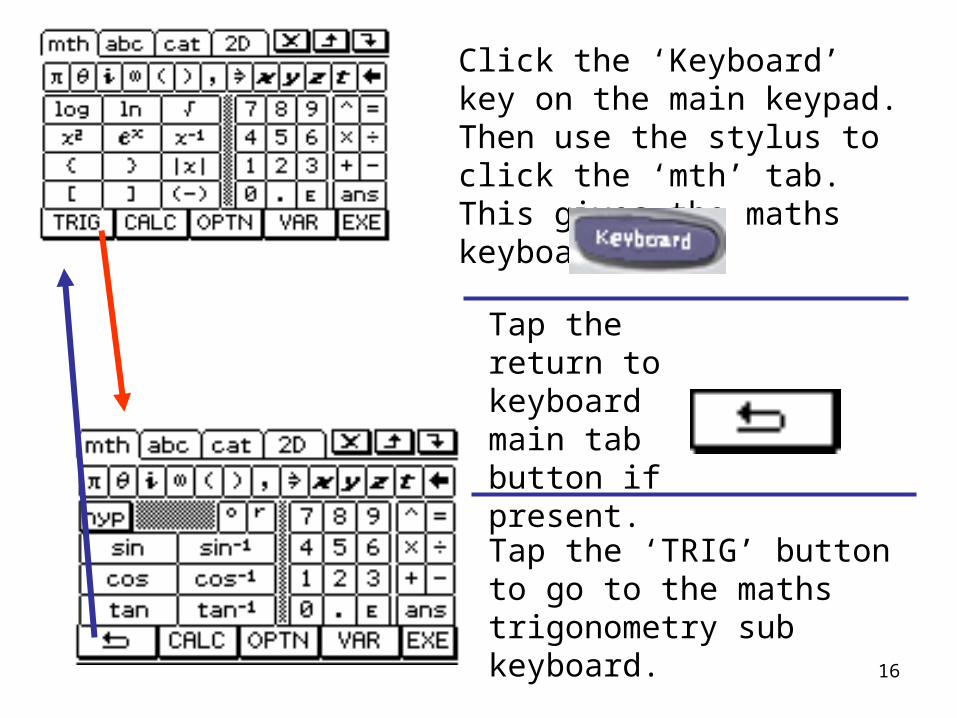
Click the ‘Keyboard’ key on the main keypad. Then use the stylus to click the ‘mth’ tab. This gives the maths keyboard.
Tap the return to keyboard main tab button if present.
Tap the ‘TRIG’ button to go to the maths trigonometry sub keyboard.
17
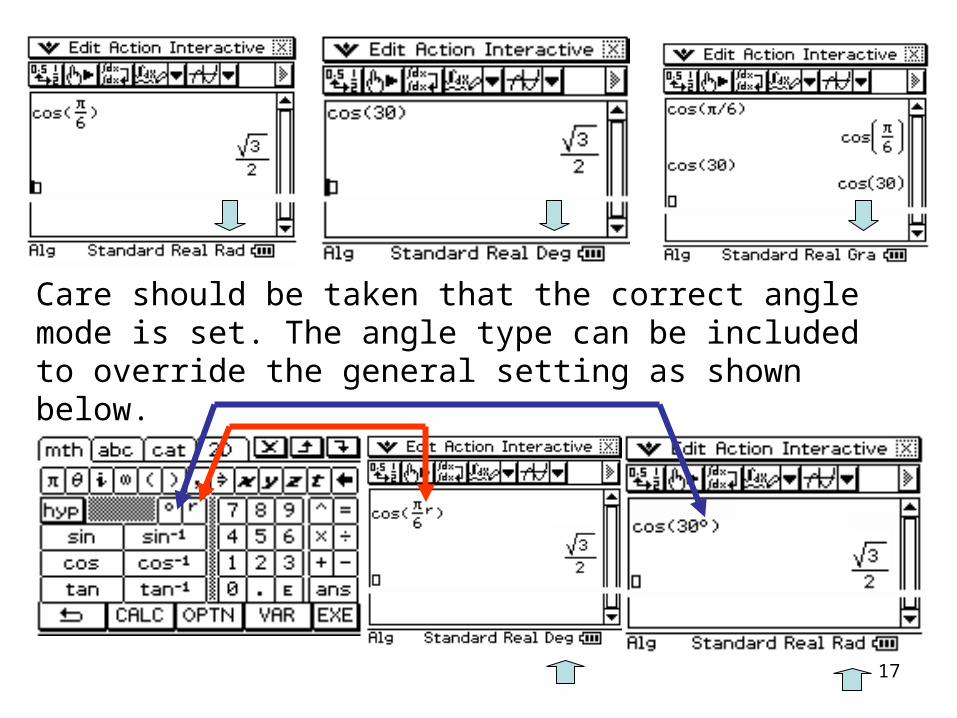
Care should be taken that the correct angle mode is set. The angle type can be included to override the general setting as shown below.
18
Solving equations with Algy 2

19
Teaching equations
with
20
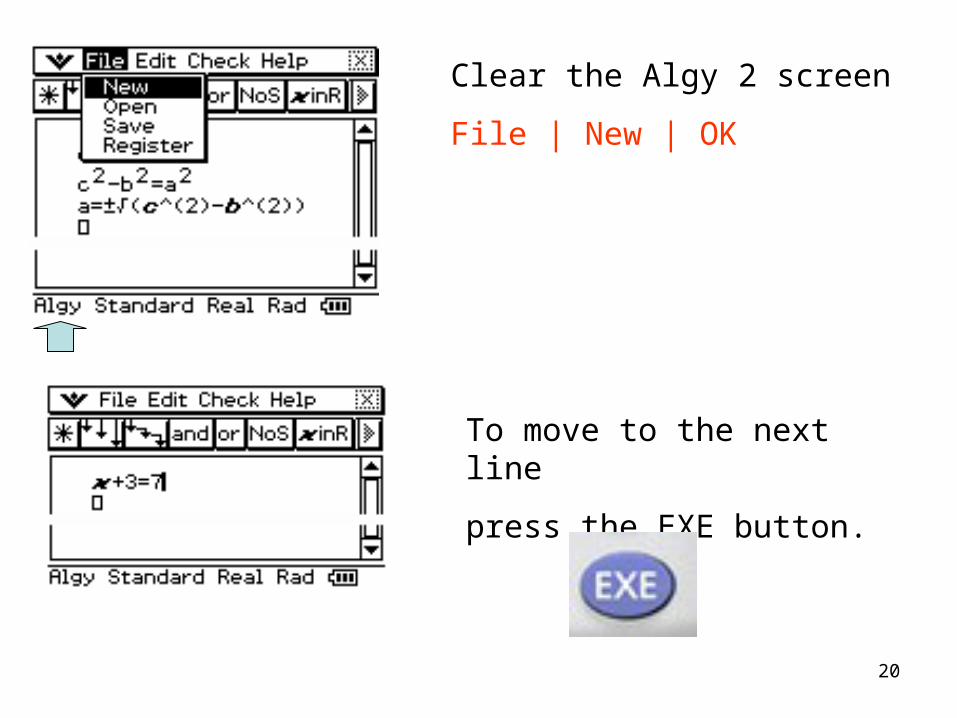
Clear the Algy 2 screen
File | New | OK
To move to the next line
press the EXE button.
21
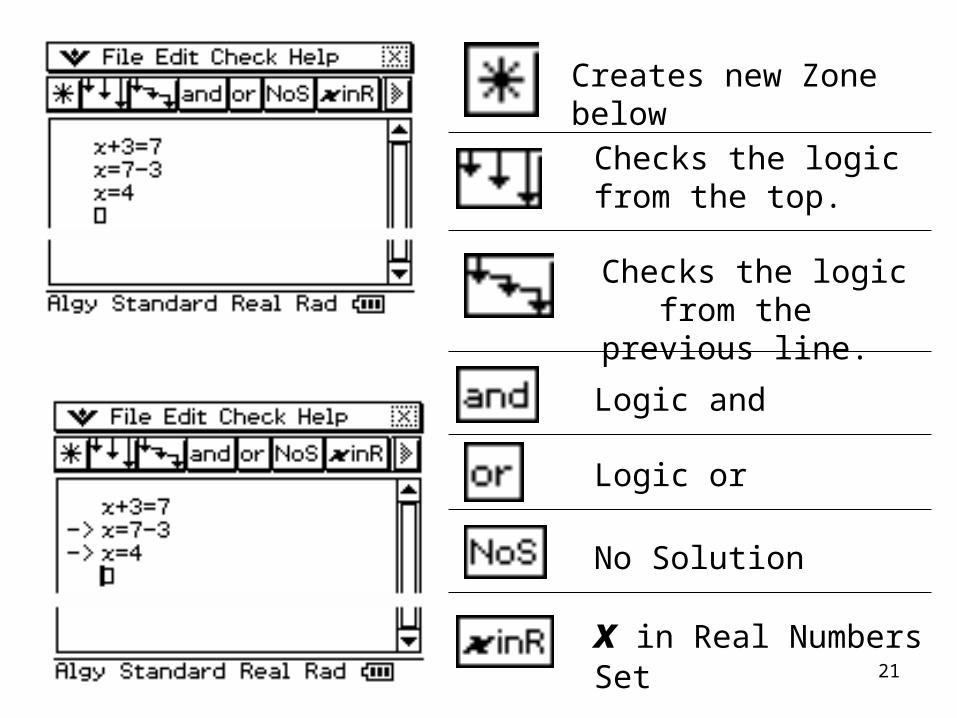
Checks the logic from the top.
Checks the logic from the previous line.
Logic and
Logic or
No Solution
x in Real Numbers Set
Creates new Zone below

22
Opposite of + is –
Opposite of – is +
Opposite of
Opposite of
is
is
3 3x x

23
9The from 9 13
13or from keyboard
2D main menu
correct logic
x incorrect logic

24
By deleting parts of each step and saving; a set of problems can be created that can be transferred to the students.

25
Investigating linear graphs
with Graph&Table
26
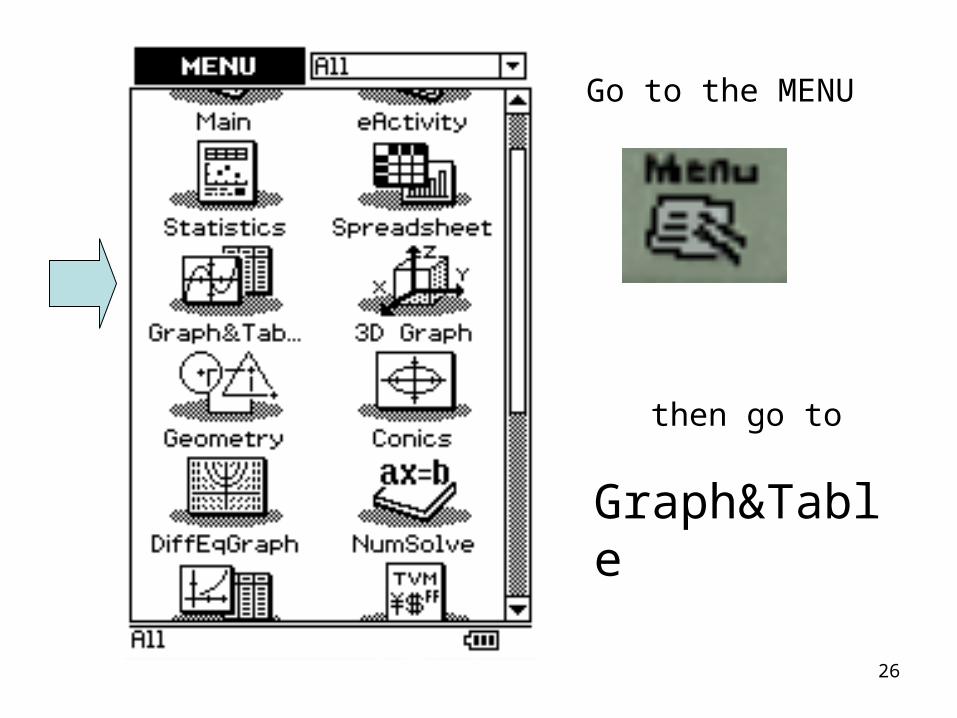
Go to the MENU
then go to
Graph&Table

27
Various settings can be altered
via the menu.
The ClassPad manual gives a good description of each option, though most are obvious.

28
To delete: tap each line and
press
Tap on the line to the right of the equation to change its type.
Tap the graph button on the top left to display the ticked graphs.

29
Find the x-intercept of a
linear graph with Graph&Table

30
Graph window settings.
Table settings
Display graph
Display table
Inequalities for graphs
Derivatives table
Zoom box
Move graph
Find the x-intercept
31
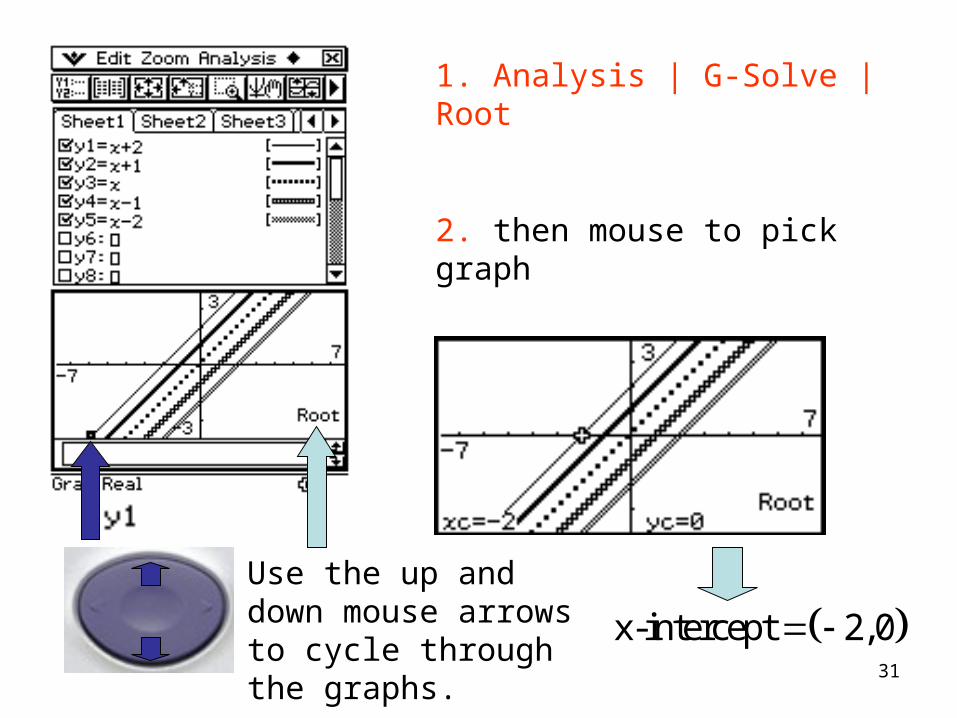
Use the up and down mouse arrows to cycle through the graphs.
1. Analysis | G-Solve | Root
2. then mouse to pick graph
3. then EXE
x-intercept 2,0
32
Quadratic calculations
in Main

33
Define26( ) 2 15y x x x
By choosing y6 the function is available from Graph&Table. The y must come from keyboard | abc NOT variables or hard keyboard.
The x is from the keyboard.
Action | Command | Define

34
2. then Edit | Copy
5. Highlight y6(x) 6. then Interactive | Transformation | factor
26( ) 2 15 ( 3)( 5)y x x x x x
1. Highlight y6(x)
3. tap new line 4. then Edit | Paste
Factor

35
To solve for the x-intercepts 1. Highlight y6(x)=0 2. then Interactive | Advanced | solve | OK
x-intercepts ( 3,0) and (5,0) Solve

36
y6’(x)=0 x-coordinate of turning point
turning point (1, 16)
1. Highlight y6(x) from y6(x)=0 2. Interactive | Calculation | diff | OK 3. Highlight line 4. Interactive | Advanced | solve
Differentiate

37
Copy to the next line
1. Highlight line 2. Interactive | Calculation | diff | OK
6 ''( ) 0 hence a minimumy x
Double Differentiation

38
Integrationanti-differentiation
1. Highlight y6(x)2. Interactive | Calculation |
3.
3. 3.
+C
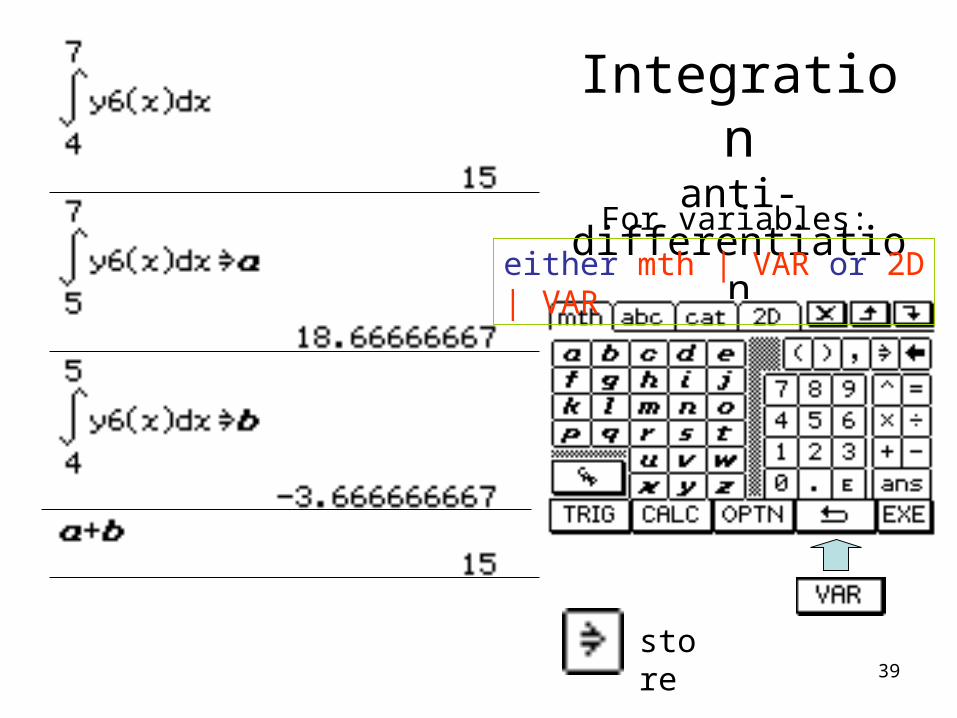
39
Integrationanti-differentiation
store
either mth | VAR or 2D | VAR
For variables:

40
Quadratics with
Graph&Table

41
Go to the MENU
then go to
Graph&Table

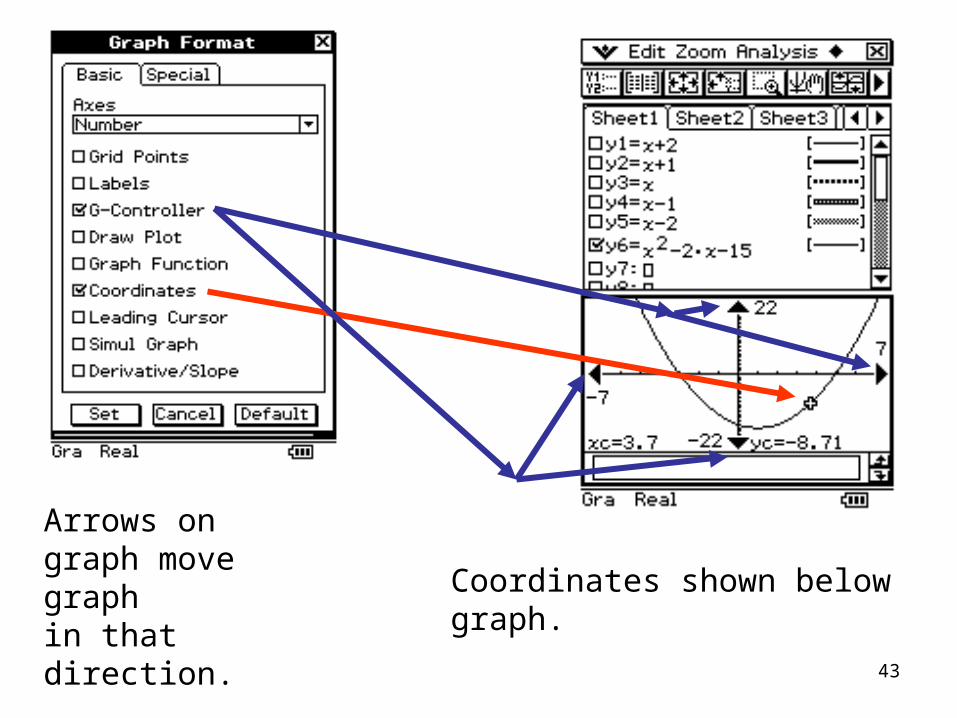
42
As was
Defined as y6(x) it is on Sheet1 of Graph&Table.
Untick y1 to y5 and graph the function. Change window
settings to fit the graph. Then
Change window directly, through zoom, or arrows then
Arrows needs | Graph Format | G - Controller ticked.
2 2 15x x
Graph
43
Arrows on graph move graph in that direction. Coordinates shown below graph.
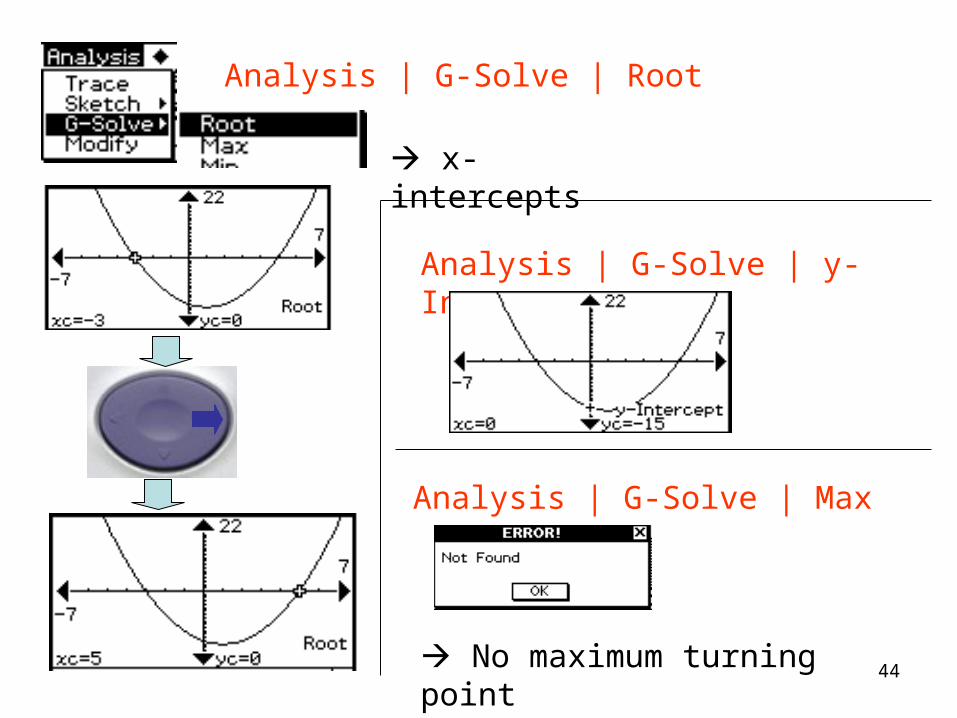
44
Analysis | G-Solve | Root
x-intercepts
Analysis | G-Solve | y-Intercept
Analysis | G-Solve | Max
No maximum turning point

45
Analysis | G-Solve | Min
Analysis | G-Solve | dx
Analysis | G-Solve | dxAnalysis | Sketch | Cls
Analysis | Sketch | Cls
Analysis | G-Solve | dx

46
Determine the
quadratic equation
from 3 points.

47
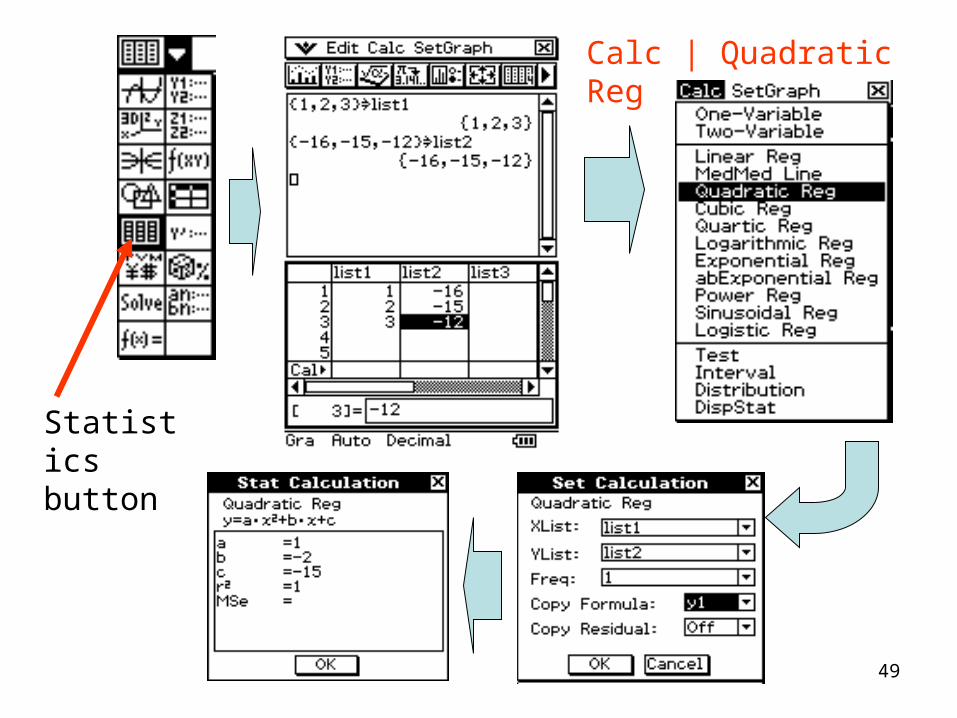
( , ) {(1, 16), (2, 15), (3, 12)}x y
Go to Statistics
Enter the data
(x,y)=(list1,list2)
Beware the time delay while entering the numbers. You may lose the first digit of the number.

48
( , ) {(1, 16), (2, 15), (3, 12)}x y
Alternatively in Main
49
Statistics button
Calc | Quadratic Reg

50
Alternatively in Main
To add an extra line tap the icon again.
Variables from mth | VAR or 2D | VAR
( , ) {(1, 16),
(2, 15), (3, 12)}
x y
Hence

51
1( 3)( 5) 1( 5)( 3)y x x x x
21( 1) 16y x

52
Keyboard | mth
Keyboard | mth | TRIG
Keyboard | mth | CALC
Keyboard | mth | OPTN

53
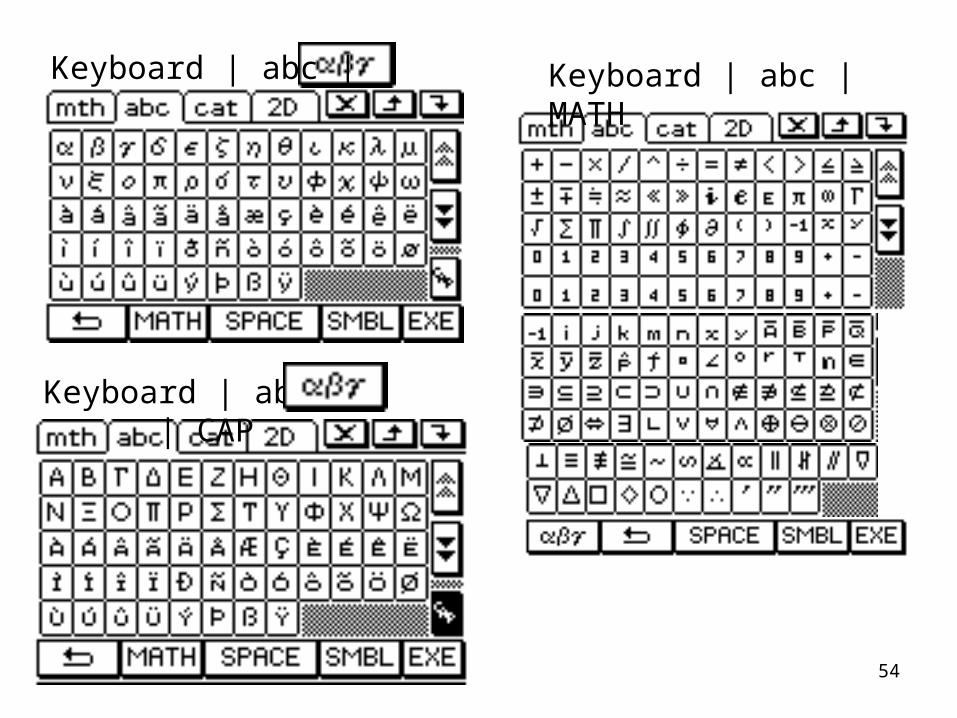
Keyboard | abc
Keyboard | abc | CAP
Keyboard | mth | VAR
Keyboard | mth | VAR | CAP
54
Keyboard | abc |
Keyboard | abc | | CAP
Keyboard | abc |MATH
55
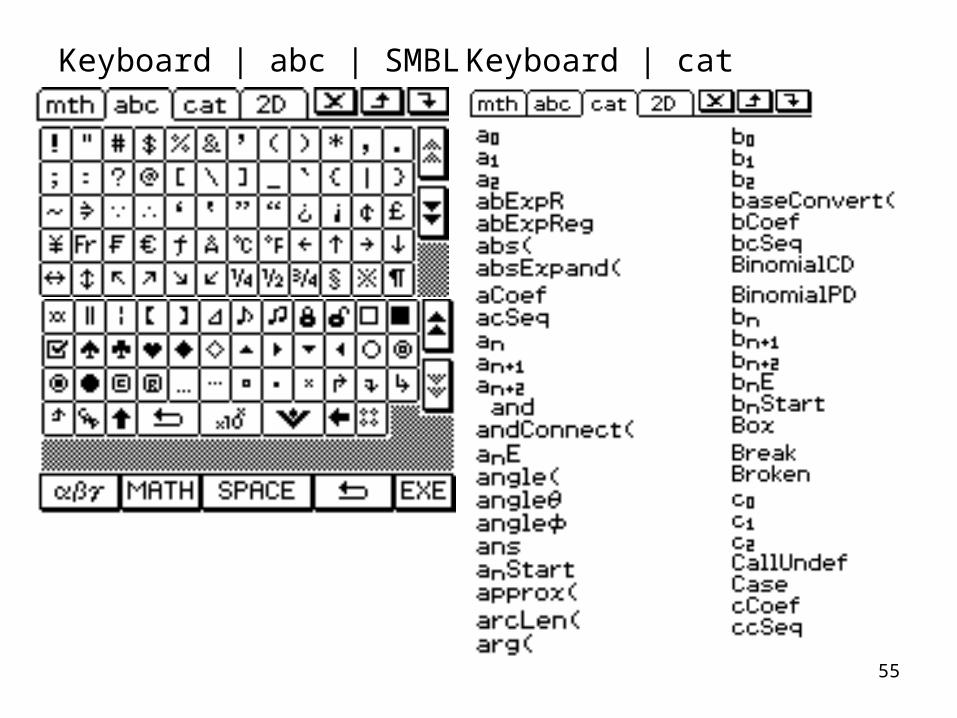
Keyboard | abc | SMBL Keyboard | cat

56
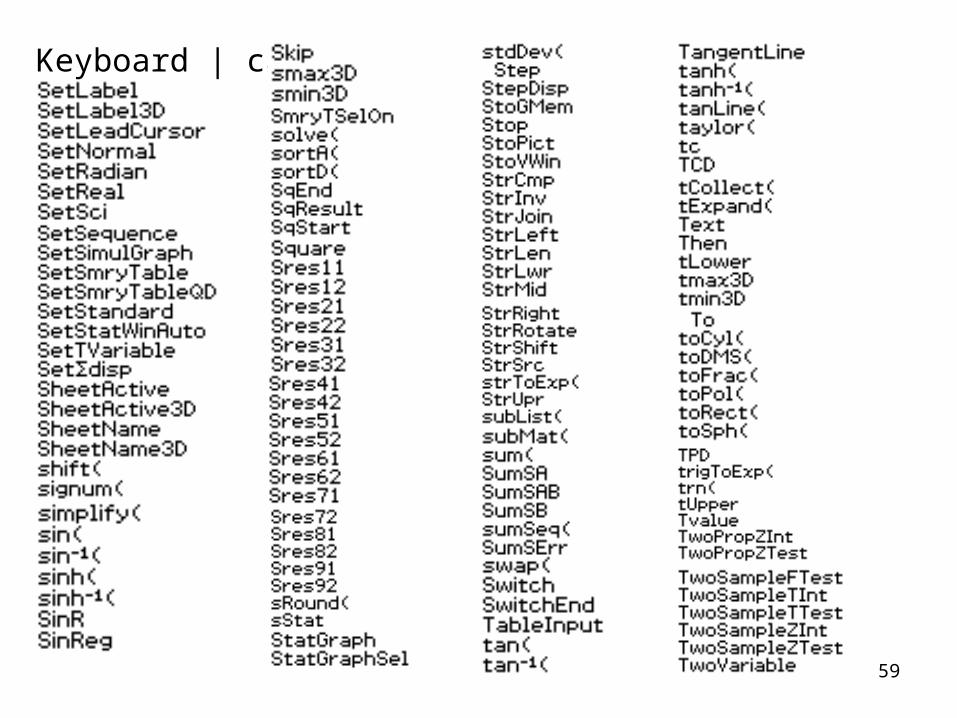
Keyboard | cat

57
Keyboard | cat

58
Keyboard | cat
59
Keyboard | cat

60
Keyboard | cat
Keyboard | 2D
| CALC
| ADV


