1 Processing Data/Library Searching Data on PC’s Introduction Why use the NIST library search? Best search algorithm I have personally used. Also, the NIST search program is just a good way to find common names, structures for common CAS numbers, model spectra, etc. Version 2.0 also allows users to search by structure and results are displayed by closest fit. The NIST search can be used to process files imported directly from HP or AMDIS software. We are working with Micromass to enable MassLynx to transfer spectra via the clipboard to the NIST software. I have been told that Finnigan (Xcalibur) also is capable of transferring spectra to the NIST search. If you desire to process files from the Finnigan UNIX system or OPUS system, you will first need to convert them from their native format to netCDF. Then these latter files need to be processed with the AMDIS software. For an overview of all our approaches see “NIST Search Program: Standard Corporate Method for Searching EI Databases” at: http://users.chartertn.net/slittle/default.htm Why software package do I use to process the data? The NIST search software only performs library searches. You will need to use another PC package to obtain a spectrum for searching. There are many different approaches. You can use your HP Chemstation software, Wsearch (a shareware program), or AMDIS (Automated Mass spectral Deconvolution & Identification System). AMDIS is a program developed by the same people who developed the NIST search. It does a great job of deconvoluting spectra and subtracting background. If you need to process files from the Finnigan UNIX system or OPUS system with AMDIS, you will first need to convert them from their native format to netCDF. Then the files can be processed with the AMDIS or Wsearch PC programs.
Transcript
1
Processing Data/Library Searching Data on PC’s
Introduction
Why use the NIST library search? Best search algorithm I have personally used. Also, the NIST search program is just a good way to find common names, structures for common CAS numbers, model spectra, etc. Version 2.0 also allows users to search by structure and results are displayed by closest fit. The NIST search can be used to process files imported directly from HP or AMDIS software. We are working with Micromass to enable MassLynx to transfer spectra via the clipboard to the NIST software. I have been told that Finnigan (Xcalibur) also is capable of transferring spectra to the NIST search. If you desire to process files from the Finnigan UNIX system or OPUS system, you will first need to convert them from their native format to netCDF. Then these latter files need to be processed with the AMDIS software. For an overview of all our approaches see “NIST Search Program: Standard Corporate Method for Searching EI Databases” at: http://users.chartertn.net/slittle/default.htm Why software package do I use to process the data? The NIST search software only performs library searches. You will need to use another PC package to obtain a spectrum for searching. There are many different approaches. You can use your HP Chemstation software, Wsearch (a shareware program), or AMDIS (Automated Mass spectral Deconvolution & Identification System). AMDIS is a program developed by the same people who developed the NIST search. It does a great job of deconvoluting spectra and subtracting background. If you need to process files from the Finnigan UNIX system or OPUS system with AMDIS, you will first need to convert them from their native format to netCDF. Then the files can be processed with the AMDIS or Wsearch PC programs.
I. Installing NIST Software………………………………………………………………………….3 II. Obtaining a Spectrum for Searching A. Transferring Spectra Directly from HP Software to NIST Search……………………………..3 1. Setting Up the HP Search……………………………………………………………………3 2. Known Problem with HP Search…………………………………………………………….4 B. Transferring Spectra Directly from Wsearch Software to NIST Search………………………4 1. Setting up the Search………………………………………………………………………..4 2. Using the software…………………………………………………………………………..5 3. Known bugs (What do you expect, its Free..)……………………………………………….6 C. Transferring Spectra Directly from AMDIS Software to NIST Search………………………..6 1. Initial Setup…………………………………………………………………………………7 2. Selecting a file for processing………………………………………………………………7 3. Selecting the size of peak to be detected……………………………………………………8 4. Selecting File Type………………………………………………………………………….8 5. Displaying Windows………………………………………………………………………..8 6. Displaying the spectrum of interest…………………………………………………………8 7. Searching spectra in NIST Program from AMDIS…………………………………………9 8. Selected ion chromatograms………………………………………………………………..9 9. Selecting spectra manually in AMDIS…………………………………………………….11 10. Problems with starting AMDIS……………………………………………………………13 11. Searching libraries within AMDIS………………………………………………………..14 12. Batch processing multiple files……………………………………………………………15 13. Closing AMDIS/opening another file…………………………………………………….16 III. Using NIST Search 2001 A. Some General Comments about NEW NIST Windows Interface……………………………17 B. Initializing the Search Software Windows……………………………………………………17 1. Library Search Properties Window 2. Window Properties C. Doing a Library Search……………………………………………………………………….19 D. Improving Library Searches………………………………………………………………….20 E. Doing a Structure Search……………………………………………………………………..22 1. Description of Common Drawing Packages………………………………………………22 2. Searching Structures Submitted to NIST Program………………………………………..25 F. Names Search…………………………………………………………………………………25 G. Aliases for Storing Databases on Network or Slave Drives…………………………………..26 H. Using MS Interpreter………………………………………………………………………….26 I. Creating User Libraries………………………………………………………………………..27 1. Adding New Entries………………………………………………………………………..27 2. Correcting Entries in User Library…………………………………………………………28 3. Deleting Entry in User Library………………………………………………………….….28 J. Updating Libraries Searched with NIST Software…………………………………………….28 1. Known Problems…………………………………………………………………………...28 2. Ways to Update…………………………………………………………………………….29 K. Sending User Libraries for Incorporation in Eastman Corporate Library……………………..31
3
I. Installing NIST Software
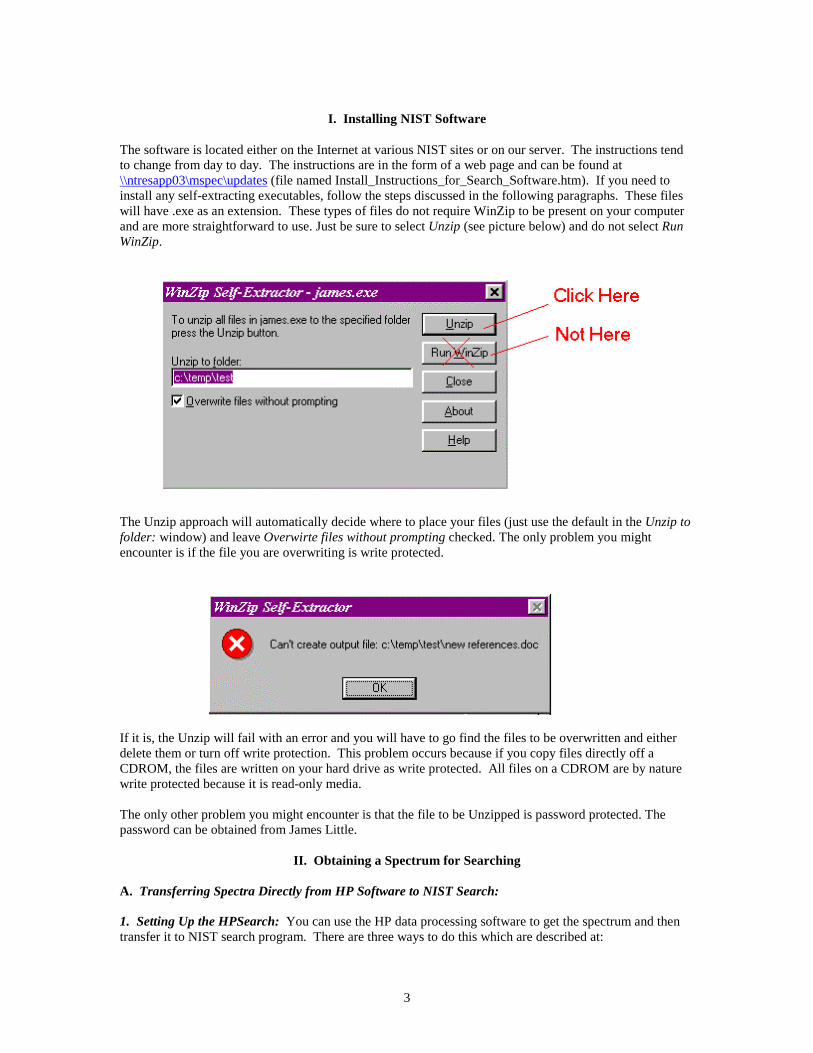
The software is located either on the Internet at various NIST sites or on our server. The instructions tend to change from day to day. The instructions are in the form of a web page and can be found at \\ntresapp03\mspec\updates (file named Install_Instructions_for_Search_Software.htm). If you need to install any self-extracting executables, follow the steps discussed in the following paragraphs. These files will have .exe as an extension. These types of files do not require WinZip to be present on your computer and are more straightforward to use. Just be sure to select Unzip (see picture below) and do not select Run WinZip.
The Unzip approach will automatically decide where to place your files (just use the default in the Unzip to folder: window) and leave Overwirte files without prompting checked. The only problem you might encounter is if the file you are overwriting is write protected.
If it is, the Unzip will fail with an error and you will have to go find the files to be overwritten and either delete them or turn off write protection. This problem occurs because if you copy files directly off a CDROM, the files are written on your hard drive as write protected. All files on a CDROM are by nature write protected because it is read-only media. The only other problem you might encounter is that the file to be Unzipped is password protected. The password can be obtained from James Little.
II. Obtaining a Spectrum for Searching A. Transferring Spectra Directly from HP Software to NIST Search: 1. Setting Up the HPSearch: You can use the HP data processing software to get the spectrum and then transfer it to NIST search program. There are three ways to do this which are described at:
4
http://users.chartertn.net/slittle/default.htm The approach I like best is described here. This approach will allow you to “double-right-click” on you HP spectrum window and do the NIST instead of the standard HP search. You don’t have to remove the HP libraries and structures, but you will probably want to free some disk space. Thus, remove all the HP libraries and structures by deleting c:\database folder. BEFORE deleting all libraries, be sure to save any personal libraries! Install the NIST software and libraries on your HP system. Double click on the NIST_srch.exe file found in \\ntresapp03\mspec\nist_stuff folder. This .exe file makes the NIST search your default search. You can switch back to HP standard search (if you didn’t have to delete the HP libraries/structures) by double clicking on PBM_srch found in \\ntresapp03\mspec\nist_stuff folder. If you want to switch back and forth for a while initially, just copy the executables to your desktop with a right-click and drag and select move here option on menu that appears. 2. Known Problem with HP Search: If you use Wsearch, sometimes the NIST search from the HP interface will fail. The file in C:\NIST98\autoimp.msd will become corrupted. You will need to open the file with Notepad and edit it. The following text should be the only text found in the file: C:\HPCHEM\HPNIST.TXT B. Transferring Spectra Directly from Wsearch Software to NIST Search 1. Setting Up the Search: Wsearch is a shareware program (ws_setup.exe) available at \\ntresapp03\mspec\shareware or on the Web at http://minyos.its.rmit.edu.au/~rcmfa/search.htm. It is very small in size (about 1 megabytes, a “floppy’s” worth) and relatively easy to use. Some basic instructions for Wsearch is shown are included in the following paragraphs: -Open Wsearch program and size window to size you want. If you leave it the small initial size, your chromatogram/spectrum will be limited by the size of the initial box. -Select File/Chose library option and will get following display
-Then select List files of type option to be NIST (nist$.exe) and highlight NIST$.exe and then click OK. The NIST$.exe will be in the C:\NIST98 folder.
2. Using the Software: -Open the file of interest from the chromatogram Icon. For HP files, List Files of type: All supported formats. For netCDF files, you have to select NetCDF (*.cdf) file format. Also, every time you select another netCDF file, you have to select the NetCDF file format again due to a bug in the software. -Use the left mouse button to expand the chromatogram region and the Original button at top of screen to shrink it. Another interesting option is when you approach the top of the chromatogram with the mouse cursor, a hand will appear (kind of reminiscent of the Munsters!). After the hand appears, leave the mouse in this position and hold down the left mouse button. The chromatogram intensity will be magically increased! -Right click and drag to get averaged spectrum (must form a box!) -Use the subtract button at top of screen to get background, Note that you can then place the mouse cursor on the box (e.g. 285 in following picture) and a Hand will appear that lets you move the single point for background subtraction by clicking and holding the left mouse button. I couldn't screen capture hand to show you what it looks like, just trust me! All spectra boxes displayed are automatically updated with the new background subtract as you slide the background box across the chromatogram.
6
-Another way to get a spectrum is to left single click or right single click (don't form box) on the scan of interest. Then another spectrum box will be displayed. You can get rid of the top spectrum box by clicking on its X on the right side of the screen or just use both boxes. One will be the averaged spectrum box, and the other will be a single spectrum box. Either can be library searched by just double-right clicking the spectrum box of interest.
-You get additional spectra in the windows by just single left clicking on the scan of interest in the Chromatogram window to place the new spectrum in the single scan box or right clicking and dragging to form a box to put new spectrum in averaged spectrum box. -To get a library search, just double right or double left click on spectrum box of interest and the NIST search program will open. -You can left click and drag to expand the spectrum. To shrink to original size, just double left click above the spectrum window, but below the window above the spectrum to be taken to its original size. 3. Known bugs (What do you expect, its Free..): -If the NIST window is minimized and the user double-clicks a spectrum box to do an NIST search, the search will not occur. You can get the search to occur by minimizing the NIST window after Wsearch maximizes it and then maximizing it again automatically. This problem occurs only in Windows 95 and 98, but not Windows NT. To overcome this problem, do not minimize the NIST search window when using with Wsearch. -For netCDF files, you have to select NetCDF (*.cdf) file format. Also, every time you select another netCDF file, you have to select the NetCDF file format again. -Sometimes network folders will not be displayed with Wsearch. Thus you might have to copy the file of interest from the server to your local drive. C. Transferring Spectra Directly from AMDIS Software to NIST Search AMDIS is opened by going to the Windows Start Button, then Programs, then NIST Mass Spectral Database option, and finally selecting AMDIS_32 option. I have discussed some of the basics of using the AMDIS software in the following paragraphs. You can also find AMDIS help in the same program group
7
that AMDIS_32 is found and on the Menu bar in the AMDIS program. A very good Adobe Acrobat PDF Manual is located on the Internet: http://chemdata.nist.gov/mass-spc/amdis/ 1. Initial Setup: After the program opens, be sure to go to the Analyze option and check “Use Uncertain peaks.” After you have opened a file, you will also need to right click on a spectrum and select “Show Uncertain Peaks” option. The program marks uncertain peaks as dashes in a spectrum. Normally you want to library search and view uncertain peaks. If you don’t have these options selected, you will not search or view these peaks, which can give you some very strange results! Uncertain peaks are marked by the program for the following reasons. It is sometimes impossible to determine which spectral peaks go with which component due to uncertain deconvolution of the data. This can be due to many things including, complicated background, multiple components eluting at similar times, or unresolved tailing. In these cases, the peaks are flagged as uncertain and are treated differently from un-flagged peaks. 2. Selecting a File for Processing: Go to File/Open option on menu bar and select an HP file for processing. You can also display multiple files by going the File/open in option. AMDIS will process netCDF and HP files plus others. The default is HP and I will discuss changing to netCDF in a later format. The HP files are found on most HP data systems in the C:\HPCHEM\1\DATA folder and you must double click on the file in the open window to select it. After you select it and say OK, it will build the index. This does not deconvolute the peaks. It only creates a file for quickly accessing total ion chromatograms. You must then select the RUN button below the menu bar to deconvolute your spectra from other components and to subtract background. Only the peaks shown on the chromatogram are deconvoluted. Thus if you expand an area of the total chromatogram by left-clicking and dragging a box, then run the deconvolution option, only the expanded part of the chromatogram will be processed. RIGHT click on the chromatogram to unzoom (last zoom reversed) or unzoom all (initializes chromatogram). Displaying the chromatogram in the log scale is a very good way to look at small peaks. Just “right” click on the chromatogram window and the following window will appear:
Select the Log Scale for Chromatogram option. 3. Selecting Size of Peak to Be Detected: The size of peak to be detected is determined by the settings found in the Analyze/Analysis Setting Menu Option. Then select the Deconv. Tab to get the following display:
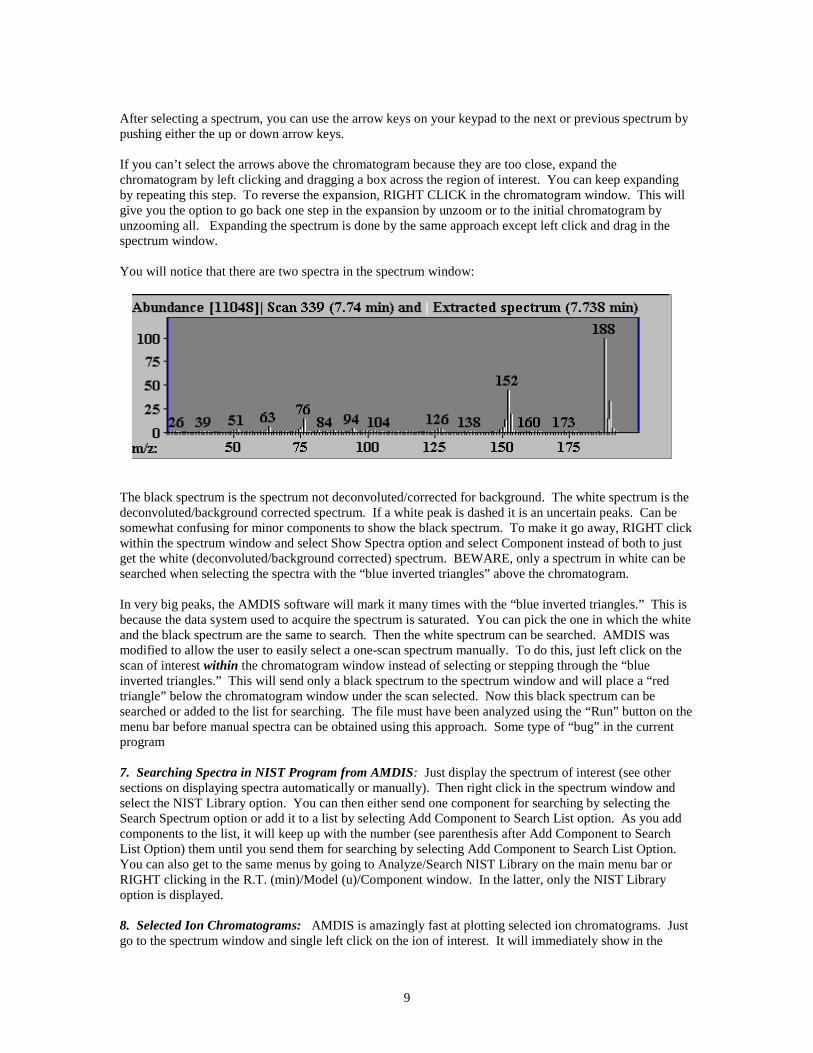
Very low only finds major components, very high finds trace components. After selecting the filter you want, then select “Save” and the file will be reprocessed. 4. Selecting File Type: The file type is selected by going to Analyze/Analysis Setting Menu option and selecting the instrument tab to get the following display: The file type is selected in the Data File Format field. Also set the Scan Direction and other parameters that might be useful. 5. Displaying Windows: There are three windows displayed in the initial display: the ion chromatogram, the ion profile, and the scan. The ion profile shows the ions used to deconvolute the spectra plus the TIC (Total Ion Chromatogram). You can add or delete these windows by RIGHT clicking almost any place in program window (except in the R.T., model, or Component windows) and selecting whatever you want from the Show Window option. You can also go to view/unlock menu option and select unlock. This leaves the window with retention times present on the screen and allows it to be placed on the screen when the Component window is not being displayed. There is also a Library window displayed when viewing library research results within AMDIS (See Section 10 below, “Searching libraries within AMDIS.” 6. Displaying the Spectrum of Interest: After deconvoluting the spectra for the whole run by selecting the “Run” button above the chromatogram, just click on the little blue arrows above the chromatogram to show the spectrum in the bottom window. Another alternative is to select the retention time from the R.T. (min) window (see partial windows shown below):
9
After selecting a spectrum, you can use the arrow keys on your keypad to the next or previous spectrum by pushing either the up or down arrow keys. If you can’t select the arrows above the chromatogram because they are too close, expand the chromatogram by left clicking and dragging a box across the region of interest. You can keep expanding by repeating this step. To reverse the expansion, RIGHT CLICK in the chromatogram window. This will give you the option to go back one step in the expansion by unzoom or to the initial chromatogram by unzooming all. Expanding the spectrum is done by the same approach except left click and drag in the spectrum window. You will notice that there are two spectra in the spectrum window:
The black spectrum is the spectrum not deconvoluted/corrected for background. The white spectrum is the deconvoluted/background corrected spectrum. If a white peak is dashed it is an uncertain peaks. Can be somewhat confusing for minor components to show the black spectrum. To make it go away, RIGHT click within the spectrum window and select Show Spectra option and select Component instead of both to just get the white (deconvoluted/background corrected) spectrum. BEWARE, only a spectrum in white can be searched when selecting the spectra with the “blue inverted triangles” above the chromatogram. In very big peaks, the AMDIS software will mark it many times with the “blue inverted triangles.” This is because the data system used to acquire the spectrum is saturated. You can pick the one in which the white and the black spectrum are the same to search. Then the white spectrum can be searched. AMDIS was modified to allow the user to easily select a one-scan spectrum manually. To do this, just left click on the scan of interest within the chromatogram window instead of selecting or stepping through the “blue inverted triangles.” This will send only a black spectrum to the spectrum window and will place a “red triangle” below the chromatogram window under the scan selected. Now this black spectrum can be searched or added to the list for searching. The file must have been analyzed using the “Run” button on the menu bar before manual spectra can be obtained using this approach. Some type of “bug” in the current program 7. Searching Spectra in NIST Program from AMDIS: Just display the spectrum of interest (see other sections on displaying spectra automatically or manually). Then right click in the spectrum window and select the NIST Library option. You can then either send one component for searching by selecting the Search Spectrum option or add it to a list by selecting Add Component to Search List option. As you add components to the list, it will keep up with the number (see parenthesis after Add Component to Search List Option) them until you send them for searching by selecting Add Component to Search List Option. You can also get to the same menus by going to Analyze/Search NIST Library on the main menu bar or RIGHT clicking in the R.T. (min)/Model (u)/Component window. In the latter, only the NIST Library option is displayed. 8. Selected Ion Chromatograms: AMDIS is amazingly fast at plotting selected ion chromatograms. Just go to the spectrum window and single left click on the ion of interest. It will immediately show in the
10
chromatogram window. Can make it show up in the profile window by highlighting the profile window before single left clicking in the spectrum window. The ions plotted in the chromatogram show in different colors and are coordinated to the pointers at the bottom of the spectrum window. To remove selected ion chromatogram display of interest, just click on the box to the right of the chromatogram window or reclick ion in spectrum or click on colored arrows below the spectrum axis:
A selected ion chromatogram can also be selected by going to the Options/Select m/z… option on the main menu.
11
9. Selecting Spectra Manually in AMDIS: AMDIS works best by automatically selecting your spectra (deconvolutes/background subtracts). However, in some cases it can be of use to do it manually. There are two ways to obtain a spectrum manually. The first is very useful for large components. The AMDIS software will mark a large component many times with the “blue inverted triangles.” This is because the data system used to acquire the spectrum is saturated. AMDIS was modified to allow the user to easily select a one-scan spectrum manually. To do this, just left click on the scan of interest within the chromatogram window instead of selecting or stepping through the “blue inverted triangles.” This will send only a black spectrum to the spectrum window and will place a “red triangle” below the chromatogram window under the scan selected. Now this black spectrum can be searched or added to the list for searching. The file must have been analyzed using the “Run” button on the menu bar before manual spectra can be obtained using this approach. This is some type of “bug” in the current program. The second way allows multiple spectra to be averaged and background ranges to be subtracted. However, this approach is a little more complicated. Go to the Analyze option on the main menu and select Manual option. Right click in chromatogram window and you will get the following window:
12
You must now select manual on option. Seems kind of redundant since you already have told it manual from main window. The reason you have to do twice if because NIST uses the left mouse button to expand the chromatogram and to mark the summing of spectra manually. Thus if you want to expand the chromatogram while in manual mode, you have to momentarily turn “manual on” in the above box off. After turning “manual” on in main menu and selecting “manual on” in drop down menu above, you can take manual spectra. Select the “signal” option in above drop down menu. Use the mouse pointer that now has an error and a plus sign to select range of spectra to average. Go to above drop down menu and select background. Now an arrow with a minus sign will appear for you to mark range or ranges of background to subtract. To either change your signal or area right click in chromatogram and select clear. Go slightly underneath the chromatogram and an eraser will appear. Either erase (drag through line to be erased) the background (blue lines) or the signal (red lines). The typical changes to the chromatogram of doing this are shown in the example below:
In the example, the red marked area shows the foreground and the blue shows background subtracted before and after the peak. You can do as many foregrounds and backgrounds as you want to get the desired
13
spectrum. Though one foreground and one background will be the common approach. Again, the spectrum window will show the uncorrected spectrum in black and the result of your averaged spectrum, which is background subtracted in white. To clear everything, select “clear all” option from drop down menu. To return to the normal mode in which AMDIS background selects peaks, you must go to the Mode option on the menu bar and select component. 10. Problems with Starting AMDIS: Occasionally AMDIS will start in the target mode instead of the qualitative mode needed for most of our work. Instead of getting the standard chromatogram window, you will get the following:
You should select the OK button and then the following window will be displayed:
Just select the confirm button and you will be back to the standard windows display for qualitative analyses. Then just select the Run button to process your data.
14
The above problem can be simulated while in the standard chromatogram mode by going to the File option on the menu bar and selecting “Go to Results” option. Unselect the “Yes Delete these files” box and then select “OK”.
Then you’ll get the first window noted in this section, which started the whole problem. 11. Searching Libraries within AMDIS. This approach only works with all libraries, but is probably most useful with the NIST and Wiley libraries. This is because the results are shown within AMDIS with names only, no structures. Many of our entries only have structures and no names. The nice thing about it is that you stay within AMDIS to view search results and the chromatogram is displayed and correlated with the search results. To use it, push “Run” button on main menu to process peak list. Then go to Analyze on main menu and select “Search NIST library” option.
15
Select the options you want (usually quick searches), and then click “Analyze”. After the search is done, select “Keep” option from window that is displayed. Your chromatogram will not have blue T’s in addition to blue arrows above it. Highlight the first blue T to the left of chromatogram. As you step through the blue T’s with the arrows on you computer keyboard, you will see the results displayed on the right side below your chromatogram:
You can display the best hits are all the hits by “Right” clicking in the results box as shown above and either selecting best hits only or all hits. Also “right click” in the spectrum window and select the “Show Window” option and select the following options:
This will let you see all the results. The top spectrum window contains the normal black/white spectra for devonvoluted/"undeconvoluted" spectra. The bottom spectrum window has the library entry in black and the unknown in white. 12. Batch Processing Multiple Files: It can take a while to process multiple files. There is a batch file-processing mode, which allows you to create peak lists for multiple files. Just add the files of interest in the Batch mode window and then run. Be sure to “Keep” the files that are created after the Batch processing is complete.
16
13. Closing AMDIS/Opening Another File: When you close AMDIS or close one file and open another, you will get the following menu:
17
If you “keep” the files, the peaks marked with the blue arrows when you processed the file will be kept and you will not have to process again. If you delete, you will have to process the peaks again if you open file in the future. If you keep the information, additional files (*.elu, *.fin, where * is your file name) will be stored with your raw data wherever your raw data is stored.
III. Using NIST Search 2001
A. Some General Comments about NEW NIST Windows Interface NIST is switching to a more "Standard Window" interface for their search program. Here are some hints in using the new interface: -You can "right click" on an object and get a menu for exporting, cutting and pasting, etc. objects from one window to another or to a file. -You can "right click" within a window and go to properties to change the display options of a window. -You can use tabs on the bottom of windows allow you to more effectively use your screen space. Searches for names, MW’s, etc. are now done in a separate group of Windows accessible by the tabs. -You can select a consecutive group of spectra in a window by "left clicking" on the first and last spectra in a range with the shift key depressed. -You can select a group of spectra, which are not consecutive spectra in a window, by "left clicking" on all the spectra of interest with the control key depressed. -All windows can be resized by pausing you left mouse button at the edge of the window. The cursor will change into two bars with arrows. Left click and you can resize them! -You can resize a window by "left-clicking and dragging", to go back to original size, "right-click" in the window and "zoom-out" -Placing your cursor over and object on a menu bar (don’t click) tells you something about the function of the button. B. Initializing the Search Software Windows 1. Library Search Properties Window: The first time you open the NIST search software; you will need to initialize some of the settings. They should be automatically saved upon exit. If you have multiple users on one computer, you can save the individual settings under File/Save configuration option on menu. The first settings to save are found under the button at the top of the menu:
This will open the Library Search Properties Window:
18
In this window, select “Quick” Spectrum Search Type. Usually “Quick” is the best for most applications. Using “Normal” will sometimes give better results by finding more candidates, but search time is increased significantly. Make sure automation is selected then select the Automation Tab at top of this window and check “Automatic Search On” which automatically searches a spectrum imported from HP, Wsearch, or AMDIS, etc. software. Select the options shown in above window for the Structure Similarity Search. The “Match Number of Cluster” would not find naphthalene when searching for biphenyl type compounds. The biphenyl has two rings but they are in two clusters while naphthalene would have two rings in one cluster. Select the “Limits” tab and make sure “Apply Limits” button is selected. If this is not checked, the library search assumes that the scan range of the unknown is the highest and lowest ion noted in spectrum. In comparing spectra, the search algorithm would only compare this narrow range for calculating the similarity of your unknown to that of the library spectrum. Many spectra in Wiley only have a few ions near molecular ion in their spectrum (very incomplete spectra) and can show up as very high fits in the results. See Figure 3 for an example of this problem. Checking this makes the library consider the fit of the whole spectrum from m/z 1-2000 which will omit these incomplete spectra from being displayed. Select the “Libraries Tab” and select the libraries you want to search. I usually select the Main, Replib, the largest Wiley, ECC, New, and my personal database for searching by spectrum and spectrum for most searches. The libraries need to be chosen (separate list) for structure and spectrum search. The libraries are described below:
19
Mainlib: The mainlib contains ~107K entries and structures of unique compounds from NIST. This is the highest quality library we have access to for searching. Replib: This library from NIST contains ~21K entries of duplicates that are also found in the Mainlib. NIST tries to put the best spectrum in Mainlib, but sometimes guess wrong. Thus, I usually include this library in the search in addition to Mainlib. Wiley 6: This library contains ~229K spectra, but no structures. Structures are displayed and searched with this library is the CAS number in Wiley entry matches a NIST entry. Wiley7: This library contains ~238K spectra, but no structures. Structures are displayed and searched with this library is the CAS number in Wiley entry matches a NIST entry. We have only limited licenses (10) for this database. ECC: This library contains ~33K spectra and ~22,000 structures of compounds entered into our Corporate database from our laboratories, the literature, and a 6-peak ASTM index. New: This library contains new entries from ECC which are updated daily to users’ computer with Get_lib batch file. Every year or two, these entries are merged with the ECC database. Distributing a smaller database, New, daily is much easier than copying the large ECC database daily. Personal Libraries: Users can create personal libraries for sharing with others or just to use within their laboratory. IonTrap: This library contains 70 spectra and structures obtained on an IonTrap. You should use this only if using an IonTrap for acquiring spectra. The IonTrap spectra can differ significantly from those acquired on a magnetic, TOF, or quadrupole mass spectrometer. TSCA: The TSCA library is a current listing (updated twice yearly) of all the TSCA chemicals referenced by molecular formula, molecular weight, and CAS number, and name. IT DOES NOT CONTAIN ACTUAL SPECTRA. It has m/z 2 entered for each entry. It is useful for finding proposed compounds in competitive products when you either know their molecular weight by EI or CI or even better their molecular formula from accurate mass data (see “New Approach for Using TSCA Inventory to Identify Unknowns,” Report No. 96-1000-365). This database should only be used by itself for best results. So remove other libraries from search before using in most cases. PM: The PM database, which is updated monthly, is the same type of database as the TSCA database (see previous paragraph). The PM Library has no real spectra. It is used identify a component suspected to be a PM material (unlabelled sample in plant, component in waster effluent, etc.) using the molecular formula or nominal molecular weight (see “Using the Eastman Chemical Company PM Number Database to Identify Unknowns”, Report No. 96-1000-367). 2. Window Properties: Right click in all the small windows and select the properties option for that window. I usually select “Wrap Text” in all windows, display structures, synonyms, etc. I usually don’t display the 10 largest peaks or the m/z intensities. Several windows will have a History associated with them such as the results from library searches, MW searches, etc. Also all spectra imported are saved indefinitely. You can select the option under these windows to discard all this information when exiting the program if you desire. C. Doing a Library Search The spectra are imported directly from Wsearch, HP, and AMDIS into the Spec List window in the lower left-hand corner when Lib Search Tab is selected. Normally, spectra are searched automatically. However, if you want to change a parameter and search again, just “double-left” click the spectrum of interest or select the Go button on menu:
20
If you want to get rid of duplicates in your search results (uses CAS number, not actual structures like OPUS!), go to menu bar and depress the following button:
If you want to show the replicate or duplicate entries for NIST entries, select the following button:
Or just go to the library hit list and “left” click the + sign next to the single entry of interest. If you want to get additional information about your unknown after performing a search such as the number of bromines, chlorines, possible molecular weight, functional groups present, etc., "left single click" on spectrum of interest in clipboard and then select the following button from top of screen:
Note the statistics in the top left-hand corner of the screen that tells you about the libraries searched and a bar graph of the number of hits versus fit.
You can also find out about the search parameters employed after a search by selecting the following button on the menu bar:
D. Improving Library Searches Usually the default library search parameters work well. But sometimes changing the default parameters in the Library Search Property window can significantly improve the search. The search process is shown in block diagram in Figure 1. Some general tips for improving searches are listed below: 1. Usually try standard search with “quick” presearch, which is fastest and usually works best. 2. If that fails, switch to a Normal search 3. Try “quick” presearch specifying a molecular weight, MW (guess MW yourself, get CI, or try suggestion from NIST program); NOTE, MW radio button option is applied BEFORE presearch, constraints are applied AFTER presearch
21
3. Try reverse search 4. Try reverse search specifying MW 5. Turn off presearch, use standard search, take a coffee break because the search process will take several minutes! 6. Turn off presearch, use reverse search You access the window for changing parameters with following Icon on the menu bar:
You can either do a normal or a quick search. The quick search is usually adequate for most users and is much quicker than the Normal search. However, the normal search is much more comprehensive if you are not getting good results with the quick search. The library search works by performing a presearch to find candidates for the more comprehensive final search. Changing the presearch from quick to normal increases the number of candidates included in the comprehensive final search. Another very useful way to improve the presearch is to only search compounds in the library with a specified molecular weight. To do this, change the presearch option from default to MW and enter the molecular weight of the unknown. Another way is just to turn off the Presearch and no presearch will be performed. However, using no presearch increases the search time to several minutes versus 5-15 seconds for the normal searches. There are many partial spectra in the Wiley databases entered from journals. Search of spectra against these partial spectra are severely penalized in their rank when compared to these partial spectra when sorted by Match. Sorting the results by Reverse Match will give much better results for these partial spectra. An example is shown in Figure 2. To sort the results by Reverse Match, check the Reverse Search option under Spectrum Search options. It is also very useful to specify a molecular weight when doing a reverse search. Avoid using the Reverse Search Option when disabling the Presearch because there are many Wiley spectra with only one or two ions, which will be placed at the top of the list with Reverse Matches of 999. Many other search options are available (see information copied from NIST help page below:). Identity Search - Choose either:
Quick - Uses a very fast prescreen search filter. Normal - Standard prescreen search filter.
Quick will almost always work when you are sure that the compound is in the database, Normal should be used in those cases where you are not sure or the results match factors are low. The quick filter takes fewer candidate spectra to the final search than the normal filter, thus the overall search is faster with the quick filter option. Similarity Search – There are several different options under the similarity search. In many of these options, a molecular weight must be supplied. The program automatically estimates the molecular weight. If you want to supply one, “unclick” the Precursor Ion/Molecular weight box and enter the molecular weight manually. A better estimate of the molecular weight can be obtained by doing a Normal Identity search, then going to the Tools/Substructure Information on the menu bar. This molecular weight is not determined by the same algorithm that can be accessed by right clicking on the unknown spectrum and selecting the MW estimation option.
Simple - The algorithm has been tuned to find spectra that are similar to the submitted spectra. The difference between the identity and the similarity search rests on different weightings of the spectra as a function of mass. Hybrid - The hybrid search requires a presumed molecular weight for the unknown. It then uses a combination of the logic of the simple similarity search and the neutral loss search.
22
Neutral Loss - This search relies on the neutral loss spectrum of the molecule and the corresponding neutral losses of the library. For certain classes of compounds these neutral losses are very characteristic. Only differences of 70 amu’s or less between a fragment and a compound’s ion are employed in this search.
Options - select any or all of: Reverse Search - Sort of the results using a match factor calculated by disregarding peaks in the submitted spectrum that are not in the library spectrum. This is treating these peaks as if they were impurities Penalize Rare Compounds - Match factors for compounds present in few or no other databases will have their match factors reduced. This, in effect, leads to a relative increase in match factors for common compounds, roughly adjusting for so-called “a priori probabilities” of finding a compound in an analysis. This ONLY works for spectra in the NIST library. Default - The default presearch is used as specified in the Identity or Similarity Search options. Off - No presearch. The user spectrum is compared to each spectrum in the search library. MW - This replaces the standard prescreen with one that retrieves all of the compounds with a specific MW first, and then processes them with the match algorithm chosen (identity, similarity, etc.). The MW presearch utilizes only the main library and user libraries. The replicates library can never be searched since it has no molecular weight index that can be presearched. Use Constraints: Additional constraints can be placed on the search by checking the Use Constraints. Using the constraints can greatly narrow the search and give much better results. However, remember that constraints are applied after the ranking process! E. Doing a Structure Search It will search our structures and display spectra for Wiley when searched by structure. Wiley doesn't have spectra, but links to the NIST structures via the CAS number. To do a structure search, draw your structure in a drawing program. Most drawing programs allow you to first select the structure of interest, then export it in Mol format. Note this export function often is not the same as the Saving the File option. So, look for the export function on the menu. After saving in Mol format, “right-click” on the Spec list window. Select import function, select the file type to be .mol, then select the mol file you saved. It will be added to the top of the Spec List window. 1. Description of Common Drawing Packages: I have used several drawing programs with the NIST software: Chem Sketch from ACD, ISIS Draw from MDL, and Structure Editor from Highchem. All three have versions available over the internet. The first two have restrictions for commercial users, but the Highchem software has NO significant restrictions to commercial users. http://www.acdlabs.com/download/ - free http://www.highchem.com/Software/Software.html http://www.mdli.com/downloads/isisdraw.html Since the Highchem software cost nothing, you might want to try it first. This software has little documentation, so just hold your mouse cursor over the item on the menu to see its function. First draw the structure of interest using the tools on the left side of the menu. Note as you draw that the molecular weight and molecular formula are noted at the bottom of the window. You can use the arrow at the top right to select part of the structure and its molecular weight will be noted at the bottom of the window.
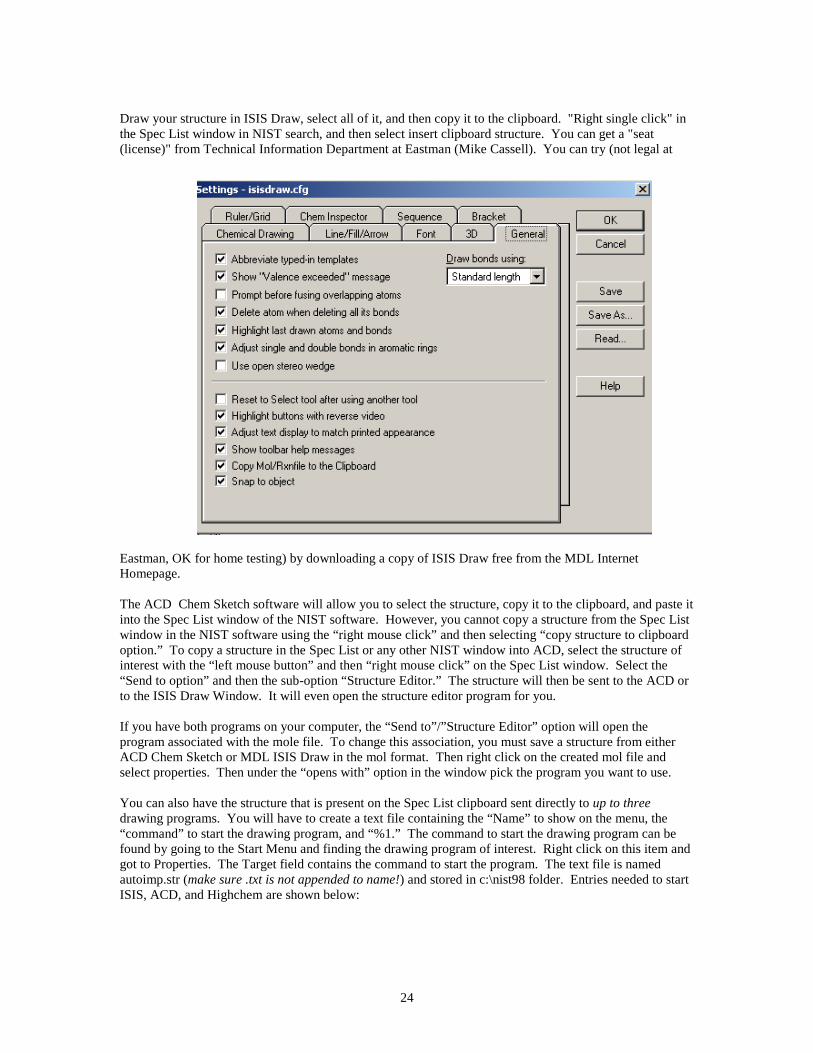
After drawing the whole structure, use the select all button to select the whole structure. Then use the “clean” button to improve the display of your structure. If you don’t like how it “cleaned-it-up,” then select the “undo” button. When your through, select the “save structure” button and save the structure to C:\nist98 folder with a name you remember. Now import to NIST by “right” clicking on the Spec List window, selecting “import” with a file type of mol file, and find the structure you saved. You can now search the NIST library as described later in this section. You can also use templates from Highchem or create your own folder of templates. To create your own, draw your structure, select “save structure” button, create a new folder (one of the icon options at top right of save menu, and save your file with a name that means something to you, and save the file in .tml format. After you create the folder, put a “Short-cut” of the folder in your C:\nist98 folder. That will make it easier to add things to your personal template folder without changing folders so often. You can also open the Highchem software automatically from the NIST software. Right click on Spec List Window, then select “Send to” and “Structure Editor”. The Highchem software will be opened if you have .mol file associated with the Highchem program. To change this association, you must save a structure from Highchem in the mol format. Then right click on the created mol file and select properties. Then under the “opens with” option in the window pick the Highchem program which is found at “C:\program files\highchem\structure editor\structure editor.exe”. ISIS Draw and ACD Chem Sketch software interface better with the NIST program. Each has their good and bad points. ISIS Draw works more effectively with the clipboard. However, the Chem Sketch software automatically shows the molecular weight of the structure drawn or substructure selected. ISIS Draw requires the opening of a menu item to perform the same task. The ISIS software will import and export structures from the NIST software via the clipboard. You must setup the ISIS Draw software to export files in the clipboard. Go to the options/settings window and select the General Tab. Make sure the “Copy mol/Rxnfile to the Clipboard” option is selected (see Settings window below).
24
Draw your structure in ISIS Draw, select all of it, and then copy it to the clipboard. "Right single click" in the Spec List window in NIST search, and then select insert clipboard structure. You can get a "seat (license)" from Technical Information Department at Eastman (Mike Cassell). You can try (not legal at
Eastman, OK for home testing) by downloading a copy of ISIS Draw free from the MDL Internet Homepage. The ACD Chem Sketch software will allow you to select the structure, copy it to the clipboard, and paste it into the Spec List window of the NIST software. However, you cannot copy a structure from the Spec List window in the NIST software using the “right mouse click” and then selecting “copy structure to clipboard option.” To copy a structure in the Spec List or any other NIST window into ACD, select the structure of interest with the “left mouse button” and then “right mouse click” on the Spec List window. Select the “Send to option” and then the sub-option “Structure Editor.” The structure will then be sent to the ACD or to the ISIS Draw Window. It will even open the structure editor program for you. If you have both programs on your computer, the “Send to”/”Structure Editor” option will open the program associated with the mole file. To change this association, you must save a structure from either ACD Chem Sketch or MDL ISIS Draw in the mol format. Then right click on the created mol file and select properties. Then under the “opens with” option in the window pick the program you want to use. You can also have the structure that is present on the Spec List clipboard sent directly to up to three drawing programs. You will have to create a text file containing the “Name” to show on the menu, the “command” to start the drawing program, and “%1.” The command to start the drawing program can be found by going to the Start Menu and finding the drawing program of interest. Right click on this item and got to Properties. The Target field contains the command to start the program. The text file is named autoimp.str (make sure .txt is not appended to name!) and stored in c:\nist98 folder. Entries needed to start ISIS, ACD, and Highchem are shown below:
25
"Icis" "C:\Program Files\ISIS214\IDraw32.exe" "%1" "ACD" "C:\ACDFREE\CHEMSK.EXE" "%1" "Highchem" "C:\Program Files\HighChem\Structure Editor\Structure Editor.exe" "%1" After this file is created, “ICIS,” “ACD,” and “Highchem” will appear as options when a structure is selected with a “right” click in the Spec List Clipboard:
2. Searching Stuctures Submitted to NIST Program: To do a structure search, highlight your imported clipboard structure in the Spec List window by “single-left” clicking on it, then select the following button from the top of the NIST search window:
There are several options for doing structure searches and they are setup under the “Library Search Options” Icon on the menu bar:
I normally set the options found on the “Search” tab as follows. Normally I select “Sort by Dot Product,” “Match Number of Rings,” “Match Number of Clusters,” and “Default Weighting.” You can also try “Sort by Distance” which sorts the structures in a different manner. I don’t really know which is the best to sort by, but NIST indicates that “Sort by Distance” might be preferred. You must also pick the “Library” tab and select the libraries to search by structure. The libraries to search by spectrum and by structure are selected separately! You can use options found on the “Constraints” tab with structure searches. F. Names Search
26
You can search all databases by incremental names by selecting the “Names” Tab at the bottom of the NIST search screen. There are “many hundreds of thousands” different names for the 123,000 spectra in the NIST library. Many compounds will have 20-50 names each! You can search by name (all libraries including commercial and our proprietary libraries) by going to the Incremental Name Search Window and just type in something. You’ll notice that it searches in real time as you type, so you can back out letters if you think you have gone the wrong way. After you find what you want, just double click on the name of interest in the Incremental Search Window and the compound’s spectrum will show up in the windows. Toggle to the bottom of the Text Info Window and you will see the other names listed in the database for the compound of interest. You can also search all other databases by name. The Wiley Database has almost 700,000 names for 230,00 entries. Also multiple names are now supported for ECC entries and users are encouraged to add a common name, CAS Number, PM Number etc. as synonyms. Adding multiple names in Opus is done by putting a | between the names when entering new spectra. G. Aliases for Storing Databases on Network or Slave Drives Aliases are used by the NIST to allow users to store their library on another drive (local or networked). If aliases are not used, then a library must be installed in a folder at C:/NIST98/. To create an alias, create a notepad text file named Alias.msd and place it in the library folder of interest such as c:\NIST98\Ecc. Then put Ecc and all its library files except the alias.msd file on any other local or network drive disk. The alias.msd text file must contain the address of the library folder on the remote disk. List the address as it is shown when you select the remote library folder with the File Explorer Program. The full path of the library folder is noted in the top right part of the explorer bar. For example: F:\Test\Ecc H. Using MS Interpreter MS interpreter tries to correlate substructural fragments to a spectrum. "Left-single-click" to select a library entry with a structure. Then "right-click" on the entry and select "Send to" and "Mass Spec Interpreter". You will get the following display.
27
Just left click on the little lines at the top of the mass spec display and the substructure corresponding to that ion will be displayed in the Structure Part of the MS Interpreter" display. You can also step through the assigned fragments by left clicking on the structure window within the Mass Interpreter Program. I. Creating User Libraries 1. Adding New Entries -Draw spectrum of compound with ISIS Draw and copy into the clipboard. Often easier to export a similar structure from NIST search and paste it into ISIS Draw for modification. Sometimes when exporting ECC structures, the formatting will be incorrect. Just select structure, select options/Select Journal or custom settings and pick JOC format or some other that you like. After drawing structure, select the show structure, and select menu bar item chemistry/calculate Mol values to check the MW of MF if you desire. -Get deconvoluted spectrum to display in AMDIS (spectrum to library would be in white) or from some other program such as HP or Wsearch. -Right Click on spectrum window, select NIST Library/Search Library -Go to Librarian tab on bottom of NIST search window and select the “ed” button from top menu bar. -Select “Clipboard” Structure in the Window and then select “From Structure” Button to automatically calculate the MW and MF from the Clipboard structure that was attached. -Enter name with one question mark in front of the if not structure not totally confirmed (reference standard, NMR, etc.) and ?? if even less certain. Compounds can be entered without structure and labeled e.g. “high-boiler in PM 1585,” etc. Be sure to put in supporting information in the Comment field such as confirmed by accurate mass, NMR, etc, and Notebook number, chemist, name of person who entered, date, location of Laboratory (e.g. RS for Research, OC for Organic Chemicals, TX for Texas, AK, for Arkansas, etc.). Also put in Other Names such as abbreviations, PM Number, common name. The Other Name Fields can be separately searched in the Names Search within NIST program. Be sure to delete any
28
chemical noise above molecular ion, column bleed, air, etc. Just use the control and shift keys and the mouse button to mark groups of ions to delete. After they are highlighted, use Delete Key on keyboard to delete the unwanted ions. -Then select “Add to library” if you are ready to add or “Add to List” if you want to use MS Interpreter to be able to import your spectrum associated with structure. If your library doesn’t exist yet, just type in a new name for the library. -If you want to search your library by structure, you have to update it each time you add it with the Strbld.exe program found in the C:\NIST98 folder. Just select your library, no need to update a library unless it is in lower case. 2. Correcting Entries in User Library -Go to Other Search Window (tab at bottom of NIST search) -Select ID Number Search option using down arrow at top left-hand of menu. Click on the binoculars, and then select a range such as 1-1000 from your user library. This normally will get all of them. After finding the entry to correct, select it with right button and select copy command. Then open the Librarian window with Tab on bottom of NIST search window, right click on the Spectrum List window and paste in your library spectrum you want to correct. -Chose “ed” button from window, and make any changes you want. Sometimes unless you click in the comment or other names window, the replace button will not be highlighted. -Select the Replace button and your entry should be replaced with corrections. The NIST software “remembers” which spectrum in the correct library to replace. The library actually cheats and adds the edited entry to the end of the library, and removes the incorrect entry leaving a “hole” in your library. 3. Deleting Entry in User Library -Go to Other Search Window (tab at bottom of NIST search) -Select ID Number Search option using down arrow at top left-hand of menu. Click on the binoculars, and then select a range such as 1-1000 from your user library. This normally will get all of them. After finding the entry to correct, select it with right button and select copy command. Then open the Librarian window with Tab on bottom of NIST search window, right click on the Spectrum List window and paste in your library spectrum you want to correct. -Select the spectrum you pasted into Librarian window you want to delete and select “x” from menu bar which is delete spectrum option -The Librarian function “knows” which library to remove the spectrum from J. Updating Libraries Searched with NIST Software We are updating the NIST searchable libraries daily. Libraries will only be replaced if newer versions are available. Libraries checked will include New, ECC, TSCA, PM, Wiley6, and Iontrap. This will replace new.exe file that I have been E-mailing you. We will be using a Windows bat file, Get_Lib.bat, to perform the daily update of entries in the “New Library.” The Get_lib function is called by the Windows Scheduler Software or JIT Scheduler (http://www.gibinsoft.com/shareware/jit/). I like the JIT (Version 4 is free) better than Windows Scheduler since no password or password updating is associated with the task. The Windows Scheduler Application might look somewhat different on different operating systems (NT 4, Windows 95, Windows 98, Windows 200), but should work in a similar manner. However, you might find it at different locations in your Start Programs menu. 1. Known Problems: -If your NIST Search Program is open, your library will not update properly. You will get a warning to close your NIST Search and run Get_Bat.bat file manually. -The DOS window will need to be closed every time the program runs. If you get tired of this, see information in the DOS window that tells you how to close automatically.
NIST Libraries Stored on a Server or Remote Drive: The program will warn you if you are using aliases to store your user libraries on a remote disk (one other than C:). You will then have to edit the Get_Lib.bat file using a text-editing program such as Word or Notepad. Just change the letter to that of the mapped letter where your libraries are located. If you need help with this, give me a call and I will send you a customized Batch file. Filestat Program: Get_lib.bat needs a program named filestat.exe. It needs to be installed at c:\filestat\filestat.exe. 2. Ways to Update: You can use this batch file in one of three different ways. Pick whichever meets your needs: 1. If you want to do it manually, just copy Get_Lib.bat it to your desktop. Click on it whenever the urge hits you. You will also need to create a Folder named with the following name and path: C:\filestat and place filestat.exe in this folder. 2. If you boot every night, you can copy Get_Lib.bat to your startup folder, which is probably located at C:\Windows\Start Menu\Programs\StartUp. It will update whenever you reboot your computer. You will also need to create a Folder named with the following name and path: C:\filestat and place filestat.exe in this folder. 3. The following instructions are used if you want to update automatically. Create a Folder named with the following name and path: C:\filestat and place filestat.exe in this folder. Copy Get_Lib.bat to your DeskTop, Double Left Click on the My Computer Icon and then double left click on the Schedule Task Icon.
If you don't have this program, call the computer support group. It was not with the original Windows 95 install, but was added with Internet Explorer 4.0. If the Schedule Task Program is running, you will see a Small Icon on the bottom right side of your task bar at the bottom of your screen with a clock in its lower right corner:
30
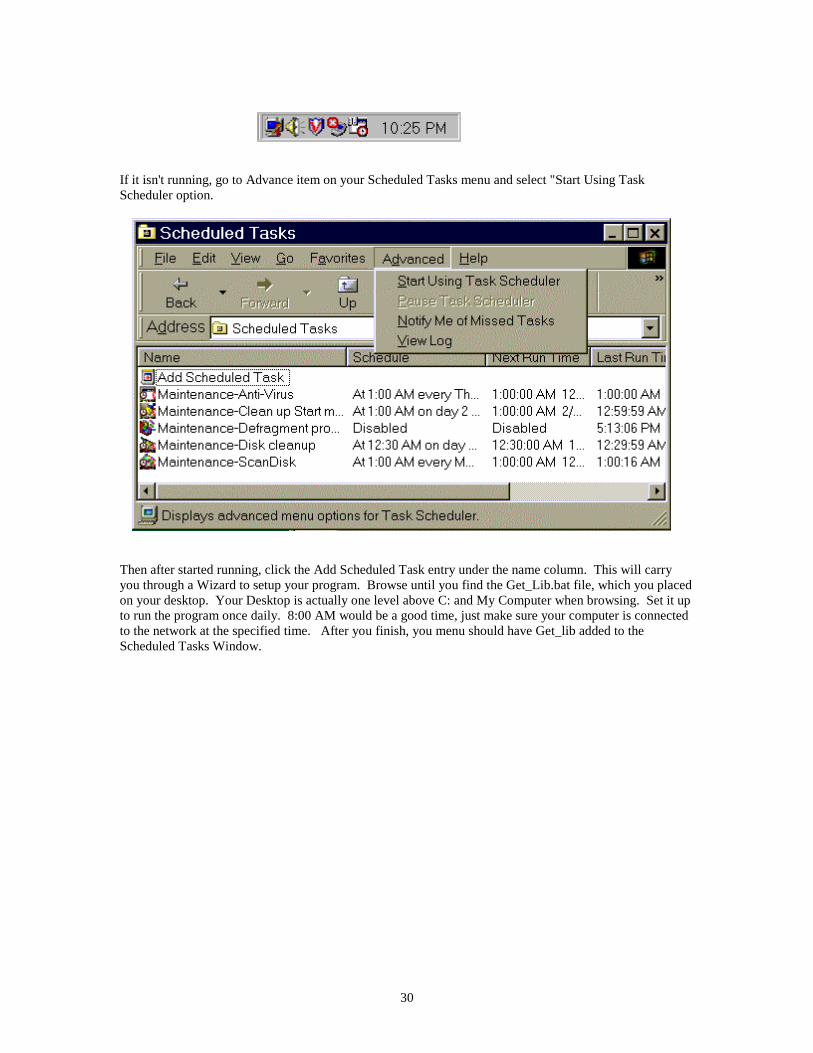
If it isn't running, go to Advance item on your Scheduled Tasks menu and select "Start Using Task Scheduler option.
Then after started running, click the Add Scheduled Task entry under the name column. This will carry you through a Wizard to setup your program. Browse until you find the Get_Lib.bat file, which you placed on your desktop. Your Desktop is actually one level above C: and My Computer when browsing. Set it up to run the program once daily. 8:00 AM would be a good time, just make sure your computer is connected to the network at the specified time. After you finish, you menu should have Get_lib added to the Scheduled Tasks Window.
31
You have to change the password for your scheduled task when you change your logon password. That is why I personally prefer to use JIT (Version 4) freeware scheduling program (http://www.gibinsoft.com/shareware/jit/). Just go to Scheduled task program, double left click on your task, and select set Password option. Also you can view the log for Task scheduler by clicking the "Advanced" option on the Scheduler Task bar. Might want to also select the "Notify me of missed Tasks" option in the "Advanced" option. K. Sending User Libraries for Incorporation in Eastman Corporate Library Entries added to your library can be automatically added to the Eastman Chemical Company Database automatically/nightly. The entries are added to the Eastman Chemical Company Library “New”. We distribute the Eastman Chemical Company spectra in two libraries, “ECC” and “New”. The bulk of the spectra/structures are kept in “ECC” and the most current entries in “New.” This approach makes updating the libraries much quicker. All users can easily obtain the “New” library automatically by using the Get_Lib macro described in a previous section. Note, a backup copy of all user libraries is made nightly by our library merge program. Thus if you corrupt your library, give James Little or Curt Cleven a call and we can recall the last good copy. There are many ways to add your spectra to the Eastman Chemical Company library using the Send_lib batch file. Just give James Little or Curt Cleven a call to determine the best mechanism for you.
1MW limit applied before presearch and comparison 2Constraints applied after ranking
Figure 1: Outline of Search Process
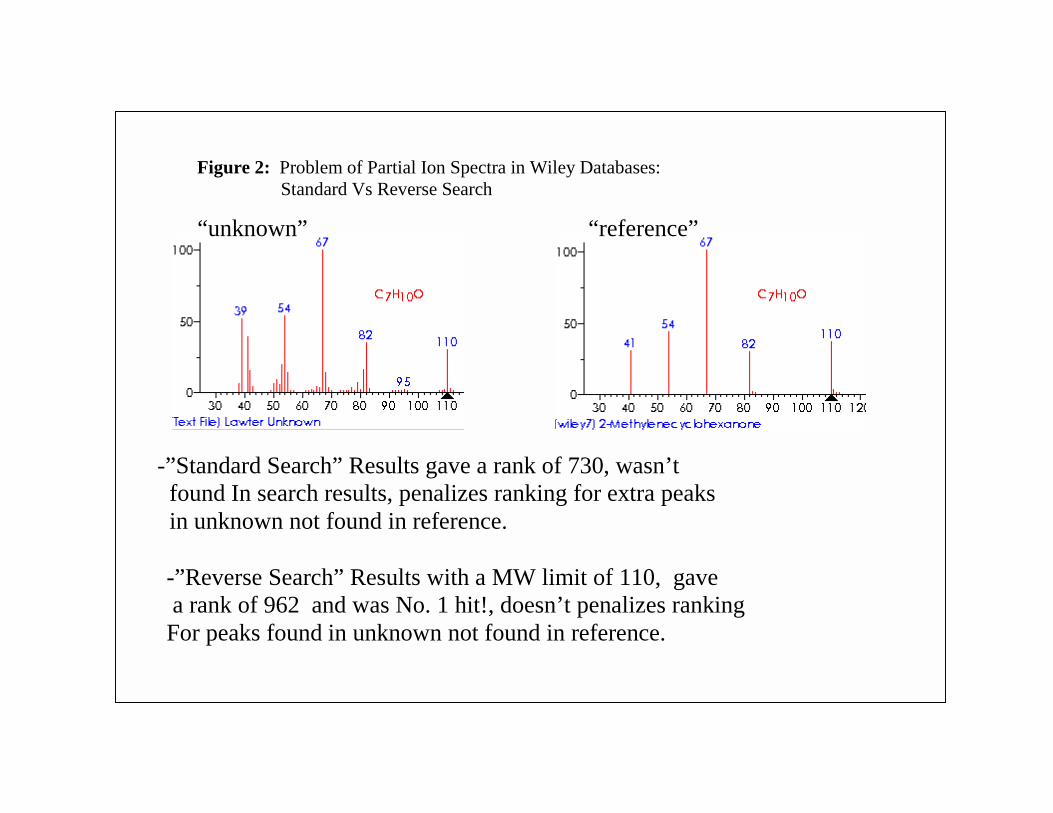
Figure 2: Problem of Partial Ion Spectra in Wiley Databases: Standard Vs Reverse Search
-”Standard Search” Results gave a rank of 730, wasn’t found In search results, penalizes ranking for extra peaks in unknown not found in reference.
“unknown” “reference”
-”Reverse Search” Results with a MW limit of 110, gave a rank of 962 and was No. 1 hit!, doesn’t penalizes rankingFor peaks found in unknown not found in reference.