28
2
1. BASIC FUNCTIONS
The technical and administrative requirements necessary in order to work with METAPOSTA have been
made as simple as possible in order to provide access to all kinds of users:
1.1. Storing documents
METAPOSTA will be used instead of the traditional mailbox.
We can "upload" or “post on the Internet” all kinds of documents by signing these digitally.
METAPOSTA adds to or replaces files of official or legal documentation of importance to us personally or
to our family that we keep at work or at home, and replaces the domestic filing system (folder) we use
for storing warranties and user manuals for the household appliances, audiovisual or computer
equipment installed in our homes.
- You can scan all the warranties for your household appliances, sign these digitally and keep them in the
corresponding METAPOSTA folder, where they will never get lost.
- You can scan the deeds for your home and sign these digitally, and you can do the same with your ID card,
passport, and so on.
And what is the legal validity of a document that is scanned, signed digitally and kept in METAPOSTA?
Art. 35.2 Law 11/ June 22, 2007, on the electronic access of citizens to Public Services: “The interested parties
may add to the dossier digitised copies of documents, the fidelity of which to the originals will be guaranteed
through the use of advanced electronic signatures. The Public Administration may request verification of the
contents of the copies provided of the corresponding file. Should this verification prove to be impossible,
under exceptional circumstances, the individual may be required to produce the document or the original
information. The provision of such copies implies that the Government is authorised to access and deal with
the personal information contained in such documents".
Unlike other countries, the law does not include the acceptance of such documentation in the private sector
and therefore a lawyer may require that we submit the documentation in the original format.
1.2. Legal custody of documents
METAPOSTA guarantees the storage and legal custody of documents, allowing a level of
criticality/relevance and a legal validity period to be established and guaranteed for each kind of
document.
1.3. Notifications service
METAPOSTA's notifications service is one of the main functionalities on which the system is based.
3
1) Registration in order to receive notifications
The first step will be for the user to notify METAPOSTA that he wishes to receive official
notifications both from public and private entities via the system. In other words, to register with
the system.
2) Sending of notifications by senders
Senders will be responsible for sending the information. Notifications will be received and
registered safely with an acknowledgement of receipt control that controls the status of
notifications: Pending reception, received and rejected.
3) Announcement of notifications received
Notification of the documents sent will be given to the user-receiver via e-mail or text message
provided that he has expressed a wish to receive this kind of notification.
4) Collecting notifications
In order to collect the notification, the user will log in with his digital certificate, eID, Izenpe
recognised electronic signature certificate or Camerfirma, User + Password- and access the
messages identified as pending notification, as well as accepted, rejected or expired notifications
in his folder.
Notifications have a expiry period. If they are not read within the established period, 10 days,
notifications will automatically switch to expired status and it will no longer be possible to collect
them. The expiry period commences the moment that the system records that the notification has
been sent.
1.4. Public Telematic Registry
METAPOSTA will act like a Public Telematic Registry with regard to the documentation sent and
deposited in the system, for which it will offer electronic notification mechanisms according to the legal
requirements set out in Royal Decree 29/2003.
4
2. HOW TO REGISTER
There are three ways you can register with the METAPOSTA service:
2.1 With a digital certificate
You can access the METAPOSTA platform by identifying yourself with a recognised digital signature
certificate (electronic ID, IZENPE citizen cards, ONA and Camerfirma).
The advantage of accessing with this kind of certificate is that it will automatically enable you to
receive electronic notifications from collaborating sender entities. Only those users that access
with recognised digital signature certificates will be able to receive electronic notifications.
2.2 In person
Registrations in person are processed at KZgunea offices. Physical persons may visit a collaborating
KZGunea centre and identify themselves to an employee with their ID or Residence Permit.
Once this process has been completed, the user will be given two passwords in order to activate the
service: One of passwords will be received by letter and the other via a text message on the user's
mobile phone.
2.3 Through the website of collaborating entities
The following entities collaborate by providing registration for METAPOSTA through their online banking
services.
- Bankoa - Bilbao Bizkaia Kutxa - Caja Laboral - Euskadiko Kutxa - Caja Vital Kutxa - Iparkutxa - Kutxa
It is only necessary for the user to be registered as an online banking user of one of these financial
entities.
In order to register with METAPOSTA via your online banking entity, the first step is to access this entity’s
website and start the session. The registration manual of the on-line banking entity provides details of
the particular process to be followed.
2.4 What should I do should my access passwords to METAPOSTA be lost or fall into the hands of
another person?
Due to the high level of confidentiality of the documentation in your METAPOSTA letterbox, should you
not have your passwords or believe that they are in the possession of another person, you must call the
telephone enquiries service of METAPOSTA (902 540 540) and request that your account be reactivated.
METAPOSTA will regenerate your PIN and your passwords and these will be sent to you again. The PIN
5
will be sent to your mobile phone via a text message and your passwords will be sent by ordinary post
to your postal address.
2.5 I would like to deregister from METAPOSTA. What must I do?
You can deregister whenever you want as there is no obligatory period of permanence in METAPOSTA.
In order to deregister, you must submit a revocation application to the headquarters of METAPOSTA, S.
A. providing the following information:
- Identity of the Holder/owner of the Account passwords.
- Detailed reasons for applying for deregistration.
- Name of the person applying for deregistration. Contact information of the person applying for
deregistration.
This application will be authenticated in accordance with the requirements established in the Declaration
of Accounts and Services Practices and MetaPosta, S.A., who will proceed to deregister the user.
The authenticated deregistration application as well as information justifying the revocation, is
registered and filed.
Should the revocation be applied for by a person other than the Holder, METAPOSTA, S.A. will notify the
Holder of the Account that a deregistration application has been made and the reasons for this.
METAPOSTA, S.A. will not be able to reactivate any Account that has previously been deregistered.
Postal address: METAPOSTA, S.A.
Miñano Technology Park
Avda. Albert Einstein, 44 - Edif. E6 - Bajo
Miñano Mayor - 01510 Vitoria-Gasteiz
Fax: 945 00 10 65
2.6 Do I need any special Hardware/Software/Infrastructure to access METAPOSTA?
METAPOSTA does not have any specific requirements other than those necessary to surf the Internet.
You just need a device to access the Internet (Personal Computer, PDA, Smartphone…) and an available
Internet connection.
Should you wish to use electronic signature certificates to initiate the METAPOSTA session, or sign
documents digitally, you must be in possession of the necessary Electronic Signature Certificates and a
working Card Reader.
6
2.7 With which navigators and/or Operating Systems can I access METAPOSTA?
METAPOSTA has been created with freeware and therefore, in principle, any navigator and/or operating
system is valid for using METAPOSTA.
METAPOSTA guarantees compatibility with the navigators and operating systems most widely-used by
the public:
1. For access and use, the following web navigators:
1.1. Internet Explorer.
1.2. Mozilla and Mozilla Firefox.
1.3. Opera.
1.4. Safari.
2. With regard to operating systems:
2.1. Microsoft Windows environment.
2.2. GNU/Linux environment.
2.3. Mac OS X environment.
2.4. Mobile phone environments (Symbian, Blackberry, Windows Mobile).

7
3. ACCESS TO METAPOSTA
Open the following Internet address in the explorer: http://www.metaposta.com/en/index.html
The section Enter my mailbox appears on the home page. You can choose between entering with a
normal version of the website or with an accessible version which will help you manage the service.
Moreover, there are a number of different ways that you can access the METAPOSTA website.
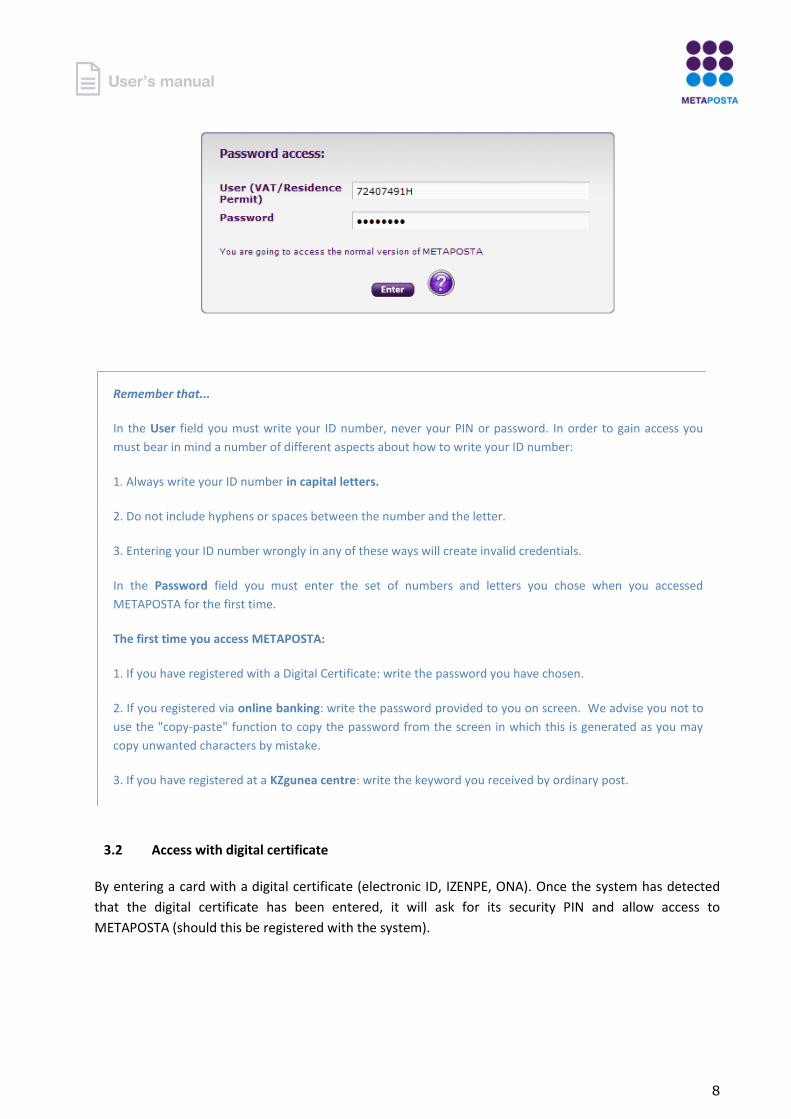
3.1 Access with username and password
All METAPOSTA users have a username and password, which they will receive when they register with
the system. Should an invalid username and password be entered, the "Invalid Credentials" message will
appear.
8
Remember that...
In the User field you must write your ID number, never your PIN or password. In order to gain access you
must bear in mind a number of different aspects about how to write your ID number:
1. Always write your ID number in capital letters.
2. Do not include hyphens or spaces between the number and the letter.
3. Entering your ID number wrongly in any of these ways will create invalid credentials.
In the Password field you must enter the set of numbers and letters you chose when you accessed
METAPOSTA for the first time.
The first time you access METAPOSTA:
1. If you have registered with a Digital Certificate: write the password you have chosen.
2. If you registered via online banking: write the password provided to you on screen. We advise you not to
use the "copy-paste" function to copy the password from the screen in which this is generated as you may
copy unwanted characters by mistake.
3. If you have registered at a KZgunea centre: write the keyword you received by ordinary post.
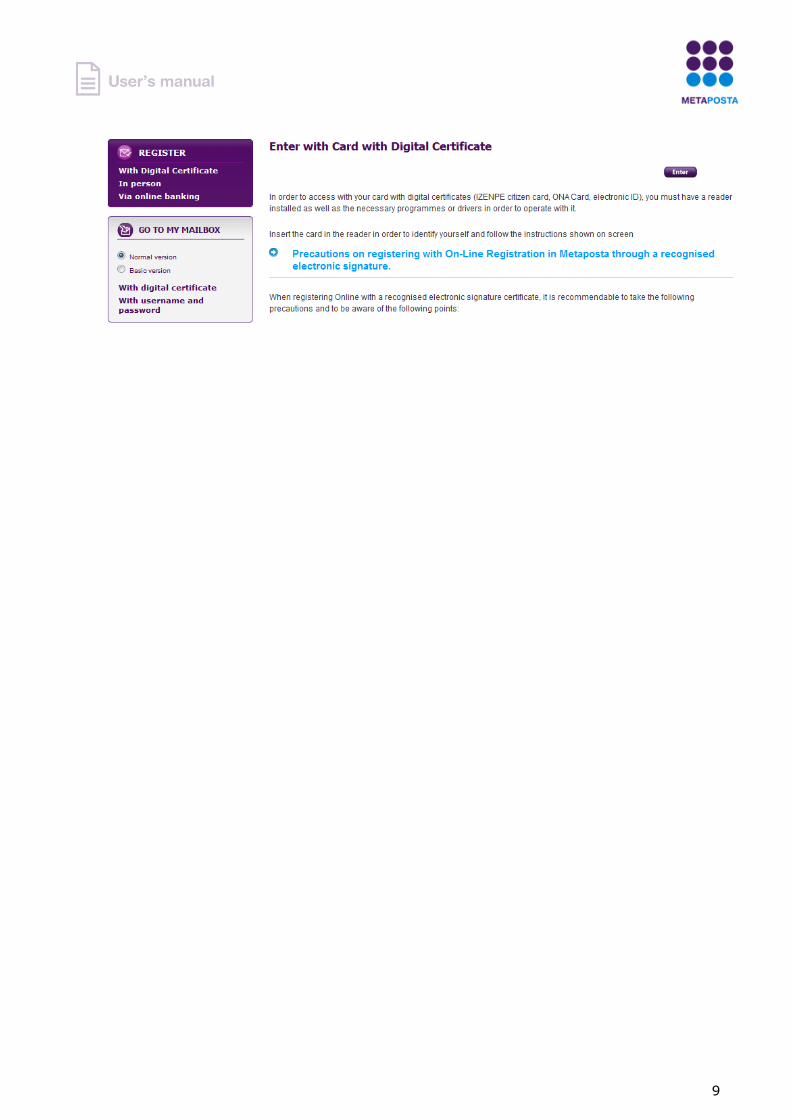
3.2 Access with digital certificate
By entering a card with a digital certificate (electronic ID, IZENPE, ONA). Once the system has detected
that the digital certificate has been entered, it will ask for its security PIN and allow access to
METAPOSTA (should this be registered with the system).
9
10
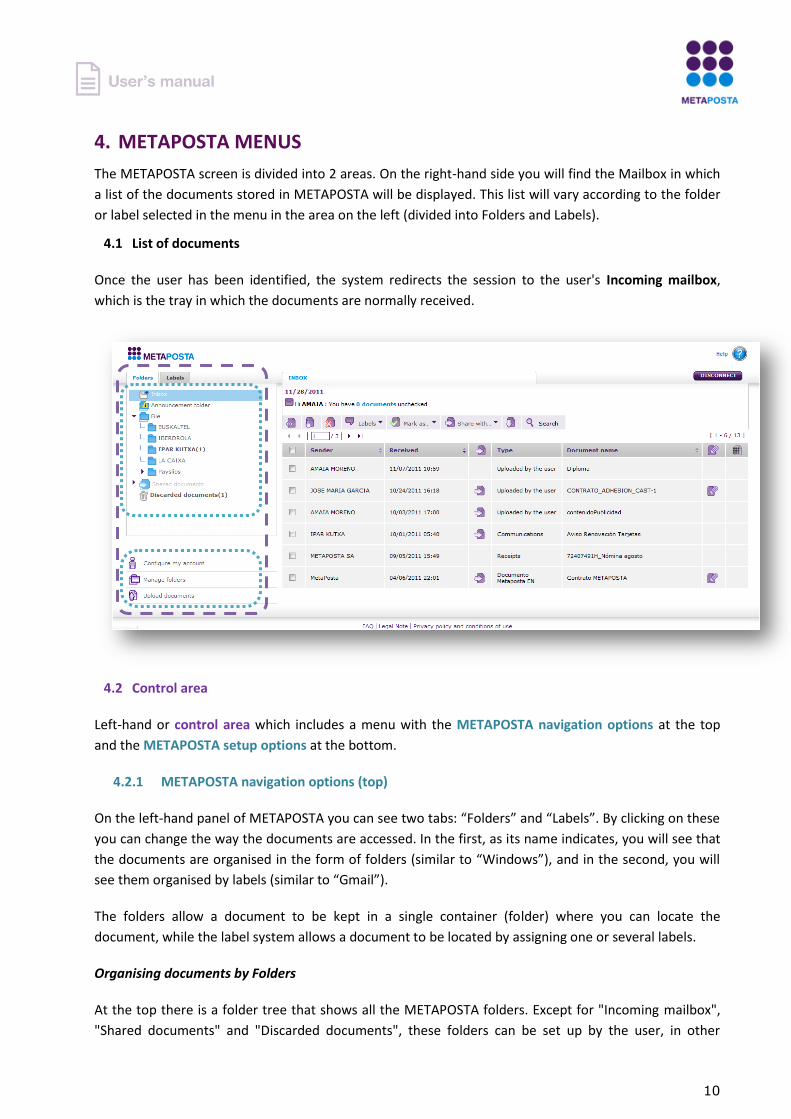
4. METAPOSTA MENUS
The METAPOSTA screen is divided into 2 areas. On the right-hand side you will find the Mailbox in which
a list of the documents stored in METAPOSTA will be displayed. This list will vary according to the folder
or label selected in the menu in the area on the left (divided into Folders and Labels).
4.1 List of documents
Once the user has been identified, the system redirects the session to the user's Incoming mailbox,
which is the tray in which the documents are normally received.
4.2 Control area
Left-hand or control area which includes a menu with the METAPOSTA navigation options at the top
and the METAPOSTA setup options at the bottom.
4.2.1 METAPOSTA navigation options (top)
On the left-hand panel of METAPOSTA you can see two tabs: “Folders” and “Labels”. By clicking on these
you can change the way the documents are accessed. In the first, as its name indicates, you will see that
the documents are organised in the form of folders (similar to “Windows”), and in the second, you will
see them organised by labels (similar to “Gmail”).
The folders allow a document to be kept in a single container (folder) where you can locate the
document, while the label system allows a document to be located by assigning one or several labels.
Organising documents by Folders
At the top there is a folder tree that shows all the METAPOSTA folders. Except for "Incoming mailbox",
"Shared documents" and "Discarded documents", these folders can be set up by the user, in other
11
words, the user can create new folders, eliminate existing ones and move the folders around a tree
without restrictions. He can also name the folders as he likes and change their names.
Notifications folder
In this folder the user receives special communications from METAPOSTA or senders. Normally,
messages will be sent about the status of the user’s subscriptions to senders. In other words,
METAPOSTA will send a notification to the user every time an entity has accepted or rejected his
subscription.
File
The “File” tray is the one in which we can organise our personal system of folders to store documents.
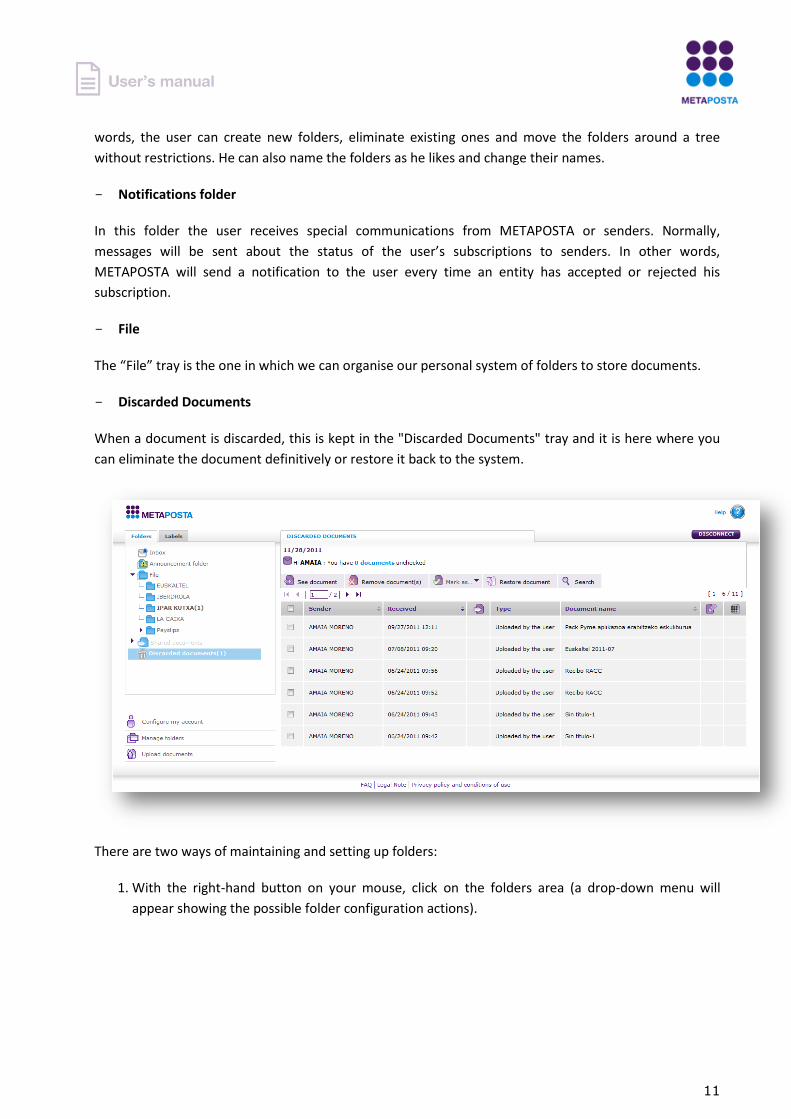
Discarded Documents
When a document is discarded, this is kept in the "Discarded Documents" tray and it is here where you
can eliminate the document definitively or restore it back to the system.
There are two ways of maintaining and setting up folders:
1. With the right-hand button on your mouse, click on the folders area (a drop-down menu will
appear showing the possible folder configuration actions).
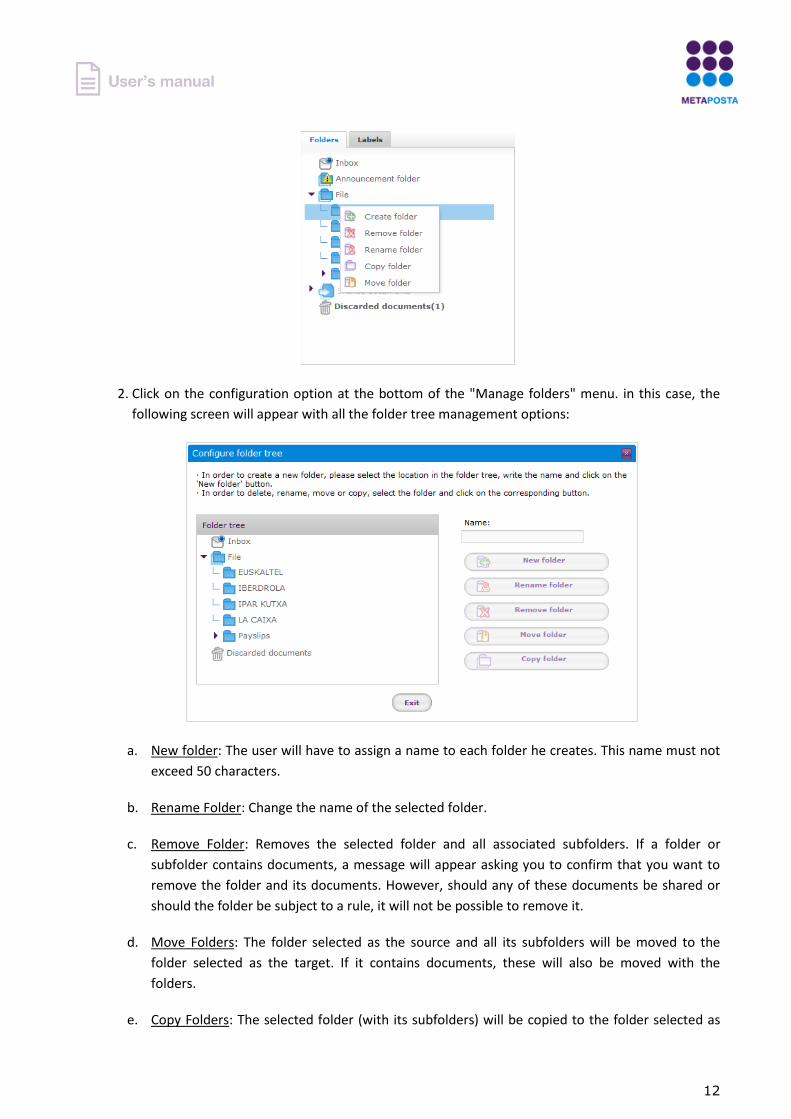
12
2. Click on the configuration option at the bottom of the "Manage folders" menu. in this case, the
following screen will appear with all the folder tree management options:
a. New folder: The user will have to assign a name to each folder he creates. This name must not
exceed 50 characters.
b. Rename Folder: Change the name of the selected folder.
c. Remove Folder: Removes the selected folder and all associated subfolders. If a folder or
subfolder contains documents, a message will appear asking you to confirm that you want to
remove the folder and its documents. However, should any of these documents be shared or
should the folder be subject to a rule, it will not be possible to remove it.
d. Move Folders: The folder selected as the source and all its subfolders will be moved to the
folder selected as the target. If it contains documents, these will also be moved with the
folders.
e. Copy Folders: The selected folder (with its subfolders) will be copied to the folder selected as

13
the target. In this process, the original folder will not be removed.
Organising documents by Labels
List of labels
When you enter the label system, a list is shown of all the labels that the user has assigned to his
documents and by selecting one or several of the labels, you can display a list of documents containing
these labels. Documents that contain intersection or conjunction labels may be selected.
Label editor
The label menu is found on the horizontal toolbar of the documents list (right-hand area), within
"Labels". Here, you can create new labels and manage all the labels you have created.
a. Create a new label: When a new label is created, this is not assigned to any document.
b. Remove a label: The label and all the documents to which it was assigned will disappear from the
label store but these documents will not be removed in any case.
c. Rename a label: The change will be applied automatically to all documents that contain the
modified label.
4.2.2 METAPOSTA setup options (bottom)
The bottom part of the menu corresponds to the METAPOSTA setup area.
14
This offers 3 options:
Personalise my account
In this option, the user will have access to his personal details as well as information on his subscriptions
to METAPOSTA Senders, as well as other setup utilities.
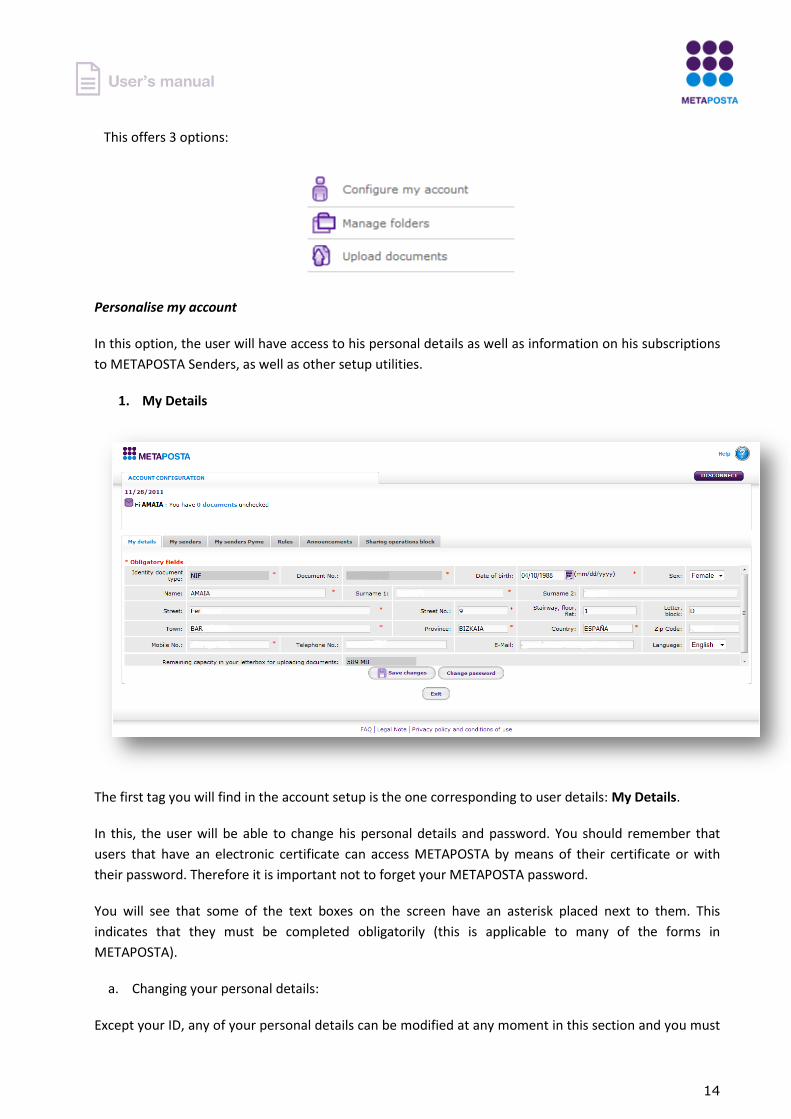
1. My Details
The first tag you will find in the account setup is the one corresponding to user details: My Details.
In this, the user will be able to change his personal details and password. You should remember that
users that have an electronic certificate can access METAPOSTA by means of their certificate or with
their password. Therefore it is important not to forget your METAPOSTA password.
You will see that some of the text boxes on the screen have an asterisk placed next to them. This
indicates that they must be completed obligatorily (this is applicable to many of the forms in
METAPOSTA).
a. Changing your personal details:
Except your ID, any of your personal details can be modified at any moment in this section and you must

15
give your name and surname.
b. Changing the language:
The language used in the system can be changed at any time, but this change will not take place until the
next time you identify yourself in the system via the METAPOSTA homepage.
c. Changing your password:
You can also change your password at any time, with the following restrictions:
- It must have a minimum of 8 characters.
- It must contain both numbers and letters.
- It must not contain the name or surnames of the user among its characters.
2. My Senders
The second and third tab shows the list of the METAPOSTA collaborating entities (Senders and SME
Senders) that the user may subscribe to.
In this tab, the user may apply for a subscription to all the Senders with whom he has any kind of
relationship. Following acceptance of the subscription application, the user may start to receive
documentation from the selected Senders when these same documents to METAPOSTA.

16
3. Rules
The next tab allows the user to create rules within METAPOSTA. These rules or triggers will apply when
the user receives a document of the type or from the selected Sender. They allow the user to automate
two kinds of actions:
a. Auto-filing
Auto-filing will allow the user to specify that whenever a document of a determined type or from a
determined Sender enters his letterbox, this document will be moved automatically to a specific folder.
b. Auto-sharing
17
Should an auto-sharing rule be created, the user will be able to specify that when a document from a
specific Sender or of a specific type enters his mailbox, this document will be shared automatically with
one or several other METAPOSTA users.
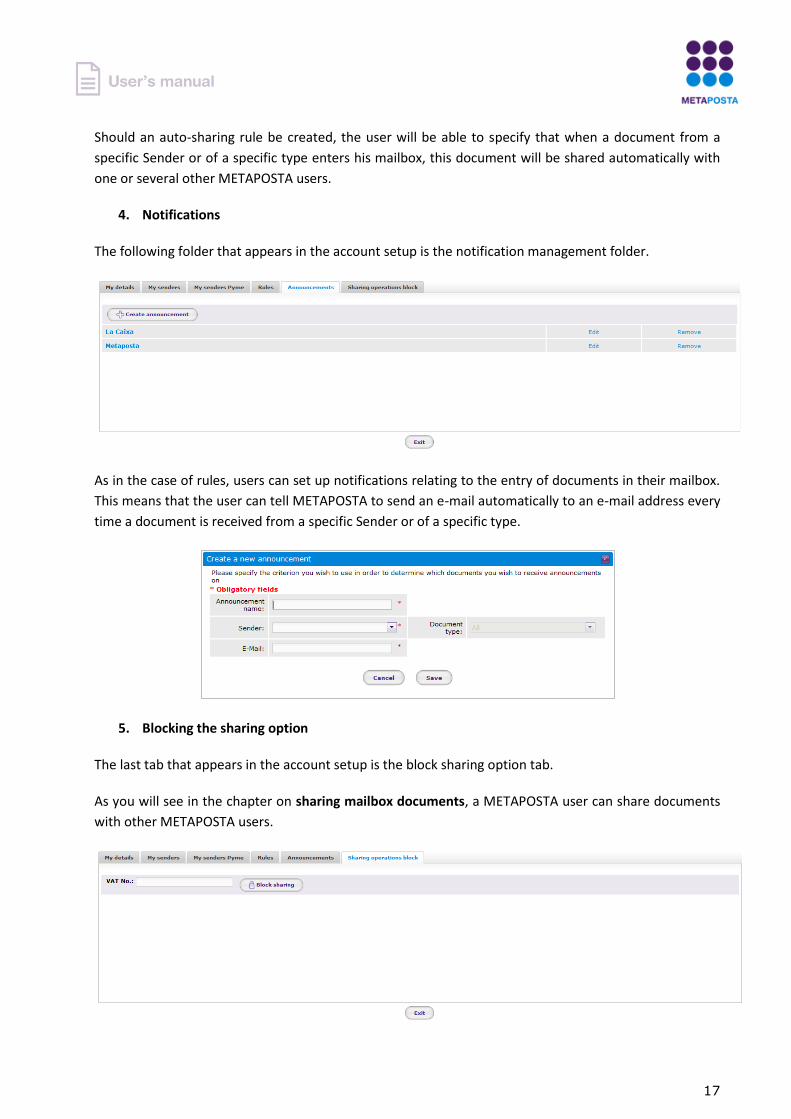
4. Notifications
The following folder that appears in the account setup is the notification management folder.
As in the case of rules, users can set up notifications relating to the entry of documents in their mailbox.
This means that the user can tell METAPOSTA to send an e-mail automatically to an e-mail address every
time a document is received from a specific Sender or of a specific type.
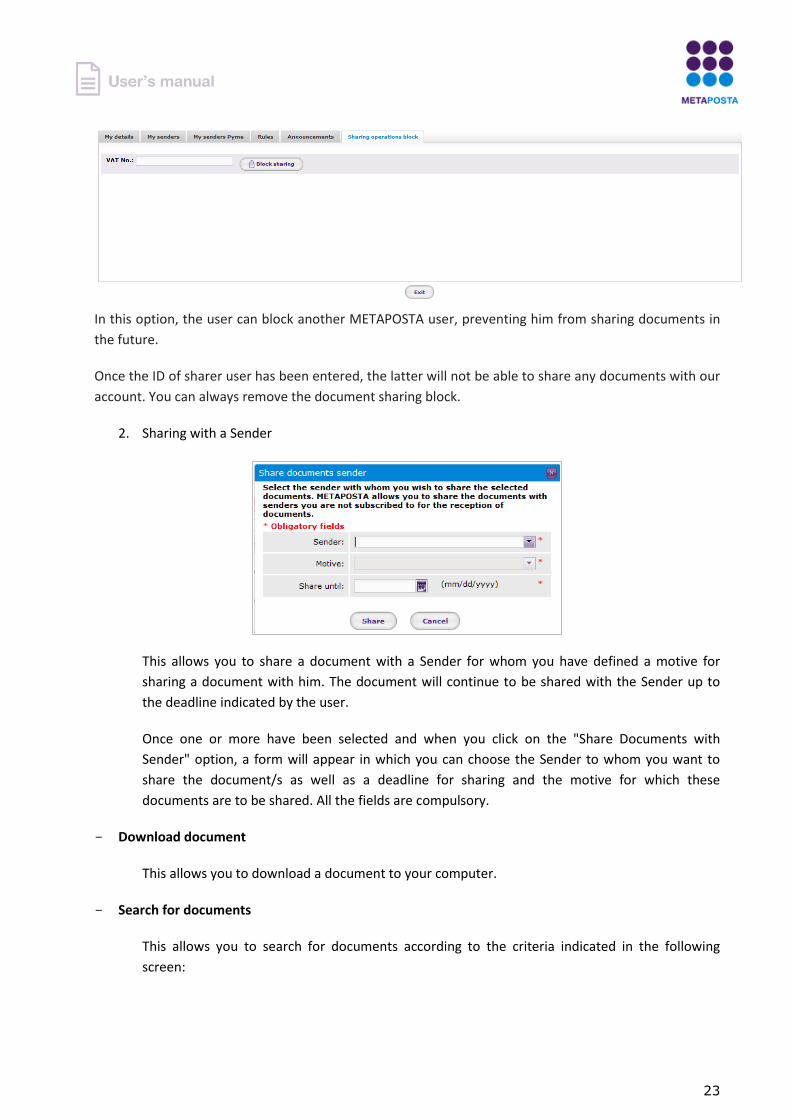
5. Blocking the sharing option
The last tab that appears in the account setup is the block sharing option tab.
As you will see in the chapter on sharing mailbox documents, a METAPOSTA user can share documents
with other METAPOSTA users.

18
In this option, the user can block another METAPOSTA user in order to prevent him from sharing
documents in the future with the user's own mailbox.
Once the ID of the sharer user has been entered, the latter will not be able to share documents with our
account again or until this block is removed.
Manage Folders
By clicking on the "Manage folders" option, the following screen will appear with all the folder tree
management options.
1. New folder: The user will have to assign a name to each of the folders he creates. This name
must not exceed 50 characters.
2. Rename Folder: Change the name of the selected folder.
3. Remove Folder: Removes the selected folder and all associated subfolders. If a folder or
subfolder contains documents, a message will appear asking you to confirm that you want to
remove the folder and its documents. However, should any of these documents be shared or
should the folder be subject to any rule, it will not be possible to remove it.
4. Move Folders: The folder selected as the source, as well as all its subfolders, will be moved to the
folder selected as the target. If it contains documents, these will also be moved with the folders.
5. Copy Folders: The selected folder (with its subfolders) will be copied to the folder selected as the
target. In this process, the original folder will not be removed.
Upload Documents
The last option on the bottom menu is Upload documents. This option allows the user to store both
electronically signed and unsigned documents in his METAPOSTA strongbox. There are a number of
aspects that must be taken into consideration:
19
- The files you want to upload to your strongbox must not exceed 10Mb per file.
- Each user may store up to a maximum capacity indicated in the Setup my account menu
- METAPOSTA allows you to store all kinds of files.
METAPOSTA will only be able to display PDF files and images in jpg, gif and png formats. (Giving the
large number of possible file types, in order to visualise other file types, the user must download en file
to his computer and display this with his own means).
Important: If the user eliminates of any documents kept in his strongbox, he will not be allowed to reuse
the space freed up as a result. In other words, when the user erases a document, the space occupied in
METAPOSTA cannot be reused for storing new documents.
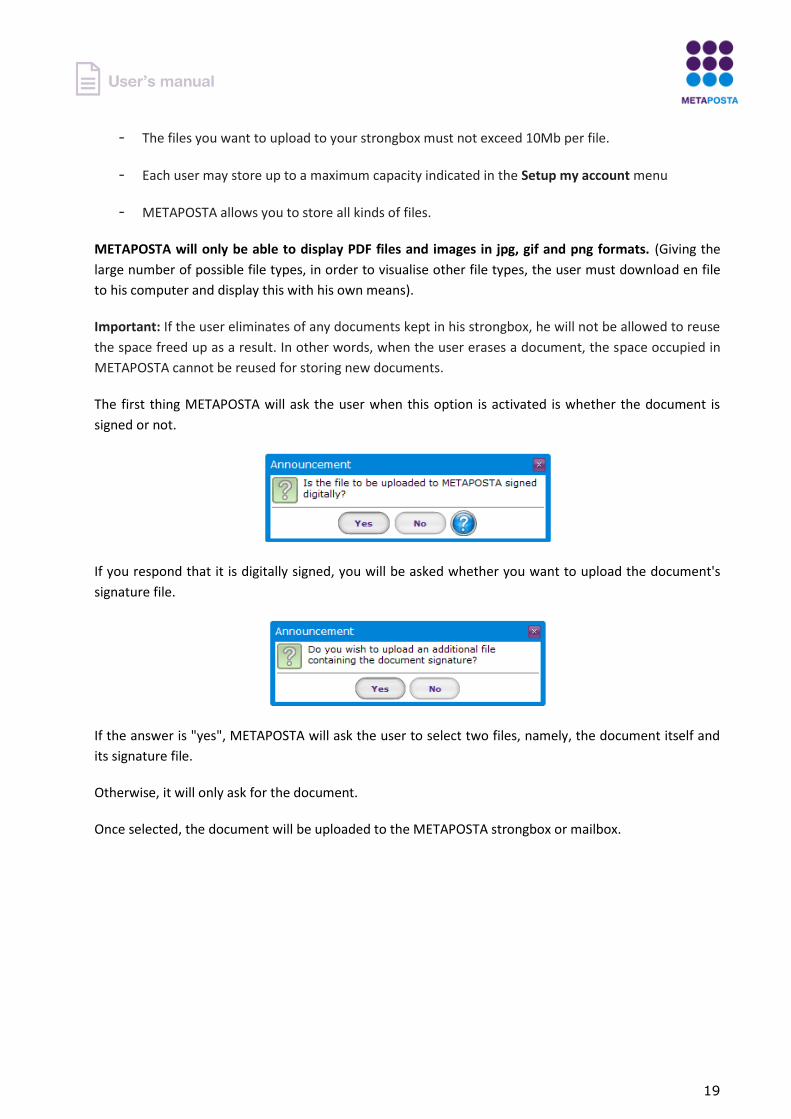
The first thing METAPOSTA will ask the user when this option is activated is whether the document is
signed or not.
If you respond that it is digitally signed, you will be asked whether you want to upload the document's
signature file.
If the answer is "yes", METAPOSTA will ask the user to select two files, namely, the document itself and
its signature file.
Otherwise, it will only ask for the document.
Once selected, the document will be uploaded to the METAPOSTA strongbox or mailbox.
20
5. OPERATIONS WITH DOCUMENTS
A number of operations can be carried out with the lists indicated in the different document trays. These
operations are described below. They require a selection of one or several of the documents in the tray.
5.1. Incoming and filing tray
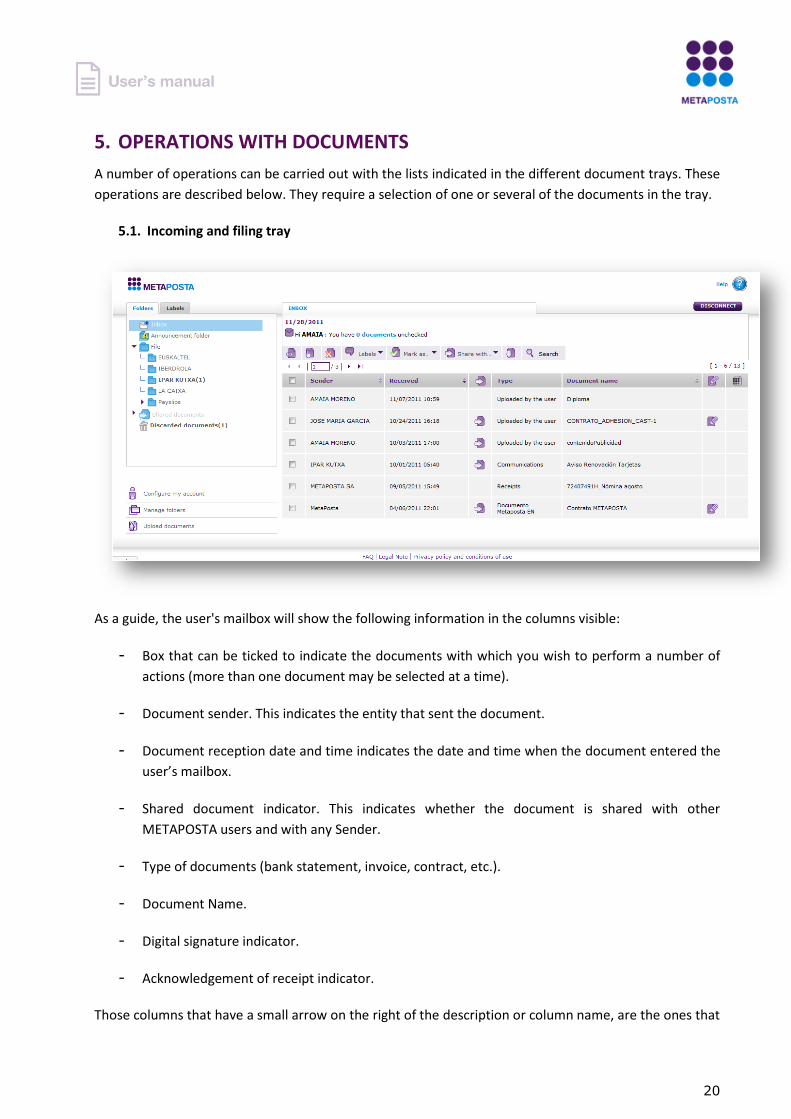
As a guide, the user's mailbox will show the following information in the columns visible:
- Box that can be ticked to indicate the documents with which you wish to perform a number of
actions (more than one document may be selected at a time).
- Document sender. This indicates the entity that sent the document.
- Document reception date and time indicates the date and time when the document entered the
user’s mailbox.
- Shared document indicator. This indicates whether the document is shared with other
METAPOSTA users and with any Sender.
- Type of documents (bank statement, invoice, contract, etc.).
- Document Name.
- Digital signature indicator.
- Acknowledgement of receipt indicator.
Those columns that have a small arrow on the right of the description or column name, are the ones that
21
allow you to re-sort the document lists in the mailbox in accordance with your own criterion. In order to
re-sort the mailbox with the criterion for one of these columns, you must click on this.
1. Actions that can be carried out with a document:
At the top of the mailbox, there is a toolbar with the following actions:
Display document
When you double-click on a document or click on the See document option, you can access its details.
Move document
In order to move any document with this icon, you must select the document first. After selecting the
document and clicking on the button, a window will appear showing the file tree in which you will have
to choose the file to which you wish to move the document.
There are two other ways of moving documents in METAPOSTA. One, by dragging the document and
releasing it over the file and the other way is by clicking on the document with the right-hand button of
your mouse and selecting Move document.
Discard Document
When you choose this option, the selected document will be sent to the discarded documents folder,
from which you will be able to eliminate it definitively from the METAPOSTA mailbox.
Labels
This option allows you to apply existing labels to a document or to create new labels in order to apply
these to the selected documents. It also allows us to edit labels, rename or remove these.

22
Mark as
This allows you to mark documents as read or unread in the user mailbox.
Share documents
The documents may be shared with other users or with a Sender. The only restriction is that you will not
be able to share a document that does not belong to you, in other words, a document that you receive
as a shared document sent by its owner.
The shared document option allows two kinds of sharing:
1. Share with another METAPOSTA user
This shares the selected document or documents with one or several METAPOSTA users, whose
ID must be known to you beforehand.
Once one or more documents have been selected and the "Share documents with Users" option
has been selected, a form will appear. You must add the IDs of the users with whom you wish to
share your documents to this form.
Once the list of users for sharing documents is ready, when you click on the "Share" button,
confirmation of the operation will appear indicating the name and surnames of the selected
users. Should any of the IDs indicated not correspond to a METAPOSTA user, you will be
informed of this.
How to block a sharing arrangement?
The last tab that appears in the Account setup menu is the Block sharing option tab.
23
In this option, the user can block another METAPOSTA user, preventing him from sharing documents in
the future.
Once the ID of sharer user has been entered, the latter will not be able to share any documents with our
account. You can always remove the document sharing block.
2. Sharing with a Sender
This allows you to share a document with a Sender for whom you have defined a motive for
sharing a document with him. The document will continue to be shared with the Sender up to
the deadline indicated by the user.
Once one or more have been selected and when you click on the "Share Documents with
Sender" option, a form will appear in which you can choose the Sender to whom you want to
share the document/s as well as a deadline for sharing and the motive for which these
documents are to be shared. All the fields are compulsory.
Download document
This allows you to download a document to your computer.
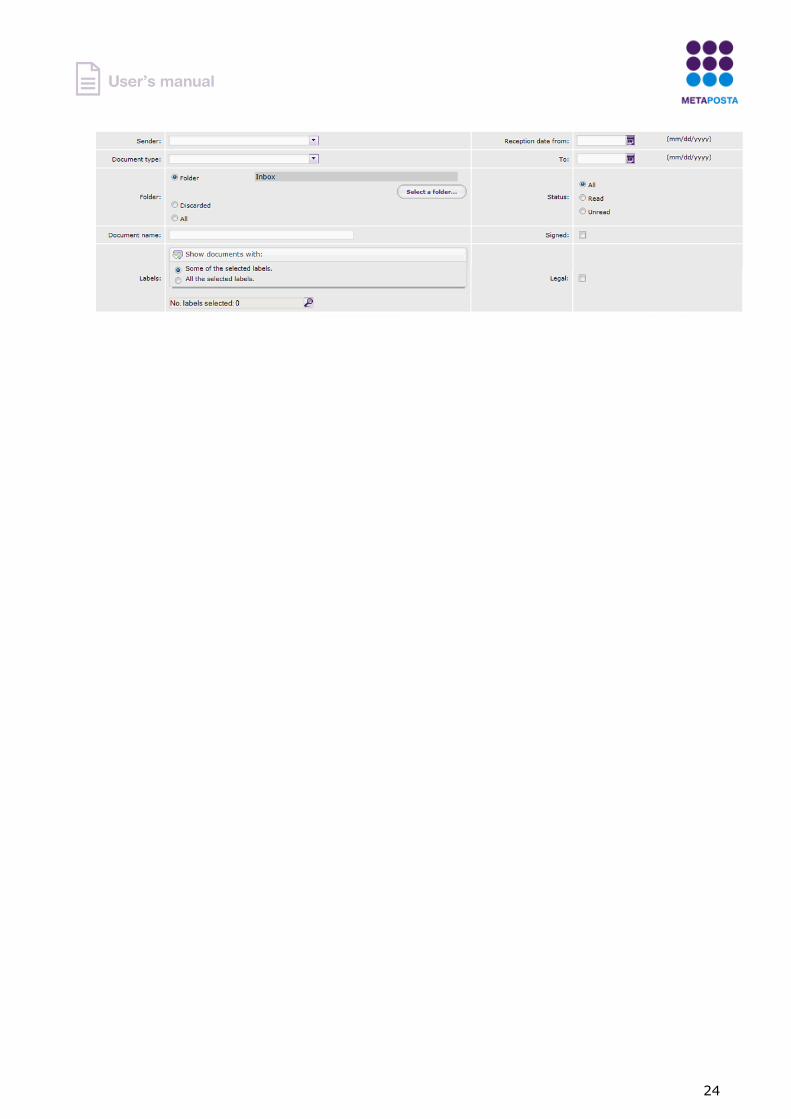
Search for documents
This allows you to search for documents according to the criteria indicated in the following
screen:
24
25
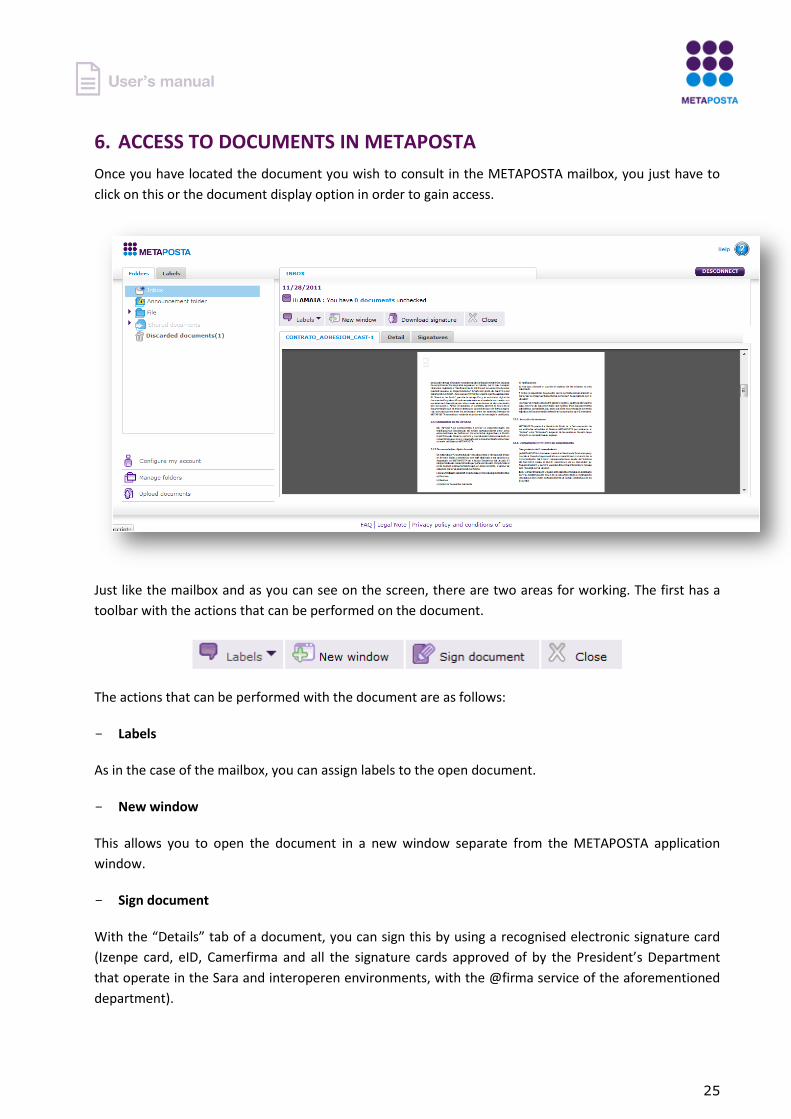
6. ACCESS TO DOCUMENTS IN METAPOSTA
Once you have located the document you wish to consult in the METAPOSTA mailbox, you just have to
click on this or the document display option in order to gain access.
Just like the mailbox and as you can see on the screen, there are two areas for working. The first has a
toolbar with the actions that can be performed on the document.
The actions that can be performed with the document are as follows:
Labels
As in the case of the mailbox, you can assign labels to the open document.
New window
This allows you to open the document in a new window separate from the METAPOSTA application
window.
Sign document
With the “Details” tab of a document, you can sign this by using a recognised electronic signature card
(Izenpe card, eID, Camerfirma and all the signature cards approved of by the President’s Department
that operate in the Sara and interoperen environments, with the @firma service of the aforementioned
department).
26
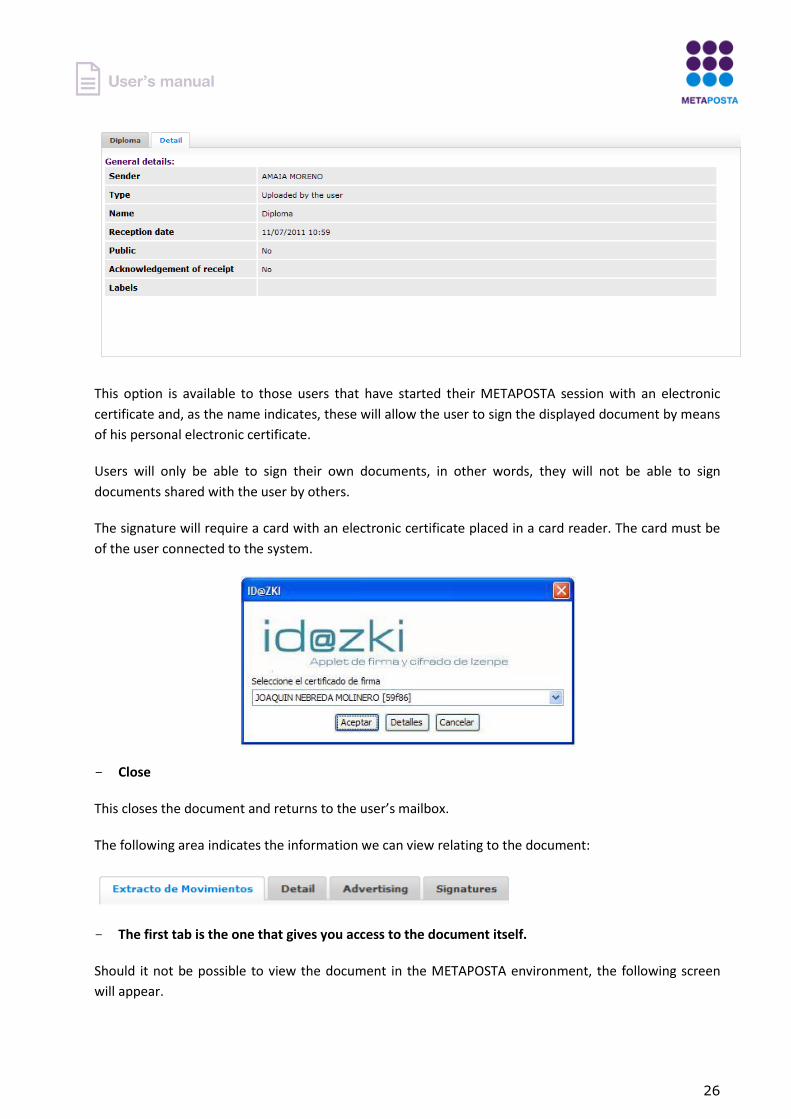
This option is available to those users that have started their METAPOSTA session with an electronic
certificate and, as the name indicates, these will allow the user to sign the displayed document by means
of his personal electronic certificate.
Users will only be able to sign their own documents, in other words, they will not be able to sign
documents shared with the user by others.
The signature will require a card with an electronic certificate placed in a card reader. The card must be
of the user connected to the system.
Close
This closes the document and returns to the user’s mailbox.
The following area indicates the information we can view relating to the document:
The first tab is the one that gives you access to the document itself.
Should it not be possible to view the document in the METAPOSTA environment, the following screen
will appear.
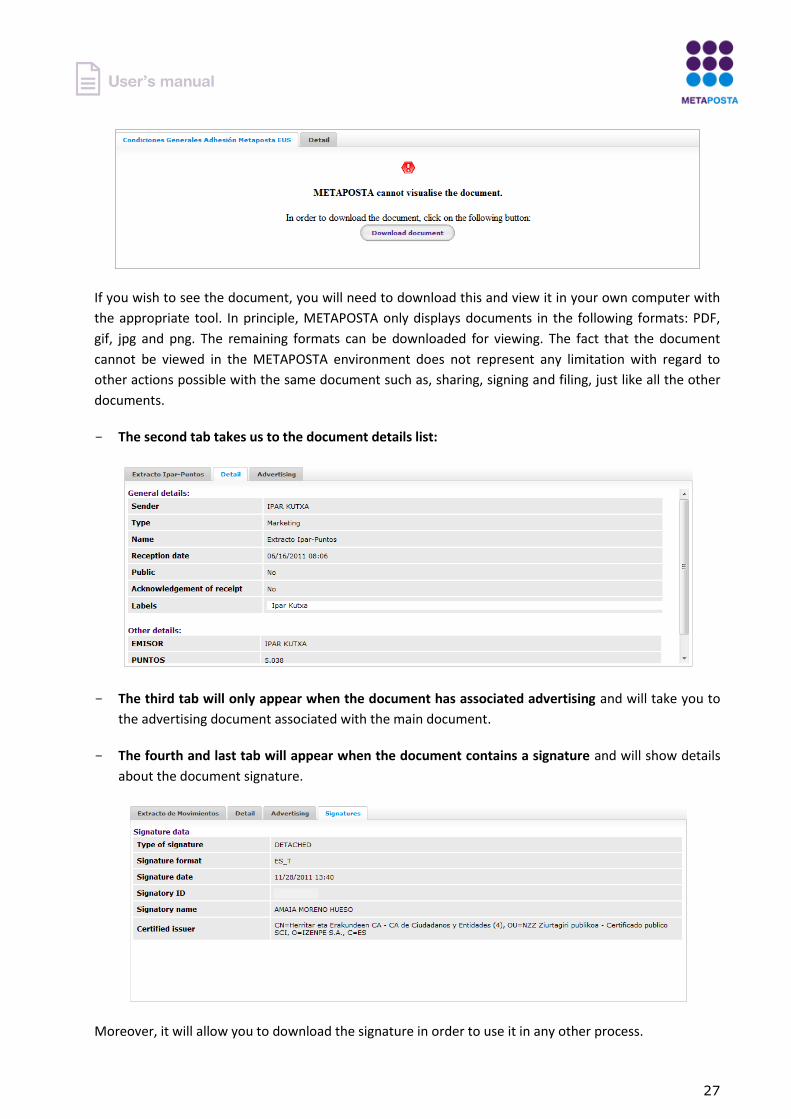
27
If you wish to see the document, you will need to download this and view it in your own computer with
the appropriate tool. In principle, METAPOSTA only displays documents in the following formats: PDF,
gif, jpg and png. The remaining formats can be downloaded for viewing. The fact that the document
cannot be viewed in the METAPOSTA environment does not represent any limitation with regard to
other actions possible with the same document such as, sharing, signing and filing, just like all the other
documents.
The second tab takes us to the document details list:
The third tab will only appear when the document has associated advertising and will take you to
the advertising document associated with the main document.
The fourth and last tab will appear when the document contains a signature and will show details
about the document signature.
Moreover, it will allow you to download the signature in order to use it in any other process.

28
7. METAPOSTA SYSTEM HELP
7.1. Training in METAPOSTA
The network of KZgunea centres collaborates with METAPOSTA in the free training of those persons who
wish to know more about the features of the system. It also offers an in-person METAPOSTA registration
service that obviates the need for a Digital Certificate.
In-person training will be offered in the form of beginners courses and advanced courses, incorporated
within the usual training modules of KZgunea.
These are 2-hour intensive courses that allow users to get to know the METAPOSTA system quickly.
The aims of the courses are as follows:
- Get a general idea of METAPOSTA and learn how to use the system correctly.
- Understand the sender-user logic and flow of the METAPOSTA system.
- Know about the technical and administrative requirements needed in order to be able to use the
METAPOSTA system.
- Learn about those critical aspects of a legal, technical or practical nature to be taken into
consideration in order to use the METAPOSTA system successfully.
- Get to know good practices in the organisation of personal information in METAPOSTA.
The list of KZgunea centres that will give the courses and their timetables can be consulted in the
following ways:
www.kzgunea.net
945 016 100
Email: [email protected]
7.2. User Service Centre
If you have any comment, doubt or suggestion to make, you can contact us in the following ways:
- METAPOSTA support line: 902 540 540
- Email: [email protected]
- Corporate blog: blog.metaposta.com
- Social networks: twitter.com/metaposta - facebook.com/metaposta


![CAMERFIRMA FOR LEGAL PERSONS€¦ · Código [PC-EIDAS-LP] Versión: 1.0.1 Elaborado por: AC Camerfirma SA Idioma: Castellano Descripción: Define los criterios básicos a seguir](https://static.documents.pub/doc/80x56/5f6695ef0c114428271c1b0d/camerfirma-for-legal-persons-cdigo-pc-eidas-lp-versin-101-elaborado-por.jpg)


