10 ft x 20 ft / 3 m x 6 m STEEL FRAME CAR CANOPY Instruction Manual ITM./ART.496840 WARNING: Keep all flame and heat sources away from this canopy fabric. This canopy is meant for vehicle / boat storage and should bot be used for public gatherings. Please check with your local regulations prior to purchasing this item. Some municipalities have restrictions and requirements. This canopy should not be used during heavy wind, ice, or snow conditions. The accumulation of snow and ice on canopy roof may pose a safety concern. Under severe weather conditions, disassemble your canopy and store indoors. It is strongly recommended that the canopy remain secure to the ground at all times via the base plates and nylon straps supplied. Avoid placing the unit on soft ground and ground that is prone to flooding. For parts or customer service, please call 1-800-867-9018 or email: service @ zhengteusa.com Monday - Friday, 8:30 am - 4:30 pm Pacific Time VIEW ASSEMBLY VIDEO AND INSTRUCTION MANUAL AT www.zhengteusa.com Before assembly, read these instructions carefully. Assemble the canopy in the location where you intend to use it. 2 or more people are recommended for assembly. MADE IN CHINA 1
Transcript
10 ft x 20 ft / 3 m x 6 m STEEL FRAME CAR CANOPY
Instruction Manual ITM./ART.496840
WARNING: Keep all flame and heat sources away from this canopy fabric.
This canopy is meant for vehicle / boat storage and should bot be used for public
gatherings.
Please check with your local regulations prior to purchasing this item.
Some municipalities have restrictions and requirements.
This canopy should not be used during heavy wind, ice, or snow conditions.
The accumulation of snow and ice on canopy roof may pose a safety concern.
Under severe weather conditions, disassemble your canopy and store indoors.
It is strongly recommended that the canopy remain secure to the ground at all
times via the base plates and nylon straps supplied. Avoid placing the unit on
soft ground and ground that is prone to flooding.
For parts or customer service, please call 1-800-867-9018
or email: service @ zhengteusa.com
Monday - Friday, 8:30 am - 4:30 pm Pacific Time
VIEW ASSEMBLY VIDEO AND INSTRUCTION MANUAL AT www.zhengteusa.com
Before assembly, read these instructions carefully.
Assemble the canopy in the location where you intend to use it.
2 or more people are recommended for assembly.
MADE IN CHINA
1
PARTS LIST
PART DESCRIPTION ILLUSTRATION QUANTITY
A Incline Bar
8
B Horizontal Bar
9
C Post
6
C1 Post 1
2
D 3-Way Corner
6
E 4-Way Corner
6
F Awning Arm
2
G Awning Front Girder
1
H Bolt (M6X16mm)
4
I Bolt (M6X30mm)
2
J Pin
2
K Base Plate
8
L Bolt & Nut
8
M Canopy Roof
1
N Side Panel with Door
1
O Side Panel without Door
1
P End Panel
1
Q End Panel
1
R Elastic Ball Strap
50
S Ground Stake
12
T Nylon Stap
4
U Allen Wrench
1
V Expansion Bolt
8
NOTE: INCLINE BARS (A) ARE PACKED INSIDE POSTS (C) AND (C1).
2
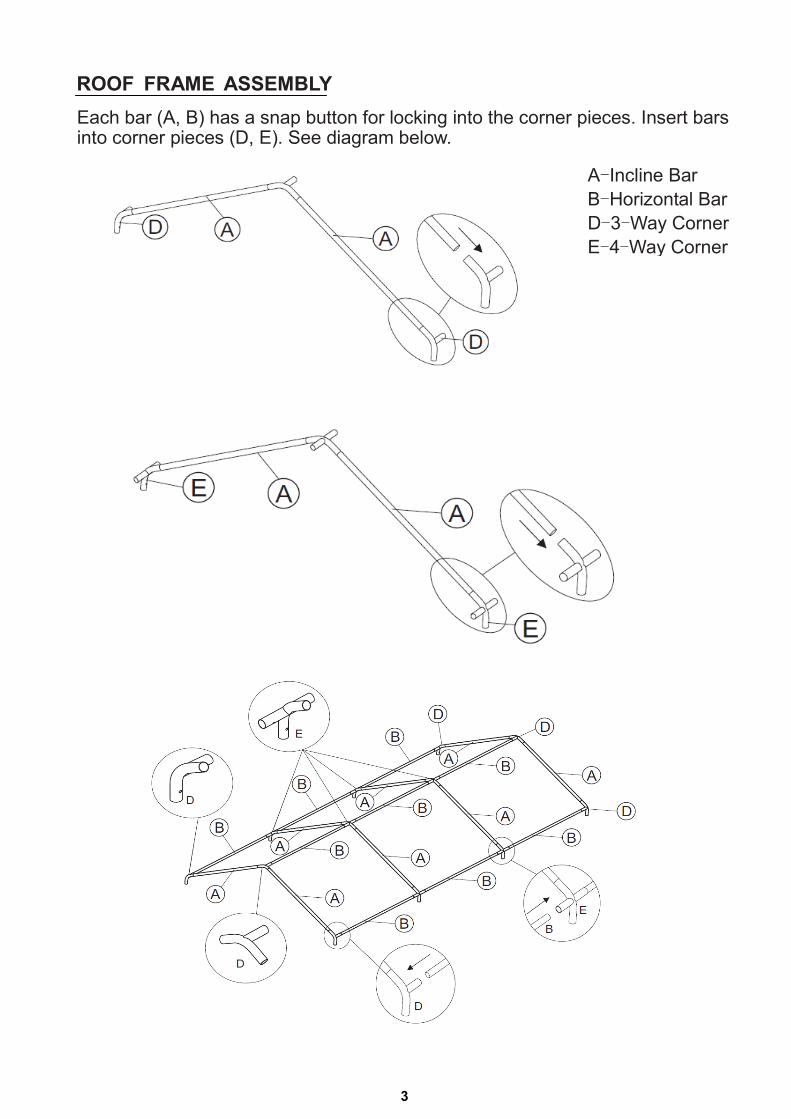
ROOF FRAME ASSEMBLY
Each bar (A, B) has a snap button for locking into the corner pieces. Insert bars into corner pieces (D, E). See diagram below.
A-Incline Bar
B-Horizontal Bar
D-3-Way Corner
E-4-Way Corner
3
POST ASSEMBLY - Part 1 & Canopy Roof Assembly
Insert posts (C, C1) into the corners on one side of the assembled roof.
Spread canopy roof (M) over assembled roof frame.
POST ASSEMBLY - Part 2 Insert the remaining posts (C) into the corners on the other side of the roof
as show in below diagram.
There are hooks attached to the four corners of the canopy roof (M). Insert these
hooks into the pre-drilled holes on the four corner posts (C). See diagram below.
It may be easier to attach the
end panels (P, Q) at this point.
See “SIDE AND END PANEL
ASSEMBLY” on page 5.
4
Insert base plates (K) on to the bottom of the posts (C) and secure using
the nuts and bolts (L).
SIDE AND END PANEL ASSEMBLY
Attach the side panel with door (N) using the elastic ball straps (R). Attention:
side panel with door (N) must be attached to the side with posts (C1). Insert the
elastic strap through the grommet in the roof (M), then behind the frame,
through the grommet in the roof (M), then behind the frame, through the
grommet in the side panel ( N ) and then stretch the elastic band over the ball.
See diagram below.
Secure straps at each corner post on the inside of canopy to the posts (C).
Repeat above assembly for the remaining side panel (O) and end panels (P/Q).
5
BASE PLATE ASSEMBLY
FINAL ASSEMBLY
2. Secure adjacent panels with hook and
loop fasteners on edge of each panel.
3. Secure panels to the posts with
the 3 hook and loop fasteners
attached to the side panels.
4. Insert the hooks into the pre-drilled
holes at the bottom of each post (C, C1).
5. Insert the elastic ball strap (R) through the grommet in the end panel, through the
grommets in the roof canopy corner, then through the side pabel grommet. Stretch
the elastic band over the ball.
1. Remove hooks from the corner posts.
6
ANCHORING TO GROUND INSTRUCTIONS
(There are 2 ways to attach this canopy to the ground)
AWNING ASSEMBLY
Attach awning arms (F) to the posts (C1) using bolts (H). See diagram below. Connect
fabric fasteners on the roof (M) with the fabric fasteners on the side panels (N, O).
Option 1: Assemble on grass or dirt.
Secure the canopy to the ground by
inserting 8 ground stakes (S) through each
base plate (K).
Then, tie the nylon strap (T) to each corner
of the canopy roof (M) and secure to the 4
remaining ground stakes (S).
Option 2: Assemble on concrete. A drill,
1/2 inch drill bit and adjustable wrench
(not included) are needed for this
option. Secure the canopy to the
concrete surface using the 8 expansion
bolt (V). Mark the location on each base
plate (K) where you will need to drill into
the concrete. Move the base plate then
drill a hole the same length as the
expansion bolt (V).
Replace the base plate (K) and secure
using expansion bolts (V).
7
Step 1
Step 2
Step 3
Step 4
Step 5
Step 6
Step 7
8
Product Limited 1 Year Warranty
If your product does not work properly because of a defect in materials or
workmanship, Zhengte U.S.A. LLC will, for 1 year from the date of purchase, as
its option either (a) repair our product with new or refurbished parts, or (b)
replace it with a new product. The decision to repair or replace will be made by
Zhengte U.S.A. LLC. ZHENGTE U.S.A. LLC RESERVES THE RIGHT TO
MAKE SUBSTITUTIONS TO WARRANTY CLAIMS IF PARTS ARE
UNAVAILABLE OR OBSOLETE.
If repair is needed during the limited warranty period, the purchaser will be
required to furnish a sales receipt as proof of purchase indicating date of
purchase, amount paid, and place of purchase. Product will not be covered
under warranty due to damages resulting from misuse, excessive or a busive