Page 1
10 Reasons Why You Should Be Shooting RAW
You’ve probably heard over and over that you should be shooting in RAW. But do you know
why it’s so important? And what it really means for your images? Let’s sort it out!
First off, what is RAW? RAW is a file format that captures all image data recorded by the
sensor when you take a photo. When shooting in a format like JPEG image information is
compressed and lost. Because no information is compressed with RAW you’re able to
produce higher quality images, as well as correct problem images that would be
unrecoverable if shot in the JPEG format.
And happily many cameras these days shoot RAW, including point and shoots! So even if
you’re using a little camera, you might still be able to take advantage of the RAW file format
(just check your camera manual to see!).
So, the benefits. Let’s list ‘em out.
Page 2
1. Get the Highest Level of Quality
This is one of the biggest benefits. When you shoot in RAW you record all of the data from
the sensor. This gives the highest quality files. And when it comes to your awesome images,
you want high quality.
Look at it this way: all cameras technically shoot RAW. Yes, it’s true.
The difference when you shoot in JPEG format is that the camera does its own processing to
convert the RAW information into a JPEG.
However, your camera is nowhere near as smart as your brain, nor is it as powerful as your
computer. When you shoot RAW, you’re able to do that processing yourself. You can make
the decisions on how the image should look, and produce way better results.
2. Record Greater Levels of Brightness
Levels of brightness are the number of steps from black to white in an image. The more you
have, the smoother the transitions of tones. Smooth is good.
JPEG records 256 levels of brightness, and RAW records between 4,096 to 16,384
levels! This is described with the term “bit”. JPEG captures in 8bit, and RAW is either 12bit
or 14bit. That’s what that bit business means!
The effect this has on your images is huge. Those additional steps of brightness let you make
more adjustments (exposure, blacks, fill light, recovery, contrast, brightness) to your image
without a significant reduction of quality, because there’s more levels to work with!
It’s also easier to avoid or correct posterization in your images when you shoot in RAW.
Posterization is the banding that you often see in bright skies, which really doesn’t look
good in prints!
3. Easily Correct Dramatically Over/Under Exposed Images
Obviously you want to get the best exposure in camera, but sometimes things move fast
(especially with weddings!) and you wind up with a dramatically over or under
exposed image.
With RAW you have additional information in the file, so it’s much easier to correct the
image without a drastic reduction in quality. You can also recover more blown highlights
and clipped shadows. Good stuff.
Page 3
4. Easily Adjust White Balance
When you shoot JPEG the white balance is applied to the image. You can’t just easily choose
another option. With RAW the white balance is still recorded, but because you have way
more data, it’s easy to adjust.
Great white balance and colour are essential to an awesome image, and shooting RAW lets
you make the adjustments easier and faster, with better results.
5. Get Better Detail
When you shoot RAW you have access to sharpening and noise algorithms in a program like
Lightroom that are way more powerful than those found in your camera.
Plus, these sharpening and noise algorithms are always improving, so in the future you’ll be
able to re-visit your RAW files and take advantage of these improvements. And jetpacks.
6. Enjoy Non-Destructive Editing
When you make adjustments to a RAW file, you’re not actually doing anything to the
original data. What you’re doing is creating a set of instructions for how
the JPEG or TIFF (another file format) version should be saved.
The awesomeness of this is that you never ever have to worry about ruining an image,
accidentally saving over, or being unable to go back and make changes. You can always reset
your adjustments, and start over again.
JPEG files lose quality every time you open them, make adjustments, and save again. True
story. It’s what is known as a “lossy” file format. So if you’re making edits to JPEGs you
always have to be duplicating the image and saving out a new version if you don’t want to
lose file quality. Hassle.
7. Get Better Prints
Because of the finer gradation of tones and colours you’ll get better prints from RAW files.
Even though more and more people are shooting digital, great prints are as important as
ever (maybe even more so, due to their relative rarity!)
You’ll also get less banding, which is really yucky on a print.
8. Select Colour Space on Output
Colour space is a bit of a complex topic, but here’s a quick tip. With RAW you can choose
from any colour space when you are exporting it out, so you can adjust depending on
the situation!
Page 4
Is the image going on to the web? Then output in the sRGB colour space to ensure
maximum compatibility among web browsers.
Are the files heading to a client? Save it in the common Adobe RGB (1998) colour space.
Do you want the widest colour space possible? Use ProPhoto RGB.
Basically there are different colour spaces that work best for different situations, and when
you shoot RAW you can export a single image in multiple spaces! Sweet!
9. Have an Efficient Workflow
It’s easier to work through large batches of images when you’re using a workflow centric
program like Lightroom or Aperture. They’re designed to easily process groups
of RAW images. Photoshop is not meant for that kind of thing, it’s built to handle one image
at a time.
In order to take full advantage of all the benefits of Lightroom and Aperture you should be
shooting RAW!
10. It’s the Pro Option
Professionals should be providing their clients with the highest quality possible. Issues like
banding and blown highlights are big deals when you’re offering your clients printed
products. Achieving proper colour balance and choosing the right colour space for the
situation are critical as well.
By shooting RAW you take control, and are able to manage these problems to create the
best results possible.
Now that some point and shoots are capable of shooting RAW, hobbyists and amateurs can
also take advantage of this pro level option, and get better files and prints! Good deal.
DOWNSIDES AND SOLUTIONS
Now, there are always pros and cons to every option, and RAW does have a few downsides.
We’ll chat about those, as well as some potential solutions!
NEED TO BE PROCESSED
A common argument against shooting RAW is that because the files need to be processed, it
takes more time to shoot RAW than JPEG. If you don’t do any processing to your JPEGs that
might be true.
However, most photographers do some level of processing to their JPEGs so already the
argument is getting flimsy.
Page 5
Then, when you add in the fact that adjustments like white balancing, and recovering
highlights and shadows are way faster with RAW files, and it actually begins to looks like
processing RAW can be faster than JPEG!!
Then, with RAW, you can easily export to JPEG, as well as convert to various sizes (like web
res) at the same time. If you really wanted you could even shoot RAW + JPEG
simultaneously!
RAW gives you way more options, and can be processed just as fast, if not faster, than JPEG.
TAKES UP MORE SPACE
Since RAW files have more uncompressed information they can be 2-3 times larger
than JPEG files. This is definitely a concern for many shooters, especially those who create a
lot of images.
But over the past few years, the cost of hard drives has really dropped, and they’re
incredibly affordable!
Let’s consider a 1TB hard drive.
A 1TB drive costs about $55
If a large JPEG file is about 8MB, you’ll fit 125,000 images on the drive,
at $0.00044/image
If a RAW file is about 30MB, you’ll fit 33,333 images on the drive, at $0.00165/image
Obviously you can store fewer RAW files, but the number of images that you can cheaply
store is so large for both formats that it’s not really an issue! It’s also probably a good idea
to not place so many images on a single hard drive. Don’t put all your photographic eggs in
one basket!
Memory cards are the same deal. They’re constantly dropping in price. Remember when
a 2GB card was over $200?? Nowadays you can hardly even buy one that small, and 4GB is
as cheap as $15. Madness!
Yes, RAW files are bigger and take up more space. But that’s because they’re of higher
quality. Go with high quality for the extra $0.00121/image.
SLOWS THE CAMERA DOWN
RAW files are larger than JPEGs, so they’ll fill up the buffer of your camera faster. The
camera will still shoot the same frames per second, regardless of whether it is RAW or JPEG,
but you may have to wait for the camera to write to the memory card if the buffer fills up.
If shooting fast sequences if critical for you, and you want to shoot RAW, you can purchase
faster memory cards, or a more expensive camera with a larger buffer.
Page 6
IN A PROPRIETARY FORMAT
RAW files are often recorded in a proprietary format, which means that the camera
manufacturers haven’t officially disclosed how the raw data can be converted. Companies
like Adobe either need to license software to decode the RAW files or reverse engineer how
the files should be converted. (For Canon cameras the RAW format looks like .CR2 and for
Nikon it’s .NEF).
The problem here is that you can’t be certain that in 5, 10 or 20 years you’ll be able to easily
open that RAW file if you don’t have the proper software to decode it!
A new open source RAW format has been developed in order to overcome this obstacle. It
was developed by Adobe and is known as DNG (Digital Negative). Using a program like
Lightroom, you can convert your proprietary RAW files into the open source DNG format.
It’s an extra step, but it will ensure your files are readable far into the future!
Already the Leica M9 shoots in the DNG format, so look for more camera manufacturers to
support this open source format in the future!
Wrap It UP!
Hopefully this looks at RAW and its benefits have cleared things up a bit! Suggestions
that RAW takes too long, or is too much work, don’t really hold water anymore.
These days, it’s super-duper easy (and fast!) to process RAW files, and you’ll be able to get
the absolute best quality out of those images that you put so much time, effort and
love into!
Page 7
Should you be shooting RAW?
You can find many articles online discussing the benefits of shooting in RAW and probably
an equal number full of counter arguments stating that it is possible to obtain equally good
results shooting in JPEG. Whilst that is definitely true, I want to discuss the reasons that
pushed me to exclusively use RAW in the hope that it can persuade others to do the same.
I liken RAW processing to taking the camera off ‘auto’ and shooting in ‘manual’ mode.
When people are starting out in digital photography, it can seem like another area full of
technical jargon that forms a barrier preventing its uptake. However, once you have an
small understanding of the processes involved and how different settings can impact your
results, you will find that letting your camera do the processing can be the limiting factor in
achieving your photographic vision.
What is RAW?
A RAW file is an uncompressed image file that records the data from the sensor ‘as is’, with
minimal processing. Depending on your camera, this file will most likely contain either 12-
bit or 14-bit data. When shooting in JPEG, the camera will take the RAW file, process it with
a number of generic actions (typically contrast/saturation adjustments, correcting for white
balance and sharpening) before compressing the image down to an 8-bit JPEG file.
That difference in ‘bit depth’ is the key here. The 12-bit image will contain 2^12=4096 tones
per channel. Given that there are three channels per pixel (red, green and blue), that
equates to 4096x4096x4096= 69 billion possible tones per pixel. If we compare that to the
other bit depths, you will see the difference:
Bit depth Tones per channel Possible tones per pixel
8-bit 2^8 = 256 16.8 million
12-bit 2^12 = 4096 68.7 billion
14-bit 2^14 =16384 4.4 trillion
Now those numbers are almost too large to comprehend, however it is quite simple to
consider in context. When you take a JPEG file from your camera into Photoshop to
process, there are only 256 possible tones to define the colour for each red, green or blue
channel, which means that when you start apply changes to contrast or brightness, there
are a very limited number of possible tones for each pixel, which can result in obvious image
degradation if pushed too far. With a RAW image, the number of possible tones is that
much greater that more significant changes to can be made without any impact on the final
image quality.
Page 8
This doesn’t come without a cost though. Due to the increased bit depth of RAW files, they
are anywhere from 2-6 times larger than the corresponding JPEG when recorded in camera.
This will make your vast memory card seem very limited. Additionally, where as a JPEG is
typically printer-ready straight out of the camera, a RAW file will need to be manually
processed in your digital darkroom. So, to answer the obvious question of ‘is it worth it?’,
let’s consider the benefits…
The benefits of RAW
As mentioned above, when shooting JPEG, the camera processes the image internally,
before compressing it to a lower bit depth. The processing applied by the camera is generic,
and uniform across the entire image. In contrast, when you capture RAW images, you have
full control over how much processing is applied to an image, and where in that image you
apply it.
Given the increased bit depth of the RAW files, any image you capture is much more
forgiving than the corresponding JPEG would be. For example, if you didn’t nail your
exposure, and you over-exposed the sky of a landscape photograph, leaving it nearly white,
you will be able to recover much more tonal data in the RAW file and potentially save what,
otherwise, may be an image destined for the recycle bin. Similarly for shadow data, much
more information is retained meaning under-exposed regions of an image can be recovered
to show detail that would otherwise have been lost.
Page 9
On the left is the image presented straight out of camera. Exposing to contain the bright sky
caused the trees to be under-exposed, and appear and a dense block of dark colour. The
image on the right shows the same image processed to boost the shadows to reveal detail
that may otherwise have been lost
Similarly, one image can contain enough tonal detail to create an HDR-style image from
one file. The exposure of the image can be increased / decreased during post processing
to give 3 images, as if bracketed, and can be combined to give that effect of increased
dynamic range, but all from just one image.
When shooting in RAW, you no longer need to set your white balance in camera. The
increased bit depth of RAW files means that the white balance can be defined, by precise
colour temperature (in Kelvin), during post processing rather than by a limited number of
defined pre-sets in camera before the shutter is pressed. Due to the increased bit depth,
significant white balance shifts do not have a negative impact on the final image quality.
No longer do you fire off a few frames before remembering that you left the white
balance on ‘incandescent’ even though you are now outdoors.
Page 10
The top image shows Bruges, captured at night, straight out of camera. The white balance of
the bottom image has been processed to reduce the colour temperature in order to give a
more realistic representation for the colour of the stone buildings, without any impact on
the image quality.
Sharpening can be applied as much as you want and even where you want, without over-
sharpening a pre-sharpened JPEG image. This can be used to emphasise details in one
section of an image, or just generally give you control over the final image output.
Page 11
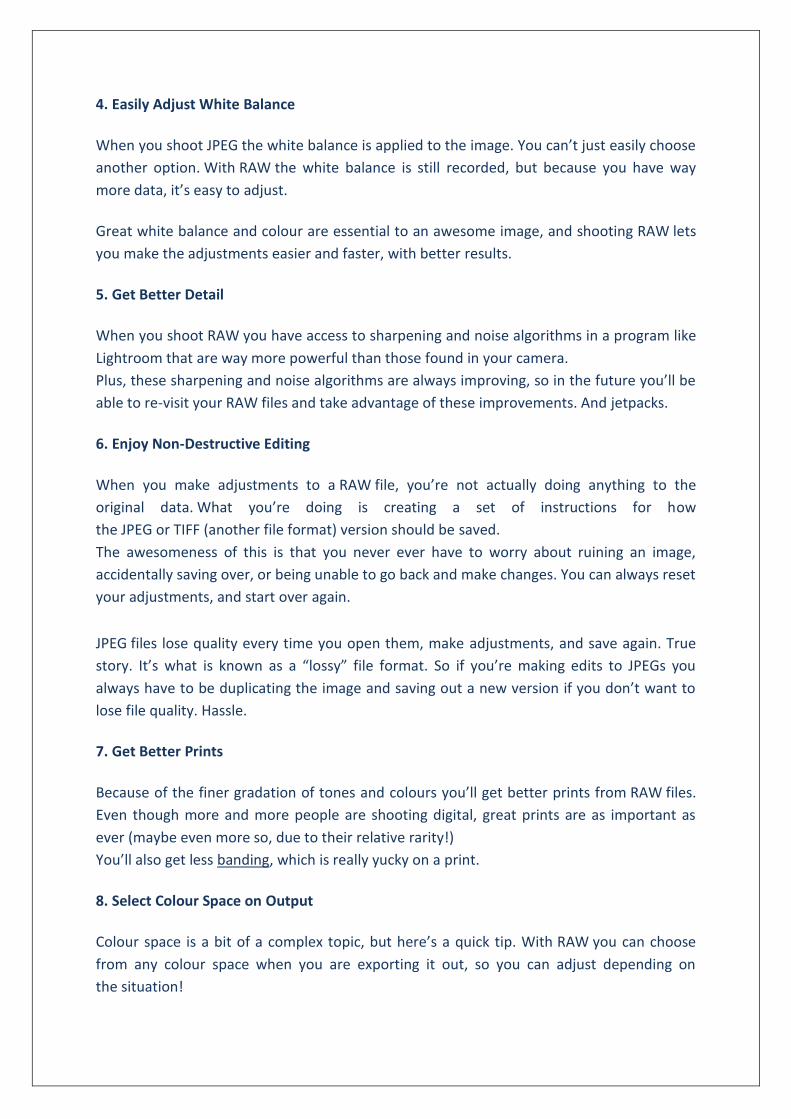
This image on the left shows a cheetah that has undergone some sharpening to increase
detail. The image on the right is the mask applied to the sharpening effect. Imagine that
black and white image superimposed over the top of the cheetah; the area of white
represents the portion of the image to which the sharpening effect has been applied and
the area of black represents the portion of the image to which the sharpening effect is not
applied. Therefore, in this instance, the sharpening has been applied only to the eyes/nose
of the big cat, to further emphasise the sharp focus in this area, and increase the impact of
the close portrait.
The added bonus
As if the above points weren’t enough, what has to be one of my favourite reasons for shooting in RAW is that all image editing is non-destructive. Unlike a JPEG file, where any changes made to the image are permanent, all changes made to a RAW image are stored in a metadata file associated with the RAW file, leaving the original file untouched. This means you can never irreparably ruin an image by saving some mistaken changes and also you can go back to an image a few weeks, months or years later and reprocess it, from the original RAW, as your processing skills improve.
Now, I would be lying if I said there was not a learning curve associated with RAW processing. You will need dedicated RAW processing software to manipulate your images, but typically cameras that support shooting in RAW should ship with the manufacturers own software for doing so. There are also a large number of alternative free programs out there, as well as software packages from well know image editing giants, such as Adobe. With a little bit of research, you will see how easy it is to squeeze the most out of your images, and you will soon wonder why you weren’t shooting in RAW sooner.
Given that most cameras should give the option of shooting in ‘RAW+JPEG’, where the
camera records both the RAW file and processed JPEG file to the memory card, you haven’t
got an excuse to not give it a go the next time you are out with your camera.
Page 12
Raw image format
A camera raw image file contains minimally processed data from the image sensor of either
a digital camera, image scanner, or motion picture film scanner. Raw files are named so
because they are not yet processed and therefore are not ready to be printed or edited with
a bitmap graphics editor. Normally, the image is processed by a raw converter in a wide-
gamut internal colorspace where precise adjustments can be made before conversion to a
"positive" file format such as TIFF or JPEG for storage, printing, or further manipulation,
which often encodes the image in a device-dependent colorspace. There are dozens if not
hundreds of raw formats in use by different models of digital equipment (like cameras or
film scanners).[1]
Raw image files are sometimes called digital negatives, as they fulfill the same role
as negatives in film photography: that is, the negative is not directly usable as an image, but
has all of the information needed to create an image. Likewise, the process of converting a
raw image file into a viewable format is sometimes called developing a raw image, by
analogy with the film development process used to convert photographic film into viewable
prints. The selection of the final choice of image rendering is part of the process of white
balancing and color grading.
Like a photographic negative, a raw digital image may have a wider dynamic range or
color gamut than the eventual final image format, and it preserves most of the information
of the captured image. The purpose of raw image formats is to save, with minimum loss of
information, data obtained from the sensor, and the conditions surrounding the capturing
of the image (the metadata).
Rationale
Raw image formats are intended to capture as closely as possible (i.e. at the best of the
specific sensor's performance) the radiometric characteristics of the scene, that is, physical
information about the light intensity and color of the scene.
Most raw image file formats store information sensed according to the geometry of the
sensor's individual photo-receptive elements (sometimes called pixels) rather than points in
the expected final image: sensors with hexagonal element displacement, for example,
record information for each of their hexagonally-displaced cells, which a decoding software
will eventually transform into the rectangular geometry during "digital developing".
File contents
Raw files contain, by necessity, the information required to produce a viewable image from
the camera's sensor data. The structure of raw files, including the ISO standard raw image
format ISO 12234-2, TIFF/EP, often follows a common pattern, that is:
A short file header which typically contains an indicator of the byte-ordering of the file,
a file identifier and an offset into the main file data
Page 13
Camera sensor metadata which is required to interpret the sensor image data, including
the size of the sensor, the attributes of the CFA and its color profile
Image metadata which is required for inclusion in any CMS environment or database.
These include the exposure settings, camera/scanner/lens model, date (and, optionally,
place) of shoot/scan, authoring information and other. Some raw files contain a
standardized metadata section with data in Exif format.
An image thumbnail
Optionally a reduced-size image in JPEG format, which can be used for a quick preview
In the case of motion picture film scans, either the timecode, keycode or frame number
in the file sequence which represents the frame sequence in a scanned reel. This item
allows the file to be ordered in a frame sequence(without relying on its filename).
The sensor image data
Many raw file formats, including IIQ (Phase One), 3FR (Hasselblad), DCR, K25, KDC (Kodak),
CR2 (Canon), ERF (Epson), MEF (Mamiya), MOS (Leaf), NEF (Nikon), ORF (Olympus), PEF
(Pentax), RW2 (Panasonic) and ARW, SRF, SR2 (Sony), are based on the TIFF file
format.[2] These files may deviate from the TIFF standard in a number of ways, including the
use of a non-standard file header, the inclusion of additional image tags and the encryption
of some of the tagged data.
Panasonic's raw converter corrects geometric distortion and chromatic aberration on such
cameras as the LX3,[3][4][5] with necessary correction information presumably included in the
raw.[citation needed] Phase One's raw converter Capture One also offers corrections for
geometrical distortion, chromatic aberration, purple fringing and keystone correction
emulating the shift capability of tilt-shift in software and specially designed hardware, on
most raw files from over 100 different cameras.[6][7] The same holds for Canon's DPP
application, at least for all more expensive cameras like all SLRs and the G<n> series of
compact cameras.
DNG, the Adobe digital negative format, is an extension of the TIFF 6.0 format and is
compatible with TIFF/EP, and uses various open formats and/or standards, including Exif
metadata, XMP metadata, IPTC metadata, CIE XYZ coordinates, ICC profiles, and JPEG.[8]
Sensor image data
In digital photography, the raw file plays the role that photographic film plays in film
photography. Raw files thus contain the full resolution (typically 12- or 14-bit) data as read
out from each of the camera's image sensor pixels.
The camera's sensor is almost invariably overlaid with a color filter array, usually a Bayer
filter, consisting of a mosaic of a 2x2 matrix of red, green, blue and (second) green filters.
One variation on the Bayer filter is the RGBE filter of the Sony Cyber-shotDSC-F828, which
exchanged the green in the RG rows with "emerald"[9] (a blue-green[10] or cyan[11] color).
Other sensors, such as the Foveon X3 sensor, capture information directly in RGB form
Page 14
(using three pixel sensors in each location). These RGB raw data still need to be processed to
make an image file, because the raw RGB values correspond to the responses of the
sensors, not to a standard color space like sRGB. These data do not need to be demosaiced,
however.
Flatbed and film scanner sensors are typically straight narrow RGB or RGBI (where "I" stands
for the additional infra-red channel for automatic dust removal) strips that are swept across
an image. The HDRi raw data format is able to store the infrared raw data, which can be
used for infrared cleaning, as an additional 16-bit channel. The remainder of the discussion
about raw files applies to them as well. (Some scanners do not allow the host system access
to the raw data at all, as a speed compromise. The raw data are processed very rapidly
inside the scanner to select out the best part of the available dynamic range so only the
result is passed to the computer for permanent storage, reducing the amount of data
transferred and therefore the bandwidth requirement for any given speed of image
throughput.)
To obtain an image from a raw file, this mosaic of data must be converted into standard RGB
form. This is often referred to as "raw development".
When converting from the four-sensor 2x2 Bayer-matrix raw form into RGB pixels, the green
pair is used to control the luminance detail of the processed output pixel, while the red and
blue, which each have half as many samples, are used mostly for the more slowly-
varying chroma component of the image.
If raw format data is available, it can be used in high-dynamic-range imaging conversion, as
a simpler alternative to the multi-exposure HDI approach of capturing three separate
images, one underexposed, one correct and one overexposed, and "overlaying" one on top
of the other.
Benefits
Nearly all digital cameras can process the image from the sensor into a JPEG file using
settings for white balance, colour saturation, contrast, and sharpness that are either
selected automatically or entered by the photographer before taking the picture. Cameras
that produce raw files save these settings in the file, but defer the processing. This result in
an extra step for the photographer, so raw is normally only used when additional computer
processing is intended. However, raw has numerous advantages over JPEG such as:
Many more shades of color compared to JPEG files - raw files have 12 or 14 bits of
intensity information per channel (4096-16384 shades), compared to JPEG's gamma-
compressed 8 bits (256 shades).
Higher image quality. Because all the calculations (such as applying gamma
correction, demosaicing, white balance, brightness, contrast, etc...) used to generate
pixel values (in RGB format for most images) are performed in one step on the base
data, the resultant pixel values will be more accurate and exhibit less posterization.
Page 15
Bypassing of undesired steps in the camera's processing, including sharpening and noise
reduction
JPEG images are typically saved using a lossy compression format (though a lossless
JPEG compression is now available). Raw formats typically use lossless compression or
high quality lossy compression.
Finer control. Raw conversion software allows users to manipulate more parameters
(such as lightness, white balance, hue, saturation, etc...) and do so with greater
variability. For example, the white point can be set to any value, not just discrete preset
values like "daylight" or "incandescent". As well, the user can typically see a preview
while adjusting these parameters.
The colour space can be set to whatever is desired.
Different demosaicing algorithms can be used, not just the one coded into the camera.
The contents of raw files include more information, and potentially higher quality, than
the converted results, in which the rendering parameters are fixed, the colour gamut is
clipped, and there may be quantization and compression artifacts.
Large transformations of the data, such as increasing the exposure of a dramatically
under-exposed photo, result in fewer visible artifacts when done from raw data than
when done from already rendered image files. Raw data leave more scope for both
corrections and artistic manipulations, without resulting in images with visible flaws
such as posterization.
All the changes made on a raw image file are non-destructive; that is, only the metadata
that controls the rendering is changed to make different output versions, leaving the
original data unchanged.
To some extent, raw-format photography eliminates the need to use the
HDRI technique, allowing a much better control over the mapping of the scene intensity
range into the output tonal range, compared to the process of automatically mapping
to JPEG or other 8-bit representation.
Drawbacks
Camera raw file size is typically 2–6 times larger than JPEG file size.[12]While use of raw
formats avoids the compression artifacts inherent in JPEG, fewer images can fit on a
given memory card. However, the large sizes and low prices of modern memory cards
mitigate this. Burst mode shooting tends to be slower and shorter due to the larger file
size.
Most raw formats implement lossless data compression to reduce the size of the files
without affecting image quality. But some others use lossy data compression where
quantization and filtering is performed on the image data.[13][14] Several recent Nikon
Page 16
cameras let photographers choose between no compression, lossless compression or
lossy compression for their raw images.
The standard raw image format (ISO 12234-2, TIFF/EP) is not widely accepted. DNG, the
potential candidate for a new standard format, has not been adopted by many major
camera companies. (See "Standardization" section). Numerous different raw formats
are currently in use and new raw formats keep appearing, while others are
abandoned.[15]
Because of the lack of widespread adoption of a standard raw format, more specialized
software may be required to open raw files than for standardized formats like JPEG or
TIFF. Software developers have to frequently update their products to support the raw
formats of the latest cameras but open source implementations like dcraw make it
easier.
The time taken in the image workflow is an important factor when choosing between
raw and ready-to-use image formats. With modern photo editing software the
additional time needed to process raw images has been greatly reduced but it still
requires an extra step in workflow.
Software support
Cameras that support raw files typically come with proprietary software for conversion of
their raw image data into standard RGB images. Other processing and
conversion programs and plugins are available from vendors that have either licensed the
technology from the camera manufacturer or reverse-engineered the particular raw format
and provided their own processing algorithms.
Free and open source software
Darktable is a raw-workflow tool for Linux and other open Unix-like operating systems.
Features native 32-bit floating point processing and a plugin architecture.
dcraw is a program which reads most raw formats and can be made to run on operating
systems not supported by most commercial software (such as Unix). Libraw[16] is
an API library based on dcraw, offering a more convenient interface for reading and
converting raw files. HDR PhotoStudio and AZImage[17] are some of the commercial
applications that use Libraw. Jrawio is another API library, written in pure Java code and
compliant to the standard Java Image I/O API.
digiKam is an advanced digital photo management application for Linux, Windows, and Mac-
OSX that supports raw processing.
ExifTool supports the reading, writing and editing of metadata in raw image files. ExifTool
supports many different types of metadata including Exif, GPS,IPTC, XMP, JFIF, GeoTIFF, ICC
Profile, Photoshop IRB, FlashPix, AFCP and ID3, as well as the maker notes of many digital
cameras.
Page 17
ImageMagick, a popular software suite for image manipulation and conversion, reads many
different raw file formats.[18] ImageMagick is available for Linux/Unix, Mac OS, Windows,
and other platforms.
Photivo is a raw processor with a 16-bit processing pipeline. It runs on Linux, Mac OSX and
Windows and integrates tightly with GIMP.
Rawstudio is a raw format developer.
RawTherapee is a raw developer supporting Linux, OS X and Windows operating systems. It
features a native 32-bit floating point pipeline.
UFRaw is a frontend which uses dcraw as a backend. It can be used as aGIMP plugin and is
available for most operating systems.
In September 2013, Google+ introduced RAW to JPEG conversion software for over 70
cameras (as initial) from Canon, Nikon, Olympus, Panasonic and Sony. The software will
automatically converts RAW file to JPEG for viewing, but still retain the original RAW file.
Google+ claimed that the conversion file is better than the other softwares existing.[19]
Proprietary software
ACDSee Pro is photo management and editing software that supports the raw formats of 21
camera manufacturers.[20]
Picasa is a free editor and organizer that supports raw files.
IrfanView is a freeware/shareware basic editor with support for raw files.
Adobe Photoshop and Adobe Photoshop Lightroom support raw formats (as of version CS2).
Capture One supports a range of raw image files from both DSLRs (Canon, Nikon, Panasonic,
Sony etc.) and medium-format cameras (Phase One, Leaf, Mamiya etc.).[21]
LightZone from Light Craft is a photo editing program provided the ability to edit many raw
formats natively. Most tools are raw converters, but LightZone allowed a user to edit a raw
file as if it were TIFF or JPEG. The project was discontinued in September 2011.[22]
Paint Shop Pro contains raw support, although as in the case of most editors updates to the
program may be necessary to attain compatibility with newer raw formats as they are
released.
Microsoft supplies free software for Windows XP to integrate viewing and printing into the
system's other photo tools; however, this software was last updated in 2005 and does not
support many raw files from cameras released subsequently.[23] The Windows Camera
Codec pack allows native viewing of raw-format files from 120 digital SLR cameras from
multiple manufacturers in Windows Explorer and Windows Live Photo Gallery, in Windows
Vista and Windows 7.[24]
Page 18
Microsoft's Digital Image 2006 recognizes and organizes raw image formats such as .crw,
.cr2, and .nef, which are file formats produced by Canon and Nikon,[citation needed] but that
product was discontinued in 2007.[25]
Windows XP and Vista both support the WIC codec standard. Products such
as Konvertor, Windows Photo Gallery, Windows Live Photo Gallery and FastPictureViewer
Professional[26] can view raw formats for which the necessary WIC codecs are installed.
Camera manufacturers Canon, Nikon, Sony, Olympus and Pentax have released WIC codecs,
although some manufactures are only providing codec support for the 32-bit versions of
Vista.[27] A commercial DNG codec is also available from Ardfry Imaging,[28]while the makers
of FastPictureViewer have released a WIC codec pack, adding support for 22 raw formats
to Windows in both 32-bit and 64-bit versions, as donationware.[29]
In 2005, Apple Computer introduced several products which offered raw-file support. In
January, Apple released iPhoto 5, which offered basic support for viewing and editing many
raw file formats. In April of that year, Apple introduced a new version of its operating
system, Mac OS X v10.4, which added raw support directly to the operating system, as part
of the ImageIO framework, which adds raw support automatically to the majority of Mac OS
X applications both from Apple (such as Preview, Mac OS X's PDF and image viewing
application and Aperture, a photo post-production software package for professionals) as
well as all third party applications which make use of the ImageIO frameworks. Semi-regular
updates to OS X generally include updated support for new raw formats introduced in the
intervening months by camera makers.
There are many other "raw workflow applications" designed to provide efficient processing
and post-processing of raw images, including Helicon Filter, DxO Labs' DxO Optics
Pro, Hasselblad's Phocus and Bibble Labs' Bibble Pro. Like Apple Aperture, Adobe
Photoshop and Lightroom, LaserSoft Imaging's SilverFast, and PhotoLine, these programs
provide sophisticated controls for processing the information stored in the raw file and
converting raw files to JPEG or TIFF. Picasa, a free image editing and cataloging program
from Google, can read and display many raw formats, but like iPhoto, Picasa provides only
limited tools for processing the data in a raw file.
The new class of Raw processing tools appears with the development of HTML5 - Rich
Internet applications. Pics.io is the first of its class. It is capable to render and apply basic
adjustments to DNG right in a browser. [30]
Standardization
Providing a detailed and concise description of the content of raw files is highly problematic.
There is no single raw format; formats can be similar or radically different. Different
manufacturers use their own proprietary and typically undocumented formats, which are
collectively known as raw format. Often they also change the format from one camera
model to the next. Several major camera manufacturers, including Nikon, Canon and Sony,
encrypt portions of the file in an attempt to prevent third-party tools from accessing them.
Page 19
This industry-wide situation of inconsistent formatting has concerned many photographers
who worry that their valuable raw photos may someday become inaccessible, as computer
operating systems and software programs become obsolete and abandoned raw formats
are dropped from new software. The availability of high-quality open source software which
decodes raw image formats, particularly dcraw, has helped to alleviate these concerns. An
essay by Michael Reichmann and Juergen Specht stated "here are two solutions – the
adoption by the camera industry of A: Public documentation of RAW formats; past, present
and future, or, more likely B: Adoption of a universal RAW format".[32] "Planning for [US]
Library of Congress Collections" identifies raw-file formats as "less desirable file formats",
and identifies DNG as a suggested alternative.[33]
DNG is the only raw image format for which industry-wide buy-in is being sought. It is based
upon, and compatible with, the ISO standard raw image format ISO 12234-2, TIFF/EP, and is
being used by ISO in their revision of that standard.
The ISO standard raw image format is ISO 12234-2, better known as TIFF/EP. (TIFF/EP also
supports "non-raw", or "processed", images). TIFF/EP provided a basis for the raw image
formats of a number of cameras. For example, Nikon's NEF raw files are based on TIFF/EP,
and include a tag which identifies the version of TIFF/EP they are based on.[34] Adobe's DNG
(Digital Negative)raw file format was based on TIFF/EP, and the DNG specification states
"DNG ... is compatible with the TIFF-EP standard".[35] Several cameras use DNG as their raw
image format, so in that limited sense they use TIFF/EP too.[36]
Adobe Systems launched this DNG raw image format in September 2004. By September
2006, several camera manufacturers had started to announce support for DNG in newer
camera models, including Leica, Samsung, Ricoh, Pentax, Hasselblad (native camera
support); and, Better Light (export).[37] The Leica Digital-Modul-R (DMR) was first to use DNG
as its native format.[38] In September 2009 Adobe stated that there were no known
intellectual property encumbrances or license requirements for DNG.[39] (There is a "Digital
Negative (DNG) Specification Patent License",[40] but it does not actually state that
there are any patents held on DNG, and the September 2009 statement was made at least 4
years after this license was published).
TIFF/EP began its 5-year revision cycle in 2006.[41] Adobe offered the DNG specification
to ISO to be part of ISO's revised TIFF/EP standard.[42][43] A progress report in October 2008
from ISO about the revision of TIFF/EP stated that the revision "... currently includes two
"interoperability-profiles," "IP 1" for processed image data, using ".TIF" extension, and "IP 2"
for "raw" image data, ".DNG" extension".[44] It is "IP 2" that is relevant here. A progress
report in September 2009 states that "This format will be similar to DNG 1.3, which serves
as the starting point for development."[45]
DNG has been exploited by open-source developers.[31] Use by camera makers varies: the
largest companies such as Canon, Nikon, Sony, and some others, don't use DNG; but smaller
companies, and makers of "niche" cameras who might otherwise have difficulty getting
Page 20
support from software companies, frequently use DNG as their native raw image format. (Or
in the case of Pentax, as an optional alternative to their own raw image format). There are
of the order of 15 or more such companies, even including a few that specialize in movie
cameras.[36] In addition, most Canon point & shoot cameras can support DNG by
using CHDK.
Processing
See also: Color image pipeline
To be viewed or printed, the output from a camera's image sensor has to be processed, that
is, converted to a photographic rendering of the scene, and then stored in a standard raster
graphics format such as JPEG. This processing, whether done in-camera or later in a raw-file
converter, involves a number of operations, typically including:[46][47]
decoding – image data of raw files are typically encoded for compression purpose, but
also often for obfuscation purpose (e.g. raw files from Canon or Nikon cameras)[citation
needed].
defective pixel removal – replacing data in known bad locations with interpolations from
nearby locations
white balancing – accounting for color temperature of the light that was used to take
the photograph
demosaicing – interpolating the partial raw data received from the color-filtered image
sensor into a matrix of colored pixels.
noise reduction – trading off detail for smoothness by removing small fluctuations
color translation – converting from the camera native color space defined by
the spectral sensitivities of the image sensor to an output color space (typically sRGB for
JPEG)
tone reproduction[48][49] – the scene luminance captured by the camera sensors and
stored in the raw file (with a dynamic range of typically 10 or more bits) needs to be
rendered for pleasing effect and correct viewing on low-dynamic-range monitors or
prints; the tone-reproduction rendering often includes separate tone
mapping and gamma compression steps.
compression – for example JPEG compression
Note that demosaicing is only performed for CFA sensors; it is not required
for3CCD or Foveon X3 sensors.
Cameras and image processing software may also perform additional processing to improve
image quality, for example:
removal of systematic noise – bias frame subtraction and flat-field correction
dark frame subtraction
Page 21
optical correction – lens distortion correction, vignetting correction, and color
fringing correction
contrast enhancement
increasing visual acuity by unsharp masking
dynamic range compression – lighten shadow regions without blowing out highlight
regions
When a camera saves a raw file it defers most of this processing; typically the only
processing performed is the removal of defective pixels (the DNG specification requires that
defective pixels are removed before creating the file[50]). Some camera manufacturers do
additional processing before saving raw files; for example, Nikon has been criticized
by astro-photographers for applying noise reduction before saving the raw file.[51]
Some raw formats also allow nonlinear quantization.[13][14] This nonlinearity allows the
compression of the raw data without visible degradation of the image by removing invisible
and irrelevant information from the image. Although noise is discarded this has nothing to
do with (visible) noise reduction.[citation needed]
Annotated list of file extensions[edit]
.3fr (Hasselblad)
.ari (ARRIFLEX)
.arw .srf .sr2 (Sony)
.bay (Casio)
.crw .cr2 (Canon)
.cap .iiq .eip (Phase_One)
.dcs .dcr .drf .k25 .kdc (Kodak)
.dng (Adobe)
.erf (Epson)
.fff (Imacon)
.mef (Mamiya)
.mos (Leaf)
.mrw (Minolta)
.nef .nrw (Nikon)
.orf (Olympus)
.pef .ptx (Pentax)
.pxn (Logitech)
.R3D (RED)
.raf (Fuji)
.raw .rw2 (Panasonic)
.raw .rwl .dng (Leica)
Page 22
.rwz (Rawzor)
.srw (Samsung)
.x3f (Sigma)
Page 23
RAW Images
A big problem in 2008 is that people are shooting raw and not knowing why. Raw requires
dedicated software to read. If you just bought a new camera, you won't be able to open the
files until you update your computer's software.
Worse, many new cameras come out a week before the camera maker's software is
updated, and if you use software by Adobe, Apple or others, may have to wait weeks (or
much longer) until there is an update. That means you may not be able to open your files
today with your new camera if you didn't shoot JPG!
If you use Photoshop and Adobe Camera Raw, you just might have to buy the newest
version of Photoshop, since Adobe doesn't update older versions to read the files from new
cameras. Ha Ha! Photoshop is so good I've seen no need to update from CS2, and not
shooting raw, I don't have to.
If you're shooting action, raw doesn't work. You'll fill an 8 gig card faster than you can
imagine.
I never shoot raw. Why would I? Raw is a waste of time and space, and doesn't look any
better than JPG even when you can open the files.
INTRODUCTION
Cameras all start with raw data and convert this data to JPG images with hardware in the
camera. They then throw away the raw data since it's no longer needed.
Saving this raw data is exactly like people who save twenty years of newspapers in piles
around their house. They know they might need the information sometime, but it sure gets
in the way! Other people think they are crazy.
Some fancier cameras save this raw data so you can use software to do the same thing the
camera's hardware did, later. Software takes much longer to do the same thing the
camera's hardware does, but gives less confident people the chance to try to fix mistakes
later.
Image quality is the same in JPG and raw. See my D200 Image Quality Setting Examples. See
also my explanation of File Formats.
This page generates controversy because fact doesn't always agree with old wives' tales
circulated by newcomers to digital photography in chat rooms. I'm sharing what works for
me gathered across three decades of continuous full-time paid professional experience in
Page 24
digital imaging. In addition I was studying digital imaging for ten years before I got my
engineering degree and started as a professional working with the guys with Ph.Ds in
mathematics who invented all this.
A reader's response to those who take issue with the observations I share below ishere.
WHICH SHOULD YOU SHOOT?
If you have to ask then just shoot JPG.
This is pretty simple and I'll get into way too much detail later.
If you shoot hundreds or thousands of images in a day shoot JPG and don't worry. The
quality is the same for almost all intents and purposes as raw, and the raw files would take
gigabytes or tens of gigabytes and resultant hours to download, convert, catalog and burn
to backup CDs. In fact, if you shoot this much then JPG can give better quality since
attempting to shoot this much raw will constipate your workflow and you could miss making
some images entirely as your cards fill up. You'd always be running out of memory cards or
time waiting for the access light to stop blinking.
If you love to tweak your images one-by one and shoot less than about a hundred shots at
a time than raw could be for you. In fact, if you prefer the look you can get from raw (it may
be different from JPG in some cases depending on software) you can let your computer
batch process images and save the results as JPGs, too. I almost never shoot anything in
raw, and when I do I never see any difference for all the effort I wasted anyway. (I can see
differences if I blow things up to 100% or bigger on my computer, but not in prints.)
That's about all there is to it. It's sad that some people actually get so excited by all this that
they put up hate sites like one that used to be here. It's sad because I completely agree with
Petteri's Pontifications. I think he moved that hate page here. One's preference for JPG or
raw depends on what you're trying to do. Each format has no absolute goodness; it's all in
how appropriate they are to your particular work at hand. Everyone's needs vary and I just
happen to prefer JPG.
With that said, here's more in my "usual opinionated, cranky style." If you understand the
basics above you can safely skip it.
JPG Basics
JPGs (same as JPEGs) are normal digital camera images. Cameras create JPG images from
raw image sensor data based on your settings like Sharpness and White Balance. The
camera makes the JPG and then the raw data evaporates as soon as the JPG is recorded.
Page 25
Beware JPEG 2000 which you only find in some advanced software. It was a newer proposed
version of JPG that has been forgotten today for still photography. It is COMPLETELY
INCOMPATIBLE WITH the current JPG systems. JPEG 2000 has found application in
the Digital Cinema Initiative and will be used as their standard for the movies many or most
of us will be seeing in theaters today and in the near future.
Raw Basics
Raw files are just the raw sensor data. It isn't a picture until it is processed further. Most
fancy digital cameras allow you to save the raw data instead of the actual JPG picture. If you
do, you still have to do the processing in your computer to make an image (JPG or
otherwise) that you actually can see. Cameras do this processing in hardware much faster
than your computer can do it in software.
Some cameras have a handy raw + JPG mode which saves both the raw data and the JPG
picture.
Raw files are just like raw olives: you need to cook or otherwise process them before you
can use them. They also go bad fast if left in the raw state and can keep forever once
processed to something like olive oil or JPGs.
Horror of horrors, I've heard that the latest Nikon software can't even read the NEFs from
older cameras and that you need to load older software to read them. Just like raw eggs,
unless you process it into something like an egg-albumen print or a JPG, the raw files may go
bad if left unprocessed.
It's not the file that goes bad, silly, it's the potential ability of future software to read it.
Since raw data is entirely unique to each camera, and different even for different firmware
revisions for the same camera, raw isn't even a format, even though the different files have
the same suffix like .CRW or .NEF.
Raw files themselves don't go bad. What goes bad is that in 10 or 20 years, whatever
software we're running on whatever sort of computer we'll be using may not be able to
open a long-forgotten 20-year old proprietary file.
JPGs are universal. Raw is proprietary to camera make and model and even camera
firmware version. Without solid manufacturer support you won't be able to use your raw
files again.
Can you find a computer to open word processing files from 10 or 20 years ago today in
Lotus Notes or PFS Write or Brother Style Writer? I can't; that's why I converted my files
from these programs to the universal .TXT format back when I could. Do you trust Canon,
Nikon and Adobe to support 10 or 20 year old cameras? How about 30 or 40 year old
Page 26
cameras? If you do, go ahead and leave your raw files as raw. I convert all my raw files to
JPGs or TIFFs for archiving.
The JPG processing in the camera can be better than what you may be able to do later in
software from raw. In the September 2004 issue of "Outdoor Photographer" magazine, page
25, Rob Shepard says "...the high quality JPEG images looked far superior to the raw files
when both were opened directly."
Cameras create their JPGs from the 12 bit or more raw data as it comes off the sensor. Your
contrast, white balance, sharpening and everything are applied to the raw data in-camera,
and only afterwards is the file compressed and stored as a JPG. You'll see no additional
artifacts since that's all done before the JPG conversion.
Using raw files obviously takes a lot more time and patience, like refrying beans, since you
could have had all that processing done right in the camera for free. You only want to go
through this trouble if for some reason you're unsure of what settings to use. The raw data,
since it includes everything, also takes up a whole lot more space and takes more time to
move around. It's sort of like either having a complete car that runs (JPG), or a science
project in a million pieces that still needs assembly before you can drive it (raw). You can't
really change exposure after a raw file is shot, although the software that opens this data
gives one the option to rescale the data and give the impression of changing exposure. You
can get this same synthetic lightening from JPGs, too, although only raw allows some ability
to correct overexposure.
I take a lot of heat from tweakers because I, like other photographers, prefer to make my
adjustments in-camera and use the JPGs directly. Others prefer to spend even more time
later twiddling in raw, but that's not for me. I get the look I need with JPGs and prefer to
spend my time making more photos. If you're the sort of person who likes to twiddle and
redo than by all means raw is for you.
Everyone's needs vary. For many hobbyists tweaking is part of the fun and I don't want to
spoil that. Please just don't take it personally that I prefer to get my shots right the first time
instead of having to tweak them later. If I need to correct a goof I just do it from the JPGs.
JPG Details
JPG (same as JPEG) is the standard used by prolific shooters. It gives great quality and offers
the fastest speed for everything. It is the most popular and compatible image format on the
planet. It is especially popular for the things for which digital cameras are best suited in the
first place, like news, sports and events. With JPG you can shoot hundreds or thousands of
images at a time and the files are ready for release with no further processing. JPGs done
properly, as digital cameras do when set to NORMAL or FINE, give great results you can use
Page 27
immediately. Of course you need a professional digital camera that provides the exact in-
camera adjustments, like subtle white balance control and immediate, easy access to them,
to be able to do this. Pros skip many of the cameras that excite amateurs if those cameras
require adjustments to be made through menus or have limited WB capabilities.
Professional journalists like Karl Grobl who need to produce results shoot JPG. Karl just
returned from a two month series of assignments in Asia. He brought back 20 Gigabytes of
JPGs, and those were just the keepers. Karl no longer has the time to piddle with anything in
Photoshop: if the image isn't perfect as shot it gets deleted. Life is too short to piddle with
sloppy images if making images is what you do for a living. Of course if photography is your
hobby and you find the piddling enjoyable or if you're in a studio with time to burn then
that's another story. Karl has a ton of images he needs to get to a ton of clients, and then
he's off on the next assignment. There is just no time to wait for things like raw file
processing. I've seen Karl's 20 x 30" prints from his JPGs and they are spectacular.
Sometimes raw will look different from JPG depending on the differences between
sharpening algorithms used in-camera (JPG) and in different versions of software (raw.) I
find every raw opener (Adobe Photoshop CS, Adobe Camera raw, the camera maker's
version, iView, etc.) processes the image a little bit differently in terms of sharpness, curves
and colors, so you never really have a definitive look until after you've opened and saved
the file as a standard JPG, PSD or TIFF.
You may prefer one or the other. If you don't like the in-camera options, shoot unsharpened
JPGs and sharpen elsewhere. Likewise, if you set the wrong white balance or underexposed
you can always correct it later using, for instance, Photoshop's Levels, Curves and/or Color
Balance features, among others. I have no problem adding two stops of exposure to a dark
JPG in Photoshop's Levels or Curves command.
Many people who shoot raw, which I consider to be a big waste of time, don't realize that
white balance can be adjusted in Photoshop even from JPGs. No, Photoshop doesn't yet
have a "dummies" panel actually marked with common white balance monikers, but skilled
photographers have always been able to do it. I prefer using the "Set White Point" and "Set
Neutral Gray" eyedroppers in the Levels command. Seehere for how to do it.
Some cameras, like the Casio EX-Z750, allow correction of JPGs for White Balance and
exposure after they've been shot as well.
I've made deliberate comparisons on my D1H (and so can you) by shooting a scene in both
JPG and raw at ISO 200, ISO 800 and then underexposing two stops (set exposure
compensation to -2) at ISO 200. There now are six shots. Open the underexposed raw by
adding +2 stops while opening and apply correction to the dark JPG with Levels or Curves.
Now look at these two vs. the shots made at ISO 800. They look pretty much the same,
Page 28
which if you really get into the camera's signal processing and external math you'll realize
that you're doing the same thing to the same data; just the different processes are doing
these identical algorithms in different places. Of course how you lighten the dark JPG will
probably alter the look of the image; I forget what curves I used best to simulate adding two
stops. Hee hee, I only made the normal ISO 200 shots to show that pushing two stops from
ISO 200 gives the same grain as shooting directly at ISO 800. Actually it's better to shoot at
ISO 800 in the first place since the camera does a better job by increasing the analog gain of
the CCD amplifiers. Also the very best image of that indoor/outdoor contrasty scene was
made by using the underexposed image (which retained the outdoor part) and using a filter
to lighten the dark indoors. I got the same result from the JPG and raw files.
If you're a tweaker you'd be interested to learn raw and JPG also have the same effective bit
precision. JPG has 8 bits per color per pixel and raw may have 12 bits, but here's the big
catch: raw is 12 bit linear, and JPG is 8 bit log, gamma corrected or some other non-linear
transform derived from the 12 bit linear data. Thus in the shadows where this might matter
the two are the same, since the full 12 bit resolution in the dark areas is preserved by the
non-linear coding. Even if the two formats differed in dark resolution the sensor noise is still
greater than one LSB anyway making it a moot point.
Raw Details
Raw is designed for people who intend to spend a lot of time twiddling with one image at a
time. For these applications I use large format 4x5" film instead for much better quality,
thus you see why I don't use raw. Raw is very popular for people shooting landscapes with
digital cameras, which is not what digital cameras are for. Unfortunately this is becoming
popular among amateurs, but remember that for amateurs the fun is in making the photo,
and for fun digital is king. Personally I focus on the final image, for which big film excels. This
goes to explain all the heat I get from hobbyists, who of course love raw and shoot Yosemite
on their digital SLRs which is very different from what I do. Raw is also for people who don't
yet get perfect exposure right when they make the image, although of course JPEGs also
allow these adjustments.
Raw is needlessly tedious if you can get the right image to begin with. Raw always requires
extra steps to process from the camera into a usable format, the files can only be opened
with very special software, requires far more time for everything and therefore slows
workflows. In fact, raw is not any sort of a standard format: .CRW or .NEF or whatever files
are actually very different from each model of camera, and you constantly need to be
updating your conversion software just to be able to read files from whatever camera you
just got. I had NEF files from an advance sample of a Nikon D70 I couldn't open since the
software had not been released. In the professional arena workflow efficiency is the
difference between waiting for a batch convert to complete and working on a new paying
project. Raw looks the same anyway as a good JPG. I will admit that on the D70 the
Page 29
differences in default sharpening are such that the raw images do look sharper than the
JPGs if you're looking zoomed in to 100% on a computer, but were still invisible to me in 12
x 18" prints.
Don't pay too much attention to sales demos showing how you can restore details in
highlights for a shot that was overexposed by a critical half stop. First off, no one really is so
bad a studio photographer that they'd actually overexpose a series of studio shots by a half
a stop and not know it on a digital camera. That reminds me of comedian George
Carlin's line about he thinks that the stupidest thing a human being can do is to run out of
gas in a car with a working gas gauge. You can see overexposure on the LCD of the digicam.
Yes, raw is great to catch this last half a stop if you goofed, but that's about as far as it can
correct depending on your camera. Today I find that unlike earlier cameras the Nikon D70
seems to offer a good deal more ability to catch lost highlights, which again I have yet to see
that the efforts involved with raw justified any improvement in the final image. Even though
I could see the improvement, my girlfriend still preferred the 12 x 18" print of the BASIC JPG
image to the 12 x 18" print made from the raw file on which I spent an hour correcting all
the levels and lens distortion and chromatic issues. Such is art!
If you intend to spend hours twiddling with individual shots or have enough time to waste
piddling in chat rooms like this then go ahead and shoot raw, just remember to save them
as something standardized so you can read them later. If you need loads of great
images now then shoot straight to standard JPGs.
Raw looks no better than JPG for real photos. It just takes up space, wastes your time and
runs the risk of not being able to be opened now and in the future. Raw is OK if you only
shoot a few dozen images and you want to play around with each of them in Photoshop;
JPG is best if you need hundreds or thousands of images each day and get them right in the
camera to begin with. The latest trick of making dual-exposure composites from single raw
files actually can be done just the same from a JPG; just open the JPG (exposed for the
highlights) in Photoshop and apply the LEVELS or CURVES command to the layer
representing your shadows.
Example 1 : a friend of mine on his first day out with his D1X shot a foot race. He had no
idea he would shoot so much and his single 256MB card was filling up quickly. He had to set
the camera down to SMALL resolution (1,312 x 2,000) and BASIC JPG (256kB) so he could
keep shooting. He then licensed one of those image files to a shoe company for use on a
poster. It looked great in print and he got $1,200 for the temporary use of the file. (No, he
did not sell the image outright for such a low price.) Sure, he could have shot raw, but if he
did he would have missed the shot completely since he would have been out of memory
giving him no image at all instead of a great looking one.
Page 30
Example 2: While everyone was in chat rooms yesterday I spent the day consulting on a
shoot of a $7,000,000 home. We shot raw + JPG on a Canon 1Ds so my client would have
both kinds of files from which to learn afterwards. It took a half hour to download the
images from the 1 Gig flash card, and we never even used the raw files. The JPGS were all
we used, and we had the files prepped, profiled and ready to go to press that night at
355DPI for use in a very high-end publication. None of the raw files were used, but they did
waste our time. There also is some weirdness in how the 1Ds records these in the raw + JPG
mode, see here.
JPG - More
Prolific shooters shoot JPG because time is money and we are able to get things right the
first time. JPGs, especially the larger JPGs, offer the same image quality as raw or TIFF, with
much less time and effort if you can set your camera correctly to begin with.
JPGs work the fastest in file transfers, CD backups, reprocessing for automated web
galleries, ability to drop off for printing at a lab, file opening, ability to send files to clients
and everything really. Therefore, since time is money in every profession, JPG is the format
of choice for photography.
JPG is the world's most popular format for digital images. It is the format most likely to be
legible to any piece of equipment, in fact, even many DVD players can read JPGs from a CD.
The ability to get a shot right the first time is one of the things good shooters get from
practice. One needs a camera that can be adjusted instantly for ISO, White Balance (WB),
exposure compensation and sharpening. This is why I complain if a camera requires menus
to make adjustments. Good cameras like the Nikon D1H allow one to make most of these
adjustments instantly with dedicated buttons, no menus required.The best delineator
between a pro camera and a tyro's toy is whether or not you need menus to adjust it from
shot to shot. In any shoot I am constantly adjusting all these things as my light and subject
change, so there is no time to wait around for menus.
More pedestrian cameras, like my point-and-shoot digital A70, require me to stop and
twiddle through menus to adjust any of these things. This makes it much harder to get a
perfect image immediately.
A well-done JPG is all I ever need.
If I didn't have a camera that allowed me to get the right results the first time I might be
tempted by the tedious raw format. Oddly, the simpler cameras that might need raw don't
offer it, and the better cameras that do usually don't need it!
Page 31
Some people worry that JPG implies poor quality. This is because JPEG files can be made at
any quality level, high or low, and we've all seen bad JPGs.
Photoshop users know that you have a huge range of quality settings when you "SAVE AS"
or SAVE FOR WEB." Smaller JPGs, especially what you see formatted for the internet on my
and other websites for easy download over telephone lines, will have artifacts often visible
as slight noise around a sharp line against a flat background, or potential blockiness of a
smooth area like the sky, or slight muddling of textured areas. This is not a problem with the
JPG format, it's just that those JPGs were deliberately made to be have small file sizes and
thus unfortunately look crummy.
The JPG format is adjustable for quality vs. file size. Larger JPGs, which is what cameras
record, record enough data, especially at the milder compression settings (FINE on Nikon
and Canon) so that these artifacts don't occur. JPGs at the correct quality settings have no
visible artifacts. Play with this yourself as I have: make a bunch of photos at the different
settings (including raw) and put them all up on your screen at 100%. You'll see for yourself.
Thus there is no quality disadvantage to using JPGs correctly, and many logistical
advantages.
Raw - More
Raw are proprietary nonstandard formats just for getting images to your computer before
saving or processing. They always require a special step just to open them after which you
can save them in a useable format. Each camera maker has its own incompatible format.
Even worse, some camera makers want to ensure you have to buy special software from
them and only them in order to read your files. See here about how Nikon is encrypting the
raw files from the D2X to ensure that only their software will work properly. This means that
if Japanese industrial giant Mitsubishi, parent of Nikon, wanted to raise profits they may
already have set the current software to time-out your ability to read today's raw files in a
few years, and then the only way you could see your photos is to buy new software.
If you have time to burn and don't mind the incompatibility aspect by all means go raw. If
you are only shooting a few images at a time don't worry too much and use raw if you want.
Raw formats, like Nikon's NEF and Canon's CRW, are aimed at people who have the time to
piddle around after a shoot to make up for what was not set correctly in the first place.
Theses folks are the ones who also have the time to spend in chat rooms likethis instead of
actually photographing.
Page 32
The biggest quality advantage of raw is the ability to correct for some of your mistakes after
the fact, so if you can get it right the first time most of the raw advantage evaporates, but all
the disadvantages remain.
Raw is free from visible compression artifacts, just like JPG at the milder compression levels.
It also can record with a couple of more bits of z-axis precision (12 bits instead of 8 bits) ,
which is invisible unless you have a very poorly lit image and need to do horrendous curve
adjustments. In this case your problem is not file format; it's your lighting.
But no! Raw records usually with 12 bits, but a linear 12 bits. JPG uses only 8 bits, but
these are after the log and gamma conversion, and thus preserves the 12 bit precision at
the shadow levels where it's important!
Raw is NOT a digital negative. Unlike a real negative, it still has restricted resolution and
dynamic range, and most importantly, cannot be read or seen except with very special
software. JPGs are far more universally read, and closer to a negative in terms of being
visible to everyone over time. Raw is like a color negative since each piece of software you
might use to open it yields different colors!
Disadvantages of Raw:
1.) Time is money to people who need to make money from photography. We simply don't
have the time to waste for all the files to download and then especially to wait while
hundreds of raw files open up the hard way before we can see them, much less do anything
with them.
Raw takes too long: too long to record to the card, especially with compressed versions,
takes up too much space on the card so more cards are required, takes longer to transfer to
a computer, longer to back up to CDs and takes more CDs, etc. Not only is there a big
disadvantage due to the bigger file sizes, but also:
2.) The formats are not standardized. With Nikon and Canon at least the latest version
Photoshop CS can open the raw formats, but otherwise you have to revert to using each
manufacturer's proprietary software. This may be something you are willing to flog through
today, but what if a fringe manufacturer like Sigma, that as far as I know is not supported in
Photoshop CS and certainly not likely supported in Breeze Browser or iView as far as I know,
decides not to supply upgraded software in the coming years that can run on the computers
of the future if Sigma is no longer choosing to make or support digital cameras? If you can't
run today's reader software in the future then you won't be able to read your image files
and they are lost forever.Thus you see why raw files are not at all like a negative that you
can read in 50 or 100 years.
Page 33
3.) Because it's not standardized, you can't send these files to clients or anyone and
expect them to open. Also if you do, and they can read them, then you have lost control
over how your file looks, since they may choose to open it differently. (Of course if your
client asks for raw give it to them.) If you shoot raw you have to open each file and convert
it to something like JPG or TIFF before you can send it out. This costs time you simply don't
have to spend if you had shot JPG to begin with. This is one thing for just a few shots,
especially if you are going to play with them in Photoshop anyway, but if you are doing this
for money you are probably dealing with hundreds and hundreds of files everyday and there
just is not enough time. Personally I try to create hundreds of JPGs I can send directly to my
client so I can get onto the next project immediately. I only open things in Photoshop if I
goofed the first time.
4.) Each camera maker has its own incompatible format. One cannot save files in raw
format either, thank goodness.
5.) Different software opens up the files differently. The same files look different! I see
one thing with Photoshop's Camera raw plug in, one thing with Nikon's plug in, and different
things on different versions of iView even in different screens! In this way raw is like a digital
negative: the colors and sharpness look different every time you try to print it! Pros need
images that always look the right color; the color we captured in the first place, which is why
slide film is far more popular than negative film professionally.
6.) Did I say it takes a long time? I had one camera maker's plug in take 30 seconds to open
a raw file, and that's after you manually chose all the settings with which you want the file
to open. The preview was crummy, so that you might have to try a few times until you get it
right, just to open a file. Multiply this by 500 shots made at a wedding and you can see why
it's just not happening.
7.) Today's versions of software may not be able to open older raw files, losing your
images forever. My prognostication of this photographic apocalypse is nigh: as of July 2005
a reader writes that he couldn't get Nikon Capture 4.3 or Photoshop to open older NEF files,
getting "unexpected end of file" errors. While waiting for Nikon support to tell him what
historical combination of Nikon Capture and Nikon View versions would enable to see his
images he tried Bibble Pro, which worked. I always make TIF archive copies of anything
about which I care shot in raw. Raw means raw, which means it's not cooked and very
perishable. Just like raw meat, raw files become worthless as time progresses unless they
are processed into something with a long life, like a standard TIF or JPG image.
So by all means shoot raw if you want, just don't expect any visible quality difference, and
do be prepared for a lot of time spent twiddling and the possibility of not being able to open
files occasionally now or ever in the future. I gave up on raw since every program I use
Page 34
opens them differently, and every different version of a program, like iView, deals with
them differently in every release.
Personally, when I want quality and have the time to mess with things I shoot on film and
scan it. This way I also have a color standard, the transparency, against which to compare
the files and prints.
If you shoot raw I prefer the built-in plugin with Photoshop CS for opening all these
files.Here's a great article on how to calibrate color if you insist.
Others speak very highly of Nikon's extra-cost Capture program. I've never tried it. If I shot
raw I would certainly try it out. I think there are free demos available, too. If you do shoot
raw of course you can go get the program in the future if you're unhappy with other
openers.
CHILDISH TOILET HUMOR
Now that you've read this far here's a summary of what it's like waiting around for big raw
files to transfer and burn and process. Sorry if this offends adults; we children find this
hilarious.
Raw + JPG Modes
As of 2004 many cameras allow you to record both. This is great, since you
1.) Have the JPGs for immediate use
2.) Have the raw files if you need or want them, and most importantly,
3.) Have a back-up file in case either is corrupted.
The disadvantages are that you wind up recording even more data that you probably don't
need. Data transfer and storage and archiving and backup takes time, which is money to a
professional or anyone else who values their finite time on this planet.
Page 35
TIFF
TIFFs (also called .TIF) are very large files used for saving processed images.
TIFFs are used only in tethered studio applications, if ever, for camera capture. Tiffs don't
have any of the post-processing advantages of raw and have enormous file sizes that will
completely clog up any workflow if you are shooting many images on cards.
TIFF (or PSD, the format native to Photoshop) is perfectly fine for archiving files after you've
played around with them or for sending to a client on CD. Just don't set your camera to this
format for recording on cards since it's so cumbersome.
ARCHIVING
If you shoot JPG, just archive the camera original JPG files.
If you shoot raw you should also archive everything in a standard JPG or TIFF format so
you'll be assured of having the best chance of being able to open and use the files in the
future.