12
10 Module TEACHER CARDS 10 ART TO BE USED IN CONJUNCTION WITH WORKSHEET 10A www.gaa.ie • Clay • Construction • Fabric • Paint and Colour • Print

10
Module
TEACHER CARDS
10
ART
TO BE USED IN CONJUNCTION WITHWORKSHEET 10A
www.gaa.ie
• Clay
• Construction
• Fabric
• Paint and Colour

ART
PAGE 52
GAA Grassroots to National Programme (GNP)
10
TE
AC
HE
R N
OT
ES
Strand Unit: Clay
STAGE 3Firmly place the ends ofthe wire right down intothe base and press clayoutward around it to makeit secure.
STAGE 1Make a base as shown.
STAGE 2Bend some modeling wireinto a narrow u-shape andbend the ends outwards (this helps to keep themodel from rocking).
STAGE 4Stick small pieces of clayonto the wire starting withthe feet and gradually addpieces to form legs, shorts,torso and shoulders.
STAGE 5Continue using small piecesof clay to form the shapeof shorts, torso andshoulders making surethat the clay covers allaround the wire.
STAGE 6Stick a small wirebetween the shoulders tosupport head and sticktwo wires well into theshoulders to supportarms. Bend the wires forthe arms to suit the poseof the model.
1
2
4
5
6
7
8
93
4
6
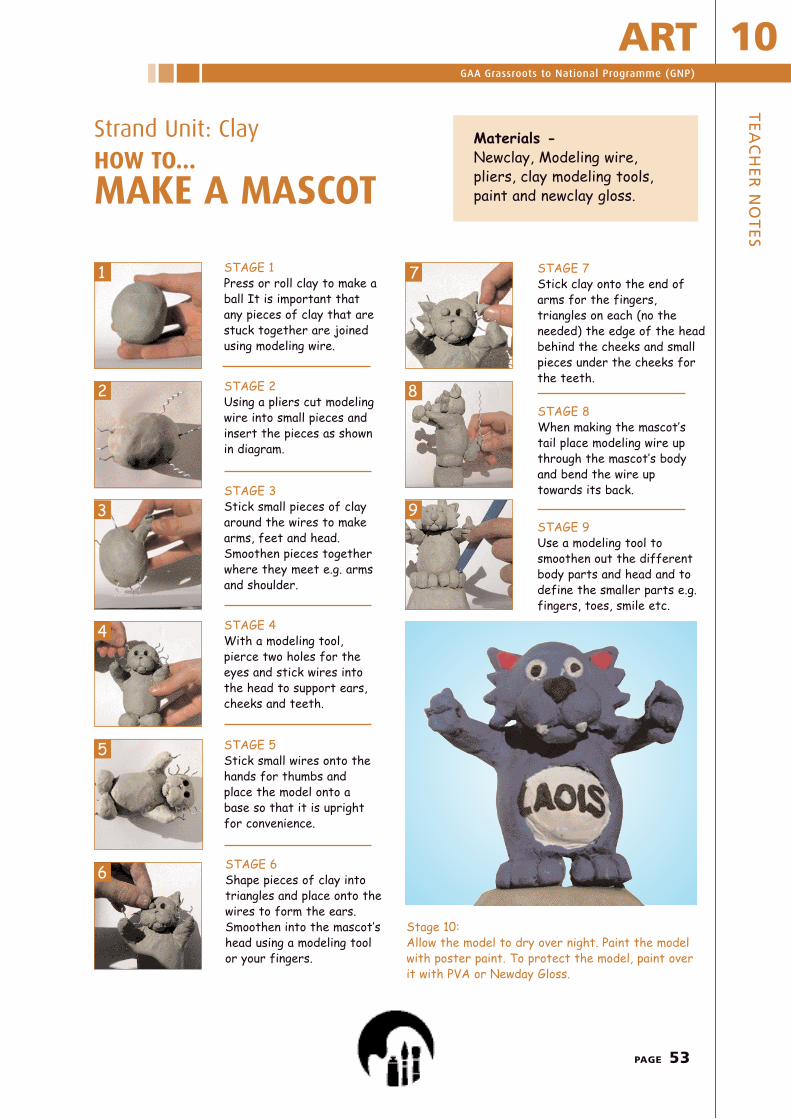
Materials - Newclay, Modeling wire, pliers, clay modeling tools, paint and newclay gloss.
HOW TO...
MAKE A CLAYFOOTBALL PLAYER
Stage 10:Paint the model after allowing to dry over night. Cover with a layer of PVA or Newclay gloss.
STAGE 7Gradually add clay toform arms and head.
STAGE 8Pierce holes for eyesockets and insert smallballs of clay for the eyes. Stick on tiny pieces ofclay to head to form ahairstyle. Also stickpieces on for ears andnose and shape out amouth with modeling tool.
STAGE 9Stick a small wire Usethe modeling tool tosmoothen the roughpieces and define otherparts e.g. fingers, shorts,collar etc.
ART
PAGE 53
GAA Grassroots to National Programme (GNP)
10T
EA
CH
ER
NO
TE
S
7
HOW TO...
STAGE 8When making the mascot’stail place modeling wire upthrough the mascot’s bodyand bend the wire uptowards its back.
STAGE 7Stick clay onto the end ofarms for the fingers,triangles on each (no theneeded) the edge of the headbehind the cheeks and smallpieces under the cheeks forthe teeth.
STAGE 9Use a modeling tool tosmoothen out the differentbody parts and head and todefine the smaller parts e.g.fingers, toes, smile etc.
8
9STAGE 3Stick small pieces of clayaround the wires to makearms, feet and head.Smoothen pieces togetherwhere they meet e.g. armsand shoulder.
STAGE 1Press or roll clay to make aball It is important thatany pieces of clay that arestuck together are joinedusing modeling wire.
STAGE 2Using a pliers cut modelingwire into small pieces andinsert the pieces as shownin diagram.
STAGE 4With a modeling tool,pierce two holes for theeyes and stick wires intothe head to support ears,cheeks and teeth.
STAGE 5Stick small wires onto thehands for thumbs andplace the model onto abase so that it is uprightfor convenience.
1
2
3
4
5
Materials - Newclay, Modeling wire, pliers, clay modeling tools, paint and newclay gloss.
Strand Unit: Clay
STAGE 6Shape pieces of clay intotriangles and place onto thewires to form the ears.Smoothen into the mascot’shead using a modeling toolor your fingers.
6
MAKE A MASCOT
Stage 10:Allow the model to dry over night. Paint the modelwith poster paint. To protect the model, paint overit with PVA or Newday Gloss.

ART
PAGE 54
GAA Grassroots to National Programme (GNP)
10
TE
AC
HE
R N
OT
ES
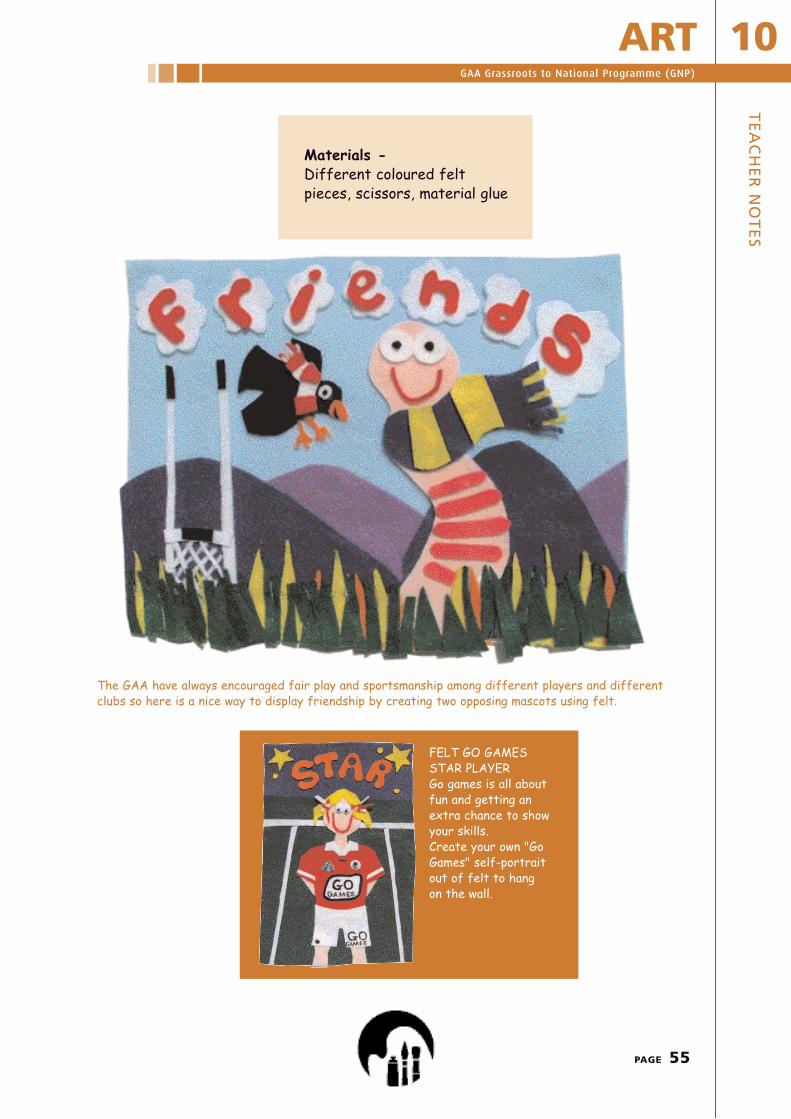
HOW TO...Strand Unit: Fabric
MAKE FABRIC FRIENDS
STAGE 1Start off with light blue,A4 piece of felt for thesky.
1
STAGE 2Cut out triangular shapesfor mountains.
2
STAGE 3Glue the mountains ontothe blue.
3
STAGE 4Stick the darker colouredmountains on top of thelighter coloured mountainsas the lighter colouredones look further away.
4
STAGE 5Cut out and glue on whitestrips for goal posts, a net,a wiggly pink piece for theworm with a round headand a black shape to showa crow flying.
5
STAGE 6Cut out and glue on sevenwhite clouds and yellowand orange triangles forthe grass (green on its ownis too flat). Glue these onas shown.
STAGE 7Glue on scarves for thecrow and worm along withthe white eyeballs and blacktops for the goalposts and ablack mark for the middleof the crossbar.
6
7
STAGE 8Cut out and stick onsmaller details e.g. crow’sfeet, eye balls, stripes onscarves, lettering for theclouds and dark pink foldmarks on the worm.
8
ART
PAGE 55
GAA Grassroots to National Programme (GNP)
10T
EA
CH
ER
NO
TE
S
Materials - Different coloured feltpieces, scissors, material glue
FELT GO GAMES STAR PLAYERGo games is all aboutfun and getting anextra chance to showyour skills. Create your own "GoGames" self-portraitout of felt to hangon the wall.
The GAA have always encouraged fair play and sportsmanship among different players and differentclubs so here is a nice way to display friendship by creating two opposing mascots using felt.

ART
PAGE 56
GAA Grassroots to National Programme (GNP)
10
TE
AC
HE
R N
OT
ES
STAGE 3Hold the flaps firmly untilthe glue is dry and the boxis completely sealed.
STAGE 1Place a box on its basewith the flaps opened.
STAGE 2Glue the flaps so the boxis completely closed.
STAGE 4Draw the outline of ascreen on the upper partof the box.
STAGE 5Cut along the outline ofthe screen and take it out.
1
2
3
4
5
STAGE 6The presenter will fit insidethe screen and the secretstorage area will beunderneath.
6
STAGE 9Glue the 4 supports inside thebox and under the bottom ofthe screen.
STAGE 7Cut the top of the box soit opens out as shown.
STAGE 8Glue 4 or 5 small pieces ofcardboard (roughly 2cm x5cm) together to makesupports for the t.v.presenter.
STAGE 10Make sure the supportsare placed evenly and levelon the inside of the box.
STAGE 11Draw the outline of thet.v. presenter oncardboard and fold it 2cmfrom the bottom.
7
8
9
10
11
STAGE 12Glue the folded section ofthe presenter to a piece ofcardboard that fits neatlyinside the box.
12
HOW TO...Strand Unit: Construction
CONSTRUCT A SECRET TV SET

ART
PAGE 57
GAA Grassroots to National Programme (GNP)
10T
EA
CH
ER
NO
TE
S
Stage 15Tidy the rough edges bysticking newspaper pieceson with pva glue.
Stage 13Paint in the t.v. presenterand studio and when dryplace the t.v. presenter inthe box on top of thesupports.
Stage 14Glue some pieces ofcardboard together andglue these onto the lid ofof the cardboard box.
Stage 16Paint the t.v. box silver orblack with a remote controllid as a handle.
13
14
15
16
Materials - Cardboard box, strong glue,paint, scissors,PVA,newspaper glue
Nobody will be able to find your personal itemswhen you open the lid, take out the presenter andhide your items underneath!

ART
PAGE 58
GAA Grassroots to National Programme (GNP)
10
TE
AC
HE
R N
OT
ES
STAGE 7Glue cardboard to theupper part of the cup tomake handles.
STAGE 8Stick a couple of layers ofpapier mache aroundthese.
STAGE 9Paint the cups using silveror gold poster paint.
7
8
9
Materials - Stapler, cardboard (cerealbox), newspaper, papiermache, paint
STAGE 34 strips should do for eachbowl. Cut 4 strips for thetop bowl each measuring23cm and 4 strips forthe bottom bowl eachmeasuring 16cm..
STAGE 1Cut out some strips ofcardboard 1.5cm thick andat least 55cm long. Make 2circles with the strips;15cm and 12cm in diameter.
STAGE 2Staple each circle to keepthem from opening out. Staple other strips ontothe inside of the circles tomake a bowl shape asshown.
STAGE 4First make a cross andthen put the other stripsdiagonally through thecentre of the cross. Mix some papier machemix up.
STAGE 5Stick strips of newspaperonto the bowl to fill upthe spaces and complete alayer around the bowl.
1
2
3
4
5
STAGE 6Allow the bowls to dry.Use papier mache to bindthe larger part of the cupto the base.
6
HOW TO...Strand Unit: Construction
MAKE THE SAM MAGUIRE

ART
PAGE 59
GAA Grassroots to National Programme (GNP)
10T
EA
CH
ER
NO
TE
S
Resources - A) A1 or A2 white sheets of card.B) Acrylic paint. It is important to use acrylic paint,
as it is far more effective when finished. Thecolours depend on the colour of the wall on which the silhouettes will be placed
C) Masking tape.
STAGE 3Discuss different GAAposes from differentsports with the children(The different striking,catching and standingposes in hurling/camogie,football, handball,rounders)
STAGE 1Place the children ingroups of three or four.The children may work well with friends.
STAGE 2Give the children sheets ofcard and ask them to tapethem together.
STAGE 4In their groups thechildren select one personand draw an outline of theperson on the card. (Using pencil)
STAGE 5Cut along the lines.
STAGE 6Place the silhouette onnewspaper and paint withacrylic paint using only onecolour.
HOW TO CREATE A...Strand Unit: Paint and Colour
GAA SILHOUETTE

ART
PAGE 60
GAA Grassroots to National Programme (GNP)
10
TE
AC
HE
R N
OT
ES
HOW TO CREATE A...Strand Unit: Paint and Colour
SILHOUETTE PAINTING OF PLAYERS
STAGE 3When the purple reachesthe light blue, blend themin together making thepurple paint overlap thelight blue until it graduallyfades into the light blue.
STAGE 1Starting at the bottompaint light-blue half way upthe page. Stroke paint onhorizontally.
STAGE 2Paint purple paint startingfrom 3/4 way up the pageand work your way downwardsstroking horizontally all thetime ( this helps the coloursto blend ).
STAGE 4At the top of the page,paint on the dark blue andhorizontally paint it onuntil it meets the purpleand repeat the process asstroke it on so it blends inwith the purple.
STAGE 5Allow the paint to dry.Now you have a duskbackdrop for the playersto be painted onto.
1
2
3
4
5
STAGE 6Paint a black silhouette ofa ground players and astand.With white paint,paint on a moon and dot afew stars around.
6
Materials - Light blue, dark blue, purple,black and white poster paint

ART
PAGE 61
GAA Grassroots to National Programme (GNP)
10T
EA
CH
ER
NO
TE
S
Look at these studies of a sphere. Look at where the light is coming from and where the darkness is. Use an 2B or 4B pencil to draw this yourself. Now lets apply this study of light and shade and observe howit would appear on a sliotar.
STAGE 1Put a tiny drop of blackpaint into a palette. Using mostly water, washon a circle onto a piece ofpaper.
STAGE 3Gradually wash on darkershades onto the circle toshow where the light iscoming from and wherethe darkness is.
STAGE 2Now using black paint,paint in the stitching ofthe sliotar.
1
2
3
LEARN HOW TO DO...
SLIOTAR PAINTING
Materials - Black, white and light blueposter paint.
Strand Unit: Paint and Colour

ART
PAGE 62
GAA Grassroots to National Programme (GNP)
10
TE
AC
HE
R N
OT
ES
STAGE 3Dip a large brush inyellow paint and press it down onto the left, half of the logo.
STAGE 1Start by cutting theshapes on the logo out.
STAGE 2Use paper glue to stickthe shapes back onto aclean A4, white paper toform the G.A.A. logo.
STAGE 4Dip the brush into theorange paint and continuepressing over the logo,blending the colourstogether.
STAGE 5Now start to dab thered paint onto the rightof the logo to blend it inwith the orange.
STAGE 6Peel off the pieces ofpaper to leave the G.A.A. logo. Mount theprint onto black sugarpaper.
LEARN HOW TO...
STENCIL PRINT THE G.A.A. LOGO
Materials - Photocopy of G.A.A. logo, largepaintbrush, red, orange andyellow paint, scissors, paper glueand white paper
GO GAMES STENCILUsing the same technique as the stencilprint for the G.A.A. logo why not try tocreate a stencil print of the “Go Games”logo. You can experiment by trying outcoloured paper for the background andvary the colours of the paint!
Strand Unit: Paint
1
2
3
4
5
6
*To be used in conjunction with Workseet 10A


