Reviewed by Oracle Certified Master Korea Community ( http://www.ocmkorea.com http://cafe.daum.net/oraclemanager ) Quick Web Development using JDeveloper 10g Have you ever experienced doing something the long way and then learned about a new shortcut that saved you a lot of time and energy? I can remember this happening in chemistry, calculus and computer science classes in college on numerous occasions. At one time tools like Oracle Forms were easier to make major edits by editing the INP file rather than using the GUI development tool. Maybe you’ve done some database administration and you prefer the SQL Plus prompt over Oracle Enterprise Manager (OEM). If you’ve every done any Web-based Java development, using Struts for example, you know the “long way” of developing such an application. Oracle’s new development framework is called the Application Developer Framework (i.e. ADF). Oracle has bundled the framework into a powerful GUI development environment. Each new version of JDeveloper gets closer to rivaling Oracle Forms. ADF will allow you to quickly and easily develop a GUI/HTML-based Web application using this point-and-click, drag-and-drop development tool. This paper will show you how to: • Map a database object into an ADF Business Component • Build an ADF Business Component view object • Create an ADF Business Component Application Module • Compose the ADF Data Bindings and Control components • Use the Struts Controller • Generate the Java Server Page • Run the application In a short period of time you'll learn how to quickly develop an application using JDeveloper 10g. This paper will review the following topics: • What is JDeveloper? • New Features • Reasons to Use JDeveloper • Quick Web Development • Tips and Tricks What is JDeveloper? Accoring to Oracle, “Oracle JDeveloper 10g Preview is a J2EE™ development environment with end-to-end support for modeling, developing, debugging, and deploying e-business applications and Web services. Oracle JDeveloper 10g allows developers to build J2EE applications and Web services either from scratch or by using a J2EE framework. Whatever implementation is chosen, JDeveloper offers all the productivity tools needed to get the job done.” JDeveloper currently costs $995. It started out at about $6000 per developer not that long ago. It’s a powerful development tool! JDeveloper 10g Preview is only supported on Windows NT/2000/XP at this time. JDeveloper9i is supported on Windows NT, Windows 2000, Windows XP, Linux, Solaris, and HP-UX. See
Transcript
Reviewed by Oracle Certified Master Korea Community
Quick Web Development using JDeveloper 10g Have you ever experienced doing something the long way and then learned about a new shortcut that saved you a lot of time and energy? I can remember this happening in chemistry, calculus and computer science classes in college on numerous occasions. At one time tools like Oracle Forms were easier to make major edits by editing the INP file rather than using the GUI development tool. Maybe you’ve done some database administration and you prefer the SQL Plus prompt over Oracle Enterprise Manager (OEM). If you’ve every done any Web-based Java development, using Struts for example, you know the “long way” of developing such an application. Oracle’s new development framework is called the Application Developer Framework (i.e. ADF). Oracle has bundled the framework into a powerful GUI development environment. Each new version of JDeveloper gets closer to rivaling Oracle Forms. ADF will allow you to quickly and easily develop a GUI/HTML-based Web application using this point-and-click, drag-and-drop development tool. This paper will show you how to:
• Map a database object into an ADF Business Component
• Build an ADF Business Component view object
• Create an ADF Business Component Application Module
• Compose the ADF Data Bindings and Control components
• Use the Struts Controller • Generate the Java Server
Page • Run the application
In a short period of time you'll learn how to quickly develop an application using JDeveloper 10g. This paper will review the following topics: • What is JDeveloper? • New Features • Reasons to Use JDeveloper • Quick Web Development • Tips and Tricks
What is JDeveloper? Accoring to Oracle, “Oracle JDeveloper 10g Preview is a J2EE™ development environment with end-to-end support for modeling, developing, debugging, and deploying e-business applications and Web services. Oracle JDeveloper 10g allows developers to build J2EE applications and Web services either from scratch or by using a J2EE framework. Whatever implementation is chosen, JDeveloper offers all the productivity tools needed to get the job done.” JDeveloper currently costs $995. It started out at about $6000 per developer not that long ago. It’s a powerful development tool! JDeveloper 10g Preview is only supported on Windows NT/2000/XP at this time. JDeveloper9i is supported on Windows NT, Windows 2000, Windows XP, Linux, Solaris, and HP-UX. See
Reviewed by Oracle Certified Master Korea Community
Quick Web Development using JDeveloper 10g http://otn.oracle.com/products/jdev/htdocs/install_902.html for 9i installation specifics.
New Features With each version of JDeveloper comes a number of new features and functionality. Oracle’s 9i release of JDeveloper included many new features, such as:
• 100% Java IDE for Cross-Platform
• Powerful Web Services Development
• Integrated UML Modeling and Generation
• Built in J2EE Application Framework – Business Components for Java (BC4J)
• Advanced Client Support – Powerful JSP/Servlet Development Support
• Built-in Profiling Tools and Code Coach
• Integrated Support for Oracle9iAS Containers (OC4J)
• End-to-End J2EE Development and Deployment
• Advance Java, SQL, and XML capabilities
• Enhanced Debugging Support • Integrated Software
Configuration Management • Oracle Help for Java • One click deployment to
Oracle9i Application Server and BEA’s Web Logic
• Expanded SQL and PL/SQL Tools
• Expanded XML tools Note that as of the 9i release, JDeveloper is no longer an Oracle Application Server solution only. In other words, you can use JDeveloper with IBM or BEA’s Application Server solution. Oracle began incorporating modeling components into JDeveloper in this release too. The addition of numerous Web Service functionality points was impressive too. The 10g release of JDeveloper included the following features: • Application Development
Framework (ADF) – Faster Development – Integrated MVC patterns
• New J2EE Features – New wizards – TopLink integration – Web Service
improvements • IDE Enhancements
– New look and feel – Code editor
improvements – Better modeling
• Database Development – Database modeling – Editing database objects
JDeveloper’s wizards are exceptionally impressive. The biggest change to JDeveloper in the 10g release was the addition of the Application Developer Framework. As you’ll see in this paper, this framework will allow you to create a
Reviewed by Oracle Certified Master Korea Community
Quick Web Development using JDeveloper 10g scalable Web application using a GUI interface. If you’re looking for a best practices guide, Oracle Consulting's rapid component-based development approach/toolkit for building J2EE applications is called JHeadstart. This toolkit is available for download at http://otn.oracle.com/consulting/9iServices/JHeadstart2.html.
Reasons to Use JDeveloper There are MANY reasons that one might consider using JDeveloper including:
• Quicker Development Time • Source Control of Files • Central Repository of
Application • Business Components for Java
(BC4J) • Compilation time • Pre-Compiler of JSP • Point and Click Deployment to
Application Servers • Code Wizards • Code Coach • Code Generation • Data Tags and Libraries • Stand Alone J2EE application
testing • Separation of Source, Class, Web
files • J2EE compliant • Flexible development • Integration with other J2EE
My favorite reasons that I use JDeveloper include the point and click deployment, the wizards and direct access to the database. JDeveloper really does speed up my development time. For some people the source code control (i.e. check-in/out capabilities) functionality is important.
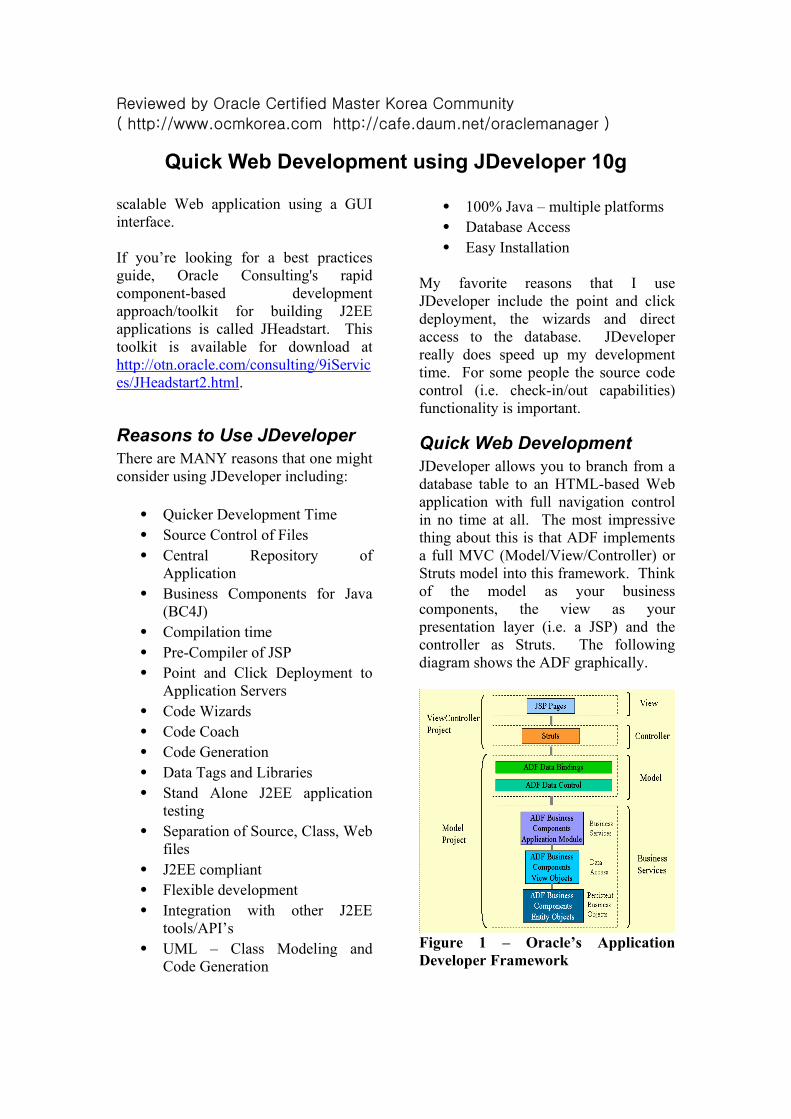
Quick Web Development JDeveloper allows you to branch from a database table to an HTML-based Web application with full navigation control in no time at all. The most impressive thing about this is that ADF implements a full MVC (Model/View/Controller) or Struts model into this framework. Think of the model as your business components, the view as your presentation layer (i.e. a JSP) and the controller as Struts. The following diagram shows the ADF graphically.
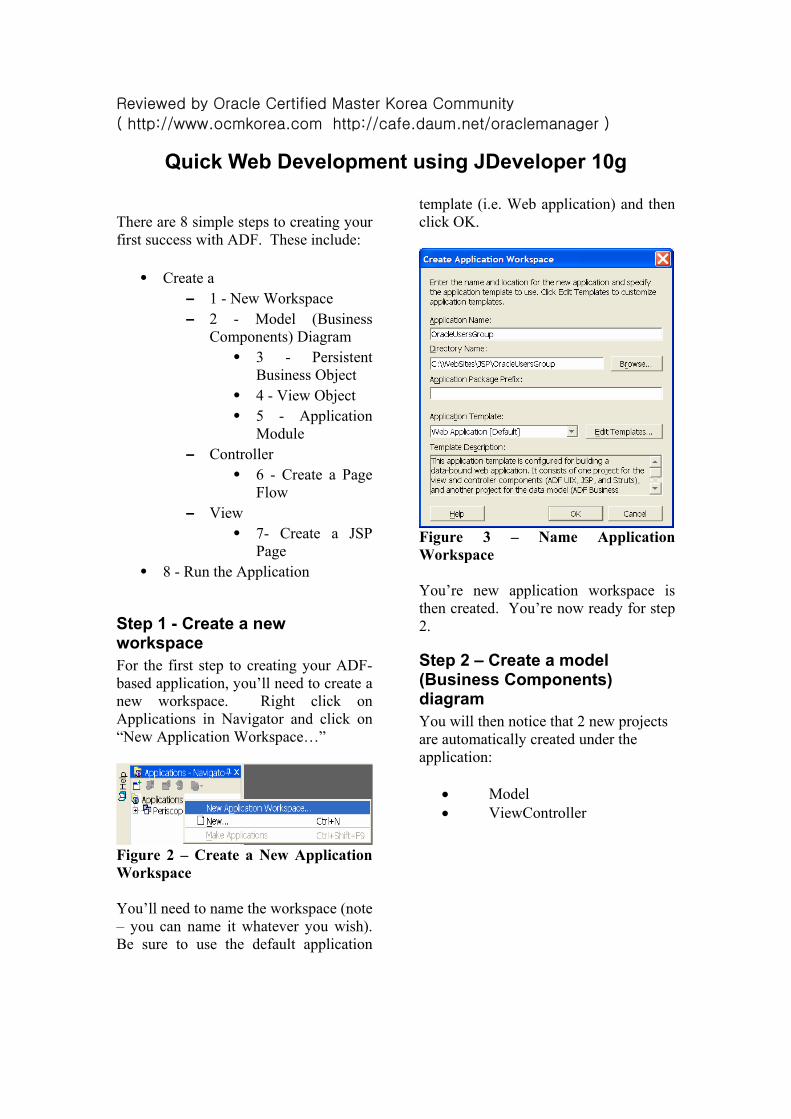
Step 1 - Create a new workspace For the first step to creating your ADF-based application, you’ll need to create a new workspace. Right click on Applications in Navigator and click on “New Application Workspace…”
Figure 2 – Create a New Application Workspace You’ll need to name the workspace (note – you can name it whatever you wish). Be sure to use the default application
template (i.e. Web application) and then click OK.
Figure 3 – Name Application Workspace You’re new application workspace is then created. You’re now ready for step 2.
Step 2 – Create a model (Business Components) diagram You will then notice that 2 new projects are automatically created under the application:
• Model • ViewController
Reviewed by Oracle Certified Master Korea Community
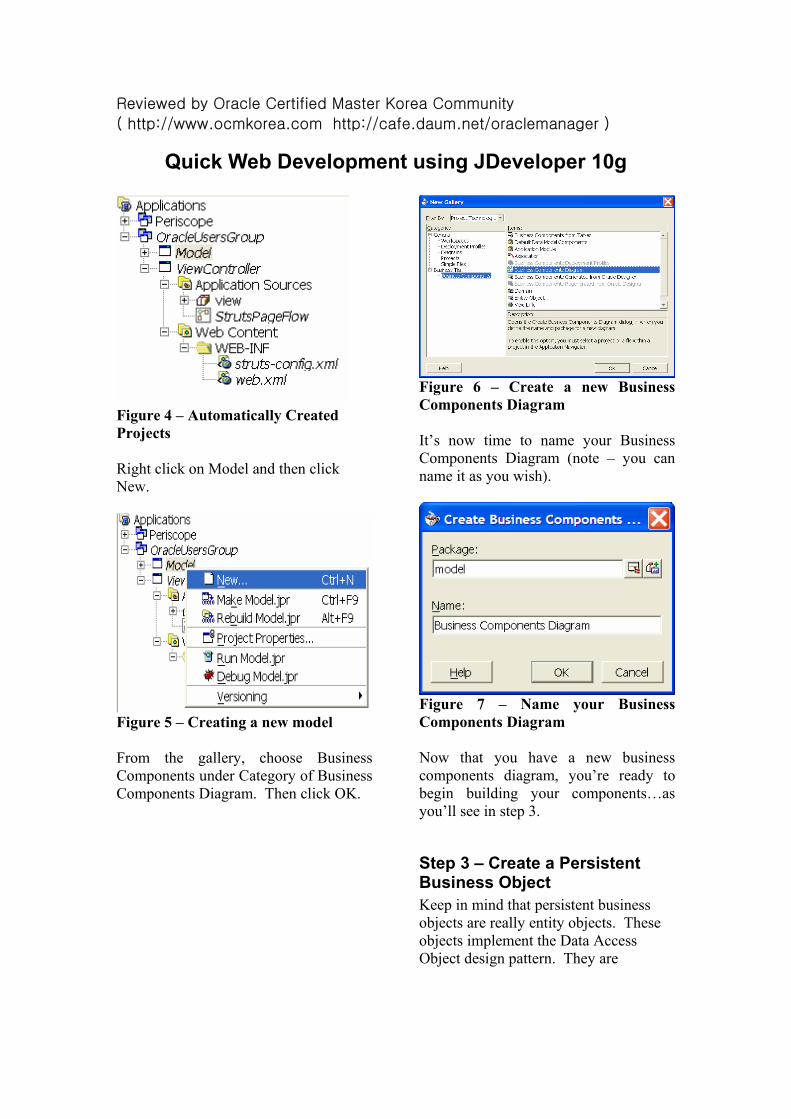
Figure 4 – Automatically Created Projects Right click on Model and then click New.
Figure 5 – Creating a new model From the gallery, choose Business Components under Category of Business Components Diagram. Then click OK.
Figure 6 – Create a new Business Components Diagram It’s now time to name your Business Components Diagram (note – you can name it as you wish).
Figure 7 – Name your Business Components Diagram Now that you have a new business components diagram, you’re ready to begin building your components…as you’ll see in step 3.
Step 3 – Create a Persistent Business Object Keep in mind that persistent business objects are really entity objects. These objects implement the Data Access Object design pattern. They are
Reviewed by Oracle Certified Master Korea Community
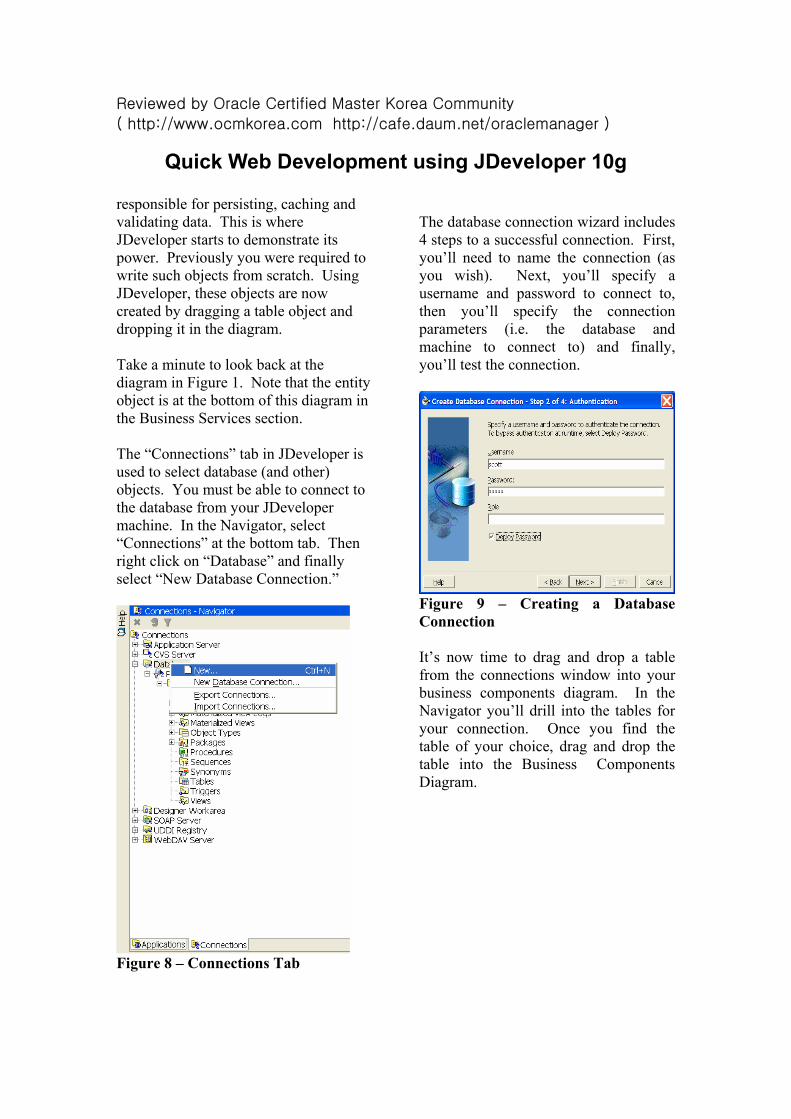
Quick Web Development using JDeveloper 10g responsible for persisting, caching and validating data. This is where JDeveloper starts to demonstrate its power. Previously you were required to write such objects from scratch. Using JDeveloper, these objects are now created by dragging a table object and dropping it in the diagram. Take a minute to look back at the diagram in Figure 1. Note that the entity object is at the bottom of this diagram in the Business Services section. The “Connections” tab in JDeveloper is used to select database (and other) objects. You must be able to connect to the database from your JDeveloper machine. In the Navigator, select “Connections” at the bottom tab. Then right click on “Database” and finally select “New Database Connection.”
Figure 8 – Connections Tab
The database connection wizard includes 4 steps to a successful connection. First, you’ll need to name the connection (as you wish). Next, you’ll specify a username and password to connect to, then you’ll specify the connection parameters (i.e. the database and machine to connect to) and finally, you’ll test the connection.
Figure 9 – Creating a Database Connection It’s now time to drag and drop a table from the connections window into your business components diagram. In the Navigator you’ll drill into the tables for your connection. Once you find the table of your choice, drag and drop the table into the Business Components Diagram.
Reviewed by Oracle Certified Master Korea Community
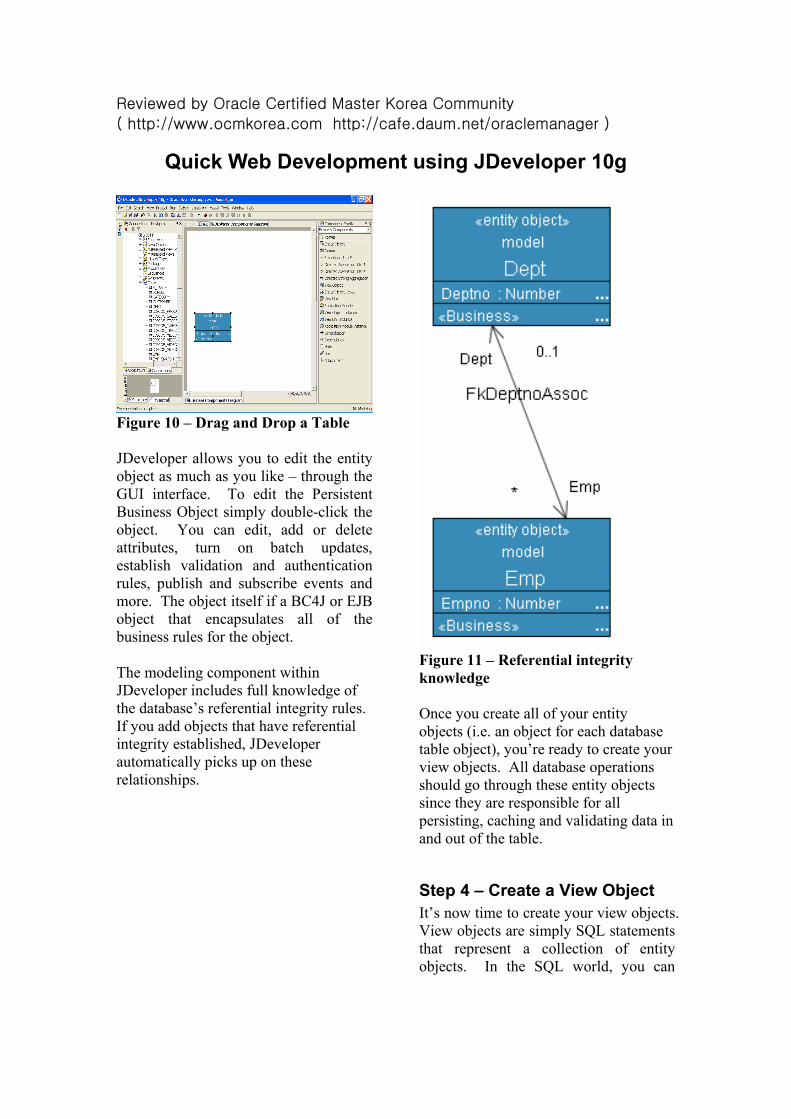
Figure 10 – Drag and Drop a Table JDeveloper allows you to edit the entity object as much as you like – through the GUI interface. To edit the Persistent Business Object simply double-click the object. You can edit, add or delete attributes, turn on batch updates, establish validation and authentication rules, publish and subscribe events and more. The object itself if a BC4J or EJB object that encapsulates all of the business rules for the object. The modeling component within JDeveloper includes full knowledge of the database’s referential integrity rules. If you add objects that have referential integrity established, JDeveloper automatically picks up on these relationships.
Figure 11 – Referential integrity knowledge Once you create all of your entity objects (i.e. an object for each database table object), you’re ready to create your view objects. All database operations should go through these entity objects since they are responsible for all persisting, caching and validating data in and out of the table.
Step 4 – Create a View Object It’s now time to create your view objects. View objects are simply SQL statements that represent a collection of entity objects. In the SQL world, you can
Reviewed by Oracle Certified Master Korea Community
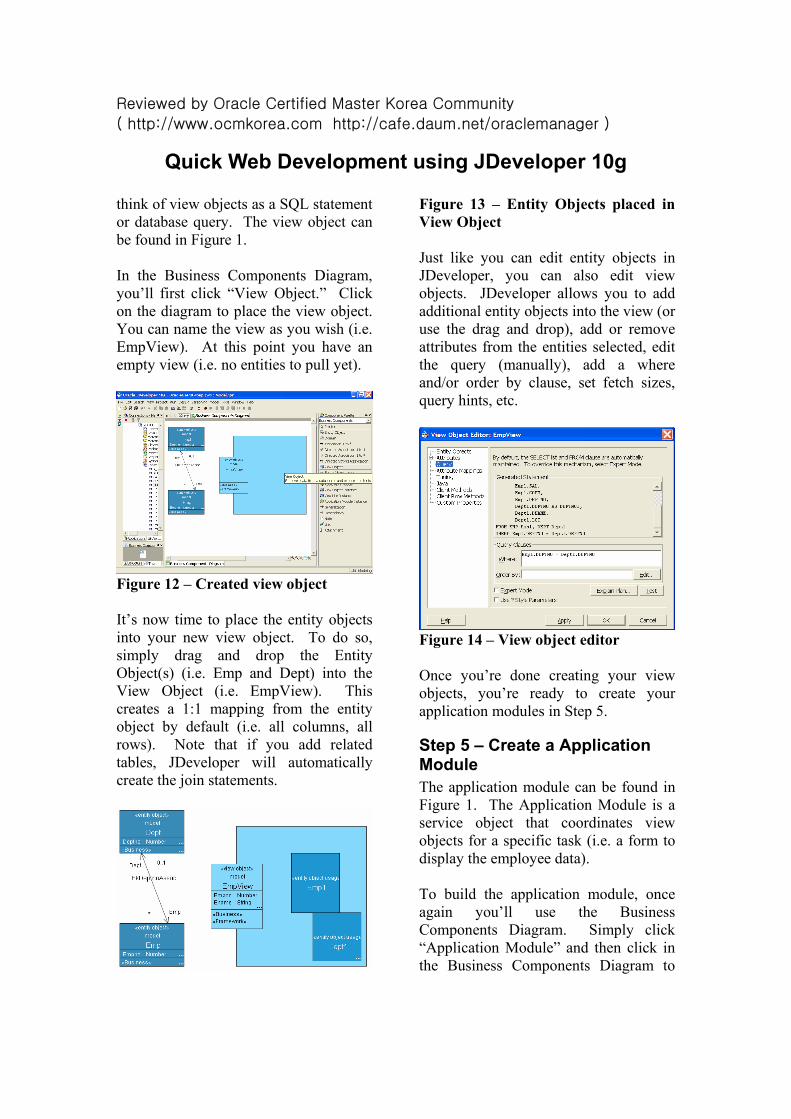
Quick Web Development using JDeveloper 10g think of view objects as a SQL statement or database query. The view object can be found in Figure 1. In the Business Components Diagram, you’ll first click “View Object.” Click on the diagram to place the view object. You can name the view as you wish (i.e. EmpView). At this point you have an empty view (i.e. no entities to pull yet).
Figure 12 – Created view object It’s now time to place the entity objects into your new view object. To do so, simply drag and drop the Entity Object(s) (i.e. Emp and Dept) into the View Object (i.e. EmpView). This creates a 1:1 mapping from the entity object by default (i.e. all columns, all rows). Note that if you add related tables, JDeveloper will automatically create the join statements.
Figure 13 – Entity Objects placed in View Object Just like you can edit entity objects in JDeveloper, you can also edit view objects. JDeveloper allows you to add additional entity objects into the view (or use the drag and drop), add or remove attributes from the entities selected, edit the query (manually), add a where and/or order by clause, set fetch sizes, query hints, etc.
Figure 14 – View object editor Once you’re done creating your view objects, you’re ready to create your application modules in Step 5.
Step 5 – Create a Application Module The application module can be found in Figure 1. The Application Module is a service object that coordinates view objects for a specific task (i.e. a form to display the employee data). To build the application module, once again you’ll use the Business Components Diagram. Simply click “Application Module” and then click in the Business Components Diagram to
Reviewed by Oracle Certified Master Korea Community
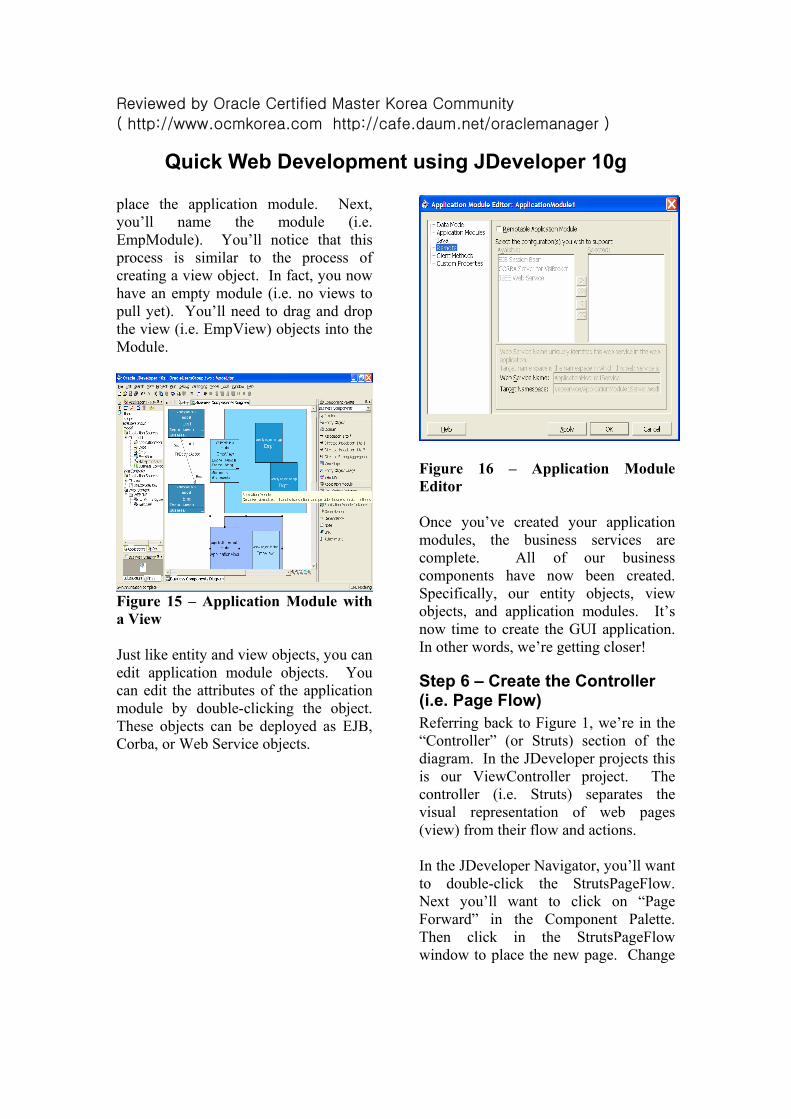
Quick Web Development using JDeveloper 10g place the application module. Next, you’ll name the module (i.e. EmpModule). You’ll notice that this process is similar to the process of creating a view object. In fact, you now have an empty module (i.e. no views to pull yet). You’ll need to drag and drop the view (i.e. EmpView) objects into the Module.
Figure 15 – Application Module with a View Just like entity and view objects, you can edit application module objects. You can edit the attributes of the application module by double-clicking the object. These objects can be deployed as EJB, Corba, or Web Service objects.
Figure 16 – Application Module Editor Once you’ve created your application modules, the business services are complete. All of our business components have now been created. Specifically, our entity objects, view objects, and application modules. It’s now time to create the GUI application. In other words, we’re getting closer!
Step 6 – Create the Controller (i.e. Page Flow) Referring back to Figure 1, we’re in the “Controller” (or Struts) section of the diagram. In the JDeveloper projects this is our ViewController project. The controller (i.e. Struts) separates the visual representation of web pages (view) from their flow and actions. In the JDeveloper Navigator, you’ll want to double-click the StrutsPageFlow. Next you’ll want to click on “Page Forward” in the Component Palette. Then click in the StrutsPageFlow window to place the new page. Change
Reviewed by Oracle Certified Master Korea Community
Quick Web Development using JDeveloper 10g the name from “Page1” (don’t remove the forward slash) to the name of your choice (i.e. /emp).
Figure 17 – Struts Page Flows That’s an easy task now isn’t it? It’s now time to generate the JSP page.
Step 7 – Create a JSP Page We’re now at the top of Figure 1 – in the view section. It’s time to create a JSP page that automatically binds to a Struts action. To accomplish this, simply double-click the Struts/forward action icon on the page flow diagram and then name the Java Server Page (JSP). Make sure edit this page now is clicked and click OK.
Figure 18 – Create a JSP You’ll start off with a blank JSP page. You’ll need to drop your business components onto the page at this time. Utilizing the business service you created in the model, you’ll create the
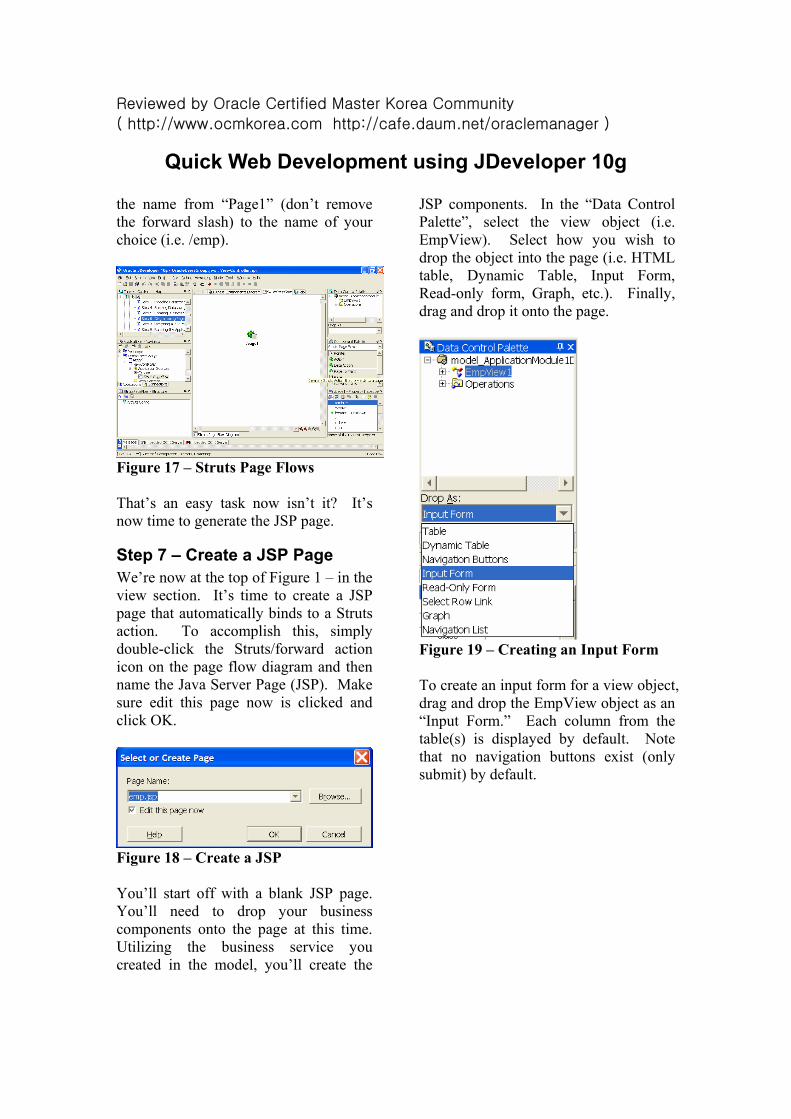
JSP components. In the “Data Control Palette”, select the view object (i.e. EmpView). Select how you wish to drop the object into the page (i.e. HTML table, Dynamic Table, Input Form, Read-only form, Graph, etc.). Finally, drag and drop it onto the page.
Figure 19 – Creating an Input Form To create an input form for a view object, drag and drop the EmpView object as an “Input Form.” Each column from the table(s) is displayed by default. Note that no navigation buttons exist (only submit) by default.
Reviewed by Oracle Certified Master Korea Community
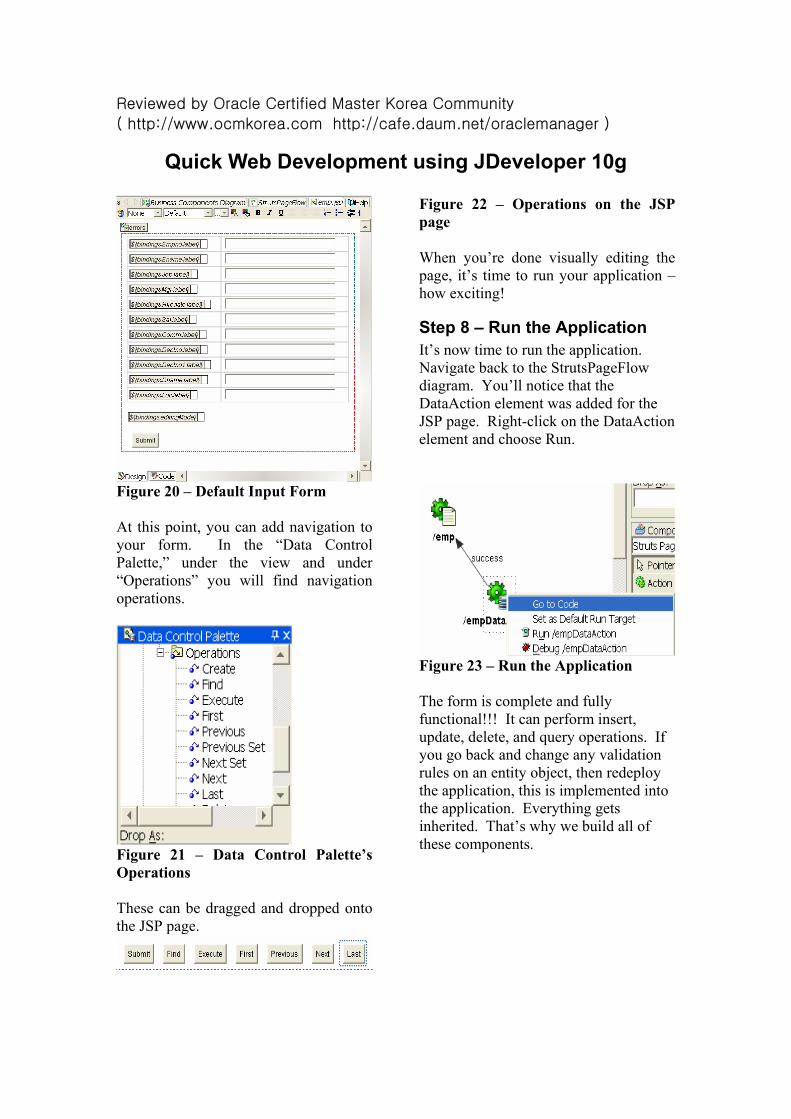
Figure 20 – Default Input Form At this point, you can add navigation to your form. In the “Data Control Palette,” under the view and under “Operations” you will find navigation operations.
Figure 21 – Data Control Palette’s Operations These can be dragged and dropped onto the JSP page.
Figure 22 – Operations on the JSP page When you’re done visually editing the page, it’s time to run your application – how exciting!
Step 8 – Run the Application It’s now time to run the application. Navigate back to the StrutsPageFlow diagram. You’ll notice that the DataAction element was added for the JSP page. Right-click on the DataAction element and choose Run.
Figure 23 – Run the Application The form is complete and fully functional!!! It can perform insert, update, delete, and query operations. If you go back and change any validation rules on an entity object, then redeploy the application, this is implemented into the application. Everything gets inherited. That’s why we build all of these components.
Reviewed by Oracle Certified Master Korea Community
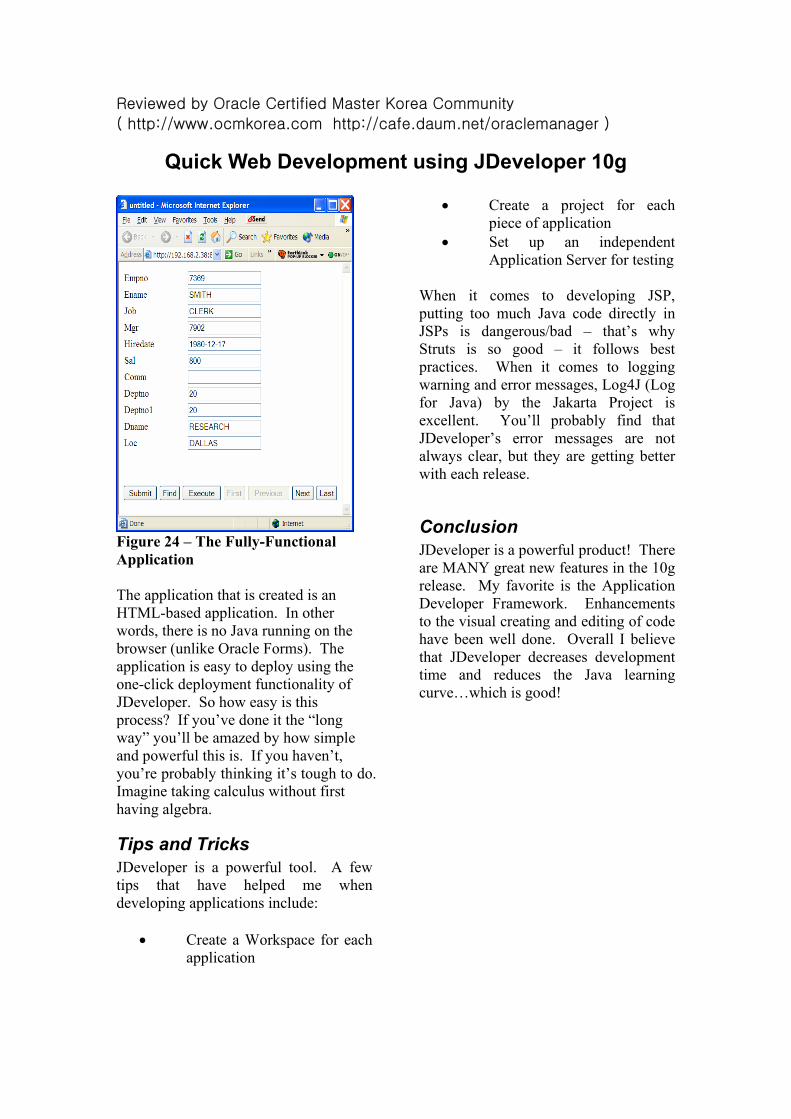
Figure 24 – The Fully-Functional Application The application that is created is an HTML-based application. In other words, there is no Java running on the browser (unlike Oracle Forms). The application is easy to deploy using the one-click deployment functionality of JDeveloper. So how easy is this process? If you’ve done it the “long way” you’ll be amazed by how simple and powerful this is. If you haven’t, you’re probably thinking it’s tough to do. Imagine taking calculus without first having algebra.
Tips and Tricks JDeveloper is a powerful tool. A few tips that have helped me when developing applications include:
• Create a Workspace for each application
• Create a project for each piece of application
• Set up an independent Application Server for testing
When it comes to developing JSP, putting too much Java code directly in JSPs is dangerous/bad – that’s why Struts is so good – it follows best practices. When it comes to logging warning and error messages, Log4J (Log for Java) by the Jakarta Project is excellent. You’ll probably find that JDeveloper’s error messages are not always clear, but they are getting better with each release.
Conclusion JDeveloper is a powerful product! There are MANY great new features in the 10g release. My favorite is the Application Developer Framework. Enhancements to the visual creating and editing of code have been well done. Overall I believe that JDeveloper decreases development time and reduces the Java learning curve…which is good!