Page 1
Chapter 1
An Insider’s Look at Jewelry Making and Beading
In This Chapter▶ Deciding whether jewelry making is for you
▶ Introducing jewelry-making techniques
▶ Choosing your projects
▶ Making more from your jewelry-making hobby
Although I could spend time explaining how rewarding, creative, and
fun jewelry making and beading are, I want to show you instead. Look
at the beautiful photos in this book, which are filled with handmade jewelry
pieces. Just flip through the chapters, look at some of the projects, and come
on back to this chapter when you’re ready. Go ahead, I’ll wait.
Like what you see? Great! Intimidated? I hope not. Don’t worry. I spend the
rest of the book giving you details on how to make each and every piece you
see in the pages of this book.
In this chapter, I give you an overview of the topics and projects that I cover
in the book, and I help you start making jewelry on your own using a variety
of techniques that you can apply to the projects throughout this book. I also
give you plenty of tips for taking these techniques and adapting them to
create your own designs. And finally, I give you ideas for making money with
your newfound hobby. While reading, feel free to take a break at any time,
whip out your pliers, and bead something.
Why Make Jewelry Yourself?The best reason to make jewelry yourself is pure enjoyment. Pouring your
artistic energy into a new creation is incredibly satisfying. But this creativity
has a practical side, too: You produce something to wear. You can make very
simple pieces to wear today, or you can create complicated designs that take
hours or even days to complete. You’re in charge and limited only by your
imagination.
05_9781118497821-ch01.indd 705_9781118497821-ch01.indd 7 3/13/13 12:04 PM3/13/13 12:04 PM
COPYRIG
HTED M
ATERIAL
Page 2
8 Part I: Getting Started with Jewelry Making and Beading
Here are a few of my other favorite reasons for making jewelry:
✓ You can create one-of-a-kind pieces that no one else has.
✓ You can make inexpensive, beautiful gifts for your family and friends.
✓ You want to spend hours culling through strings, strands, and bins of
beautiful beads.
✓ You have tons of divided plastic containers and don’t know what to do
with them.
✓ You can’t fathom giving the Kardashians (or their Kardashian Kollection
jewelry line) any more fame or fortune.
✓ You can start a low-cost home-based business.
✓ You can always find a new technique, stitch, or pattern that you haven’t
tried, which means you can’t reach the end of everything there is to
know about this hobby.
Finding ways to inspire your creativityWhere you go with your newfound hobby is entirely up to you. You choose
where your interest lies, what techniques and pieces to develop, and what to
do with your pieces when you’re done. Let your creativity be your guide.
If you’re looking for ways to get the creative juices flowing, consider the
following:
✓ Go to your library or bookstore. Look at any jewelry-making books
you can find. Even if a particular book focuses on a technique you don’t
think you’ll ever try, it’s worth spending time looking at it. You can get
countless ideas from looking at what other people have done.
Check to see whether your local library has an online catalog at its
website. Some search terms for jewelry-making inspirations include
jewelry making, jewelry trends, bead, beading, bead making, embellish,
bead weaving, fashion, jewelry design, design, home décor, and crafts.
Don’t look only in the adult section (and I don’t mean the smutty one!)
at your library or bookstore. Check out the kids’ craft areas, too, where
you can find great resources that can provide inspiration.
✓ Browse social media curation websites. Pinterest (www.pinterest.com), Pearltrees (www.pearltrees.com), and The Fancy (www.thefancy.com) are social media curation websites that let users create
virtual pin boards of images of designs, projects, and ideas that inspire
them. You can find high-end designs and DIY projects all in one place.
Create your own boards full of whatever you love. Many jewelry pictures
link back to full instructions for making the items. Clicking through the
images is a great way to find new blogs and websites of crafty people
making beautiful things.
If you haven’t been to a site like Pinterest before, I warn you it’s
addictive. You can spend hours looking at projects, but remember that
the real fun is in making them.
05_9781118497821-ch01.indd 805_9781118497821-ch01.indd 8 3/13/13 12:04 PM3/13/13 12:04 PM
Page 3
9 Chapter 1: An Insider’s Look at Jewelry Making and Beading
✓ Search the Internet. Look up different styles of jewelry, search for
ancient inspirations and the hottest trends, or look up specific terms
like “wrap bracelet” or “steampunk style,” and you’re sure to get some
inspiring pictures, techniques, and tutorials. Also take a look at celebrity
“news” sites like www.eonline.com to see what the stars think is hot.
Look at fashion sites like www.instyle.com, www.baublebar.com, or
www.shopbop.com. Look at their accessories sections to zero in on
jewelry inspiration.
✓ Subscribe to a jewelry-making or beading magazine. A library is a
great place to get a sampling of jewelry-making magazines, but getting
your own copy in the mail on a regular basis is a boon to your creative
energy.
✓ Order a catalog from a large bead and jewelry-supply house. Having
a catalog is like carrying a bead store with you! My personal favorite
is from Fire Mountain Gems and Beads; I like its catalog because it has
plenty of project ideas mixed with fantastic full-color photos. Every
time I pick up the catalog, I want to make several somethings. Visit Fire
Mountain’s website at www.firemountaingems.com and click Free
Catalog, or call the customer service number (800-355-2137) to request a
free 500+-page catalog.
✓ Spend a few hours in a craft or bead store. Ultimately, there’s no better
way to get inspired right now than to walk into your local bead store.
Feel the beads. Hold them in your hand. Walk around with them. Hold
them next to other beads. Lay them out on a bead board. Some stores
actually have tools you can use to make your pieces right there. Check
out Chapter 3 for design tips and ideas on pairing beads together.
If you’re like me, you’ll never spend just a short time in a bead store, so
allow plenty of time to wander, explore, and create.
Deciding whether to set up a separate workspaceShould you set up a separate jewelry-making workspace? In a word: probably.
How’s that for definite? But seriously, setting up a workspace just for making
jewelry has many benefits. Here are just a few of them:
✓ You control the noise level. If you like to work to music, blare it. If you
prefer silence, don’t even keep a radio in your space. By having your
own workspace, you can also keep other people from making noise in
your space when you want a quiet atmosphere.
✓ You control the light level. If you’re trying to make jewelry in the same
room where someone else is trying to meditate, read, or do homework,
your lighting needs may not take priority. In your own space, you’re the
boss.
✓ You control the activity level. You may have difficulty being creative
and satisfied when people are milling around and asking you questions
or if the phone is ringing. Or maybe for you, having activity around you
isn’t a problem. You can locate your workspace outside (or inside) the
flow of everything else going on in your home.
05_9781118497821-ch01.indd 905_9781118497821-ch01.indd 9 3/13/13 12:04 PM3/13/13 12:04 PM
Page 4
10 Part I: Getting Started with Jewelry Making and Beading
✓ You can leave a half-finished project on a bead board (covered, of course) without being in anyone’s way. Because jewelry making is fun
for everyone, you’ll have no shortage of curious onlookers. Accidents
can happen when they look, though, and a separate workspace keeps
unfinished projects with loose beads away from prying eyes and
exploring hands.
✓ You can lock your door. A little added security may be just what you
need to complete your masterpiece. You decide what you need in your
space. Just having a door is helpful, but a lock is that much safer.
Are you sensing a pattern here?
Ultimately, having a separate studio or office for making jewelry is ideal. But
don’t let the fact that you don’t or can’t have one right now keep you from
getting started. Check out Chapter 4 for tips on making the most out of
whatever space you do have.
Discovering Jewelry-Making Designs and Techniques
I intersperse design tips and tricks throughout this book, and I offer many
color photos to illustrate my suggestions. For many of the projects I present,
I also give you ideas for making them your own.
The following sections briefly explain a few simple jewelry-making techniques.
You can get the lowdown on each in Part II.
Stringing and knottingStringing, threading beads onto a cord or thread, is the first technique most
jewelry makers start with. In fact, you can get started with stringing in this
very chapter in Project 1-1. Techniques for stringing beads and connecting
jewelry findings are used in some way or another in almost every piece of
jewelry.
Knotting, tying knots between beads, is traditionally used to separate fine
gemstones, like pearls, on simple elegant strands. But you can make trendy
pieces like the Tin Cup Necklace (see Project 5-2 in Chapter 5) using this
technique as well.
Wire wrappingWire wrapping involves twisting and bending wire into shapes or around
beads. This technique is exciting because you can do just about anything
with it. Create delicate chains, beautiful wrapped beads, or easy dangle earrings.
Look to Chapter 6 for exciting and easy designs using this technique.
05_9781118497821-ch01.indd 1005_9781118497821-ch01.indd 10 3/13/13 12:04 PM3/13/13 12:04 PM
Page 5
11 Chapter 1: An Insider’s Look at Jewelry Making and Beading
Putting a few techniques to useProject 1-1, an Eternity Knot Pendant on Leather Cord, gives you a chance to
try some simply jewelry-making techniques.
Project 1-1: Eternity Knot Pendant on Leather CordYou use a simple sterling silver eternity knot pendant in this design. If you
have a different favorite pendant (like a wolf, bear, arrowhead, or cross, for
example), feel free to substitute. And if leather isn’t your thing, a hemp or silk
cord can also display a beautiful single pendant. Take a look at Chapter 2 if
you need help with any of the tools or supplies. Check out Figure 1-3 to see
the finished project.
I used a prepackaged clasp set to finish this necklace. It came with two coil
ends, and one end already had the lobster claw attached. If you’d rather use
the individual findings than a set, you need two coil ends, a lobster claw, and a
jump ring to attach the lobster claw to one of the coil ends.
Tools and Materials
Chain-nose pliers
2 feet black leather cord, 2mm round
Eternity pendant, sterling silver
1 clasp set with 2 coil ends and a lobster claw, silver
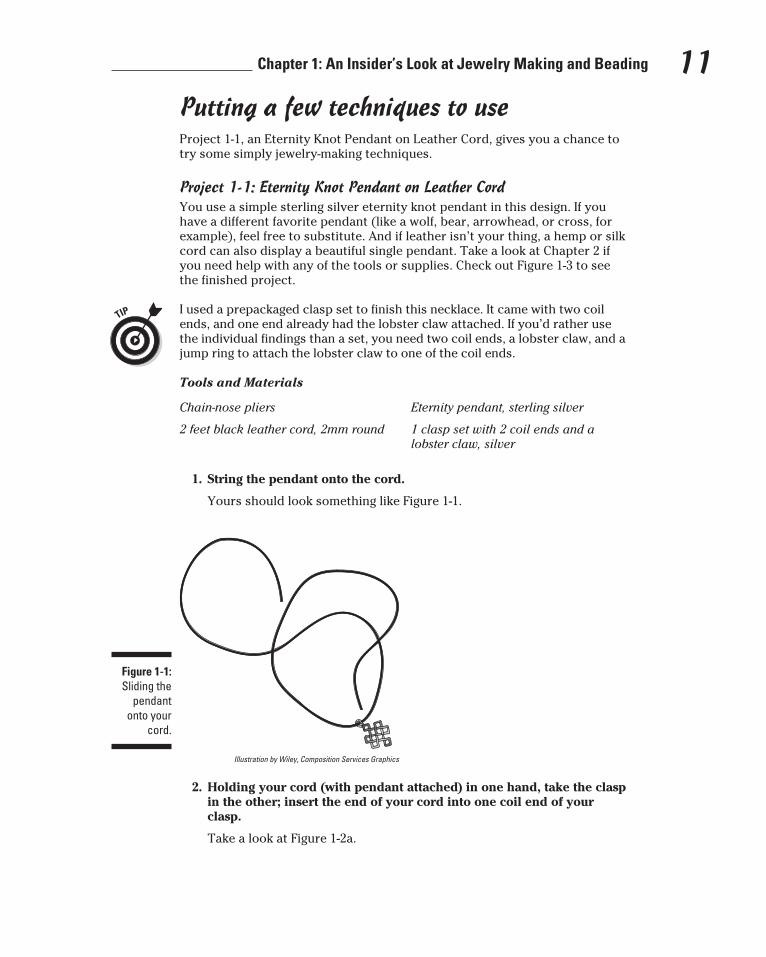
1. String the pendant onto the cord.
Yours should look something like Figure 1-1.
Figure 1-1: Sliding the
pendant onto your
cord.
Illustration by Wiley, Composition Services Graphics
2. Holding your cord (with pendant attached) in one hand, take the clasp in the other; insert the end of your cord into one coil end of your clasp.
Take a look at Figure 1-2a.
05_9781118497821-ch01.indd 1105_9781118497821-ch01.indd 11 3/13/13 12:04 PM3/13/13 12:04 PM
Page 6
12 Part I: Getting Started with Jewelry Making and Beading
Figure 1-2: Attaching
the coil-end clasp.
Illustration by Wiley, Composition Services Graphics
3. Using the chain-nose pliers, pinch the coil end around your leather cord, as shown in Figure 1-2b.
Use your pliers to bend the last coil in the clasp, instead of trying to
mash the entire end of the clasp flat.
4. Repeat Steps 2 and 3 to finish the other side of your clasp.
The finished clasp should look like Figure 1-2c.
Figure 1-3: Eternity
Knot Pendant
on Leather Cord.
Photograph by Andy Dismore
05_9781118497821-ch01.indd 1205_9781118497821-ch01.indd 12 3/13/13 12:04 PM3/13/13 12:04 PM
Page 7
13 Chapter 1: An Insider’s Look at Jewelry Making and Beading
From Antique to Funky: Creating Innovative Jewelry
Jewelry isn’t just for special occasions. Whatever your style and interest,
with more than 70 projects in this book, you can make pieces that you can
wear or use every day. The tough part is deciding which projects to make
first.
Here are a few suggestions for how to prioritize your project list:
✓ Wrap bracelets: Long bracelets that wrap two or three times around the
wrist, closing with a chunky clasp, are extremely popular right now.
You can find versions of this bracelet with different bead and cord
combinations in Chapter 9 (Project 9-9) and Chapter 11 (Project 11-3).
Take a look at Figure 1-4 to see each project.
Figure 1-4: Wrap
bracelets.
Photographs by Matt Bowen and Andy Dismore
✓ Customized rings: Chunky rings are a great way to add personality to
your look. Making them yourself is a great way to add to your collection on
the cheap. Take a look at the Wire-wrapped Ring in Chapter 9 (Project
9-11) and Button Rings in Chapter 12 (Project 12-4) and check out
Figure 1-5. After you get the technique down, you can create one for
every outfit.
✓ Chunky statement necklaces: Large, colorful baubles are hot, hot, hot.
I create a few in this book, including the Fabric Pom Pom Bib Necklace
in Chapter 8 (Project 8-6), the Layered Charm Necklace in Chapter 9
(Project 9-4), and the Turquoise Bib Necklace in Chapter 10 (Project
10-8). Check them out in Figure 1-6.
✓ Hip, simple earrings: Try the Wrapped Beaded Earrings in Chapter 6
(Project 6-4) or the Steampunk Chandelier Earrings in Chapter 9 (Project
9-3), both shown in Figure 1-7. I include several earring projects in their
very own section in Chapter 9.
05_9781118497821-ch01.indd 1305_9781118497821-ch01.indd 13 3/13/13 12:04 PM3/13/13 12:04 PM
Page 8
14 Part I: Getting Started with Jewelry Making and Beading
Figure 1-5: Fashionable
rings.
Photographs by Matt Bowen and Andy Dismore
Figure 1-6: Statement necklaces.
Photographs by Matt Bowen
05_9781118497821-ch01.indd 1405_9781118497821-ch01.indd 14 3/13/13 12:04 PM3/13/13 12:04 PM
Page 9
15 Chapter 1: An Insider’s Look at Jewelry Making and Beading
Figure 1-7: Simple
earrings.
Photographs by Andy Dismore
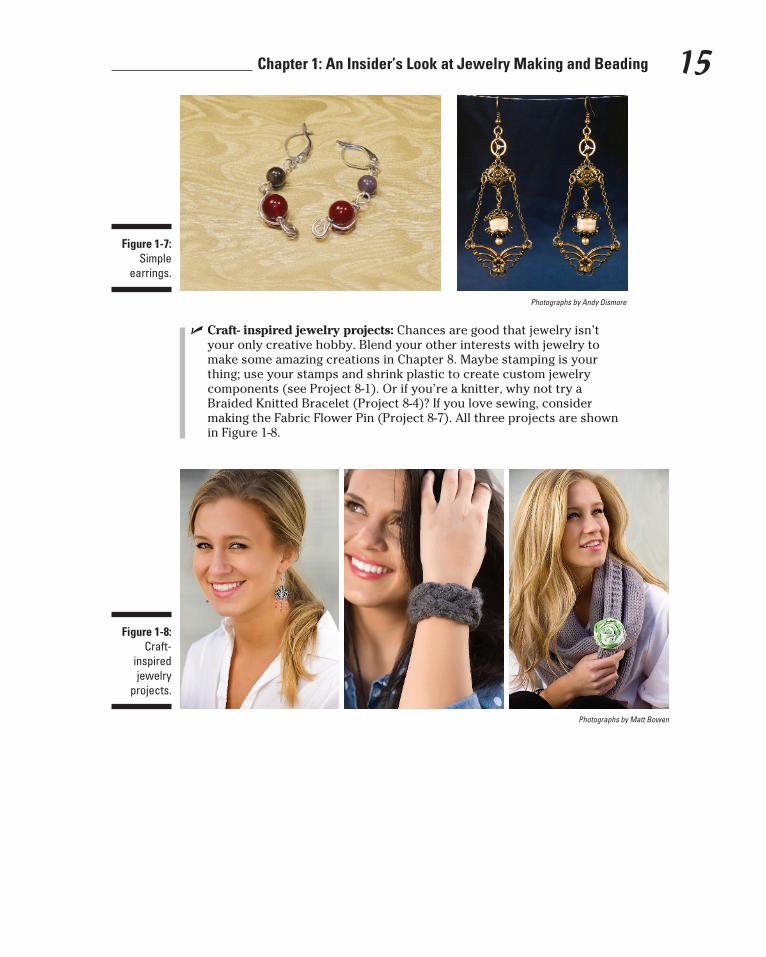
✓ Craft- inspired jewelry projects: Chances are good that jewelry isn’t
your only creative hobby. Blend your other interests with jewelry to
make some amazing creations in Chapter 8. Maybe stamping is your
thing; use your stamps and shrink plastic to create custom jewelry
components (see Project 8-1). Or if you’re a knitter, why not try a
Braided Knitted Bracelet (Project 8-4)? If you love sewing, consider
making the Fabric Flower Pin (Project 8-7). All three projects are shown
in Figure 1-8.
Figure 1-8: Craft-
inspired jewelry
projects.
Photographs by Matt Bowen
05_9781118497821-ch01.indd 1505_9781118497821-ch01.indd 15 3/13/13 12:04 PM3/13/13 12:04 PM
Page 10
16 Part I: Getting Started with Jewelry Making and Beading
✓ Vintage gems: One of my favorite pastimes is digging around thrift
stores to discover hidden treasures. In this updated edition of the
book, I include a whole chapter (Chapter 12) on upcycling these finds
and using them in new and exciting ways. Take a look at the Recycled
Component Necklace (Project 12-6) and Gear and Sprocket Cuff Bracelet
(Project 12-7) for inspiration. Both are shown in Figure 1-9.
Figure 1-9: Vintage
finds find a new home.
Photographs by Matt Bowen and Andy Dismore
Don’t miss the themed chapters in Part III, where you find, among other
things, a chapter on creating high-end pieces (see Chapter 10). Also check
out Chapter 13, in which you create home décor accents that utilize
jewelry-making techniques and beading.
Taking Your Hobby to the Next LevelWhen do you know you’re addicted to jewelry making and beading? When
you just can’t help but share it with everyone else. It’s hard to resist when
people compliment you on your pieces or your kids (and their friends) want
to get into your bead bins.
Assuming that you want to, you can involve other people in your hobby in
many ways. Here are a few favorites:
✓ Try a new technique with a friend. If she’s a wire wrapper and you’re
an experienced bead stringer, take a bead-making class together. Often,
the most interesting and innovative pieces of jewelry employ several
jewelry-making techniques. Part II introduces all the techniques used in
this book.
✓ Host a jewelry-making party for your friends. I show you how to set
it up, whom to invite, and how to organize a great party. Check out
Chapter 15 for details.
✓ Make jewelry with kids. In Chapter 14, I give you step-by-step support
for choosing the best projects for each age group, keeping everyone
interested and on task. Your kids will complete beautiful projects
everyone can be proud of.
05_9781118497821-ch01.indd 1605_9781118497821-ch01.indd 16 3/13/13 12:04 PM3/13/13 12:04 PM
Page 11
17 Chapter 1: An Insider’s Look at Jewelry Making and Beading
✓ Sell your pieces and your expertise. You can make money selling your
jewelry and your talent. Whether you’re sitting at your own booth at an
art show or posting your pieces on Etsy (www.etsy.com, the leading
online handmade and vintage marketplace), you can find a market for
your pieces. In Chapter 16, I help you work through the legal and
logistical issues to find a way to make it work for you.
✓ Meet other jewelry makers online. Chapter 17 gives you tips for online
communities to check out. You could develop a group of trusted advis-
ers to give you advice, feedback on new designs, or tips on where to go
next.
✓ Develop your online presence as a jewelry maker. Go to social media
sites, such as Twitter and Pinterest. Create a profile that identifies you
and your jewelry-making hobby. Then search for other like-minded
people to follow, who may follow you back if they like your posts,
tweets, and pins.
✓ Take field trips. Go to crafts stores and bead stores when you travel for
business or pleasure. There’s no substitute for walking around a store
and looking at the lovely items. Most stores have inspiration pieces dis-
played to help get your own ideas flowing.
05_9781118497821-ch01.indd 1705_9781118497821-ch01.indd 17 3/13/13 12:04 PM3/13/13 12:04 PM
Page 12
18 Part I: Getting Started with Jewelry Making and Beading
05_9781118497821-ch01.indd 1805_9781118497821-ch01.indd 18 3/13/13 12:04 PM3/13/13 12:04 PM