56


11/29/10

Theme of the Course Meru University course 1200, Course Orientation and Technical Training, is a hands-on tour, step by step, on how to register and then use features on our course pages. We share how to log-on to webinar host Adobe Connect with fun interactive features. Learn how to join our discussion forum to share your insights in posts, read others, and reply. The goal of this short class is to make registering and participating in Meru University courses fun and easy and enable all students to fully participate in and gain 100% benefit from all classes.

123rf.com
Part 1: How to Register

11/29/10
You are not required to log in to the website to register; just go directly to the store.

First login to the store. If you're a first-time customer, still click Login.
All students, both new and returning customers, should first login to the store before purchasing a course.

.
If you’re a returning customer, enter your user name and store password, and click “Sign In.” Please note that your store password might be different from your Hearts Center website password. For security purposes, the next screen will show a six digit numerical code which you are required to enter in. If you’re a new customer, register in the store by entering your email address and creating a password. It must contain 6 characters with at least one uppercase, one lower case, and one nonletter (e.g., Password1). Then click “Register.” This will only register you in the store, and not the website or the course. Keep your user name or you may not be able to access the store. NOTE: Each student must register for Meru courses with their own store account username in order for our system to grant them access to their class. If you would like to gift a class to friends and family please use our convenient Hearts Center Gift Certificates, as explained on the following slide, and then have them register under their own store username.
.
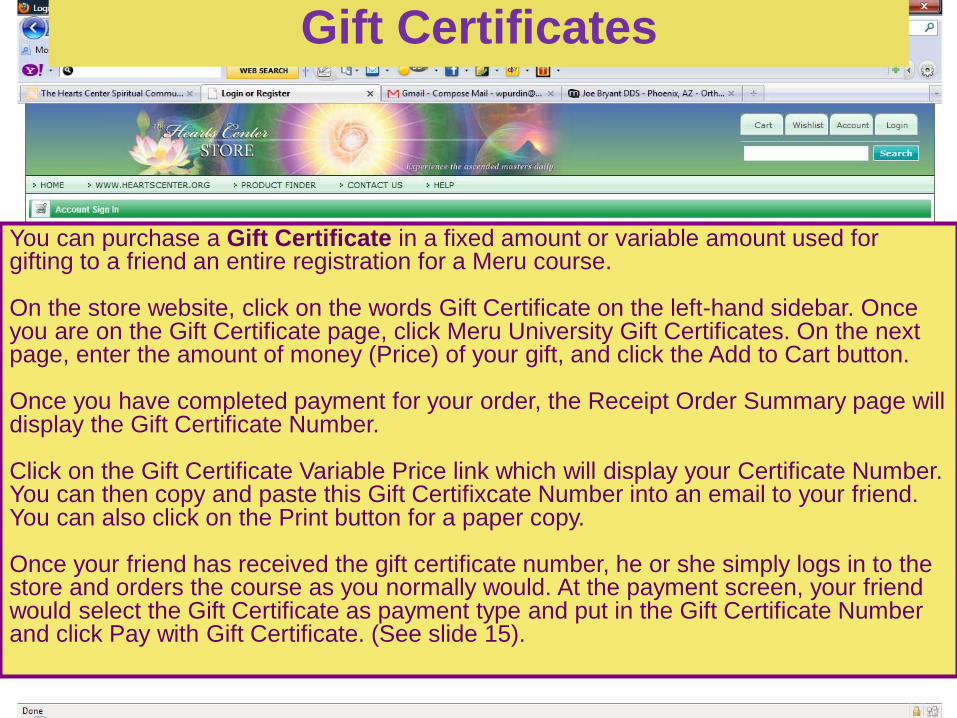
You can purchase a Gift Certificate in a fixed amount or variable amount used for gifting to a friend an entire registration for a Meru course. On the store website, click on the words Gift Certificate on the left-hand sidebar. Once you are on the Gift Certificate page, click Meru University Gift Certificates. On the next page, enter the amount of money (Price) of your gift, and click the Add to Cart button. Once you have completed payment for your order, the Receipt Order Summary page will display the Gift Certificate Number. Click on the Gift Certificate Variable Price link which will display your Certificate Number. You can then copy and paste this Gift Certifixcate Number into an email to your friend. You can also click on the Print button for a paper copy. Once your friend has received the gift certificate number, he or she simply logs in to the store and orders the course as you normally would. At the payment screen, your friend would select the Gift Certificate as payment type and put in the Gift Certificate Number and click Pay with Gift Certificate. (See slide 15).
Gift Certificates

First login to the store. If you're a first-time customer, still click Login.
Once logged in, click on the “Meru University” tab to find the course if it is not on the main page of the store.

Your user name
********
x
Then, click on the icon for the course. In this example, Course #1009.

Enter the type of registration and your full name.

When you register for a course in the bookstore, each book, whether recommended or required, will have box to check if it is sold in the store. Click on the box to check it. Then click “Add to Cart” You may also purchase course textbooks through Amazon on the course page if we do not carry these books in our store.

11/29/10
An appearance waiver and liability release will pop up. Please read it and click “accept” to continue with the registration.

Fill in the information indicated, and click “Continue.”
But first, if you have a coupon code, enter it in the box above and click “apply.” Coupons can be used for books and other products, including courses if they are so specified.

Make sure your billing address is correct. Enter your credit or debit card information, and click “Pay with Card.” If you plan to pay by check, see the next slide.

Paying by check? Mail it early! To ensure you have immediate access to your class, please allow 7 to 9 business days for your check to arrive and be processed, international students please allow 14-16 days. We must have received your check in order to grant you access to your class. Please include the order number and Meru class number on your check so that your registration payment can be correctly credited to your Meru class.
Paying By Check

Download the pdf file containing instructions for accessing the course page and webinar. It is under DIGITAL GOODS. Click on the icon under “download.” NOTE: You will also receive an email confirmation with these instructions.

You can save the pdf of these instructions onto your computer by selecting “Save File” and clicking OK. Store it in a special folder on your computer for the course.

11/29/10
Once you have completed your purchase of the course registration, please allow 24 hours for your Hearts Center website login to be upgraded which gives you permission to access the student-only information on the course page. Before your login is upgraded, you can find general information on the course page. To access the course page on the Hearts Center’s website, go to www. HeartCenter.org. If you are new to the website, please register at the top right and login to access the course page.

11/29/10
Under the Meru University tab on the Hearts Center website main menu bar, hover over Meru University, and choose your course from the drop-down list. Once you are on the course page, you must sign into the website to see your course access button. Use your Hearts Center website username and password to login. The remaining slides are on logging into and using Adobe Connect.
123rf.com
Part 2: Adobe Connect

11/29/10
Before accessing Adobe Connect, adjust your computer audio settings. First, make sure your USB headset is plugged in to your computer. Click on your “Start” menu, usually the first icon on the tool bar located in most cases at the bottom of the screen. Follow this path: Start > Control Panel > Sound >

11/29/10
Use the lower two tabs. After selecting the device, click “Set Default” to make your choice permanent. Then click the “Properties” tab to check the sound level. Adjust if necessary, using the volume control (not shown).

11/29/10
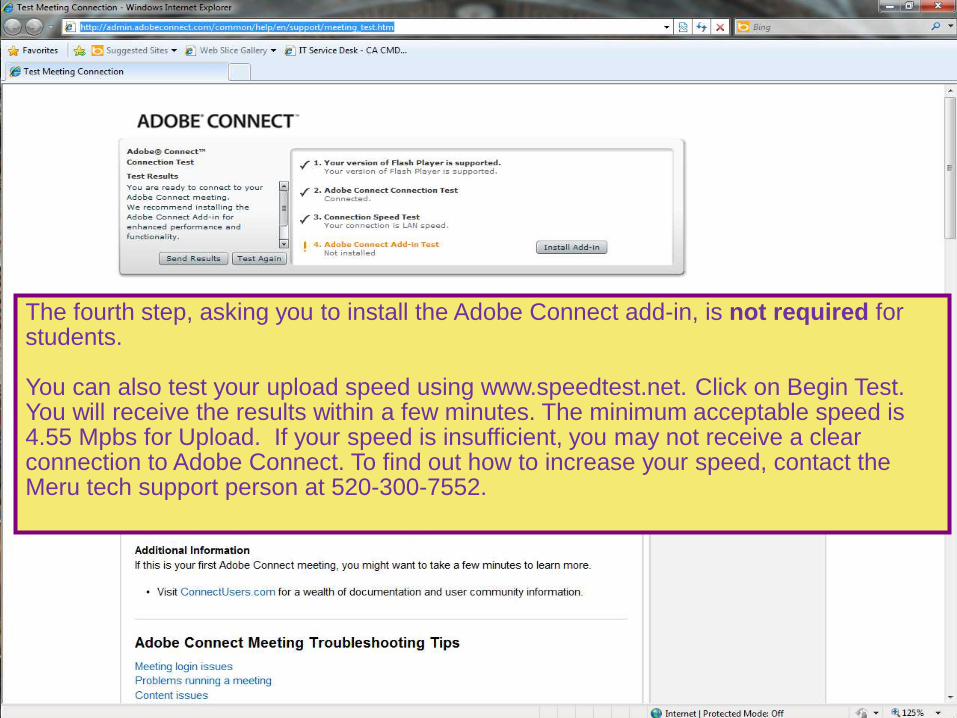
Go to http:/ /admin.adobeconnect.com/common/help/en/support/meeting_test.htm to test your computer speed prior to attending the class. The Connection Test checks that all system requirements of your computer are met. If you pass the first three steps of the test, you are ready to participate in a meeting. The fourth step, asking you to install the Adobe Connect add-in, is not required for students. · You can also test your upload speed using www.speedtest.net. o Click on Begin Test. You will receive the results within a few minutes. o The minimum acceptable speed is 4.55 Mpbs for Upload. If your speed is insufficient, you may not receive a clear connection to Adobe Connect.
11/29/10
The fourth step, asking you to install the Adobe Connect add-in, is not required for students. You can also test your upload speed using www.speedtest.net. Click on Begin Test. You will receive the results within a few minutes. The minimum acceptable speed is 4.55 Mpbs for Upload. If your speed is insufficient, you may not receive a clear connection to Adobe Connect. To find out how to increase your speed, contact the Meru tech support person at 520-300-7552.
11/29/10
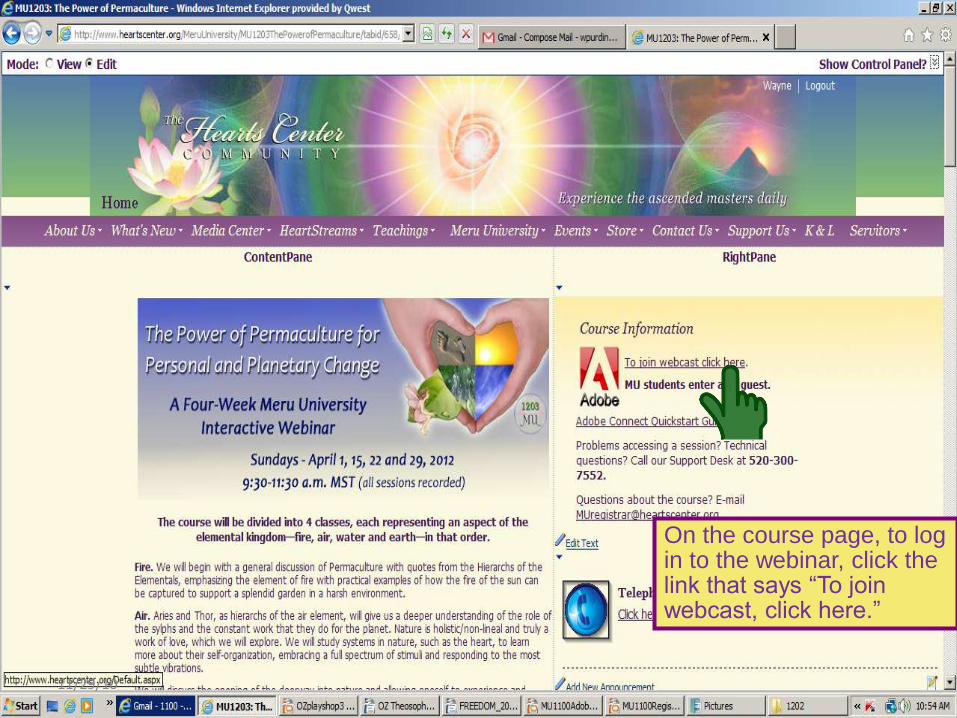
On the course page, to log in to the webinar, click the link that says “To join webcast, click here.”

Select “Enter as Guest” and enter your first name and last name initial. Then click “Enter Room.”
P.
When Adobe connect first opens, you may get a pop-up box stating the requirement for the Adobe Connect Add-On. Please choose the green button for Okay or Allow.

The first thing you should do after entering the course room, is click on the arrow next to the phone icon to connect your audio. The next few slides will show how you can choose to connect via phone or computer. After you connect your audio, mute yourself using the down arrow. This is also where you unmute to speak.

You have two audio choices at this point. If you do not have a headset or prefer to use the telephone, select “Dial in the Audio Conference via Phone.”

If you choose the telephone dial-in option, use your telephone to call one of the Rewired phone numbers above and use the course extension number, as given on the course page. You can listen and talk on the session via the telephone and see the slides via the computer. Please mute upon arrival by using the down arrow next to the phone symbol at the top of your screen. You will be able to listen when muted. This is also where you will unmute yourself to speak.
US City Number Boston, MA 857-244-6259 Chicago, IL 312-253-7597 Dallas, TX 469-375-5328 Detroit, MI 313-879-6975 Edmonton, AB 780-702-7470 Las Vegas 702-952-5225 Los Angeles 323-345-6416 Miami, FL 786-431-2520 New York, NY 646-383-1487 Philadelphia 267-414-1561 Seattle, WA 206-826-1777 Tucson, AZ 520-300-7553 Extension (on course page) To mute or unmute yourself, dial *1
Rewired Phone Numbers

If you are going to listen using your computer and have the option to speak using your headset with built-in microphone, select “Using Computer.”

Then click “Join.”

The phone icon will now become a microphone icon. Other people in the class would be able to hear you if you say something. Be sure that you mute your microphone.

Mute your microphone by clicking on the arrow next to it and selecting “Mute my microphone.”

If you plan to speak during class, prepare your microphone volume and quality by going to the “Meeting” tab and selecting “Audio Setup Wizard.” This will take you through the steps required to check your microphone.
If you have not already checked your computer’s sound settings in your Start menu, please refer to slide 22-23 above and perform this step before proceeding as the Audio Wizard accesses your microphone choices and does not give you the choice of speakers.
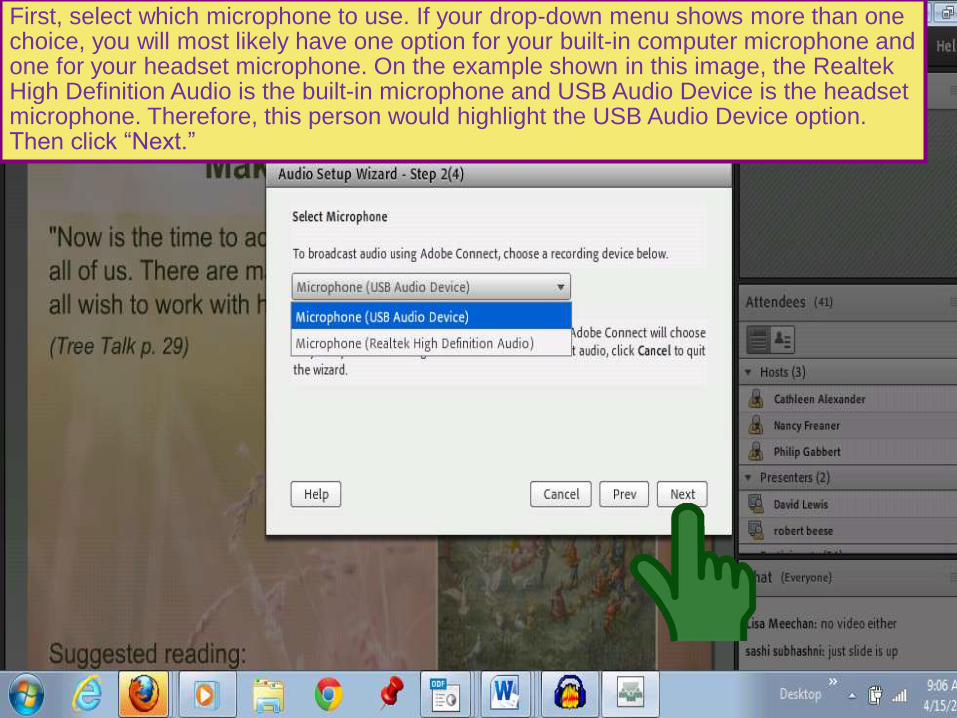
First, select which microphone to use. If your drop-down menu shows more than one choice, you will most likely have one option for your built-in computer microphone and one for your headset microphone. On the example shown in this image, the Realtek High Definition Audio is the built-in microphone and USB Audio Device is the headset microphone. Therefore, this person would highlight the USB Audio Device option. Then click “Next.”

The selected microphone will be displayed. Click “Next” again.

Then test your microphone by clicking “Record” and speaking into it with a normal voice.

A popup box may appear here or elsewhere asking you to allow Adobe Connect to access your camera and microphone. Click “Allow.” Selecting Remember will skip this prompt in the future.

You can now record your speaking into the microphone. To stop the recording at any time, click “Stop.” Otherwise, it will stop automatically after a few seconds.

After recording, you can play the recording to see if your voice is loud enough. If not, you may have to speak up or adjust your microphone volume (as described on slides 41 - 44)

You can stop the playback at any time by clicking “Stop Playing.” Otherwise, it will stop playing automatically when it's done. Then click “Next.”

You can test the silence level to see if you have any background noise. Click “Test Silence.” Please complete the "Test Silence" for the full 10 seconds so your microphone rules out background noise when you talk.

While the silence level is being tuned, remain silent and don't get your microphone near anything noisy like your computer fan. Then click “Next.”

This completes the audio setup wizard. Click “Finish.”

To adjust speaker volume if it's too soft or loud, click on the arrow next to the speaker icon and select “Speaker Volume.”

Drag the pointer on the slider bar to the desired setting. Then click “OK.”

To adjust your microphone volume, go to the arrow next to the microphone icon and select “Adjust Microphone Volume.”

Again, adjust the level, using the slider, to the desired setting and click “OK.” You are now able to listen and speak.

To alert the instructor and request to speak, raise your hand by clicking the hand icon above. Wait for the instructor to acknowledge you, then unmute your microphone by unchecking the selection on the microphone dropdown menu.
You can also indicate agreement or disagreement, tell others you stepped away, ask them to speak louder or softer, faster or slower, laugh and applause with icons.
If you select an option above the line such as Agree or Step Away, your status remains until you choose Clear Status. If you choose an option below the line such as Speed Up or Applause, your status automatically clears itself after a number of seconds. When you set your status, an icon appears next to your name in the Attendees pod.

Once the host has enabled the video webcams, you will see the webcam icon appear between the speaker and raised hand icons. Click the Grey webcam icon to turn on your webcam. When you click “Start My Webcam,” the icon turns green and you will see a preview of yourself that may cover up the other pictures and gives you time to correct your camera shot and image. If you’re happy with the preview, click Start Sharing to share your video with all participants.
When ready to transmit, hit, "Start Sharing" to broadcast your camera. To stop broadcasting, hit "Stop My Webcam."

To use the Chat box, type your message into the box and hit Enter. Please note that the default setting sends your chat to everyone.
Select Pod Options, using the faint down arrow at the top right corner of the pod to type to everyone, private individuals, hosts or presenters. Private chat messages show up in additional tabs to make it easy to distinguish between private and public chat.
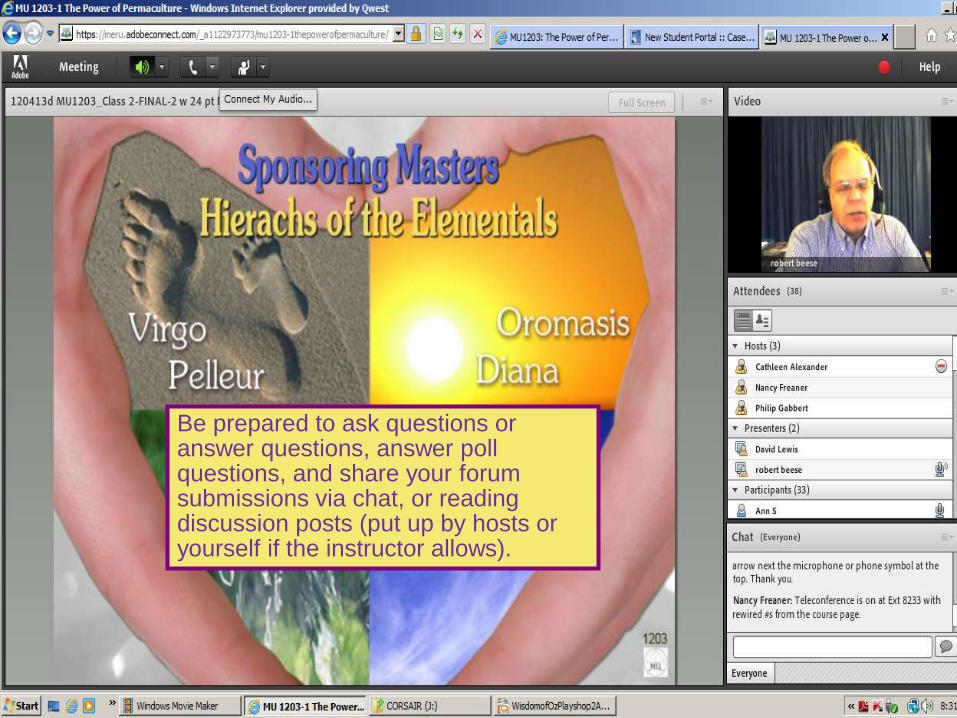
Be prepared to ask questions or answer questions, answer poll questions, and share your forum submissions via chat, or reading discussion posts (put up by hosts or yourself if the instructor allows).

When the class is over, go to the Meeting tab on the top left and click “Exit Adobe Connect.” If this option is not there, please hit the red X at the top right of the screen.
Thank you for taking this tutorial. Enjoy using Adobe Connect!

for your participation
© 123rf.com
THANK YOU

11/29/10


