Page 1 of 64 [email protected]JAVA – NETBEANS A graphical user interface (GUI ) is a human-computer interface (i.e., a way for humans to interact with computers) that uses windows, icons and menus and which can be manipulated by a mouse (and often to a limited extent by a keyboard as well). GUIs stand in sharp contrast to command line interfaces (CLIs), which use only text and are accessed solely by a keyboard. The most familiar example of a CLI to many people is MS-DOS. Another example is Linux when it is used in console mode (i.e., the entire screen shows text only). RAD : It stands for Rapid Application Development. It is a programming system that enables programmers to quickly build working programs. In general RAD system provides a number of graphical tools to help build a GUI that would normally take a large development effort. IDE (Integrated Development Environment ) is a programming environment integrated into a software application that provides a GUI builder, a text or code editor, a compiler and/or interpreter and a debugger. Visual Studio, Delphi, JBuilder, FrontPage and DreamWeaver, Java‟s NetBEans are all examples of IDEs. NetBeans IDE offers many features of application development: Drag and drop GUI creation Advanced source code editor Web services Excellent degugging(finding out bugs or errors) Wizards, automatic code generation and management tools. Thus, NetBeans IDE is a free, open source, cross platform IDE with a built-in support for Java Progg Language. Platform word is often used as synonym for Operating System of the computer. It defines a standard around which a system can be developed. Cross -Platform refers to the capability of the s/w or h/w to run identically on different platforms. Features of NetBeans IDE: 1. Title Bar: to display title of the application/project. 2. Menu Bar and Pull Down Menu: to display a list of options for a particular category. 3. Toolbar: contains shortcut for commonly used commands in form of icons. 4. GUI Builder: It is also called as „Design Area‟. This is the area where a user visually constructs a GUI application. It has two View: a. Source View: opens the code editor to add/edit a java code. b. Design View: is the default view where you drag and drop various GUI tools to create an application. 5. The Palette: contains all the graphical components needed to create a GUI. It contains icons for various type of graphical controls available under Java Swing API‟s(Application Programming Interface) ex. textbox, buttons, checkboxes, radiobuttons etc. 6. Inspector Window: displays a tree hierarchy of all components contained in the currently opened form. 7. Properties Window: displays editable settings for the currently selected control. 8. Code Editor Window: to open these double click on the control for which you want to write code. Basics of GUI GUI refers to the windows, buttons, dialogs, menus and everything that is visual in a modern application: a. An event refers to the occurrence of an activity. Each time an event occurs, a „MESSAGE‟ is sent to the OS. The system processes the message and passes it to other windows. b. A „message‟ is the information/request sent to the application Types of Graphical Components 1. Container Controls: are those controls that can hols other controls within it. Ex. frame, panel and pane. 2. Child Controls: these are controls inside a container. Ex textboxes, buttons, checkboxes, textarea etc.
A graphical user interface (GUI) is a human-computer interface (i.e., a way for humans to interact with
computers) that uses windows, icons and menus and which can be manipulated by a mouse (and often to a
limited extent by a keyboard as well).
GUIs stand in sharp contrast to command line interfaces (CLIs), which use only text and are accessed
solely by a keyboard. The most familiar example of a CLI to many people is MS-DOS. Another example is
Linux when it is used in console mode (i.e., the entire screen shows text only).
RAD: It stands for Rapid Application Development. It is a programming system that enables programmers to quickly build working programs. In general RAD system provides a number of graphical tools to help build a GUI that would normally take a large development effort. IDE (Integrated Development Environment) is a programming environment integrated into a software application that provides a GUI builder, a text or code editor, a compiler and/or interpreter and a debugger. Visual Studio, Delphi, JBuilder, FrontPage and DreamWeaver, Java‟s NetBEans are all examples of IDEs. NetBeans IDE offers many features of application development:
Drag and drop GUI creation Advanced source code editor Web services Excellent degugging(finding out bugs or errors) Wizards, automatic code generation and management tools.
Thus, NetBeans IDE is a free, open source, cross platform IDE with a built-in support for Java Progg Language. Platform word is often used as synonym for Operating System of the computer. It defines a standard around which a system can be developed. Cross-Platform refers to the capability of the s/w or h/w to run identically on different platforms. Features of NetBeans IDE:
1. Title Bar: to display title of the application/project. 2. Menu Bar and Pull Down Menu: to display a list of options for a particular category. 3. Toolbar: contains shortcut for commonly used commands in form of icons. 4. GUI Builder: It is also called as „Design Area‟. This is the area where a user visually constructs a
GUI application. It has two View: a. Source View: opens the code editor to add/edit a java code. b. Design View: is the default view where you drag and drop various GUI tools to create an
application. 5. The Palette: contains all the graphical components needed to create a GUI. It contains icons for
various type of graphical controls available under Java Swing API‟s(Application Programming Interface) ex. textbox, buttons, checkboxes, radiobuttons etc.
6. Inspector Window: displays a tree hierarchy of all components contained in the currently opened form.
7. Properties Window: displays editable settings for the currently selected control. 8. Code Editor Window: to open these double click on the control for which you want to write code.
Basics of GUI GUI refers to the windows, buttons, dialogs, menus and everything that is visual in a modern application:
a. An event refers to the occurrence of an activity. Each time an event occurs, a „MESSAGE‟ is sent to the OS. The system processes the message and passes it to other windows.
b. A „message‟ is the information/request sent to the application Types of Graphical Components 1. Container Controls: are those controls that can hols other controls within it. Ex. frame, panel and
pane. 2. Child Controls: these are controls inside a container. Ex textboxes, buttons, checkboxes, textarea
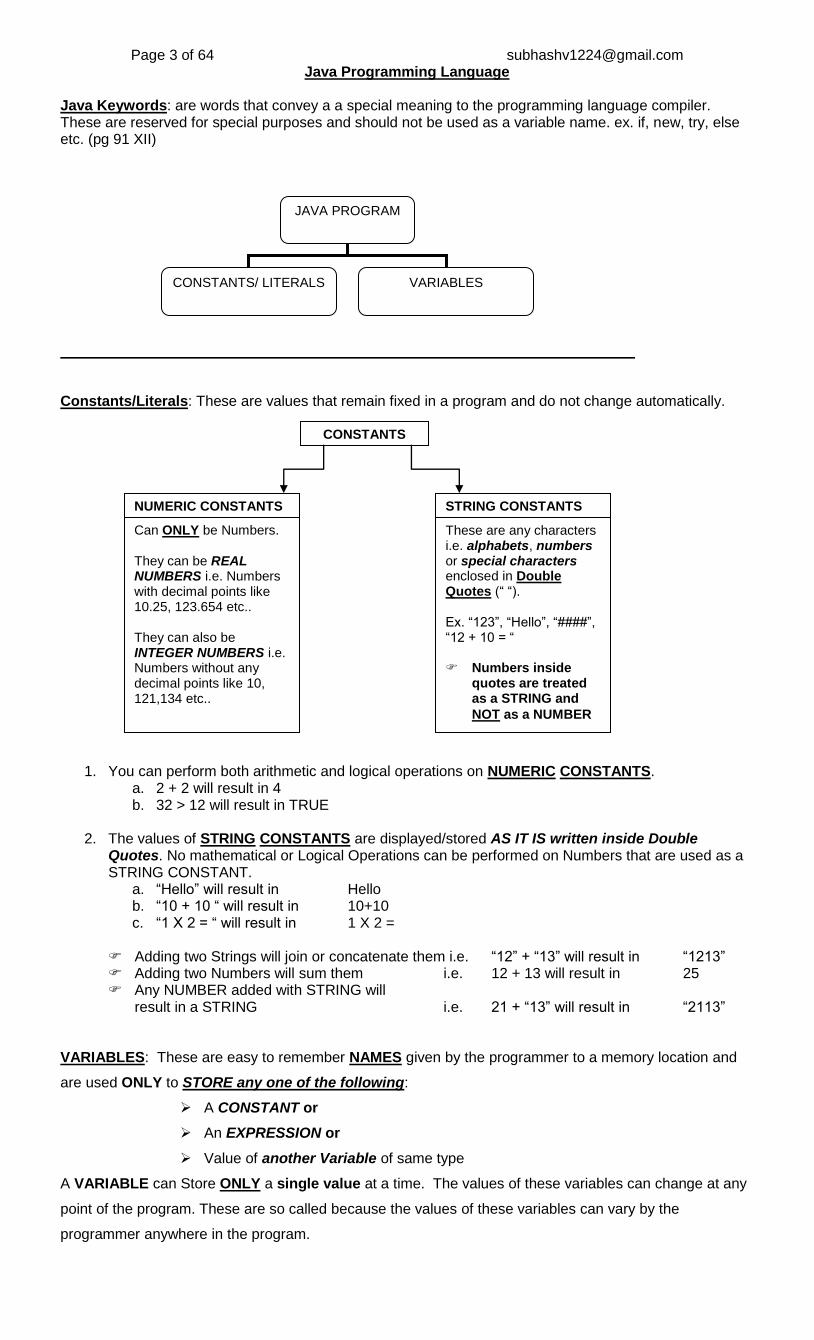
Java Keywords: are words that convey a a special meaning to the programming language compiler. These are reserved for special purposes and should not be used as a variable name. ex. if, new, try, else etc. (pg 91 XII)
Constants/Literals: These are values that remain fixed in a program and do not change automatically.
1. You can perform both arithmetic and logical operations on NUMERIC CONSTANTS. a. 2 + 2 will result in 4 b. 32 > 12 will result in TRUE
2. The values of STRING CONSTANTS are displayed/stored AS IT IS written inside Double
Quotes. No mathematical or Logical Operations can be performed on Numbers that are used as a STRING CONSTANT.
a. “Hello” will result in Hello b. “10 + 10 “ will result in 10+10 c. “1 X 2 = “ will result in 1 X 2 =
Adding two Strings will join or concatenate them i.e. “12” + “13” will result in “1213” Adding two Numbers will sum them i.e. 12 + 13 will result in 25 Any NUMBER added with STRING will
result in a STRING i.e. 21 + “13” will result in “2113” VARIABLES: These are easy to remember NAMES given by the programmer to a memory location and
are used ONLY to STORE any one of the following:
A CONSTANT or
An EXPRESSION or
Value of another Variable of same type
A VARIABLE can Store ONLY a single value at a time. The values of these variables can change at any
point of the program. These are so called because the values of these variables can vary by the
programmer anywhere in the program.
JAVA PROGRAM
CONSTANTS/ LITERALS VARIABLES
CONSTANTS
NUMERIC CONSTANTS STRING CONSTANTS
Can ONLY be Numbers. They can be REAL NUMBERS i.e. Numbers with decimal points like 10.25, 123.654 etc.. They can also be INTEGER NUMBERS i.e. Numbers without any decimal points like 10, 121,134 etc..
These are any characters i.e. alphabets, numbers or special characters enclosed in Double Quotes (“ “). Ex. “123”, “Hello”, “####”, “12 + 10 = “ Numbers inside
Examples of invalid variables : 1a a b new long 12ab 4qtr ….
Assigning values to a variable, just store them in memory. Now if you want to display values of
variables, you will be using : „System.out.println(<values>) ; command.
You can print:
String constants that are enclosed in double quotes.
Variables. The values stored in these variables are displayed.
To display more than one value, you need to use a separator „+‟.
Every „System.out.println‟ will print on a new line.
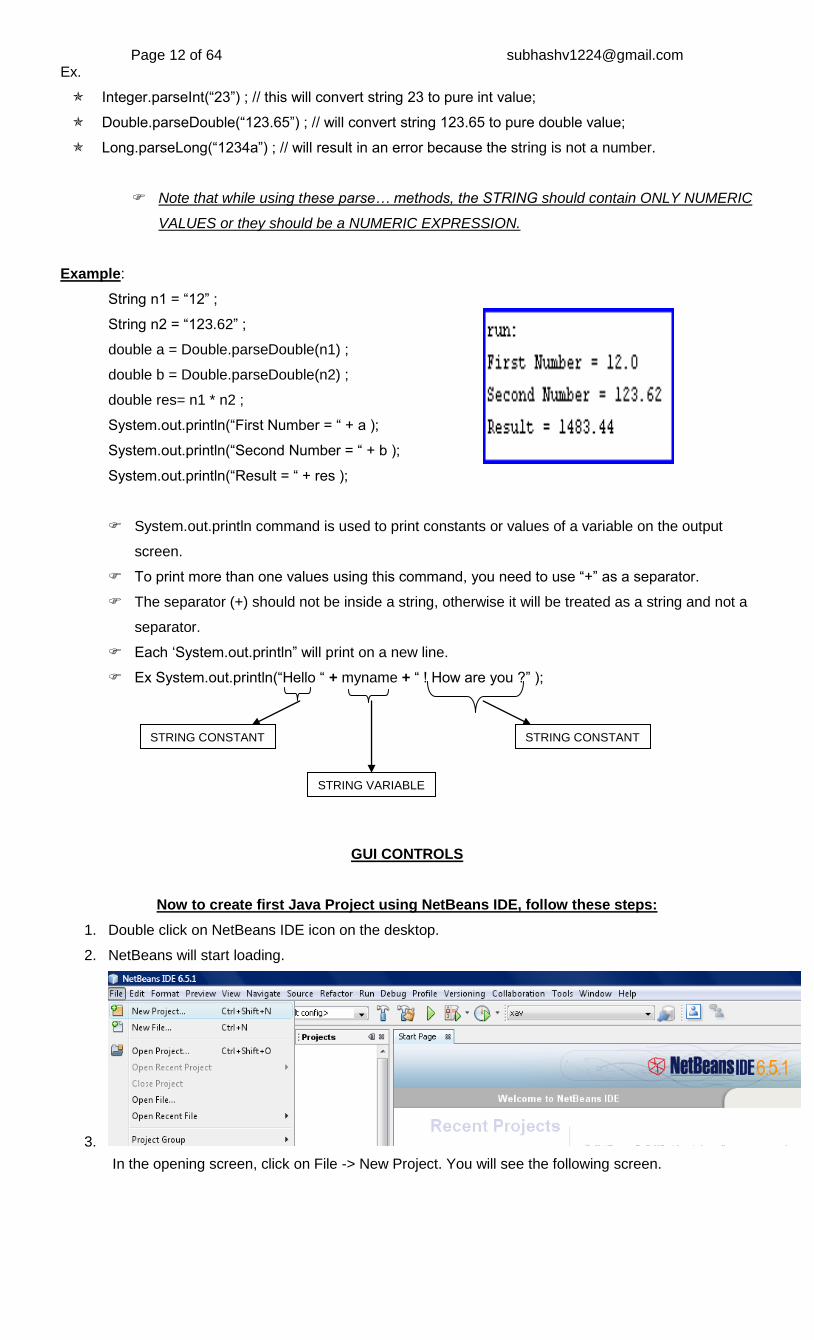
Example:
double n1 = 12 ;
double n2 = 123.62 ;
double res= n1 * n2 ;
System.out.println(“First Number = “ + n1 );
System.out.println(“Second Number = “ + n2 );
System.out.println(“Result = “ + res );
b1 s1 n1 n2
n3 n4
s2
MEMORY
23 123 452 123456
12345.765 657.43876
St. Xaviers School, Jaipur
In this piece of code you are storing a constant value in these variables. If CONSTANT is numeric, then VARIABLE should also be a numeric. If CONSTANT is a string, then VARIABLE should also be a string. Also, you CANNOT store real numbers in integer type variables
o In case no parameter is needed, you have to put a blank bracket.
Examples:
Math . sqrt ( double type constant or variable)
note that spaces are given just to explain, otherwise no space can be
given while using a method of a class.
To perform mathematical operations, Java consists of a class named ‘Math’ which contains many
functions. Most commonly used are :
Math.sqrt(double) > Math.sqrt(24);
> Math.sqrt(n1); // where n1 is a double type variable
In this example, you are storing an int value in double data type, which is possible and the „int‟ value will be stored as a „double‟ value in n2 variable.
This statement will result in an error as you are trying to store larger value into a smaller data type variable.
This statement will store the value of „n2‟ variable as an „int‟ because of the CASTING statement and no error.
7. Now select the project, right click on it and from the shortcut menu, select New -> JFrame Form as
shown here
8. In the next screen, give a name of the form of you choice as shown here and click Finish
button.
9. Now you will see a new Java Form. Remember that you can create any number of forms in the
same project.
This creates a new project and a form in that project. You can see the Palette on the right side of
the form. This palette contains various GUI controls. We will be using many of these controls to
quickly create a Java application.
GRAPHICAL USER PALETTE IT CONTAINS VARIOUS GUI CONTROLS LIKE LABEL, TEXTFIELD, BUTTON ETC. YOU NEED TO JUST SELECT THE CONTROL AND DRAG IT ONTO THE FORM
Every programming language provides statements/commands/constructs to support:
Sequence
Selection
Iteration ( Repetition )
1. Sequence : this means that the statements of the program are being executed sequentially from
top to bottom and from left to right.
2. Selection: this means that the execution of statement(s) depends on a condition test.
If a condition is “true” a set of statements are executed and if the condition is “false”
another set of statements are executed.
“Condition” is any expression which result in “true” or “false”.
In hindi you can say, vxj ,¢lk g¨ r¨ ;g dj¨ ugh r¨ og dj¨
CONDITION TRUE FALSE
START
Statement 1
Statement 2
Statement 3
STOP
In the Flow Chart, you can see that, Statement 1 Statement 2 Statement 7 and Statement 8 will be executed in the program. And if the condition is TRUE: Statement 3 and Statement 4 will be executed And if the condition is FALSE: Statement 5 and Statement 6 will be executed.
3. Iteration: means repetition of a set of statements depending upon a condition test.
Till a condition is true, a set of statements are repeated again and again. As soon as the
condition becomes false, the repetitions stop.
BLOCKS
A Block is a group of zero or more statements written between an opening curly bracket and closing curly
bracket.
{
int a=10;
b= a+ c ;
System.out.println(“The value of „a‟ = “ + a );
}
Any variable defined in a BLOCK is visible ONLY in THAT BLOCK and ALL its SUB BLOCKS.
Ex. {
int a=10;
{
int b = a + 20 ;
System.out.println ( a ) ; // no error
}
System.out.println ( b ) ; // error
}
Loop body
F
Condition ?
START
Statement 1
Statement 2
Statement 3
Statement 4
Statement 5
Statement 6
STOP
T
In the Flow Chart, you can see that, Statement 1 Statement 2 Statement 5 and Statement 6 will be executed in the program. And till condition is TRUE: Statement 3 and Statement 4 will be executed again and again. And when the condition becomes FALSE control comes out of the loop and : Statement 5 and Statement 6 will be executed in sequence.
We have already discussed about „selection‟ construct. Now we will study those commands in JAVA that
supports this construct.
1. if
2. if – else
3. if – else if – else
4. switch
1. if : In this you specify what has to be done if the condition is TRUE, but you don‟t
specify what has to be done if the condition is FALSE.
if ( condition ) {
statements to be executed
if the condition is TRUE ;
}
In this „if‟ statement, if the condition is TRUE, the block after „if‟ statement will be executed and if the condition is FALSE, the control is
transferred just after the if block
Condition ?
START
Statement 1
Statement 2
Statement 3
Statement 4
Statement 5
Statement 6
STOP
T
If - block
If the condition is TRUE, then the following statements will be executed: Statement 1; Statement 2 ; Statement 3 ; Statement 4 ; Statement 5 ; Statement 6 ; If the condition is FALSE, then the following statements will be executed: Statement 1; Statement 2 ; Statement 5 ; Statement 6 ;
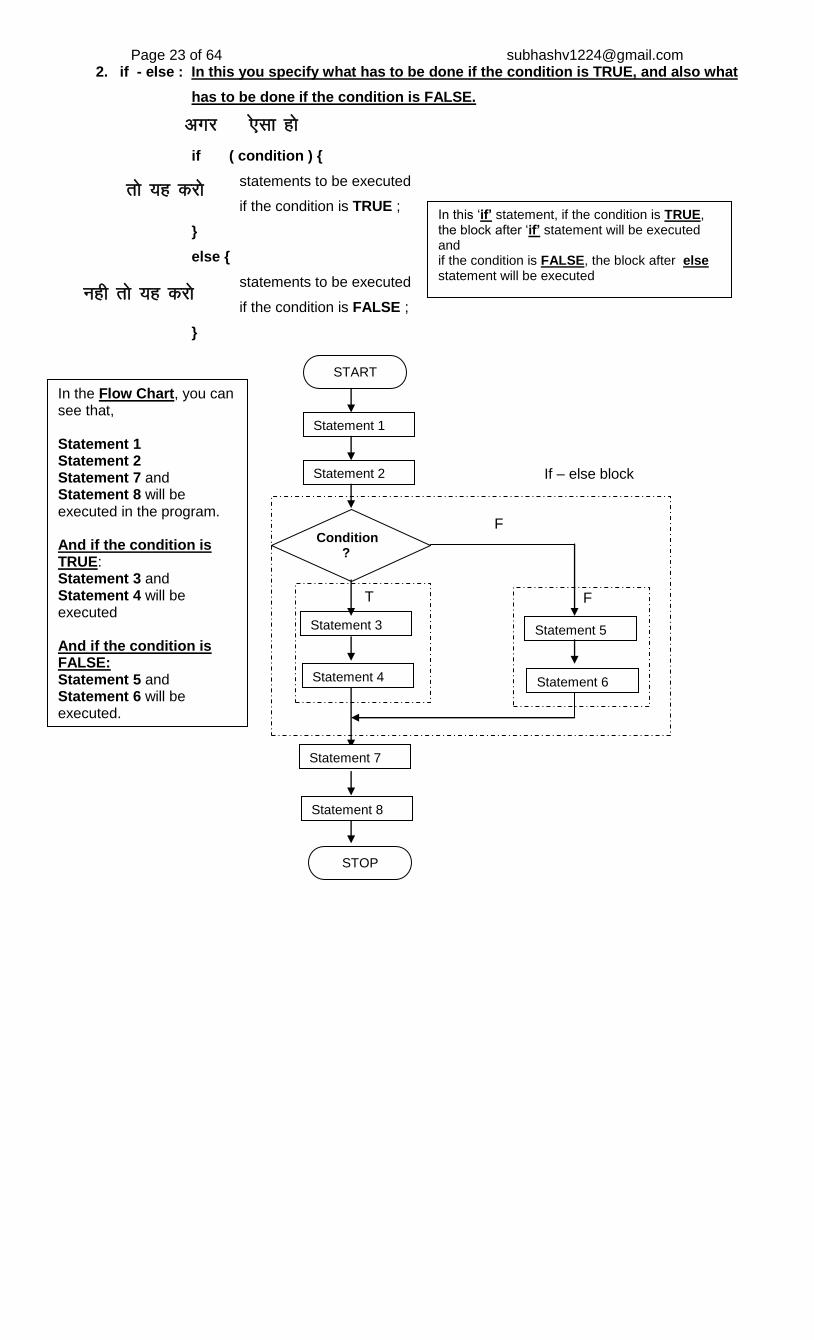
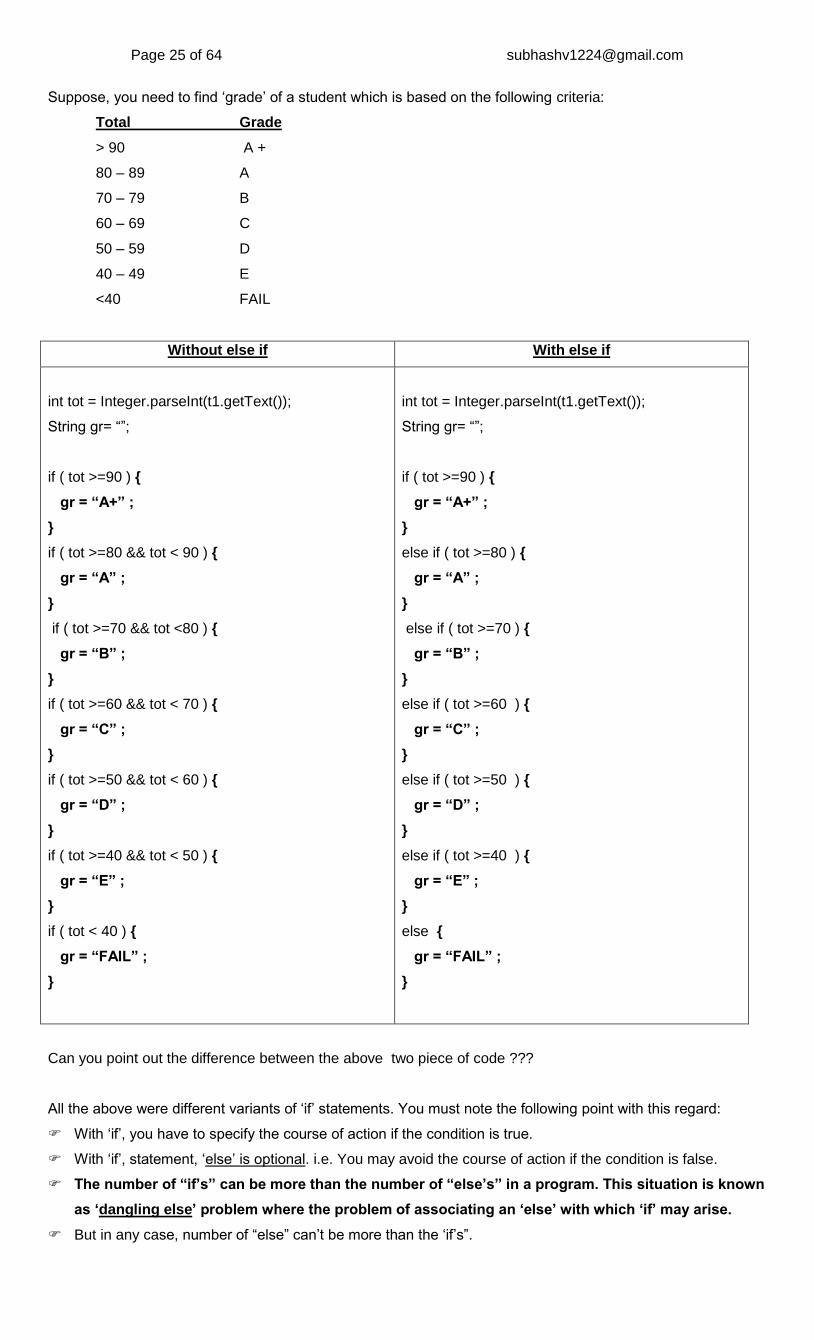
Page 23 of 64 [email protected] 2. if - else : In this you specify what has to be done if the condition is TRUE, and also what
has to be done if the condition is FALSE.
vxj ,¢lk g¨
if ( condition ) {
statements to be executed
if the condition is TRUE ;
}
else {
statements to be executed
if the condition is FALSE ;
}
In this „if‟ statement, if the condition is TRUE, the block after „if‟ statement will be executed and if the condition is FALSE, the block after else statement will be executed
Condition ?
START
Statement 1
Statement 2
Statement 3
Statement 4
Statement 5
Statement 6
Statement 7
Statement 8
STOP
T
F
If – else block
In the Flow Chart, you can see that, Statement 1 Statement 2 Statement 7 and Statement 8 will be executed in the program. And if the condition is TRUE: Statement 3 and Statement 4 will be executed And if the condition is FALSE: Statement 5 and Statement 6 will be executed.
3. if - else if - else : This is used when you have to check for more than one condition and
you know that out of those many conditions ONLY one can be TRUE.
if ( condition 1 ) {
statements to be executed
if the condition is TRUE ;
}
else if ( condition 2 ){
statements to be executed
if the condition 2 is TRUE ;
}
else if ( condition 3 ){
statements to be executed
if the condition 3 is TRUE ;
}
else if ( condition n ){
statements to be executed
if the condition n is TRUE ;
}
else {
statements to be executed if
all the above conditions are FALSE ;
}
Note the following code. Both are same.:
Without Blocks With Blocks
If(condition1)
Statement 1;
else if(condition 2)
Statement 2;
else if(condition 3)
Statement 3;
else
Statement 4 ;
If(condition1) {
Statement 1;
} else if(condition 2) {
Statement 2;
} else if(condition 3) {
Statement 3;
} else
Statement 4 ;
If the number of statement to be executed on the condition being true or false is a SINGLE statement, then
you can avoid the opening and closing blocks. But in case of MULTIPLE statements, they need to be
enclosed between opening and closing blocks as shown in the following example,
If(condition1)
Statement 1;
Statement 2 ;
else if(condition2)
Statement 3;
Statement 4 ;
The code to the left will
result in an error as you are
executing 2 statements
without giving blocks.
The correct code is on the
right side.
If(condition1) {
Statement 1;
Statement 2 ;
}
else if(condition2) {
Statement 3;
Statement 4 ;
}
In this „if‟ statement, if the condition is TRUE, the block after „if‟ statement will be executed and if the condition is FALSE, following „else if‟ condition is checked and so on.. Note that, the following „else-if‟ statement is checked ONLY IF the above „if‟ or „else- if „ condition is FALSE.
Now try to convert the following piece of „if‟ statement into its equivalent „switch‟ statement :
int n1=Integer.parseInt(t1.getText());
String msg=””;
if(n1==1 || n1==2 || n1==3 ) {
msg= “RED” ;
}
else if (n1==4) {
msg = “GREEN” ;
}
else if(n1==5 || n1==6) {
msg=”BLUE” ;
}
else {
msg = “Enter a value between 1 and 6”);
}
This piece of „switch; statement is actually performing OR ( || ) operation. If the case matches „A‟ then the control will fall through all other cases in the absence of „break‟ statement. The following equivalent „if‟ statement will explain this.
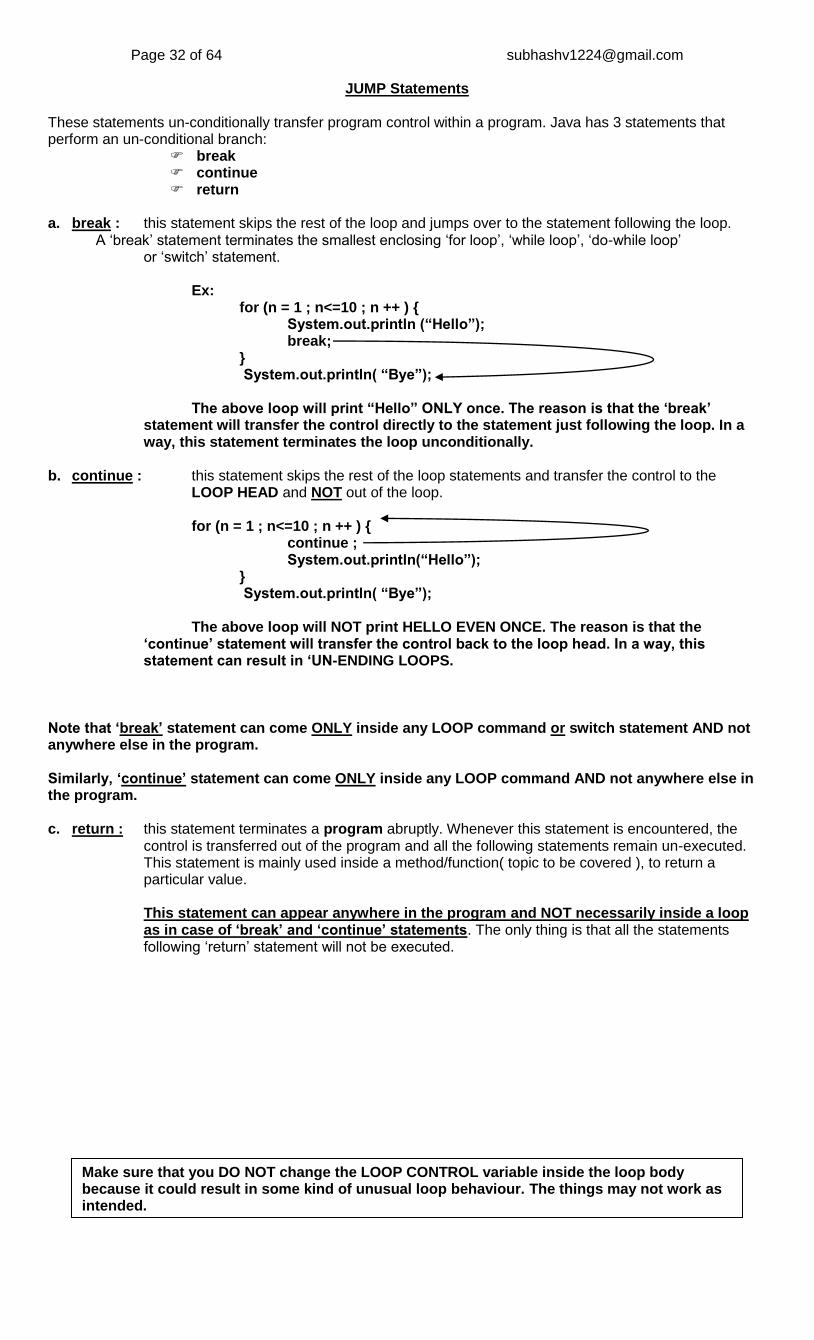
JUMP Statements These statements un-conditionally transfer program control within a program. Java has 3 statements that perform an un-conditional branch:
break continue return
a. break : this statement skips the rest of the loop and jumps over to the statement following the loop.
A „break‟ statement terminates the smallest enclosing „for loop‟, „while loop‟, „do-while loop‟ or „switch‟ statement.
Ex: for (n = 1 ; n<=10 ; n ++ ) {
System.out.println (“Hello”); break;
} System.out.println( “Bye”);
The above loop will print “Hello” ONLY once. The reason is that the „break‟ statement will transfer the control directly to the statement just following the loop. In a way, this statement terminates the loop unconditionally.
b. continue : this statement skips the rest of the loop statements and transfer the control to the
LOOP HEAD and NOT out of the loop. for (n = 1 ; n<=10 ; n ++ ) {
continue ; System.out.println(“Hello”);
} System.out.println( “Bye”);
The above loop will NOT print HELLO EVEN ONCE. The reason is that the „continue‟ statement will transfer the control back to the loop head. In a way, this statement can result in „UN-ENDING LOOPS.
Note that „break‟ statement can come ONLY inside any LOOP command or switch statement AND not anywhere else in the program. Similarly, „continue‟ statement can come ONLY inside any LOOP command AND not anywhere else in the program. c. return : this statement terminates a program abruptly. Whenever this statement is encountered, the
control is transferred out of the program and all the following statements remain un-executed. This statement is mainly used inside a method/function( topic to be covered ), to return a particular value. This statement can appear anywhere in the program and NOT necessarily inside a loop as in case of „break‟ and „continue‟ statements. The only thing is that all the statements following „return‟ statement will not be executed.
Make sure that you DO NOT change the LOOP CONTROL variable inside the loop body because it could result in some kind of unusual loop behaviour. The things may not work as intended.
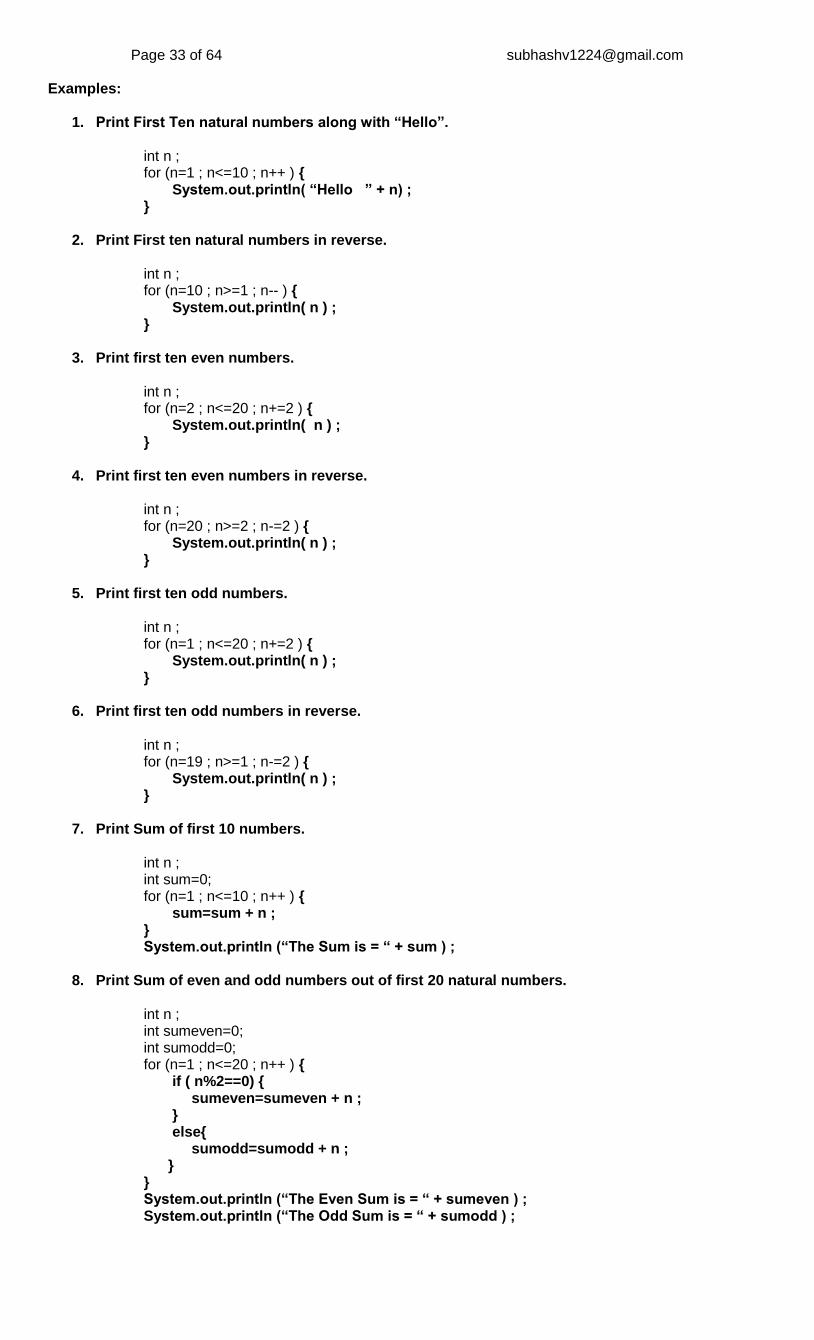
1. Print First Ten natural numbers along with “Hello”.
int n ; for (n=1 ; n<=10 ; n++ ) { System.out.println( “Hello ” + n) ; }
2. Print First ten natural numbers in reverse.
int n ; for (n=10 ; n>=1 ; n-- ) { System.out.println( n ) ; }
3. Print first ten even numbers.
int n ; for (n=2 ; n<=20 ; n+=2 ) { System.out.println( n ) ; }
4. Print first ten even numbers in reverse.
int n ; for (n=20 ; n>=2 ; n-=2 ) { System.out.println( n ) ; }
5. Print first ten odd numbers.
int n ; for (n=1 ; n<=20 ; n+=2 ) { System.out.println( n ) ; }
6. Print first ten odd numbers in reverse.
int n ; for (n=19 ; n>=1 ; n-=2 ) { System.out.println( n ) ; }
7. Print Sum of first 10 numbers.
int n ; int sum=0; for (n=1 ; n<=10 ; n++ ) { sum=sum + n ; } System.out.println (“The Sum is = “ + sum ) ;
8. Print Sum of even and odd numbers out of first 20 natural numbers.
int n ; int sumeven=0; int sumodd=0; for (n=1 ; n<=20 ; n++ ) { if ( n%2==0) { sumeven=sumeven + n ; } else{ sumodd=sumodd + n ; } } System.out.println (“The Even Sum is = “ + sumeven ) ; System.out.println (“The Odd Sum is = “ + sumodd ) ;
Page 34 of 64 [email protected] 9. Print table of n number upto n x 10 .
int num = Integer.parseInt(t1.getText()); int n ; for (n=1 ; n<=10 ; n++ ) { System.out.println( num + “ x ” + n + “ = ” + num * n ) ; }
10. Print factorial of n number.
int num=Integer.parseInt(t1.getText()); int n ; int fact=1; for (n=1 ; n<=num ; n++ ) { fact=fact*n; } System.out.println( “Factorial = ” + fact ) ;
11. Check weather a given number is a Prime number or not.
int num=Integer.parseInt(t1.getText()); int n ; boolean prime=true ;; for (n=2 ; n<=num/2 ; n++ ) { if (num % 2 ==0) {
prime=false; break ;
} } if(prime==true)
System.out.println( “The Number is Prime” ) ; else System.out.println( “The Number is Not Prime” ) ;
12. Print sum and average of first n Numbers.
int num=Integer.parseInt(t1.getText()); int sum=0; int avg=0; for(int n=1 ; n<=num ; n++) sum=sum + n ; avg=sum/num; System.out.println(“Sum = “ + sum) ; System.out.println(“Average = “ + avg) ;
13. Print sum and average of first n Numbers which are divisible by 3. (Do it yourself) 14. Print the following series : 1 1 2 3 5 8 13 21 34….
(Such a series is known as a FIBONACCI SERIES where every new number is sum of previous two numbers. int num=Integer.parseInt(t1.getText()); int n1=1; int n2=1; System.out.print(n1 + “ “ + n2); for(int n=3 ; n<=num ; n++) { n3 = n1 + n2 ; System.out.print(“ “ + n3 ); n1 = n2 ; n2 = n3 ; }
Page 35 of 64 [email protected] 15. Print all the ARMSTRONG NUMBERS.
„Armstrong Numbers‟ are those numbers whose sum of cube of individual digits is the number itself: 153 ( 1 + 125 + 27 = 153 ) int n,newn,n1,n2,n3; int sumcube=0; for(n=100 ; n<=999 ; n++){ newn=n;
n1=newn%10; newn=newn/10; n2=newn%10; newn=newn/10; n3=newn%10; sumcube=(n1*n1*n1) + (n2*n2*n2) + (n3*n3*n3) ; if( n==sumcube) System.out.println(“It‟s an ARMSTRONG number.”); else System.out.println(“It‟s NOT an ARMSTRONG number.”);
}
II. while loop: this loop has also the same 4 elements as in case of „for‟ loop. The
ONLY difference is the syntax.
Initilization ;
while ( test – condition ) {
loop body ;
update expression ;
}
statement n ;
1. Initialize LOOP CONTROL variable.
2. Check the CONDITION. If TRUE enter the LOOP. If FALSE go to STEP 5.
3. Execute LOOP BODY.
4. UPDATE the LOOP CONTROL VARIABLE and JUMP back to STEP 2
5. Execute the statement JUST after the LOOP.
for loop while loop
Print First Ten natural numbers along with “Hello”.
int n ; for (n=1 ; n<=10 ; n++ ) { System.out.println( “Hello ” + n) ; }
System.out.println(“Bye”);
Print First Ten natural numbers along with “Hello”.
int n;
n = 1 ;
while (n<=10) {
System.out.println(“Hello ” + n ) ;
n++ ;
}
System.out.println(“Bye”);
We will STORE value of „n‟ to „newn‟ in order to NOT to change the value of „n‟ because „n‟ is acting like a LOOP CONTROL VARIABLE .
1
2
3
4
5
1 2
3
4
5
1
2
3
4
5
If TRUE enter the LOOP
If FALSE exit the LOOP
Move back to the TOP of the LOOP to check the
condition
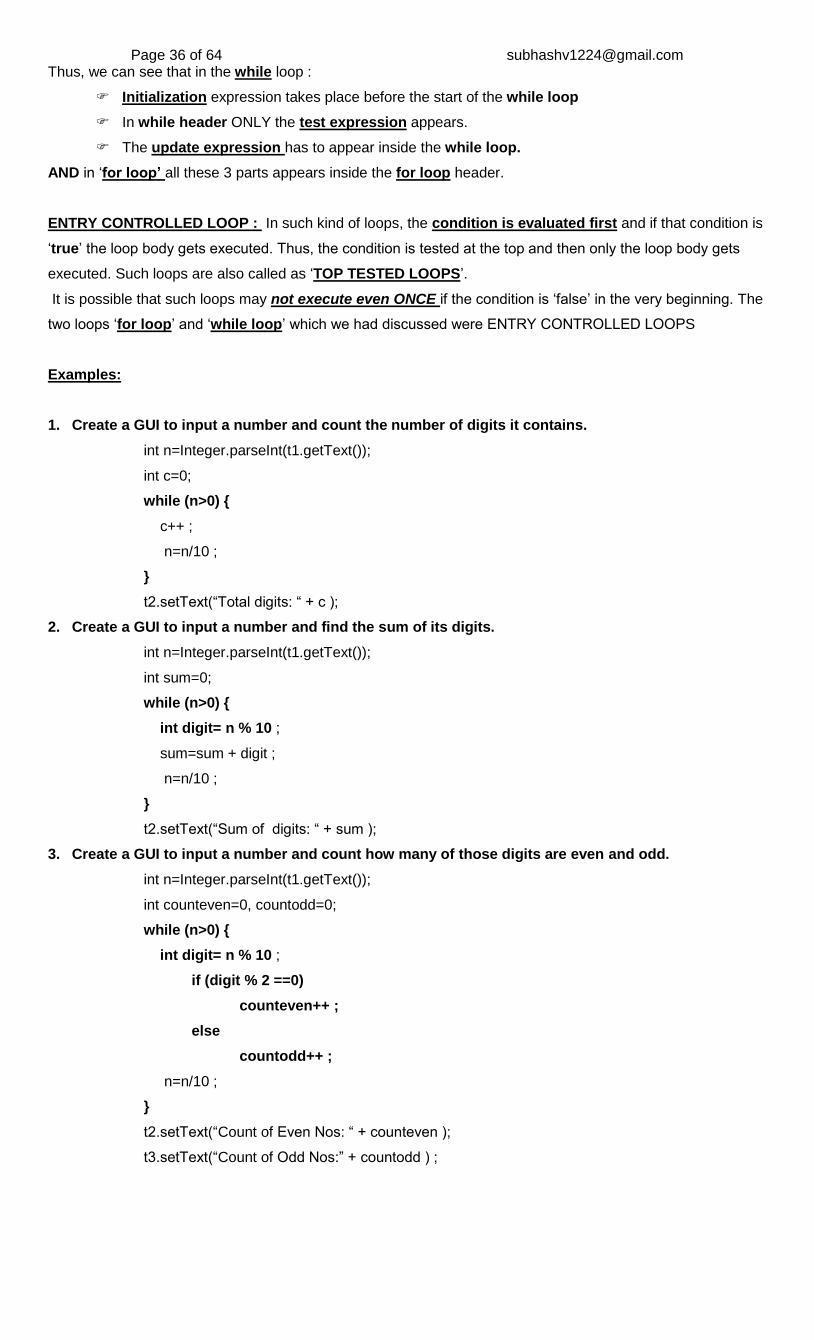
Page 36 of 64 [email protected] Thus, we can see that in the while loop :
Initialization expression takes place before the start of the while loop
In while header ONLY the test expression appears.
The update expression has to appear inside the while loop.
AND in „for loop‟ all these 3 parts appears inside the for loop header.
ENTRY CONTROLLED LOOP : In such kind of loops, the condition is evaluated first and if that condition is
„true‟ the loop body gets executed. Thus, the condition is tested at the top and then only the loop body gets
executed. Such loops are also called as „TOP TESTED LOOPS‟.
It is possible that such loops may not execute even ONCE if the condition is „false‟ in the very beginning. The
two loops „for loop‟ and „while loop‟ which we had discussed were ENTRY CONTROLLED LOOPS
Examples:
1. Create a GUI to input a number and count the number of digits it contains.
int n=Integer.parseInt(t1.getText());
int c=0;
while (n>0) {
c++ ;
n=n/10 ;
}
t2.setText(“Total digits: “ + c );
2. Create a GUI to input a number and find the sum of its digits.
int n=Integer.parseInt(t1.getText());
int sum=0;
while (n>0) {
int digit= n % 10 ;
sum=sum + digit ;
n=n/10 ;
}
t2.setText(“Sum of digits: “ + sum );
3. Create a GUI to input a number and count how many of those digits are even and odd.
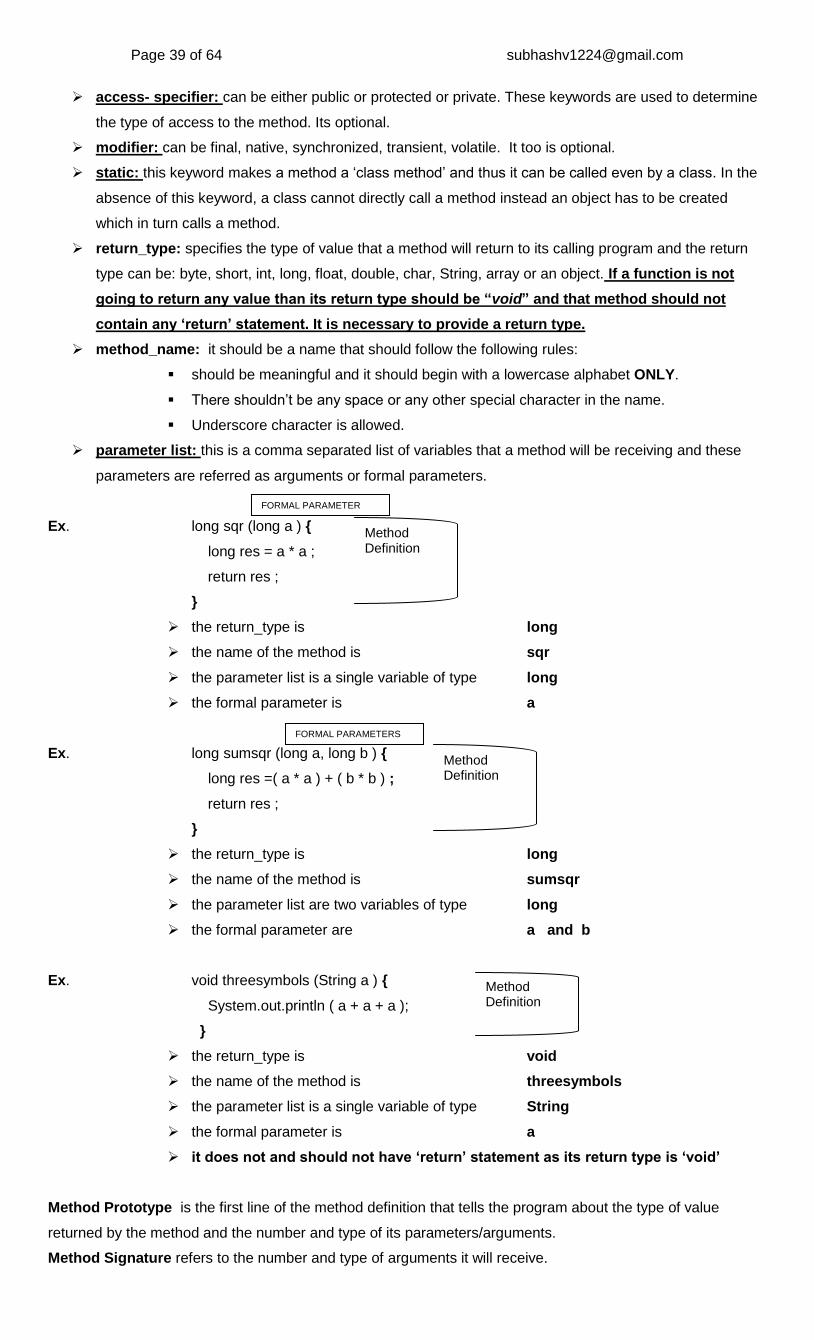
Now, in JAVA Methods always exist in a class. Thus a method had to be defined in a class in order to
access it. To create your first „CLASS‟ do the following:
You will see a dialog box and give the name of the class as “MyClass”. Now you will see coding window as shown below: public class MyClass { }
Note that a “class window” will not contain the GUI palette.
So, now we will write those methods that we have written earlier between these blocks of the class namely “MyClass” public class MyClass { static long sqr (long a ) {
long res = a * a ;
return res ; }
long sumsqr (long a, long b ) {
long res =( a * a ) + ( b * b ) ;
return res ; }
void threesymbols (String a ) {
System.out.println ( a + a + a ); }
} // class ends here Thus, the above class “MyClass” contains three “non-static methods” . The next step will be to call the method whenever they are required.
To create an object/instance of a class, „new‟ keyword is used. Now, to call the method in a GUI form:
For Methods that are non static, you have to first create an object of a class: o MyClass m1= new MyClass () ; The above statement will create an object ‘m1’ of class ‘MyClass’ with the help of the keyword ‘new’.
Now, the object can call the method as follows:
o m1.threesymbols(“ # ”) ; // Method call
o long r = m1.sumsqr( x , y) ; // since this method is returning a value of type long‟ we are storing the returned value in a variable of the same type i.e. „long‟.
But a „static method‟ can be called directly by a „class‟ and as such no need to create an „object‟ of a class. In the above class „sqr‟ method is a static method:
o long r = MyClass.sqr ( 12 ) ; The above statement will call „sqr‟ method with the class name rather than with the object.
All the methods should be defined between these blocks of this class named “MyClass
long r = m1 . sumsqr ( x , y) ; // A METHOD CALL STATEMENT
The above statement will call the „sumsqr‟ method and will pass the value of „x‟ and „y‟ variables to it.
value of „x‟ will be copied to „a‟ and value of „y‟ will be copied to „b‟ and after that there is no connection between these variables whatsoever. This is „CALL BY VALUE‟
long sumsqr (long a, long b ) {
long res =( a * a ) + ( b * b ) ;
return res ; }
note that in : long sumsqr (long a, long b ) // „a‟ and „b‟ are termed as FORMAL PARAMETERS‟ The „return res‟ statement will copy the answer to calling statement and then it‟s up to the calling statement to how to use the returned value.
It can either print the value or
store the value in a compatible variable. o In our case the returned value gets stored in a variable named „r‟ of „long‟ data-type.
Thus, variables that appear in the method definition are termed as „FORMAL PARAMETERS‟ and variables that appear in the method call statement are termed as „ACTUAL PARAMETERS‟. Moreover, the technique in which actual parameters pass the value to the formal parameters of the method is termed as „CALL BY VALUE‟ and in this, changes made by formal parameters in the method is not reflected back in actual parameters. class MyMath {
static int fact(int n){ int f=1; for(int i=1;i<=n;i++) f=f*i; return f; } static int findmax(int a,int b, int c){ int max; max=a; if(b> max) max=b; if(c> max) max=c; return max; } static int countdigits(long n){ int c=0; while(n>0){ c=c+1; n=n/10; } return c; }
OBJECT NAME
METHOD NAME
ACTUAL PARAMETERS
Method Definition
x y
1 METHOD
CALLED
2 METHOD RETURNING
A VALUE
1. Method to find factorial of a number
2. Method to find maximum of three numbers
3. Method to find count of digits in a number
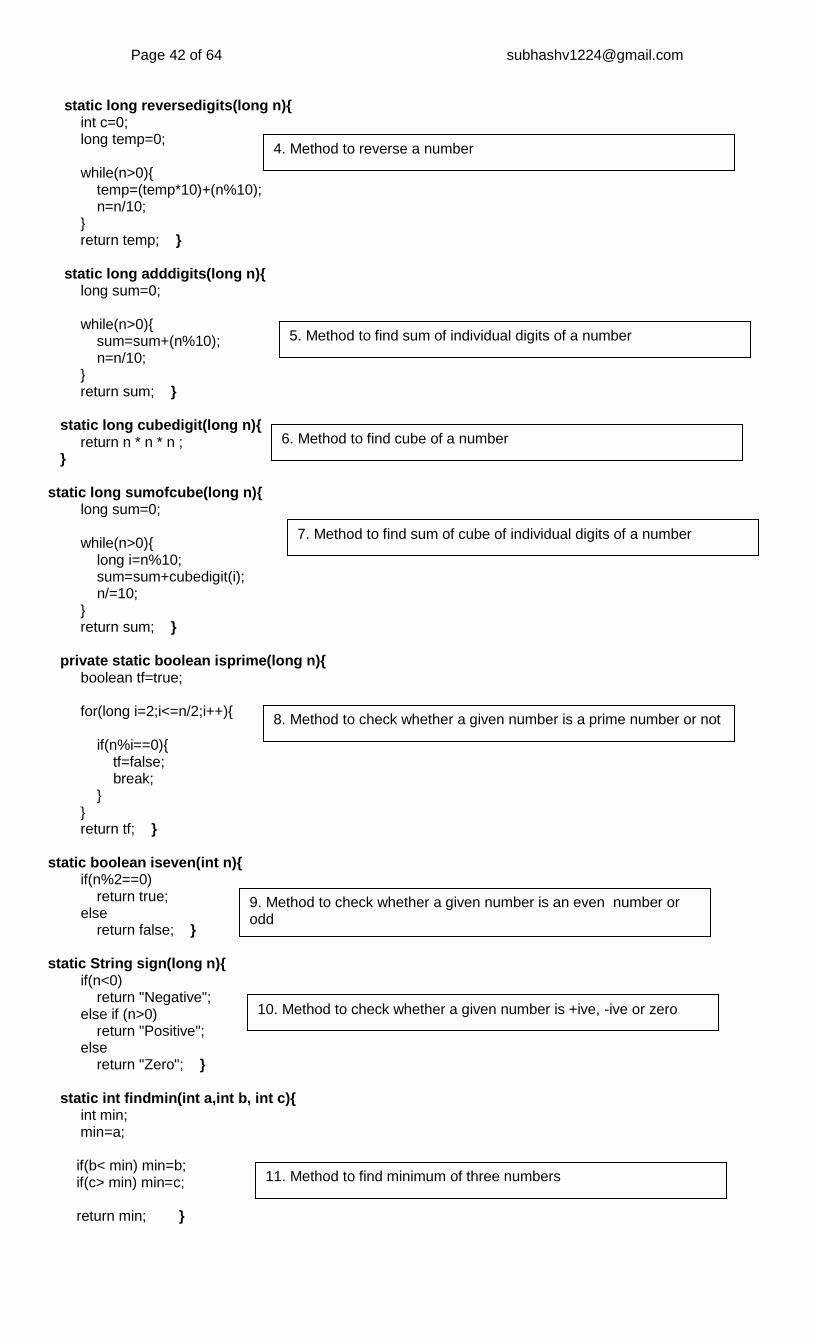
Page 42 of 64 [email protected] static long reversedigits(long n){ int c=0; long temp=0; while(n>0){ temp=(temp*10)+(n%10); n=n/10; } return temp; } static long adddigits(long n){ long sum=0; while(n>0){ sum=sum+(n%10); n=n/10; } return sum; } static long cubedigit(long n){ return n * n * n ; } static long sumofcube(long n){ long sum=0; while(n>0){ long i=n%10; sum=sum+cubedigit(i); n/=10; } return sum; } private static boolean isprime(long n){ boolean tf=true; for(long i=2;i<=n/2;i++){ if(n%i==0){ tf=false; break; } } return tf; } static boolean iseven(int n){ if(n%2==0) return true; else return false; } static String sign(long n){ if(n<0) return "Negative"; else if (n>0) return "Positive"; else return "Zero"; } static int findmin(int a,int b, int c){ int min; min=a; if(b< min) min=b; if(c> min) min=c; return min; }
4. Method to reverse a number
5. Method to find sum of individual digits of a number
6. Method to find cube of a number
7. Method to find sum of cube of individual digits of a number
8. Method to check whether a given number is a prime number or not
9. Method to check whether a given number is an even number or odd
10. Method to check whether a given number is +ive, -ive or zero
11. Method to find minimum of three numbers
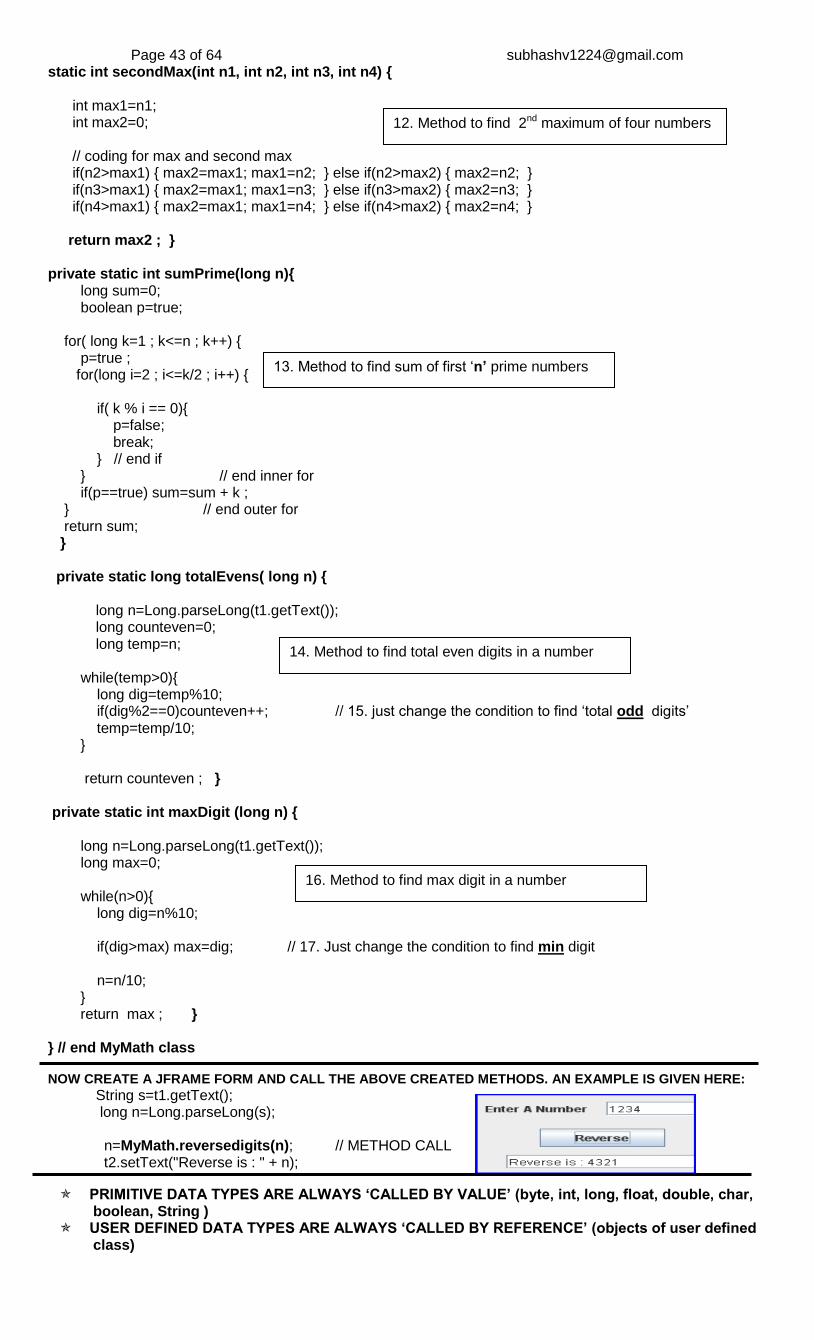
Page 43 of 64 [email protected] static int secondMax(int n1, int n2, int n3, int n4) { int max1=n1; int max2=0; // coding for max and second max if(n2>max1) { max2=max1; max1=n2; } else if(n2>max2) { max2=n2; } if(n3>max1) { max2=max1; max1=n3; } else if(n3>max2) { max2=n3; } if(n4>max1) { max2=max1; max1=n4; } else if(n4>max2) { max2=n4; } return max2 ; } private static int sumPrime(long n){ long sum=0; boolean p=true; for( long k=1 ; k<=n ; k++) { p=true ; for(long i=2 ; i<=k/2 ; i++) { if( k % i == 0){ p=false; break; } // end if } // end inner for if(p==true) sum=sum + k ; } // end outer for return sum; } private static long totalEvens( long n) {
long n=Long.parseLong(t1.getText()); long counteven=0; long temp=n; while(temp>0){ long dig=temp%10; if(dig%2==0)counteven++; // 15. just change the condition to find „total odd digits‟ temp=temp/10; } return counteven ; } private static int maxDigit (long n) { long n=Long.parseLong(t1.getText()); long max=0; while(n>0){ long dig=n%10; if(dig>max) max=dig; // 17. Just change the condition to find min digit n=n/10; } return max ; } } // end MyMath class
NOW CREATE A JFRAME FORM AND CALL THE ABOVE CREATED METHODS. AN EXAMPLE IS GIVEN HERE:
String s=t1.getText(); long n=Long.parseLong(s); n=MyMath.reversedigits(n); // METHOD CALL t2.setText("Reverse is : " + n);
PRIMITIVE DATA TYPES ARE ALWAYS „CALLED BY VALUE‟ (byte, int, long, float, double, char, boolean, String )
USER DEFINED DATA TYPES ARE ALWAYS „CALLED BY REFERENCE‟ (objects of user defined class)
Class : this is a template from which you can create objects. The definition of class includes the formal specifications for the class and any data and method in it. Object: this is an instance of a class much as a variable is an instance of a data type. We can think of a class as the type of an object. Every object has got (a) state/characteristics (Data Members) and (b) behaviour (methods/functions)
Data members: those variables that are part of a class. We use them to store the data the object uses. Objects supports both „instance variables‟ whose values are specific to the object and „class/static variables‟ whose values are shared among the objects of a specified class.
Methods/Functions: this is a function built into a class or object. We have instance and class methods. We can use instance methods with objects and class /static methods just by referring to the class name, no object is required.
Class declaration and definition syntax: [access] class class_name [extends …] [implements…] { // class definition [access] [static] type variable1; [access] [static] type variable2; . [access] [static] type variableN; [access] [static] return-type method1([parameter-list]) { (method definition) ….. }
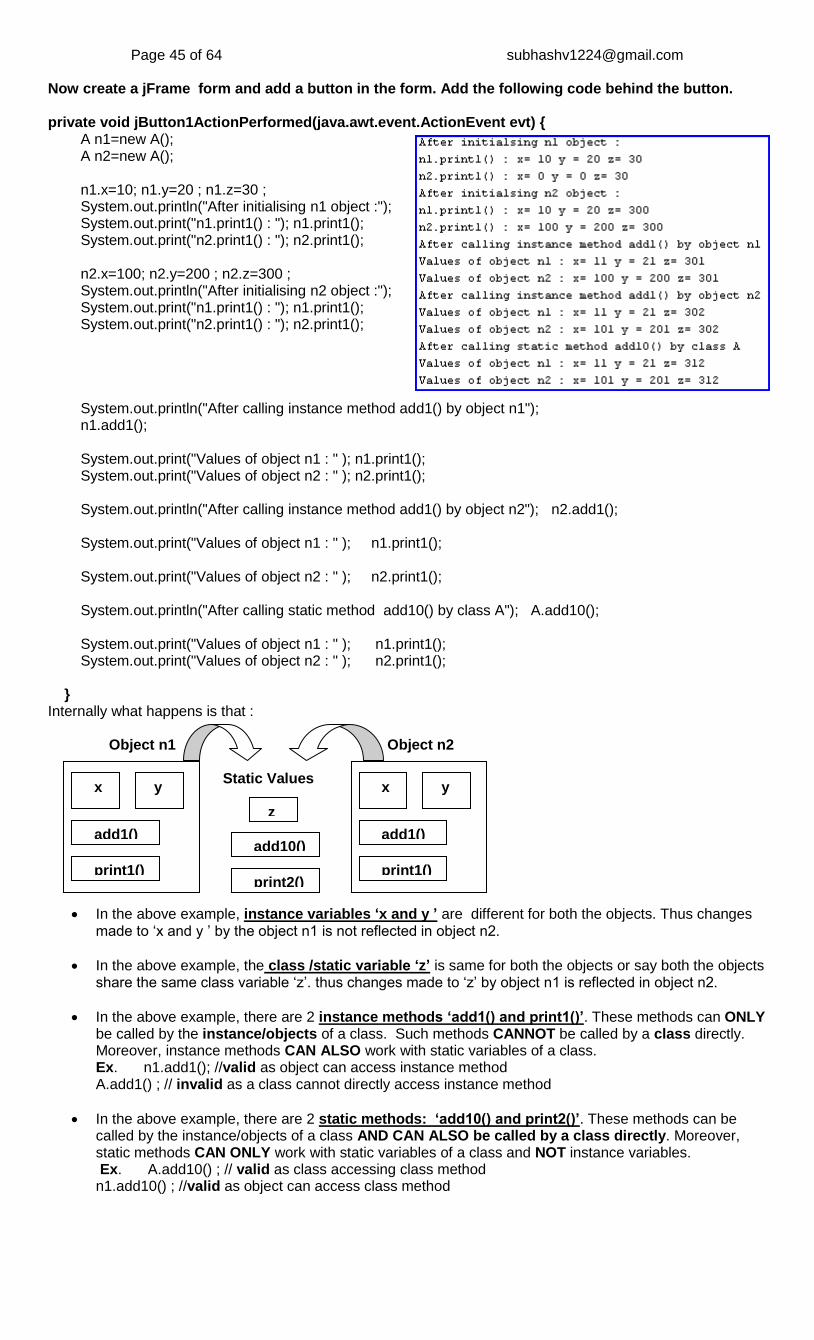
[access] [static] return-type method2([parameter-list]) { (method definition) ….. } [access] [static] return-type methodN([parameter-list] { (method definition) ….. } } // end class definition The keyword „static‟ turns variable into a class variable and a method into a class method. The „access‟ term specifies the accessibility of the class or a class method or a class variable to the rest of the program and it can be public, private or protected. Instance and Class variables: instance variables are specific to the objects. If you have 2 objects(i.e. two instances of a class), the instance variables in each object are independent of the instance variables in other object On the other hand, class variables of both the objects will refer to the same data and therefore will hold the same value. Ex. Create a class named „A‟ public class A { int x,y; // instance variables static int z; // static variable void add1(){ x++; y++; z++; } static void add10(){ z+=10; // not allowed x+=10; // not allowed y+=10; } void print1(){ System.out.println("x= "+ x + " y = " + y + " z= " + z); } static void print2(){ System.out.println(" z= " + z); } } // end class A
Page 45 of 64 [email protected] Now create a jFrame form and add a button in the form. Add the following code behind the button. private void jButton1ActionPerformed(java.awt.event.ActionEvent evt) { A n1=new A(); A n2=new A(); n1.x=10; n1.y=20 ; n1.z=30 ; System.out.println("After initialising n1 object :"); System.out.print("n1.print1() : "); n1.print1(); System.out.print("n2.print1() : "); n2.print1(); n2.x=100; n2.y=200 ; n2.z=300 ; System.out.println("After initialising n2 object :"); System.out.print("n1.print1() : "); n1.print1(); System.out.print("n2.print1() : "); n2.print1(); System.out.println("After calling instance method add1() by object n1"); n1.add1(); System.out.print("Values of object n1 : " ); n1.print1(); System.out.print("Values of object n2 : " ); n2.print1(); System.out.println("After calling instance method add1() by object n2"); n2.add1(); System.out.print("Values of object n1 : " ); n1.print1(); System.out.print("Values of object n2 : " ); n2.print1(); System.out.println("After calling static method add10() by class A"); A.add10(); System.out.print("Values of object n1 : " ); n1.print1(); System.out.print("Values of object n2 : " ); n2.print1(); } Internally what happens is that : Object n1 Object n2 Static Values
In the above example, instance variables „x and y ‟ are different for both the objects. Thus changes made to „x and y ‟ by the object n1 is not reflected in object n2.
In the above example, the class /static variable „z‟ is same for both the objects or say both the objects share the same class variable „z‟. thus changes made to „z‟ by object n1 is reflected in object n2.
In the above example, there are 2 instance methods „add1() and print1()‟. These methods can ONLY be called by the instance/objects of a class. Such methods CANNOT be called by a class directly. Moreover, instance methods CAN ALSO work with static variables of a class. Ex. n1.add1(); //valid as object can access instance method
A.add1() ; // invalid as a class cannot directly access instance method
In the above example, there are 2 static methods: „add10() and print2()‟. These methods can be called by the instance/objects of a class AND CAN ALSO be called by a class directly. Moreover, static methods CAN ONLY work with static variables of a class and NOT instance variables. Ex. A.add10() ; // valid as class accessing class method
n1.add10() ; //valid as object can access class method
These are special methods which have the same name as that of a class and its basic use is to initialize or provide a starting value to the objects of a class. Thus, a constructor:
1. It is a METHOD with the same name as that of a class. 2. It does NOT have a return type, not even void. 3. Is called automatically when an object is created. 4. It can be parameterized or non-parameterized. 5. There can be any number of constructors but with different signatures. 6. No need to call it explicitly as other methods.
class Student { int roll; String name;
float marks; public Student() { roll=1; name=”Ajay”; marks=45; } public Student(int r); roll=r; } public Student(int r, String n) { roll=r; name=n; } public Student(int r, String n, float m){ roll=r; name=n; marks=m; } public void printdata(){ System.out.println(“Roll No.= ” + roll); System.out.println(“Name = ” + name); System.out.println(“Marks = ” + marks); } } Now creating objects of the class: Student s1=new Student(); // calling no parameter constructor Student s2=new Student(2); // calling 1-parameter constructor Student s3=new Student(3,"Amit"); // calling 2-parameter constructor Student s4=new Student(4,"Bishnu",50); //calling 3-parameter constructor System.out.println("Object s1:") ; s1.printdata(); System.out.println("\nObject s2:") ; s2.printdata(); System.out.println("\nObject s3:") ; s3.printdata(); System.out.println("\nObject s4:") ; s4.printdata(); Internally the following happened:
A constructor with zero parameters. This
will initialize an objects all the three variables with the default value provided here.
A constructor with one parameter. This will
only initialize the „roll‟ variable of the class with the user supplied value. The other two variable will have „null‟ and 0.0
A constructor with two parameters. This
will initialize the „roll‟ and „name‟ variables of the class with the user supplied value. The other variable „marks‟ will have 0.0
A constructor with three parameters. This
will initialize the „roll‟ , „name „ and „marks‟ variables of the class with the user supplied value.
roll
name
marks
1
“Ajay”
45.0
Object: s1
roll
name
marks
2
null
0.0
Object: s2
roll
name
marks
3
“Amit”
0.0
Object: s3
roll
name
marks
4
“Bishnu”
50.0
Object: s4
Three instance variables of the class namely, roll, name and marks. Note that if you initialize a
variable at class level than this value will be treated as a default value for that variable.
5. Extract data from the resultset: ResultSet object provides methods for obtaining column/field
data for a row: rs.getString(“regno”); // where regno is a field of students table.
getxxxx() methods provides the means for retrieving field values from the current row.
ResultSet Cursor: when the resultset object is first created the cursor is positioned before the
first row.
Various Navigational methods of ResutSet object
Method name Description
rs.first() Moves the cursor to the first row
rs.next() Moves the cursor to the next row in the recordset
rs.previous() Moves the cursor to the previous record in a recordset
rs.last() Moves the cursor to the last row in the recordset
rs.relative(int r) Moves the cursor relative to its current position. Ex if the cursor is at row/record 3, then rs.relative(4) will place the cursor at the 7th record in the resultset
rs.absolute(int r) Positions the cursor on the rth row of the resultset. Ex. rs.absolute(4) will place the cursor at the 4th record of the resultset
rs.getRow() Retrieves the current row number the cursor is pointing at.
We can sum up five basic steps to connect to the database as follows:
4. Opening the Connection. To use DriverManager class you can do as follows:
String url=”jdbc:mysql://localhost/mydatabase”;
String user=”root”;
String pass=”1234”;
conn=DriverManager.getConnection(url,user,pass);
5. Executing the SQL statements.
s=conn.createStatement();
rs=s.executeQuery(“SELECT * FROM students WHERE std=12”);
How to retrieve a data based on user specified value: Enter Class tClass Enter Section tSection rs=s.executeQuery(“Select * From students Where std= ” + tClass.getText() + “ and section= ” + tSection.getText() );
Note that there should be a space between “....std= ” & “ and section= ”
INHERITANCE Inheritance is the capability of one class to derive properties from another class. Thus, the class inheritance lets you derive new classes called „derived classes‟ from old ones with the derived class inheriting the properties and methods of the old class known as base class. Need:
1. Reusability: it allows addition of new features to an existing class without modifying it. One can derive a new class(subclass or derived class) from an existing one and new features to it.
2. Transitivity: this means, if a class B inherits properties of another class A, then all the subclasses of B will automatically inherit the properties of A.
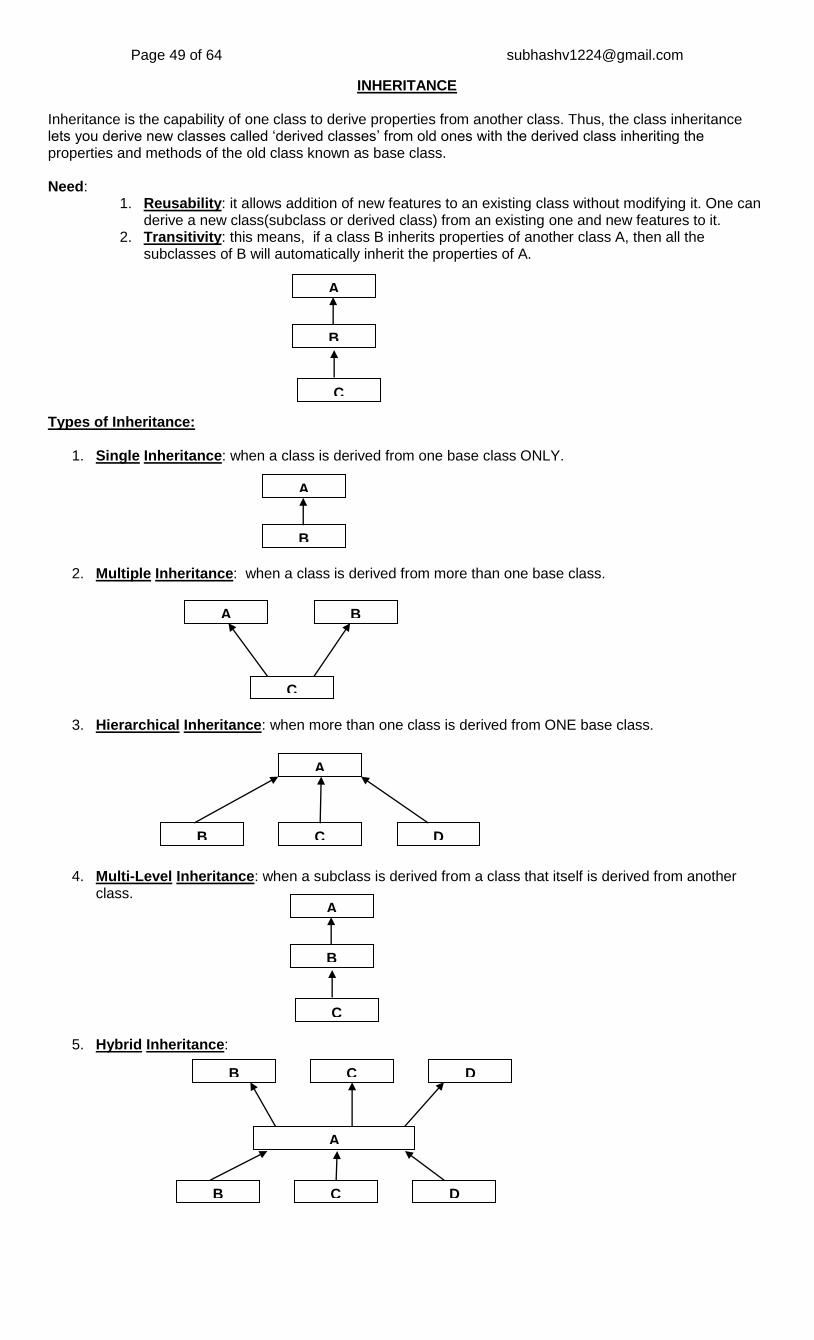
Types of Inheritance:
1. Single Inheritance: when a class is derived from one base class ONLY.
2. Multiple Inheritance: when a class is derived from more than one base class.
3. Hierarchical Inheritance: when more than one class is derived from ONE base class.
4. Multi-Level Inheritance: when a subclass is derived from a class that itself is derived from another class.
class <derived-class> extends <base-class>{ -----;
} Example: class One { private int a ; char b; protected double z; One(){ System.out.println(“Constructor of class One”); } } class Two extends One{ int x,y; //new members of subclass Two(){ System.out.println(“Constructor of class Two”); } } Here the class „Two‟ is a sub-class or a derived class of the class „One‟ which is the base or superclass. Note that while extending classes instance variables and methods of super-class also become part of the new sub-class. Now the question arise, can a sub-class can access all the members of its super-class? the answer depends on the various access-specifiers used for the members of a super-class.
Access Specifiers/Access Control of Inherited Members Although a sub-class inherits all the members of its super-class, yet it can access only those variables or methods for which it has access permissions. In other words, the access of inherited members depends upon their access modifiers i.e. whether they are private or public or protected.
Modifiers Specification
private Members are accessible only inside their own class where they have been originally declared and nowhere else.
public Members are accessible in all the classes whether a sub-class or class in the same package or class in another class along-with their own class
protected Members are accessible inside their own class as well as in all sub-classes of their class, regardless of whether sub-classes exist in the same package or any other package.
default These are those members that are declared without any access modifiers i.e. only with a data type. These members are accessible only inside those classes that are in the same package.
private protected
These members are accessible only from sub-classes whether in the same package or any other package
Modifier Inside own class
Inside sub-classes Inside non-sub-classes
In the same package
In other packages
In the same package
In other packages
public Yes Yes Yes Yes Yes
protected Yes Yes Yes Yes No
default Yes Yes Yes No No
private protected
Yes Yes Yes No No
private Yes No No No no
Things you should know about the Inheritance in JAVA:
Java allows ONLY single Inheritance and Hierarchical and Multi-Level Inheritance which means that a class has at most one immediate super-class.
Every class in Java has one and only one immediate/direct super-class, but might have several sub-classes.
The inheritance relationship is transitive. Therefore, every class inherits variables and methods from all classes which are higher in the class hierarchy (direct or indirect super-class)
Overriding methods and Hiding Member Variables: Sometimes, a sub-class uses the same name for variables and methods as in the super-class. This leads to the following behaviour:
Methods are OVERRIDEN
Variables are HIDDEN class A{ void print1(){ System.out.println(“The class A”); } } class B extends A { void print1(){ System.out.println(“The class B”); } } Coding behind a BUTTON: B objB1=new B(); objB1.print1(); In the above example, the „print1‟ method of class B will be executed and Not that of the class A. You can say „print1()‟ method of class A will be overridden by the „print1()‟ method of class B. Similarly, variables of super-class are said to be HIDDEN, if the variable with the same name and type exist in the sub-class or derived class. Thus, a method in a sub-class hides or overshadows a method inherited from the super-class if both methods have the same signature i.e. same name, number and type of arguments, and the same return type. This property is known as Overriding the inherited methods. You can still refer to the method of the super-class by using the keyword super i.e. super.overridenMethod() refers to the method as it is defined in the super-class. Similarly, you can refer to the super-classes hidden variable by : super.hiddenVariable class A{ void print1(){ System.out.println(“The class A”); } } class B extends A { void print1(){ System.out.println(“The class B”); } void print2(){ super.print1(); } Coding behind a BUTTON: B objB1=new B(); objB1.print1(); // print1 of class B will be called objB1.print2(); // print2 of class B will be called which in turn will call print1 of class A
NOTE that an object of a sub-class cannot directly access an Overridden method of super-class. it can do so by calling a method of the sub-class which in turn can call the Overridden method of the super-class with the keyword „super‟.
The keyword „final‟:
Using final keyword with a variable makes it a constant and they cannot be changed in the class and sub-classes.
Using final keyword with methods will not allow them to be overridden by sub-classes methods.
Using final keyword with a class will not allow it to be extended or say inherited.
void print() { System.out.println(“print method of the super-class”); }
} class subClass extends superClass { String id=”id of sub-class”; //overriding super-classes variable id
void print() { // overriding super-classes method print() System.out.println(“print method of the sub-class”); } void print2(){ System.out.println(id); print() ; System.out.println();
System.out.println(super.id); // accessing the hidden variable of the superclass super.print(); // accessing overridden method of the superclass }
} The OUTPUT of the method print2() will be: id of sub-class print method of the sub-class id of super-class print method of the super-class
Method Overloading/Function Overloading A function name having several definitions in the same scope that are differentiated by the number and type of arguments is said to be an overloaded functions or methods.
The key to Method Overloading is a method‟s argument list which is also known as the function signature. It is the signature and not the function type that enables function overloading.
A function‟s argument list is known as a function‟s signature. Functions with the same name and signature but different return types are not allowed in Java. But you can have functions with the same name and different return types ONLY IF their signature is
different. o Same name, different return types and different signatures
int sqr(int n) { return n * n ; } float sqr(float n) { return n * n ; }
o Same name, same return type and different signatures void sqr(int n) { System.out.println( n * n ) ; } void sqr(float n) { System.out.println( n * n ) ; }
o Same name, same signature but different return type are NOT ALLOWED but if the
signatures of two functions differ in either the number or type of their arguments, the two methods are considered to be OVERLOADED
An ABSTRACT class is the one that simply represents a concept and whose objects can‟t be created. Such a class is created through the keyword „abstract‟.
An ABSTRACT class needs to be extended or inherited because such a class cannot create an object of its type.
Example: public abstract class Shape { String name; double area ; public void display(){ } } class Circle extends Shape { ........... } class Rectangle extends Shape { ........ }
ABSTRACT METHODS
AM‟s are methods with no method statements. Sub-classes must provide the method statements for the inherited abstract methods.
To define a method as abstract, we need to use the keyword „abstract‟ with the method and its declaration with a semi-colon.
The „abstract methods‟ of super-class would require overriding in each sub-class. public abstract class Shape { String name; double area ; public abstract void display() ; // an abstract method } class Circle extends Shape{ double radius; double calcArea() { return 3.154 * radius * radius ; } public void display() { //overriding abstract method display() System.out.println(“Radius= ” + radius); System.out.println(“Area= ” + area) ; } }
A sub-class cannot override methods that are declared „final‟ in the super-class. A sub-class must override methods that are declared „abstract‟ in the super-class or the sub-class itself
must be abstract.
INHERITANCE AND CONSTRUCTORS Constructor Functions, even though, they are member methods of the class, are not inherited by the sub-class. We can explicitly call the constructor of the super-class using the keyword „super‟. Ex. to call the constructor of the super-class A in sub-class B: super() ; Such an explicit call of the constructor of a super-class must be the first statement in the sub-class constructor.
1. A web browser is a WWW client that navigates through the WWW and displays web pages.
2. Web Servers are computers on which web documents reside. They provide 4 major function: Serving web pages Running gateway programs Controlling access to the server Monitoring and logging server access
o Example, apache web server, MS internet Information Server(IIS), netscape navigator server
3. A location on a web server is called a web site
4. Each web site has got a unique address called URL (Uniform Resource Locator)
5. A set of rules on which the internet structure of WWW is built is called HTTP (HyperText Transfer
Protocol)
6. A file‟s internet address or URL is determined by: o The type of server or protocol like http. o The name of the server or domain name, like yahoo.com o The location of the file on the server, like http://yahoo.com/index.htm
HTML: it is a page-layout and hyperlink specification markup language. It is NOT a programming language. HTML is made up of elements or tags and its attributes which work together. A TAG is a coded HTML command that indicates that how a part of a web page should be displayed. An ATTRIBUTE is a special word used with a tag to specify additional information to the tag. TML tags are contained within angle brackets (<>). These tags or elements are NOT CASE SENSITIVE. The basic structure of writing HTML file is as follows: <HTML> <HEAD> <TITLE> MY FIRST WEB PAGE </TITLE> </ HEAD> <BODY> ACTUAL CONTENT TO BE DISPLAYED ON THE WEB PAGE THE VARIOUS HTML TAGS ARE DEFINED HERE </ BODY> </ HTML>
<HTML> tag identifies the document as HTML document.
<HEAD> tag contains information about the document title, scripts used, style definitions and document descriptions.
<TITLE> tag contains the document‟s title. It is included with the <HEAD> tag.
<BODY> tag encloses all tags and their attributes and the information to be displayed in the web page. HTML documents can be written in notepad or any text editor and has to be saved with an extension „.htm‟ or „.html‟. Container elements or tags require pair tags i.e. starting as well as ending tag. Empty tags require just a starting tag only ex. <br>, <hr> etc.
Page 55 of 64 [email protected] The syntax to write a tag: <TAGNAME ... ATTRIBUTE=VALUE... ATTRUBUTE=VALUE... ATTRIBUTE=VALUE..> </ TAGNAME> Every HTML element consists of a tag-name followed by an optional list of attributes and their values and all placed between opening and closing angle brackets. Tag attribute come after tag-name each separated by one or more space. A tag attribute‟s value, if any, is given after an equal to (=) sign. Note that, if value of an attribute is a single word then no need to put a double quote around that value otherwise you have to put a double quote. HTML TAGS/ELEMENTS
1) <HTML>
2) <BODY>
a. ATTRIBUTES:
i. BACKGROUND=”imagefile.jpg”
ii. BGCOLOR=color-code OR color-name
iii. TEXT=text-color
iv. ALINK=active-link color
v. VLINK=visited-link color
vi. TOPMARGIN=value in pixels
vii. LEFTMARGIN=value in pixels
3) <H1> TO <H6>
a. ATTRIBUTES:
i. ALIGN=center/right/left
<H1> TO <H6> tags are differentiated from each other through these factors: typeface, point-
size and space above and below them.
4) <BR> - this will move the following text to the next immediate line without any space.
5) <P> - this will move the following text to the next line leaving one blank line in between.
a. ATTRIBUTES:
i. ALIGN=center/right/left
6) <CENTER> - this will centralize a segment of text.
7) <BASEFONT> -
a. ATTRIBUTES:
i. SIZE= 1 TO 7 or relative +1 + 2 ....
ii. FACE= any font name
iii. COLOR= color code or color name
8) <FONT>
a. ATTRIBUTES:
i. SIZE= 1 TO 7 or relative +1 + 2 ....
ii. FACE= any font name
iii. COLOR= color code or color name
Note that BASEFONT is used to set default settings for a text. This is because it affects all the text that
follows it until a new tag affecting that is encountered. While FONT tag affects a text up-to its closing tag
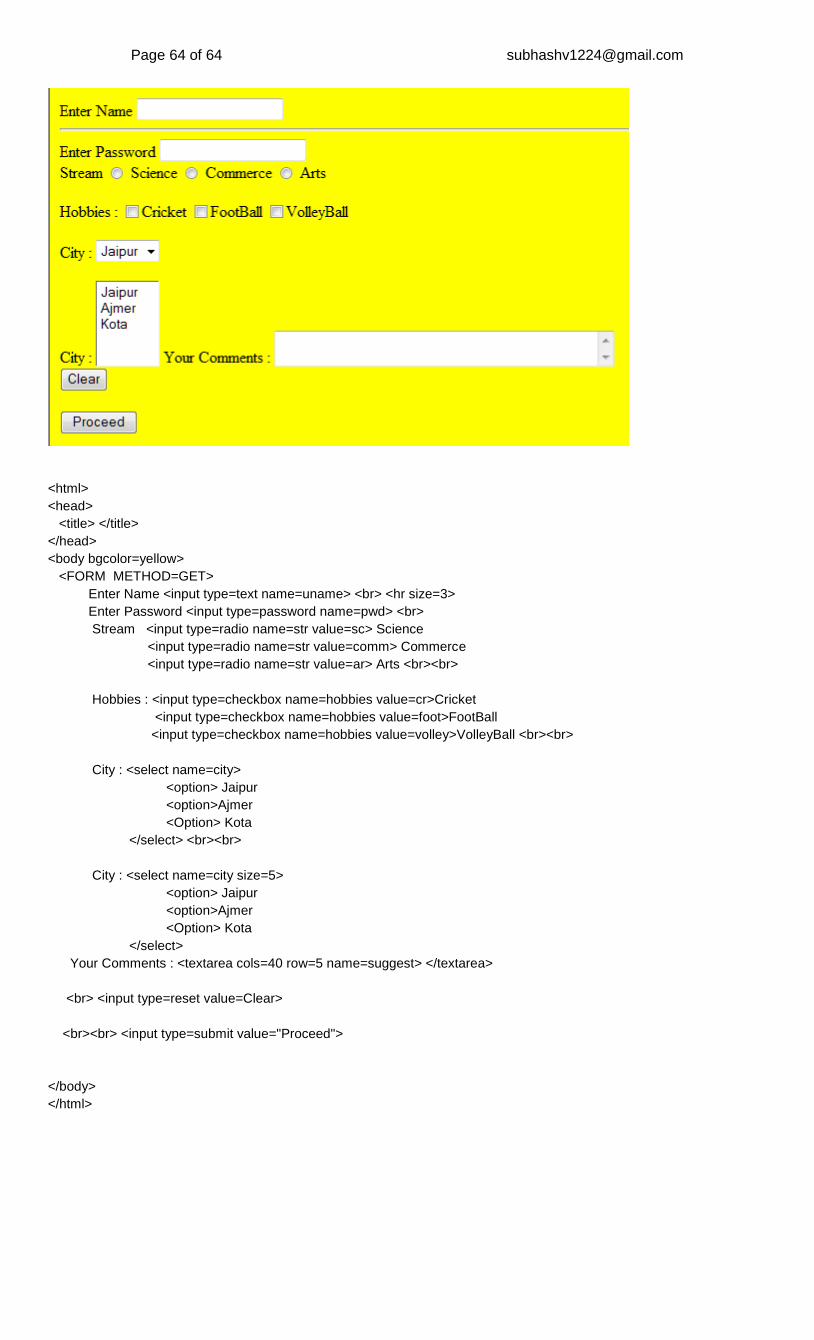
Forms are a vital tool for the webmaster to receive information from the web surfer, such as: their name, email address, credit card, etc. A form will take input from the viewer and depending on your needs, you may store that data into a file, place an order, gather user statistics, register the person to your web forum, or maybe subscribe them to your weekly newsletter.
Text Fields
<input> has a few attributes that you should be aware of.
type - Determines what kind of input field it will be. Possible values are: password: to create a password box text: to create text-field radio: to create radio button checkbox: to create check-box
name - Assigns a name to the given field so that you may reference it later. size - Sets the horizontal width of the field. The unit of measurement is in blank spaces. maxlength - Dictates the maximum number of characters that can be entered.
Page 61 of 64 [email protected] Do not use the password feature for security purposes. The data in the password field is not encrypted and is not secure in any way.
HTML Form Email
Now we will add the submit functionality to your form. Generally, the button should be the last item of your form and have its name attribute set to "Send" or "Submit". Name defines what the label of the button will be. Here is a list of important attributes of the submit:
In addition to adding the submit button, we must also add a destination for this information and specify how we want it to travel to that place. Adding the following attributes to your <form> will do just this.
method - We will only be using the post functionality of method, which sends the data without displaying any of the information to the visitor.
action - Specifies the URL to send the data to. We will be sending our information to a fake email address.
Simply change the email address to your own and you will have set up your first functional form!
HTML Radio Buttons
Radio buttons are a popular form of interaction. You may have seen them on quizzes, questionnaires, and other web sites that give the user a multiple choice question. Below are a couple attributes you should know that relate to the radio button.
value - specifies what will be sent if the user chooses this radio button. Only one value will be sent for a given group of radio buttons (see name for more information).
name - defines which set of radio buttons that it is a part of. Below we have 2 groups: shade and size. To group a set of radio buttons, their “name” attribute should have the same name.
Check boxes allow for multiple items to be selected for a certain group of choices. The check box's name and value attributes behave the same as a radio button.
Drop down menus are created with the <select> and <option> tags. <select> is the list itself and each <option> is an
available choice for the user.
HTML Code:
<form method="post" action="mailto:[email protected]"> College Degree? <select name="degree"> <option>Choose One</option> <option>Some High School</option> <option>High School Degree</option> <option>Some College</option> <option>Bachelor's Degree</option> <option>Doctorate</option> <input type="submit" value="Email Yourself"> </select> </form>
Drop Down Lists:
Education? Choose One Email Yourself
HTML Selection Forms
Yet another type of form, a highlighted selection list. This form will post what the user highlights. Basically just another type of way to get input from the user.
The size attribute selects how many options will be shown at once before needing to scroll, and the selected option tells the browser which choice to select by default.
Text areas serve as an input field for viewers to place their own comments onto. Forums and the like use text areas to post what you type onto their site using scripts. For this form, the text area is used as a way to write comments to somebody.
Rows and columns need to be specified as attributes to the <textarea> tag. Rows are roughly 12pixels high, the same as in word programs and the value of the columns reflects how many characters wide the text area will be. i.e. The example below shows a text area 5 rows tall and 20 characters wide. Another attribute to be aware of is the wrap. Wrap has 3 values.
wrap= "off" "virtual" "physical"
Virtual means that the viewer will see the words wrapping as they type their comments, but when the page is submitted to you, the web host, the document sent will not have wrapping words. Physical means that the text will appear both to you, the web host, and the viewer including any page breaks and additional spaces that may be inputed. The words come as they are. Off of course, turns off word wrapping within the text area. One ongoing line.
HTML Code:
<form method="post" action="mailto:[email protected]"> <textarea rows="5" cols="20" wrap="physical" name="comments"> Enter Comments Here </textarea> <input type="submit" value="Email Yourself"> </form>
Text Area:
Enter Comments Here
Email Yourself
Also note that any text placed between the opening and closing textarea tags will show up inside the text area when the browser views it.