1 Paper 151-2012 Doing More with the SAS® Display Manager: From Editor to ViewTable - Options and Tools You Should Know Arthur L. Carpenter California Occidental Consultants ABSTRACT If you have used the interactive interface for SAS ® you have most likely used the Display Manager. As it ships, the Display Manager is very powerful and yet fairly easy to use with a minimal learning curve for the new user. Because it is functional „right out of the box‟, most users do very little to customize the interface. This is a shame, because the Display Manager contains a great many hidden opportunities to make it even more powerful, even easier to use, and customized for your way of using the interface. The Display Manager builds a variety of windows, screens, and dialogue boxes to facilitate communication between SAS, the Operating System, and the user. For each of the five primary windows and extending to the dozens of secondary windows there are options that control the content, display, and level of interaction. Options have defaults and a majority of these can be easily changed to suite your needs. You think that you know the Display Manager, but you will be amazed at what you have yet to learn. From simple tricks that will save you hours of work, to embedding tools and macros in the Enhanced Editor; there is so very much more that we can do in the Display Manager. KEY WORDS Display Manager, Enhanced Editor, ViewTable, SAS Explorer, WSAVE INTRODUCTION The Display Manager is extremely customizable. Many of these possible customizations are a bit over the top, but there are a number that are very helpful. Virtually every option has a default that can be changed. Tool bars and pull down menus can be customized. You can execute programs with a single keystroke and you can create short cuts and editing tools for use with the Enhanced Editor. Most of these customizations are easy, and most only require a bit of imagination as to what you would like to have different for your work environment. The examples shown in this paper are adapted from Chapter 14 of the book Carpenter’s Guide to Innovative SAS ® Techniques by Art Carpenter. Depending on the version of SAS, the operating system (OS), and the way that SAS is installed and executed at your location, the appearance of some of the screens may vary from those shown in this paper. The basics however should be the same. When using the Display Manager many of the options, tool bars, and pull down menus are window dependent. This means that you will need to be careful to properly select the active window when a following the steps in the following examples. Hands-on Workshops SAS Global Forum 2012
Transcript
1
Paper 151-2012
Doing More with the SAS® Display Manager: From Editor to ViewTable - Options and Tools You Should
Know
Arthur L. Carpenter
California Occidental Consultants
ABSTRACT If you have used the interactive interface for SAS
® you have most likely used the Display Manager. As it ships, the
Display Manager is very powerful and yet fairly easy to use with a minimal learning curve for the new user.
Because it is functional „right out of the box‟, most users do very little to customize the interface. This is a shame,
because the Display Manager contains a great many hidden opportunities to make it even more powerful, even
easier to use, and customized for your way of using the interface.
The Display Manager builds a variety of windows, screens, and dialogue boxes to facilitate communication between
SAS, the Operating System, and the user. For each of the five primary windows and extending to the dozens of
secondary windows there are options that control the content, display, and level of interaction. Options have
defaults and a majority of these can be easily changed to suite your needs.
You think that you know the Display Manager, but you will be amazed at what you have yet to learn. From simple
tricks that will save you hours of work, to embedding tools and macros in the Enhanced Editor; there is so very
much more that we can do in the Display Manager.
KEY WORDS Display Manager, Enhanced Editor, ViewTable, SAS Explorer, WSAVE
INTRODUCTION The Display Manager is extremely customizable. Many of these possible customizations are a bit over the top, but
there are a number that are very helpful. Virtually every option has a default that can be changed. Tool bars and
pull down menus can be customized. You can execute programs with a single keystroke and you can create short
cuts and editing tools for use with the Enhanced Editor.
Most of these customizations are easy, and most only require a bit of imagination as to what you would like to have
different for your work environment.
The examples shown in this paper are adapted from Chapter 14 of the book Carpenter’s Guide to Innovative SAS®
Techniques by Art Carpenter. Depending on the version of SAS, the operating system (OS), and the way that SAS
is installed and executed at your location, the appearance of some of the screens may vary from those shown in this
paper. The basics however should be the same.
When using the Display Manager many of the options, tool bars, and pull down menus are window dependent. This
means that you will need to be careful to properly select the active window when a following the steps in the
following examples.
Hands-on WorkshopsSAS Global Forum 2012
DM COMMANDS AND FUNCTION KEYS The earliest versions of the Display Manager predated the mouse or even GUI interfaces. To assist with navigation
a series of commands designed to be typed into the Command Box or on the Command Line were developed. These
even included an editor. Although still available many of these commands are no longer useful, however some can
still be very helpful.
Commands Each of the five primary and all of the secondary windows have names. Typing the name of the window in the
Command Box makes that the active window
Primary and secondary window names include:
wpgm enhanced editor
log log
output Output window
explorer SAS explorer
title titles window
Other useful commands include:
clear clear the contents of the active window
submit submit the contents of the editor for execution (editor must
be the active window)
help initiate a SAS help session
zoom maximize or shrink the size of a window
Function Keys One or more commands can be assigned to function keys. The current key assignments can be seen be seen by
examining the KEYS window. Type KEYS (or by default press F9) to bring up the KEYS window. Each of these
assignments can be modified by the user. Multiple commands can be chained together. By default F8 shrinks the
editor window and submits the code for execution.
DM Statement The DM statement allows you to execute one or more Display Manager commands from within a SAS Program.
These are the same commands that can be used in the command box, on the command line, or from the KEYS
window.
If you do not need to designate or change the
active window all you need is the action.
This is common when performing a DM task
from within a batch program.
The command to the right will clear the LOG window.
Multiple DM commands can be included in a single DM statement by chaining them together with semicolons. This
DM statement turns off the program editor and executes an AF program making the AF window active.
You can also reroute the LOG to a file much as you could by using PROC PRINTTO or the ALTLOG option.
DM <windowname> 'action' <windoname>;
dm log 'clear';
dm af "pgm off; af cat = appls.allproj.passwd.program";
dm 'log; file "&path\logdump1.log"';
Hands-on WorkshopsSAS Global Forum 2012
3
The POST command can be used to post a message box to the users screen. This can be a much stronger attention
grabber than just a message to the LOG.
In the DM statement the enhanced editor is opened using the WEDIT
command, and if followed by a file name, a specific file can be
loaded and opened for editing.
The ViewTable can be invoked as well using either the VIEWTABLE or VT command. Here the data set
ADVRPT.DEMOG is opened with the variable names shown as column headings (COLHEADING=LABELS is the
default).
The DM statement can also be used to assign a specific command to a
function key. The KEYDEF command is used to make the assignment.
Here the F12 key is assigned to clear the log.
For combination keystrokes enclose the key definition in quotes as well. The SHIFT F9 key will now close the next
open ViewTable window. Close a
series of open VT windows with
successive selections of SHIFT F9.
dm 'post "this is a message"';
dm 'wedit "C:\temp\test.sas"' ;
dm "viewtable advrpt.demog colheading=names";
dm 'keydef f12 "log;clear"';
dm 'keydef "shf f9" "next VIEWTABLE:; end"';
Hands-on WorkshopsSAS Global Forum 2012
CUSTOMIZING AND SAVING WINDOW APPEARANCE By default the five primary windows of the display manager are arranged so that the OUTPUT window is hidden,
and the RESULTS window is docked and hidden behind the EXPLORER window which is also docked.
These windows can be moved, resized, and their new attributes saved. The EXPLORER and RESULTS windows
can be undocked by selecting the DOCKED option
under the WINDOW pull down menu. Allowing these
windows to float is especially useful on laptops or
monitors with limited real estate.
For the EXPLORER I like the traditional view and like
to select the DETAILS and TREE options on the tool
bar.
The size and position of each of these windows can be adjusted using standard mouse/window techniques. Once
they have been adjusted the way you want them, use the WSAVE ALL command in the command box to save these
settings for your next SAS session.
Hands-on WorkshopsSAS Global Forum 2012
5
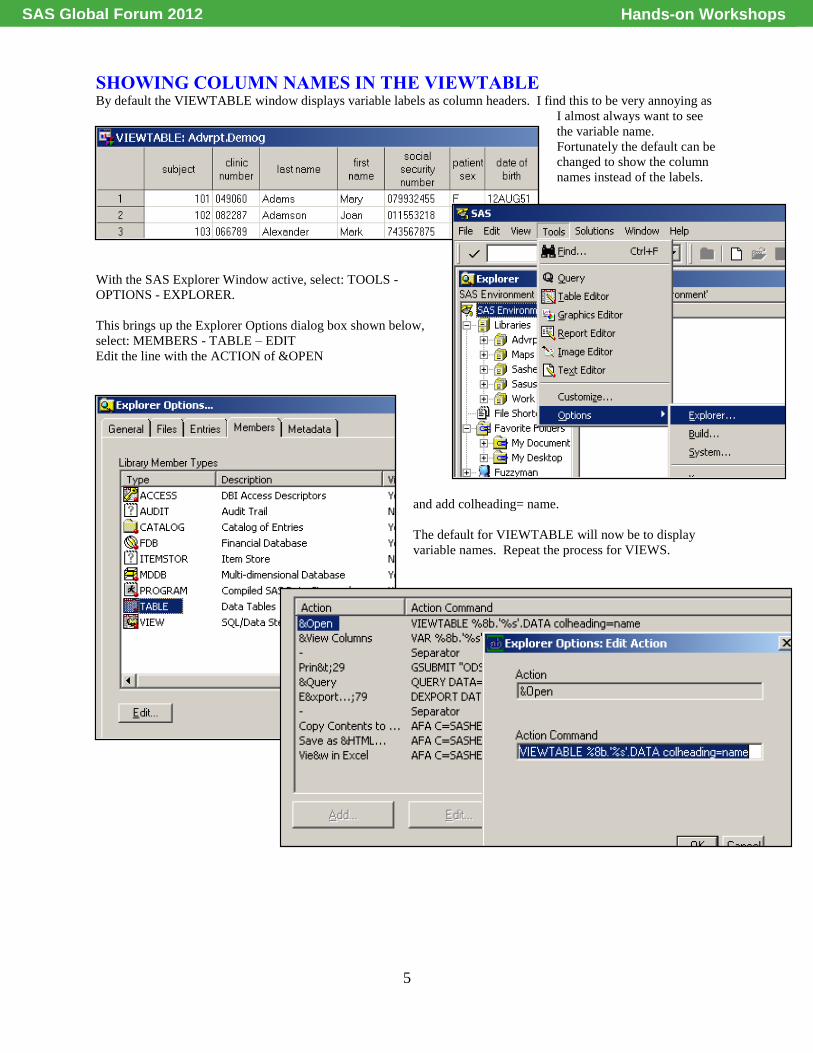
SHOWING COLUMN NAMES IN THE VIEWTABLE By default the VIEWTABLE window displays variable labels as column headers. I find this to be very annoying as
I almost always want to see
the variable name.
Fortunately the default can be
changed to show the column
names instead of the labels.
With the SAS Explorer Window active, select: TOOLS -
OPTIONS - EXPLORER.
This brings up the Explorer Options dialog box shown below,
select: MEMBERS - TABLE – EDIT
Edit the line with the ACTION of &OPEN
and add colheading= name.
The default for VIEWTABLE will now be to display
variable names. Repeat the process for VIEWS.
Hands-on WorkshopsSAS Global Forum 2012
ENHANCING THE ENHANCED EDITOR There are a number of options and shortcuts available for use with the Enhanced Editor. It is also possible to do a fair amount of customization.
Editor Setup There are only a few set up preferences that I would recommend that you change. Most of the defaults are fine for
typical users. The options for the Enhanced editor can be found when the editor is the active window. Use TOOLS
– Options – Enhanced Editor. This brings up the Enhanced Editor Options dialog box. I like to select „Show Line
numbers‟ , because it makes life easier for
large programs. More importantly, be sure to
check „insert spaces for tabs‟ and „replace tabs
with spaces on the open‟ . Both of these
options help to make it easier to maintain the text
formatting of a SAS program when it is
transferred between programmers.
Enhanced Editor Keys The editor has been set up with a number of short cut key
combinations. Depending on how you work and what things
you tend to do, some of these key combinations can be very
useful. You can see and learn more of these key combinations
through the Enhanced Editor Keys pull down menu. While
the Enhanced Editor is the active window, go to TOOLS –
OPTIONS – ENHANCED EDITOR KEYS.
Expl
ore the resulting dialog box to find the key combinations
that are most useful to you. I especially like to use:
Ctrl+/ add comments
Ctrl+shift+/ remove comments
Ctrl+F2 mark a line in a program
F2 jump to the next marked line
Shift+F jump to the previous marked line
Hands-on WorkshopsSAS Global Forum 2012
7
Not only are the defined key combinations very useful, but you can redefine the combinations and add new keyed
operations. Notice that the BEEP has no
assigned key combinations and is
therefore not available. While BEEP is
probably not particularly useful, others
can be, you can scroll down the list of
available operations until you find one
of interest. Here “Sort the selected
lines” has been highlighted. Next press
the “Assign keys…” button.
The „Assign Keys‟ dialog box is used to assign a set
of key strokes to this operation. Highlight the none
in the „Press new shortcut key:‟ box, and then press
the desired keys.
If you select a combination that is
already in use, the keystroke
combination is changed to be used with
the new operation. In this example we
are choosing to use Alt + Shift + R
(which is already used to
„Start/Complete macro‟).
We can now use this key combination in the
Enhanced Editor to sort rows.
Hands-on WorkshopsSAS Global Forum 2012
The list of variables on the left are in the
ADVRPT.DEMOG data set and have been written in
variable number order. If the first 14 rows are
highlighted and we press the Alt+Shift+R keys the
rows are reordered. And the list becomes the one
shown on the right.
Marking a Block of Text While most applications allow you to hold the left mouse button (LMB) while dragging the
mouse to highlight entire lines of text, in the Enhanced editor you can go a couple of steps
further. Dragging while the cursor is in the gray area (left side of the editor), ensures that all
the text in the first and last lines will be highlighted.
You can highlight, while controlling for columns and lines, by also pressing the „Alt‟ key at
the same time as dragging with the LMB depressed. In the image to the right, „delete‟ would
shift lines 14-23 five columns to the left.
AUTOSAVE – Finding the backup file Files being edited by the Enhanced Editor are automatically saved every few minutes
(the frequency is set in the DM preferences under the TOOLS – OPTIONS –
PREFERENCES - EDIT tab). If you need to recover the saved file the location can be a bit difficult to
find and it varies with OS and version of SAS. Usage Note 12392: Enhanced Editor Autosave should be
consulted to find the location of these backup versions of your program. Under Windows the file
extension is .ASV.
Hands-on WorkshopsSAS Global Forum 2012
9
Macro Abbreviations for the Enhanced Editor The Enhanced Editor allows you to build abbreviations for your editor. Much like abbreviations in other
applications, a single word or part of a word can be typed and then other (generally longer) text can be substituted at
a keystroke.
For the purposes of this example assume that you want to type the following header block at the top of each of your
programs. Typing it once is fine, but more than
once becomes tedious. Let‟s make a macro
abbreviation that does the typing for us.
While the Enhanced Editor is the active window,
use the pull down menus TOOLS – ADD
ABBREVIATION (or the editor short cut keys
CTRL+SHIFT+A). This brings up the Add
Abbreviation dialog box.
In the Add Abbreviation dialog box enter a name for
the new abbreviation (header) . This becomes a
keyboard macro, so you must select a name that has
not already been used. Then type (or more
practically paste) the substitution text into the „Text
to insert for abbreviation‟ dialog space . Pressing the OK button creates and stores the abbreviation.
To use the abbreviation simply type in the name of the abbreviation while in the Enhanced Editor. As soon as the
last letter of the abbreviation has been entered, a small pop-up „tip‟ text box containing the first few characters of the
abbreviation is displayed. If at that point you press the TAB or ENTER key, the name of the abbreviation will be
replaced by the text that you stored.
The following screen shot shows that the name of the HEADER abbreviation has been entered in the Enhanced
Editor and the first few
characters of the text to be
substituted is shown in the
pop-up „tip‟ box. Pressing
the TAB or ENTER key
causes the abbreviation
name to be replaced by the
stored text.
* xxx.sas
*
* Purpose:
*
* Written by:
* Art Carpenter
* 06Nov2011
* (907)865-9167
*
* Inputs:
*
* Outputs:
*
* Notes:
*
* Modifications:
*
*
*********************************;
Hands-on WorkshopsSAS Global Forum 2012
Once created macro abbreviations can be edited or deleted just like any other keyboard macro. Use the pull down
menus TOOLS – KEYBOARD MACROS – MACROS to
bring up the KEYBOARD MACROS dialog box.
Using this dialog box you may also export/import your macro
abbr
eviat
ions
so
that
they
may
be
stand
ardiz
ed
acros
s
your
work group. Use the EXPORT button to
create a file with the KMF extension. This file
can then be imported by another SAS user.
The date in the HEADER abbreviation shown above is static. There are a number of predefined edits that we can
apply to a keyboard macro (remember that a macro abbreviation is a special form of a keyboard macro). Several of
these predefined edits allow the insertion of date values. Using these we can automatically insert the current date
time stamp when the abbreviation is executed. The steps re-establish the HEADER abbreviation with the current
date time value replacing the static date (06Nov2011) are not straight forward, but are discussed in detail in Section
14.4 of Carpenters Guide to Innovative SAS®
Techniques.
ADDING TOOLS TO THE APPLICATION TOOL BAR Like most applications that have pull down menus and tool bars, it is possible to modify or customize the list of
available tools. A common usage is when you have a program or code snippet that you run regularly, and would
like to have it readily available. By modifying the tool bar, you can add an icon that will instantly execute your
program.
Each of the icons, their placement, and even their meaning can be customized. New icons that perform other tasks
can be added. The default tool bar for the
Enhanced Editor is shown here. In the example
that follows an icon will be added that will
execute a PROC DATASETS step.
Consider the following program that will delete all the data sets in the work directory. We would like to add an icon
on the tool bar associated with the Enhanced Editor that will
execute this step. The icon could be placed on any of the tool
bars in the DM, this one seems most logical.
Use the pull down menus to select TOOLS – CUSTOMIZE (or
right click on the tool bar itself). The CUSTOMIZE TOOLS
dialog box for the tool bar is shown. From here you can add or
remove items on the tool bar. We would like to add an icon
that will execute our PROC DATASETS program.
proc datasets library=work
memtype=data
kill
nolist;
quit;
Hands-on WorkshopsSAS Global Forum 2012
11
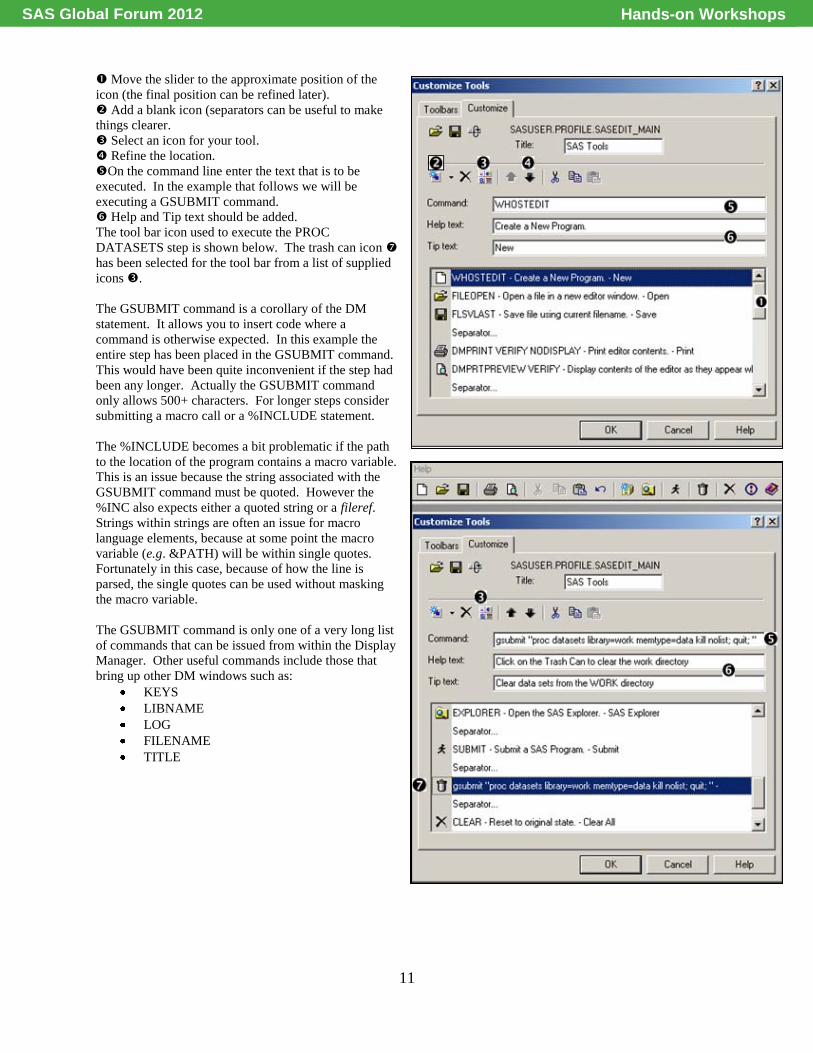
Move the slider to the approximate position of the
icon (the final position can be refined later).
Add a blank icon (separators can be useful to make
things clearer.
Select an icon for your tool.
Refine the location.
On the command line enter the text that is to be
executed. In the example that follows we will be
executing a GSUBMIT command.
Help and Tip text should be added.
The tool bar icon used to execute the PROC
DATASETS step is shown below. The trash can icon
has been selected for the tool bar from a list of supplied
icons .
The GSUBMIT command is a corollary of the DM
statement. It allows you to insert code where a
command is otherwise expected. In this example the
entire step has been placed in the GSUBMIT command.
This would have been quite inconvenient if the step had
been any longer. Actually the GSUBMIT command
only allows 500+ characters. For longer steps consider
submitting a macro call or a %INCLUDE statement.
The %INCLUDE becomes a bit problematic if the path
to the location of the program contains a macro variable.
This is an issue because the string associated with the
GSUBMIT command must be quoted. However the
%INC also expects either a quoted string or a fileref.
Strings within strings are often an issue for macro
language elements, because at some point the macro
variable (e.g. &PATH) will be within single quotes.
Fortunately in this case, because of how the line is
parsed, the single quotes can be used without masking
the macro variable.
The GSUBMIT command is only one of a very long list
of commands that can be issued from within the Display
Manager. Other useful commands include those that
bring up other DM windows such as:
KEYS
LIBNAME
LOG
FILENAME
TITLE
Hands-on WorkshopsSAS Global Forum 2012
ADDING TOOLS TO PULL DOWN / POP-UP MENUS Sometimes adding a specialized tool to the pull down or pop-up menus used in the DM can be very beneficial. In
the previous section the GSUBMIT command
was used to execute a SAS program from a tool
bar. You can do the same sort of thing from a
pull down or pop-up menu.
Consider the pop-up menu shown on the left, if
you right click on a data set from within the
Explorer window. We would like to have the
ability to execute a specialized tool against a SAS
data set simply by clicking on a menu item in this
pop-up menu.
While the Explorer window is active, this menu is
controlled through the TOOLS – OPTIONS –
EXPLORER menus. This brings up the
EXPLORER OPTIONS dialog box. This box is
worth exploring, just because it is used to control
access to a variety of objects from within the SAS
Explorer. Since we want to apply our tool to a
SAS data table, we select the MEMBERS tab
and then highlight the TABLE (SAS data set)
line. Clicking on the EDIT button brings up
the EXPLORER OPTIONS: TABLE OPTIONS
dialog box.
Hands-on WorkshopsSAS Global Forum 2012
13
Notice that the EXPLORER
OPTIONS: TABLE OPTIONS
dialog box is used to form the
primary pop-up menu that you see
when you right click on a SAS data
table (see the first figure in this
section). The items in the ACTION
COMMANDS section in this dialog
box are worth examining. Notice
the use of the VIEWTABLE, VAR,
GSUBMIT, and QUERY
commands. The table name is
brought into the script using %8b
for the libref, and „32b‟N for the
data set name.
We are going to add a GSUBMIT
item to this menu by using the ADD
action button . Highlight the item
below which you want to insert the
new command and press the ADD
action button. This brings up the ADD ACTION dialog box. Here we enter a name for the action and the action
(gsubmit "proc print data=%8b.'%32b'N;run;") that is to take place. Exit from each of the dialogue boxes using OK.
A new entry, titled „Listing‟ , will now appear on the pop-up
associated with a SAS data set. Selecting the „Listing‟ entry will
perform a PROC PRINT on the highlighted data set.
Inserting a PROC PRINT is a bit of a silly thing to do. If you notice
the third item in the „table options‟ list, you will see that it already
contains a GSUBMIT for a PROC PRINT which utilizes ODS.
Hands-on WorkshopsSAS Global Forum 2012
Because the scripting uses the percent sign in the data set name, you must be careful when calling macro language
elements from within the GSUBMIT. This is demonstrated by adding a macro call to the autocall macro
%OBSCNT which returns the number of observations in a SAS data set. If we use it in a %PUT statement the
number of
observations is
written to the
LOG. Notice
that the percent signs associated with the macro
language are doubled. This delays their interpretation
until the macro statement has been submitted after the
data set name has been inserted. For the data set
WORK.NEW the resultant submitted %PUT statement is shown to the right.
In the TABLE OPTIONS dialog box shown here, this GSUBMIT has been added to the pop-up menu.
The following GSUBMIT executes the %PRINITIT macro for the displayed data set. The macro quoting function
%NRSTR is used to delay the
interpretation of the macro call and
may be required when the macro
resides in a stored compiled macro
library. For most standard data set names this code can sometimes be simplified by removing the quotes around the
data set name(%32b).
gsubmit "%%put Obs count is %%obscnt(dsn=%8b.'%32b'N);"
%put Obs count is %obscnt(dsn=work.new);
gsubmit "%%nrstr(%%printit(dsn=%8b.'%32b'N));"
gsubmit "%%nrstr(%%printit(dsn=%8b.%32b));"
Hands-on WorkshopsSAS Global Forum 2012
15
ADDING TOOLS TO THE KEYS LIST The KEYS window (TOOLS – OPTIONS – KEYS or F9 or KEYS on the command line) lists DM commands that
have been pre-assigned to specific key combinations, including function keys and mouse buttons. One of the first
sections in this paper showed you how to add commands to keys. The key assignments can also be modified by the
user and can include Display Manager commands and even macro calls.
The first few key definitions of the KEYS window are shown
to the left. Notice that multiple commands can be
concatenated with a semi-colon.
You can type in a new command, either by overwriting an
existing command or in any available space. As was also
shown earlier, commands can also be inserted into the key
definitions using KEDYDEF command on a DM statement.
Like in the previous section, if you want to submit code, the
GSUBMIT command can be used. In this example the CTL
F2 and CTL F3 key combinations have been designated to
submit the %MAKETEMPWORK and %CLEARTEMPWORK macro calls. The macro definitions have been
saved in the Autocall library so that they can be loaded when
the appropriate key combinations are selected.
The %MAKETEMPWORK macro creates a directory and
assigns the libref TEMPWORK to it. When the library is no
longer needed, perhaps at the end of the session, the user can press CTL+F3, which executes the macro
%CLEARTEMPWORK, which in turn clears the contents of the directory and deletes the directory. Since these
macros utilize the %SYSEXEC macro function, the system option NOXWAIT should be declared to prevent
prompts from the OS.
Once modified, the new
key definitions can be
saved using the SAVE
command. Key
definitions are stored as
catalog entries with an
entry type of keys.
Saved definitions can be
recovered through the
use of the COPY
command.
SUMMARY It should be clear from
this short introduction to
the Display Manager that
a great deal more can be
done than one might
originally think when
first starting to use this
interactive tool. The
many options, menus, tool bars, and even the
Enhanced Editor of the Display Manager can all be easily customized to make your work easier.
%macro MakeTEMPWORK;
%local rc;
%let rc=%sysfunc(fileexist("c:\tempwork"));
%if &rc=0 %then %do;
%sysexec md "c:\tempwork";
%let rc=%sysfunc(libname(tempwork,c:\tempwork));
%end;
%mend maketempwork;
%macro ClearTEMPWORK;
%local rc;
%let rc=%sysfunc(fileexist("c:\tempwork"));
%if &rc ne 0 %then %do;
%let rc=%sysfunc(libname(tempwork));
%sysexec del /Q "c:\tempwork\*.*";
%sysexec rd /Q "c:\tempwork";
%end;
%mend cleartempwork;
Hands-on WorkshopsSAS Global Forum 2012
ABOUT THE AUTHOR Art Carpenter‟s publications list includes five books, and numerous papers and posters presented at SUGI, SAS
Global Forum, and other user group conferences. Art has been using SAS® since 1977 and has served in various
leadership positions in local, regional, national, and international user groups. He is a SAS Certified Advanced
Professional Programmer and through California Occidental Consultants he teaches SAS courses and provides