56
A Gentle Introduction to z/VM System Installation for the Inexperienced Daniel P. Martin Rocket Software, Inc. Tuesday, August 11 th , 2015 Session Number 17481

A Gentle Introduction to z/VM System Installation for the Inexperienced
Daniel P. Martin
Rocket Software, Inc.
Tuesday, August 11th, 2015
Session Number 17481

Agenda
• Introductions– Who is this person, and why is he here?
• Getting Started– Materials, Methods, and The Bootstrapping Problem.
• Planning – Motive, means…
• Choices– …and opportunity.
• Process– “…take the red pill: find out how deep the rabbit hole goes.”
• Results– What did I just do, and where do I go from here?
2

Agenda
• Additional Resources
– IBM resources
– User Community Resources
• Questions, Comments, and Feedback
3

IntroductionAbout Rocket Software
http://www.rocketsoftware.com/about
We Build Software That Matters.
One day in 1990, one of our founders started writing assembler code in a spare bedroom in his house near Boston. The very first product he built helped large enterprises solve an important problem—how to process more database queries more efficiently. That was how Rocket Software started.
More than two decades later, our software engineers have built well over 100 products that solve problems across a broad spectrum of enterprise technology. Our engineers talk with you, our customers and partners, every day to discover new pain points and learn about the (hopefully really hard) problems and challenges you face.
We help you prevent outages, protect your data, store your data, share your data, virtualize your data, manage your networks, improve your service levels, discover insights, modernize your applications, access and connect users and applications, minimize risk and increase compliance, and so much more. We build and deliver products that matter to you so that you can deliver your best products, solutions, and services to your customers and grow your business.
We Put You First.
Rocket was founded on the premise that we would build products that matter for people—and we have never wavered from that. In fact, it’s the cornerstone of our core values that we live every day—we put you, our customers and partners, first.
We treat all of our customers and partners as individuals rather than transactions. That’s been our history. And that’s why our customers and partners see us as a trusted partner.
We don’t just sell software. We care about our customers’ and partners’ success—a win for you is a win for us. We spend our time solving the problems that keep you awake. We build software that matters—to you.
Treating You With Humanity.
This is the piece that almost every business today gets wrong. This is the piece that we talk about getting right at Rocket. We put you first and are committed to never letting you fail. We are committed to each other. Rocketeers don’t let each other fail. We are people building software for people. We are people solving problems for people. We have worked really hard over the past 25 years to earn your trust. And for the past 25 years we have always tried to treat you with humanity.
4

About your speaker
5
• As a customer:
• 22 years at University of Arkansas
• …lots of VM, starting with VM/370 R6 PLC 3 (CDC Omega 480-III, anyone?)
• …lots of Unix / Linux (Solaris, HP-UX, AIX, NCR/Teradata, Various distros)
• …IT Security Weasel*
*Telling people things they didn’t want to hear before it was cool.
• “A Certain Major Retailer”
• Early 1980’s - “Distributed Systems”
• Since 2003: Senior Software Developer for Rocket Software, Inc.
• Lead design / development
• IBM Backup and Restore Manager for z/VM
• IBM Archive Manager for z/VM
• Co-conspirator
• IBM Tape Manager for z/VM
• IBM Operations Manager for z/VM
• Away From the Keyboard:
• Certified Law Enforcement Officer, Search and Rescue Worker, Emergency Medical First Responder, and
misplaced farm boy with a peculiar fondness for shiny things…

Target Audience
• Some familiarity with IBM z Systems Concepts, Facilities, and Terminology
• Some familiarity with IBM z/VM Concepts and Terminology
• Foundation-level, Introductory Overview
• Shameless Plug:
– Tuesday, 13:45-17:30: Sessions 17468, 17469, & 17470, “z/VM Installation / Migration / Upgrade Hands-On Lab” (three parts, in room Asia 5)
6

Starting out…
7

Materials, methods, andWhat we’re about to do…
• Goal: Provide basic instruction on how to perform the initial system installation for z/VM
• Objectives:
– Define the basic requirements
– Identify available options for z/VM installation packaging and distribution
– Identify necessary system resources
– Review the planning process
– Navigate the installation process
– Discuss post-installation configuration
8

Materials and Methods: What you’re going to need
• Our example scenario:
• You are using a currently supported processor.
• You are using a currently supported z/VM release.
• This presentation uses z/VM 6.3 for all examples.
• You have already ordered and received installation
materials.
9

Materials and Methods: Basic requirements
• Our example scenario:
• Goal is to produce a monolithic / non-SSI system:
– SSI installation procedure is functionally similar.
• More decisions.
• More hardware resources.
• Plan is to install a “Traditionally Managed” system:
– Not managed by OpenStack / xCAT / IBM Director.
• Why?
– Simplicity.
10

Materials and Methods: What’s in the box?
• Make sure you received what you ordered.
– Physical or Electronic Delivery
• Review the Packing List.
– Otherwise, how do you know you actually received what you asked for?
– If you didn’t, where is it?
– If the materials you received are inconsistent with the packing list, stop now – and don’t resume until the situation is corrected.
» It’s quite uncommon, but mistakes happen. Fix It Now.
11

Materials and Methods: The Bootstrapping Problem
12
• It all starts with
hardware.
• Hardware is only
useful once you add
software. *
• *Otherwise, you have a wheel with
no hamster.
• “OK, the power is on…
Now what?”

Materials and Methods: The Bootstrapping Problem
13
• “The old days” (phrase of
old; noun): Stuff that we
don’t have to do any more.

Materials and Methods: The Bootstrapping Problem
14
• The modern installation
process relies on the
presence of a starter
system.
• If you do not have a starter
system, one will be provided
for you.

Materials and Methods: The Bootstrapping Problem
• Source media• Tape
• ECKD DASD required• TCP/IP Network is not
required• Starter system preloaded on
tape.
• DVD+RW or Digital Download• ECKD or FBA/SCSI DASD• TCP/IP infrastructure is
required• Starter system preloaded on
DVD+RW media• Digital download: You
already have a starter system.
15
• Installation destination
• 1st Level (“Bare LPAR”)
• No pre-existing z/VM system
• …or “clean sweep” desired
• …or migration coming later
• …starter system required.
• 2nd Level (as z/VM guest)
• 1st-level system IS your
starter system
• z/VM supports z/VM as a
guest operating system
• Migration, testing, education.

• Source media• Tape
• ECKD DASD required• TCP/IP Network is not
required• Starter system preloaded on
tape.
• DVD+RW or Digital Download• ECKD or FBA/SCSI DASD• TCP/IP infrastructure is
required• Starter system preloaded on
DVD+RW media• Digital download: You
already have a starter system.
Materials and Methods: The Bootstrapping Problem
16
• Installation destination
• 1st Level (“Bare LPAR”)
• No pre-existing z/VM system
• …or “clean sweep” desired
• …or migration coming later
• …starter system required.
• 2nd Level (as z/VM guest)
• 1st-level system IS your
starter system
• z/VM supports z/VM as a
guest operating system
• Migration, testing, education.

• Source media• Tape
• ECKD DASD required• TCP/IP Network is not
required• Starter system preloaded on
tape.
• DVD+RW or Digital Download• ECKD or FBA/SCSI DASD• TCP/IP infrastructure is
required• Starter system preloaded on
DVD+RW media• Digital download: You
already have a starter system.
Materials and Methods: The Bootstrapping Problem
17
• Installation destination
• 1st Level (“Bare LPAR”)
• No pre-existing z/VM system
• …or “clean sweep” desired.
• A starter system is required.
• 2nd Level (as z/VM guest)
• 1st-level system IS your
starter system.
• z/VM supports z/VM as a
guest operating system.
• Migration, testing, education.

Materials and Methods:The Bootstrapping Problem
• Two stages:
• (1) Deploy an initial installation (“starter”) system if you do not
already have one.
• (2) Perform the actual system installation.
• Exact steps are determined by:
• Type of installation media (Tape, optical media, download)
• Initial system state (Bare LPAR, “Second-level” VM)
18

Materials and MethodsThe Bootstrapping Problem:
• Road map:
• Steps are defined in one book: z/VM Installation Guide
• Assumptions for this exercise:
• Not installing an SSI cluster (“Monolithic” z/VM system)
• Not configuring for external management (xCAT / OpenStack)
19

Materials and Methods:Getting past fear of commitment
• Decision time:
• Second-level VM; install materials downloaded from DVD.
• Assumptions:
• FTP transfer from DVD to CMS minidisk has been done.
• Second-level guest virtual machine has been created.
• …more in a moment…
• We’re just installing, not plumbing a network today.
• Following this path:
• z/VM 6.3 Installation Guide – Chapter 6
• …jumping in at “Step 3: Complete the installation worksheets”
20

ActionFoundation: Installation Worksheets
• For this path:
• Worksheet 1 (Table 7)
• Worksheet 2 (Table 8)
• Worksheet 3 (Table 9)
• Worksheet 8 (Table 14)
21

ActionFoundation: Installation Worksheets
• For this path:
• Worksheet 1 (Table 7)
• Second level install
• Install to MDISK
• Default language is AMENG
• Destination media is ECKD 3390-3
• Common service file pool name is VMPSFS
• Non-SSI
• System name: SHARE125
22

ActionFoundation: Installation Worksheets
23

ActionFoundation: Installation Worksheets
• For this path:
• Worksheet 2 (Table 8)
• Using xCAT or IBM Director? Not today.
24

ActionFoundation: Installation Worksheets
25

ActionFoundation: Installation Worksheets
• For this path:
• Worksheet 3 (Table 9)
• DASD Assets – VOLSERs and VDEVs
• There’s some recycling going on here…
• Worksheet 8 (Table 14)
26

ActionFoundation: Installation Worksheets
27

ActionFoundation: Installation Worksheets
• For this path:
• Worksheet 8 (Table 14)
• Where’s all this stuff coming from?
28

Action“Make me a virtual machine like this”
WATSON DIRECT A0 F 80 Trunc=72 Size=56 Line=7 Col=1 Alt=0
===== USER WATSON XXXXXXXX 256M 1024M G
=====
===== MACHINE ESA 2
===== IPL CMS
===== OPTION TODENABLE
=====
===== ACCOUNT DMARTIN ZVM63L2
=====
===== CPU 00
===== CPU 01
=====
===== CONSOLE 001F 3215 T OPMGRM1
=====
===== SPOOL 00C READER *
===== SPOOL 00D PUNCH A
===== SPOOL 00E PRINTER A
=====
===== LINK DMARTIN 5400 5400 RR
…continued…
29
Virtual machine identity. No special privileges
needed.
Virtual processors – number and mode
(Spot the two-engine virtual MP?)
“Can set virtual TOD clock”
ACCOUNT…
Virtual CPUs defined
Virtual console – recorded by OPMGRM1
Virtual unit record devices
LINK to DMARTIN 5400 – source of install
images

Action“Make me a virtual machine like this”
…continued…
===== SPECIAL 1200 3270
===== SPECIAL 1201 3270
===== SPECIAL 1202 3270
===== SPECIAL 1203 3270
===== SPECIAL 1204 3270
===== SPECIAL 1205 3270
===== SPECIAL 1206 3270
===== SPECIAL 1207 3270
===== SPECIAL 1208 3270
===== SPECIAL 1209 3270
===== SPECIAL 120A 3270
===== SPECIAL 120B 3270
===== SPECIAL 120C 3270
===== SPECIAL 120D 3270
===== SPECIAL 120E 3270
===== SPECIAL 120F 3270
…continued…
30
A handful of virtual 3270 terminals,
just because we can.
(See the CP DIAL command…)

Action“Make me a virtual machine like this”
…continued…
===== MDISK 0191 3390 101 10 VM540A WR XXXXXXXX XXXXXXXX
===== MDISK 2222 3390 111 10 VM540A WR XXXXXXXX XXXXXXXX
===== MDISK 24CC 3390 9497 10 VM540B MR XXXXXX XXXXXX XXXXXX
===== MDISK 2CF0 3390 9507 120 VM540B MR XXXXXX XXXXXX XXXXXX
…continued…
31
Required MDISK definitions for this installation path:
191 – CMS “A” disk2222, 24CC, 2CF0 – Required by bootstrapping tactics.

Action“Make me a virtual machine like this”
…continued…
===== MDISK 6301 3390 0 END 62DCM1 MR XXXXX XXXXX XXXXX
===== MDISK 6302 3390 0 END 62DCM2 MR XXXXX XXXXX XXXXX
===== MDISK 6303 3390 0 END 62DRL1 MR XXXXX XXXXX XXXXX
===== MDISK 6304 3390 0 END 62DRL2 MR XXXXX XXXXX XXXXX
===== MDISK 6305 3390 0 END 62DRES MR XXXXX XXXXX XXXXX
===== MDISK 6306 3390 0 END 62DS01 MR XXXXX XXXXX XXXXX
===== MDISK 6307 3390 0 END 62DP01 MR XXXXX XXXXX XXXXX
===== MDISK 6308 3390 0 END 62DW01 MR XXXXX XXXXX XXXXX
===== MDISK 6309 3390 0 END 62DW02 MR XXXXX XXXXX XXXXX
===== MDISK 630A 3390 0 END 62DW03 MR XXXXX XXXXX XXXXX
=====
===== LINK MAINT 190 190 RR
===== LINK MAINT 19D 19D RR
===== LINK MAINT 19E 19E RR
===== * * * End of File * * *
====>
32
And, finally…
Nine 3390-3 DASD volumes for the
second-level system install (MDISKs
6301-630A)
…plus…
The stock set of first-level CMS
MDISKs (MAINT 190, 19D and 19E)

Action:Inspect the virtualized install setup
00: q v da
00: DASD 2222 3390 VM540A R/W 10 CYL ON DASD AFB2 SUBCHANNEL = 001C
00: DASD 24CC 3390 VM540B R/W 10 CYL ON DASD AD35 SUBCHANNEL = 001D
00: DASD 2CF0 3390 VM540B R/W 120 CYL ON DASD AD35 SUBCHANNEL = 001E
00: DASD 5400 3390 V54X00 R/O 32767 CYL ON DASD AF00 SUBCHANNEL = 0016
00: DASD 6301 3390 62DCM1 R/W 3339 CYL ON DASD AE38 SUBCHANNEL = 0020
00: DASD 6302 3390 62DCM2 R/W 3339 CYL ON DASD AE39 SUBCHANNEL = 0021
00: DASD 6303 3390 62DRL1 R/W 3339 CYL ON DASD AE3A SUBCHANNEL = 0022
00: DASD 6304 3390 62DRL2 R/W 3339 CYL ON DASD AE3B SUBCHANNEL = 0023
00: DASD 6305 3390 62DRES R/W 3339 CYL ON DASD AE37 SUBCHANNEL = 0024
00: DASD 6306 3390 62DS01 R/W 3339 CYL ON DASD AE3D SUBCHANNEL = 0025
00: DASD 6307 3390 62DP01 R/W 3339 CYL ON DASD AE3E SUBCHANNEL = 0026
00: DASD 6308 3390 62DW01 R/W 3339 CYL ON DASD AE3F SUBCHANNEL = 0027
00: DASD 6309 3390 VM5406 R/W 3339 CYL ON DASD AD39 SUBCHANNEL = 0017
CP READ VMLEVEL1
33

Action:Log in, let CMS start, and invoke INSTPLAN:
34
Most of the actual thought is taken
out of the process at this point, IF
you completed the worksheets first.

Action:Log in, let CMS start, and invoke INSTPLAN:
35
INSTPLAN fields are all filled in;
we’ve pressed <ENTER> to validate
the contents.

Action:Log in, let CMS start, and invoke INSTPLAN:
36
INSTPLAN panel 2 filled in;
We’ve declined the privilege of
external systems management by
responding N.

Action:Log in, let CMS start, and invoke INSTPLAN:
37
INSTPLAN: We pressed PF5 after
saying “N” to external management.
We get to review some of our
choices now.
Note that the “generic” DASD
volume names are still shown.
We’ll fix that in a moment.

Action:Log in, let CMS start, and invoke INSTPLAN:
38
INSTPLAN: We’ve now supplied our
own DASD volume names and
(virtual – it’s a second-level install…)
device addresses.

Action:Log in, let CMS start, and invoke INSTPLAN:
39
INSTPLAN: We pressed “PF5” to
process DASD choices. The result
is one last opportunity to check for
correctness, and a CMS “Ready;”
prompt.

Action:Time to invoke INSTALL
40
INSTPLAN has finished.
You have double-checked your work.
It’s all correct, so…
…it’s time to execute INSTALL

Action:Time to invoke INSTALL
41
INSTALL takes off.
Once the 3390-3 volumes are
initialized, things move along at a
fairly brisk pace.

Action:Time to invoke INSTALL
42
And by “brisk” I mean “a few
minutes, and 317 steps later…”

Action:After INSTALL, the first IPL of 2nd-level system:
43
…INSTALL finishes loading MDISK
images, and the initial boot of the
installed system takes place.
Some housekeeping will ensue.

Action:After INSTALL, the first IPL of 2nd-level system:
44
Housekeeping: The POSTLOAD
process restores some additional
DASD, and SFS File Pool Servers
are initialized…

Action:After INSTALL, the first IPL of 2nd-level system:
45
More housekeeping: SFS file pool
server initialization completes.
Shareable components of CMS on
the newly-installed system are
initialized.

Action:After INSTALL, the first IPL of 2nd-level system:
46
More housekeeping:
Next, any pending service updates
embedded with the installed system
image are processed.

Action:After INSTALL, the first IPL of 2nd-level system:
47
Yet more housekeeping:
Services have been initialized, and
pending service updates are tidied
up. The initial installation process
automatically shuts down the fresh
system with the REIPL option
specified.

Action:After INSTALL, the first IPL of 2nd-level system:
48
The newly-installed system image
has successfully shut down, and is
about to re-IPL itself…
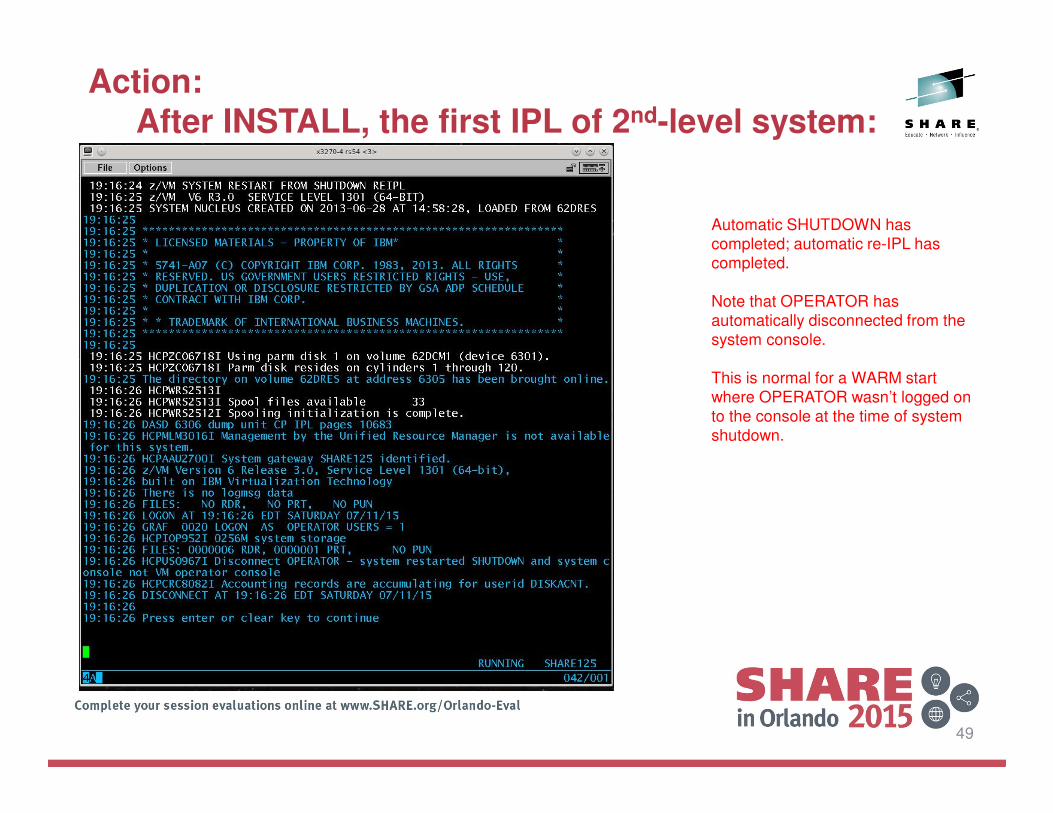
Action:After INSTALL, the first IPL of 2nd-level system:
49
Automatic SHUTDOWN has
completed; automatic re-IPL has
completed.
Note that OPERATOR has
automatically disconnected from the
system console.
This is normal for a WARM start
where OPERATOR wasn’t logged on
to the console at the time of system
shutdown.

FinisSome observations about the install process:
• It takes more time to narrate the installation process than it
does to actually execute it.
– On our lab system, the actual “heads down” time was about
30 minutes.
– Pay attention to details when completing the worksheets…
– …and when transcribing them to the install dialogs.
– … or don’t, and enjoy the process ofComing to the Attention of Important People …
50

FinisWhat did we just accomplish?
• End result: A “second-level” z/VM 6.3 system
– Not a cluster member (non-SSI)
• …although with multiple virtual machines, you could make a virtual SSI cluster.
– “Traditionally” managed (i.e. not enabled for xCAT)
• What’s the point?
– Test / development environment established
• First-level hypervisor protects other guests from “collateral damage” if something horrible happens to this new system.
– Other uses: “Your mileage may vary” depending on need
• Training; initial deployment of new service updates or OEM products; “safe playground” for systems programmer.
51

Next StepsWhere to from here?
• A: “It depends.”
• Typical next steps:
– Deploy in LPAR instead of as a 2nd-level guest:
– Do NOT try to run same system volumes from two locations
concurrently. At best, “results may be unpredictable.”
– Enable, configure and implement networking:
– TCP/IP
– RSCS (NJE)
– Provision resources for other guest virtual machines:
– Linux, z/OS, z/VSE, z/TPF, CMS
– Provision systems management / security tools:
– RACF, DIRMAINT, Automation, Tape Management, Backup…
– Non-IBM OEM tools
52

Next stepsIt’s all about choices
• Except, perhaps, for the parts that are all about policy.
• “Next steps” are dictated by installation needs.
• Needs of the enterprise dictate the level of complexity
– Mix of features and products
– Cluster or monolithic system configuration?
• Two-way? Four-way?
» Remote? How remote?
– Traditional or xCAT-style system management?
• Goal: Keep it as simple as necessary – but no more so.
53

Additional Resourcesa/k/a “Things I wish I had known…”
• This week:
– Tuesday afternoon: z/VM 6.3 Hands-On Lab
– This week: Spot a ribbon wearer, ask questions!
• Online
– http://www.vm.ibm.com/ – “All Things z/VM”
– http://listserv.uark.edu/archives/ibmvm.html – IBMVM Listserv
– http://www2.marist.edu/htbin/wlvindex?LINUX-VM – Linux-390 Listserv
54

A Gentle Introduction to z/VM System Install:Questions, comments, and feedback?
55

THANK YOU! – Session 17481Intro to z/VM System Installation
56
Daniel P. Martin
Senior Software DeveloperRocket Software
1400 NE McClain Rd, Suite 8 • Bentonville, AR 72712
• USA
• e: [email protected]
• w: www.rocketsoftware.com


