54

Key Plays of the “Spread” • Not all spreads are created equal… but what you will usually see: – Zone and Zone Read
• Inside and Outside Zone (Do they do both?) – T Trap – Q Trap – Screen Game
• (RB Flare / Snag / Bubble / Tunnel) – GT Counter (Q or T) – Veer – Inverted Veer – Rollout Pass – Speed Op\on
• Fly Ac\on with all of the plays above

Places to look first
1. How much help do your DB’s need? A. Where do they need help? Under or Deep? On both
sides? Trips or Island? (The evolu\on of H.S. football… this was not a key point in 1990)
2. How do they block their core plays? A. Who pulls? How do they replace the puller? B. Zone Block – Where do they double team?
3. Are the QB and the RB equal threats to run the ball? A. Can you cheat to a side or force them to run the
weaker player?

Why 46 principles? 1. Reduce the number of double teams they can run in
zone or power schemes 2. Have the ability to bring pressure… 3. Make the opposing center be a great blocker while
snapping a football 4. Take away certain plays so that your defense is only
focused on a few things… 1. We want to take away the run and the drop back game
and make the offense into a screen and quick passing team… I am going to dare the offense to run bubble the en\re game (and then I may walk my FS over to that side and start playing 3 on 2 coverage games).

What do I mean by “46” principles?
• 3 DL on the GCG is the key
• Historically the 46 requires the ability to stop the pass with great corners… – Cover 3, Cover 1, Man 0

2x2 – Rollout Draw
• Notes:
Wide
Q T
X
Z
Y
S
F
C
SS
C
S
M
W
H
T T N
True 46 – Guards and Center have someone shading them, 2 ILB’s, and a Free Safety

2x2 – Rollout Draw
• Notes:
Wide
Q T
X
Z
Y
S
F
C
E
C
S
M
W
H
T T N
1 LB Version, allowing you to play 1 back and keep the Free Safety FREE… “Jayhawk” adjustment

2x2 – Rollout Draw
• Notes:
Wide
Q T
X
Z
Y
S
F
C
E
C
S
M
W H T T N
1 LB Version, allowing you to play 1 back and keep the Free Safety FREE… “Jayhawk” adjustment, STICKY technique.

Things that have forced the 46 to evolve
• The quick pass game • The ability of QB’s to connect on intermediate routes consistently
• Warning… If you face a team with a good QB, AND a good OL, AND 2 WR’s that demand double teams… look at versions of 3-‐4 or 4-‐3. – Or you can blitz, leverage/rotate to one side, and take your chances…

“46” v. 4-‐3

2x2 – Rollout Draw
• Notes:
Wide
Q T
X
Z
Y
S
F
C
E
C
S
M
W
H
T T N
46 Defense

2x2 – Rollout Draw
• Notes:
Wide
Q T
X
Z
Y
S
F
C
E
C
E
M W B
T T E
4-‐3 Defense

“46” concepts in other fronts

2x2 – Rollout Draw
• Notes:
Wide
Q T
X
Z
Y
S
F
C
E
C S M W
H T T N
3-‐3 Version 1
2x2 – Rollout Draw
• Notes:
Wide
Q T
X
Z
Y
S
F
C
E
C S M W
H T T N
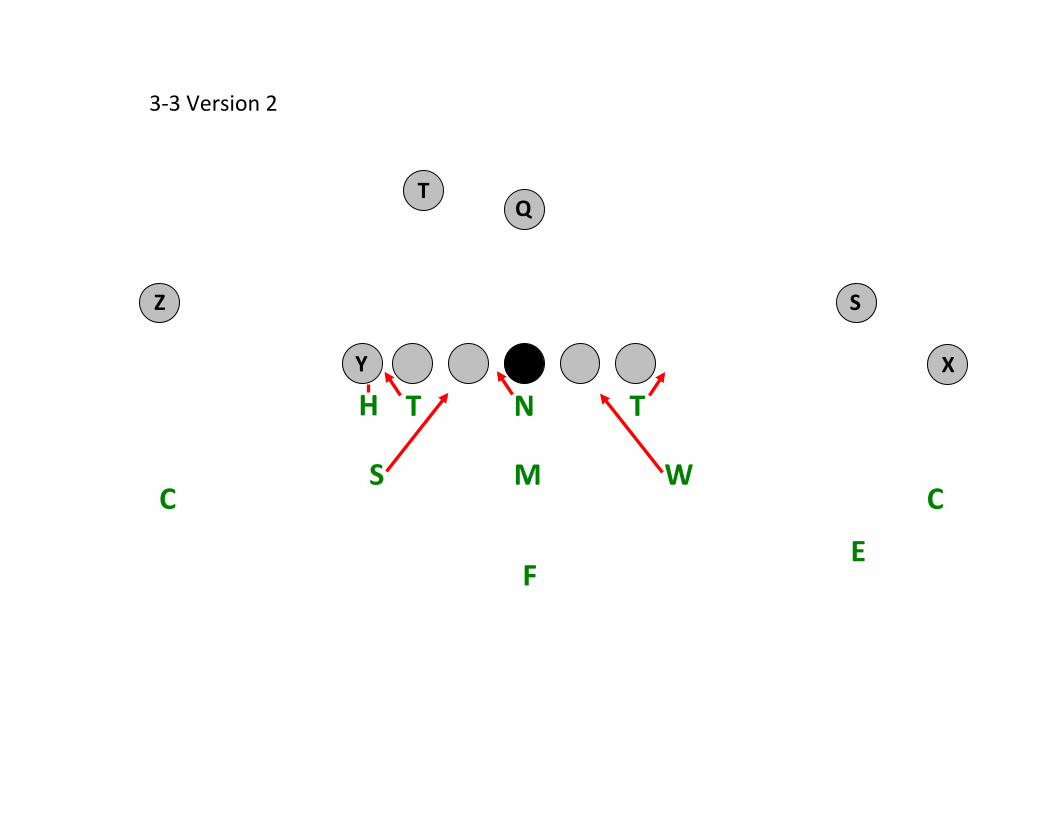
3-‐3 Version 2

2x2 – Rollout Draw
• Notes:
Wide
Q T
X
Z
Y
S
F
C
E
C
S
M
W H T T
N
42 Blitz into a “46” look (Alterna\ng who is firing and throw in the occasional DT Pinch)

2x2 – Rollout Draw
• Notes:
Wide
Q T
X
Z
Y
S
F
C
E
C
S
M
W
H
T T
N
43 Blitz into a “46” look

2x2 – Rollout Draw
• Notes:
Wide
Q T
X
Z
Y
S
F
C
E
C S M W H
T T N
3-‐4

Inside Zone Read
FYI – All versions of Zone (OZ/IZ) get more complicated v. quick LB movement and SHORT DL slants. Some coaches also like “long s\ck” slants (2 gaps).

2x2 – Rollout Draw
• Notes:
Wide
T
X
Z
Y
S
F
C
E
C
S
B
W
H
T T
M
Zone v. 4-‐3 Gap
Q

2x2 – Rollout Draw
• Notes:
Wide
Q T
X
Z
Y
S
F
C
E C
S
M
W H T T N
Zone v. Bear Front – dbl. the nose – scoop opposite

2x2 – Rollout Draw
• Notes:
Wide
Q T
X
Z
Y
S
F
C
E C
S
M
W H T T N
Zone v. Bear Front – dbl. the bs DT

2x2 – Rollout Draw
• Notes:
Wide
Q T
X
Z
Y
S
F
C
E C
S
M
W H T T N
Zone v. Bear Front

Inside Zone Read • No\ce how many blocks are now 1 on 1. By alignment, we have eliminated their easy double team angles.
• Using film, try and guess where the DB will be and where the RB will cut – they will usually either dbl. the nose or dbl. the backside DT.
• I am going to tell my H to run with the TE’s zone step inside. – This forces the cutback back to the QB… While it may not be perfect, it stops guys from running all over the field and it causes some clear problems.
– My OLB on the back side is going to read the QB first… Does he have the ball? Usually he has \me to read that and then close down the cutback…
• When in doubt, the OLB sits in the C gap!
Inside Zone Read cont. • What about the Zone read with a push block by the backside TE or T? – They want to run the Q where a DT was, hoping he will chase the RB. They want to make the DT a “sucker.”
– I tell my interior players (TNTH) that if the guy in front of them blocks out, sit and play smart! Watch trap and sucker!

Outside Zone Read
Understand the difference between Inside Zone and Outside Zone Inside Zone is a scheme designed to get a ver\cal push and create double teams. Outside Zone is a stretch play designed to make defenders run to the sidelines and create seams.

2x2 – Rollout Draw
• Notes:
Wide
T
X
Z
Y
S
F
C
E
C
S
B
W
H
T T
M
Outside Zone v. 4-‐3 Gap
Q

2x2 – Rollout Draw
• Notes:
Wide
T
X
Z
Y
S
F
C E C
S W
M
Outside Zone v. 4-‐3 Gap
Q
H T T N

Outside Zone Read • What you must iden\fy is whether or not a team runs BOTH Inside and Outside Zone. – If they run both –
• I am going to have my OLB’s be a step wider. – When near hat tries to Reach, I step forward and SIT! Doorstop! – When I see the Center try and reach the 3 tech, I am going to teach my Mac to fill INSIDE of the OLB.
– I need one DL to win their ba:le, I need my OLB to cap the reach, and I need my FS to be a sure tackler.

Tailback Trap

2x2 – Rollout Draw
• Notes:
Wide
T
X
Z
Y
S
F
C
E
C
S
B
W
H
T T
M
T Trap v. 4-‐3 Gap
Q

2x2 – Rollout Draw
• Notes:
Wide
Q T
X
Z
Y
S
F
C
E C
S
M
W H T T N
T Trap v. Bear Front

T Trap • We have taken away the bubble inside of their aiming point (the W backer/end)
• They are either going to have to pull the tackle to avoid a hard backside cut… or they leave the MLB unblocked if they do a “down-‐down-‐down.”
• Whether you believe in “strong arm” or “wrong arm,” your OLB must close it down. – Your MAC must know his fill angle related to the OLB’s technique

RB Flare

2x2 – Rollout Draw
• Notes:
Wide
T
X
Z
Y
S
F
C
E
C
S
B
W
H
T T
M
RB Flare v. 4-‐3 Gap
Q

2x2 – Rollout Draw
• Notes:
Wide
Q T
X
Z
Y
S
F
C E C
S
M
W H T T N
RB Flare v. Bear Front

RB Flare • We have mul\ple ways of dealing with RB Flare. – OLB goes with the flare – DOWN the LINE. – F and E rotate to a cover 3 look on RB release – Mac goes with Flare
RB Flare with Hook

2x2 – Rollout Draw
• Notes:
Wide
T
X
Z
Y
S
F
C
E
C
S
B
W
H
T T
M
Snag v. 4-‐3 Gap
Q

2x2 – Rollout Draw
• Notes:
Wide
Q T
X
Z
Y
S
F
C E C
S
M
W H T T N
Snag v. Bear Front

RB Flare with Hook • We have mul\ple ways of dealing with RB Flare. – OLB goes with the flare – DOWN the LINE and/or – F and E rotate to a cover 3 look on RB release and/or
– Mac goes with Flare and/or – Corner is alerted to poten\al RB flare, and then goes to it with hook by #1.

Q GT

2x2 – Rollout Draw
• Notes:
Wide
T
X
Z
Y
S
F
C
E
C
S
B
W
H
T T
M
Q GT v. 4-‐3 Gap
Q

2x2 – Rollout Draw
• Notes:
Wide
T
X
Z
Y
S
F
C E C
Q GT v. Bear
Q
S
M
W H T T N

Q GT • We have taken away the bubble inside of their aiming point (the W backer/end)
• The O Line does NOT get to double team any player.
• Whether you believe in “strong arm” or “wrong arm,” your OLB must close it down.

Rollout Pass

2x2 – Rollout Draw
• Notes:
Wide
T
X
Z
Y
S
F
C E C
S
B
W
H
T T
M
Rollout v. 4-‐3 Gap
Q

2x2 – Rollout Draw
• Notes:
Wide
T
X
Z
Y
S
F
C E C
S N W H T T
M
Rollout v. Bear
Q

Outside Veer

2x2 – Rollout Draw
• Notes:
Wide
T
X
Z
Y
S
F
C
E
C
S
B
W
H
T T
M
Veer v. 4-‐3 Gap
Q

2x2 – Rollout Draw
• Notes:
Wide
Q T
X
Z S
F
C
E C
S
M
W H T T N
Veer v. Bear Front
Y

Inverted Veer

2x2 – Rollout Draw
• Notes:
Wide
T
X
Z
Y
S
F
C
E
C
S
B
W
H
T T
M
Veer v. 4-‐3 Gap
Q

2x2 – Rollout Draw
• Notes:
Wide
Q
X
Z S
F
C E C
S
M
W H T T N
Veer v. Bear Front
Y
T Q


