www.modelmetricks.net 31 2 Round Tower Here’s what we’re making in this chapter: a tall tower with spiral-step boxes all around it. All of the faces have circle windows. Make the Floor Shape 1. The floor of the tower will be round with rectangles sticking out. To make these shapes, it’s easiest to work in Top view, so click the Top icon.
Transcript
www.modelmetricks.net 31
2 Round TowerHere’s what we’re making in this chapter: a tall tower with spiral-step boxes all around it. All of the faces have circle windows.
Make the Floor Shape1. The floor of the tower will be round with rectangles sticking
out. To make these shapes, it’s easiest to work in Top view, so click the Top icon.
Chapter 3: Star Buildings
www.modelmetricks.net 95
Chapter ReviewChapter 3 was busy - here’s the new stuff we’ve learned:
• If you want to divide a rectangle into smaller faces (like stripes), use Move with Option to copy one edge of the rectangle to the other side of the rectangle. Then type “5/” to create five stripes.
• To make a face larger or smaller, Select it first, then activate Scale. Click one of the green drag handles, and move it to change the shape of the face.
• If you want to keep the center of the face in place while using Scale, keep the Option key pressed.
• If you use Offset on a face, and the offset edges cross each other, you need to break up the lines where they meet. Draw a line that starts or ends where you see the “Intersection” popup, and trace the edge to the other end.
• If you press the Option key while using Push/Pull, you will create a new set of faces, instead of just making something shorter or taller.
• When you use Push/Pull, the color of the face you click is the color of what you make with Push/Pull.
• If you press Shift while painting, this paints ALL faces that have the same paint as the face you click.
• If you press Option while painting, it’s almost the same as pressing Shift. But any faces that aren’t connected to the face you click WON’T get painted.
Book 1: Write Now!
96 ModelMetricks Intermediate Series
11. The left side of the rectangle needs to stick out past the letters, too. First make sure nothing is selected, then activate Move. Click anywhere on this edges:
12. Move this edge a bit to the left.
Chapter 1: Round Things Around
www.modelmetricks.net 15
Striped BowlIf you made the art gallery in ModelMetricks Advanced Series Book 2: Art Gallery, you already made a few fancy bowls using the Follow Me tool. This one is similar, but it has stripes, which are made by using the Intersect with Model tool.
Make the Follow Me PathThis path is a little more complicated than a simple circle - it is made up of connected arcs.
1. Start a new file in Top view, and use Rectangle to make a square.
2. Select the square and use Move to copy it diagonally. For the move points, click two opposite corners of the first square.
Chapter 2: Square Things Around
www.modelmetricks.net 63
15. Select the vertical arc you just made.
16. Use Follow Me on the circle. Now each box has two wires sticking out.
Book 3: Crazy Shapes
100 ModelMetricks Advanced Series
Circus BallOK, enough copying circle groups! This sphere pattern is also created using Intersect with Model, but we’re going to start with a hexagon instead of a circle. (I’m not sure what else to call this model, but it reminds me of circus decorations.)
Make the Hexagon TowerThe first step is to make a tower of smaller and smaller hexagons. The walls of this tower will be used later to create intersection edges on the sphere.
1. Start a new file. Activate the Polygon tool - this icon is shaped like a triangle.
www.modelmetricks.net 113
4 Stacked Building BlocksIn this final chapter, we’ll use components and Intersect with Model to make interlocking blocks, which form a tower.
Stack the Blocks1. Start a new file. Make a long rectangle and pull it up, like this:
Book 2: Art Gallery
26 ModelMetricks Advanced Series
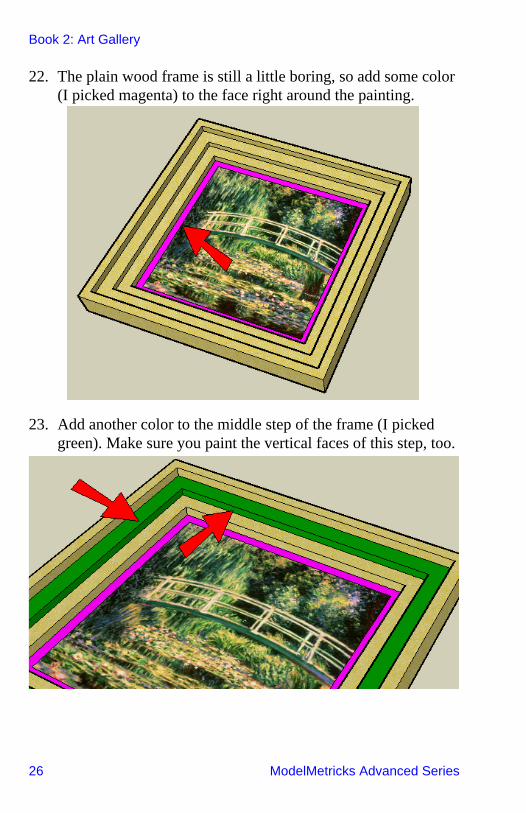
22. The plain wood frame is still a little boring, so add some color (I picked magenta) to the face right around the painting.
23. Add another color to the middle step of the frame (I picked green). Make sure you paint the vertical faces of this step, too.
www.modelmetricks.net 65
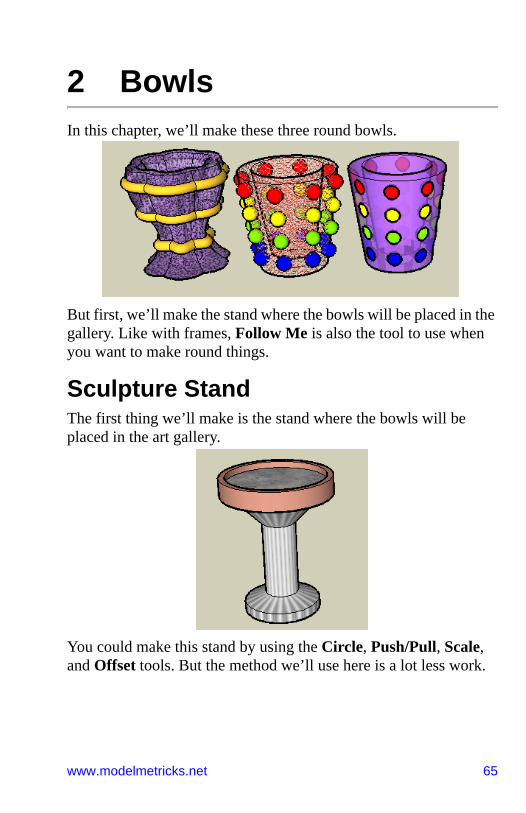
2 BowlsIn this chapter, we’ll make these three round bowls.
But first, we’ll make the stand where the bowls will be placed in the gallery. Like with frames, Follow Me is also the tool to use when you want to make round things.
Sculpture StandThe first thing we’ll make is the stand where the bowls will be placed in the art gallery.
You could make this stand by using the Circle, Push/Pull, Scale, and Offset tools. But the method we’ll use here is a lot less work.
Chapter 5: Penguins
www.modelmetricks.net 117
Put Penguins in the Room1. Now that the penguin is a component, let’s put him in the room.
Activate Move, and click a point at the bottom of one of his (her?) feet.
2. Move him to the floor.
Book 2: Painting with Pictures
118 ModelMetricks Intermediate Series
3. Open the Components window (choose Window / Components) to the “In Model” folder. Click the penguin to bring in another one.
4. Insert a few penguins this way.
Chapter 5: Penguins
www.modelmetricks.net 119
5. It’s boring to have a bunch of identical penguins, so we can make each one a little different. First, Select one of them.
6. Then click Scale.
Book 2: Painting with Pictures
122 ModelMetricks Intermediate Series
10. To see what Always face camera means, orbit the room around. No matter where the walls are, the penguins are always looking at you (which is a little creepy, don’t you think?)
We only have one “empty” wall left, which needs some windows.
Chapter ReviewHere’s what we learned in Chapter 5:
• You can use the Styles window to change the color of all edges in the model. Open the Edit tab and the Edge page, and click the color square.
• The Freehand tool is good for tracing around a picture. Instead of making one long freehand line, it’s best to make a chain of short freehand lines. Make sure to start a new line exactly where you ended the last one.
• If you activate Select and double-click a face, you’ll select both the face and its edges.
• A flat object, like a picture, can be made into a component that always faces you. When you create the component, check Always face camera.
• If you have a bunch of identical components (like penguins) that you’d rather look all slightly different, you can use the Scale tool to change each component’s size.