2-step air spring troubleshooting guide(lyrik - totem)
introduction
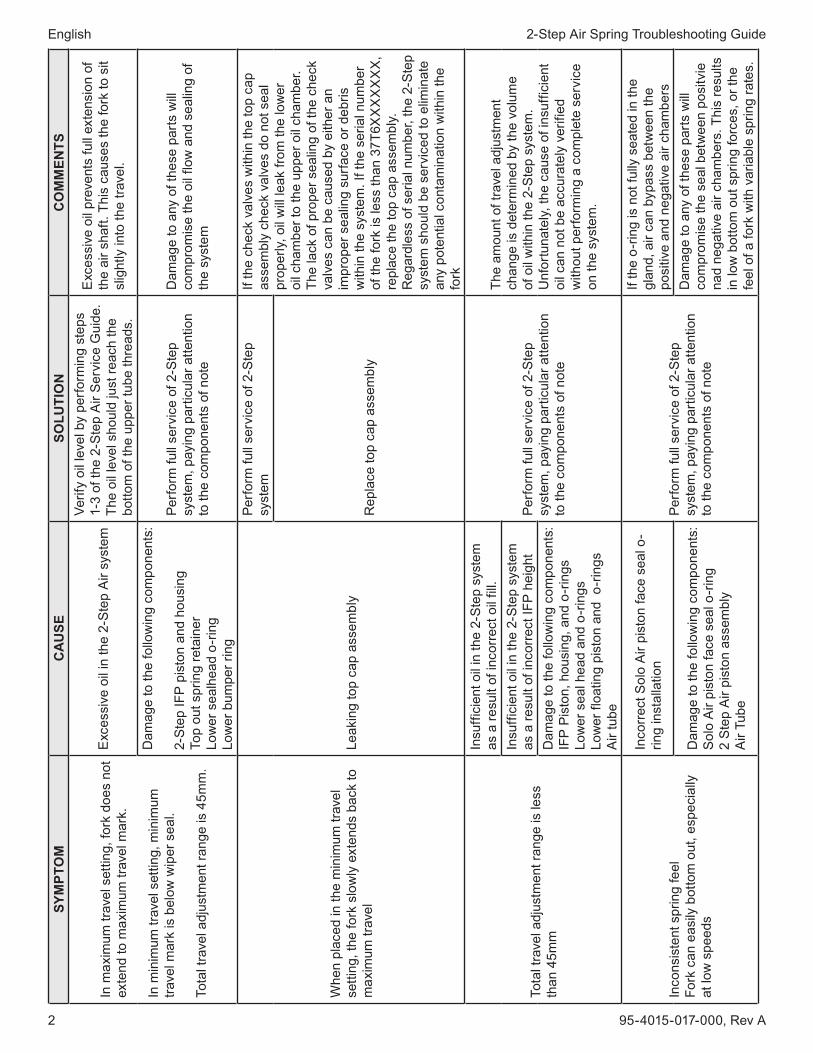
This troubleshooting guide is intended to help in the diagnosis and evaluation of problems occurring on Lyrik and Totem forks equipped with the 2-Step Air spring system. This guide is not intended to replace the comprehensive service instructions available for the 2-Step Air system.
For more information on servicing Lyrik or Totem forks, please reference the links below:Lyrik Spare Parts DiagramTotem Spare Parts Diagram
note: prior to perForming serVice on the 2-step system, please be sure you haVe the most recent and up to date parts. Warning: beFore perForming any serVice, alWays depressuriZe the 2-step air system and remoVe the air ValVes!
THE FOLLOWING IS AN EXCERPT FROM: 2008 ROCKSHOX TECHNICAL MANUAL (p/n 95-4015-016-000 Rev A)
95-4015-016-000 REV A62
2-step air spring service(lyrik - totem)
introductionAt this point you should already have the lowers removed from your fork. If not, you will need to return to the Lower Leg Removal section of this manual and follow the instructions for removing your fork lowers.
2-step air spring removal/service instructions
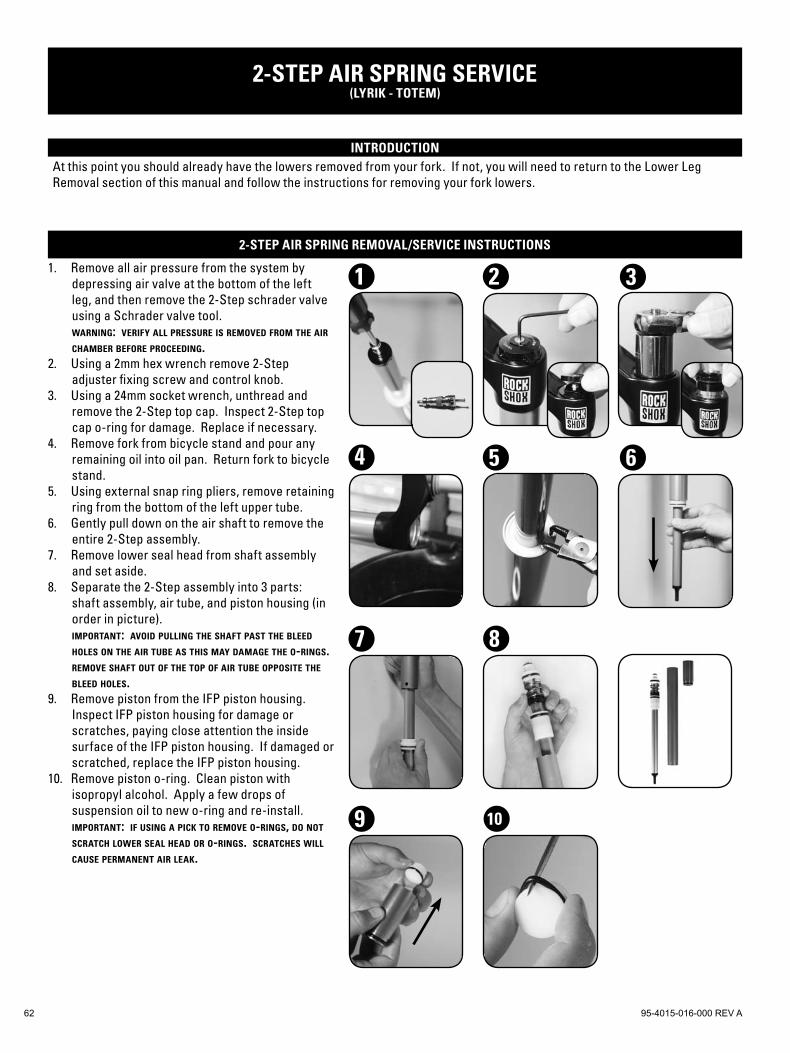
Remove all air pressure from the system by depressing air valve at the bottom of the left leg, and then remove the 2-Step schrader valve using a Schrader valve tool.warning: verify all pressure is removed from the air chamber before proceeding.Using a 2mm hex wrench remove 2-Step adjuster fixing screw and control knob.Using a 24mm socket wrench, unthread and remove the 2-Step top cap. Inspect 2-Step top cap o-ring for damage. Replace if necessary.Remove fork from bicycle stand and pour any remaining oil into oil pan. Return fork to bicycle stand.Using external snap ring pliers, remove retaining ring from the bottom of the left upper tube.Gently pull down on the air shaft to remove the entire 2-Step assembly.Remove lower seal head from shaft assembly and set aside.Separate the 2-Step assembly into 3 parts: shaft assembly, air tube, and piston housing (in order in picture). important: avoid pulling the shaft past the bleed holes on the air tube as this may damage the o-rings. remove shaft out of the top of air tube opposite the bleed holes.Remove piston from the IFP piston housing. Inspect IFP piston housing for damage or scratches, paying close attention the inside surface of the IFP piston housing. If damaged or scratched, replace the IFP piston housing.Remove piston o-ring. Clean piston with isopropyl alcohol. Apply a few drops of suspension oil to new o-ring and re-install. important: if using a pick to remove o-rings, do not scratch lower seal head or o-rings. scratches will cause permanent air leak.
2-step air spring removal/service instructions (cont)
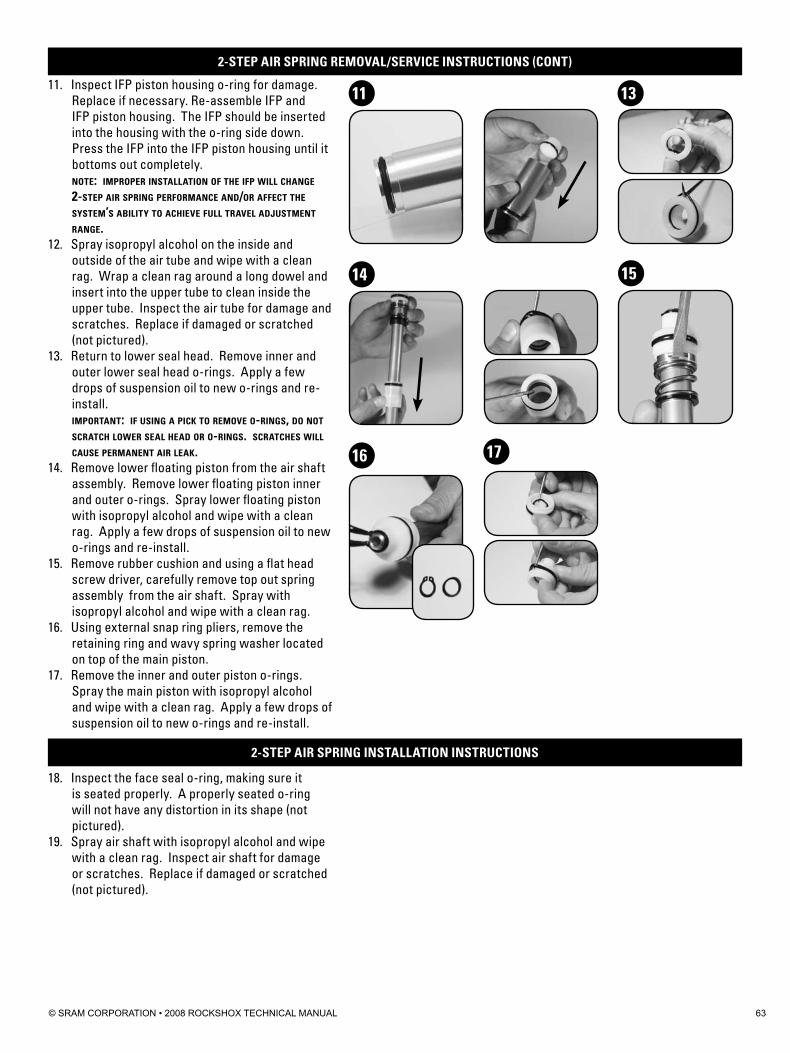
Inspect IFP piston housing o-ring for damage. Replace if necessary. Re-assemble IFP and IFP piston housing. The IFP should be inserted into the housing with the o-ring side down. Press the IFP into the IFP piston housing until it bottoms out completely.note: improper installation of the ifp will change 2-step air spring performance and/or affect the system’s ability to achieve full travel adjustment range.Spray isopropyl alcohol on the inside and outside of the air tube and wipe with a clean rag. Wrap a clean rag around a long dowel and insert into the upper tube to clean inside the upper tube. Inspect the air tube for damage and scratches. Replace if damaged or scratched (not pictured).Return to lower seal head. Remove inner and outer lower seal head o-rings. Apply a few drops of suspension oil to new o-rings and re-install.important: if using a pick to remove o-rings, do not scratch lower seal head or o-rings. scratches will cause permanent air leak.Remove lower floating piston from the air shaft assembly. Remove lower floating piston inner and outer o-rings. Spray lower floating piston with isopropyl alcohol and wipe with a clean rag. Apply a few drops of suspension oil to new o-rings and re-install.Remove rubber cushion and using a flat head screw driver, carefully remove top out spring assembly from the air shaft. Spray with isopropyl alcohol and wipe with a clean rag.Using external snap ring pliers, remove the retaining ring and wavy spring washer located on top of the main piston.Remove the inner and outer piston o-rings. Spray the main piston with isopropyl alcohol and wipe with a clean rag. Apply a few drops of suspension oil to new o-rings and re-install.
11.
12.
13.
14.
15.
16.
17.
2-step air spring installation instructions
Inspect the face seal o-ring, making sure it is seated properly. A properly seated o-ring will not have any distortion in its shape (not pictured).Spray air shaft with isopropyl alcohol and wipe with a clean rag. Inspect air shaft for damage or scratches. Replace if damaged or scratched (not pictured).
18.
19.
13
14 15
16 17
11
95-4015-016-000 REV A64
2-step air spring installation instructions (cont)
Reassemble main piston and kick plate and install onto air shaft. Slide wavy washer on top of main piston and secure into place with snap ring.Install top out spring assembly, rubber cushion, and lower floating piston onto air shaft. Do not install lower seal head at this time.Install shaft assembly into air tube, air valve first, in the side opposite the two holes on the air tube. Install lower seal head on shaft assembly.Measure and pour 5cc/ml of 15wt suspension oil into the top of the air tube assembly. Insert the IFP piston housing into the air tube assembly, being careful not to spill the oil already in air tubeInsert the 2-Step assembly into the bottom of the upper tube. Secure with retaining ring.important: retaining ring must be fully seated in upper tube groove. check retaining ring closely to ensure secure fit.Gently pull down on air shaft to extend to maximum length.Lyrik Only: Measure and pour 35cc/ml of 2.5wt suspension oil into the top of the upper tube.Totem Only: Measure and pour 135cc/ml of 2.5wt suspension oil into the top of the upper tube.tip: tap the side of the upper tube with your hand, then gently wiggle the shaft side to side to bring any trapped air bubbles to the top. gently pull down on air shaft again to make sure it is at full extension.note: the oil will just reach the bottom of the upper tube threads, remove any excess oil. important: as little as 2cc/ml can make a difference in the travel adjustment performance. too little oil will result in limited travel adjustment range. too much oil will change fork height.Insert top cap into upper tube/crown and hand thread into upper tube. Using the 2-Step adjuster knob, turn the adjuster to the minumum travel setting. Remove the adjuster knob and using a 24mm socket wrench, tighten top cap to 60 in-lb.Install 2-Step adjuster knob and secure fixing screw with a 2mm hex wrench.Install schrader valve into bottom of air shaft, using schrader valve tool.Add 100psi to the 2-Step system. Rotate adjuster knob to minimum travel position and compress air shaft to ensure proper function. Rotate adjuster knob to full travel position and verify return to full extension.