Index ................................................................ 1
2005 Cadillac STS Navigation System M
GENERAL MOTORS, GM, the GM Emblem, CADILLAC,the CADILLAC Crest & Wreath and the name STS areregistered trademarks of General Motors Corporation.
DTS and DTS DigitalSurround are registeredtrademarks of DigitalTheater Systems, Inc.
The information in this manual supplements the ownermanual. This manual includes the latest informationavailable at the time it was printed. We reserve theright to make changes in the product after thattime without notice.
Keep this manual with the owner manual in the vehicle,so it will be there if it is needed while you are on theroad. If the vehicle is sold, leave this manual andthe owner manual with the vehicle.
This device complies with Part 15 of the FCC Rules.Operation is subject to the following two conditions:(1) this device may not cause harmful interference,(2) this device must accept any interference received,including interference that may cause undesiredoperation.
This device complies with RSS-210 of Industry Canada.Operation is subject to the following two conditions:(1) this device may not cause interference, (2) this devicemust accept any interference, including interference thatmay cause undesired operation of the device.
Manufactured under license from Dolby® Laboratories.Dolby® and the double-D symbol are trademarks ofDolby® Laboratories. Confidential unpublished works.Copyright 1992–1997 Dolby® Laboratories. All rightsreserved.
Overview .........................................................1-2Navigation System Overview ............................1-2Getting Started ...............................................1-3
Section 1 Overview
1-1
OverviewNavigation System Overview
1-2
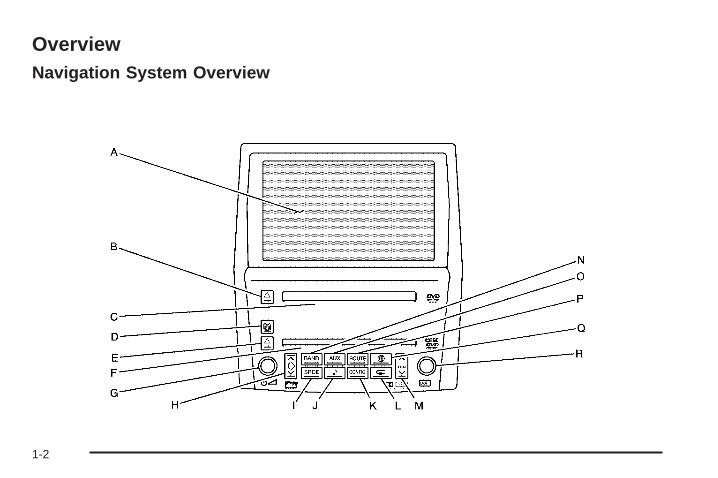
A. Display Screen.B. Map DVD Eject Key. See “Hard Keys” under Using
the Navigation System on page 2-2 for moreinformation.
C. Map DVD Loading Slot.D. CD/DVD Changer Loading Key. See Six-Disc
CD/DVD Changer on page 3-12 for more information.E. CD/DVD Changer Eject Key. See Six-Disc CD/DVD
Changer on page 3-12 for more information.F. CD/DVD Changer Loading Slot.G. Power/Volume Knob. See “Hard Keys” under Using
the Navigation System on page 2-2 for moreinformation.
H. Navigation Screen Tilt Key (in/out). See “Hard Keys”under Using the Navigation System on page 2-2for more information.
I. SRCE (Source) Key. See Six-Disc CD/DVD Changeron page 3-12 for more information.
J. Audio Key. See Six-Disc CD/DVD Changer onpage 3-12 for more information.
K. CONFIG Key. See Configure Menu on page 2-49 formore information.
L. Navigation Voice Prompt Repeat Key. See “HardKeys” under Using the Navigation System onpage 2-2 for more information.
M. Seek/Scan Key (up/down). See Six-Disc CD/DVDChanger on page 3-12 for more information.
N. BAND Key. See Six-Disc CD/DVD Changer onpage 3-12 for more information.
O. AUX (Auxiliary) Key. See “Hard Keys” under Usingthe Navigation System on page 2-2 for moreinformation.
P. ROUTE Key. See Enter Destination on page 2-6 formore information.
Q. Map Key. See “Hard Keys” under Using theNavigation System on page 2-2 for more information.
R. Tune Knob. See Six-Disc CD/DVD Changer onpage 3-12 for more information.
Getting StartedBefore you begin to operate the navigation system, readthis manual thoroughly to become familiar with it andto understand how the system works.
The navigation system allows you to do the following:• Plan a route with provided turn-by-turn route
and map guidance with voice prompts.• Select a destination using various methods and
choices.• Receive broadcast announcements on traffic and
emergency alert communications.
1-3
The information in the system may not always becomplete. Road conditions such as prohibited turns,detours, and construction zones, change frequently. It isimportant to consider whether you can follow thedirections given by the system for the current conditions.
Each time you first start your vehicle and turn on thenavigation system by touching the map hard key,you will see this screen. You can touch Agree toproceed into the system, or the globe symbol in thelower left corner of the screen to change the languageof the system. For more information on changingthe language, see Personalization on page 5-2.
When getting started you may set the navigation systemto your preference using various options. To do so,reference the following topics:
• To adjust screen appearance, see “ScreenAppearance” under Configure Menu on page 2-49.
• To adjust the clock and other time options,see “Clock” under Configure Menu on page 2-49.
• To plan a route, see Enter Destination on page 2-6.
• To adjust the volume of voice guidance promptsor voice recognition, see “Navigation Set Up”under Configure Menu on page 2-49.
1-4
Features and Controls ......................................2-2Using the Navigation System ...........................2-2Enter Destination ............................................2-6Stored Locations ...........................................2-28Maps ..........................................................2-41Symbols ......................................................2-43Keyless Access System .................................2-47OnStar® System ...........................................2-48
Configure Menu ............................................2-49Global Positioning System (GPS) ....................2-59Vehicle Positioning ........................................2-60Problems with Route Guidance .......................2-61If the System Needs Service ..........................2-62Ordering Map DVDs ......................................2-62Database Coverage Explanations ....................2-62
Section 2 Features and Controls
2-1
Features and Controls
Using the Navigation SystemThis section presents basic information you will need toknow to operate the navigation system.
Use the hard keys located on the navigation systemalong with the available touch screen buttons onthe navigation screen to operate the system. SeeNavigation System Overview on page 1-2 for moreinformation.
Once the vehicle is moving, various functions will bedisabled to reduce driver distractions.
Hard KeysThe following hard keys are located on the navigationsystem:
Z (Map DVD Eject): Press the eject key locatednext to the map DVD loading slot to eject the map DVD.The map DVD slot is the slot directly below the displayscreen.
M (Load): Press the CD/DVD changer loading key togo to the loading screen and begin loading DVDs orCDs. See Six-Disc CD/DVD Changer on page 3-12 formore information.
Z (CD/DVD Eject): Press the eject key next to theCD/DVD changer loading slot to begin ejecting DVDs orCDs. See Six-Disc CD/DVD Changer on page 3-12for more information.
On (Power/Volume): Press the power/volume knobto turn the audio system on and off. Turn the knob toincrease or decrease the volume to the audio system.
ymz (Tilt): Press the up arrow on the tilt key to tiltthe navigation screen forward. Press the down arrowon the tilt key to tilt the screen rearward. There are threetilt positions to choose from.
BAND: Press the BAND key to change bands. TheBAND key will toggle among the bands available, FM,AM, XM, and WX. See Navigation Audio Systemon page 3-2.
SRCE (Source): Press the source key to switchbetween the audio sources. Pressing this key will switchbetween the radio and the CD/DVD player. SeeNavigation Audio System on page 3-2.
AUX (Auxiliary): Press the AUX key to access screensfrom which you will operate Bluetooth®, OnStar®, orcontrol video input. See Bluetooth® Phone on page 6-2.
2-2
e (Audio): Press the audio key to access the AudioAdjust screen, where you can adjust your base,mid, fade, balance and DSP settings. See NavigationAudio System on page 3-2.
ROUTE: Press the ROUTE key to access theDestination Entry screen or the search area and beginplanning a destination. See Enter Destinationon page 2-6.
CONFIG (Configure): Press the CONFIG key toaccess the desired SET UP Function screen. SeeConfigure Menu on page 2-49.
) (Map): Press the map key to access the map screen.
k (Navigation Repeat): Press the navigation repeatkey to repeat the last voice guidance prompt, whileyou are on a route.
Tune Knob: Turn the tune knob to go to the next orprevious radio station and stay there. See NavigationAudio System on page 3-2.
Alpha-Numeric KeypadLetters of the alphabet, symbols, punctuation, andnumbers, when available to you, will be displayed onthe navigation screen as an alpha or numeric keypad.The alpha keypad will be displayed when the systemneeds you to input a city or street name. You can alsotouch the symbol button (Sym.) at the bottom of thealpha keypad to access the numeric keypad wheninputting a house address, punctuation mark, or othercharacter. There are three pages of different symbolsavailable. Touch A - Z to return to the alpha keypad.Touch Others to get to a alpha keypad with specialcharacters. There are two pages of characters availableunder the Others selection. On either the Symbol orOthers screens, using the arrows at the bottom next tothe page numbers will navigate you through the restof the screens available.
All characters are touch-sensitive screen buttons. Toucha character to select it.
U: Select the space symbol on the A - Z screen toenter a space between characters or the words of aname.
V: Select the backspace symbol if you have selectedan incorrect character.
2-3
To make your name selections easier, the system willonly allow you to select a character which can follow thelast one entered. For example, if you enter Z, youwould not be allowed to follow it with T. The system willhighlight the available characters and darken theunavailable characters.
If you are unsuccessful when inputting a name, it mayneed to be selected differently. It is also possible that themap DVD database may not contain that informationor the correct search area has not been selected. SeeDatabase Coverage Explanations on page 2-62 formore information.
The following screens are some of the different alphakeypads you will have access to:
2-4
Touch-Sensitive ButtonsTouch-sensitive screen buttons are located on thescreen. When you have successfully selected a screenbutton, a beep will sound. These buttons will behighlighted when a feature is available and dim whenthey are unavailable. There are also some toggle screenbuttons that will be light blue when active and darkblue when inactive.
2-5
Enter DestinationPress the ROUTE key to access the Destination Entryscreen. From this screen, you can choose from severaloptions to plan a route by entering destination points.
The DESTINATION ENTRY screen allows you to alsoselect the area included in the search for yourdestination. A map of the United States and a part ofCanada divided into 11 regions is shown.
Before selecting a method of destination entry, reviewthe search area map to make sure your destinationis located in the highlighted region.
If you need to see a list of states included in thehighlighted region, or to change the region, touchREGION from the DESTINATION ENTRY screen. TheSEARCH AREA screen will be displayed. Touch thenumbered screen button to the right of the search areamap that corresponds with the numbered region youwish to choose or to view a list of states included in theregion selected. You may also touch the down arrowto the right of the search area map to choose CAN forCanada. Once your selection has been made, youwill see the area covered on the map highlighted. Touchthe back key to return to the DESTINATION ENTRYscreen. The new selection will be stored once you selectthe back touch screen key.
2-6
To enter a destination, choose from one of the followingdestination entry methods:
AddressThe address destination entry method allows you toinput an address by providing the system with a housenumber, street name, and city.
If you choose Any City, the system will generate a listof all cities containing that street name. If you choose5 Nearest Cities, the system will generate a list ofthe five nearest cities containing that street name.
C (Address): Touch this screen button to access theADDRESS screen. At this point you can choose toenter the address one of three ways, either housenumber first, street first or city first.
To use the house number first destination entry method,do the following:
1. Touch the numeric keypad to input the housenumber.
2. Touch the Street button to enter the street nameusing the alpha keypad.
3. A list of available street names will be displayed ifthere are less than 5 items available. You mayselect the list screen button at any time to view theavailable list. Select the correct street with thecorrect prefix from the list.
4. The Navigation System will either display a list ofavailable cities or go to the map screen directlybased on the input.
5. Select the desired city name on the list.A map screen will then appear with the destinationmarked.
2-7
To use the street name first destination entry method,do the following:
1. Select the Street screen button from the addressmenu and start inputting the street name using thealpha keypad. A list of available street nameswill be displayed if there are less than 5 itemsavailable. You may select the list screen button atany time to view the available list.
2. Select the desired street name with the correctprefix from the list (Dr., Ln., St., etc.).
3. The Navigation System will display a list of availablecities. Select the correct city from the list.
4. The numeric keypad will be displayed, allowing youto enter the house number.
5. Press OK.A map screen will then appear with the destinationmarked.
To use the city name first destination entry method, dothe following:
1. Touch the City button.
2. Select from the choices shown on the City screen,Any City, 5 Nearest Cities, Input City Name, or fromthe Last 5 Cities used.Using the Any City choice will take you back to thehouse number first entry method.
Using the 5 Nearest Cities choice, the system willdisplay the 5 cities nearest your current position.Using the Input City Name choice will allow you toinput the city name with the alpha keypad.Using the Last 5 Cities choice, the system willdisplay a list of the last five city names used.
3. If using the alpha keypad, finish inputting the cityname and then touch the list touch screen button todisplay a list of available cities. Choose a city fromthe list. If choosing from one of the prior mentionedlists, select the city from the list displayed.
4. The House number screen will be displayed. Inputthe house number using the numeric keypad.
5. Select the Street screen button from the addressmenu and start inputting the street name using thealpha keypad. A list of available street nameswill be displayed if there are less than 5 itemsavailable. You may select the list screen button atany time to view the available list.
6. Select the desired street name with the correctprefix (Dr., Ln, St., etc.) from the listA map screen will then appear with the destinationmarked.
See “Getting Started on Your Route” later in this sectionfor more information.
2-8
Point of Interest (POI)The Point of Interest (POI) destination entry methodallows you to choose a destination from the POI list.
i (Point of Interest): Touch this screen button toaccess the POINT OF INTEREST screen. Fromthis screen you have three options to select/input yourdestination. You can either input the name usingthe alpha keypad, select a category from the categorylist or select the city by touching the city name and thenusing the alpha keypad.
Then, to use this destination entry method by inputtingthe name, do the following:
1. Use the alpha keypad to enter the POI name.Touch Sym. to view a list of symbols to addwhen entering a POI, touch Others to view a list ofspecial characters you can choose from, ortouch A - Z to return to the alpha keypad.
2. A list of POIs will appear if there are fewer than fivePOIs found using the information from the alphakeypad input. You may also touch the List button atany time to view available POIs.
3. Select the desired POI from the list.A map screen will then appear with the destinationmarked.
2-9
To use this destination entry method by selecting acategory, do the following:
1. Touch the Category screen button from the POINTOF INTEREST screen to view a list of POIcategories.
2. Choose a category, and then a sub-category.
3. The Navigation System will display available POIsnames in the selected sub-category or if the list istoo long the system will display the alpha keypad.
4. If the alpha keypad is displayed, input the POI nameuntil a list of available POIs appears. You may alsoselect the List screen button when it becomesavailable.
5. Select the POI from the list.A map screen will then appear with the destinationmarked.
To use this destination entry method by selecting a city,do the following:
1. Select the city screen button, then choose from AnyCity, 5 Nearest Cities, Input City Name or from theLast 5 Cities list. If you choose Any City, the systemwill return to the name POI input method/screen. Ifyou choose 5 Nearest Cities, the system willgenerate a list of the five nearest cities to yourcurrent position. Or you can select from the last fivecities that were used. If you choose to input the cityname the system will display the alpha keypad.
2. Input the city name using the alpha keypad.3. Select the desired city from the list displayed.4. Use the alpha keypad to enter the POI name.
Touch Sym. to view a list of symbols to addwhen entering a POI, touch Others to view a list ofspecial characters you can choose from, ortouch A - Z to return to the alpha keypad.
5. A list of POIs will appear if there are fewer than fivePOIs found using the information from the alphakeypad input. You may also touch the List button atany time to view available POIs.
6. Select the desired POI from the list.A map screen will then appear with the destinationmarked.
See “Getting Started on Your Route” later in this sectionfor more information.
2-10
MapThe map destination entry method allows you to choosea destination by scrolling on the map.
I (Map): Touch this screen button to enter the mapdestination entry method.
Then, to use this destination entry method, do thefollowing:
1. Touch the map for the desired area you wish to setas your destination.
2. Use the zoom in/out function to view the direction ofthe desired area.
3. Pressing/holding and dragging on the map willactivate fast scrolling. Press/touch once on thearea to which you would like to move the currentposition mark.
4. On the map screen you will then see the destinationmarked and the address information for the currentdestination mark. Touch the destination screenbutton or the waypoint screen button to save theaddress as a destination or waypoint. Touching thememory point screen button will store the addressas a memory point. Touching the POI screen buttonwill display the QUICK-POI screen.
See “Getting Started on Your Route” later in this sectionfor more information.
2-11
IntersectionThe intersection destination entry method allows you toset two intersecting streets as your destination.
M (Intersection): Touch this screen button to accessthe INTERSECTION screen.
To enter a destination using the intersection entrymethod, do the following:
1. Enter the first of two streets in the intersection. TheList option may become available.
2. You may now choose a street from the list, orcontinue to spell the street name to furtherreduce the number of available items. Select thestreet with the correct prefix (Dr., Ln., St., etc.).
3. After the first street has been chosen, enter thesecond street name. The List option may againbecome available.
4. You may now choose the second street from thelist, or continue to spell the street name to furtherreduce the number of available items. Selectthe street with the correct prefix (Dr., Ln., St., etc.).After both streets have been chosen, a mapscreen will then appear with the destination marked.
See “Getting Started on Your Route” later in this sectionfor more information.
2-12
Phone NumberThe phone number destination entry method allows youto choose a destination by entering a phone numberthat is contained on the map DVD.
U (Phone Number): Touch this screen button toaccess the PHONE NUMBER screen.
Then, to use this destination entry method, do thefollowing:
1. Input the area code and phone number of a POIusing the numeric keypad.
2. If the phone number can be found on the mapDVD, a map screen will then appear with thedestination marked.
See “Getting Started on Your Route” later in this sectionfor more information.
2-13
Freeway Entrance/ExitThe freeway entrance/exit destination entry methodallows you to choose a destination by entering a freewayentrance or exit point.
K (Freeway Entrance/Exit): Touch this screen buttonto access the FREEWAY ENT/EXIT screen.
Then, to use this destination entry method, do thefollowing:
1. Touch the Freeway screen button and enter thefreeway name. Be sure to use abbreviations,such as I - 75, rather than spelling out Interstate.Touch Sym. to view a list of symbols to addwhen entering a freeway name, touch Others toview a list of special characters you can choosefrom, or touch A - Z to return to the alpha keypad.A list of freeways will appear.
2. Choose a freeway from the list, and then choosewhether you want an exit point or an entrance point.You can choose an exit/entrance point from the list,input it by name, or sort the list by distance or name.If you choose to input the freeway name, the alphakeypad will be displayed. Touch the alpha keypad toenter the freeway exit or entrance name. Touch theName Sort screen button to sort the list by name.Touch the Dist. Sort screen button to have the listsorted by distance.After choosing a point from the list, a map screenwill then appear with the destination marked.
See “Getting Started on Your Route” later in this sectionfor more information.
2-14
EmergencyThe emergency destination entry method allows you toenter a destination by choosing from three categories:Police Station, Hospital, or Dealer.
| (Emergency): Touch this screen button to accessthe EMERGENCY screen. When in this screen, thesystem will display your current position address and thelongitude and latitude information.
Then, to use this destination entry method, do thefollowing:
1. Choose a category.
2. Choose a destination point from the list. TouchName Sort to sort the list by name, or Dist Sortto sort the list by distance from the vehicle’scurrent position.After choosing a destination from the list, a mapscreen will then appear with the destination marked.
See “Getting Started on Your Route” later in this sectionfor more information.
2-15
Memory PointsThe memory points destination entry method allows youto choose a destination from a list of points that youhave previously stored.
N (Memory Points): Touch this screen button toaccess the MEMORY POINTS screen.
Then, to use this destination entry method, do thefollowing:
1. Select the category/folder in which the memorypoint has been stored. Choose from Personal,Business, Entertainment or Marked Point folders.
2. Select the desired memory point within the selectedcategory/folder. Use the sort button to sort thedestinations within their category/folder. Touch theDist. screen button to sort the destination bydistance based on your current position. Touch theIcon screen button to sort the destinations basedon the icon symbol. Touch the Date screen button tosort the destinations based on the date they werestored. Touch the Name screen button to sortthe destinations in alpha/numeric order.
See “Getting Started on Your Route” later in this sectionfor more information.
Previous DestinationThe previous destination entry method allows you tochoose a destination from a list of previous destinationpoints.
h (Previous Destination): Touch this screen button toaccess the PREVIOUS DEST. screen. The systemwill store up to 100 points that have been previouslyinput. As new destinations are entered, the system willautomatically delete the oldest destinations and addthe new entries.
2-16
Then, to use the previous destination entry method, dothe following:
1. Choose a previous destination from the list. Use thearrow to the right of the destination to view theentire destination name as necessary. Use the Sortby Name/Date function as necessary. Also fromthis menu you can select the previous startpoint option. This option is available while thevehicle is moving.
1.1. To use the previous start point option fromthe PREVIOUS DEST. screen, choose thePrevious Start Point screen button.
1.2. The system will plan a route to the previouspoint you were at when a route was entered.
2. After choosing a destination from the previousdestinations list, a map screen will then appearwith the destination marked.
See “Getting Started on Your Route” later in this sectionfor more information.
CoordinatesThe coordinates destination entry method allows you tochoose a destination by entering latitude and longitudecoordinates.
) (Coordinates): Touch this screen button to accessthe COORDINATES screen.
2-17
Then, to use this destination entry method, do thefollowing:
1. Touch N or S next to LAT. to enter the direction ofthe latitude coordinate.
2. Input the numeric portion of the latitude coordinateusing the keypad.
3. Touch E or W next to LONG. to enter the directionof the longitude coordinate.
4. Input the numeric portion of the longitude coordinateusing the keypad.
5. Once both coordinates are entered, touch the OKscreen button.A map screen will then appear with the destinationmarked.
See “Getting Started on Your Route” later in this sectionfor more information.
Preset DestinationThe preset destination entry method allows you to set adestination by choosing from one of five previouslystored destinations. Besides home, these are the onlydestinations available to set while the vehicle ismoving or by voice recognition. If a destination is notset for one of the screen buttons, the button willbe dimmed and will not be available.
j (Preset Destination): Touch this screen button toaccess the PRESET DESTINATIONS screen.
2-18
Then, to use this destination entry method, do thefollowing:
1. Select the desired preset destination from theDESTINATION ENTRY screen. The screenbuttons are numbered 1 - 5.
2. The system will then set the stored presetdestination as your current destination.
3. A map screen will then appear with the destinationmarked and the number of the preset destination.
See “Getting Started on Your Route” and “MemoryPoints” later in this section for more information.
HomeThis feature allows you to plan a route to one previouslystored destination that you have selected as home. Ifa home destination is not stored, the home buttonwill not be available. In addition to preset destinationsone through five, this destination is available to set whilethe vehicle is moving or by voice recognition.
L(Home): Touch this screen button to set yourdestination as home.
To use this destination entry method, do the following:
1. From the DESTINATION ENTRY screen, touchthe home button.
2. The system will then set your stored preset homedestination as the current destination.
3. A map screen will then appear with the destinationmarked.
Once your destination entry is complete, regardless ofwhich method of entry you used, a map screen with thedestination previewed will be displayed. You canchange route preferences, route options, mapappearances, or add a waypoint at this time. You mayalso set the destination without making any furtherchanges. See “Getting Started on Your Route” followingin this section for more information on your choicesonce a destination has been entered.
2-19
Getting Started on Your RouteOnce you have entered a destination, you can performone of the following options:
h (Destination): Touch the destination symbol to setthe entered destination as it is, without furtheradjustment.
o (Waypoint): Touch the waypoint symbol to enterthis point as a waypoint along the route.
Route Preference: Touch this screen button to accessthe ROUTE PREFERENCES screen and adjust the routepreferences. The current setting is displayed in the RoutePreference section of the Map screen. See “ChangeRoute” later in this section for more information.
Once the route preferences have been set, touch theCalculate screen button and the system will display themap screen. From this screen, you can touch the Menuscreen button to access the NAV. (Navigation) MENU.
2-20
From this screen you can select Guide to start your routeguidance or select 3routes if available to select betweenQuick, Normal or Short route options. You can also selectthe Chg. Route screen button to go to the ROUTEOPTIONS menu and select from the available options.
Nav. (Navigation) MenuFrom this screen you can touch the menu screen buttonto access the Nav. (Navigation) menu.
2-21
From this menu, you can choose Change Route orMemory Points.
Change Route
Selecting Change Route from the Nav. Menu will takeyou to the ROUTE OPTIONS menu. The availabilityof these buttons depends on if a route is planned or ifyou are driving a route. You can perform the followingfunctions from this menu:
2-22
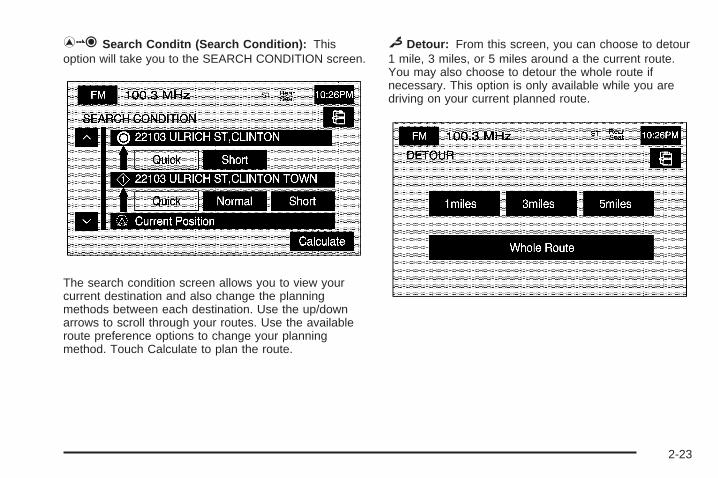
H Search Conditn (Search Condition): Thisoption will take you to the SEARCH CONDITION screen.
The search condition screen allows you to view yourcurrent destination and also change the planningmethods between each destination. Use the up/downarrows to scroll through your routes. Use the availableroute preference options to change your planningmethod. Touch Calculate to plan the route.
% Detour: From this screen, you can choose to detour1 mile, 3 miles, or 5 miles around a the current route.You may also choose to detour the whole route ifnecessary. This option is only available while you aredriving on your current planned route.
2-23
F Route Pref. (Route Preferences): This feature willtake you to the ROUTE PREFERENCES screen.
Touch any of the following options to turn them on andoff. If any of these features are turned off, there willbe a diagonal red line through its icon.
c (Allow Major Roads): This feature allows thesystem to use major roads when calculating a route.
l (Allow Time Restricted Road): This feature allowsthe system to use time restricted roads whencalculating a route.
W (Allow Toll Road): This feature allows the systemto use toll roads when calculating a route.
b (Allow Ferry): This feature allows the system touse ferries when calculating a route.
o Dest. & Way Pt. (Destination and Waypoint): Fromthis screen, you can choose to add or delete awaypoint from your current route.
Select this button to plan a destination with waypoints.Five waypoints and one destination can be entered.
2-24
9 Display route: From this screen, you can view theentire route and choose to view a Turn List. Fromthe Turn List you can select the Avoid screen button ifdesired, to avoid using selected turns. The systemwill then re-plan your route based on your selections.
G Route Preview: From this screen, you canpreview the entire route in either direction, as well asedit the route.
Use the touch-sensitive screen buttons at the bottom ofthe navigation screen to move forward or backwardthrough the route.
s(Skip to Start): Touch this screen button to skip tothe starting position, previous waypoint or previousPOI depending on the mode selected.
S/{ (Scroll to Start): Touch this screen button toscroll to the starting position, previous waypoint orprevious POI depending on the mode selected. Thisbutton will toggle between low and fast speed.
2-25
j (Pause): Touch this screen button to pause theroute preview.
T/| (Scroll to Destination): Touch this screenbutton to scroll to the destination, next waypoint or nextPOI depending on the mode selected. This buttonwill toggle between low and fast speed.
t (Skip to Destination): Touch this screen button toskip to the destination, next waypoint or next POIdepending on the mode selected.
Choose Edit to edit the route and access the followingscreen:
From this screen, you can add a waypoint or POI to thecurrent route.
If you chose to calculate your route, this screen will bedisplayed. From this map screen, you can touchGuide to begin route guidance, or Chg. route to returnto the ROUTE OPTIONS screen.
2-26
Three RoutesTo access this screen, touch the Chg. Route button onthe map screen while planning a destination.
When applicable, the system will calculate up to threedifferent versions of your current route in three differentcolors: Quick, Normal, and Short. The routes areshown with distance to destination and estimated traveltime. The quickest route may not be the shortest,and vice versa. When an optional route is selected it isshown on the map in another color.
Touch Info on the three routes screen to access theINFO FOR 3 ROUTES screen. From this screen,you can view the following information for the differentplanned routes:
G (Estimated Travel Time): This icon shows theroute’s estimated time of travel.
J (Straight-Line Distance): This icon shows theroute’s straight-line distance to destination.
2-27
W (Toll Road): This icon shows the route’s toll roaddistance information.
c (Freeway Travel): This icon shows the route’sfreeway distance information.
b (Ferry): This icon shows the route’s ferry distanceinformation.
{ (Time-Restricted Roads): This icon shows theroute’s time-restricted road information.
Stored Locations
Memory PointsChoosing Memory Points from the Nav. Menu will takeyou to the STORED LOCATIONS screen. From thisscreen, you can access the following options:
NMemory Points: This feature allows you the ability tostore memory points. You can store them in the fourdifferent categories listed, Personal, Business,Entertainment, and Marked Point. Once in afolder/category you can store a point (Add), edit a point,delete a point, delete all points, or edit a categoryname. You can store up to 60 memory points per driverin each folder.
2-28
To store a point:
1. Select one of the folders/categories listed.
2. Select Add.
3. Select the desired method of entering a destinationto enter the memory point. See Enter Destinationfor more information. A map screen will appeardisplaying the selected memory point location.
4. If available, touch the INFO button to view theaddress information of the selected point.
5. Touch OK to store the point as a memory point.
This feature will allow you to make changes to a specificstored point, such as changing the name, moving it to adifferent folder/category, storing the point as a name tag,modifying the position of the stored point, changing theicon and changing the phone number.
To edit a the name of a stored point:
1. Select one of the folders/categories listed.
2. Select the memory point that you wish to edit.
2-29
3. Touch the Name screen button from the EDITMEMORY POINT screen.
4. Use the backspace screen button to delete thecurrent name or use the alpha keypad to makechanges.
5. Touch the OK screen button to store the change.
To move the memory point from one folder/category toanother:
1. Select one of the folders/categories listed.
2. Select the memory point that you wish to edit.
3. Touch the Category screen button from the EDITMEMORY POINT screen.
4. Touch the new folder/category button you want tomove the memory point to.
5. The Navigation System will display a messageconfirming your move.
To store the point as a name tag:
1. Select one of the folders/categories listed.
2. Select the memory point that you wish to edit.
3. Touch the Add Nametag screen button from theEDIT MEMORY POINT screen.
4. The Navigation System will say “Name please.” Statewhat you would like to call the memory point.If the name is short, wait a few seconds after thesystem asks you to state the name.
5. The Navigation System will play back what wasrecorded and then will ask you to confirm yournametag. State “Yes“ if you want to confirmthe nametag. Stating “No” will cancel the nametagand you can try again.
2-30
Once a nametag is stored, you can choose to whetherto have the name show. You can also select theDel Nametag screen button to delete the nametag.
To modify the position of the stored point:
1. Select one of the folders/categories listed.
2. Select the memory point that you wish to edit.
3. Touch the Position screen button from the EDITMEMORY POINT screen.
4. The Navigation System will display the map screenwith the destination marked. Touch the map tomove the position of the memory point.
5. Touch OK when you have moved the memory pointto the appropriate location.
6. The Navigation System will return to the EDITMEMORY POINT screen and will now displaythe new address, longitude and latitude forthe changed memory point.
To change the icon associated with a memory point:
1. Select one of the folders/categories listed.
2. Select the memory point that you wish to edit.
3. Touch the Icon screen button from the EDITMEMORY POINT screen.
4. Select the desired icon. There are two pages oficons, a page of icons that have sounds associatedwith them, and a no icon button to choose from.
5. The new icon will be displayed in the EDIT MEMORYPOINT screen, next to the Icon screen button.
To change the phone number of a memory point:
1. Select one of the folders/categories listed.
2. Select the memory point that you wish to edit.
3. Touch the Tel. screen button from the EDITMEMORY POINT screen.
4. Use the numeric keypad to change the phonenumber.
5. Touch OK to store the changed phone number.
To delete a memory point:
1. Select one of the folders/categories listed in theMEMORY POINTS screen.
2. Select the Delete screen button.
3. Select the memory point that you wish to deletefrom the DELETE POINT screen. You can usethe sort feature to sort by distance, icon, name ordate as needed.
2-31
4. The Navigation System will show the map screenwith the position address and a pop-up confirmationmessage. Select Yes to delete the point; selectNo to return to the DELETE POINTS screen and notdelete the point.
To delete all of the memory points in a folder/category:
1. Select the desired folder/category from theMEMORY POINTS screen.
2. Select the Del.All screen button.
3. The Navigation System will display a pop-upconfirmation message. Select Yes to delete all thepoints in the folder/category; select No to cancel theoperation.
To change the name of the folder/category:
1. Select the desired folder/category from theMEMORY POINTS screen.
2. Select the Edit Category screen button.
3. Use the alpha keypad to change the name of thefolder/category as desired.
4. Touch the OK screen button to save your changes.
3 Avoid Area: This feature allows you to store ordelete an area to be avoided while planning a route. Youcan have up to 10 points stored.
2-32
To store a point to be avoided while planning a route:
1. Touch Avoid Area from the MEMORY POINTSscreen.
2. Touch Add from the AVOID AREA screen.
3. Select the desired method of entering a destinationto enter the area to be avoided. See EnterDestination for more information. A map screen willappear displaying the selected location.
4. If desired, reduce or enlarge the area around thepoint you want to avoid by using the reduce orenlarge keys.
5. Touch OK to store the area.
To change the name of the point to be avoided:
1. Touch the Avoid Area screen button from theMEMORY POINTS screen.
2. Touch the Edit screen button from the AVOIDAREA screen.
3. Select the point to be changed.
4. Touch the Name screen button.
5. Use the alpha keypad to add to or change the name.
2-33
6. Touch the OK screen button to save your changes.
7. Select the Show Name On screen button if youwould like the name of the point to appear on themap screen.
To change the position of the point to be avoided:
1. Touch the Avoid Area screen button from theMEMORY POINTS screen.
2. Touch the Edit screen button from the AVOIDAREA screen.
3. Select the point to be changed.
4. Touch the Position screen button.
5. Touch the map to move the location.
6. If desired, reduce or enlarge the area around thepoint you want to avoid by using the reduce orenlarge keys.
7. Touch OK to store the area.
To delete a point to be avoided:
1. Touch the Avoid Area screen button from theMEMORY POINTS screen.
2. Touch the Delete screen button from the AVOIDAREA screen.
3. Select the point you want to delete. Use thescrolling arrows as needed.
4. The Navigation System will display the map screenwith the name of the point and a pop-upconfirmation message. Touch Yes to have the pointdeleted; touch No to cancel the function.
To delete all of the points to be avoided:
1. Touch the Avoid Area screen button from theMEMORY POINTS screen.
2. Touch the Del.All screen button.
3. The Navigation System will display a pop-upconfirmation message. Touch Yes to have all of thepoints deleted; touch No to cancel the functionand return to the AVOID AREA screen.
2-34
$ Dest. & Way Pt.: This feature allows you to storeup to five waypoints to the current route.
From this screen you can add, edit, or delete waypointsto your route.
To add a waypoint:
1. Touch the Dest. & Way Point screen button fromthe MEMORY POINTS screen.
2. Touch the Add screen button from the DEST. &WAY POINT screen.
3. Using the desired method of entering a destination,enter the way point. See Enter Destination for moreinformation.
4. A map screen will appear with the way point marked.
5. Select the o (Way point) symbol on the mapscreen to save the way point.
6. Repeat Steps 2 - 6 to add up to five way points toyour route. For the second through the fifth waypoints added, the Navigation System will display theADD WAYPOINT screen.
7. Select the desired location/order that you want yournewly added waypoint to fall in your route bytouching the corresponding Add screen button. TheAdd and arrow screen buttons are located toshow where the new way point is placed.
2-35
To change the order of the route:
1. Touch the Dest. & Way Point screen button fromthe MEMORY POINTS screen.
2. Touch the Edit screen button from the DEST. &WAY POINT screen.
3. From the CHANGE ORDER screen, select on theaddresses in the order you would like them to fallon the route.
4. Select OK to save your changes.
To change the location of a way point:
1. Touch the Dest. & Way Point screen button fromthe MEMORY POINTS screen.
2. Touch the Edit screen button from the DEST. &WAY POINT screen.
3. Touch the Chg. Loc. screen button from theCHANGE ORDER screen.
4. From the CHANGE LOCATION screen select thepoint whose location needs to change.
5. A map screen will be displayed with the destinationmarked. Touch on the map to move the location ofthe waypoint.
6. Touch the OK screen button to save your changes.The Navigation System will return to the STOREDLOCATIONS screen.
To delete a way point from your current route:
1. Touch the Dest. & Way Point screen button fromthe MEMORY POINTS screen.
2. Touch the Delete screen button from the DEST. &WAY POINT screen.
3. Select the way point/destination you want to delete.
4. The Navigation System will display the mapscreen with a pop-up confirmation message.Choose Yes to delete the way point; touch No tocancel this operation.
2-36
To delete all of the way points on your route:
1. Touch the Dest. & Way Point screen button fromthe MEMORY POINTS screen.
2. Touch the Del.All screen button from the DEST. &WAY POINT screen.
3. The Navigation System will display the map screenwith a pop-up confirmation message. Choose Yesto delete all of the way points; touch No tocancel this operation.
LHome: This feature allows you to store/delete/edit apoint to be stored as your home destination.
Storing a Home Destination
This function allows you to set a destination and store itas home.
Touch this L (Home) screen button to access theHOME screen.
To store your home destination, do the following:
1. From a map screen, touch the Menu screen button.The NAV. (Navigation) MENU will be displayed.
2. Choose Memory Points.
3. Choose Home.
4. Choose Add to add a the destination.
5. Choose a destination entry method. See EnterDestination for more information.
6. Touch OK on the map screen and the destinationwill be stored. The home icon will now behighlighted on the DESTINATION ENTRY screen.
2-37
To edit your home destination, do the following:
1. From a map screen, touch the Menu screen button.The NAV. (Navigation) MENU will be displayed.
2. Choose the Memory Points screen button.
3. Choose the Home screen button.
4. Choose Edit from the HOME screen to changethe location.
5. Touch the map to move the location of the point.
6. Touch OK to save your changes.
To delete your home point, do the following:
1. From a map screen, touch the Menu screen button.The NAV. (Navigation) MENU will be displayed.
2. Choose Memory Points.
3. Choose Home.
4. Choose Delete from the HOME screen.
5. The Navigation System will display the map screenwith a pop-up confirmation message. Select Yes todelete the home position previously stored;select No to cancel the operation.
& Previous Dest.: This feature allows you to deleteone or all previous destinations.
To delete a specific destination from your previousdestinations list, do the following:
1. From a map screen, touch the Menu screen button.The NAV. (Navigation) MENU will be displayed.
2. Choose the Memory Points screen button.3. Touch the Previous Dest. screen button.4. Touch the Delete screen button.5. Select a destination from the list displayed.6. The Navigation System will display the map screen
with a pop-up confirmation message. Select Yes todelete the destination previously stored; selectNo to cancel the operation.
To delete all destinations from your previousdestinations list, do the following:
1. From a map screen, touch the Menu screen button.The NAV. (Navigation) MENU will be displayed.
2. Choose the Memory Points screen button.3. Touch the Previous Dest. screen button.4. Touch the Del.All screen button.5. The Navigation System will display the map screen
with a pop-up confirmation message. Select Yes todelete all of the destinations previously stored;select No to cancel the operation.
APreset Dests.: This feature allows you to add,delete or change one of five preset destinations.
2-38
Storing a Preset Destination
To store a preset destination, do the following:1. From a map screen, touch the Menu screen button.
The NAV. (Navigation) MENU will be displayed.2. Press the Memory Points screen button.3. Choose the Preset Dests. screen button.4. Choose the Add screen button to add a preset
destination, then choose the numbered preseticon you would like it to appear as.
5. Choose a destination entry method from theSTORE PRESET DEST screen.
6. Set the destination. See for more information.7. Touch OK on the map screen and the destination
will be stored. It will now be highlighted on theDESTINATION ENTRY screen.
To edit the name of a preset destination, do the following:1. From a map screen, touch the Menu screen button.
The NAV. (Navigation) MENU will be displayed.2. Press the Memory Points screen button.3. Choose the Preset Dests. screen button.4. Choose the Edit screen button from the PRESET
DESTS. screen.5. Select the preset destination whose name you want
to edit.
6. Touch the Name screen button and use the alphakeypad to edit or add the name.
7. Touch the OK screen button to save your changes.The new name will then be displayed.
2-39
To change the position of a preset destination, do thefollowing:
1. From a map screen, touch the Menu screen button.The NAV. (Navigation) MENU will be displayed.
2. Press the Memory Points screen button.
3. Choose the Preset Dests. screen button.
4. Choose the Edit screen button from the PRESETDESTS. screen.
5. Select the preset destination whose position youwant to change.
6. Touch on the map to move the location/positionpoint on the map.
7. Touch the OK screen button to save your changes.
To add or change the phone number of a presetdestination, do the following:
1. From a map screen, touch the Menu screen button.The NAV. (Navigation) MENU will be displayed.
2. Press the Memory Points screen button.
3. Choose the Preset Dests. screen button.
4. Choose the Edit screen button from the PRESETDESTS. screen.
5. Select the preset destination whose phone numberyou want to change.
6. Touch the Tel. screen button and use the numerickeypad to input or change the phone number.
7. Touch the OK screen button to save your changes.
Display Memory Pt. Icons: Touch this screenbutton to display memory point icons on the map screen.When highlighted, the feature is on. When dark, thefeature is off.
Calculate: Touch Calculate to calculate your route.
2-40
MapsThis section includes basic information that you need toknow about the map database.
Regional MapsThe maps are stored on a DVD. The 48 contiguousUnited States and portions of Canada are contained onone disc.
If a regional map does not contain a specific city, the mapDVD may not contain the city or it may be misspelled.
Refer to the Navigation System Map Disc manual to viewa detailed explanation of map coverage and detailed citylists in each region. This manual will be in your map DVDcase when the vehicle is delivered from the factory.
Installing the Map DVDWhen your vehicle is delivered from the factory, thedealer may have installed the map DVD. If the map DVDwas not installed in your vehicle when first purchased,use the following directions to load the map DVD:
Read the following steps completely before operatingthis feature.
1. Turn the ignition on.
2. Load the map DVD into the slot located just belowthe navigation system screen by inserting it partiallyuntil the system pulls it in.
Once the map DVD is inserted correctly, you will havethe following two choices:
Agree: Touch this screen button to proceed to thenavigation system.
^ (Language): Touch this screen button to changethe language of the navigation system. See “Language”under Personalization on page 5-2 for more information.
Once a language has been selected, touch Agree toenter the navigation system. The map will appearshowing your current vehicle position.
Setting the Search AreaSee Enter Destination on page 2-6 for information onchanging the search area.
Map AdjustmentsThe system allows you to adjust the scale of view onthe map. Also, as you drive, the map will scrollautomatically based on the direction you are traveling.
2-41
Map Scales
To view a larger or smallerscale of the map, touchthe map scale arrows.
You can change the level of map detail by either zoomingin or zooming out using the arrow screen buttons or bytouching the scale on the bar. The system will adjust themap accordingly. The scale of a map can range from1/32 of a mile (0.05 km) to 128 miles (256 km).
Scrolling the Map
Touch anywhere on themap screen twice and thescroll symbol will appear.Use this feature toscroll across the map.
You can hold your finger in any direction outside of thescroll symbol and the map will continue to scroll in thatdirection until you remove your finger from the mapscreen.
If scrolling while your vehicle is in PARK (P), the systemwill scroll initially at a slower rate. It will increase ifyou continue touching the map screen.
If scrolling while your vehicle is in motion, you have onescroll speed and a limited distance to scroll. Youhave to keep touching the map screen to scroll for alonger distance.
If you have used the scroll feature to scroll the map andyour vehicle icon becomes lost, press the map hardkey to return to the current vehicle location on the map.
When scrolling on the map without a planned route,the system will display the route from your currentposition to the destination mark.
You can use the scroll feature on the map to set adestination. See “Map” under Enter Destinationon page 2-6 for more information.
2-42
SymbolsThe following symbols are the most common symbolsthat will appear on a map screen.
I (Current Position): Your vehicle is shown as thissymbol. It indicates the current position and headingdirection of your vehicle on the map.
The destination symbol willappear on the map after aroute has been plannedmarking your finaldestination.
The waypoint symbol willbe displayed on the mapafter a waypoint has beenadded to your route.
The waypoint symbol will be numbered from one throughfive depending on how many waypoints have been set.
The distance to destinationsymbol indicates thedistance to your finaldestination. It only appearswhen time is not availableor when you are scrollingon the map without aroute planned.
The distance and time todestination symbolindicates the distance andthe estimated timeremaining to your finaldestination or arrival time,depending on the optionselected. See ConfigureMenu on page 2-49for more information.
2-43
The straight line todistance symbol shows thestraight-line distance toyour destination.
This symbol will appear before you start driving on theroute or if you are on a road where navigationguidance cannot be given.
The north up symbolindicates the map withNorth Up, known as NorthUp mode.
While in North Up mode, the vehicle icon will follow thenorth direction on the map regardless of which directionthe vehicle is traveling. Touch this screen symbol toswitch between North Up and Heading Up modes.
The heading up symbolindicates the map with thevehicle travel directionup, known as HeadingUp mode.
The shaded triangle indicates the North direction. Whilein Heading Up mode, the direction your vehicle istraveling will always be at the top of the map screen.The vehicle icon will always be headed in the directionyour vehicle is traveling. Touch this screen symbolto switch between Heading Up and North Up modes.
y (No GPS): This symbol will appear in the upper rightcorner of the map screen, under the heading directionsymbol, when your vehicle is not receiving a GlobalPositioning System (GPS) satellite signal. See GlobalPositioning System (GPS) on page 2-59 for moreinformation.
When a name is too long tobe displayed, an arrowsymbol will appear. Touchthe right or left arrowscreen button to scrollthrough the entire name.
2-44
This symbol indicates theposition of the nextguidance maneuver.
The following symbols can also be found on a mapscreen:
Touch this symbol todisplay the scale on themap, allowing you to zoomin and out.
O (Guidance Window Appearance on Map): Touchthis symbol to change the guidance window appearance.You can select from one of the following options.Availability of these options depends on the route.
P (Map Appearance): Touch this symbol to show themap screen.
Q (Dual View): Touch this symbol to change theguidance window to dual map mode when under RouteGuidance. This mode will show two map screensand each can have a different scale level and differentPOIs. Touch the map to change the heading direction,scale and to add or delete POIs.
R (Turn List): Touch this symbol to change theguidance window to display turn list guidance on themap screen when under Route Guidance. Thismode displays several maneuvers at a time.
2-45
S (Next Turn): Touch this symbol to change guidancemode to display mode guidance on the map screen whenunder Route Guidance. This mode allows you to seemore of the map screen and displays a small guidancewindow with the direction and distance of the upcomingmaneuver.
T (Next Maneuver): Touch this symbol to displayonly the next maneuver along with a small map of themaneuver.
c (Highway Guidance): Touch this symbol to displayhighway guidance on the map screen. The NavigationSystem will go into this mode any time you have a routeon a freeway, unless you change it manually. When inthis mode, the Navigation System provides the upcomingexit number, distance to the exit, and available POIs atthe exit. You can use the up and down arrows to scrollthrough the list displayed. Select an exit to view availablePOIs and select the map button to go to that location onthe map.
h (Destination): Touch this symbol to set the currentroute as the final destination.
o (Waypoint): Touch this symbol to enter a waypointalong the current route. This allows you to havemore than one destination planned at a time.
N (Memory Point): Touch this symbol to store thelocation on the screen as a memory point. The memorypoint will be stored in the Marked Point folder/category.
W (Back): Touch this screen button to return tothe previous page.
F (Cancel): This screen button will return you to theNavigation menu.
2-46
Auto RerouteWhen your destination is set and you are off theplanned route, the system will automatically plan a newroute and begin to reroute. You will be able to seethe new route highlighted on the screen.
Traveling Across RegionsIf you plan to drive across many states, you may haveto change the region selected to represent the areayou are traveling to. To do so, do one of the following:
1. Change the selected region in the search areawhen you get closer to the area you are travelingto. See Enter Destination on page 2-6 or,
2. Change the selected region in the search are whenentering your destination and route settings. SeeEnter Destination on page 2-6.For example, if you were traveling from Michigan toFlorida, change the region currently selected inthe search area to Florida. Enter a destination inFlorida under the DESTINATION ENTRY menu.
Keyless Access SystemWhen you start your vehicle, you will see Driver 1 orDriver 2 displayed on the cluster. If personalizationis turned off in feature programming, a message will notappear on the cluster. The number on the back ofthe RKE transmitter corresponds to driver 1 or driver 2.The navigation system can store memory points fordriver 1 and 2 individually. See Personalizationon page 5-2 for more information.
2-47
OnStar® System
With an active OnStar® subscription with personal calling,you can make telephone calls from your vehicle, usingthe Navigation System screen to enter the numbers.
Q(OnStar): Touch this screen button to access theOnStar® phone screen. Touch the AUX hard keyto access this button. This screen is not availablewhile driving.
V (Place/End Call): Touch this screen button to placeyour phone call. While in a call this button will be redand can then be used to end your call.
Tone Send: Touch this screen button send touch tonedata. This button will become available during aphone call. This function is used when you need toenter numbers in response to an automated phonerequest, such as when check your voice mail orare asked to choose menu items.
Incoming Call: When receiving an incoming call, apop-up message will be shown on the screen with twoplace/end call screen buttons, one green and theother red. Touch the green button to answer the call.Touch the red button to reject the call.
When using the OnStar® system, the audio system willbe muted. The volume of an OnStar® call can beadjusted by using the steering wheel controls or thevolume knob on the Navigation System. See “OnStar®
System” in the index of your vehicle’s owner manualfor more information.
2-48
Using the OnStar® Screen to Make aPhone CallTo make a phone call using the OnStar® screen do thefollowing:
1. Press the AUX hard key.
2. Touch the OnStar® screen button.
3. Enter the phone number using the numeric keypad.
4. Touch the place/end call screen button to placethe phone call.
5. If you need to use the tone send button for checkingvoice mail or responding to an automated request,enter the appropriate number(s) using the keypadand then touch the tone send button. Once that setof numbers has been sent, the tone send buttonwill be dimmed until another set of numbers is inputon the keypad.
6. To end the call, touch the place/end call screenbutton. It will be red while you are on the call.
Configure Menu
Press the CONFIG hard key to access this menu,allowing you to adjust several of your system’s featuresand preferences.
2-49
Bluetooth®
E (Bluetooth®): Touch this screen button to access theBluetooth® setup screen. See Bluetooth® Phone onpage 6-2 for more information on the Bluetooth® system.
AudioTouch the Audio screen button to access a screenwhere several audio features may be turned on and offand several options are available for adjustment.The screen buttons next to each option will behighlighted if chosen to be on. The items on this menuwill depend on which audio source is selected.
Auto Store: Touch this button to turn the Auto Store onfor the current audio source selected. When on, thisbutton will appear on the main audio screen. This buttonis not available when in XM™ audio mode.
Info (Information): This information will changedepending on what audio source is selected. This buttonis available when you are using the FM or XM™ audiomodes. Touch this button to turn the Info function on.When on, the button will be available to select from theaudio main menu.
Category: This information will change depending onwhat audio source is selected. This button is onlyavailable when you are using the FM or XM™ audiomodes. Touch this button to turn the Category functionon. When on, the button will be available to selectfrom the audio main menu.
Traffic: This button is only available when you areusing the FM or CD/DVD audio modes. When on, theNavigation System will search for stations that broadcasttraffic announcements. See Navigation Audio Systemon page 3-2 for more information.
2-50
When in CD/MP3 mode select this on if you want to usethese functions while listening to a CD/MP3 disc.
Audio Language: Select this button to view a list oflanguage choices. Select the desired language. The listof languages will depend on the languages supportedby the inserted disc. This button will allow you to changethe language spoken.
Subtitle Language: Select this button to view a list oflanguages to choose for subtitles. The list of languageswill depend on the languages supported by theinserted disc. Select the language desired.
Menu Language: Select this button to view a list oflanguages to choose for the DVD menu text. The list oflanguages will depend on the languages supportedby the inserted DVD.
Parental Level: Select this button if you choose to setup parental protection. Use the keypad to enter thepassword. Select from options such as change level andchange password, as necessary.
2-51
Navigation Set Up
3(Navigation Set Up): Touch this screen button toaccess the NAVIGATION SET UP screen.
From this menu, several options are available foradjustment:
8 2D/3D View: This option allows you to changethe view of the map screen and the guidance screenbetween a 2-dimensional and 3-dimensional view. Whenchanging the map to the 3-dimensional view, use theup/down arrows to change the angle of the map. SelectDefault to return to the factory settings.
2-52
C Quick POI Selection: This option allows you toset six Point of Interest (POI) categories that youcan select from while driving. To select from thesecategories while driving, touch anywhere on the map orpress the POI screen button on the map screen.
To set the Quick POI selection, do the following:
1. Touch the Quick POI Selection screen key.
2. Select the category you would like to replace.
3. Select a Quick POI category from the Quick POIselection menu list.
4. Pick the subcategory from the list that appears.
5. The system automatically returns to the Quick POISelection screen. Your category changes arenow saved.
6. To change back to the system generated choices,touch the Default screen key.
2-53
To remove the POI icons from the map screen, do thefollowing:
1. Touch the Quick POI Selection screen key.
2. Touch the POI Off screen key. The current POIicons will be removed from the map screen.
5 Calibration: This option allows you to recalibratethe navigation system.
Once you enter the Calibration screen, you have thechoice to either adjust your vehicle’s position or to adjustthe vehicle speed signal.
To correct the position of your vehicle on the map (ifyour vehicle has been shipped, for example) or tochange to the current position, touch thePosition/Direction screen key.
If there are tire pressure differences or a spare tire isinstalled, the Navigation System will automaticallyre-calibrate the system but it may take longer. Tocalibrate the vehicle speed signal, touch the Distancescreen key.
J User Settings: This option allows you to turn onand off several other route guidance setting options.
2-54
From this screen, you can adjust the following:
Notify traffic restriction: This option instructs thesystem to notify you when the current route has trafficrestrictions.
Arrival Time G (Time of Arrival): This option willdisplay the estimated time of arrival to your destination.
Arrival Time \ (Time to Destination): This option willdisplay how much time remains to reach your destination.
Guidance Screen: This option will turn the guidancescreen on and off.
Freeway Information: This option will display freewayinformation in the guidance window while on a route.
Text size on map: This option allows you to adjust thetext size on the map between Large, Medium, andSmall. This option is located on the second page of theUSER SETTINGS screen. Touch the down arrow toaccess this option.
DRestore System Defaults: Select this option fromthe NAVIGATION SET UP screen to change alladjustable system settings to factory defaults.
Average Speed: Select this option to set the averagespeed to default.
2-55
> Volume: This option allows you to adjust thevolume of voice guidance prompts and the voicerecognition system. You may also choose to turn voiceguidance prompts off.
Vehicle
Vehicle: Touch this screen button to access the vehicleinformation menu. From this menu, you can adjustsuch options as the language, personal settings, andmemory options. See Personalization on page 5-2for more information on these features.
2-56
Clock
H (Clock Adjust): Touch this screen button to accessthe Clock Adjust screen and adjust several time features.
From this screen, you can adjust the following:
12Hour: Touch this screen button to display the time instandard AM/PM format.
24Hour: Touch this screen button to display the time inmilitary format.
AM: Touch this screen button when setting thetime in AM.
PM: Touch this screen button when setting thetime in PM.
PST, MST, CST, EST: Touch one of these screenbuttons to choose between Pacific Standard Time (PST),Mountain Standard Time (MST), Central StandardTime (CST), and Eastern Standard Time (EST).
GPS TIME: Touch this screen button to match thenavigation system’s time to GPS time.
Daylight Savings: Touch this screen button to increasethe time by one hour. Touch this screen button again toturn this feature off and decrease the time by one hour.
y/z: Touch the up arrow to increase the hour orminutes. Touch the down arrow to decrease the houror minutes.
2-57
Screen Appearance
z (Screen Appearance): Touch this screen button toaccess the appearance screen menu.
From this menu, several options may be adjusted:
Color Scheme: This option allows you to choosebetween three different screen color schemes bytouching 1 (blue), 2 (green), or 3 (brown).
Color Mode: This option allows you to adjust yourscreen mode between Auto, Day, and Night. Day modewill change the navigation system screen to a lighterbackground for better viewing in the daytime. Nightmode will change the navigation system screento a darker background for better viewing at night. Automode will adjust the screen automatically dependingon exterior lighting conditions.
_ (Contrast): This feature allows the adjustment ofcontrast of the navigation screen. Touch the plus (+) orminus (−) signs on either side of the contrast bargraph to increase or decrease the contrast.
] (Brightness): This feature allows the adjustment ofbrightness of the navigation screen. Touch the plus (+) orminus (−) signs on either side of the brightness bar graphto increase or decrease the brightness.
Screen OFF: This feature allows you to turn thenavigation screen off. Touch any hard key to turn thescreen back on.
2-58
Global Positioning System (GPS)The Navigation System determines the position of yourvehicle by using satellite signals, various vehiclesignals and map data.
At times, other interferences such as the satellitecondition, road configuration, the condition of the vehicleand/or other circumstances can interfere with theNavigation’s ability to determine the accurate position ofthe vehicle.
The GPS shows the accurate current position of yourvehicle using signals sent by the GPS Satellites ofthe United States Department of Defense. When yourvehicle is not receiving signals from the satellites,a symbol will appear on the map screen. Refer toSymbols on page 2-43.
This system may not be available/or interference mayoccur if the following happens:
• Signal obstructions caused by tall buildings, largetrucks, tunnels,
• objects located on top of the instrument panel,
• satellites will not send signals if they are beingrepaired or improved,
• after-market glass tinting has been applied to thevehicle’s windows.
Notice: Do not apply after-market glass tinting tothe vehicle’s windows. Glass tinting will interferewith the system’s ability to receive GPS signals andcause the system to malfunction. You might haveto replace the window to correct the problem.This would not be covered by your warranty.
For more information if you are experiencing a problem,see If the System Needs Service on page 2-62 andProblems with Route Guidance on page 2-61.
2-59
Vehicle PositioningAt times, the position of the vehicle on the map may beinaccurate due to one or more of the following reasons:
• The road system has changed.
• The vehicle is driving on slippery road surfaces suchas in sand, gravel and/or snow.
• The vehicle is traveling on winding roads.
• The vehicle is on a long straight road.
• The vehicle is approaching a tall building or alarge vehicle.
• The surface streets run parallel to a freeway.
• The vehicle has just been transferred by a vehiclecarrier or a ferry.
• The current position calibration is set incorrectly.
• The vehicle is traveling at high speed.
• The vehicle changes directions more than once, orwhen the vehicle is turning on a turn table in aparking lot.
• The vehicle is entering and/or exiting a parking lot,garage or a lot with a roof.
• The GPS signal is not received.
• A roof carrier is installed on your vehicle.
• The vehicle is equipped with tire chains.
• The tires are replaced.
• The tire pressure for your tires is incorrect.
• The tires are worn.
• The first time the map DVD is inserted.
• The battery is disconnected for several days.
• The vehicle is driving in heavy traffic where driving isat low speeds, and the vehicle is stopped and startedrepeatedly.
If you experience problems with your system, you mayneed to calibrate the system. This may be due to tirepressure differences, or if a spare tire is installed. Tocalibrate the system, see Configure Menu on page 2-49.
2-60
Problems with Route GuidanceInappropriate route guidance may occur under one ormore of the following conditions:
• You have not turned onto the road indicated.
• Route guidance may not be available when usingautomatic rerouting for the next right or left turn.
• The route may not be changed when usingautomatic rerouting.
• There is no route guidance when turning at anintersection.
• Plural names of places may be announcedoccasionally.
• It may take a long time to operate automaticrerouting during high-speed driving.
• Automatic rerouting may display a route returning tothe set waypoint if you are heading for a destinationwithout passing through a set waypoint.
• The route prohibits the entry of a vehicle due to aregulation by time or season or any other regulationwhich may be given.
• Some routes may not be searched.
• The route to the destination may not be shown ifthere are new roads, if roads have recentlychanged or if certain roads are not listed on themap DVD. See Ordering Map DVDs on page 2-62.
To recalibrate the vehicle’s position on the map, seeConfigure Menu on page 2-49.
2-61
If the System Needs ServiceIf your system needs service and you have followed thesteps listed here and still are experiencing problems,see your dealer for assistance. For more informationon calibrating the system, see Configure Menu onpage 2-49.
Ordering Map DVDsThe map DVD in your vehicle is the most up-to-dateinformation available when your vehicle was purchased.The map DVD is updated once a year, provided thatthe map information has changed. To order a new mapDVD, contact your dealer.
Database Coverage ExplanationsThe United States, excluding Alaska and Hawaii, andportions of Canada are contained on one DVD disc. Themap database contains three different levels ofcoverage: detailed areas, non-detailed areas and limitedguidance areas. Detailed areas are available for theUnited States and Canada and are primarily locatedaround metropolitan areas. Limited guidance areas areonly available for the United States. The roads aredisplayed on the map, but route and voice guidance isnot available. Non-detailed areas are available forCanada only. Major roads are included depending uponavailable coverage.
For more detailed information on database coverage,see the Navigation System Map Disc manual includedinside the map DVD case.
2-62
Navigation Audio System ..................................3-2Six-Disc CD/DVD Changer .............................3-12Radio Personalization ....................................3-23
Section 3 Navigation Audio System
3-1
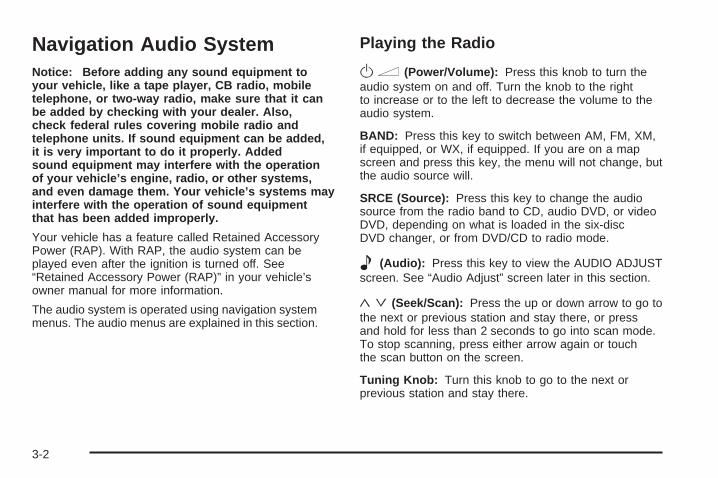
Navigation Audio SystemNotice: Before adding any sound equipment toyour vehicle, like a tape player, CB radio, mobiletelephone, or two-way radio, make sure that it canbe added by checking with your dealer. Also,check federal rules covering mobile radio andtelephone units. If sound equipment can be added,it is very important to do it properly. Addedsound equipment may interfere with the operationof your vehicle’s engine, radio, or other systems,and even damage them. Your vehicle’s systems mayinterfere with the operation of sound equipmentthat has been added improperly.
Your vehicle has a feature called Retained AccessoryPower (RAP). With RAP, the audio system can beplayed even after the ignition is turned off. See“Retained Accessory Power (RAP)” in your vehicle’sowner manual for more information.
The audio system is operated using navigation systemmenus. The audio menus are explained in this section.
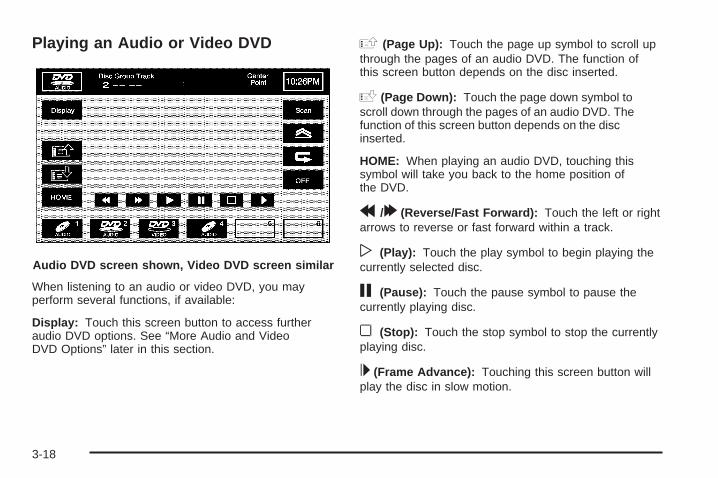
Playing the Radio
On (Power/Volume): Press this knob to turn theaudio system on and off. Turn the knob to the rightto increase or to the left to decrease the volume to theaudio system.
BAND: Press this key to switch between AM, FM, XM,if equipped, or WX, if equipped. If you are on a mapscreen and press this key, the menu will not change, butthe audio source will.
SRCE (Source): Press this key to change the audiosource from the radio band to CD, audio DVD, or videoDVD, depending on what is loaded in the six-discDVD changer, or from DVD/CD to radio mode.
e (Audio): Press this key to view the AUDIO ADJUSTscreen. See “Audio Adjust” screen later in this section.
ǻ(Seek/Scan): Press the up or down arrow to go tothe next or previous station and stay there, or pressand hold for less than 2 seconds to go into scan mode.To stop scanning, press either arrow again or touchthe scan button on the screen.
Tuning Knob: Turn this knob to go to the next orprevious station and stay there.
3-2
Finding a Station
Press the BAND hard key to toggle between AM, FM,XM, if equipped, or WX, if equipped. Or, touch thedesired audio source to select it. To search for a stationuse the tune, seek, or Scan button.
SCAN: To scan stations, touch the Scan screen button.The radio will go to a station, play for a few seconds,then go on to the next station. Touch Scan again to stopscanning.
To scan preset stations, touch and hold Scan for twoseconds. Touch Scan again to stop scanning. While inA.B.C mode, the system will change bands andscreens to the current band.
If available on your vehicle, you can also use the1 - 6 (preset seek) steering wheel control to seekthrough your preset stations.
Info (Information): Touch Info to display informationbroadcasted by the RDS station when in FM modeor XM™ radio station you are listening to. See “RadioData System (RDS)” or “XM™ Satellite Radio Service”later in this section.
Category: Touch this button when in FM mode to havethe program types appear on the preset. Select acategory and the system will start scanning for availablestations within the selected category. If none arefound the system will display “None Found” and willreturn to the last selected station. Each of the sixcategory names displayed on the presets include agrouping of other program types. In AM and WX modes,the Category option is not available.
FM source shown, other sources similar
3-3
A.B.C: This button allows you to scroll through the7 preset lists. The list names are A - G. Each list canstore 6 presets. The presets within each list can bemixed, AM, FM, or XM, if equipped. Press the left/rightarrow buttons to scroll through the list. The name of thelist is displayed between the two arrows and the presetsfor each list are displayed on the preset buttons. To exitthis mode, press the A.B.C screen button.
[ ] (No Traffic Announcements): This symbol willappear on the status line when traffic is selected, but thestation does not broadcast traffic announcements.
[TA] (Traffic Announcements): This symbol willappear on the status line when the station selectedbroadcasts traffic announcements. TA announcementswill depend on the station.
Preset Station MenuStoring Dedicated PresetsThis feature allows you to store up to 24 dedicatedpresets. In this mode, you can only store six AM, six FM,six XM (if equipped) and six WX (if equipped). Tostore presets, do the following:
1. Turn the audio system on.
2. Touch the desired audio source for the station youwish to set.
3. Tune in the desired station by using theSEEK/SCAN hard key.
4. Touch and hold one of the six preset buttons formore than two seconds or until you hear a beep.
5. Repeat the steps for each preset desired.
A.B.C Preset ModeThis feature allows you to store up to 42 presets, sixeach in seven different preset lists. These presets are inaddition to any dedicated presets that may be stored.To store the A.B.C presets, do the following:
1. Select the A.B.C screen button.
2. Scroll to the desired list (A - G).
3. Touch the desired audio source (AM, FM, XM, ifequipped, or WX, if equipped) for the station youwish to set.
4. Use the tune knob or seek up/down hard keybuttons to tune in the station you wish to set.
5. Press and hold the desired preset number until youhear a beep.
6. Repeat the above process for each preset and list.
3-4
Audio Adjust
e(Audio Adjust): Touch this hard key to access theAUDIO ADJUST menu and to adjust the tone, DigitalSignal Processing (DSP), fade, and balance for allsources.
To adjust the DSP, see “Adjusting the Speakers”following in this section. To adjust the tone settings, dothe following:
P(Treble): Touch the plus (+) or minus (−) sign next tothis symbol to increase or decrease the treble. Touchthe center position to adjust the setting to the center.
Mid (Mid-range): Touch the plus (+) or minus (−) signnext to this symbol to increase or decrease themid-range. Touch the center position to adjust thesetting to the center.
D (Bass): Touch the plus (+) or minus (−) sign next tothis symbol to increase or decrease the bass. Touchthe center position to adjust the setting to the center.
Z (Speaker): Touch the plus (+) or minus (−) sign nextto this symbol to increase or decrease the speakerwhen in surround mode or Center Point DSP setting isselected. This feature allows you to increase ordecrease the amount of surround sound. Touch thecenter position to adjust the setting to the center.
To adjust the balance or fade, do the following:
1. Touch Left or Right to adjust the balance of thespeakers. Touch the center position to adjust thesetting to the center.
2. Touch Front or Rear to adjust the fade of thespeakers. Touch the center position to adjustthe setting to the center.
3-5
Your system is designed to automatically store theaudio adjustment settings. If you want to program themyourself, use the following procedure:
1. Press the BAND hard key until the desired sourceappears on the display.
2. Touch the AM, FM, XM, WX, and A.B.C screenbuttons to access the preset screen and selectthe desired preset.
3. Touch the audio adjust (e) screen button.
4. Make the audio adjustments desired. Set the levelfor treble, mid, bass, fade, balance, and DSP.
5. When you have finished the adjustments, theNavigation System will automatically store them withthe selected preset.
Audio Pilot: With this feature, your audio systemcompensates for unwanted noise in the vehicle.AudioPilot® automatically adjusts the volume level so thatit always sounds the same to you. To use AudioPilot®,touch the AudioPilot® screen button. To turn it off, touchthe screen button again. When this feature is on, thebutton will be highlighted. For additional information onAudioPilot®, please visit www.bose.com.
Multi-channel: When available, touch this screenbutton to play the DVD Audio source in surround mode.Touch this screen button again to have the audioplay in 2-channel mode. The function depends on themedia in the DVD changer.
Adjusting the SpeakersThe Digital Signal Processing (DSP) feature is used toprovide a choice of five different listening experiences.DSP can be used while listening to the audio system orthe six-disc DVD changer. The type of DSP selectedis displayed on the status line.
You may choose from the following DSP settings:
Center Point: Touch this screen button to adjust theaudio to get the best sound quality when listening to anXM™ audio source or CD/DVD. This feature creates amulti-channel experience from CDs containing stereorecordings. This feature is not available in AM and FMaudio modes.
Normal: For non-surround sound sources only. Touchthis screen button to adjust the audio to be in normalmode. DSP will be in the off mode.
Driver: For non-surround sound sources only. Touchthis screen button to adjust the audio to give thedriver the best possible sound quality.
Talk: For non-surround sound sources only. Touch thisscreen button when listening to non-musical materialsuch as news, talk shows, and sports broadcasts. TheTalk DSP setting makes spoken words sound clear.
Rear Seat: For non-surround sound sources only.Touch this screen button to adjust the audio to give therear seat occupants the best possible sound quality.
3-6
Radio Data System (RDS)The audio system has a Radio Data System (RDS).RDS features are available for use only on FM stationsthat broadcast RDS information. With RDS, the radiocan do the following:
• Seek to stations broadcasting the selected type ofprogramming
• Receive announcements concerning local andnational emergencies
• Display messages from radio stations
• Seek to stations with traffic announcements
The RDS system is always on. When information isbroadcast from the FM station you are listening to, theinformation will be displayed on the audio screen.
XM™ Satellite Radio ServiceXM™ is a satellite radio service that is based inthe 48 contiguous United States. XM™ offers100 coast-to-coast channels including music, news,sports, talk, and children’s programming. XM™ providesdigital quality audio and text information, includingsong title and artist name. A service fee is required inorder to receive the XM™ service. For more information,contact XM™ at www.xmradio.com or call1-800-852-XMXM (9696).
While in XM™ mode, the Artist Name/Feature,Song/Program Title, and Channel Category will updateand be displayed on the screen as new informationbecomes available.
Info (Information): Touch this screen button to allowthe ability to display additional Information messages asthey become available.
XL (Explicit Language Channels): XL on the radiodisplay, after the channel name, indicates content withexplicit language. These channels, or any others,can be blocked at a customer’s request, by calling1-800-852-XMXM (9696).
3-7
Category: Select the Category button to search for astation using a category. The categories are displayed onthe preset area. Use the arrows to the left of the categorybutton to scroll through the available categories. Thecurrent category name is displayed in the middle of thearrows. The category display on the screen will time outafter 6 seconds if you do not select anything. While incategory mode, you can scroll through the category list,select a category type and then scroll through thechannels available in each list. To exit the category modepress the Category button again.
Group Name Category
POP
RockClassic Rock
Adult HitsTop 40
Oldies MusicNostalgiaCollege
EASY
Soft RockSoftR&B
Soft R&BReligious Music
TALK
NewsInformation
SportsTalk
LanguageReligious Talk
PersonalityPublic
WeatherCNTRY Country MusicCLASS ClassicalJAZZ Jazz Music
3-8
To select a category, do the following:
1. Select the XM™ audio source.
2. Select the Category screen button.
3. The Navigation System will display the availablecategory on the presets.
4. Use the left and right arrows to scroll through thepresets or use the seek up/down hard key to go tothe next category.
5. Select the desired category by touching it from thescreen.
To view the available channels within the category,select the category as explained above, and then usethe tune knob or seek button to scroll through theavailable channels within the selected category.
Category Scanning: This function allows you to scanthrough the channels on a specific category. Toactivate the category scan function, do the following:
1. Select the XM™ audio source.
2. Select the Category screen button.
3. The Navigation System will display the availablecategory on the presets.
4. Use the left and right arrows to scroll through thepresets or use the seek up/down hard key to go tothe next category.
5. Select the desired category by touching it from thescreen.
6. Touch the Scan screen button and the system willcan through the channels available within theselected category.
Scan and Preset Scan: While in XM™, the scanfunction allows you to scan through the XM™ band.Press the Scan screen button and the system will startscanning. Press the Scan button again to turn thescan function off. Press and hold the Scan screen buttonto have the system scan the presets stored on theXM™ band.
3-9
XM Radio Messages
Radio Display Message Condition Action Required
XM Updating Updating encryption code The encryption code in your receiver is being updated, andno action is required. This process should take no longerthan 30 seconds.
No XM signal Loss of signal Your system is functioning correctly, but you are in a locationthat is blocking the XM signal. When you move into an openarea, the signal should return.
Loading XM Acquiring channel audio(after 4 second delay)
Your radio system is acquiring and processing audio and textdata. No action is needed. This message should disappearshortly.
Channel Off Air Channel not in service This channel is not currently in service. Tune in to anotherchannel.
Channel Unavail Channel no longeravailable
This previously assigned channel is no longer assigned.Tune to another station. If this station was one of yourpresets, you may need to choose another station for thatpreset button.
No Artist Info Artist Name/Featurenot available
No artist information is available at this time on this channel.Your system is working properly.
No Title Info Song/Program Titlenot available
No song title information is available at this time on thischannel. Your system is working properly.
3-10
Radio Display Message Condition Action Required
No CAT Info Category Namenot available
No category information is available at this time on thischannel. Your system is working properly.
Not Found No channel available forthe chosen category
There are no channels available for the category youselected. Your system is working properly.
No Information No Text/Informationalmessage available
No text or informational messages are available at this timeon this channel. Your system is working properly.
XM Theftlocked Theft lock active The XM receiver in your vehicle may have previously beenin another vehicle. For security purposes, XM receiverscannot be swapped between vehicles. If you receive thismessage after having your vehicle serviced, check with theservicing facility.
XM Radio ID Radio ID label(channel 0)
If you tune to channel 0, you will see this message alternatingwith your XM Radio 8 digit radio ID label. This label isneeded to activate your service.
Unknown Radio ID not known(should only be ifhardware failure)
If you receive this message when you tune to channel 0,you may have a receiver fault. Consult with your dealer.
Check XM Receiver Hardware failure If this message does not clear within a short period of time,your receiver may have a fault. Consult with your retaillocation.
3-11
Six-Disc CD/DVD ChangerThis system has the ability to play different types ofmedia formats. The system can play DVD - Video,DVD - Video (DTS), DVD - Audio, CD - DigitalAudio (CD - DA), CD-DA (DTS), CD - Text, CD - Extra,MP3 - CD, CDR, and CDRW. The system may alsoplay DVD - R and DVD - RW type discs depending onthe writing software used. The system will play DTS-typediscs and tracks and Dolby® tracks in surround sound.
With the six-disc CD/DVD changer, you can play up tosix audio CDs, MP3s, DTS discs, audio DVDs, orvideo DVD discs continuously.
M (Load): To load a disc(s) into the DVD changer,press the DVD changer load hard key and followthe screen message displayed.
Then, do the following:
1. Touch the number of the slot you will be loading thedisc into, numbered 1 to 6, at the bottom of theCD/DVD changer screen.
2. Wait to insert the disc until the screen reads “InsertDisc (number)”, then insert the disc partway. Thesystem will pull it in and start playing it. The systemwill show you the type of disc inserted, DVD - Video,BAudio for CD/DTS, MP3 for MP3 CDs, orDVD - Audio.
3. If no CD or DVD is loaded in the CD/DVD changerand you press the SRCE hard key a “No discloaded” error message will be displayed.
You may also choose to load all disc slots at once bypressing and holding the CD/DVD changer loadhard key. The system will instruct you to insert eachdisc when the screen displays “Insert Disc (number).”When you load all the slots at once, the disc type will notbe displayed until the system reads that disc.
3-12
To eject a disc(s) from the CD/DVD changer, do thefollowing:
1. Press the eject hard key.
2. Touch the available slot from the bottom of thescreen, numbered 1 through 6, that you wish to eject.
3. The system will display “Ejecting Disc” and then willstart to eject the disc. If a selection is not made, thesystem will eject the disc in the current slot. If thedisc is not removed from the slot, the systemwill load it after a 10 second delay and will thenstart playing it.
You may also choose to eject all disc slots at once bypressing and holding the CD/DVD changer ejecthard key. The system will instruct you to the disc numberbeing ejected.
Playing an Audio CD
Once you access the CD/DVD changer screen, you canselect one of the numbered screen buttons at the bottomof the screen to go from one disc to another among thoseloaded in the DVD changer. Any time a disc changeoccurs, the system will display, “Changing Disc.”
The numbered screen buttons, 1 through 6, representthe order of the discs loaded in the changer. If there areonly two discs loaded, only screen buttons 1 and 2will be available to choose from.
3-13
The following features are also available from this screen:
Play: Touch one of the available screen buttons1 through 6 to begin playing that disc automatically.
Scan: Touch Scan to hear the first 10 seconds of eachtrack on the selected disc. Touch Scan a secondtime to hear the first 10 seconds of each track on eachaudio CD disc loaded. Touch the OFF screen buttonto stop all scanning. When the system has scannedthrough all tracks on a disc or all first tracks of each CDloaded, the system will automatically stop scanning.
M SCAN (Disc Scan): This symbol will appear at thetop of the CD/DVD changer screen when scanningthe first 10 seconds of each track on each disc. Thisfunction scans all discs with the same type of media.
X (Scan Track): This symbol will appear at the top ofthe CD/DVD changer screen when scanning the first10 seconds of each track on the selected disc.
y (Random): Touch this screen button to hear thetracks in random, rather than sequential, order onthe disc selected. Touch this screen button a secondtime to hear the tracks and all discs loaded in random,rather than sequential, order. Touch the OFF screenbutton to turn off random play.
M RND (Disc Random): This symbol will appear atthe top of the CD/DVD changer screen when playing alltracks and discs with the same type of media inrandom, rather than sequential, order.
B RND (Random Disc): This symbol will appear atthe top of the CD/DVD Changer screen when in randomdisc mode.
k (Repeat): Touch this screen button to repeat thetrack on the selected disc. To repeat the entire selecteddisc, touch this screen button again. Touch the OFFscreen button to turn off the repeat mode.
X(Track Repeat): This symbol will appear at the top ofthe CD/DVD changer screen when the repeat feature isturned on. The system will repeat the current track.
B RPT (Disc Repeat): This symbol will appear at thetop of the CD/DVD changer screen when the repeatfeature is pressed a second time. The system will repeatthe current disc.
3-14
ǻ(Seek Up/Down): Press the up arrow hard keyto seek to the next selection on a disc. If playing the lasttrack of the disc, pressing the up arrow will seek tothe first track of the next disc. Press the down arrowhard key to seek to the previous selection on a disc. Ifplaying the first track of the disc, pressing the downarrow will seek to the last track on the selected disc.
OFF: Touch this screen button any time you wantto turn off the Scan, Random, or Repeat functions.
Playing an MP3 CDOnce you access the CD/DVD changer screen, you canselect one of the numbered screen buttons at the bottomof the screen to go from one disc to another among thoseloaded in the DVD changer. Any time a disc changeoccurs, the system will display, “Changing Disc.”
The numbered screen buttons, 1 through 6, representthe order of the discs loaded in the changer. If there areonly two discs loaded, only screen buttons 1 and 2will be available to choose from.
The following features are also available from thisscreen:
Play: Touch one of the available screen buttons1 through 6 to begin playing that disc automatically.
Scan: Touch this screen button to hear the first10 seconds of each track on the current folder. Touchthis screen button a second time to hear the first10 seconds of each track on each folder of the currentdisc. Touch this screen button a third time to havethe system play the first 10 seconds of each disc of themedia type selected. If there are no other CDs loadedwith the same type of media, the scan function willcancel. When the system has scanned through all trackson a disc or all first tracks of each MP3 CD loaded,the system will automatically stop scanning.
# SCAN (Folder Scan): This symbol will appear atthe top of the CD/DVD changer screen when scanningthe first 10 seconds of each track in the current folder.
3-15
y (Random): Touch this screen button to hear thetracks in the current folder in random, rather thansequential, order. Touch this screen button a secondtime to hear the current disc played in random (tracksand folders) order. Touch this screen button a third timeto hear the system play all discs of the same type ofmedia in random (discs, folders, and tracks) order.If only one disc of this media type is loaded, the systemwill play the folders and tracks in random order.Touch the OFF screen button to turn off random play.
# RND (Track Random): This symbol will appear atthe top of the CD/DVD changer screen when playingtracks within the current folder in random, ratherthan sequential, order.
B RND (Folder/Track Random): This symbol willappear at the top of the CD/DVD changer screen whenplaying the folders and tracks on the current disc israndom order.
M RND (Disc Random): This symbol will appear atthe top of the CD/DVD changer screen when the systemis playing all discs, folders and tracks of the samemedia type in random order.
k (Repeat): Touch this screen button to repeat thetrack on the selected disc. Touch this screen buttonagain to repeat all tracks within the current folder. Touchthis screen button a third time to repeat all tracks onthe current disc. Touch the OFF screen button to turn offthe repeat mode.
X(Track Repeat): This symbol will appear at the top ofthe CD/DVD changer screen when the repeat feature isturned on. The system will repeat the current track.
# RPT (Folder Repeat): This symbol will appearat the top of the CD/DVD changer screen whenthe repeat button is touched a second time. The systemwill repeat all tracks within the current folder.
B RPT (Disc Repeat): This symbol will appear at thetop of the CD/DVD changer screen when the repeatbutton is touched a third time. The system will repeat alltracks and folders on the current disc.
3-16
ǻ(Seek Up/Down): Press the up arrow hard keyto seek to the next selection on a disc. If playing the lasttrack of the disc, pressing the up arrow will seek tothe first track of the next disc. Press the down arrowhard key to seek to the previous selection on a disc. Ifplaying the first track of the disc, pressing the downarrow will seek to the last track on the selected disc.
OFF: Touch this screen button any time you wantto turn off the Scan, Random, or Repeat functions.
Display: Touch this screen button to display the MP3play list. Use the up/down arrows to scroll throughthe list. While in this menu, you can use the Scan,Random, and Repeat functions.
# (Root Directory): Touch this screen button to goto the root directory, if available, on the MP3 disc.While in this mode, you can select a specific folder tobe played.
HOME: Touch this screen button to allow you to go tothe Home folder. This is the first folder on the disc.
# + (Up to next folder): Touch this screen button togo up to the next folder.
# – (Down to previous folder): Touch this screenbutton to go down to the previous folder.
j (Pause): Touch this screen button to pause play.
[ (Fast forward): Touch this screen button tofast forward through the current track.
r (Reverse): Touch this screen button to reversethrough the current track.
Combined Disc: This system will also play a combineddisc which contains CD-DA and MP3 types of media. Usethe CD screen button to switch between MP3 and CD-DAtracks when you are playing a combined disc.
3-17
Playing an Audio or Video DVD
When listening to an audio or video DVD, you mayperform several functions, if available:
Display: Touch this screen button to access furtheraudio DVD options. See “More Audio and VideoDVD Options” later in this section.
a (Page Up): Touch the page up symbol to scroll upthrough the pages of an audio DVD. The function ofthis screen button depends on the disc inserted.
` (Page Down): Touch the page down symbol toscroll down through the pages of an audio DVD. Thefunction of this screen button depends on the discinserted.
HOME: When playing an audio DVD, touching thissymbol will take you back to the home position ofthe DVD.
r/[(Reverse/Fast Forward): Touch the left or rightarrows to reverse or fast forward within a track.
w (Play): Touch the play symbol to begin playing thecurrently selected disc.
j (Pause): Touch the pause symbol to pause thecurrently playing disc.
o (Stop): Touch the stop symbol to stop the currentlyplaying disc.
L(Frame Advance): Touching this screen button willplay the disc in slow motion.
Audio DVD screen shown, Video DVD screen similar
3-18
Scan: Touch Scan to hear the first 10 seconds of eachtrack on the selected disc.
M SCAN (Disc/Track Scan): This symbol will appearat the top of the DVD changer screen when scanningboth tracks and discs.
y (Random): Touch this screen button to hear thetracks in random, rather than sequential, order onthe disc selected. Touch the OFF screen button to turnoff random play.
M RND (Disc Random): This symbol will appear atthe top of the DVD changer screen when playing tracksand discs in the current group of discs in random,rather than sequential, order.
k (Repeat): Touch this screen button to repeat thetrack on the selected disc. Touch this screen buttonagain to repeat the tracks on the selected disc. Touchthis screen button a third time to repeat all of the discs inthe group. Continuing to touch this button will takeyou through the choices again. Touch the OFF screenbutton to turn off the repeat mode.
X (DVD Repeat): This symbol will appear at the topof the DVD changer screen when the repeat featureis turned on. The system will repeat the current track.
ǻ(Seek Up/Down): Press the up arrow hard key togo to the next track in the current group. If you are inthe last track, the system will go to the first track of thenext group. If you are in the last track of the lastgroup, the system will display an error message in theupper right corner of the screen. Press the downarrow hard key to go back to the beginning of the currenttrack. Press the down arrow hard key again to go tothe previous track in the current group. If you are in thefirst track of the current group, pressing this hard keywill take you to the last track of the previous group.If you are in the first track of the first group, the systemwill display an error message in the upper rightcorner of the screen.
OFF: Touching this screen button will turn off the scan,random, and repeat functions.
3-19
More Audio and DVD Options
Once you touch Display from the main audio DVDmenu, you have access to the following options:
Cursor: Touch this screen button to access the left,right, up, and down cursors on the screen. The cursorsallow you to navigate through menu options on thescreen.
See the following option for more cursor information:
S,y,T,z(Cursor Arrows): Touch these cursorscreen buttons when you need to scroll through a list ofDVD items, such as track names, menu options, orscene selection. Then touch Enter to set your selection.
Menu: Touch this screen button to access the DVD’smenu options. Depending on the type of DVD you areusing, this screen button may or may not be available.
Audio DVD screen shown, Video DVD screen similar
3-20
DVD Menu: Touch this screen button to access thevideo DVD menu.
While watching a video DVD or playing an audio DVD,you can touch anywhere on the screen to removethe DVD menu for easier viewing. Touch anywhere onthe screen again to display the DVD options.
Audio: Touch this screen button to change the audiolanguage heard. This may not be available on all DVDs.Depending on the type of DVD you are using, thisscreen button may or may not be available.
Angle: Touch this screen button to adjust the viewingangle of the DVD. Some DVDs allow you to change thecamera angle. This may not be available on all DVDs.Depending on the type of DVD you are using, thisscreen button may or may not be available.
Subtitle: Touch this screen button to play back thevideo with subtitles. This may not be available onall DVDs. Depending on the type of DVD you are using,this screen button may or may not be available.
Search: Touch this screen button to search through aDVD by Title/Group, or Chapter/Track. Touch Keypadto access the numeric keypad used to enter datain these searches.
To use the search button, do the following:
1. Touch the Search screen button from theDVD-Video or DVD-Audio screen.
2. Touch the Keypad screen button to access anumeric keypad to enter the track/chapter number.
3. Touch the OK screen button and the system will goto the specified track/chapter.
3-21
Screen Adjust: Touch this screen button to access theaudio/video DVD screen adjust menu.
From this screen, you will have the following options:
_ (Contrast): Touch the plus (+) or minus (−) signsnext to this symbol to increase or decrease the contrast.
] (Brightness): Touch the plus (+) or minus (−)signs next to this symbol to increase or decrease thebrightness.
Tint: Touch the plus (+) or minus (−) signs next to thissymbol to increase or decrease the screen tint.
' (Color Symbol): Touch the R for red or G for greennext to this symbol to increase or adjust the color ofthe screen.
p (Widescreen): Touch this screen button to view avideo DVD in widescreen format.
d (Full Screen): Touch this screen button to view avideo DVD in full screen format.
e (Normal Screen): Touch this screen button to viewa video DVD in normal screen size.
3-22
Six-Disc DVD Changer ErrorsAlthough the DVD or CD you are playing meetsregulation requirements, there are circumstances thatmay cause the disc to not play correctly in your system.Some of those circumstances may include therecording conditions of the disc, the disc condition andthe pick up circumstances of the player.
If using your system in extremely low or hightemperatures, the video playback may become distorted.
Because of some types of compression techniquesused during recording MP3 discs, the sound quality ofthe discs can be inferior. This is not caused by youraudio system.
Radio PersonalizationWith this feature, you can recall the latest audio systemsettings as adjusted the last time your vehicle wasoperated. This feature allows two different drivers tostore and recall their own audio system settings.The settings recalled by the audio system aredetermined by which RKE transmitter (1 or 2) was usedto enter the vehicle. The number on the back of theRKE transmitter corresponds to driver 1 or to driver 2.The audio system settings will automatically adjustto where they were last set by the identified driver. Thesettings can also be recalled using the memoryscreens under the CONFIG MENU or voice recognition.See Personalization on page 5-2 for more information.
When battery power is removed and later applied, youwill not have to reset your audio system preset stations.
Voice RecognitionThe navigation system’s voice recognition allows forhands-free operation of navigation, phone, audio system,climate controls, windows, OnStar®, and memoryfeatures. Voice recognition can be used when the ignitionis on or when Retained Accessory Power (RAP) is active.See “Retained Accessory Power (RAP)” in your vehicle’sowner manual for more information.
To use voice recognition, do the following:
1. Press the talk symbolsteering wheel controland release it whenyou hear a beep. Theaudio system, if on,will mute.
When you are in the navigation screens, the system willdisplay a symbol (|) while the voice recognition is active.
2. Clearly state one of the commands listed on thefollowing pages. When the system recognizes thecommand, it will either perform the function, ask youto confirm your choice by clearly stating “yes orno”, or issue an error message such as “Systemdoes not recognize this command” or direct you to“Please start speaking after the beep”. You mayalso get a message saying, “System is checking thedisc. Please wait.” if the system is not yet ready.To cancel a command or if the system talkback does not match your verbal command, pressand hold the talk symbol button. The systemwill reply, “System will cancel the voice recognition.”
If you experience difficulty with the system recognizing acommand, try saying it more softly, and wait for a fewseconds after the beep, or you may just try sayingit again.
To use the voice recognition system, the map DVDmust be loaded.
This system is able to recognize commands in fivedifferent languages. The system will only recognizecommands based on the language selected.
4-2
Voice Recognition HelpHelp commands can be displayed on the screen whileyou are stopped. When the vehicle is moving, thesystem will let you know that this command is notavailable while driving. To enter the help screens, clearlystate one of the help commands.
While in the help menu, you can select from twoscreens, the Command List and the Operating Guide.
The Command List shows a list of available voicerecognition commands to use. Touch the Command Listscreen button and then touch one of the buttons onthe right of the screen to choose the commands to list.Use the up and down arrows to scroll through thelist of commands.
Navi (Navigation): Touch this screen button to displaythe list of navigation commands.
Radio: Touch this screen button to display the list ofradio commands.
CD: Touch this screen button to display the list of CDcommands.
4-3
DVD: Touch this screen button to display the list ofDVD commands.
Heater: Touch this screen button to display the list ofclimate control commands.
Disp. (Display): Touch this screen button to display thelist of display commands.
Phone: Touch this screen button to display the list ofphone commands.
Nametag: Touch this screen button to display the list ofnametag commands.
Etc.: Touch this screen button to display the list ofmiscellaneous commands, such as OnStar®, windows,and personalization.
The Operating Guide screen gives step-by-stepdirections for using the voice recognition feature. Touchthe Operating Guide screen button and then touchone of the buttons on the right of the screen to choosethe instructions to list. Use the up and down arrowsto scroll through the instructions.
Start: Touch this screen button to display instructionson how to start using the voice recognition system.
Cancel: Touch this screen button to display instructionson how to cancel a command, what to do in case ofan error, and other helpful hints.
Dest. (Destination): Touch this screen button todisplay instructions on how to use voice recognition toplan a route or how to use the destination command list.
Audio: Touch this screen button to display instructionson how to use the radio commands.
Nametag: Touch this screen button to displayinstructions on how to use and store a nametag.
4-4
Voice Recognition CommandsThe following list shows all of the voice commandsavailable for the navigation system with a briefdescription of each. The commands are listed with theoptional words in brackets. To use the voice commands,refer to the instructions listed previously.
Display Commands
Display [set] language English: This commandinstructs the system to change the display (instrumentpanel cluster, HUD, and Navigation System display),Navigation System voice prompt and voice recognitionlanguage to English. Once the language is changed,a command to return to another language must be madeusing the selected language or from the Languagemenu under the CONFIG MENU. See Configure Menuon page 2-49 for more information.
Display [set] language UK English: This commandinstructs the system to change the display (instrumentpanel cluster, HUD, and Navigation System display),Navigation System voice prompt and voice recognitionlanguage to UK English. Once the language ischanged, a command to return to another languagemust be made using the selected language or from theLanguage menu under the CONFIG MENU. SeeConfigure Menu on page 2-49 for more information.
Display [set] language French: This commandinstructs the system to change the display (instrumentpanel cluster, HUD, and Navigation System display),Navigation System voice prompt and voice recognitionlanguage to French. Once the language is changed,a command to return to another language must be madeusing the selected language or from the Languagemenu under the CONFIG MENU. See Configure Menuon page 2-49 for more information.
Display [set] language Spanish: This commandinstructs the system to change the display (instrumentpanel cluster, HUD, and Navigation System display),Navigation System voice prompt and voice recognitionlanguage to Spanish. Once the language is changed,a command to return to another language must be madeusing the selected language or from the Languagemenu under the CONFIG MENU. See Configure Menuon page 2-49 for more information.
Display [set] language German: This commandinstructs the system to change the display (instrumentpanel cluster, HUD, and Navigation System display),Navigation System voice prompt and voice recognitionlanguage to German. Once the language is changed,a command to return to another language must be madeusing the selected language or from the Languagemenu under the CONFIG MENU. See Configure Menuon page 2-49 for more information.
4-5
Display [set] language Italian: This commandinstructs the system to change the display (instrumentpanel cluster, HUD, and Navigation System display),Navigation System voice prompt and voice recognitionlanguage to Italian. Once the language is changed,a command to return to another language must be madeusing the selected language or from the Languagemenu under the CONFIG MENU. See Configure Menuon page 2-49 for more information.
Display [set] English units: This command instructsthe system to switch to English units of measurement.All display settings will change.
Display [set] metric units: This command instructs thesystem to switch to metric units of measurement. Alldisplay settings will change.
Display [set] day mode: This command instructs thesystem to switch the system display to day mode.See “Screen Appearance” under Configure Menu onpage 2-49 for more information.
Display [set] night mode: This command instructs thesystem to switch the system display to night mode.See “Screen Appearance” under Configure Menuon page 2-49 for more information.
Display [set] auto mode: This command instructs thesystem to switch the system display to auto mode.See “Screen Appearance” under Configure Menu onpage 2-49 for more information.
Display Help: This command instructs the system tooffer assistance with the previously listed displaycommands. The Navigation System will display thecommands on the screen.
General Navigation CommandsA list of the commands will be displayed on the screenwhile the vehicle is stopped. The following arecommands you can access by clearly stating thecommands exactly as they are written:
Navigation [show] current position, navigation[show] current location: This command instructs thesystem to show your vehicle’s current position onthe map.
Navigation [show] map: This command instructs thesystem to show the current map screen.
Navigation [command] help, navigation [command]list: This command instructs the system to statethe navigation command help list.
Navigation repeat [voice] [guidance]: This commandinstructs the system to repeat the previous voiceguidance prompt.
Cancel: This command instructs the system to cancelthe most recently given command.
4-6
Map CommandsThe following are map commands you can access byclearly stating the commands exactly as they are written:
Navigation zoom in, navigation zoom out: Thesecommands instruct the system to zoom in or out onthe map.
Navigation zoom in maximum, navigation zoom outmaximum: These commands instruct the system tozoom in or out to the maximum amount allowed.
Navigation right map zoom in, navigation right mapzoom out: These commands instruct the system tozoom in or out on the map to the right when in dualmap mode.
Navigation right map zoom in maximum scale,navigation right map zoom in minimum scale,navigation right map zoom out maximum scale,navigation right map zoom out minimum scale:These commands instruct the system to zoom in or outto the maximum or minimum allowed on the rightscreen when in dual map mode. These commands areavailable while the map screen is displayed anddual map mode is on.
Navigation [change to] North Up [mode], navigation[show] North Up [mode]: These commands instructthe system to switch the map to North Up mode. Thesecommands are available while the map screen isdisplayed.
Navigation [change to] Heading Up [mode],navigation [show] Heading Up [mode]: Thesecommands instruct the system to switch the map toHeading Up mode. These commands are available whilethe map screen is displayed.
Navigation [change] map direction: This commandinstructs the system to change the direction of the map toheading up/north up depending on previous setting.
Navigation right map [change to] North Up [mode],navigation right map [show] North Up [mode]: Thesecommands instruct the system to switch the map tothe right to North Up mode when in dual map mode.These commands are available while the map screen isdisplayed and dual map mode is on.
Navigation right map [change to] Heading Up[mode], navigation right map [show] Heading Up[mode]: These commands instruct the system to switchthe map to the right to Heading Up mode when indual map mode. These commands are available whilethe map screen is displayed and dual map mode is on.
4-7
Navigation right map [change map] direction: Thiscommand instructs the system to change the direction ofthe map to heading up or north up depending on theprevious setting. This command is available while a mapscreen is displayed when in dual map mode.
Navigation [show] dual map [mode], navigation[change to] dual map [mode], navigation [show]single map [mode], navigation [change to] singlemap [mode]: These commands instruct the system toswitch between dual and single map modes. Thesecommands are available while a map screen isdisplayed.
Navigation store [this point], navigation mark [thispoint]: These commands instruct the system to store ormark a point in its memory. These commands areavailable while a map screen is displayed.
Navigation [change to] 3-D map [mode], navigation[change to] 2-D map [mode]: These commandsinstruct the system to switch between 2-D and 3-D mapmodes. These commands are available while a mapscreen is displayed.
Point of Interest (POI) CommandsThe following is a list of POI commands. State thecommands exactly as they are written to receiveinformation from the system regarding that specificcommand. POIs will only be displayed on the map screenif the map scale is 1⁄2 mile (1 km) or less. If you try to havePOIs displayed on a map with the wrong scale, thesystem will remind you of this. When you are ready to exitthe POI command mode, state “POI off”. The availablePOI commands are the following:
Automobile Commands• Navigation Automobile Club
• Navigation Triple A
• Navigation Car Wash
• Navigation Gas Station
• Navigation Gas
• Navigation Parking
• Navigation Parking Lot
• Navigation Parking Garage
• Navigation Car Park
• Navigation Auto Service and Maintenance
• Navigation Auto Service
• Navigation Other Automotive
• Navigation GM
4-8
Entertainment Locations• Navigation Amusement Park
• Navigation Casino
• Navigation Cinema
• Navigation Golf Course
• Navigation Historical Monument
• Navigation Horse Racing
• Navigation Marina
• Navigation Museum
• Navigation National and State Parks
• Navigation Ski Resort
• Navigation Skiing
• Navigation Speedway
• Navigation Sports Complex
• Navigation Stadium
• Navigation Performing Arts
• Navigation Tourist Attraction
• Navigation Tourist Information
• Navigation Video Rental
• Navigation Winery
Financial Locations• Navigation ATM
• Navigation Bank
• Navigation Other Financial Services
Governmental Offices• Navigation Town Center
• Navigation City Center
• Navigation Convention Center
• Navigation Exhibition Center
• Navigation Court House
• Navigation Government Offices
• Navigation Higher Education
• Navigation University
• Navigation College
• Navigation Hospital
• Navigation Library
• Navigation Parks and Recreation
• Navigation Park and Recreation
• Navigation Police Station
• Navigation Post Office
• Navigation School
4-9
Personal Services• Navigation Beauty and Barber Shops
• Navigation Dry Cleaning
• Navigation Health and Fitness Club
• Navigation Business Facility
Restaurant Locations• Navigation Restaurant
• Navigation I’m Hungry
• Navigation Show Restaurant
• Navigation American Restaurant
• Navigation American Food
• Navigation Chinese Restaurant
• Navigation Chinese Food
• Navigation Coffee House
• Navigation Continental Restaurant
• Navigation Continental Food
• Navigation Fast Food
• Navigation Fast Food Restaurant
• Navigation French Restaurant
• Navigation French Food
• Navigation Ice Cream Parlor
• Navigation Italian Restaurant
• Navigation Italian Food
• Navigation Japanese Restaurant
• Navigation Japanese Food
• Navigation Mexican Restaurant
• Navigation Mexican Food
• Navigation Seafood Restaurant
• Navigation Seafood
• Navigation Thai Restaurant
• Navigation Thai Food
• Navigation Other Restaurant
• Navigation Other Food
Shopping Locations• Navigation Convenience Store
• Navigation Department Store
• Navigation Grocery Store
• Navigation Home and Garden
• Navigation Pharmacy
• Navigation Shopping Mall
• Navigation Specialty Food Store
• Navigation Other Retail Stores
4-10
Transportation• Navigation Airport
• Navigation Bus Station
• Navigation Campground
• Navigation Ferry Terminal
• Navigation Hotel
• Navigation Rental Car Agency
• Navigation Rest Area
• Navigation Train Station
Destination CommandsThe following are destination commands you canaccess by clearly stating the commands exactly as theyare written. Confirm your choice of destination entryby responding to the system with “Enter destination”when prompted. You may also state “Add waypoint” or“To waypoint” after entering a destination to add awaypoint along the route to your final destination. Youcan cancel the command by stating, “cancel” afterthe system talk back.
Navigation [go] home, navigation [select] home:These commands instruct the system to set thehome preset as the destination.
Navigation [go to] starting point, navigation[previous] starting point: These commands instructthe system to set the previous starting point as thedestination.
Navigation [go to] previous destination: Thiscommand instructs the system to set the previousdestination as the new destination.
Navigation [go to] preset destination [number] (one,two, three, four, or five): These commands instructthe system to set one of the preset destinationsone through five as the new destination.
Cancel: This command instructs the system to cancelthe most recently given command.
4-11
Nametag CommandsThe following are nametag commands you can access byclearly stating the commands exactly as they are written.You may have up to 10 nametag entries for phone bookentries and 10 nametag entries for destinations.
Navigation store name: This command lets thesystem know you will be storing a name in memory.The system will request that you state the nametag.After the prompt, state the name desired for this point.The system will play back the recorded nametagand will request that you confirm it. After the prompt,state “Yes” to confirm or “No” to cancel.
Navigation go to [destination] (nametag), navigationselect [destination] (nametag): These commandsinstruct the system to select a destination saved underthe nametag you have stored. The system will askwhether you want the nametag to be set as a waypointor final destination. State “waypoint” or “destination”after the prompt.
Phone/telephone dial name (state specific name):These commands instruct the system to dial the phonenumber of a specific previously stored name. See “PhoneBook Screen” under Bluetooth® Phone on page 6-2 formore information on how to store a nametag.
Guidance CommandsThe following are guidance commands you can accessby clearly stating the commands exactly as they arewritten:
Navigation louder, navigation softer: Thesecommands instruct the system to increase and decreasethe volume of the voice guidance and voice recognitionsystem prompts.
Navigation [show] whole route [map], navigation[show] entire route [map]: These commands instructthe system to show the entire route from beginningto end on the map.
Navigation show next waypoint [map]: Thiscommand instructs the system to show the nextwaypoint on the map.
Navigation show (first, second, third, fourth, or fifth)waypoint [map]: These commands instruct thesystem to show the first, second, third, fourth, or fifthwaypoint on the map.
Navigation show destination [map]: This commandinstructs the system to show the final destination onthe map.
4-12
Navigation delete next waypoint, navigation cancelnext waypoint: These commands instruct thesystem to cancel the next waypoint from the route. Thesystem will request that you confirm. After the prompt,state “Yes” to confirm or “No” to cancel.
Navigation delete destination, navigation canceldestination: These commands instruct the system tocancel the current destination. The system willrequest that you confirm. After the prompt, state “Yes”to confirm or “No” to cancel.
Navigation delete all waypoints and destination,navigation cancel all waypoints anddestination: These commands instruct the system tocancel the current destination and all waypoints.The system will request that you confirm. After theprompt, state “Yes” to confirm or “No” to cancel.
Navigation voice guidance off, navigation voiceguidance on: These commands instruct the system toturn route voice guidance off and on.
Navigation quick: This command instructs the systemto use the quick search planning method condition.The system will request that you confirm. Afterthe prompt, state “Yes” to confirm or “No” to cancel.
Navigation normal: This command instructs thesystem to use the normal search planning condition.The system will request that you confirm. After theprompt, state “Yes” to confirm or “No” to cancel.
Navigation short: This command instructs the systemto use the short search planning method condition.The system will request that you confirm. Afterthe prompt, state “Yes” to confirm or “No” to cancel.
Navigation detour [entire route]: This commandinstructs the system to add a detour to your route. Thesystem will request that you confirm. After the prompt,state “Yes” to confirm or “No” to cancel.
Navigation [change to] arrow guide, navigation[change to] arrow guidance: These commandsinstruct the system to enter arrow guidance mode. Thiscommand is only available while on a route.
Navigation [change to] turn list guide, navigation[change to] turn list guidance: These commandsinstruct the system to enter turn list guidance mode. Thiscommand is only available while on a route.
Navigation [change to] freeway guide, navigation[change to] freeway guidance: These commandsinstruct the system to enter freeway guidance mode.This command is only available while on a route.
Navigation [change to] intersection guide, navigation[change to] intersection guidance: These commandsinstruct the system to enter intersection guidancemode. This command is only available while on a route.
4-13
Radio CommandsThe following are radio commands you can access byclearly stating the commands exactly as they are written.The commands are only available when you are inone of the following audio modes, AM, FM, XM™(if equipped), or WX (if equipped).
Radio, radio turn off: These commands instruct thesystem to turn the audio system on and off.
Radio [set] balance left, radio [set] balance right:These commands instruct the system to increasethe balance to the maximum setting left or right.
Radio [set] fade front, radio [set] fade rear: Thesecommands instruct the system to increase the fadeto the maximum setting front or rear.
Radio [set] balance center, radio [set] balancemiddle, radio [set] fade center, radio [set] fademiddle: These commands instruct the system to setthe fade or balance to the center and middle.
Radio scan up, radio scan down: These commandsinstruct the system to scan up or down through radiostations.
Radio [band] [select] AM, radio [band] [select] FM,radio [band] [select] XM, radio [band] [select]satellite, radio [band] [select] WX, radio [band][select] weather band: These commands instruct thesystem to go to either the AM, FM, XM (if equipped),or WX (if equipped) radio bands.
Radio [select] (frequency) AM, radio [select](frequency) FM, radio [select] (channel) weatherband: These commands instruct the system to goto a specific frequency on either the AM, FM,weather bands.
Radio [select] (channel) XM, radio [select] (channel)satellite: These commands instruct the system togo to a specific channel on the XM™ band (if equipped).
Radio set traffic, radio [set] traffic off, radio [turn]traffic off: These commands instruct the system to turnthe traffic feature on or off.
Radio [show] [next] presets: This command instructsthe system to change to the next presets on theactive band.
4-14
Radio [select] center point [mode], radio [select] talk[mode], radio [select] rear seat [mode], radio[select] driver [mode], radio [select] normal [mode]:These commands instruct the system to switchbetween the different DSP settings.
Radio autostore: This command instructs the systemto enter radio autostore mode. The autostore functionmust be selected on from the audio setup screenfor each band.
Radio help: This command instructs the system toassist with radio commands. The radio commands willbe displayed on the screen.
CD CommandsThe following are CD/MP3 commands you can accessby clearly stating the commands exactly as they arewritten. The commands are only available when a CDis inserted.
CD, CD turn off: These commands instruct the systemto turn the audio system CD Changer on and off.
CD [set] balance left, CD [set] balance right:These commands instruct the system to increase thebalance to the maximum setting left or right.
CD [set] fade front, CD [set] fade rear: Thesecommands instruct the system to increase the fade tothe maximum setting front or rear.
CD [set] balance center, CD [set] balance middle,CD [set] fade center, CD [set] fade middle: Thesecommands instruct the system to set the fade andbalance to the center position.
CD scan up: This command instructs the system toscan upward through tracks.
CD [select] disc (one, two, three, four, five, or six):These commands instruct the system to select discnumber one through six. The system will selectthe specified disc and start to play it.
CD [select] track (one, two, three, etc.): Thiscommand instructs the system to select a specifictrack number.
CD [select] disc (one, two, etc.) track (one, two,etc.): This command instructs the system to select aspecific disc and track number on that disc.
CD [select] next track, CD [select] previous track:These commands instruct the system to go to thenext or previous track on a disc.
4-15
CD eject [disc], CD eject [disc] (one, two, etc.):These commands instruct the system to eject one disc,or a specific numbered disc.
CD [select] center point [mode], CD [select] talk[mode], CD [select] rear seat [mode], CD [select]driver [mode], CD [select] normal [mode]: Thesecommands instruct the system to switch betweenthe different DSP settings.
CD help: This command instructs the system to assistwith CD changer commands. Help commands will bedisplayed on the map screen when the vehicle isstopped.
DVD Changer CommandsThe following are DVD commands you can access byclearly stating the commands exactly as they are written.The commands are only available when a DVD isinserted.
DVD, DVD turn off: These commands instruct thesystem to turn the DVD player on and off.
DVD [set] balance left, DVD [set] balance right:These commands instruct the system to increase thebalance to the maximum setting left or right.
DVD [set] fade front, DVD [set] fade rear: Thesecommands instruct the system to increase the fade tothe maximum setting front or rear.
DVD [set] balance center, DVD [set] balance middle,DVD [set] fade center, DVD [set] fade middle: Thesecommands instruct the system to set the fade andbalance to the center and middle.
DVD scan up: This command instructs the system toscan upward through chapters/tracks.
DVD [select] disc (one, two, etc.): These commandsinstruct the system to go to a specific disc.
DVD [select] chapter/track (one, two, etc.): Thesecommands instruct the system to go to a specificchapter or track number.
DVD [select] disc (one, two, etc.) chapter/track(one, two, etc.): These commands instruct the systemto go to a specific disc and chapter/track.
DVD [select] previous chapter/track: This commandinstructs the system to select the previous chapteror track.
DVD [select] next chapter/track: This commandinstructs the system to select the next chapter or track.
DVD eject [disc], DVD eject [disc] (one, two, etc.):These commands instruct the system to eject one disc,or a specific numbered disc.
4-16
DVD [select] center point [mode], DVD [select] talk[mode], DVD [select] rear seat [mode], DVD[select] driver [mode], DVD [select] normal [mode]:These commands instruct the system to switchbetween the different DSP settings.
DVD help: This command instructs the system to assistwith DVD changer commands. Help commands willbe displayed on the map screen when the vehicleis stopped.
Climate Control CommandsThe following are climate control commands you canaccess by clearly stating the commands exactly as theyare written.
Heater/heat, heater/heat turn off: These commandsinstruct the system to turn the heater in the vehicleon and off.
AC/air conditioning, AC/air conditioning turn off:These commands instruct the system to turn theair conditioning in the vehicle on and off.
Heater/heat/AC/air conditioning [set] fan high,heater/heat/AC/air conditioning [set] fan low: Thesecommands instruct the system to change the heaterand air conditioning fan speed between high and low.
Heater/heat/AC/air conditioning [set] temperature(number): This command instructs the system toset the heater or air conditioning to a specifictemperature. You must state the temperature numberwhen using this command.
Heater/heat/AC/air conditioning defrost/defog,heater/heat/AC/air conditioning turn defrost/defogoff: These commands instruct the system to turnboth the defrost and defogger on and off.
Heater/heat/AC/air conditioning front defrost/defog,heater/heat/AC/air conditioning turn frontdefrost/defog off: These commands instruct thesystem to turn the front defrost or defogger on and off.
Heater/heat/AC/air conditioning rear defrost/defog,heater/heat/AC/air conditioning turn reardefrost/defog off: These commands instruct thesystem to turn the rear defrost or defogger on and off.
Heater/heat/AC/air conditioning help: This commandinstructs the system to assist with climate controlcommands. Help commands will be displayed on themap screen when the vehicle is stopped.
4-17
Personalization CommandsThe following are personalization commands you canaccess by clearly stating the commands exactly as theyare written. These functions are available to help withsetting, storing, and recalling driver settings.
Set driver one, set driver two: These commandsinstruct the system to change the driver setting betweendriver 1 and driver 2. See Personalization on page 5-2for more information.
Set driver exit: This command instructs the system toset/store an exit position for the driver that has beenchosen. Adjust your seat and steering wheel exitposition before stating this command.
Select driver one: This command selects the memorysettings for driver 1. The seat, steering wheel andnavigation system settings will change to those storedby driver 1.
Select driver two: This command selects the memorysettings for driver 2. The seat, steering wheel andnavigation system settings will change to those storedby driver 2.
Select driver exit: This command instructs the systemto select the exit position for the currently chosen driver.
Driver help: This command instructs the system toassist with driver commands. Help commands willbe displayed on the map screen when the vehicle isstopped.
Window Commands
Windows up, windows down: These commandsinstruct the system to express up or express down thewindows. The system will request that you confirm. Afterthe prompt, state “Yes” to confirm or “No” to cancel.
Windows help: This command instructs the system toassist with window commands. Help commands willbe displayed on the map screen when the vehicleis stopped.
4-18
Phone CommandsThese commands will only function if a Bluetooth®
phone has been paired with the navigation system, isavailable in the vehicle, and is on.
Phone/telephone enter: These commands instruct thesystem to dial a phone number after it is stated.State the number including the area code(ex. 555 123 4567) then state “dial.”
Phone/telephone redial/recall: These commandsinstruct the system to redial a phone number.
Phone/telephone help: These commands instruct thesystem to assist with phone commands. Helpcommands will be displayed on the map screen whenthe vehicle is stopped.
OnStar® Command
OnStar: This command instructs the system to connectto OnStar®. You will enter the OnStar® voice recognitionsystem. Refer to your OnStar® manual for moreinformation.
PersonalizationYour vehicle is equipped with personalization that allowsyou to program certain features to a preferred settingfor up to two people. Features such as driver position,door lock personalization, passenger windowpersonalization, chime personalization, driver informationcenter, remote lock and unlock confirmation, suspensionsystem configuration, and remote start climate controlsettings can be personalized.
Language
This feature allows you to change the language that thevehicle (instrument panel cluster, HUD, Navigationsystem, etc.) is in. The languages available areUS English (male speaking voice) US English (femalespeaking voice), UK English, German, French,Italian, and Spanish.
5-2
To change the language, do the following:
1. Select the CONFIG hard key.
2. Touch the Vehicle screen button.
3. Select the globe screen button or choose thedesired language.
4. Your choice will be stored automatically.
If you become stuck in a language that you do notunderstand, do the following:
1. Turn off the vehicle.
2. Open and close the door. Wait about 10 seconds.
3. Turn on the vehicle.
4. Press the map hard key.
5. Touch the globe symbol screen button from theWARNING screen. See Getting Started on page 1-3for more information. This will take you directly to theLanguage screen. Choose the desired language.Your choice will be stored automatically. All screenswill display text in the selected language.
Entering the Personalization Menu
To enter the personal settings mode, use one of thefollowing procedures:
1. Be sure the ignition is either on, in accessory mode,or in RAP. The transmission must be in eitherPARK (P), or the vehicle must be stopped.
2. Press any button on the appropriate keylessaccess transmitter to identify yourself as Driver 1or Driver 2. The driver number is shown on theback of the keyless access transmitter.
3. Press the CONFIG hard key.4. Touch the Vehicle screen button.
5-3
5. Access the Personal Menu Setting by pressing thePersonal Settings screen button.
6. The appropriate driver information should behighlighted. If you wish to change driver numbers,touch the appropriate screen button, either Driver 1or Driver 2. The system will show the start upscreen when the driver is changed.
7. The Personal Settings button must be highlighted tocontinue programming. If it is not highlighted, touchit. If it is highlighted, touch any of the buttons onthe right of the screen to begin programming.
Some features have submenus that show additionalfeatures that can be turned on or off. After entering asubmenu, select a feature and scroll through the menuand make the necessary change.
Personalization Menu Settings Off ModeIf you choose not to use the Personalization Menu, thefollowing defaults will be active on your vehicle:
Feature Default Mode
Lock/Unlock
All Doors unlock in parkAll Doors unlock when PULLING
front door handleKeyless Access All Doors lock 5 sec
after last door closed offDELAY locking 5 sec after LOCK is
pressed and last door closed on
Feature Default Mode
Lights/Horns
Lights flash at UNLOCK onLights flash at LOCK on
Exterior lighting at UNLOCK onHorn chirps at LOCK off
External Audible Keyless EntryTransmitter in vehicle reminder onTwilight Delay will be set at 5 sec
OccupantInformation
Driver Greeting - standard drivergreeting
Chime Volume - Normal ChimeVolume
Passenger window Lockout offSuspension Ride Control Mode
Touring
OccupantPosition
Recall Memory with START buttonactivation Off
REMOTE recall Memory OffAuto EXIT Seat Recall Off
Auto EXIT steering column recall OffRemote Start Remote Start Off
5-4
Lock/Unlock
This feature allows you to change the automatic doorlocking and unlocking and the keyless access transmitterlocking and unlocking.
The following choices are available:
Automatic Door UnlockIf you turn this feature on, you may choose one of thefollowing options:
DRIVER unlock at OFF: This feature allows thedriver’s door to automatically unlock when the ignition isturned off. When this feature is turned on, the buttonwill appear highlighted next to the feature name.
ALL doors unlock at OFF: This feature allows all ofthe doors to automatically unlock when ignition is turnedoff. When this feature is turned on, the button willappear highlighted next to the feature name.
DRIVER unlock in PARK: This feature allows thedriver’s door to automatically unlock when thetransmission is shifted into PARK (P). When this featureis turned on, the button will appear highlighted nextto the feature name.
ALL doors unlock in PARK: This feature allows alldoors to automatically unlock when the transmission isshifted into PARK (P). When this feature is turned on, thebutton will appear highlighted next to the feature name.
5-5
Keyless Access UnlockWhen this is selected, the keyless access system willautomatically unlock the door based on the positionof the transmitter. If you turn this feature on, you maychoose between the following two options:
ALL doors unlock when PULLING front doorhandle: This feature automatically unlocks all of thedoors when you approach the vehicle with your keylessaccess transmitter and pull either front door handle.When this feature is turned on, the button will appearhighlighted next to the feature name. See “Door Locks”in the index of your owner manual for more information.
FRONT door unlocks when PULLING front doorhandle: This feature automatically unlocks theappropriate front door when you approach the vehiclewith your keyless access transmitter and pull therespective front door handle. When this feature is turnedon, the button will appear highlighted next to thefeature name. See “Door Locks” in the index of yourowner manual for more information.
You may also choose to activate one or both of thefollowing two options:
Keyless Access All Doors lock 5 sec after Last doorclosed: This feature delays the locking of the vehicle’sdoors for up to five seconds after the lock button on thekeyless access transmitter is pressed. The five seconddelay occurs after the last door is closed. If the keylessaccess transmitter is left inside of the vehicle, the doorswill not lock. When this feature is turned on, the buttonwill appear highlighted next to the feature name.
DELAY locking 5 sec after LOCK is pressed and lastdoor closed: This feature delays the locking of thevehicle’s doors for up to five seconds after a power doorlock switch or the lock button on the keyless accesstransmitter is pressed. The five-second delay occursafter the last door is closed. If the keyless accesstransmitter is left inside of the vehicle, the doors will notlock. When this feature is turned on, the button willappear highlighted next to the feature name.
1. Choose the desired modes.
2. When you are finished, use the Back screen buttonto return to the PERSONAL SETTINGS screen.
5-6
Lights/Horn
This feature allows you to choose the type of feedbackdesired when using your keyless entry transmitterand to set your vehicle’s Twilight Sentinel® delay time.You can choose any or all of the following options:
Lights flash at UNLOCK: This feature allows theexterior lamps to flash when the keyless accesstransmitter is used to unlock the vehicle. All doors mustbe closed for this feature to work, and the lamps willnot flash if the parking lamps or headlamps areon. If Lights flash at UNLOCK is turned on and eitherALL doors unlock when PULLING front door handleor FRONT door unlocks when PULLING front doorhandle is turned on, the exterior lamps will flash whenthe doors are passively unlocked. See “AutomaticDoor Lock” earlier in this section for more information.When this feature is turned on, the button will appearhighlighted next to the feature name.
Lights flash at LOCK: This feature allows the exteriorlamps to flash once when the keyless accesstransmitter is used to lock the vehicle. All doors must beclosed for this feature to work, an the lamps will notflash if the parking lamps or headlamps are on. If Lightsflash at LOCK is turned on and either ALL doorsunlock when PULLING front door handle or FRONTdoor unlocks when PULLING front door handle is turnedon, the exterior lamps will flash when the doors arepassively unlocked. See “Automatic Door Lock” earlierin this section for more information. When this feature isturned on, the button will appear highlighted next tothe feature name.
5-7
Exterior Lighting at UNLOCK: This feature turns onthe exterior lamps when the keyless access transmitteris used to unlock the vehicle. The lamps will remainon for about 20 seconds unless a door is opened, theignition is turned to ACC, ON or START or thekeyless access transmitter is used to lock the vehicle.When this feature is turned on, the button will appearhighlighted next to the feature name.
Horn chirps at LOCK: This feature sounds the hornonce when the keyless access transmitter is used to lockthe vehicle. All doors must be closed for this featureto work. When this feature is turned on, the button willappear highlighted next to the feature name.
External Audible Keyless Entry Transmitter remainsin vehicle reminder: This feature chirps the hornthree times when the driver’s door is closed and there isa keyless access transmitter left inside the vehicle.This will only occur when the vehicle is off. When thisfeature is turned on, the screen button will appearhighlighted next to the feature name.
Twilight Delay: If this feature is activated, you canchoose the delay time that your exterior vehicle lightswill stay on when you exit the vehicle. If you choose Off,the exterior lamps will not stay on when you exit thevehicle. Only one made can be selected at a time. Thebutton next to the feature name will appear highlightedwhen the setting has been selected. You can chooseany of the available options by touching the appropriatetime button.
1. Choose the desired settings.
2. When you are finished, use the Back screen buttonto return to the PERSONAL SETTINGS screen.
5-8
Occupant Information
This feature allows you to choose the greeting, chimevolume, suspension ride controls, and front passengerwindow lockout settings.
Driver Greeting: You can choose between a personalgreeting and a standard greeting of Driver 1 or Driver 2.This greeting is shown on the instrument cluster whenyou turn the vehicle on.
If you choose to have a personal greeting, the next step isto touch the Edit screen button. The alpha keypad will bedisplayed. Type in the desired greeting. You may enterup to 16 characters. When you are finished typing thegreeting, touch the OK screen button.
Chime Volume: You can choose a normal or highvolume level for the vehicle chime setting. The chimevolume cannot be turned off.
Suspension: If your vehicle has this feature, you canselect between performance or touring modes.Performance mode is used where road conditions orpersonal preference demand more control. This settingprovides more “feel” or response to road conditions.Touring mode is used for normal city and highwaydriving. This setting provides a smooth, soft ride.
Passenger Window Lockout: You can choose whetheror not to have the front passenger window deactivatedas part of the window lockout button. If you wouldlike the passenger window to be deactivated when thewindow lockout button is pushed, choose this feature.If this feature is left off, the window lockout buttonlocated on the door will deactivate only the rearwindows. When this is on, the button next to this featurename will appear highlighted. See “Power Windows”in the index of your owner manual for more information.
1. Choose the desired settings.
2. When you are finished, use the Back screen buttonto return to the Personal Settings screen.
5-9
Occupant Position
This feature allows you to choose the memory featuresyou want activated automatically upon entering andexiting the vehicle. You may select any or all ofthe following settings:
Recall memory with START button activation: Whenon, the previously programmed seat, mirror andsteering column positions will recalled when the STARTbutton is pressed. See “Starting and Operating YourVehicle” in the index of your owner manual formore information.
REMOTE recall memory: When on, the previouslyprogrammed seat and mirror positions will be recalledwhen you press the unlock button on the keyless accesstransmitter.
Auto EXIT Seat Recall: When on, your previouslyprogrammed exit seat position is recalled when vehicleis turned off, the shift lever is in PARK (P), and thedriver door is opened.
Auto EXIT steering column recall: When on, yourpreviously programmed exit steering column position isrecalled when vehicle is turned off, the shift lever isin PARK (P), and driver door is opened.
1. Choose the desired settings.
2. When you are finished, touch the Back screenbutton to return to the PERSONAL SETTINGSscreen.
5-10
Remote Start
This feature allows you to choose the features (ifequipped) you would like to have activate when youengage the remote start on your vehicle. See “RemoteVehicle Start” under “Keyless Access System Operation”in the index of your owner manual for more information.
You may choose any or all of the following items:
1. The Remote Start screen button must be highlightedfor the remote start feature to be activated.
2. Once the remote start feature is activated, you canchoose any or all of the features shown.
Climate Control: If this feature is active, the climatecontrol system will engage when the vehicle is startedusing the remote start feature. It will be at the sameclimate control setting that was last used by the driverusing that keyless access transmitter.
Rear Defog: If this feature is active, the rear defoggerwill engage when the vehicle is started using theremote start feature.
Seat Temperature Control: If this feature is active, theseats will be heated or cooled, if equipped, when thevehicle is started using the remote start feature.
5-11
MemoryIf your vehicle has the memory feature, you canprogram and recall memory settings for the followingfeatures for up to two drivers:• The driver’s seat position.
• The outside rearview mirrors position.
• The telescopic steering column position.
• The language, radio and XM™ presets, tone,volume, playback mode (AM/FM or CD), lastdisplayed stations and compact disc position areset automatically.
• The last climate control setting is set automatically.
• The Head-Up Display (HUD) position, if equipped,is set automatically.
• Navigation System previous destination, storedmemory points, nametags, paired phones,navigation voice prompts, etc. are storedautomatically.
• Other personalization settings (for example,remote start settings).
Memory features are programmed and recalled throughthe Navigation System and the Voice Recognitionsystem. See “Entering the Memory Menu” later in thissection for more information on recalling andprogramming the memory settings using the NavigationSystem screen buttons.
Entering the Memory MenuTo enter the memory programming mode, use thefollowing procedure:
1. Be sure the ignition is either on, in accessory mode,or in RAP. The transmission must be in eitherPARK (P), or the vehicle must be stopped.
2. Press any button on the appropriate keyless accesstransmitter to identify yourself as Driver 1 or Driver 2.The numbers on the back of the keyless accesstransmitters correspond to the driver number.
3. Press the CONFIG hard key.
4. Touch the Vehicle screen button.
5. Press the Memory screen button.
6. Select either Recall Driver Settings or StoreDriver Settings.
7. The appropriate driver information should behighlighted. If you wish to change driver numbers,touch the appropriate screen button, eitherDRIVER 1 or DRIVER 2.
8. Touch the Memory screen button.
5-12
Recall Driver Settings: Touch this screen button tohave your previously stored seat, steering column,outside mirror, climate control and radio positionsrecalled.
To recall driver settings using the Navigation System,use the following procedure:
1. Select the CONFIG hard key.
2. Select the Vehicle screen button.
3. Select the Memory screen button.
4. Select the Recall Driver Setting screen button torecall your previously stored settings.
If the vehicle is in PARK (P), a beep will sound and yourpreviously saved driving position will then be recalled.If the vehicle is not in PARK (P), three beeps will soundand your previously saved driving position will not berecalled.
A memory recall can be stopped by pressing anymemory seat or mirror position button. If you would likethe stored driving positions to be recalled whenunlocking your vehicle with the keyless accesstransmitter or when starting your vehicle, see “OccupantPosition” earlier in this section.
Store Driver Settings: This feature allows you to storethe seat, steering column, and outside mirrorspositions.
To store driver settings, using the Navigation System,use the following procedure:
1. Select the CONFIG hard key.
2. Select the Vehicle screen button.
3. Select the Memory screen button.
4. Select the Store Settings screen button.
5. Adjust your settings for the driver’s seat, the outsidemirrors, and the steering column to a comfortabledriving position.
6. Select the Store Driver Settings screen button. Abeep will sound to confirm that the driver settingsare stored.
7. Repeat this procedure for a second driver byprogramming the other driver number.
Your memory settings are now programmed. Anychanges that are made to the HUD, Navigation System,and climate controls while driving will be automaticallystored when then ignition is turned off.
Driver Select: Change which driver is active bytouching this screen button. The numbers on the backof the keyless access transmitters correspond tothe driver number.
5-13
Store Exit Settings: This feature allows you to storeexit positions for the seat and steering column.
To store exit settings using the Navigation System, usethe following procedure:
1. Select the CONFIG hard key.2. Select the Vehicle screen button.3. Select the Memory screen button.4. Adjust your settings for the driver’s seat and the
steering column to a comfortable exit position.5. Select the Store Exit Driver Settings screen button.
Two beeps will sound to confirm that your new exitsettings are saved.
6. Repeat this procedure for a second driver byprogramming the other driver number.
Recall Exit Settings: This screen button allows you torecall the seat and steering column to the appropriateexit positions.
To recall exit settings using the Navigation System, usethe following procedure:
1. Select the CONFIG hard key.2. Select the Vehicle screen button.3. Select the Memory screen button.4. Select the Recall Exit Settings screen button to
recall your previously stored exit settings.
If the vehicle is in PARK (P), a beep will sound and yourpreviously saved exit position will then be recalled. Ifthe vehicle is not in PARK (P), three beeps willsound and your previously saved exit position will notbe recalled.
A memory recall can be stopped by pressing any memoryseat or mirror position button. If you would like the storedexit positions to be recalled when your vehicle is inPARK (P), the vehicle is off, and the driver’s door isopened, see “Occupant Position” earlier in this section.
Memory Infotainment Settings and PresetsThese settings and presets are set automatically.They include the following:
Bluetooth® PhoneYour vehicle is equipped with Bluetooth®. Bluetooth® isa wireless communication system that allows you touse a Bluetooth® compatible phone in a hands-freemode. You may also set up a phone directory for use inyour vehicle. Up to 12 phones may be registered withyour Bluetooth® system, but only one phone maybe connected at a time.
Setting Up Your Bluetooth® PhoneIn order to use your cellular phone with this Bluetooth®
system, your phone must be Bluetooth® compatible.Please see your phone information to find out whichversions of Bluetooth® work with your phone.
My Info: Touch this screen button to display the detailsof your Bluetooth® device including the name andpasskey information. Selecting Device Name allows youto edit the name of the Bluetooth® device in yourvehicle. Selecting PASS-Key® allows you to edit thepairing passkey used for your vehicle.
{ (Page Up): This screen button scrolls up the listone page at a time.
z (Page Down): This screen button scrolls down thelist one page at a time.
6-2
F (Cancel): Touch this screen button to return to theBLUETOOTH PHONE screen.
Registered Device: Touch this screen button to displaya list of all Bluetooth® phones that are connected toyour vehicle. From this list you can set your defaultdevice or change phones to be used in the vehicle.
New Device: Touch this screen button when you are inthe process of adding a new phone to be used in thevehicle. From this menu you can receive a newdevice or search for new devices.
W (Back): This screen button will return the screen tothe previous page.
Connect: This screen button will connect your phone tothe Bluetooth® system.
Receive: Touch this screen button to have yourBluetooth® system connect to your phone when you areusing your phone as the device to initiate pairing.This allows your phone to seek your vehicle andconnect. When this button is pressed, the Navigationsystem is waiting to be connected.
Y (Delete): This screen button will delete items one ata time.
Default: This screen button will set the highlighteddevice to be the default. This will underline the defaultdevice in the list.
Search: This screen button will begin the system’ssearch for all available Bluetooth® phones in adesignated area.
To set up your phone, do the following:
1. Press the CONFIG hard key to enter the SelectSetting Function screen.
2. Touch the Bluetooth® screen button (E).
3. Touch the Search screen button. The system willsearch for all Bluetooth compatible phones withinthe vehicle.Your phone must be in the discoverable mode to befound by the Bluetooth system.
4. The Device List screen will appear. Scroll throughthe choices using the arrow buttons.
5. Choose your device by touching the icon next tothe device name.
6. Touch the Connect screen button. Your phone andthe Bluetooth® system will begin a connectingprocedure.
7. Follow the instructions on screen. They will differdepending on your phone. Refer to your phoneinstructions for further information.
6-3
Screen Explanation
E (Bluetooth): This is the Bluetooth® screen button.
F (Cancel): This screen button will take you backto the Navigation menu.
^ (Call Status): This area will indicate the call status. Itwill indicate whether or not there is good signal strengthand whether or not the phone is in service range.
q (Delete): Touch this screen button to delete numbersafter they have been entered. Touch and release todelete numbers one-by-one or hold it down to delete allnumbers.
Switch Call: Use this screen button to switch callsduring a call-waiting situation.
Hands Free: Choose this screen button to use thephone like a speaker phone.
Private: Choose this screen button to use the phonehandset.
Last 10: This screen button will take you to a screenshowing your last 10 calls either sent or received.You are able to place phone calls from this screen.
g (Phone Book): This screen button will take you tothe phone book screen.
V (Send/End Call): This screen button will let youplace a call after using the alpha keypad or to cancel acall at the end of the conversation. When you senda call, the button will be green. When you are in a callthe button will be red to indicate that touching the buttonwill end the call.
6-4
Using Your Bluetooth® PhoneOnce your phone has been set up, you are ready tobegin using it.
1. Press the AUX hard key to enter the BLUETOOTHPHONE screen.
2. Touch the Bluetooth® screen button (E).
3. Use the keypad to dial the number you wish to call.
4. Touch the phone icon screen button to place the call.
5. When you are ready to hang up, press the phoneicon screen button again to disconnect the call.
Depending on the model of your Bluetooth® compatiblephone, you may be able to choose the Hands Freeor Private screen buttons. If you want to use the phonethrough your speakers, use the hands free mode. Ifyou want to talk directly into your phone, choosethe private mode.
Phone Book ScreenThis screen allows access to your Bluetooth® PhoneBook where you can store names and phone numbers.
{ (Page Up): This screen button scrolls up the listone page at a time.
y (Scroll Up): This screen button scrolls up the listone entry at a time.
z (Scroll Down): This screen button scrolls down thelist one entry at a time.
z (Page Down): This screen button scrolls down thelist one page at a time.
6-5
Q(OnStar): Touch this screen button to use theOnStar® system to place a phone call. See OnStar®
System on page 2-48 for more information.
F (Cancel): Touch this screen button to return to theBLUETOOTH PHONE screen.
W (Back): This screen button will return the screen tothe previous page.
qr (Scroll to End/Beginning): These screenbuttons will allow you to scroll through the entry asnecessary.
New: This screen button will begin the creation of anew phone book entry.
Edit: This screen button allows you to edit an existingphone book entry.
Y All (Delete All): This screen button deletes all phonebook entries.
Last 10: This screen button will take you to a screenshowing your last 10 calls either sent or receivedusing the Bluetooth system. You are able to place phonecalls from this screen.
V (Send/End Call): This screen button will let youplace a call after touching the appropriate phone bookentry or to cancel a call at the end of the conversation.
To add a new phone book entry, do the following:
1. Touch the New screen button.
2. Touch a blank entry.
3. Touch the Edit screen button.
4. Use the keypads to input the name and telephonenumber. You may have a maximum of24 characters.
5. If you want, you may also add a nametag to theentry to work with the voice recognition. You mayhave up to 10 nametags for phone book entriesin use at a time.
6. When you have completed entering the information,touch the OK screen button.
To add a nametag to a specific name:
1. Select the PHONE BOOK screen.
2. Select the name that you wish to add a nametag to.
3. Select the Edit screen button.
4. Touch the Add Nametag screen button.
5. The system will request that you state the nameyou wish to associate with this entry.
6. The system will repeat the name and requestconfirmation. Say “Yes” to confirm or “No” to cancel.
6-6
Last 10 Calls ScreenThis screen shows either the last 10 calls that have beenplaced or the last 10 calls received by your Bluetooth®
system. The newest calls are at the top of the list.
{ (Page Up): This screen button scrolls up the listone page at a time.
y (Scroll Up): This screen button scrolls up the listone entry at a time.
z (Scroll Down): This screen button scrolls down thelist one entry at a time.
z (Page Down): This screen button scrolls down thelist one page at a time.
F (Cancel): Touch this screen button to return to theBLUETOOTH PHONE screen.
W (Back): This screen button will return the screen tothe previous page.
qr (Scroll to End/Beginning): These screenbuttons will allow you to scroll through the entry asnecessary.
Save: This screen button will allow you to save theentry in your phone book.
Y All (Delete All): This screen button deletes all phonebook entries in the screen you are currently in, eitherreceived or sent.
g (Phone Book): This screen button will take you tothe phone book screen.
V (Send/End Call): This screen button will let youplace a call after touching the appropriate phone bookentry or to cancel a call at the end of the conversation.
Sent: Touching this screen button will give you thelist of the last 10 calls sent from your Bluetooth® system.
Received: Touching this screen button will give youthe list of the last 10 calls received on your Bluetooth®
system.
6-7
✍ NOTES
6-8
AAudio System .................................................. 3-2