Overview ........................................................ 1-1 Overview .................................................. 1-2 Features and Controls ..................................... 2-1 Features and Controls ................................ 2-2 Navigation Audio System ................................ 3-1 Navigation Audio System ............................ 3-2 Index ................................................................ 1 2008 Mid-Size Truck Navigation System M
Features and Controls ..................................... 2-1Features and Controls ................................ 2-2
Navigation Audio System ................................ 3-1Navigation Audio System ............................ 3-2
Index ................................................................ 1
2008 Mid-Size Truck Navigation System M
GENERAL MOTORS, GM, CHEVROLET, theCHEVROLET Emblem, GMC, and the GMC TRUCKEmblem, and the names TRAILBLAZER, ENVOY, andDENALI are registered trademarks of General MotorsCorporation.
Dolby® is manufactured under license from Dolby®
Laboratories. Dolby® and the double-D symbolare trademarks of Dolby® Laboratories.
The information in this manual supplements the ownermanual. This manual includes the latest informationavailable at the time it was printed. We reserve the rightto make changes in the product after that time withoutnotice. For vehicles first sold in Canada, substitutethe name General Motors of Canada Limited forChevrolet Motor Division and GMC whenever it appearsin this manual.
Keep this manual with the owner manual in the vehicle,so it will be there if it is needed. If the vehicle is sold,leave this manual in the vehicle.
Canadian OwnersA French language copy of this manual can be obtainedfrom your dealer/retailer or from:
Helm, IncorporatedP.O. Box 07130Detroit, MI 48207
1-800-551-4123www.helminc.com
Propriétaires CanadiensOn peut obtenir un exemplaire de ce guide en françaisauprès de concessionnaire ou à l’adresse suivante:
Helm IncorporatedP.O. Box 07130Detroit, MI 48207
1-800-551-4123www.helminc.com
iii
✍ NOTES
iv
Overview .........................................................1-2Navigation System Overview ............................1-2
Getting Started ...............................................1-4Cleaning the Video Screen ..............................1-9
Section 1 Overview
1-1
OverviewNavigation System Overview
1-2
A. P (Power/Volume) Knob. See “Hard Keys” underUsing the Navigation System on page 2-2.
B. Directional Indicator. See Symbols on page 2-6.C. DVD/CD Loading Slot. See Maps on page 2-5 or CD
Player on page 3-9.
D. X (DVD/CD Eject) Key. See “Hard Keys” underUsing the Navigation System on page 2-2.
E. NAV (Navigation) Key. See “Hard Keys” under Usingthe Navigation System on page 2-2.
F. NAV RPT (Navigation Repeat) Key. See “HardKeys” under Using the Navigation System onpage 2-2.
G. BAND Key. See “Playing the Radio” underNavigation Audio System on page 3-2.
H. w SEEK x Key. See “Finding a Station” underNavigation Audio System on page 3-2.
I. B (CD) Key. See CD Player on page 3-9.
J. e (Audio) Key. See Navigation Audio System onpage 3-2.
K. CONFIG (Configure) Key. See “Hard Keys” underUsing the Navigation System on page 2-2.
L. O (Tuning) Knob. See “Finding a Station” underNavigation Audio System on page 3-2.
M. V (Zoom In) Screen Button. See “Touch SensitiveScreen Buttons” under Using the NavigationSystem on page 2-2.
N. Dest (Destination) Screen Button. See “TouchSensitive Screen Buttons” under Using theNavigation System on page 2-2.
O. Nav (Navigation) Options Screen Button. See“Touch Sensitive Screen Buttons” under Using theNavigation System on page 2-2.
P. Nav y (Navigation Menu) Screen Button. See“Touch Sensitive Screen Buttons” under Using theNavigation System on page 2-2.
Q. U (Zoom Out) Screen Button. See “Touch SensitiveScreen Buttons” under Using the NavigationSystem on page 2-2.
R. Clock. See “Clock” under Configure Menu onpage 2-31.
1-3
Getting StartedBefore you begin to operate the navigation system, readthis manual thoroughly to become familiar with it andto understand how the system works.
Keeping your mind on the drive is important for safedriving. See “Defensive Driving” in the Index ofyour vehicle’s owner manual for more information. Getfamiliar with your vehicle’s navigation system soyou can use it with less effort and take full advantage ofits features. Your navigation system includes not onlynavigation, but also audio functions. While yourvehicle is parked:
• Familiarize yourself with all of its controls: hardkeys on the faceplate and touch-sensitive screenbuttons.
• Familiarize yourself with its operation.
• Set up your audio by presetting your favoritestations, setting the tone, and adjusting thespeakers. Then, when driving conditions permit, youcan tune to your favorite stations using thepresets and steering wheel controls (if equipped).
• Set up the navigation features that can only be donebefore you begin driving, such as entering anaddress or a preset destination.
Entering a destination or alphanumeric text requiresmany steps, so you can only perform these operationswhen the vehicle is in PARK (P). You will noticethat touch-sensitive screen buttons leading to thealphanumeric keyboard are dimmed out while driving.
Other functions may also be locked out while driving andthey too will appear grayed out on the screen — butall functions are available when parked. Some functionscan be performed while driving, as long as you cando so without diverting too much of your attention fromyour driving.
{CAUTION:
This system provides you with a far greateraccess to audio stations and song listings.Giving extended attention to entertainmenttasks while driving can cause a crash and youor others can be injured or killed. Always keepyour eyes on the road and your mind on thedrive — avoid engaging in extended searchingwhile driving.
1-4
{CAUTION:
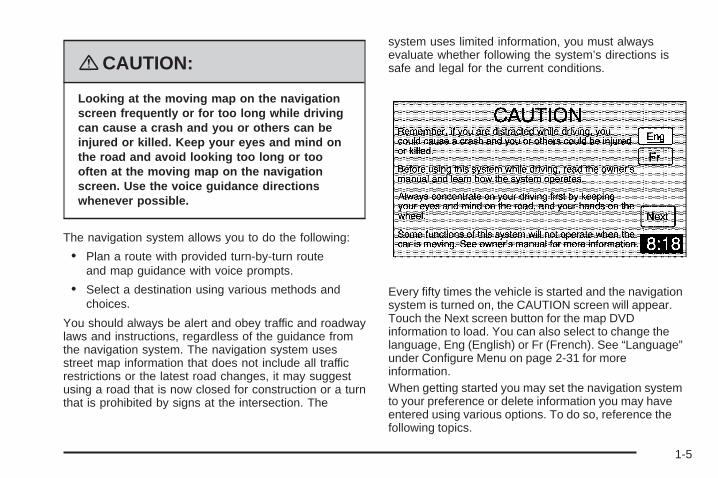
Looking at the moving map on the navigationscreen frequently or for too long while drivingcan cause a crash and you or others can beinjured or killed. Keep your eyes and mind onthe road and avoid looking too long or toooften at the moving map on the navigationscreen. Use the voice guidance directionswhenever possible.
The navigation system allows you to do the following:
• Plan a route with provided turn-by-turn routeand map guidance with voice prompts.
• Select a destination using various methods andchoices.
You should always be alert and obey traffic and roadwaylaws and instructions, regardless of the guidance fromthe navigation system. The navigation system usesstreet map information that does not include all trafficrestrictions or the latest road changes, it may suggestusing a road that is now closed for construction or a turnthat is prohibited by signs at the intersection. The
system uses limited information, you must alwaysevaluate whether following the system’s directions issafe and legal for the current conditions.
Every fifty times the vehicle is started and the navigationsystem is turned on, the CAUTION screen will appear.Touch the Next screen button for the map DVDinformation to load. You can also select to change thelanguage, Eng (English) or Fr (French). See “Language”under Configure Menu on page 2-31 for moreinformation.When getting started you may set the navigation systemto your preference or delete information you may haveentered using various options. To do so, reference thefollowing topics.
1-5
Deleting Personal InformationThis navigation system can record and storedestinations. At times, such as when you are disposingof your vehicle, you may want to delete thesedestinations. refer to the following sections to delete thedestination information that has been stored.
See “Delete” under “Edit Route” under Navigation Menuon page 2-8 for deleting the current destination.
See “Memory Points”, “Preset Dest.” (Destination),“Register Home”, and “Del. Prev. Dest.” (Delete PreviousDestination) under “Memory Points” under NavigationMenu on page 2-8 for deleting stored destinations.
Storing Radio Station PresetsTo set preset radio stations, do the following:
1. Press the power/volume knob to turn thesystem on.
2. Press the BAND hard key to access the band menuand select the desired band (AM, FM1, FM2, XM1,or XM2 (if equipped)).
3. Use the tuning knob or the SEEK hard key arrowsto select a station.
4. Touch and hold one of the six screen buttons at thebottom of the screen until you hear a beep or seethe station displayed on the selected preset button.
Setting the ClockTo set the time, do the following:
1. Press the power/volume knob to turn thesystem on.
2. Press the CONFIG hard key.
3. Touch the Clock screen button.
4. Touch the appropriate Time Zone screen button.
5. Touch the Daylight Savings screen button.
The time is now set. Touch the Manual Adjust screenbutton if you need to further adjust the time. Theradio will use the GPS satellite to set the time. Thevehicle needs to be in an open area to receivethe signal. See Global Positioning System (GPS) onpage 2-33 for more information.
Entering an Address, Point of Interest,Home, and Preset DestinationsBefore entering an Address, Point of Interest, Home, orPreset Destination, select the appropriate searcharea that contains the final destination. Your vehiclemust be stopped to perform this operation.
1-6
Setting the Search AreaTo set the search area, do the following:
1. Press the power/volume knob to turn thesystem on.
2. Insert the DVD map disc into the CD slot.
3. A notice may appear. Touch the NEXT screenbutton to proceed.If the radio is already on with a map disc inserted,push the NAV hard key.
4. Touch the DEST screen button.
5. Touch the Change screen button.
6. Touch the appropriate Search Area numberedscreen button that contains your final destination.
The system will return to the Destination menu.
Entering an AddressTo set a destination by entering a street address, do thefollowing:
1. Press the power/volume knob to turn the system on.
2. Insert the DVD map disc into the CD slot.
3. A notice may appear. Touch the NEXT screenbutton to proceed.If the radio is already on with a map disc inserted,push the NAV hard key.
4. Touch the DEST screen button.
5. Verify that the selected Search Area is correct.
6. Touch the Address screen button.
7. Enter the street name using the alpha keypad onthe screen.Do not enter directional information or street type,and use the space symbol screen button (U)between street or city names. For example,the street name N. Royal Oak Rd. should beentered as royalUoak. Use the backspace (V)screen button if an incorrect character has beenentered.
8. Select the desired street name from the list bytouching the screen button next to the correctstreet name.
9. Enter the address number using the numerickeypad on the screen. You may first have to selectthe correct range for the address number, thenenter the desired address and touch the OK screenbutton.
10. Touch the Enter Destination screen button. Theaddress entry is now complete.
11. Once you begin driving you will hear an audioprompt to “Proceed to the highlighted route.”You are now in route guidance mode.
1-7
Entering a Point of Interest (POI)To set a destination by entering a Point of Interest (POI),do the following:
1. Press the power/volume knob to turn thesystem on.
2. Insert the DVD map disc into the CD slot.3. A notice may appear. Touch the NEXT screen
button to proceed.If the radio is already on with a map disc inserted,push the NAV hard key.
4. Touch the DEST screen button.5. Verify that the selected Search Area is correct.6. Touch the POI screen button.7. Enter the specific title of the POI in the Name space
(i.e. Washington Monument) using the alpha keypadon the screen.• If there are POIs with the same name, spell out
the name and then touch the List screen button(McDonald’s restaurant vs. McDonald corporateoffice).
• Select the business desired.
• The system will list the POIs in alphabetical orderor, if there are multiple POIs with the same name,the system will list the POIs in order of distancefrom your location.
• Touch the screen button next to the address ofthe POI desired.
8. Touch the Enter Destination screen button. ThePOI entry is now complete.
9. Once you begin driving you will hear an audioprompt to “Proceed to the highlighted route.”You are now in route guidance mode.
Using the Category or City selections will aid the systemin finding your POI by limiting the search options.
Setting Home Destination1. Press the power/volume knob to turn the system on.
2. Insert the DVD map disc into the CD slot.
3. A notice may appear. Touch the NEXT screenbutton to proceed.If the radio is already on with a map disc inserted,push the NAV hard key.
4. Touch the Nav y (navigation) menu screen button.
5. Touch the Memory Points screen button.
6. Touch the Register Home screen button.
7. Touch the Address screen button and then enter alladdress information.
8. Touch the Register Point screen button to store thehome address as a memory point.
1-8
Setting Preset Destinations1. Press the power/volume knob to turn the system on.
2. Insert the DVD map disc into the CD slot.
3. A notice may appear. Touch the NEXT screenbutton to proceed.If the radio is already on with a map disc inserted,push the NAV hard key.
4. Touch the Nav y (navigation) menu screen button.
5. Touch the Memory Points screen button.
6. Touch the Register screen button.
7. Touch one of the five preset buttons.
8. Touch the Address screen button and then enterthe address information.
9. Touch the Register Point screen button to store thememory point.
Using Your Home or PresetDestinationsThese destinations are available for selection whiledriving.
1. Press the power/volume knob to turn the system on.
2. Insert the DVD map disc into the CD slot.
3. Touch the DEST screen button.
4. Touch the L (Home symbol) or one of the availablePreset Destination symbols at the bottom of theDestination screen.
5. Once you begin driving, or if you are alreadydriving, you will hear an audio prompt to “Proceed tothe highlighted route.” You are now in routeguidance mode.
Canceling GuidanceGuidance will be canceled once you arrive at your finaldestination. To cancel guidance prior to arrival at thefinal destination, do the following:
1. From the map screen, touch the Nav Optionsscreen button.
2. Touch the Cancel Route screen button.
3. Touch the Yes screen button to confirmcancellation.
Cleaning the Video ScreenWhen cleaning the video screen, use only a soft cleancotton cloth dampened with clean water.
1-9
✍ NOTES
1-10
Features and Controls ......................................2-2Using the Navigation System ...........................2-2Maps ............................................................2-5Symbols ........................................................2-6Navigation Menu ............................................2-8Destination ..................................................2-17Colors on the Screen ....................................2-30
Configure Menu ............................................2-31Global Positioning System (GPS) ....................2-33Vehicle Positioning ........................................2-34Problems with Route Guidance .......................2-35If the System Needs Service ..........................2-36Ordering Map DVDs ......................................2-36Database Coverage Explanations ....................2-36
Section 2 Features and Controls
2-1
Features and Controls
Using the Navigation SystemThis section includes the basic information to operatethe navigation system.
The main navigation menu displays a number of optionswhich offer information on a variety of topics. SeeNavigation Menu on page 2-8 for more information.
Use the hard keys located on the navigation systemalong with the available touch-sensitive screen buttonson the navigation screen to operate the system.
Once the vehicle is moving, various functions will bedisabled to reduce driver distractions.
Hard KeysThe following hard keys are located to the left of thenavigation screen:
P (Power/Volume Knob): Press the power/volumeknob to turn the audio and navigation system on and off.Turn the knob to increase or decrease the volume tothe audio system.
NAV RPT (Navigation Repeat): Press the NAV RPTkey to repeat the current voice guidance navigationprompt.
NAV (Navigation): If you are in a menu and are not onthe map screen, press the NAV key to view the mapshowing your vehicle’s current position.
If a route has not been planned, press this key todisplay the map screen and the following information:
• North or Heading Up symbol
• Time
• Map scale
2-2
If a route has been planned, press this key to displaythe map screen and the following information:
• Number of miles/kilometers between current vehicleposition and the destination. See “Route OverviewMenu” under Destination on page 2-17 for moreinformation.
• Estimated travel time to the destination. See “RouteOverview Menu” under Destination on page 2-17 formore information.
• Highlighted route or turn-by-turn instructions. See“Map Appearance” under Navigation Menu onpage 2-8 for more information.
You will find more information on each feature found ona map screen later in this manual.
BAND: Press the BAND key to access the BANDscreen and to switch between AM, FM1, FM2, XM1, orXM2, if equipped. See “Finding a Station” underNavigation Audio System on page 3-2.
xSEEK w: Press the SEEK up or down arrows to goto the next or previous radio station or tracks on aCD. See “Finding a Station” under Navigation AudioSystem on page 3-2 or CD Player on page 3-9.
B (CD): Press the CD key to play a CD. The CDscreen will display. See CD Player on page 3-9.
e (Audio): Press the audio key to access the Audiomenu. See Navigation Audio System on page 3-2.
CONFIG (Configure): Press the CONFIG key to accessthe Configure menu. See Configure Menu on page 2-31for more information.
O (Tuning) Knob: Turn this knob to go to the next orprevious frequency and stay there. See “Finding aStation” under Navigation Audio System on page 3-2.
X (Eject): Press the eject key located next to theDVD/CD slot to eject a map DVD or CD.
2-3
Alpha-Numeric KeypadLetters of the alphabet, symbols, punctuation, andnumbers will display on the navigation screen as analpha or numeric keypad. The appropriate keypadwill automatically display whenever the system needsinformation from you. The alpha keypad will displaywhen the system needs input of a city or street name.The numeric keypad will display when the system needsinput of a phone number or house address.
Touch a character on the screen to select it. You mayalso touch the 0 - 9 screen button at any time fromthe alpha keypad to access the numeric keypad.
U (Space): Touch this screen button to enter aspace between characters or the words of a name.
V (Backspace): Touch this screen button if anincorrect character has been selected.
To make name selections easier, the system will onlyallow you to select a character which can follow the lastone entered. For example, if a Z is entered, a T willnot be available to select. The system will highlight theavailable characters.
If a name is not available after input, it may need to beinputted differently, the map DVD database may notcontain that information, or the correct search area hasnot been selected. See Database CoverageExplanations on page 2-36.
Touch-Sensitive Screen ButtonsTouch-sensitive buttons are located on the screen. Afterselecting a button on the screen, a beep will sound.This feature can be turned off. See Configure Menu onpage 2-31 for more information. Screen buttons willbe highlighted when available. There are some togglescreen buttons that will be light blue when active.
The following touch-sensitive screen buttons will appearfrequently at the bottom of a map screen.
2-4
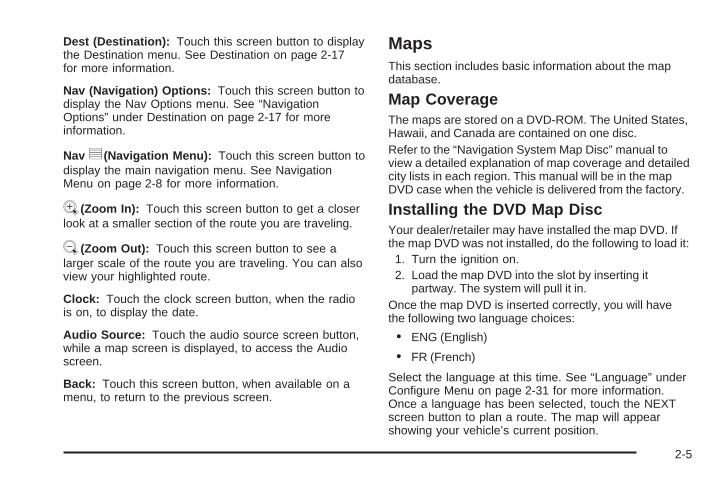
Dest (Destination): Touch this screen button to displaythe Destination menu. See Destination on page 2-17for more information.
Nav (Navigation) Options: Touch this screen button todisplay the Nav Options menu. See “NavigationOptions” under Destination on page 2-17 for moreinformation.
Nav y (Navigation Menu): Touch this screen button todisplay the main navigation menu. See NavigationMenu on page 2-8 for more information.
V (Zoom In): Touch this screen button to get a closerlook at a smaller section of the route you are traveling.
U (Zoom Out): Touch this screen button to see alarger scale of the route you are traveling. You can alsoview your highlighted route.
Clock: Touch the clock screen button, when the radiois on, to display the date.
Audio Source: Touch the audio source screen button,while a map screen is displayed, to access the Audioscreen.
Back: Touch this screen button, when available on amenu, to return to the previous screen.
MapsThis section includes basic information about the mapdatabase.
Map CoverageThe maps are stored on a DVD-ROM. The United States,Hawaii, and Canada are contained on one disc.Refer to the “Navigation System Map Disc” manual toview a detailed explanation of map coverage and detailedcity lists in each region. This manual will be in the mapDVD case when the vehicle is delivered from the factory.
Installing the DVD Map DiscYour dealer/retailer may have installed the map DVD. Ifthe map DVD was not installed, do the following to load it:
1. Turn the ignition on.2. Load the map DVD into the slot by inserting it
partway. The system will pull it in.Once the map DVD is inserted correctly, you will havethe following two language choices:
• ENG (English)
• FR (French)
Select the language at this time. See “Language” underConfigure Menu on page 2-31 for more information.Once a language has been selected, touch the NEXTscreen button to plan a route. The map will appearshowing your vehicle’s current position.
2-5
Ejecting the DVD Map DiscWhen the DVD map disc is not loaded, you will not beable to use the navigation portion of the system.
X (Eject): Press the eject key, located next to theDVD/CD slot, to eject a DVD map disc and a CD. Thedisc will eject.
Handling the DVD Map DiscWhen handling the DVD map disc, be careful of thefollowing:
• Handle the disc very carefully to avoidcontamination or flaws. Signals may not read outproperly if the disc gets contaminated or flawed.
• If the disc gets soiled, use a soft cloth to gently wipeit out from the center of the disc to the outside. Donot use photographic record cleaner, solvents,or other cleaners.
• Do not use the disc to rest on while writing ordrawing using any writing utensil or attach a seal toany of the sides or the disc.
• Do not keep the disc in direct sunlight, hightemperatures, or humidity.
• After using the disc, place it back into theoriginal case.
Map Adjustments and ScalesThe system allows you to adjust the scale of view onthe map. The map will scroll automatically based on thedirection the vehicle is traveling.
To view a larger or smaller scale of the map, touchzoom in or zoom out. The scale of a map can rangefrom 1/32 of a mile (0.05 km) to 128 miles (206 km). See“Hard Keys” under Using the Navigation System onpage 2-2 for more information.
SymbolsThe following symbols are the most common thatappear on a map screen.
Your vehicle is shown asthis symbol. It indicates thecurrent position andvehicle orientation of yourvehicle on the map.
2-6
This red bulls-eye symbolwill appear on the map toshow your final destinationafter a route has beenplanned.
See Destination on page 2-17 for information onplanning a route.
The waypoint symbol willdisplay on the map after awaypoint has beenadded to the route.
The waypoint symbol will be numbered from onethrough five depending on how many intermediatewaypoints have been set.
See “Preset Destinations” under Destination onpage 2-17 for more information.
This symbol indicates thatthe map is shown withNorth up (North Up mode).
While in North Up mode, North will always be at the topof the map screen regardless of which direction thevehicle is traveling. Touch this screen button to switchbetween North Up and Heading Up modes. See“Map Appearance” under Navigation Menu on page 2-8for more information.
This symbol indicates thatthe map is shown with thevehicle travel directionup (Heading Up mode).
The shaded triangle indicates North. While in HeadingUp mode, the direction your vehicle is traveling willalways be at the top of the map screen. Touchthis screen button to switch between Heading Up andNorth Up modes. See “Map Appearance” underNavigation Menu on page 2-8 for more information.
2-7
Navigation Menu
Nav y (Navigation Menu): Touch the navigation menuscreen button at the bottom of the map screen toaccess the main navigation menu.
The main navigation menu allows you to select from alist of options and to use the available touch screenbuttons to make system adjustments and plan routes.
You will be able to select from the following items onthe main navigation menu:
Suspend Guidance
} (Suspend Guidance): Select this screen buttonfrom the Nav Menu to suspend guidance to all currentand programmed destinations, but the current routewill be retained in memory. You will no longer receivevoice prompts for navigation. The map can still beviewed by pressing the NAV hard key. If you suspendguidance, you can touch the Resume Guidancescreen button to resume the current route.
Route Overview
z (Route Overview): Select this screen button todisplay the map with the route highlighted. Thetotal distance and estimated travel time will also display.
2-8
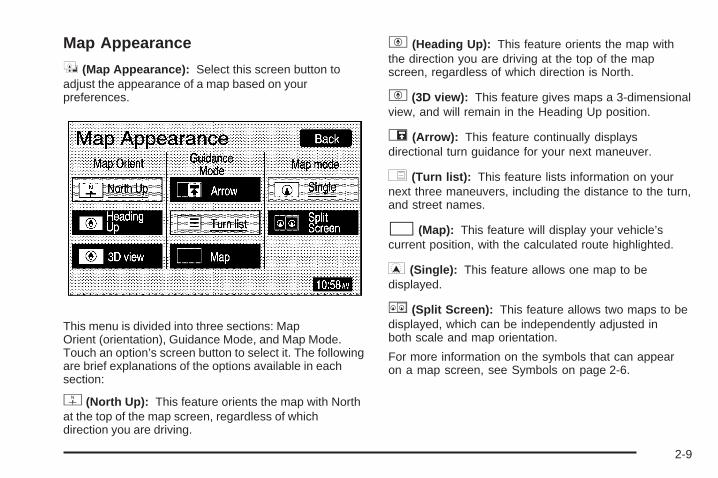
Map Appearance
v (Map Appearance): Select this screen button toadjust the appearance of a map based on yourpreferences.
This menu is divided into three sections: MapOrient (orientation), Guidance Mode, and Map Mode.Touch an option’s screen button to select it. The followingare brief explanations of the options available in eachsection:
y (North Up): This feature orients the map with Northat the top of the map screen, regardless of whichdirection you are driving.
u (Heading Up): This feature orients the map withthe direction you are driving at the top of the mapscreen, regardless of which direction is North.
u (3D view): This feature gives maps a 3-dimensionalview, and will remain in the Heading Up position.
s (Arrow): This feature continually displaysdirectional turn guidance for your next maneuver.
R (Turn list): This feature lists information on yournext three maneuvers, including the distance to the turn,and street names.
? (Map): This feature will display your vehicle’scurrent position, with the calculated route highlighted.
P (Single): This feature allows one map to bedisplayed.
| (Split Screen): This feature allows two maps to bedisplayed, which can be independently adjusted inboth scale and map orientation.
For more information on the symbols that can appearon a map screen, see Symbols on page 2-6.
2-9
Voice Volume
! (Voice Volume): Select this screen button to adjustthe volume of the voice guidance prompts thatprovide various messages as you approach pointswhere you need to maneuver your vehicle, such as anintersection.
To adjust the volume of the voice prompts, do thefollowing:
1. Touch the Voice Volume screen button.
2. Touch the plus (+) or minus (−) sign screen buttonsto increase or decrease the volume. The voiceprompt will come on with each adjustment to giveyou an idea of the volume at each level.
3. Once you have reached the desired volume level,touch the Back screen button to return to theprevious screen.
Adaptive Voice Volume Control: The volume of voiceprompts will increase automatically once the vehicleexceeds 50 mph (80 km/h). Touch the On screen buttonto activate this feature, or the Off screen button toturn this feature off.
If voice guidance is not needed, lower the volume as faras it will go, so the voice prompts are not heard.
2-10
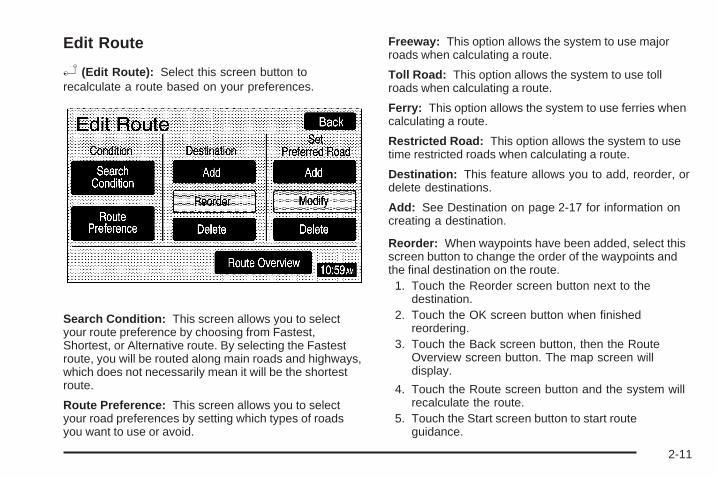
Edit Route
t (Edit Route): Select this screen button torecalculate a route based on your preferences.
Search Condition: This screen allows you to selectyour route preference by choosing from Fastest,Shortest, or Alternative route. By selecting the Fastestroute, you will be routed along main roads and highways,which does not necessarily mean it will be the shortestroute.
Route Preference: This screen allows you to selectyour road preferences by setting which types of roadsyou want to use or avoid.
Freeway: This option allows the system to use majorroads when calculating a route.
Toll Road: This option allows the system to use tollroads when calculating a route.
Ferry: This option allows the system to use ferries whencalculating a route.
Restricted Road: This option allows the system to usetime restricted roads when calculating a route.
Destination: This feature allows you to add, reorder, ordelete destinations.
Add: See Destination on page 2-17 for information oncreating a destination.
Reorder: When waypoints have been added, select thisscreen button to change the order of the waypoints andthe final destination on the route.
1. Touch the Reorder screen button next to thedestination.
2. Touch the OK screen button when finishedreordering.
3. Touch the Back screen button, then the RouteOverview screen button. The map screen willdisplay.
4. Touch the Route screen button and the system willrecalculate the route.
5. Touch the Start screen button to start routeguidance.
2-11
Delete: Press this button to delete the currentdestination.
Set Preferred Road: This feature allows you to add,modify, or delete road preference settings.
Add: Press this screen button to add a road. The mapscreen will display. Touch the map to scroll to thepreferred road. Select the OK screen button. Press theEnter screen button to set the road as a road to beadded to the current destination or the Next screenbutton to change the road type.
Modify: Press this screen button to change thepreferred road. Follow the directions for the “Add” screenbutton.
Delete: Press this button to delete road preferencesettings.
Route Overview: Touch this screen button to accessthe Route Overview menu. See “Route Overview” underDestination on page 2-17.
Route Preview
{ (Route Preview): Select this screen button onceroute guidance has begun to display the map screenwith the route highlighted.
The route is traced by the vehicle symbol as you travel.You can preview the route from the starting positionto the final destination by touching the arrow screenbuttons inside the Route Preview pop-up menu.
Info (Information): Touch the Info screen button toview POI information such as the POI name, address,and phone number, if available.
2-12
Edit: Touch the Edit screen button to select a POI asthe next destination you would like to preview.
To preview a POI’s destination instead of the finaldestination, do the following:
1. Touch the Edit screen button.
2. Touch the Select POI screen button.
3. Touch the screen button of the desired POIcategory.
4. Touch the icon screen button of the desired POI,then touch the OK screen button.
5. Touch the Back screen button twice to get to theEdit Route Preview screen.
6. Touch the Next POI screen button, then touch theOK screen button.
7. Touch the Back screen button to return to theRoute Preview screen.Now when you touch the arrow screen buttons topreview the route, it will trace the route to thenext selected POI rather than the route to the finaldestination.
To return to previewing the route to the final destination,do the following:
1. Touch the Edit screen button.
2. Touch the Next screen button.
3. Touch the OK screen button, then the Back screenbutton to return to the Route Preview screen.Now when you touch the arrow screen buttons topreview the route, it will trace the route to the finaldestination rather than the route to the next POI.
Use the following arrow screen buttons from the RoutePreview pop-up menu to trace a route:
Iq (Preview to current location): Touch this screenbutton to preview the route traveling toward thevehicle’s current location. Touch this screen buttonrepeatedly to increase the speed at which the indicatorwill trace the route.
rh (Preview to final destination): Touch this screenbutton to view the route traveling toward the finaldestination. Touch this screen button repeatedly toincrease the speed at which the indicator will trace theroute.
It (View current location): Touch this screenbutton to view the vehicle’s current location along thecurrent route.
uh (View final destination): Touch this screenbutton to view the final destination along the currentroute.
2-13
Navigation Setup
x (Navigation Setup): Select this screen button todisplay the Nav Setup menu.
From this menu, several options may be selected,adjusted, or turned on and off. Touch the up or downarrow screen buttons to the left of the menu options toscroll through the list. The following are the availableoptions with a brief explanation of each:
English/Metric: This feature switches distancemeasurements between English or metric. Touch theMiles screen button for English measurements, or the Km(kilometers) screen button for metric measurements.
Notify Seasonal Restrict (Restrictions): This featurenotifies the driver of seasonal maneuver restrictions.Touch the On screen button to have a voice prompt warnof existing seasonal restrictions played at guidancepoints. Touch the Off screen button to turn this feature off.
Estimated Travel Time: This feature displays theestimated time to travel from your current position to thedestination. Touch the On screen button to have theestimated travel time displayed with the distanceto destination, or the Off screen button to turn thisfeature off.
Enter Speed Change?: This feature allows you toadjust estimated speeds for Freeway, Main street, orResidential driving. These speed values are used tocalculate estimated travel time. To change estimatedspeeds, touch the Yes screen button. The Change Speedmenu will appear. Touch the arrow screen buttons undereach road type to increase or decrease the speed. Themaximum allowable speed to set is 100 mph (161 km).You may also touch the Default screen button to choosefactory default speed settings as your choice. When youradjustments are complete, touch the Back screen buttonto return to the Nav Setup menu.
Auto Reroute: With this feature on, the navigationsystem will automatically recalculate a route if you driveoff course. Touch the Off screen button to turn thisfeature off.
2-14
Voice Guide in All Mode: Touch the On screen buttonto hear navigation voice prompts while in Audio mode.Touch the Off screen button to turn this feature off.
Current Street Name: Touch the On screen button todisplay the current street name that the vehicle istraveling on. Touch the Off screen button to turn thisfeature off.
Exit Information: This feature will display map iconswhich can be selected to display the next exit’sinformation, including Point of Interest (POI) facilitiessuch as gas stations, restaurants, and lodging. Touchthe On screen button to display exit information icons, ortouch the Off screen button to cancel the display ofexit information icons.
Map Color (Day): This feature allows you to adjust thedaytime map appearance. Choose between Normal,Auto, 1, 2, 3, or 4. The numbered settings vary the colorscheme of the map display. The Auto setting will changethe map appearance automatically every three months.When the desired color setting has been selected, pressthe NAV hard key to view the adjusted map color.
Map Color (Night): This feature allows you to adjustthe nighttime map appearance. Choose betweenNormal, Auto, 1, 2, 3, or 4. The numbered settings varythe color scheme of the map display. The Auto settingwill change the map appearance automatically everythree months. When the desired color setting has beenselected, press the NAV hard key to view the adjustedmap color.
Calibrate System?: This feature will calibrate wheelspeed to assist in the calculation of vehicle position. Thisfeature also allows you to manually reposition thevehicle symbol on the map. You may need to calibratethe system following a tire change, rotation, or ifyour vehicle has been relocated a great distance. Touchthe Yes screen button to calibrate the system, or theNo screen button to leave the calibration as it is.See Vehicle Positioning on page 2-34 for moreinformation.
Select Defaults?: This feature allows you to restore allavailable factory default settings in the Nav Setupmenu. Touch the Yes screen button to restore defaults,or the No screen button to retain the current settings.
2-15
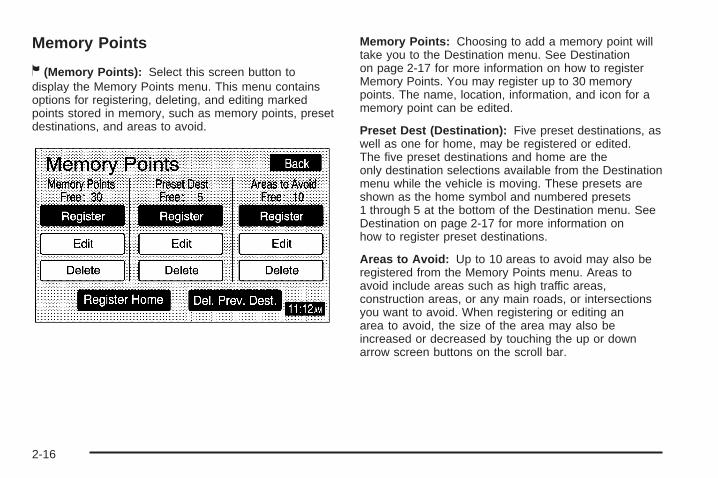
Memory Points
w (Memory Points): Select this screen button todisplay the Memory Points menu. This menu containsoptions for registering, deleting, and editing markedpoints stored in memory, such as memory points, presetdestinations, and areas to avoid.
Memory Points: Choosing to add a memory point willtake you to the Destination menu. See Destinationon page 2-17 for more information on how to registerMemory Points. You may register up to 30 memorypoints. The name, location, information, and icon for amemory point can be edited.
Preset Dest (Destination): Five preset destinations, aswell as one for home, may be registered or edited.The five preset destinations and home are theonly destination selections available from the Destinationmenu while the vehicle is moving. These presets areshown as the home symbol and numbered presets1 through 5 at the bottom of the Destination menu. SeeDestination on page 2-17 for more information onhow to register preset destinations.
Areas to Avoid: Up to 10 areas to avoid may also beregistered from the Memory Points menu. Areas toavoid include areas such as high traffic areas,construction areas, or any main roads, or intersectionsyou want to avoid. When registering or editing anarea to avoid, the size of the area may also beincreased or decreased by touching the up or downarrow screen buttons on the scroll bar.
2-16
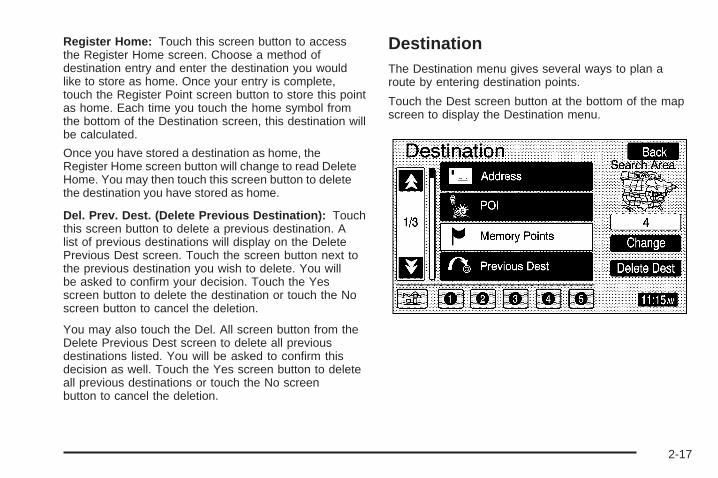
Register Home: Touch this screen button to accessthe Register Home screen. Choose a method ofdestination entry and enter the destination you wouldlike to store as home. Once your entry is complete,touch the Register Point screen button to store this pointas home. Each time you touch the home symbol fromthe bottom of the Destination screen, this destination willbe calculated.
Once you have stored a destination as home, theRegister Home screen button will change to read DeleteHome. You may then touch this screen button to deletethe destination you have stored as home.
Del. Prev. Dest. (Delete Previous Destination): Touchthis screen button to delete a previous destination. Alist of previous destinations will display on the DeletePrevious Dest screen. Touch the screen button next tothe previous destination you wish to delete. You willbe asked to confirm your decision. Touch the Yesscreen button to delete the destination or touch the Noscreen button to cancel the deletion.
You may also touch the Del. All screen button from theDelete Previous Dest screen to delete all previousdestinations listed. You will be asked to confirm thisdecision as well. Touch the Yes screen button to deleteall previous destinations or touch the No screenbutton to cancel the deletion.
DestinationThe Destination menu gives several ways to plan aroute by entering destination points.
Touch the Dest screen button at the bottom of the mapscreen to display the Destination menu.
2-17
Search Area: The Destination menu allows you toselect the area to be searched for your destination. Amap of the 48 contiguous United States, includingHawaii, and Canada will be shown. The map is dividedinto nine regions.
Before selecting a destination, review the search areamap on the right side of the menu to make sureyour destination is located in the highlighted region.
Change: Touch this screen button to see a moredetailed search area map with a list of states or tochange the search area. The Search Area screen willappear. Touch the numbered screen button to the left ofthe map that corresponds with the numbered regionyou wish to choose.
Delete Dest (Destination): Touch the Delete Destscreen button on the Destination menu to deletethe current destination.
k / l (Up and Down Arrows): Touch the up or downarrow screen buttons, on the Destination menu, toscroll through the pages of the menu.
Once your destination entry is complete, a screen withthe destination preview menu will display. See“Destination Preview Menu” later in this section for moreinformation.
2-18
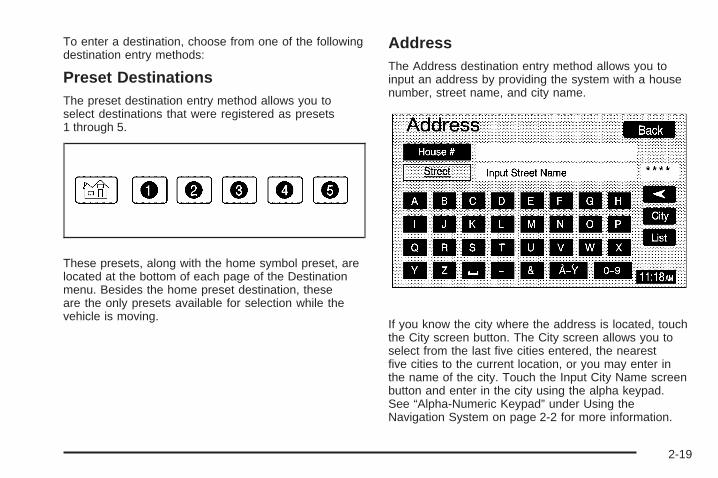
To enter a destination, choose from one of the followingdestination entry methods:
Preset DestinationsThe preset destination entry method allows you toselect destinations that were registered as presets1 through 5.
These presets, along with the home symbol preset, arelocated at the bottom of each page of the Destinationmenu. Besides the home preset destination, theseare the only presets available for selection while thevehicle is moving.
AddressThe Address destination entry method allows you toinput an address by providing the system with a housenumber, street name, and city name.
If you know the city where the address is located, touchthe City screen button. The City screen allows you toselect from the last five cities entered, the nearestfive cities to the current location, or you may enter inthe name of the city. Touch the Input City Name screenbutton and enter in the city using the alpha keypad.See “Alpha-Numeric Keypad” under Using theNavigation System on page 2-2 for more information.
2-19
Use the same city name that you would use whenmailing a letter. The system will search for an entryexactly as you have entered it. If you did not include aspace between words where necessary, the systemmay not be able to find the desired location. Asinformation is entered, the system will automaticallysearch for available names, and the List screen buttonwill become available. Touch the List screen buttonto view name choices and select the desired city name,or touch the Back screen button to continue to spellthe city name, further reducing the number of availableitems. The box at the end of the Street entry fieldwill contain the number of city names available in thecurrent generated list. If you do not know the city,proceed to entering the street name.
Enter the street name using the alpha keypad. See“Alpha-Numeric Keypad” under Using the NavigationSystem on page 2-2 for more information. Do not includename extensions such as N. or Drive. For example,the street name N. Civic Center Drive should be enteredas CivicUCenter. The system will search for anentry exactly as you have entered it. If you didnot include a space between words where necessary,the system may not be able to find the desired location.
As information is entered, the system will automaticallysearch for available names, and the List screenbutton will become available. Touch the List screenbutton to view name choices and select the desiredstreet name, or touch the Back screen button to continueto spell the street name, further reducing the numberof available items. The box at the end of the Street entryfield will contain the number of street names availablein the current generated list.
Once the street name has been selected, enter the housenumber using the numeric keypad. The system will listthe house number range that is available for the street.When you have finished entering the house number,touch the OK screen button. If the address number existson more than one street that shares the same name, a listof matching street names will display. Touch the screenbutton by the desired street name.
If you have not already entered in the city name for theaddress, a list of cities that contain the address willdisplay. Touch the screen button by the desired city toselect it.
2-20
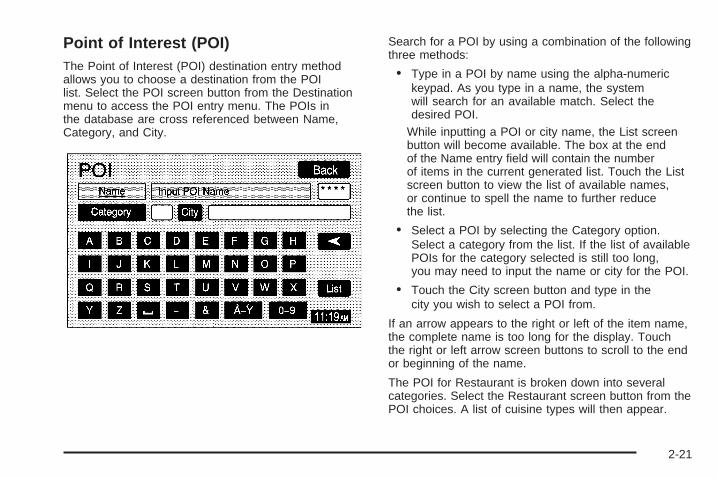
Point of Interest (POI)The Point of Interest (POI) destination entry methodallows you to choose a destination from the POIlist. Select the POI screen button from the Destinationmenu to access the POI entry menu. The POIs inthe database are cross referenced between Name,Category, and City.
Search for a POI by using a combination of the followingthree methods:
• Type in a POI by name using the alpha-numerickeypad. As you type in a name, the systemwill search for an available match. Select thedesired POI.
While inputting a POI or city name, the List screenbutton will become available. The box at the endof the Name entry field will contain the numberof items in the current generated list. Touch the Listscreen button to view the list of available names,or continue to spell the name to further reducethe list.
• Select a POI by selecting the Category option.Select a category from the list. If the list of availablePOIs for the category selected is still too long,you may need to input the name or city for the POI.
• Touch the City screen button and type in thecity you wish to select a POI from.
If an arrow appears to the right or left of the item name,the complete name is too long for the display. Touchthe right or left arrow screen buttons to scroll to the endor beginning of the name.
The POI for Restaurant is broken down into severalcategories. Select the Restaurant screen button from thePOI choices. A list of cuisine types will then appear.
2-21
Memory PointsThe Memory Points destination entry method allows youto select a destination by choosing from a list ofmarked points on the map that were previously marked.
Memory points include up to 30 saved points, fivepreset destinations, and a home destination. Select theMemory Points screen button from the Destinationscreen to select any one of the marked points as theactive destination. Marked points can also be sorted byicon, date saved, or alphabetically.
If a memory point has been registered, you can select anicon to correspond with that memory point. To registerthat memory point with a sound, touch the With Soundscreen button, then select a sound.See “Memory Points” under Navigation Menu onpage 2-8 for more information on registering, editing, anddeleting memory points.
Previous DestinationThe Previous Destination entry method allows you toselect a destination by selecting from a list of previouslyentered destinations.
Touch the number next to the destination to select it as adestination or a waypoint.
2-22
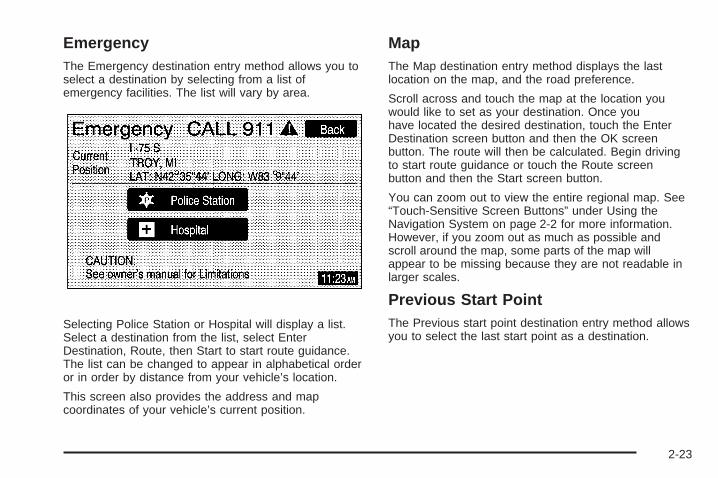
EmergencyThe Emergency destination entry method allows you toselect a destination by selecting from a list ofemergency facilities. The list will vary by area.
Selecting Police Station or Hospital will display a list.Select a destination from the list, select EnterDestination, Route, then Start to start route guidance.The list can be changed to appear in alphabetical orderor in order by distance from your vehicle’s location.
This screen also provides the address and mapcoordinates of your vehicle’s current position.
MapThe Map destination entry method displays the lastlocation on the map, and the road preference.
Scroll across and touch the map at the location youwould like to set as your destination. Once youhave located the desired destination, touch the EnterDestination screen button and then the OK screenbutton. The route will then be calculated. Begin drivingto start route guidance or touch the Route screenbutton and then the Start screen button.
You can zoom out to view the entire regional map. See“Touch-Sensitive Screen Buttons” under Using theNavigation System on page 2-2 for more information.However, if you zoom out as much as possible andscroll around the map, some parts of the map willappear to be missing because they are not readable inlarger scales.
Previous Start PointThe Previous start point destination entry method allowsyou to select the last start point as a destination.
2-23
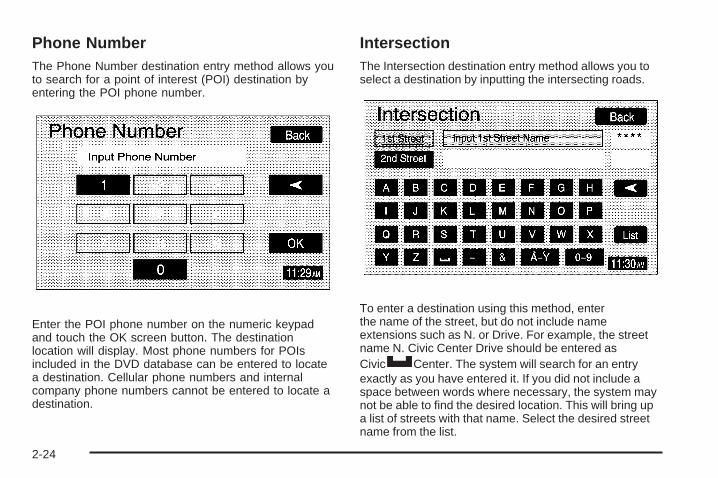
Phone NumberThe Phone Number destination entry method allows youto search for a point of interest (POI) destination byentering the POI phone number.
Enter the POI phone number on the numeric keypadand touch the OK screen button. The destinationlocation will display. Most phone numbers for POIsincluded in the DVD database can be entered to locatea destination. Cellular phone numbers and internalcompany phone numbers cannot be entered to locate adestination.
IntersectionThe Intersection destination entry method allows you toselect a destination by inputting the intersecting roads.
To enter a destination using this method, enterthe name of the street, but do not include nameextensions such as N. or Drive. For example, the streetname N. Civic Center Drive should be entered asCivicUCenter. The system will search for an entryexactly as you have entered it. If you did not include aspace between words where necessary, the system maynot be able to find the desired location. This will bring upa list of streets with that name. Select the desired streetname from the list.
2-24
Now begin entering the second street name, and selectthe desired street name from the list. After both streetnames in the intersection have been selected, a list ofcities containing the selected intersection will appear. Ifthere are several cities that contain that specificintersection, you must specify a city. Select the desiredcity from the list. The route will then be calculated. Begindriving to start route guidance or touch the Route screenbutton and then the Start screen button.
Freeway Entrance/ExitThe Freeway Entrance/Exit destination entry methodallows you to select a destination by entering a freewayentrance or exit point.
Enter Freeway names using the alpha keypad. See“Alpha-Numeric Keypad” under Using the NavigationSystem on page 2-2 for more information. After enteringthe freeway name, enter the name of the entrance orexit that you want to set as the destination.
2-25
Destination Preview Menu
Each time a destination is entered, a screen with thedestination preview menu will appear. This screen willdisplay a zoomed in view of the destination, as well as thefollowing options:Enter Destination: Touch this screen button to set thecurrent destination as the only destination in the system.The route will be calculated and the Route Previewscreen will display.
Add Waypoint: Touch this screen button to add thecurrent destination to your current trip. The Add Waypointscreen will display. Touch the Add screen button thatcorresponds with where you would like to add the currentdestination. Up to five waypoints can be added.
Info (Information): When a POI icon is selected on thescreen, touch this screen button to display the name,address, and telephone number, if available, forthe selected POI. See “Navigation Options” later in thissection for more information on POIs and their icons.
Route Preference: This option will display theRoute Preference screen. To adjust route preferences,touch Change. See “Edit Route” under NavigationMenu on page 2-8 for more information.
Once the desired adjustments from the destinationpreview menu are complete, the route overview menucan be displayed. See “Route Overview Menu” followingin this section for more information.
Once you have entered your destination by touching theEnter Destination screen button, you can do one ofthe following:
• Press the NAV hard key to begin route guidance.
• Start driving to begin route guidance.
• Touch the Route screen button on the map screendisplaying the new destination to make furtherchanges. See “Route Overview” following in thissection for more information.
2-26
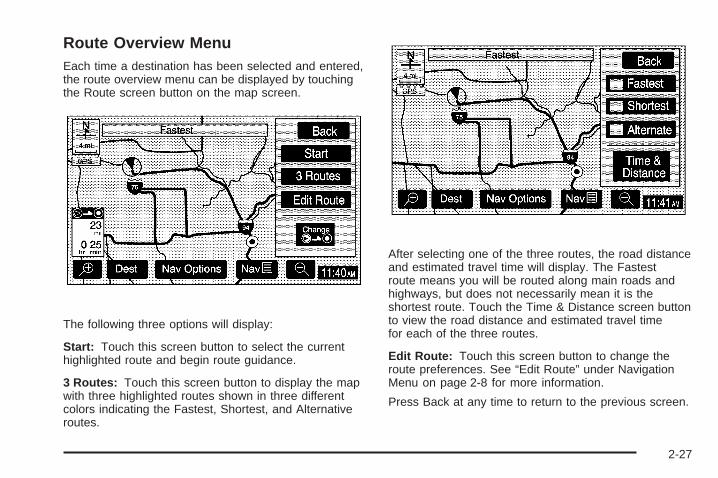
Route Overview MenuEach time a destination has been selected and entered,the route overview menu can be displayed by touchingthe Route screen button on the map screen.
The following three options will display:
Start: Touch this screen button to select the currenthighlighted route and begin route guidance.
3 Routes: Touch this screen button to display the mapwith three highlighted routes shown in three differentcolors indicating the Fastest, Shortest, and Alternativeroutes.
After selecting one of the three routes, the road distanceand estimated travel time will display. The Fastestroute means you will be routed along main roads andhighways, but does not necessarily mean it is theshortest route. Touch the Time & Distance screen buttonto view the road distance and estimated travel timefor each of the three routes.
Edit Route: Touch this screen button to change theroute preferences. See “Edit Route” under NavigationMenu on page 2-8 for more information.
Press Back at any time to return to the previous screen.
2-27
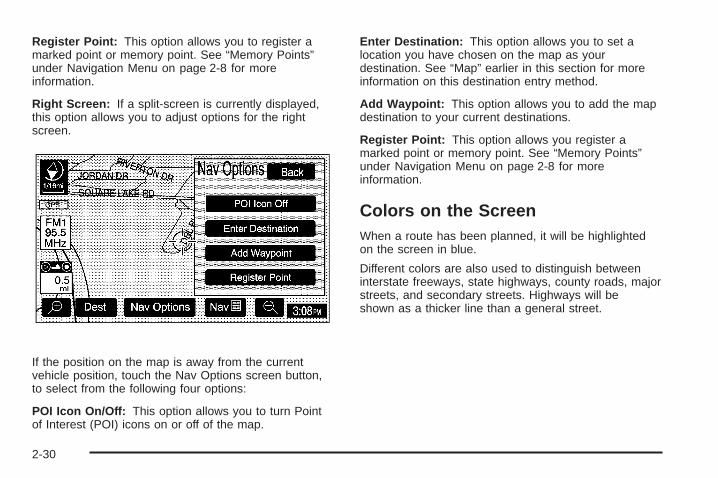
Navigation Options
Once a destination is selected and you begin yourroute, touch the Nav Options screen button to view amenu with additional route options. Select from thefollowing route options:
POI Icon On/Off: This option allows you to turn Pointof Interest (POI) icons on or off of the map.
POI Selection: This option allows you to select whichtypes of POIs will be displayed on the map.
After selecting POI selection, the POI Selection screenwill appear and display the different POI categories.You can select up to five different POI categoriesby touching the categories on the screen. Touch theMore screen button to view more categories. The iconsfor the selected categories will appear at the top ofthe screen and will display on the map.
Nav Options Menu shown with a Set Destination
2-28
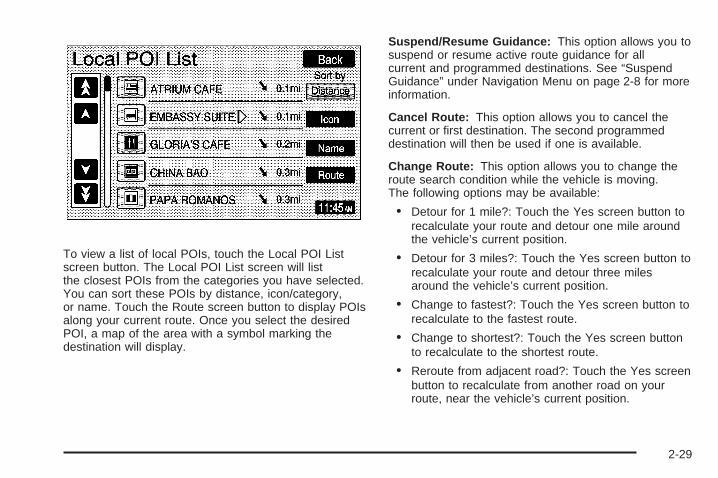
To view a list of local POIs, touch the Local POI Listscreen button. The Local POI List screen will listthe closest POIs from the categories you have selected.You can sort these POIs by distance, icon/category,or name. Touch the Route screen button to display POIsalong your current route. Once you select the desiredPOI, a map of the area with a symbol marking thedestination will display.
Suspend/Resume Guidance: This option allows you tosuspend or resume active route guidance for allcurrent and programmed destinations. See “SuspendGuidance” under Navigation Menu on page 2-8 for moreinformation.
Cancel Route: This option allows you to cancel thecurrent or first destination. The second programmeddestination will then be used if one is available.
Change Route: This option allows you to change theroute search condition while the vehicle is moving.The following options may be available:
• Detour for 1 mile?: Touch the Yes screen button torecalculate your route and detour one mile aroundthe vehicle’s current position.
• Detour for 3 miles?: Touch the Yes screen button torecalculate your route and detour three milesaround the vehicle’s current position.
• Change to fastest?: Touch the Yes screen button torecalculate to the fastest route.
• Change to shortest?: Touch the Yes screen buttonto recalculate to the shortest route.
• Reroute from adjacent road?: Touch the Yes screenbutton to recalculate from another road on yourroute, near the vehicle’s current position.
2-29
Register Point: This option allows you to register amarked point or memory point. See “Memory Points”under Navigation Menu on page 2-8 for moreinformation.
Right Screen: If a split-screen is currently displayed,this option allows you to adjust options for the rightscreen.
If the position on the map is away from the currentvehicle position, touch the Nav Options screen button,to select from the following four options:
POI Icon On/Off: This option allows you to turn Pointof Interest (POI) icons on or off of the map.
Enter Destination: This option allows you to set alocation you have chosen on the map as yourdestination. See “Map” earlier in this section for moreinformation on this destination entry method.
Add Waypoint: This option allows you to add the mapdestination to your current destinations.
Register Point: This option allows you register amarked point or memory point. See “Memory Points”under Navigation Menu on page 2-8 for moreinformation.
Colors on the ScreenWhen a route has been planned, it will be highlightedon the screen in blue.
Different colors are also used to distinguish betweeninterstate freeways, state highways, county roads, majorstreets, and secondary streets. Highways will beshown as a thicker line than a general street.
2-30
Configure MenuThe Configure menu allows you to set up and adjust suchthings as screen color, appearance, and language of thedisplay for the navigation system. Press the CONFIGhard key to access the Configure menu.
Contrast/Brightness/ModeContrast: Touch the plus (+) or minus (–) sign screenbuttons to increase or decrease the contrast of thescreen.
Brightness: Touch the plus (+) or minus (–) signscreen buttons to increase or decrease the brightnessof the screen.
AUTO (Automatic): Touch this screen button for thesystem to automatically adjust the screen backgrounddepending on exterior lighting conditions.
Day: Touch this screen button and the system will makethe map background brighter.
Night: Touch this screen button and the system willmake the map background darker.
BeepWith this feature on, a beep will sound every time ascreen button is pressed on the navigation screen. SelectOff to turn the beeps off.
Vehicle ChimeNotice: The chime signals related to seat belts,parking brake, and other functions of your vehicleoperate through the navigation/radio system. If thatequipment is replaced or additional equipment isadded to your vehicle, the chimes may not work.Make sure that replacement or additional equipmentis compatible with your vehicle before installing it.
This feature allows you to adjust the chime volume levelin your vehicle. Touch the Normal screen button fornormal chime volume or the Loud screen button for alouder chime volume.
2-31
LanguageYour vehicle has been set for the English language, butyou may also select French for all instructional textand voice prompts. However, names on the map whenusing the navigation functions will not change.
To change the language, the map DVD must beinserted. Then, do the following:
1. Touch the Language screen button. A caution willdisplay.
2. Touch the desired language to select it.
3. Touch the NEXT screen button to change thedisplay back to the map screen.
If the language is changed from English, the menuscreens will not match word-for-word as they appear inthis manual.
If you accidentally select a language you do notunderstand, press the CONFIG hard key, then theLanguage screen button, then select the desiredlanguage.
Clock
To adjust the time displayed touch the Clock screenbutton. This will take you to the Adjust Clock screen.
You may also touch the time display in the lowerright corner of the navigation screen to briefly displaythe date.
2-32
To change the hours and minutes on the clock, do thefollowing:
1. Touch the Manual Adjust screen button.
2. Touch the up or down arrow screen buttons toincrease or decrease the hours and minutes.
3. Touch the Back screen button to return to theprevious screen.
12Hr/24Hr: This feature allows you to choose whetherthe time is displayed in standard or military time.Touch the 12Hr screen button for standard time or the24Hr screen button for military time.
Auto GPS Update: With this feature on, the navigationsystem time will be set to match the current GPStime. The time will be updated with the GPS time whenthe ignition is turned on. Touch the Off screen buttonto turn this feature off.
Daylight Savings: With this feature on, the navigationsystem will automatically adjust the time for DaylightSavings. Touch the Off screen button to turn thisfeature off.
Time Zone: This feature allows you to select from fivedifferent time zones: HST (Hawaii), PST (Pacific),MST (Mountain), CST (Central), and EST (Eastern).Touch the desired time zone screen button to select it.
Display OffTo turn the navigation screen off, touch the Disp Offscreen button on the Configure menu. To turn thescreen back on, press any hard key to the left of thenavigation screen.
Global Positioning System (GPS)The Navigation System determines the position of yourvehicle by using satellite signals, various vehiclesignals and map data.
At times, other interferences such as the satellitecondition, road configuration, the condition of the vehicleand/or other circumstances can interfere with thenavigation system’s ability to determine the accurateposition of the vehicle.
The GPS shows the accurate current position of yourvehicle using signals sent by the GPS Satellites ofthe United States Department of Defense. When yourvehicle is not receiving signals from the satellites,a symbol will appear on the map screen.
2-33
This system may not be available/or interference mayoccur if the following happens:
• Signal obstructions caused by tall buildings, largetrucks, tunnels,
• objects located on top of the instrument panel,
• satellites will not send signals if they are beingrepaired or improved,
• after-market glass tinting has been applied to thevehicle’s windows.
Notice: Do not apply after-market glass tinting tothe vehicle’s windows. Glass tinting will interferewith the system’s ability to receive GPS signals andcause the system to malfunction. You might haveto replace the window to correct the problem.This would not be covered by your warranty.
For more information if you are experiencing a problem,see If the System Needs Service on page 2-36 andProblems with Route Guidance on page 2-35.
Vehicle PositioningAt times, the position of the vehicle on the map may beinaccurate due to one or more of the followingreasons:
• The road system has changed.
• The vehicle is driving on slippery road surfacessuch as in sand, gravel and/or snow.
• The vehicle is traveling on winding roads.
• The vehicle is on a long straight road.
• The vehicle is approaching a tall building or a largevehicle.
• The surface streets run parallel to a freeway.
• The vehicle has just been transferred by a vehiclecarrier or a ferry.
• The current position calibration is set incorrectly.
• The vehicle is traveling at high speed.
• The vehicle changes directions more than once, orwhen the vehicle is turning on a turn table in aparking lot.
• The vehicle is entering and/or exiting a parking lot,garage or a lot with a roof.
• The GPS signal is not received.
2-34
• A roof carrier is installed on your vehicle.
• The vehicle is equipped with tire chains.
• The tires are replaced.
• The tire pressure for your tires is incorrect.
• The tires are worn.
• The first time the map DVD is inserted.
• The battery is disconnected for several days.
• The vehicle is driving in heavy traffic where drivingis at low speeds, and the vehicle is stopped andstarted repeatedly.
If you experience problems with your system, see“Navigation Setup” under Navigation Menu on page 2-8to calibrate the system.
Problems with Route GuidanceInappropriate route guidance may occur under one ormore of the following conditions:
• You have not turned onto the road indicated.
• Route guidance may not be available when usingautomatic rerouting for the next right or left turn.
• The route may not be changed when usingautomatic rerouting.
• There is no route guidance when turning at anintersection.
• Plural names of places may be announcedoccasionally.
• It may take a long time to operate automaticrerouting during high-speed driving.
• Automatic rerouting may display a route returning tothe set waypoint if you are heading for a destinationwithout passing through a set waypoint.
• The route prohibits the entry of a vehicle due to aregulation by time or season or any other regulationwhich may be given.
• Some routes may not be searched.
• The route to the destination may not be shown ifthere are new roads, if roads have recentlychanged or if certain roads are not listed on themap DVD. See Ordering Map DVDs on page 2-36.
To recalibrate the vehicle’s position on the map, see“Navigation Setup” under Navigation Menu on page 2-8to calibrate the system.
2-35
If the System Needs ServiceIf your system needs service and you have followed thesteps listed here and still are experiencing problems,see your dealer/retailer for assistance.
Ordering Map DVDsThe map DVD in your vehicle is the most up-to-dateinformation available when your vehicle was produced.The map DVD is updated periodically, provided thatthe map information has changed.
If you have any questions about the operation of thenavigation system or the update process, contactthe GM Nav Disc Center toll-free phone number,1-877-NAV-DISC (1-877-628-3472) or go to the center’swebsite, www.gmnavdisc.com. If you need any updatesor a replacement disc, because the current disc is lost,damaged, or needs to be updated, call the GM Nav DiscCenter or order a new disc online. To order a disc, haveyour Vehicle Identification Number (VIN) available. Thishelps the center make sure you receive the correct andmost up-to-date DVD map disc for your vehicle. See“Vehicle Identification Number (VIN)” in the Index of yourvehicle’s owner manual for more information.
After receiving the updated disc, replace the old disc inthe navigation system. See “Installing the DVD MapDisc” and “Ejecting the DVD Map Disc” under Maps onpage 2-5. Dispose of the old disc to avoid confusionabout which disc is the most current.
Database Coverage ExplanationsCoverage areas vary with respect to the level of mapdetail available for any given area. Some areas willfeature greater levels of detail than others. If thishappens, it does not mean there is a problem with thesystem. As the map DVD is updated, more detailmay become available for areas which previously hadlimited detail. See Ordering Map DVDs on page 2-36.
2-36
Navigation Audio System ..................................3-2CD Player .....................................................3-9Rear Seat Entertainment (RSE) System ...........3-12
Section 3 Navigation Audio System
3-1
Navigation Audio SystemNotice: Before adding any sound equipment toyour vehicle, such as an audio system, CD player,CB radio, mobile telephone, or two-way radio, makesure that it can be added by checking with yourdealer/retailer. Also, check federal rules coveringmobile radio and telephone units. If soundequipment can be added, it is very important to do itproperly. Added sound equipment can interfere withthe operation of your vehicle’s engine, radio, or othersystems, and even damage them. Your vehicle’ssystems can interfere with the operation of soundequipment that has been added.
Notice: The chime signals related to seat belts,parking brake, and other functions of your vehicleoperate through the navigation system. If thatequipment is replaced or additional equipment isadded to your vehicle, the chimes may not work.Make sure that replacement or additional equipmentis compatible with your vehicle before installing it.See “Accessories and Modifications” in the Index ofyour vehicle’s owner manual.
Your vehicle has a feature call Retained AccessoryPower (RAP). With RAP, the audio system will continueto play even after the ignition is turned off. See“Retained Accessory Power (RAP)” in the Index of yourvehicle’s owner manual for more information.
The audio system is operated using navigation systemmenus.
Playing the Radio
O (Power/Volume): Press this knob to turn the audioand navigation system on and off. Turn the knob toincrease or decrease the volume.
3-2
Finding a Station
BAND: Press this hard key to access the band menuand to switch between AM, FM1, FM2, XM1, or XM2,if equipped.
O (Tuning) Knob: Turn this knob to change radiofrequencies.
w SEEK x: Press the SEEK up or down arrows togo to the next or previous station and stay there.
To scan stations, press and hold the SEEK up or downarrow for two seconds until you hear a beep. The radiowill go to a station, play for a few seconds, then go on tothe next station. Press either SEEK arrow again to stopscanning.
To scan preset stations, press and hold the SEEK up ordown arrow for more than four seconds. You will heartwo beeps and PSCAN will appear on the display, alongwith the highlighted preset. The radio will go to one ofthe preset stations, play for a few seconds, then go on tothe next preset station. Press either SEEK arrow again tostop scanning presets.
The radio will only seek and scan stations with a strongsignal that are in the selected band.
Setting Preset StationsUp to 30 stations, six AM, six FM1, six FM2, six XM1,and six XM2, if equipped, can be programmed using thesix screen buttons on the bottom of each band menu.To set preset stations, do the following:
1. Turn the audio system on.
2. Press the BAND hard key to select AM, FM1, FM2,XM1, or XM2, if equipped.
3. Tune to the desired station using the SEEK hardkey arrows or the tuning knob.
4. Press and hold one of the six preset screen buttonsuntil you hear a beep. Whenever that presetscreen button is pressed, the station that was setwill return.
5. Repeat the steps for each preset and source.
3-3
Band MenuIf the radio is on while the navigation system is not inuse, this band menu will display the current audioinformation, as well as list the presets for thecurrent band.
If the radio is on while the navigation system is in use, asmaller band menu will appear, located on the left sideof the map screen. This audio screen will display thecurrent audio information, such as band and station.Touch the smaller band menu screen button to accessthe full screen band menu.
Audio Menu
e (Audio): Press this hard key to display the Audiomenu. Several adjustment options are available fromthis menu.FM1 Source shown, Other Sources similar
FM1 Source shown, Other sources Similar
3-4
Tone (Bass/Midrange/Treble): Touch the plus (+) andminus (–) sign screen buttons to increase or decreasethe Bass, Midrange, or Treble. If a station is weak ornoisy, decrease the treble.
Speakers (Balance/Fade): Touch the L (left) or R(right) screen buttons to adjust the balance between theleft and right speakers. Touch the Front or Rear screenbuttons to adjust the fade between the front and rearspeakers.
Speed Compensated Volume (SCV): With SCV, theaudio system will adjust automatically to make up forroad and wind noise as you drive, by increasing the
volume as vehicle speed increases. Touch the downarrow screen button to access the second page of theAudio menu. Set the volume at the desired level, thenselect Low, Med, or High. The volume level shouldalways sound the same to you as you drive. To turn SCVoff, touch the Off screen button.
EQ (Equalizer): Use the screen buttons labeled EQ1through EQ5 to choose preset bass, midrange, andtreble equalization settings. The Custom screen buttonallows you to choose and set the equalization levels.To set a custom equalization setting, adjust each settingto the desired level, then touch the Custom screenbutton until you hear a beep.
After adjustments are made, press the BAND hard keyto go back to the preset station menu. Now that youhave preset the station and the EQ setting, you canassign the EQ to the preset station. To do this, touch thedesired preset station screen button until you hear abeep. The EQ setting will now be assigned to that stationunless you decide to change it.
If you were at the CD screen before setting an EQ andyou press the CD hard key, you will be returned to the CDscreen, and the EQ will be set to that screen until youchange it.
See “Rear Seat Audio (RSA)”, “Theft-Deterrent Feature”,“Audio Steering Wheel Controls”, “Radio Reception”,and the antenna information in the Index of yourvehicle’s owner manual for more information.
Audio Menu
3-5
Radio Data Systems (RDS)The audio system has a Radio Data System (RDS).RDS features are available for use only on FM stationsthat broadcast RDS info. With RDS, the radio can dothe following:
• Display station name
• Display messages from radio stations
• Display song title and artist name
This system relies on receiving specific information fromthese stations and will only work when the informationis available. In rare cases, a radio station may broadcastincorrect information that will cause the radio featuresto work improperly. If this happens, contact theradio station.
While the radio is tuned to an RDS station, the stationname will appear on the display with the frequency.
Touch the Info screen button on the band menu toreceive information the selected radio station is currentlybroadcasting.
XM™ Satellite Radio ServiceXM™ is a satellite radio service that is based in the48 contiguous United States and Canada. XM™offers a large variety of coast-to-coast channelsincluding music, news, sports, talk, traffic/weather(U.S. subscribers), and children’s programming.XM™ provides digital quality audio and text informationthat includes the channel name and number, songtitle, and artist name. A service fee is required in orderto receive the XM™ service. For more information,contact XM™; In the U.S. at www.xmradio.comor call 1-800-852-XMXM (9696) or in Canada atwww.xmradio.ca or call 1-877-GET-XMSR (438-9677).
Press the BAND hard key repeatedly until you reachthe XM™ selection. When XM™ is active, the channelname and number, song title, and artist will display onthe screen.
Touch the XM Info screen button to display additionalXM station information.
3-6
XM™ OptionsTouch the XM Options screen button to access theXM Options menu.
This menu allows you to seek or scan for stations basedon their category. Touch the On screen button next to XMInfo Timeout to hide XM™ information after a certainamount of time has passed. Touch Off to turn thisfeature off.
While in this menu, turn XM Category Seek/Scan on toscroll through the categories you want to seek to.This option will take you to the first available channel inthat category.
3-7
XM™ Radio Messages
XL (Explicit Language Channels): XL on the radiodisplay, after the channel name, indicates content withexplicit language. These channels, or any others,can be blocked at a customer’s request by calling1-800-852-XMXM (9696).
XM Updating: The encryption code in the receiver isbeing updated and no action is required.
No XM signal: The vehicle is in a location that isblocking the XM™ signal. When the vehicle is movedinto an open area, the signal should return.
Loading XM: The audio system is processing audioand text data received. No action is needed.
Channel Off Air: This channel is not currently inservice.
Channel Unavail: This previously assigned channel isno longer assigned.
No Artist Info: No artist information is available.The system is working properly.
No Title Info: No song title information is available.The system is working properly.
No CAT Info: No category information is available.The system is working properly.
Not Found: There are no channels available for theselected category. The system is working properly.
No Information: No text or informational messages areavailable. The system is working properly.
XM Theftlocked: The XM™ receiver may havepreviously been in another vehicle. For securitypurposes, XM™ receivers cannot be swapped betweenvehicles. If this message is received after having yourvehicle serviced, check with your dealer/retailer.
XM Radio ID: If tuned to channel 0, this message willalternate with the XM™ Radio eight digit radio ID label.This label is needed to activate the service.
Unknown: If this message is received when tuned tochannel 0, there may be a receiver fault. Consult withyour dealer/retailer.
Check XM Receiver: If this message does not clearwithin a short period of time, the receiver may havea fault. Consult with your dealer/retailer.
3-8
CD PlayerRemove the navigation map DVD from the slot andreturn it to its case. Insert a CD partway into the slot,label side up. The player will pull it in.
There will be a 12 to 15 second delay while the CD isread, before it begins to play. When the player begins toread a CD, the Disc Check in Process message willappear briefly to remind you of the delay. When the mapDVD is reinserted and read, the DVD Check in Processmessage will appear briefly to remind you of the delay.
If the ignition or radio is turned off with a CD in theplayer, it will stay in the player. When the ignition orradio is turned on, the CD will start playing where itstopped, if it was the last selected audio source.
If playing a CD-R the sound quality may be reduceddue to CD-R quality, the method of recording, the qualityof the music that has been recorded, and the way theCD-R has been handled. There may be an increase inskipping, difficulty in finding tracks, and/or difficulty inloading and ejecting. If these problems occur, check thebottom surface of the CD. If the surface of the CD isdamaged, such as cracked, broken, or scratched, the CDwill not play properly. If the surface of the CD is soiled,see “Care of Your CDs” in the Index of your vehicle’sowner manual.
If there is no apparent damage, try a known good CD.
Notice: If a label is added to a CD, or more than oneCD is inserted into the slot at a time, or an attemptis made to play scratched or damaged CDs, theCD player could be damaged. While using theCD player, use only CDs in good condition withoutany label, load one CD at a time, and keep theCD player and the loading slot free of foreignmaterials, liquids, and debris.
Do not add any label to a CD, it could get caught in theCD player. If a CD is recorded on a personal computerand a description label is needed, try labeling the top ofthe recorded CD with a soft marker instead.
If an error appears on the display, see “CD Messages”later in this section.
While playing a CD in the CD player, the navigationsystem is not available. A message will display if theNAV key is pressed. If your vehicle is equipped with RearSeat Entertainment (RSE), you can play an audio CDwhile using the navigation system. See Rear SeatEntertainment (RSE) System on page 3-12 for moreinformation.
3-9
B (CD): Press this hard key to play a CD whenlistening to the radio. The CD screen will be displayed.
Y (Eject): Press this hard key to eject a CD.
Random: Touch this screen button to play the tracks inrandom, rather than sequential, order. Touch it again toturn off random play.
Repeat: Touch this screen button to repeat the trackthat is currently playing. Touch it again to turn offrepeat play.
[ (Forward): Touch this screen button to advancequickly within a track. As the CD advances, elapsed timewill display to help you find the correct passage.Release this screen button to play the passage.
r (Reverse): Touch this screen button to reversequickly within a track. As the CD reverses, elapsed timewill display to help you find the correct passage.Release this screen button to play the passage.
3-10
u (Track Forward): Touch this screen button toadvance to the next track on the CD.
t (Track Reverse): Touch this screen button toreturn to the previous track on the CD.
w SEEK x: Press and release the SEEK up arrow toadvance to the next track, or the down arrow to returnto the previous track. If more than two seconds ofthe song has played, pressing the SEEK down arrowwill return you to the beginning of the current track.
Track Scan: Press and hold one of the SEEK arrowsfor two seconds or more to enter CD TRACK SCANmode. A chime will sound. The first 10 seconds of eachtrack will play. Press one of the SEEK arrows again tostop scanning.
BAND: Press the BAND hard key to listen to the radiowhen a CD is playing.
CD Messages
CD ERROR: If this message appears on the screen,the CD is not being read by the system. The CD couldbe dirty, scratched, wet, or upside down. You may alsobe driving on a very rough road. When the road becomessmoother, the CD should play.
NO MUSIC DISC: If this message appears on thescreen, the map DVD is still inserted in the system.Press eject and return the map DVD to its case, theninsert a CD. The CD should play.
NO DISC: If this message appears on the screen, theCD slot is empty. Insert a CD. The CD should play.
If a CD is not playing correctly for any other reason, trya known good CD. If any error occurs repeatedly orif an error cannot be corrected, contact yourdealer/retailer. If your radio displays an error message,write it down and provide it to your dealer/retailer whenreporting the problem.
See “Rear Seat Audio (RSA)”, “Care of Your CDs andDVDs”, “Care of Your CD and DVD Player” in the Indexof your vehicle’s owner manual for more information.
3-11
Rear Seat Entertainment (RSE)System
Your vehicle may have a DVD Rear Seat Entertainment(RSE) system. While playing a DVD or audio CD in theRSE, press the CD hard key to view the RSE screen andto switch to DVD as your main audio source. The RSEsystem will then be heard through all of the vehicle’sspeakers. From the RSE screen you can mute the Frontor Rear speakers, mute RSE entirely, or turn off RSE.
When the RSE system is turned off, you must turn itback on from the RSE system. It cannot be turned backon through the navigation system radio.
RSE Messages
CD ERROR: If this message appears on the navigationscreen, the DVD or CD is not being read by the system.The DVD or CD could be dirty, scratched, wet, or upsidedown. You may also be driving on a very rough road.When the road becomes smoother, the DVD or CDshould play.
RSE ERROR: If this message appears on thenavigation screen, the RSE system is not workingproperly. See “DVD Messages” under “Rear SeatEntertainment System” in the Index of your vehicle’sowner manual for more information.
NO DISC: If this message appears on the navigationscreen, the DVD slot is empty. Insert a DVD or CD.The DVD or CD should play.
See “Rear Seat Entertainment System”, “Rear SeatAudio (RSA)”, “Care of Your CDs and DVDs”, and “Careof Your CD and DVD Player”, in the Index of yourvehicle’s owner manual for more information.
3-12
AAddress ......................................................... 2-19Alpha-Numeric Keypad ...................................... 2-4Audio Menu ..................................................... 3-4Audio System .................................................. 3-2
BBand Menu ...................................................... 3-4Beep ............................................................. 2-31
Player ......................................................... 3-9
CD Messages ................................................ 3-11CD Player ....................................................... 3-9Cleaning the Video Screen ................................ 1-9Clock ............................................................ 2-32Colors on the Screen ...................................... 2-30Configure Menu .............................................. 2-31Contrast/Brightness/Mode ................................. 2-31
DDatabase Coverage Explanations ...................... 2-36Deleting Personal Information ............................. 1-6Destination ..................................................... 2-17Destination Preview Menu ................................ 2-26Display Off ..................................................... 2-33DVD
Rear Seat Entertainment System ................... 3-12
1
EEdit Route ..................................................... 2-11Ejecting the DVD Map Disc ............................... 2-6Emergency .................................................... 2-23Entering an Address, Point of Interest, Home,
and Preset Destinations ................................. 1-6
FFinding a Station .............................................. 3-3Freeway Entrance/Exit ..................................... 2-25
GGetting Started, Navigation ................................ 1-4Global Positioning System (GPS) ...................... 2-33
HHandling the DVD Map Disc .............................. 2-6Hard Keys ....................................................... 2-2
IInstalling the DVD Map Disc .............................. 2-5Intersection .................................................... 2-24
Getting Started ............................................. 1-4Menu .......................................................... 2-8System Overview .......................................... 1-2Using the System .......................................... 2-2
Map DVDs ................................................. 2-36Overview, Navigation System ............................. 1-2Owners, Canadian .............................................. iii
PPhone Number ............................................... 2-24Playing the Radio ............................................. 3-2Point of Interest (POI) ..................................... 2-21Preset Destinations ......................................... 2-19Previous Destination ........................................ 2-22Previous Start Point ........................................ 2-23Problems with Route Guidance ......................... 2-35Propriétaires Canadiens ....................................... iii
3
RRadio ............................................................. 3-2Radio Data Systems (RDS) ................................ 3-6Rear Seat Entertainment System ....................... 3-12Route Overview ................................................ 2-8Route Overview Menu ..................................... 2-27Route Preview ................................................ 2-12
SSetting Preset Stations ...................................... 3-3Setting the Clock .............................................. 1-6Storing Radio Station Presets ............................. 1-6Suspend Guidance ........................................... 2-8Symbols .......................................................... 2-6System Needs Service, If ................................. 2-36