Gradna 78A, 10430 Samobor Croatia | Hrvatska +385 (0)1 33 62 513 +385 (0)1 33 62 905 [email protected]www.klimaoprema.hr Inženjering u čistim prostorima, projektiranje, proizvodnja, montaža, servis i održavanje, validacije. | Engineering in Cleanrooms, design, production, assembly, service and maintenance, validation. 230V 50Hz IP 65 IK 09 Es ist sehr wichtig, diese Anweisungen zu folgen, um die Vorrichtung richtig zu installieren. It is very important to follow these instruction to enable the fitting to be installed correctly ! MONTAGEANLEITUNGEN ASSEMBLY INSTRUCTIONS EINBAU-LED-LAMPE RECESSED LED LAMP “LUMINUS-CR-3”
Inženjering u čistim prostorima, projektiranje, proizvodnja, montaža, servis i održavanje, validacije. | Engineering in Cleanrooms, design, production, assembly, service and maintenance, validation.
MONTAŽNO UPUSTVOASSEMBLY INSTRUCTIONS
UGRADNA LED SVJETILJKARECESSED LED LAMP
˝LUMINUS-CR-3˝
Vrlo je važno slijediti ovo montažno uputstvo kako bi se montaža izvela ispravno !It is very important to follow these instruction to enable the fitting to be installed correctly !
230V50HzIP 65
Opće odredbe o sigurnosti:1. Samo odgovarajuće osposobljena osoba smije izvršavati montažu i održavanje. 2. Prije montažeprovjerite da mreža nije pod naponom. 3. Montaža i održavanje vrši se isključivo izvornim rezervnimdjelovima 4. Samo svjetiljke sa odgovarajućim stupnjem IP zaštite se smiju koristiti u vlažnimprostorima. 5. Upotrebljavati samo odgovarajuće izvore svjetlosti navedene na etiketi. 6. Svjetiljkuobavezno isključiti iz električne mreže prije servisiranja. 7. Proizvodač ne jamči za štetu koja bi moglanastati prilikom nepravilne montaže/upotrebe. 8. Ukoliko se na svjetiljci izvede zahvat koji nije u skladus uputama, proizvodač ne priznaje garanciju.
General safety notes:1. Mounting and maintenance is allowed only by competent persons. 2. Before installation make surethere is no voltage in network. 3. Repair and maintenance is made with original parts only. 4. Use onlyfixitures with proper IP protection in wet rooms. 5. Use only suitable light sources indicated on theproduct label. 6. Please make sure the fixiture is disconnected from network voltage before servicing.7. The manufacturer cannot guarantee for damage caused with improper installation and/or use. 8. Anyoperation performed on the fixiture that is not in accordance with instructions will avoid manufacturer’swarranty.
Allgemeine Sicherheitsanweisungen:1. Montage und Wartungsarbeiten dürfen nur von ausgebildetem Fachpersonal durchgeführt werden.2. Vor der Montage muss überprüft werden, dass sich im Stromnetz keine Spannung befindet. 3. BeiReparaturen oder Wartungsarbeiten dürfen nur Originalteile verwendet werden. 4. Verwenden Sie infeuchten Räumen nur Lampen mit entsprechender IP - Schutzart. 5. Verwenden Sie nur dafürgeeignete Lichtquellen, die auf der Etikette/ auf dem Aufkleber angeführt sind. 6. Ziehen Sie vor derWartung unbedingt die Lampe aus dem Stromnetz. 7. Für Schäden, die durch unsachgemäße Montageund/ oder Verwendung verursacht werden, kann der Hersteller keine Haftung übernehmen. 8. DerHersteller stellt klar, dass keine Garantie gewährt wird, wenn an den Lampen ein Eingriff durchgeführtwird, der nicht gemäß den Anweisungen ausgeführt wurde.
Note di sicurezza generale:1. Il montaggio e la manutenzione possono essere eseguiti soltanto da personale con competenzespecifiche. 2. Prima di procedere al montaggio, verificare che la rete non sia messa in tensione. 3.Utilizzare solo pezzi di ricambio originali per eventuali riparazioni o manutenzioni. 4. In ambienti umidiutilizzare soltanto apparecchi illuminati con protezione IP idonea. 5. Utilizzare esclusivamente le fonti diluce idonee come indicate sull’etichetta. 6. Prima di procedere ad eventuali riparazioni mettere ilapparecchi illuminati fuori tensione. 7. Il produttore non garantisce per danni derivanti dal montaggioe/o utilizzo improprio. 8. Il produttore non riconoscera la garanzia se si dovesse riscontrare che iapparecchi illuminati sono stati sottoposti a interventi non in conformita alle istruzioni.
GB
HR
D
I
IK 09
Es ist sehr wichtig, diese Anweisungen zu folgen, um die Vorrichtung richtig zu installieren.It is very important to follow these instruction to enable the fitting to be installed correctly !
Inženjering u čistim prostorima, projektiranje, proizvodnja, montaža, servis i održavanje, validacije. | Engineering in Cleanrooms, design, production, assembly, service and maintenance, validation.
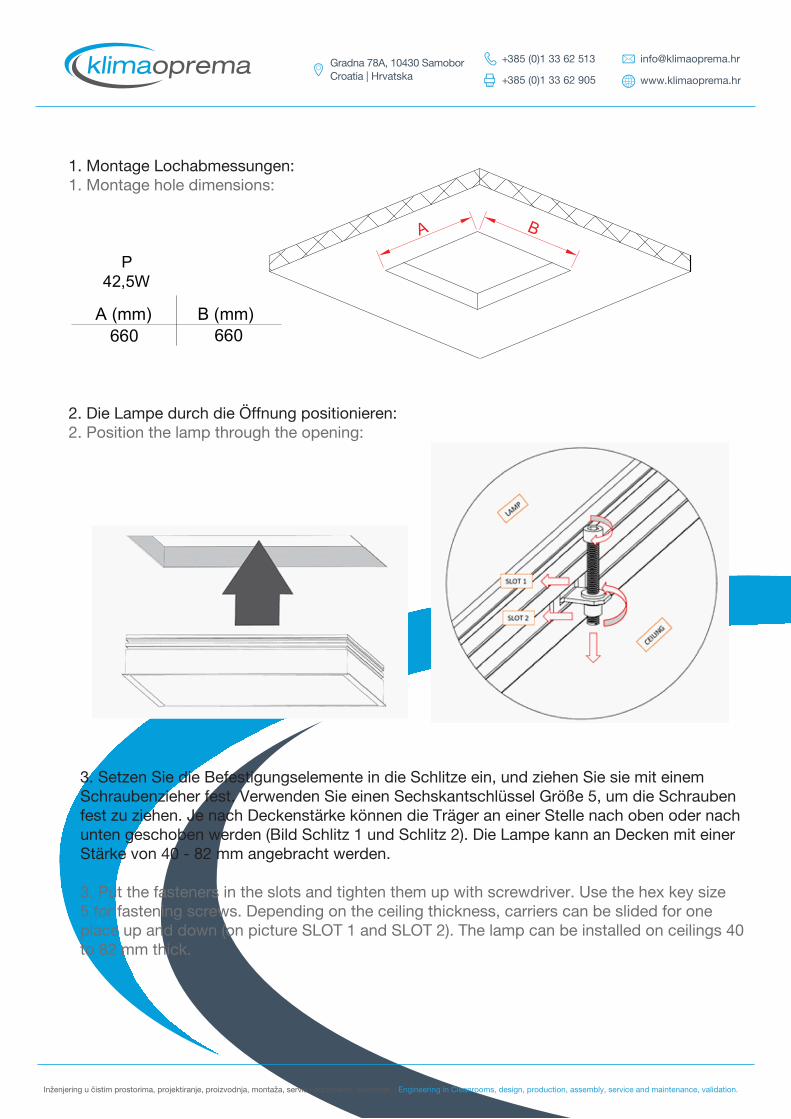
1. Dimenzije otvora za montažu:1. Montage hole dimensions:
2. Ugradit svjetiljku u otvor:2. Position the lamp through the opening:
LN NULA
ZERO
UZEMLJENJE GROUND
FAZALIVE WIRE
A Električno spajanjeElectrical connection B Električno spajanje / DALI
Electrical connection / DALI C Električno spajanje / PANIKElectrical connection / PANIK
3. Stavite pričvrsnice u utore i zategnite ih odvijačem. Upotrijebite šesterokutni ključ 5za pričvrsne vijke. Ovisno o debljini stropa, nosači se mogu klizati za jedno mjestogore i dolje (na SLOT 1 i SLOT 2). Svjetiljka se može postaviti na stropove debljine 40do 82 mm.:3. Put the fasteners in the slots and tighten them up with screwdriver. Use the hex key size5 for fastening screws. Depending on the ceiling thickness, carriers can be slided for oneplace up and down (on picture SLOT 1 and SLOT 2). The lamp can be installed on ceilings 40to 82 mm thick.:
4. Električno spajanje:4. Electrical connection:
LN NULA
ZERO
UZEMLJENJE GROUND
FAZALIVE WIRE
12
DALI
DALI
LN NULA
ZERO
UZEMLJENJE GROUND
FAZALIVE WIRE
NL
FAZA PANIKLINE WIRE PANIC
NULA ZERO
Napojni kabel se dovodi kroz za topredviđenu uvodnicu na stražnjojstrani svjetiljke.Supply cable is brought to theclamp trough provided gland on theback side of the lamp.
www.eltorlighting.com www.eltorlighting.com
P42,5W
A B
A (mm) B (mm)660 660
1. Dimenzije otvora za montažu:1. Montage hole dimensions:
2. Ugradit svjetiljku u otvor:2. Position the lamp through the opening:
LN NULA
ZERO
UZEMLJENJE GROUND
FAZALIVE WIRE
A Električno spajanjeElectrical connection B Električno spajanje / DALI
Electrical connection / DALI C Električno spajanje / PANIKElectrical connection / PANIK
3. Stavite pričvrsnice u utore i zategnite ih odvijačem. Upotrijebite šesterokutni ključ 5za pričvrsne vijke. Ovisno o debljini stropa, nosači se mogu klizati za jedno mjestogore i dolje (na SLOT 1 i SLOT 2). Svjetiljka se može postaviti na stropove debljine 40do 82 mm.:3. Put the fasteners in the slots and tighten them up with screwdriver. Use the hex key size5 for fastening screws. Depending on the ceiling thickness, carriers can be slided for oneplace up and down (on picture SLOT 1 and SLOT 2). The lamp can be installed on ceilings 40to 82 mm thick.:
4. Električno spajanje:4. Electrical connection:
LN NULA
ZERO
UZEMLJENJE GROUND
FAZALIVE WIRE
12
DALI
DALI
LN NULA
ZERO
UZEMLJENJE GROUND
FAZALIVE WIRE
NL
FAZA PANIKLINE WIRE PANIC
NULA ZERO
Napojni kabel se dovodi kroz za topredviđenu uvodnicu na stražnjojstrani svjetiljke.Supply cable is brought to theclamp trough provided gland on theback side of the lamp.
2. Die Lampe durch die Öffnung positionieren:2. Position the lamp through the opening:
3. Setzen Sie die Befestigungselemente in die Schlitze ein, und ziehen Sie sie mit einemSchraubenzieher fest. Verwenden Sie einen Sechskantschlüssel Größe 5, um die Schraubenfest zu ziehen. Je nach Deckenstärke können die Träger an einer Stelle nach oben oder nachunten geschoben werden (Bild Schlitz 1 und Schlitz 2). Die Lampe kann an Decken mit einerStärke von 40 - 82 mm angebracht werden.
3. Put the fasteners in the slots and tighten them up with screwdriver. Use the hex key size5 for fastening screws. Depending on the ceiling thickness, carriers can be slided for oneplace up and down (on picture SLOT 1 and SLOT 2). The lamp can be installed on ceilings 40to 82 mm thick.
1. Dimenzije otvora za montažu:1. Montage hole dimensions:
2. Ugradit svjetiljku u otvor:2. Position the lamp through the opening:
LN NULA
ZERO
UZEMLJENJE GROUND
FAZALIVE WIRE
A Električno spajanjeElectrical connection B Električno spajanje / DALI
Electrical connection / DALI C Električno spajanje / PANIKElectrical connection / PANIK
3. Stavite pričvrsnice u utore i zategnite ih odvijačem. Upotrijebite šesterokutni ključ 5za pričvrsne vijke. Ovisno o debljini stropa, nosači se mogu klizati za jedno mjestogore i dolje (na SLOT 1 i SLOT 2). Svjetiljka se može postaviti na stropove debljine 40do 82 mm.:3. Put the fasteners in the slots and tighten them up with screwdriver. Use the hex key size5 for fastening screws. Depending on the ceiling thickness, carriers can be slided for oneplace up and down (on picture SLOT 1 and SLOT 2). The lamp can be installed on ceilings 40to 82 mm thick.:
4. Električno spajanje:4. Electrical connection:
LN NULA
ZERO
UZEMLJENJE GROUND
FAZALIVE WIRE
12
DALI
DALI
LN NULA
ZERO
UZEMLJENJE GROUND
FAZALIVE WIRE
NL
FAZA PANIKLINE WIRE PANIC
NULA ZERO
Napojni kabel se dovodi kroz za topredviđenu uvodnicu na stražnjojstrani svjetiljke.Supply cable is brought to theclamp trough provided gland on theback side of the lamp.
Inženjering u čistim prostorima, projektiranje, proizvodnja, montaža, servis i održavanje, validacije. | Engineering in Cleanrooms, design, production, assembly, service and maintenance, validation.
1. Dimenzije otvora za montažu:1. Montage hole dimensions:
2. Ugradit svjetiljku u otvor:2. Position the lamp through the opening:
LN NULA
ZERO
UZEMLJENJE GROUND
FAZALIVE WIRE
A Električno spajanjeElectrical connection B Električno spajanje / DALI
Electrical connection / DALI C Električno spajanje / PANIKElectrical connection / PANIK
3. Stavite pričvrsnice u utore i zategnite ih odvijačem. Upotrijebite šesterokutni ključ 5za pričvrsne vijke. Ovisno o debljini stropa, nosači se mogu klizati za jedno mjestogore i dolje (na SLOT 1 i SLOT 2). Svjetiljka se može postaviti na stropove debljine 40do 82 mm.:3. Put the fasteners in the slots and tighten them up with screwdriver. Use the hex key size5 for fastening screws. Depending on the ceiling thickness, carriers can be slided for oneplace up and down (on picture SLOT 1 and SLOT 2). The lamp can be installed on ceilings 40to 82 mm thick.:
4. Električno spajanje:4. Electrical connection:
LN NULA
ZERO
UZEMLJENJE GROUND
FAZALIVE WIRE
12
DALI
DALI
LN NULA
ZERO
UZEMLJENJE GROUND
FAZALIVE WIRE
NL
FAZA PANIKLINE WIRE PANIC
NULA ZERO
Napojni kabel se dovodi kroz za topredviđenu uvodnicu na stražnjojstrani svjetiljke.Supply cable is brought to theclamp trough provided gland on theback side of the lamp.
www.eltorlighting.com www.eltorlighting.com
P42,5W
A B
A (mm) B (mm)660 660
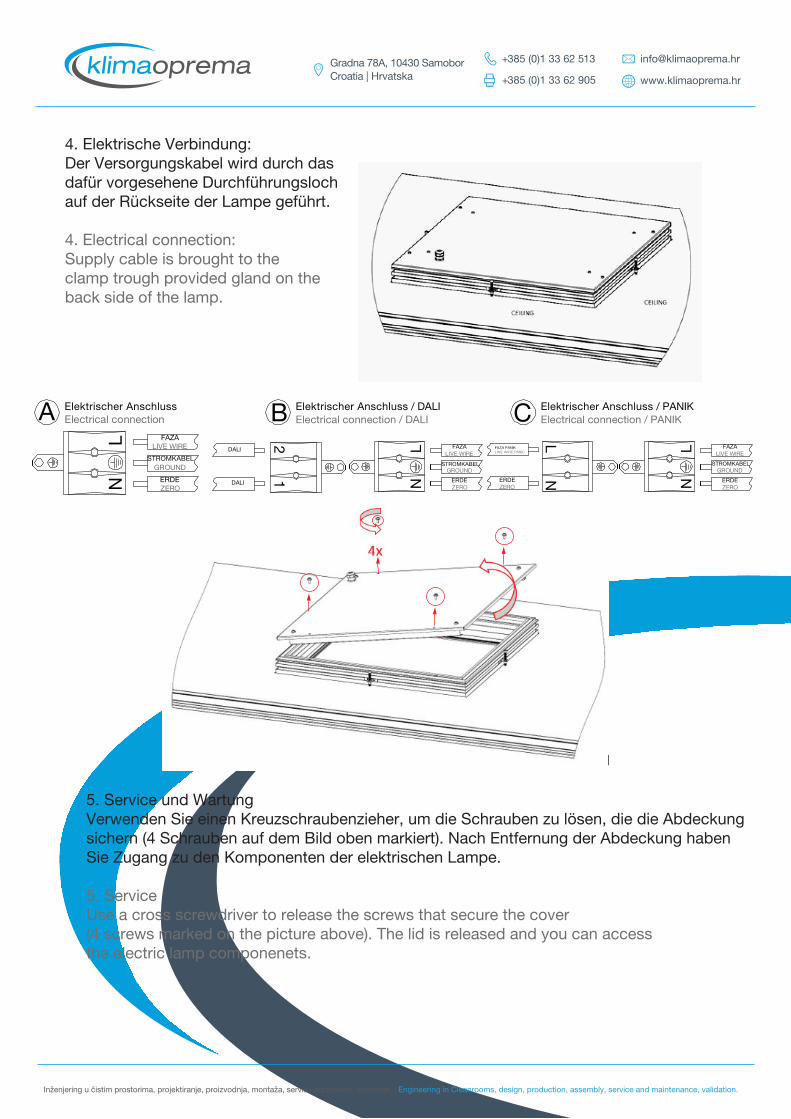
5. Service und WartungVerwenden Sie einen Kreuzschraubenzieher, um die Schrauben zu lösen, die die Abdeckungsichern (4 Schrauben auf dem Bild oben markiert). Nach Entfernung der Abdeckung habenSie Zugang zu den Komponenten der elektrischen Lampe.
5. ServiceUse a cross screwdriver to release the screws that secure the cover(4 screws marked on the picture above). The lid is released and you can accessthe electric lamp componenets.
4. Elektrische Verbindung:Der Versorgungskabel wird durch dasdafür vorgesehene Durchführungslochauf der Rückseite der Lampe geführt.
4. Electrical connection:Supply cable is brought to theclamp trough provided gland on theback side of the lamp.
LN ERDE
ZERO
STROMKABEL GROUND
FAZALIVE WIRE
A Elektrischer Anschluss Electrical connection B Elektrischer Anschluss / DALI
Electrical connection / DALI C Elektrischer Anschluss / PANIKElectrical connection / PANIK
Inženjering u čistim prostorima, projektiranje, proizvodnja, montaža, servis i održavanje, validacije. | Engineering in Cleanrooms, design, production, assembly, service and maintenance, validation.
Opće odredbe o sigurnosti:
1. Samo odgovarajuće osposobljena osoba smije izvršavati montažu i održavanje. 2. Prije montažeprovjerite da mreža nije pod naponom. 3. Montaža i održavanje vrši se isključivo izvornim rezervnimdjelovima 4. Samo svjetiljke sa odgovarajućim stupnjem IP zaštite se smiju koristiti u vlažnimprostorima. 5. Upotrebljavati samo odgovarajuće izvore svjetlosti navedene na etiketi. 6. Svjetiljkuobavezno isključiti iz električne mreže prije servisiranja. 7. Proizvodač ne jamči za štetu koja bi moglanastati prilikom nepravilne montaže/upotrebe. 8. Ukoliko se na svjetiljci izvede zahvat koji nije u skladus uputama, proizvodač ne priznaje garanciju.
HR
General safety notes:
1. Mounting and maintenance is allowed only by competent persons. 2. Before installation make surethere is no voltage in network. 3. Repair and maintenance is made with original parts only. 4. Use onlyfixitures with proper IP protection in wet rooms. 5. Use only suitable light sources indicated on theproduct label. 6. Please make sure the fixiture is disconnected from network voltage before servicing.7. The manufacturer cannot guarantee for damage caused with improper installation and/or use. 8. Anyoperation performed on the fixiture that is not in accordance with instructions will avoid manufacturer’swarranty.
GB
Allgemeine Sicherheitsanweisungen:
1. Montage und Wartungsarbeiten dürfen nur von ausgebildetem Fachpersonal durchgeführt werden.2. Vor der Montage muss überprüft werden, dass sich im Stromnetz keine Spannung befindet. 3. BeiReparaturen oder Wartungsarbeiten dürfen nur Originalteile verwendet werden. 4. Verwenden Sie infeuchten Räumen nur Lampen mit entsprechender IP - Schutzart. 5. Verwenden Sie nur dafürgeeignete Lichtquellen, die auf der Etikette/ auf dem Aufkleber angeführt sind. 6. Ziehen Sie vor derWartung unbedingt die Lampe aus dem Stromnetz. 7. Für Schäden, die durch unsachgemäße Montageund/ oder Verwendung verursacht werden, kann der Hersteller keine Haftung übernehmen. 8. DerHersteller stellt klar, dass keine Garantie gewährt wird, wenn an den Lampen ein Eingriff durchgeführtwird, der nicht gemäß den Anweisungen ausgeführt wurde.
D
Note di sicurezza generale:
1. Il montaggio e la manutenzione possono essere eseguiti soltanto da personale con competenzespecifi che. 2. Prima di procedere al montaggio, veri�care che la rete non sia messa in tensione. 3.Utilizzare solo pezzi di ricambio originali per eventuali riparazioni o manutenzioni. 4. In ambienti umidiutilizzare soltanto apparecchi illuminati con protezione IP idonea. 5. Utilizzare esclusivamente le fonti diluce idonee come indicate sull’etichetta. 6. Prima di procedere ad eventuali riparazioni mettere ilapparecchi illuminati fuori tensione. 7. Il produttore non garantisce per danni derivanti dal montaggioe/o utilizzo improprio. 8. Il produttore non riconoscera la garanzia se si dovesse riscontrare che iapparecchi illuminati sono stati sottoposti a interventi non in conformita alle istruzioni.