Page 2127 Exploration Chapter 6: Editing Data Chapter 6 Editing Data In this Chapter • Introduction • The Workspace Editor Window • Selecting and Editing Data • Rearranging Data • The Menu • Default Configuration File Introduction The Gemcom for Windows workspace editor is a very versatile utility that allows you to enter data into the workspace or to view and edit data that is already in the workspace. The data is displayed in two spreadsheets: the top spreadsheet always contains data from the header table, and the bottom spreadsheet shows data from any of the other tables in the current workspace. The Workspace Editor Window When the workspace editor is activated, it replaces the current Gemcom for Windows graphic work area as the active window. The Gemcom title bar and status bar remain visible and active within this window. The Gemcom toolbar is visible, but is dimmed and thus unavailable. The workspace editor has its own menu bar, which replaces the Gemcom for Windows menu bar.
Transcript
Page 2127
Exploration Chapter 6: Editing Data
Chapter 6
Editing Data
In this Chapter
• Introduction• The Workspace Editor Window• Selecting and Editing Data• Rearranging Data• The Menu• Default Configuration File
Introduction
The Gemcom for Windows workspace editor is a very versatileutility that allows you to enter data into the workspace or to viewand edit data that is already in the workspace. The data isdisplayed in two spreadsheets: the top spreadsheet always containsdata from the header table, and the bottom spreadsheet shows datafrom any of the other tables in the current workspace.
The Workspace Editor Window
When the workspace editor is activated, it replaces the currentGemcom for Windows graphic work area as the active window. TheGemcom title bar and status bar remain visible and active withinthis window. The Gemcom toolbar is visible, but is dimmed andthus unavailable. The workspace editor has its own menu bar,which replaces the Gemcom for Windows menu bar.
Page 2128
Section II: Workspaces Gemcom for Windows
The remainder of the window contains the two spreadsheets thatdisplay the data, as well as some navigation buttons to help youmanoeuvre around the workspace data
There are three main areas in this window that are unique (or havecommands that are unique) to the workspace editor:
• Menu Bar
• Header Table Spreadsheet
• Secondary Table Spreadsheet
Menu
This area contains the menus that you will use to manipulate theworkspace editor data and how it is displayed. The menu isexplained in detail later in this chapter.
Title bar
Headertable
spreadsheet
Secondarytable
spreadsheet
Status bar
Menu bar
Figure 6-1: A workspace editor screen
Page 2129
Exploration Chapter 6: Editing Data
Header Table Spreadsheet
This area displays the data from the header table of the currentproject in spreadsheet format. Scroll bars will appear at the rightand may appear along the bottom of this area, allowing you to scrollthrough the data both vertically and horizontally.
The example shown in Figure 6-1 has a scroll bar to the right of thespreadsheet, but not along the bottom, as all fields are visible on-screen, and there is no need to scroll horizontally.
Secondary Table Spreadsheet
This area displays the data from a selected secondary table of thecurrent project in spreadsheet format. At the right of this area is ascroll bar allowing you to scroll through the data vertically.
Along the bottom of the area on the left-hand side are a series oftabs showing the names of the available secondary tables. Todisplay the data from any of these tables, simply click thecorresponding tab. If the tab for the table you wish to view is notvisible, you can click the right and left arrow buttons to the left ofthe tabs to display additional tabs.
Also along the bottom, on the right-hand side, is a scroll barallowing you to scroll through the data horizontally, if necessary.
Page 2130
Section II: Workspaces Gemcom for Windows
Selecting and Editing Data
You can use the keyboard or the mouse to navigate around thetables in the workspace editor in order to select data for editing.
Be careful when you select or edit data not to overwrite data youwant to keep. If you change data in a cell by accident, do not movethe cursor from that cell. Press the [Esc] key immediately to revertto the old entry. As soon as you move the cursor out of a cell, anychanges you made to that cell are automatically saved to theworkspace. There is no way to undo your changes or recover yourold data once it has been modified and saved.
Using the Mouse
You can use the mouse to move around the workspace editor as youwould in any Windows program, by using the horizontal andvertical scroll bars, and by pointing and clicking where you wantthe cursor located.
Additionally, you can select a block of cells by clicking and holdingthe left mouse button on a cell representing one corner of thedesired block of cells, dragging the mouse until the entire block ishighlighted, and releasing the button.
You can also select an entire row (one record) by clicking thenumbered button to the left of that row.
Selecting a cell by positioning the mouse cursor and clicking theleft mouse button highlights the data entry within that cell. Youcan then type a new entry to overwrite the existing entry, or youcan use the right and left arrow keys or the Home and End keys toposition the cursor within the data entry. This allows you to insertcharacters into the entry without overwriting it.
!
Page 2131
Exploration Chapter 6: Editing Data
Using the Keyboard
You can use the following keys to move around the workspaceeditor and edit workspace data:
[Enter] Moves the cursor to the next field. When theleft/right separator is in use, moves the cursor tothe next field only in those fields on the same sideof the separator.
[Tab] Moves the cursor to the next field. When theleft/right separator is in use, moves the cursorfrom one side of the separator to the other withinthe same record.
[àà] Moves to the next field to the right. If a specificdata entry is highlighted, moves the cursor onecharacter to the right within that entry.
[ßß] Moves to the previous field to the left. If a specificdata entry is highlighted, moves the cursor onecharacter to the left within that entry.
[áá] Moves to the same field in the previous record. Innormal mode, the record does not get updated.The system can be defined to update the record(i.e., to have the up arrow key act as the [Enter]key).
[ââ] Moves to the same field in the next record. Innormal mode, the record does not get updated.The system can be defined to update the record(i.e., to have the down arrow key act as the[Enter] key).
[PgUp] Moves up one screen.
[PgDn] Moves down one screen.
Page 2132
Section II: Workspaces Gemcom for Windows
[Home] Moves to the beginning of the data entry in thecurrent cell.
[End] Moves to the end of the data entry in the currentcell.
[Ctrl] [Home] Moves to the first field in the first record.
[Ctrl] [End] Moves to the last field in the last record.
[Ctrl] [E] Allows you to enter or edit text in a memo fieldwhen the cursor is placed in that field.
Rearranging and Sorting Data
The workspace editor is very flexible in how it allows you to displaythe data within a table. Columns, rows and tables can be resized,and columns can be repositioned with respect to their neighbours.You can even choose not to display certain fields within a table.
You can also re-order records in any of the tables in the workspaceby sorting into ascending (smallest first) or descending (largestfirst) order based on the contents of any single field in the tablebeing sorted.
Fields with numeric data types (integer, real, double, coordinate,time, date and angle) will be sorted on the basis of data values ineach record. Fields with character (string) data types will be sortedalphanumerically (for example, A comes before B in an ascendingsort; B11 comes before B2, etc.).
When you sort a workspace table, the actual order of values in theworkspace will be updated to reflect the results of the sortingoperation.
Most of these functions can be performed in either of two ways(although some can only be done through one method):
Page 2133
Exploration Chapter 6: Editing Data
• Using various commands available through the menus, inparticular the sorting commands available on the View menuand the Table Options dialog box available on the Optionsmenu.
• Using the mouse to resize and drag and drop columns asdesired. You can also select the fields by which to sort the data.
For more information on using menu commands to customize thearrangement of your data, see “Table” on page 2143.
Using the Mouse
The following illustration shows some of the ways the mouse can beused to resize tables, columns, and rows; and sort and reposition data.
Click on the arrowsto scroll throughthe table tabs.
Click on a table tabto show the datafrom that table.
Drag the linesbetween column
headings to adjustcolumn width.
Drag the linesbetween recordnumber cells to
adjust row height.
Drag the linebetween tables to
adjust table height.
Double-click on acolumn heading tosort the data inascending order bythe data in thatfield.Double-click againto sort the data indescending order.Double click a thirdtime to revert to theoriginal unsortedorder.
Click on thebuttons or drag theslider to scrollthrough data eitherhorizontally orvertically.
Figure 6-2: Using the mouse in the Workspace Editor
Page 2134
Section II: Workspaces Gemcom for Windows
The Menu
The workspace editor menu bar has six menus available on it.These are as follows:
• File. The commands on this menu allow you to exit from theworkspace editor and from the main program.
• Edit. The commands on this menu allow you to perform variousediting functions on the data in the loaded workspace.
• Goto. The commands on this menu allow you to access specificrecords within the loaded workspace.
• View. The commands on this menu allow you to determine howthe records within the loaded workspace are sorted.
• Options. This menu allows you to specify a number ofparameters defining how fields will be displayed andmanipulated by Gemcom for Windows. It also providescommands for loading and saving workspace configurations.
• Help. This menu allows you to display information about thesoftware and your license.
File
The File Menu in the workspace editor contains two commands,only one of which is unique to the workspace editor:
Close Workspace Editor
Selecting this command will close the workspace editor, returningyou to the Gemcom for Windows graphical work area. Upon exitingthe Workspace Editor, Gemcom for Windows will create a defaultconfiguration file to preserve your options settings. See page 2148.
Page 2135
Exploration Chapter 6: Editing Data
Exit Program
Selecting this command will close the entire application ratherthan just the workspace editor.
Edit
The Edit Menu in the workspace editor contains eight commandsallowing you to edit the data displayed in the spreadsheets.
Clear Subtable Records
This command removes all records in the displayed secondarytable. Before you choose this command, you must select a record inthe Header table by clicking the numbered button to the left of therecord.
Cut Row
This command removes the highlighted row(s) to the Windowsclipboard.
Copy Row
This command copies the highlighted row(s) to the Windowsclipboard. Note that because FROM values must be unique within atable, if the original row contains a FROM value, its correspondingvalue in the copy will be increased by one. You can then adjust theFROM value as required.
Paste Row
This command inserts the current selection on the Windowsclipboard into a new row at the end of the table in the activespreadsheet.
Page 2136
Section II: Workspaces Gemcom for Windows
Delete Row
This command deletes the highlighted row from the workspacewithout placing it on the Windows clipboard.
Append Row
This command inserts a blank row at the end of the current table.
Insert Row
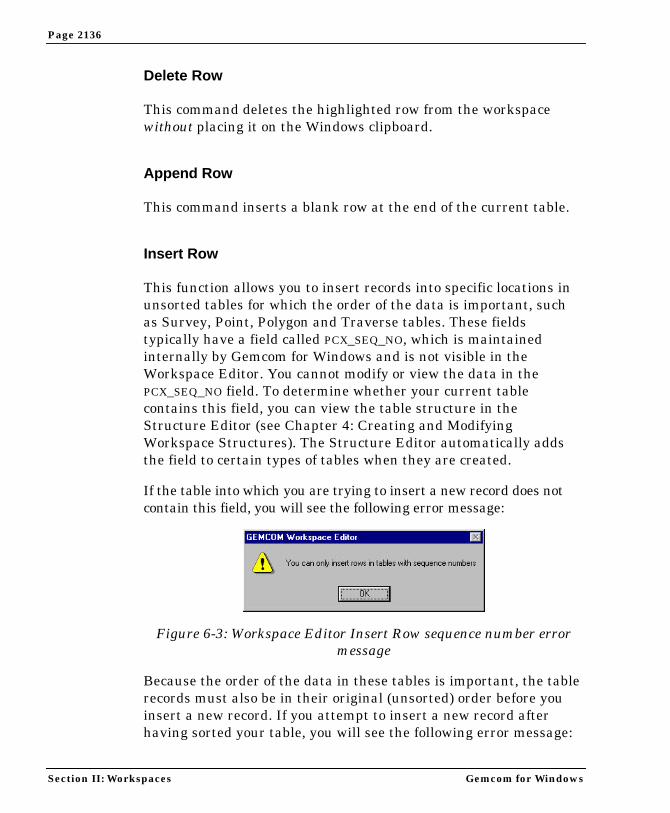
This function allows you to insert records into specific locations inunsorted tables for which the order of the data is important, suchas Survey, Point, Polygon and Traverse tables. These fieldstypically have a field called PCX_SEQ_NO, which is maintainedinternally by Gemcom for Windows and is not visible in theWorkspace Editor. You cannot modify or view the data in thePCX_SEQ_NO field. To determine whether your current tablecontains this field, you can view the table structure in theStructure Editor (see Chapter 4: Creating and ModifyingWorkspace Structures). The Structure Editor automatically addsthe field to certain types of tables when they are created.
If the table into which you are trying to insert a new record does notcontain this field, you will see the following error message:
Figure 6-3: Workspace Editor Insert Row sequence number errormessage
Because the order of the data in these tables is important, the tablerecords must also be in their original (unsorted) order before youinsert a new record. If you attempt to insert a new record afterhaving sorted your table, you will see the following error message:
Page 2137
Exploration Chapter 6: Editing Data
Figure 6-4: Workspace Editor Insert Row sort order error message
To insert a record into a table with a sequence number field, followthis procedure:
1. Ensure that the table into which you wish to insert the newrecord is unsorted by selecting View }} Unsorted.
2. Position the cursor in the record before which you wish to inserta new record. The record number of the current record will beassigned to the new record, and all subsequent record numberswill be adjusted accordingly.
3. Select Edit }} Insert Row. The new row will be inserted before thecurrent record, and the record numbers will be changed toreflect the new addition.
4. The cursor will be located in the new record. Enter theappropriate values in the individual fields.
5. Save the new record by pressing the [Enter] key or clickinganother record. If you move the cursor out of the new recordwithout entering any data, the Insert Row operation will becancelled, and the blank record deleted. You can also cancel theInsert Row operation by pressing [Esc] while the cursor is stilllocated in the new record.
Fill
This command allows you fill a selected set of fields within a rangeof records with identical or related information. To use thiscommand, follow these steps:
Page 2138
Section II: Workspaces Gemcom for Windows
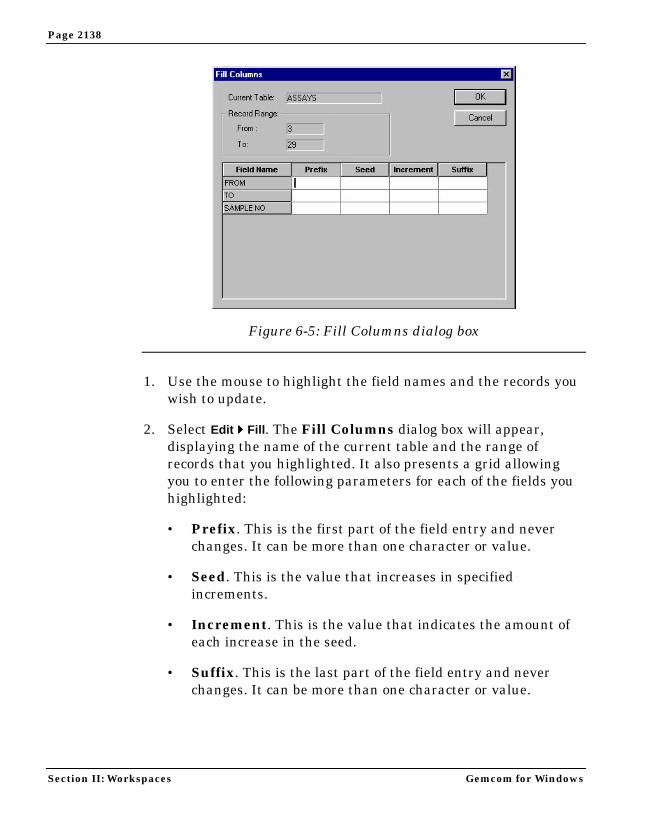
1. Use the mouse to highlight the field names and the records youwish to update.
2. Select Edit }} Fill. The Fill Columns dialog box will appear,displaying the name of the current table and the range ofrecords that you highlighted. It also presents a grid allowingyou to enter the following parameters for each of the fields youhighlighted:
• Prefix. This is the first part of the field entry and neverchanges. It can be more than one character or value.
• Seed. This is the value that increases in specifiedincrements.
• Increment. This is the value that indicates the amount ofeach increase in the seed.
• Suffix. This is the last part of the field entry and neverchanges. It can be more than one character or value.
Figure 6-5: Fill Columns dialog box
Page 2139
Exploration Chapter 6: Editing Data
For example: B1A, B2A, B3A
Prefix = B Seed = 1 Suffix = A Increment = 1
3. When you have entered all required parameters, click OK. Thedata that you entered will be used to update the highlightedfields within the range of records specified.
Goto
The workspace editor Goto Menu contains four commands whichallow you to select the active record (the record in which the cursoris located).
Goto First Record
Selecting this command places the cursor in the first record of theactive table.
Goto Last Record
Selecting this command places the cursor in the last record of theactive table.
Goto Record Number
Selecting this command places the cursor in the recordcorresponding to the number you enter.
Page 2140
Section II: Workspaces Gemcom for Windows
Find Record
You can select this command to bring up a dialog box into whichyou can enter parameters for finding records containing particulardata entry requirements.
To find a record containing specific data, follow this procedure:
1. Ensure that the mouse cursor is located in the table whichcontains the record you wish to find.
2. Select Goto }} Find Record. Enter the following parameters:
• Search For. Enter the data entry you wish to find. Youmust enter the entire numeric value or text string exactlyas it appears in the desired record. You cannot use wild cardcharacters or truncated (partial) entries in your searchstring.
• In Field. Select the field which contains the search stringyou entered. The field in which the cursor is located isentered by default.
• Direction. Select one of the following three commands todetermine how Gemcom for Windows will search for thedesired record.
Figure 6-6: Find Record dialog box
Page 2141
Exploration Chapter 6: Editing Data
◊ Forward from first record. Gemcom for Windows willsearch the table beginning with the first record, and willlocate the first occurrence of the search string in thetable.
◊ Forward from current record. Gemcom for Windowswill search the table beginning with the record in whichthe cursor is located, and will locate the first occurrenceof the search string following the current record.
◊ Backwards from last record. Gemcom for Windowswill search the table backwards from the last record tothe first, and will locate the last occurrence of the searchstring in the table.
• Match Case. Select this command if you want the searchprocess to find a text string with upper and lower case setexactly as you typed it in the Search For parameter.
3. Click Find. The next record encountered in the selected searchdirection which contains the specified data entry will behighlighted.
View
This menu has three commands which allow you to sort the recordsin the selected table. For more information on sorting records, see“Rearranging and Sorting Data” on page 2132.
Unsorted
Select this command to view the records in the order in which theywere saved in the workspace.
Page 2142
Section II: Workspaces Gemcom for Windows
Sort Ascending
Select this command to view the records in the active table inascending order according to the field (column) in which the cursoris currently located.
Sort Descending
Select this command to view the records in the active table indescending order according to the field (column) in which thecursor is currently located.
Options
The workspace editor Options Menu contains four commands whichallow you to determine the configuration of your workspace and todefine some parameters for data entry.
General
This command brings up the following dialog box with parametersthat apply to all fields in the workspace:
Figure 6-7: Sample General Options dialog box
Page 2143
Exploration Chapter 6: Editing Data
• Limit check all entries. When this option is selected, everyvalue that you enter from the keyboard will be tested againstthe minimum and maximum data values defined for the field inthe workspace structure. When this option is not selected, youcan set limit checking on or off on a field-by field basis in theTable Options dialog box.
• Up/down keys same as Enter. When this option is selected,the up/down arrow keys will operate in the same manner as the[Enter] key.
• Confirm Deletions. Allows you to enable or disable the deleteconfirmation prompt for each table. When the confirmationprompt is enabled for a particular table, you will be prompted toconfirm the deletion of any record within that table. You willnot need to do this if it is disabled.
Table
This command brings up a grid-style dialog box into which you canenter parameters on a field-by-field basis for each table (see Figure6-8).
Use this dialog box to enter the following parameters for each fieldname in the table, as applicable or desired.
• Edit Mode. When you place the cursor in this field, you will seea pull-down list arrow displayed. Click that arrow to display thefollowing three choices:
◊ Editable. Selecting this choice means that the data in thisfield can be edited. This is the default setting for this option.
◊ Protected. Selecting this choice means that the data in thisfield cannot be edited. Protected fields will be unavailable(dimmed) in the workspace editor.
◊ Hidden. Selecting this choice means that this field will notbe displayed in the workspace editor.
Page 2144
Section II: Workspaces Gemcom for Windows
• Limit Check. This option specifies whether or not Gemcom forWindows will perform a limit check on the data in this field. Whenthis option is active, every value that you enter into that field fromthe keyboard will be tested against the minimum and maximumdata values defined for the field in the workspace structure (seeChapter 4: Creating and Modifying Workspace Structures).
This option is active by default. To deactivate it for a given field,click the box. If there is an X in the box, the option is active. Ifthe box is empty, the option is not active. Note that if LimitCheck is enabled in the General Options dialog box, it willoverride this function, and limit checks will be performed on alldata regardless of the settings in the Table Options dialogbox.
• Binding. Locating the cursor in a binding cell on the grid willdisplay a pulldown list from which you can select another fieldname to which to bind the current field name. When a field is“bound” to the current field, this means that any data enteredinto the first field will be automatically entered in to the second
field in the next record as the record is created. The default isNone, which leaves the cell blank.
The last four parameters allow you to define the autoincrementation of values within a field.
• Prefix. This is the first part of the field entry and neverchanges. It can be more than one character or value.
• Seed. This is the value that increases in specified increments.
• Increment. This is the value that indicates the amount of eachincrease in the seed.
• Suffix. This is the last part of the field entry and neverchanges. It can be more than one character or value.
For example: B1A, B2A, B3A
Prefix = BSeed = 1Suffix = AIncrement = 1
The tables option dialog box also allows you to determine the orderin which columns will appear in the workspace editor. When youplace the mouse cursor over a field name in the left-hand column ofthe table options dialog box without actually selecting that fieldname, you will notice that the mouse cursor becomes a right arrow(Ù). Selecting that field name will turn the mouse cursor into theregular mouse pointer. To change the position of that field relativeto the others, you can do one of two things:
• You can click the Move Up and Move Down buttons on theright-hand side of the dialog box.
• You can use the mouse to drag the field into the desiredposition.
You will also notice that one of the “field name” buttons is entitled“Left/Right Separation”. The position of this separator can also
Page 2146
Section II: Workspaces Gemcom for Windows
be moved relative to the fields. When this separator is positionedanywhere but at the top or bottom of the list of file names, it willshow up in the corresponding table in the workspace editor as aheavy black line (see Figure 6-9).
Using the left-right separator allows you to use the [Enter] key tomove the cursor location from field to field, but only in those fieldson one side or other of the separator. This is particularly useful ifyou want to enter data for all records within a limited number offields in a table, as it saves having to move through all those fieldsfor which you have no data to enter.
In Figure 6-9, pressing [Enter] would move the cursor to the fieldSPARE1 in record number 3. If the cursor were located in the lastcolumn on the right in record number 5, pressing [Enter] wouldmove the cursor to the SAMPLE NO field in record number 6.
Use the tab key to move to the cursor location from one side of theseparator to the other within the same record number. The cursorkeys and the mouse continue to move among and select fields asthey would if the separator were not present.
Left/RightSeparator
CursorLocation
Figure 6-9: Using the left/right separator in the Workspace Editor
Page 2147
Exploration Chapter 6: Editing Data
Load Configuration
This command allows you to load an existing workspace editorconfiguration (*.CFG) for the current workspace. The loadingprocess must check all the table name references and field namereferences against the current workspace. If you load a specific .CFG
configuration file, this will also become the default configurationfile (.WED) upon exiting the Workspace Editor.
Save Configuration
After changing any of the display attributes, use this command tosave the current configuration of the spreadsheets in the workspaceeditor to a configuration file. This file is separate from the defaultconfiguration file (see page 2148) and is automatically given a .CFG
extension. This command is useful if several people are using thesame workspace and each has personal preferences about how thegeneral and table options should be set as well as the order inwhich the columns should appear. You can also use it to save anumber of different spreadsheet configurations depending on whichpart of the data you are most interested in at a given moment.
Help
The Help menu in the workspace editor contains four commandswhich allow you to get information about your Gemcom system andto access online help.
Contents
This command allows you to access the online help for theworkspace editor through the online help contents.
Page 2148
Section II: Workspaces Gemcom for Windows
Search
This command allows you to search for specific topics in theworkspace editor online help.
About Gemcom
This command is identical to the Help }} About Gemcomcommand for the complete Gemcom for Windows program. Itdisplays the current version number, information about your userlicense and about contacting Gemcom Software International.
Gemcom Settings
This command is identical to the Help }} Gemcom Settingscommand for the complete Gemcom for Windows program. Itdisplays information about the current date and time, viewingmode, active plane, and project and workspace.
Default Configuration File
When you exit the Gemcom for Windows Workspace Editor, your fieldorder, column display, and general and table option settings will besaved in a wordspace editor configuration file (workspacename.WED).This default configuration will remain in effect even if you compactthe database.
If you load a different *.CFG configuration file while working in theWorkspace Editor, this configuration file will become the newdefault configuration file when you exit the Editor unless you resetthe columns and option settings before you exit.
If you make changes to the structure of your workspace using theStructure Editor (see Chapter 4: Creating and ModifyingWorkspaces), the default configuration file will no longer be valid
Page 2149
Exploration Chapter 6: Editing Data
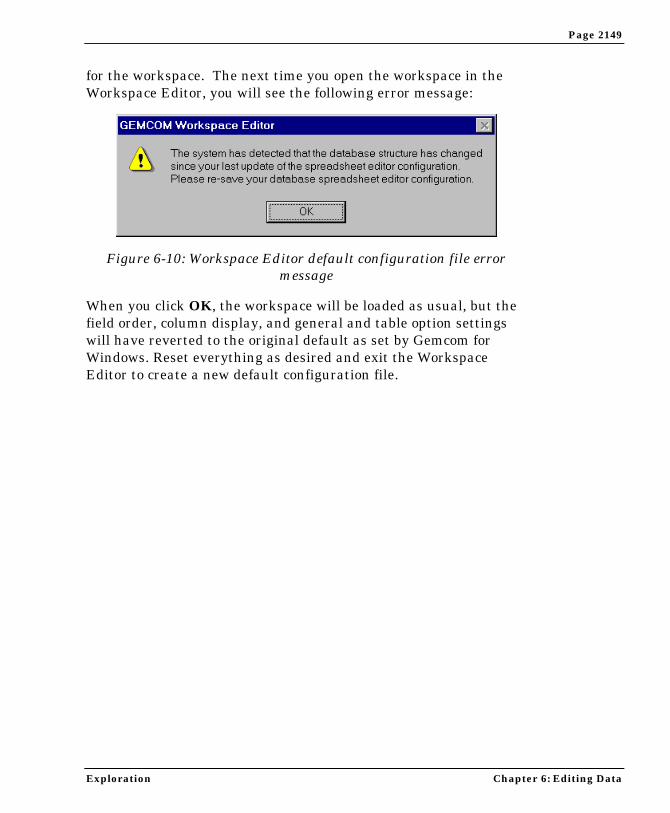
for the workspace. The next time you open the workspace in theWorkspace Editor, you will see the following error message:
When you click OK, the workspace will be loaded as usual, but thefield order, column display, and general and table option settingswill have reverted to the original default as set by Gemcom forWindows. Reset everything as desired and exit the WorkspaceEditor to create a new default configuration file.