+ All Categories
Home > Documents > 21.5 HD-SDI / 3G Broadcast Monitor VZ-215PM-P - ViewZ...

21.5 HD-SDI / 3G Broadcast Monitor VZ-215PM-P - ViewZ...

Date post: 07-Mar-2018
Category:
Upload: hangoc
View: 220 times
Download: 1 times
Share this document with a friend
28
21.5HD-SDI / 3G Broadcast Monitor VZ-215PM-P USER GUIDE(v1.2) Driving Visual Innovation Please read this manual carefully to ensure proper use, including connection and operation. Also, keep this manual for future use.
Transcript

21.5” HD-SDI / 3G Broadcast Monitor

VZ-215PM-P

USER GUIDE(v1.2)

Driving Visual Innovation

Please read this manual carefully to ensure proper use, including connection and operation.

Also, keep this manual for future use.

Class B Equipment (Broadcasting and Telecommunications Equipment for Home Use)

This equipment is for home use (Class B) and granted a Certificate of Conformity for electromagnetic

radiation. It is designed for home use and can be used in all regions.

(These images are for illustrative purposes only. They may vary depending on circumstances.)

Please read the Safety Instructions carefully to ensure proper use of the product.

Warning/Caution Label Description

This label indicates potential safety hazards during use.

Failure to do so may result in personal injury or property damage.

Warning/Caution Label Description

This label indicates prohibited actions. This label indicates instructions that must be followed.

▶ If you do not use the monitor for a long time, please set it to DPMS (Display Power Management Signaling) mode.

▶ If you turn on a screen saver, set it to Moving Picture mode.

▶ Do not use damaged power cords, plugs, or loose outlets. Failure to do so may cause an electric shock or fire.

Power Supply Instructions

Never remove the plug or power cord from the outlet with wet hands.

- Failure to do so may cause an accident due to an electric shock.

Make sure that the power cord is firmly plugged into the outlet and not loose.

- Unstable connection may cause a monitor blackout or fire.

- To disconnect, grip the plug and pull from the outlet. Pulling the cord may cause

Fire.

accident due to disconnection or a short circuit.

Do not insert several plugs into an outlet.

- It may cause a fire or accident due to overloading.

Never use a damaged plug or outlet. Such use may result in an accident such as

an electric shock or fire.

- Failure to do so may cause a fire or accident due to a short circuit.

Excessive bending of the power plug may cause disconnection or a short circuit.

- Please note that disconnection may cause a fire or accident due to a short circuit.

Do not remove the power cord while using the monitor.

- An electric shock occurring during disconnection may damage the monitor.

If the monitor is to be installed and used in a special place rather than under normal conditions, the

surroundings may cause serious quality problems. Before installing the product, please check with our

Service Engineer.

Installation Instructions

Do not install or use the product in humid or dusty locations.

- Failure to do so may cause a fire or accident due to a short circuit or electric shock.

Make sure that the monitor stand does not stick out of a desk, shelf, or case when

installing the product.

- If the product falls to the ground, it may be broken or damaged.

Maintain a distance of over 10cm from the wall when installing the monitor.

- An increase in the temperature inside the monitor may affect the service life and

performance of its components.

Set down the monitor gently to avoid impacts.

- An impact may cause monitor failure or personal injury.

Make sure to keep the power cord away from any heat source.

- Melting of the cord coating may cause an electric shock or fire. Please adhere to the

warning.

- Do not place cigarettes, candles, or mosquito repellent incense on top of the product.

Failure to keep them away may cause a fire.

To mount a wall-mount monitor on the wall, please consult an expert.

- Installation by an unqualified person may cause personal injury. Make sure to use

the designated mounting device.

Do not spray a cleaning solution directly on the monitor.

- Directly spraying on the monitor may significantly increase the risk of discoloration,

cracks, or peeling of the LCD panel surface.

Do not use or keep flammable sprays or substances near the product.

- Careless handling of flammable substances may cause an explosion or fire.

Make sure to disconnect the power cord before cleaning.

- Failure to do so may cause an electric shock or fire.

Cleaning and Use Instructions

Pull out the power cord and wipe it with soft, dry cloth when cleaning the product.

- Do not use chemicals, including wax, benzene, alcohol, thinner, mosquito repellent,

air freshener, lubricant, or cleaning solution.

Do not put items that can easily catch fire, such as metal chopsticks, wire, awls, paper, or

matches, into the air vent, headphone port, or AV port.

- Failure to do so may cause an electric shock or fire.

- If water or any foreign object gets into the product, turn off the product, unplug it from the

outlet, and contact our Service Center.

If one image is displayed for a long time, it may cause burn-in or image persistence.

- If the monitor is not used for a long time, set it to Power Saving mode or Moving Picture

mode such as animated screensavers.

If the monitor makes unusual noises or smoke, unplug the product and contact our Service

Center.

- Failure to do so may cause an electric shock or fire.

- Sit up straight.

- Position the monitor at a distance of 40-50cm below eye level, and make sure to look straight at the monitor.

- Tilt the monitor back 1 to 20 degrees and adjust the height slightly below eye level.

- Keep the arms perpendicular to the body and parallel to the back of the hand.

- Make sure the elbows are positioned at a 90-degree angle.

- Maintain a knee angle of over 90 degrees and adjust the monitor height to keep the heels on the floor and the

arms above the heart.

Do not cover the air vent.

- Improper ventilation may cause monitor failure or a fire.

If the product is not used for a long time, disconnect the power cord.

- Dust buildup may result in an electric shock or short circuit or fire due to heat output,

ignition or deteriorating insulation.

Do not place the monitor on unstable or vibrating locations, such as shaking shelves or

inclined surfaces.

- The fall of the product may result in failure or personal injury. Using the monitor on

a vibrating location may shorten its service life or cause a fire.

When moving the monitor, make sure to turn it off and unplug from the outset. Also, make

sure that other cords such as the antenna and other connecting cables have been

disconnected.

- Moving the monitor without disconnecting the cod will damage the cord, which may cause

a fire or electric shock.

Make sure that no child hangs on to or climb on the product.

- If the product collapses, it may cause injury or death.

Set the product resolution and frequency correctly. Otherwise, it may lead to eye problems.

- The resolution varies depending on the monitor size. Find and set the correct resolution

before use.

Use the monitor in the correct posture.

Checking Control Buttons / Names & Functions of I/O Port ……………………...… 2

Checking Control Buttons

Names & Functions of I/O Port

Main Features………………………………….…..………………………………………

3

Menu Tree & Control…………………………… ………………………………..………

Menu Tree

Menu Control

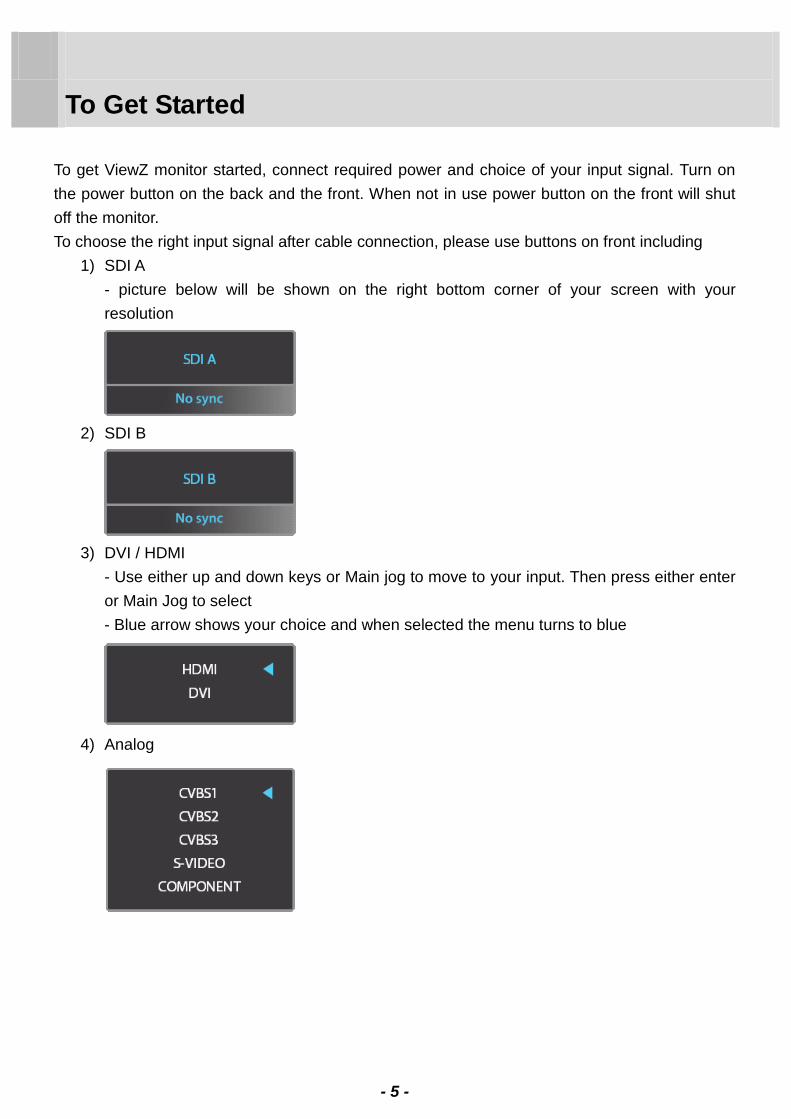
To Get Started……………………...………………………………………………………

4

5

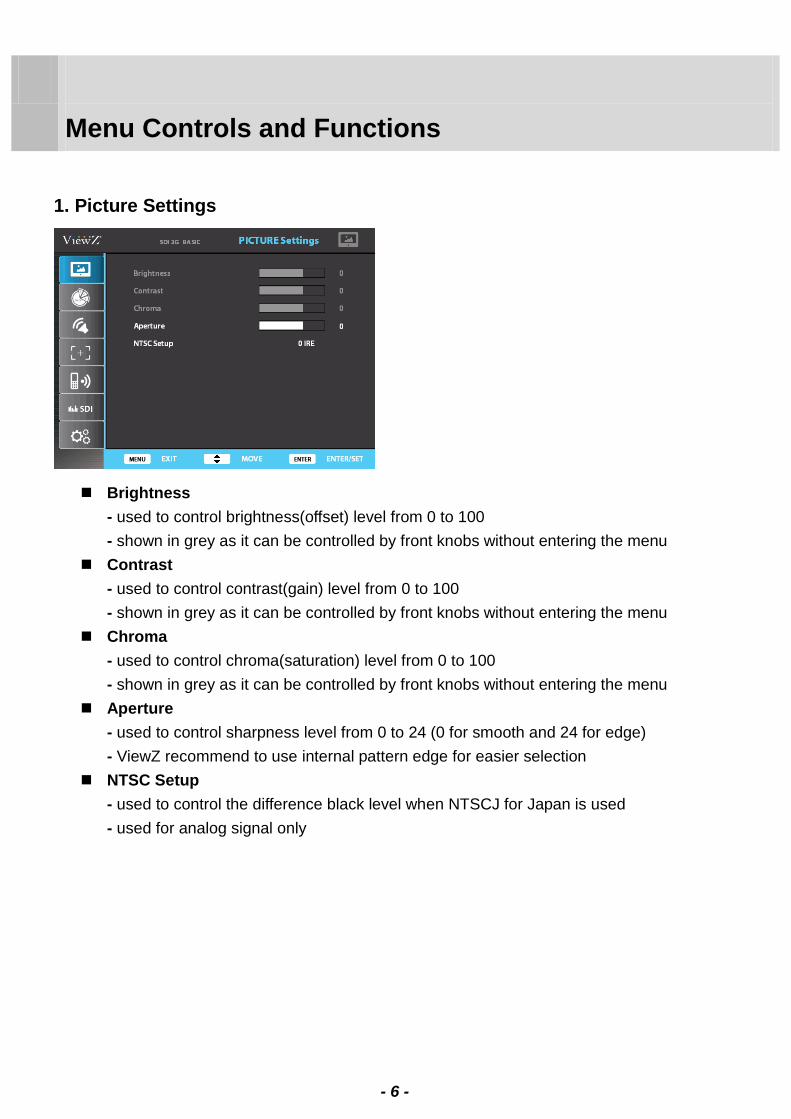
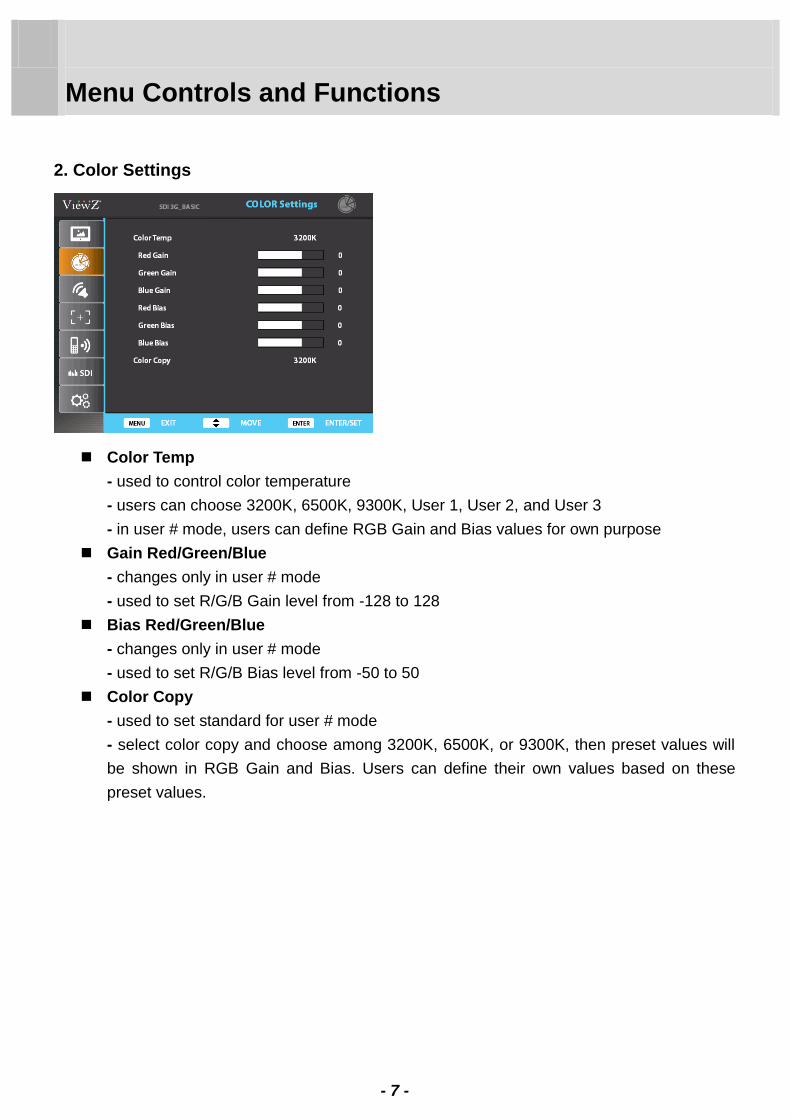
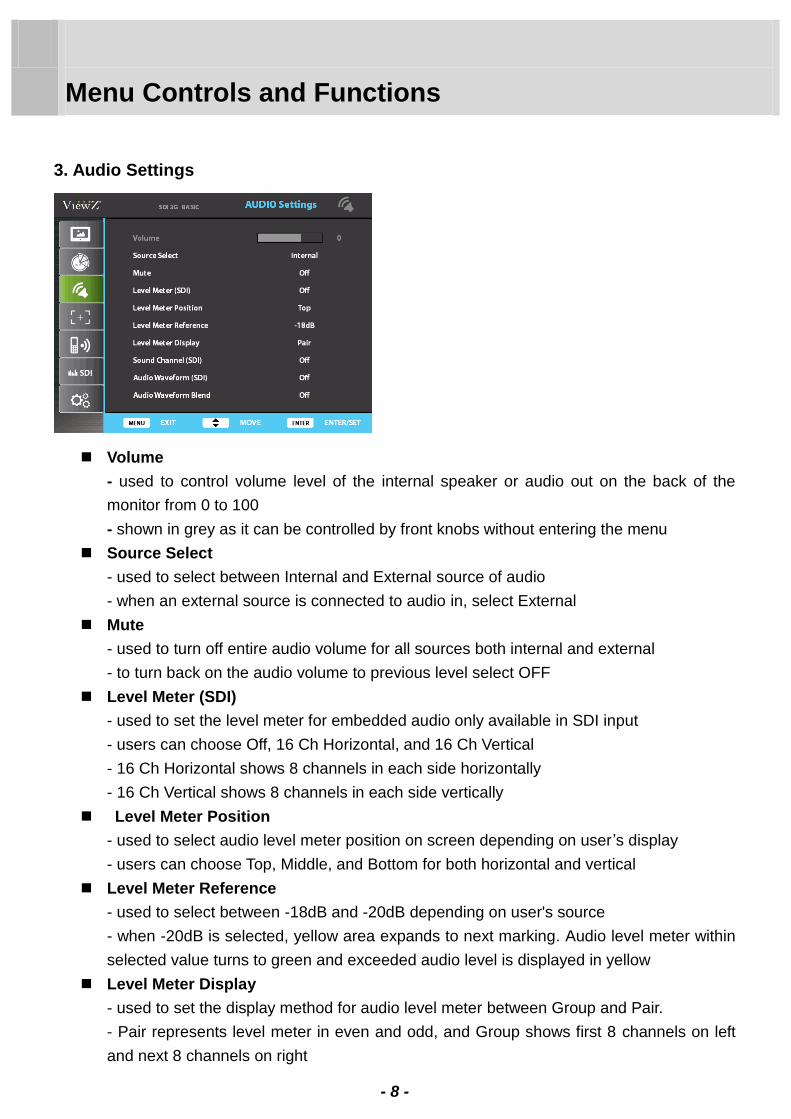
Menu Controls and Functions ………….……………..………………..……………..… 6

Picture Settings.

Color Settings

Audio Settings

Marker Settings

Remote Settings

SDI Analyze

System Settings

Specification …………..…………………………………………..……………………… 17

- 1 -

This Monitor was

Manufactured by ISO 9001

Certified Factory

Checking Control Buttons / Names & Functions of I/O

Ports

1. Checking Control Buttons

2. Names and Functions of I/O Ports

1. AC 110~240V 6. DVI In

2. DC 12~24V In

3. SDI A/ SDI B/ SDI Out

4. CV123/ YPbPr/ SYSC

5. HDMI In/ Out

7. Audio In/ Out

8. PGM

9. Remote

10. RS422 In/Out

1. Volume 6. Short Keys &

Programmable Keys

2. Bright

3. Contrast

4. Chroma

5. Main Select Jog

7. Menu

8. Up / Down

9. Enter

10. Power

- 2 -

1 3 2 4 5 6 7 8 9

1 2 3 4 5 6 7 8 9 10

0

10

0

Main Features

Internal SDI to HDMI Converter

Closed Caption : CEA-608/708/Line21(SDI)

Color Calibration (Gamma, Color Temperature 3200K, 6500K, 9300K)

Waveform(YCbCr/RGB)/ Vectorscope Parade Support(SD/HD SDI)

Selectable Y/R/G/B Histogram(SD/HD SDI)

3G SDI LEVEL A/B (YCbCr, RGB 4:4:4) Support.

SDI Embedded 16CH Audio Level Meter.

SDI Embedded 2CH Select Audio Waveform.

Focus Assist(SD/HDSDI)

False Color(SD/HD SDI)

Y Clip Guide Min/Max Select (SD/HD SDI)

12bit to 8bit / 12bit to 10bit Dithering.

Dynamic UMD Support.

DSLR Scaling (HDMI)

Blue Only, Mono

Maker

Time Code Display

Monitor External Control : Remote , RS422(Daisy Chain)

Selectable 2 User Key

DPMS Select

Color Bar / 100% White Internal Patten

Easy Menu Control by Jog

- 3 -

Menu Tree & Control

1. Menu Tree

Main menu includes

1) Picture Settings

2) Color Settings

3) Audio Settings

4) Market Settings

5) Remote Settings

6) SDI Analyze

7) System Settings

The picture above shows Audio Settings menus in ViewZ monitor.

2. Menu Control

Menu control can be handled in two ways by

1) Main Select Jog

2) Front Keys

Press Menu button or Main Jog to enter menu

Use Up / Down keys on front or turn the main jog to choose desired menu

To enter desired menu press Enter key or Main Jog

To exit to the previous step press Exit key or press Main Jog for 2 seconds

Menu turns to blue when selected

Grey menus are not yet activated

- 4 -

To Get Started

To get ViewZ monitor started, connect required power and choice of your input signal. Turn on

the power button on the back and the front. When not in use power button on the front will shut

off the monitor.

To choose the right input signal after cable connection, please use buttons on front including

1) SDI A

- picture below will be shown on the right bottom corner of your screen with your

resolution

2) SDI B

3) DVI / HDMI

- Use either up and down keys or Main jog to move to your input. Then press either enter

or Main Jog to select

- Blue arrow shows your choice and when selected the menu turns to blue

4) Analog

- 5 -

Menu Controls and Functions

1. Picture Settings

Brightness

- used to control brightness(offset) level from 0 to 100

- shown in grey as it can be controlled by front knobs without entering the menu

Contrast

- used to control contrast(gain) level from 0 to 100

- shown in grey as it can be controlled by front knobs without entering the menu

Chroma

- used to control chroma(saturation) level from 0 to 100

- shown in grey as it can be controlled by front knobs without entering the menu

Aperture

- used to control sharpness level from 0 to 24 (0 for smooth and 24 for edge)

- ViewZ recommend to use internal pattern edge for easier selection

NTSC Setup

- used to control the difference black level when NTSCJ for Japan is used

- used for analog signal only

- 6 -

Menu Controls and Functions

2. Color Settings

Color Temp

- used to control color temperature

- users can choose 3200K, 6500K, 9300K, User 1, User 2, and User 3

- in user # mode, users can define RGB Gain and Bias values for own purpose

Gain Red/Green/Blue

- changes only in user # mode

- used to set R/G/B Gain level from -128 to 128

Bias Red/Green/Blue

- changes only in user # mode

- used to set R/G/B Bias level from -50 to 50

Color Copy

- used to set standard for user # mode

- select color copy and choose among 3200K, 6500K, or 9300K, then preset values will

be shown in RGB Gain and Bias. Users can define their own values based on these

preset values.

- 7 -

Menu Controls and Functions

3. Audio Settings

Volume

- used to control volume level of the internal speaker or audio out on the back of the

monitor from 0 to 100

- shown in grey as it can be controlled by front knobs without entering the menu

Source Select

- used to select between Internal and External source of audio

- when an external source is connected to audio in, select External

Mute

- used to turn off entire audio volume for all sources both internal and external

- to turn back on the audio volume to previous level select OFF

Level Meter (SDI)

- used to set the level meter for embedded audio only available in SDI input

- users can choose Off, 16 Ch Horizontal, and 16 Ch Vertical

- 16 Ch Horizontal shows 8 channels in each side horizontally

- 16 Ch Vertical shows 8 channels in each side vertically

Level Meter Position

- used to select audio level meter position on screen depending on user’s display

- users can choose Top, Middle, and Bottom for both horizontal and vertical

Level Meter Reference

- used to select between -18dB and -20dB depending on user's source

- when -20dB is selected, yellow area expands to next marking. Audio level meter within

selected value turns to green and exceeded audio level is displayed in yellow

Level Meter Display

- used to set the display method for audio level meter between Group and Pair.

- Pair represents level meter in even and odd, and Group shows first 8 channels on left

and next 8 channels on right

- 8 -

Menu Controls and Functions

3. Audio Settings (Continued)

Sound Channel (SDI)

- used to set embedded audio channel for internal speaker or Audio Out

- select from CH1, CH2, CH1+CH2, CH3, CH4, CH3+CH4, CH5, CH6, CH5+CH6, CH7,

CH8, CH7+CH8, CH9, CH10, CH9+CH10, CH11, CH12, CH11+CH12, CH13, CH14,

CH13+CH14, CH15, CH16, and CH15+CH16

- when CH1 is chosen, user can hear Ch1 from both speakers. When CH1+CH2 is chosen,

user can hear Ch1 from left speaker and Ch2 from right speaker

Audio Waveform (SDI)

- used to show audio level meter in waveform for easier representation and fast analyze

- available in CH1+CH2, CH3+CH4, CH5+CH6, CH7+CH8, CH9+CH10, CH11+CH12,

CH13+CH14, CH15+CH16 and Off

Audio Waveform Blend

- used to fade off audio waveform on screen for better display

- 9 -

Menu Controls and Functions

4. Marker Settings

Marker On/Off

- used to activate the marker function

- Marker should be ON to use any features in Marker Setting menu

Line Marker

- used to select user’s desired marker type

- available in off, 16:9, 4:3, 4:3(on air), 15:9, 14:9, 13:9, 1.85:1, 2.35:1, 1.85:1 and 4:3

Center Marker

- used to turn on and off center marker

Safety Area

- used to select safety area among off, 80%, 85%, 88%, 90%, 93% and 100%

Marker Mat

- used to change darkness of areas out of line marker

- select level from OFF (transparent) to 7 (black)

Marker Color

- used to change marker color on the screen

- select from blue, green, red, gray, black, and white

Corner On/Off

- used to show safety area by ticks rather than a box

- Safety area shown in regular line when the feature is off

- 10 -

Menu Controls and Functions

5. Remote Settings

To help users to control ViewZ monitor from the distance using own controller, ViewZ includes

Remote port on the back of the monitor with 6 pins (Pin 7 and 8 are used for Power and

Ground). Upon user’s needs, 6 Pins can be assigned to features in monitors including below

1) tally red

2) tally green

3) SDI A

4) SDI B

5) CVBS1

6) CVBS2

7) CVBS3

8) S-VIDEO

9) COMPONENT

10) HDMI

11) DVI

12) 16:9 MARKER

13) 4:3 MARKER

- 11 -

Menu Controls and Functions

` 6. SDI Analyze

Focus Assist

- used to color the pixels in the shape or boundary area of the image to inform the user to

make the best focus

Focus Assist Level

- used to set the focus assist level from 0, the strongest, to 10, the weakest

Focus Assist Color

- used to set the focus assist color from red, green, and blue

Waveform / Vector

- used to turn on and off waveform and vector function

- available in WF(Y/G), VT, WF(Y/G)+VT, WF(YCbCr/RGB), WF(YCbCr/RGB)+VT, and off

Waveform Select

- used to select between YCbCr and RGB for Waveform

Waveform Blend

- used to select the transparency option of Waveform and Vectorscope on the screen

Time Code

- used to activate the time code among VITC, LTC, Off

Time Code Blend

- used to select the transparency option of Time Code on the screen

Closed Caption

- used to activate closed caption among CC608(Line21), CC608(ANC), CC708 and Off

Histogram

- used to turn on and off histogram function

- available in red(R), green(G), blue(B), and black(Y)

- Histogram graph represents how designated color is shown in the screen. At the bottom of

the graph, there is color level of designated color and histogram bar above that level shows

how much designated color is exposed in the screen.

- 12 -

Menu Controls and Functions

6. SDI Analyze (Continued)

Histogram Blend

- used to select the transparency option of Histogram graph on the screen

False Color

- used to turn on and off False Color feature

- False color feature utilizes a full spectrum of assigned color indicators, ensuring flawless

shot exposure. As the camera Iris is adjusted, the subject of the images will change color

based on specific brightness values indicating optimal exposure

False Color Palette

- used to turn on and off False Color palette on the screen

False Color Blend

- used to select the transparency option of False Color on the screen

Y Clip Guide

- used to analyze the luma level of the input video signal and display the selected sector on

the screen to aid exposure setting of the camera

- Clip Guide will highlight areas with luminance level under pre-set value using Y Clip Guide

Min and over preset value using Y Clip Guide Max

Y Clip Guide Max

- used to select maximum value for luminance level from 0 IRE to 100 IRE

Y Clip Guide Min

- used to select minimum value for luminance level from 0 IRE to 100 IRE

Y Clip Guide color

- available in red, green, blue, and white

3G Level A/B

- used to select 3G-SDI A/B input format among normal, YCbCr 444 10Bit A, RGB 444

10Bit A, YCbCrA 444 10Bit A, RGBA 444 10Bit A, YCbCr 422 12Bit A, RGB 444 12Bit A,

YCbCr 444 12Bit A, YCbCr 444 10Bit B, RGB 444 10Bit B, YCbCrA 444 10Bit B, RGBA 444

10Bit B, YCbCr 422 12Bit B, RGB 444 12Bit B and YCbCr 444 12Bit B

- 13 -

Menu Controls and Functions

7. System Settings

Scan

- used to change the scan mode among zero scan, over scan, and pixel to pixel

- wen pixel to pixel is on, turn the main jog to move the position

- when system setting is in pixel to pixel, marker features don't work

Aspect

- used to change the display ratio among full screen, 16:9, and 4:3

BlueMono

- used to change the display among off(regular), mono, and blue

H/V Delay

- used to observe blank area for H sync and V sync

- when system setting is in H/V delay, marker features don't work

Internal Pattern

- used to turn on internal pattern among off, color bar, and white

- 14 -

Menu Controls and Functions

7. System Settings (Continued)

Remote ID

- when more than 1 monitor is used, assign the monitor to user's desired number

Backlight

- to control backlight of screen from 0 to 100

User Key 1 & 2

- to assign programmable key 1&2 on front to user's desired / frequently used feature

among source ID, blue/mono, DSLR scaling, false color, and Y clip guide

Source ID (UMD)

- enables users to enter input source name in the display

- select from off, manual(BG), manual(Char), and UMD

- when manual(BG/Char) is chosen, user needs to enter source name manually at Source

ID Character below. The difference between BG and Char is BG is with black box to

highlight source name and Char is with source name only

- when UMD is chosen, the monitor receives source name automatically from the source

and shows in black line at the bottom using RS 485

Source ID Character

- used to enter desired source name up to 5 characters

Source ID Position

- used to show source name that user entered at user's desired location on screen

- available in top-left, top-center, top-right, bottom-left, bottom-center, and bottom-right

Source ID Color

- used to change the color of the source name that user entered

DSLR Scaling

- used to scale the image with different resolution of the camera to fulfill the screen

- activates with HDMI signal only

- available only with Canon Camera 5DII and 7D

- 15 -

Menu Controls and Functions ]

7. System Settings (Continued)

Power Saving

- select between off and DPMS

- when DPMS is selected and there's no input signal for longer than 15sec, monitor takes

sleep mode

- LED light on front: red-power off, green-power on, orange blink-no input, orange-

DPMS(sleep mode)

Factory Reset

- used to reset the monitor to factory default setting

- 16 -

Specification

VZ-215PM-P

Display

Screen Size 21.5"

Max Resolution 1920 X 1080

Pixel Pitch 0.2475mm X 0.2475mm

Brightness 250cd/㎡(Typical)

Contrast Ratio 1000:1

Aspect Ratio 16:9

Viewing Angle (H/V) 178°/178°

Color Depth 16.7M

Input Connector

2 x BNC SDI (SD/HD/3G) 2Channel Inputs

3 x BNC 3 CVBS, S-Video, Component Inputs

1 x HDMI HDMI Input

1 x DVI DVI Input

1 x Phone Jack Analog Stereo Audio Input

1 x RJ45 Jack Remote Control

1 x RJ45 Jack RS422 Monitor Control

1 x HDMI PGM Download Port

Output Connector

1 x BNC SDI Select Channel Output

1 x HDMI SDI to HDMI Converter Output

1 x Phone Jack Analog Stereo Audio Output

1 x RJ45 Jack RS422 Daisy Chain Output

2 x Speaker 2 X 2W

Input Signal Format

SDI

SMPTE

425M-AB

YCbCr 4:2:2

10bit 1080P (60/59.94/50)

YCbCr, RGB

4:4:4

10bit,12bit

1080i (60/59.94/50)

1080P (30/29.97/25/24/23.98)

1080Psf (30/29.97/25/24/23.98)

YCbCr, RGB

4:4:4 10bit 720P(60/59.94/50/30/29.97/25/24/23.98)

SMPTE 274M YCbCr 4:2:2

10bit

1080i (60/59.94/50)

1080P (30/29.97/25/24/23.98)

1080Psf (30/29.97/25/24/23.98)

SMPTE 260M YCbCr 4:2:2

10bit 1035i (60/59.94)

SMPTE 296M YCbCr 4:2:2 720P(60/59.94/50/30/29.97/25/24/23.98)

10bit

SMPTE 125M YCbCr 4:2:2

10bit 525i (NTSC 59.94)

ITU-R BT.601 YCbCr 4:2:2

10bit 625i (PAL 50)

2K Format YCbCr 4:2:2

10bit 2048 x 1080P (24/23.98/24sF/23.98sF)

CVBS, S-

Video NTSC(525/59.94i) , PAL(625/50i)

ANALOG COMPONENT

1080P (60/59.94/50)

1080i (60/59.94/50)

1080P (30/29.97/25/24/23.98)

720P(60/59.94/50)

HDMI 480i/480P/576i/576P/1080i/1080P

DVI VGA, SGA, XGA, SXGA, WXGA, WUXGA

Dimensions

Outline Dimension 20.1" x 13.9” x 2.6"

(W x H x D) (511mm x 354mm x 66mm)

Net Weight 17.19lbs (7800g)

General

Power DC 12V~24V / AC 110~240V (50~60Hz)

Power Consumption 70W

Operating Temperature 0~40℃ (32~104℉)

- 18 -

Product Name 21.5” HD-SDI / 3G Broadcast Monitor

Client Address Name Telephone

Address

Dealer (Store

Location)

Store Telephone

Address

Purchase Date

(YYYY / MM / DD)

Warranty

Period

One (1) year from

purchase date

Serial Number Purchase Price

Consumer Dispute Resolution Standards

Type of Consumer Claim

Compensation Details

Within Warranty

Period

Within Warranty

Period

Performance or

functional failure

that occurs

naturally under

normal

conditions

Important repair is requested within 10 days of purchase.

Exchange or

free-of-charge

repair

Repair of important parts is requested within a month of purchase.

Important repair of exchanged product is requested within a month of exchange.

Exchange or

free-of-charge

repair

Refund for

purchase price

If the product cannot be exchanged

Can be

repaired

If a defect occurs Free repair Free repair

If failure recurs after the same defect has been repaired 3 times

Exchange or

refund for

purchase price

Refund by adding

10% to the

depreciated

amount

The product has been repaired 4 times for failure of several areas

and failure occurs for the 5th time

If the product cannot be repaired

Repair is impossible because spare parts are not available

The company has lost the product a customer requested for repair

Damage occurs during transportation or installation after purchase Exchange Repair with charge

Performance or

functional failure

caused by

customer on

purpose or by

mistake

Repair is possible Repair with

charge Repair with charge

Repair is impossible

Exchange after

charging for

repairs

In accordance with

the company’s

policy

- 19 -

■ Failure occurs due to a natural disaster event (fire, seawater damage, gas, earthquake,

storm/flood)

■ Failure occurs due to abnormal power supply or poor connection of devices

■ Failure occurs due to repairs or modification by an unauthorized person other than an engineer at

the store or service center.

■ Consumable parts are to be exchanged due to natural wear.

■ Damage is caused by external forces rather than internal defects.

※ Service Contact: #177 W. Orangethorpe Ave. Placentia, CA 92870

TEL. 1-714-996-1177 / 1-888-99-ViewZ

Repair with

charge

Repair with

charge

The conditions not stated will be subject to the Consumer Dispute Resolution Standards. The above compensation is in accordance with 2 of

Article 21 of the Consumer Protection Act.

- 20 -

Memo

- 21-

www.viewzusa.com

MODEL VZ-215PM-P HD-SDI / 3G Broadcast Monitor

OPERATION MANUAL

© Jan. 2014 by ViewZ USA

□ All rights reserved. Reproduction or duplication, without permission of ViewZ USA of

edition or contents in whole in part, any manner, is prohibited.

□ Specifications and design are subject to change without notice


Recommended