136
Advanced Operation Guide 2540 3040 Please read the Operation Guide before using this machine. Keep it close to the machine for easy reference.
| Date post: | 03-May-2018 |
| Category: |
Documents |
| Upload: | truongkhuong |
| View: | 221 times |
| Download: | 1 times |
Advanced Operation Guide
25403040
Please read the Operation Guide before using this machine. Keep it close to the machine for easy reference.
This Advanced Operation Guide is for models 2540 and 3040. In this guide, 2540 refers to the 25 cpm (copies per minute) model and 3040 to the 30 cpm model.
Included GuidesThe following guides are included with this machine. Refer to the proper guide based on your requirements.
Operation Guide
Describes how to load paper, basic copy operations, and troubleshooting.
Advanced Operation Guide (This Guide)
Explains copying features in depth, as well as default settings.
Quick Start Guide
Lists and briefly describes the copy functions of the machine.
Note This Advanced Operation Guide contains information that corresponds to using both the inch and metric versions of these machines.
The inch versions of these machines are shown in the screens in this guide. If you are using the metric version, use the messages provided for the inch version as reference only. In the body text, only the inch messages are given if these versions differ only in capitalization. When there is even a slight difference in the message, we have listed the information for the inch version followed, in brackets, by the corresponding information for the metric version.
Contents
Legal Information and Conventions ............................................iii
1 Copy Functions .......................................................................... 1-1Selecting Paper Source ............................................................ 1-2Selecting Original Size ............................................................... 1-3Copy Quantity ............................................................................. 1-5Orientation of Original Document ............................................. 1-6Offset Mode ................................................................................. 1-7Stapling ....................................................................................... 1-8Combine Mode ............................................................................ 1-9Margin Mode ............................................................................. 1-12Centering Originals .................................................................. 1-13Border Erase ............................................................................. 1-14Page Numbering ....................................................................... 1-16Cover Mode ............................................................................... 1-18Booklet from Sheets ................................................................. 1-19Booklets from Facing Pages ................................................... 1-21Memo Mode ............................................................................... 1-22Continuous Scan ...................................................................... 1-24Proof Copy ................................................................................ 1-24Repeat Copy .............................................................................. 1-25Auto Image Rotation ............................................................... 1-27Selecting Output Destination .................................................. 1-28EcoPrint ..................................................................................... 1-28Negative Image Copying ......................................................... 1-29Mirror Copying .......................................................................... 1-29Mixed Size Originals Mode ...................................................... 1-30Programmed Copying .............................................................. 1-31Assigning Register Keys ......................................................... 1-33Job Build ................................................................................... 1-34
2 Output Management Functions ................................................. 2-1Overview of Output Management Functions ........................... 2-2Using the Output Management Functions ............................... 2-2
3 System Menu .............................................................................. 3-1Default Settings .......................................................................... 3-2Setting MP Tray ........................................................................ 3-23Registering Non-standard Sizes for Originals ....................... 3-24Drum Refresh ............................................................................ 3-25Printing Reports ....................................................................... 3-26Checking Total Copy Count .................................................... 3-28
4 Job Accounting .......................................................................... 4-1Overview of Job Accounting ..................................................... 4-2Managing Accounts ................................................................... 4-4Copy Count per Department .................................................... 4-10Activating and Deactivating Job Accounting ........................ 4-12Job Accounting Default Settings ............................................ 4-13Using Job Accounting ............................................................. 4-18
5 Troubleshooting ......................................................................... 5-1Solving Malfunctions ................................................................. 5-2
i

Responding to Error Messages ................................................. 5-4
6 Appendix ..................................................................................... 6-1Paper ............................................................................................ 6-2Intercompatibility of Functions ............................................... 6-10Glossary .................................................................................... 6-15
Index ....................................................................................Index-1
ii

Legal Information and Conventions
Please read this information before using your machine.
Regarding Tradenames• PRESCRIBE and ECOSYS are registered trademarks of Kyocera
Corporation.• KPDL is trademark of Kyocera Corporation.• Windows and Windows Server are registered trademarks of
Microsoft Corporation. • Windows NT is a trademark of Microsoft Corporation.• PCL and PJL are registered trademarks of Hewlett-Packard
Company.• Adobe, Adobe Acrobat and Adobe Reader are registered
trademarks of Adobe Systems Inc. • PowerPC is a trademark of International Business Machines
Corporation.• CompactFlash is a trademark of SanDisk Corporation.• This product was developed using the Tornado™ Real Time
Operating System and Tools from Wind River Systems.• This product uses PeerlessPrintXL to provide the HP LaserJet
compatible PCL 6 language emulation. PeerlessPrintXL is a trademark of Peerless Systems Corporation, 2381 Rosecrans Ave. El Segundo, CA 90245, U.S.A.
• TrueType is a registered trademark of Apple Computer Inc.• All resident fonts in this printer are licensed from Monotype Imaging
Inc.• Helvetica, Palatino and Times are registered trademarks of
Linotype-Hell AG.• ITC Avant Garde Gothic, ITC Bookman, ITC ZapfChancery and ITC
Zapf Dingbats are registered trademarks of International Typeface Corporation.
• This product contains UFST™ and MicroType® from Monotype Imaging Inc.
All other brand and product names are registered trademarks or trademarks of their respective companies. The designations ™ and ® will not be used in this Operation Guide.
IBM PROGRAM LICENSE AGREEMENT
THE DEVICE YOU HAVE PURCHASED CONTAINS ONE OR MORE SOFTWARE PROGRAMS (“PROGRAMS”) WHICH BELONG TO INTERNATIONAL BUSINESS MACHINES CORPORATION (“IBM”). THIS DOCUMENT DEFINES THE TERMS AND CONDITIONS UNDER WHICH THE SOFTWARE IS BEING LICENSED TO YOU BY IBM. IF YOU DO NOT AGREE WITH THE TERMS AND CONDITIONS OF THIS LICENSE, THEN WITHIN 14 DAYS AFTER YOUR ACQUISITION OF THE DEVICE YOU MAY RETURN THE DEVICE FOR A FULL REFUND. IF YOU DO NOT SO RETURN THE DEVICE WITHIN THE 14 DAYS, THEN YOU WILL BE ASSUMED TO HAVE AGREED TO THESE TERMS AND CONDITIONS.
iii

The Programs are licensed not sold. IBM, or the applicable IBM country organization, grants you a license for the Programs only in the country where you acquired the Programs. You obtain no rights other than those granted you under this license.
The term “Programs” means the original and all whole or partial copies of it, including modified copies or portions merged into other programs. IBM retains title to the Programs. IBM owns, or has licensed from the owner, copyrights in the Programs.
1. License
Under this license, you may use the Programs only with the device on which they are installed and transfer possession of the Programs and the device to another party. If you transfer the Programs, you must transfer a copy of this license and any other documentation to the other party. Your license is then terminated. The other party agrees to these terms and conditions by its first use of the Program.
You may not:
1) use, copy, modify, merge, or transfer copies of the Program except as provided in this license;
2) reverse assemble or reverse compile the Program; or3) sublicense, rent, lease, or assign the Program.
2. Limited Warranty
The Programs are provided “AS IS.”
THERE ARE NO OTHER WARRANTIES COVERING THE PROGRAMS (OR CONDITIONS), EXPRESS OR IMPLIED, INCLUDING, BUT NOT LIMITED TO, THE IMPLIED WARRANTIES OF MERCHANTABILITY AND FITNESS FOR A PARTICULAR PURPOSE.
Some jurisdictions do not allow the exclusion of implied warranties, so the above exclusion may not apply to you.
SUPPLEMENT TO AGREEMENT FOR SOFTWARE BUNDLING AND DISTRIBUTION FOR ALDC
3. Limitation of Remedies
IBM's entire liability under this license is the following;
1) For any claim (including fundamental breach), in any form, related in any way to this license, IBM’s liability will be for actual damages only and will be limited to the greater of;a) the equivalent of U.S.$25,000 in your local currency; orb) IBM's then generally available license fee for the Program
This limitation will not apply to claims for bodily injury or damages to real or tangible personal property for which IBM is legally liable. IBM will not be liable for any lost profits, lost savings, or any incidental damages or other economic consequential damages, even if IBM, or its authorized supplier, has been advised of the possibility of such damages. IBM will not be liable for any damages claimed by you based on any third party claim. This limitation of remedies also applies to any developer of Programs supplied to IBM. IBM’s and the developer’s limitations of remedies are not cumulative. Such developer is an intended beneficiary of this Section. Some jurisdictions do not allow these limitations or exclusions, so they may not apply to you.
4. General
iv

You may terminate your license at any time. IBM may terminate your license if you fail to comply with the terms and conditions of this license. In either event, you must destroy all your copies of the Program. You are responsible for payment of any taxes, including personal property taxes, resulting from this license. Neither party may bring an action, regardless of form, more than two years after the cause of action arose. If you acquired the Program in the United States, this license is governed by the laws of the State of New York. If you acquired the Program in Canada, this license is governed by the laws of the Province of Ontario. Otherwise, this license is governed by the laws of the country in which you acquired the Program.
Monotype Imaging License Agreement
1. “Software” shall mean the digitally encoded, machine readable, scalable outline data as encoded in a special format as well as the UFST Software.
2. You agree to accept a non-exclusive license to use the Software to reproduce and display weights, styles and versions of letters, numerals, characters and symbols (“Typefaces”) solely for your own customary business or personal purposes at the address stated on the registration card you return to Monotype Imaging. Under the terms of this License Agreement, you have the right to use the Fonts on up to three printers. If you need to have access to the fonts on more than three printers, you need to acquire a multi-user license agreement which can be obtained from Monotype Imaging. Monotype Imaging retains all rights, title and interest to the Software and Typefaces and no rights are granted to you other than a License to use the Software on the terms expressly set forth in this Agreement.
3. To protect proprietary rights of Monotype Imaging, you agree to maintain the Software and other proprietary information concerning the Typefaces in strict confidence and to establish reasonable procedures regulating access to and use of the Software and Typefaces.
4. You agree not to duplicate or copy the Software or Typefaces, except that you may make one backup copy. You agree that any such copy shall contain the same proprietary notices as those appearing on the original.
5. This License shall continue until the last use of the Software and Typefaces, unless sooner terminated. This License may be terminated by Monotype Imaging if you fail to comply with the terms of this License and such failure is not remedied within thirty (30) days after notice from Monotype Imaging. When this License expires or is terminated, you shall either return to Monotype Imaging or destroy all copies of the Software and Typefaces and documentation as requested.
6. You agree that you will not modify, alter, disassemble, decrypt, reverse engineer or decompile the Software.
7. Monotype Imaging warrants that for ninety (90) days after delivery, the Software will perform in accordance with Monotype Imaging-published specifications, and the diskette will be free from defects in material and workmanship. Monotype Imaging does not warrant that the Software is free from all bugs, errors and omissions.The parties agree that all other warranties, expressed or implied, including warranties of fitness for a particular purpose and merchantability, are excluded.
v

8. Your exclusive remedy and the sole liability of Monotype Imaging in connection with the Software and Typefaces is repair or replacement of defective parts, upon their return to Monotype Imaging. In no event will Monotype Imaging be liable for lost profits, lost data, or any other incidental or consequential damages, or any damages caused by abuse or misapplication of the Software and Typefaces.
9. Massachusetts U.S.A. law governs this Agreement.
10.You shall not sublicense, sell, lease, or otherwise transfer the Software and/or Typefaces without the prior written consent of Monotype Imaging.
11. Use, duplication or disclosure by the Government is subject to restrictions as set forth in the Rights in Technical Data and Computer Software clause at FAR 252-227-7013, subdivision (b)(3)(ii) or subparagraph (c)(1)(ii), as appropriate. Further use, duplication or disclosure is subject to restrictions applicable to restricted rights software as set forth in FAR 52.227-19 (c)(2).
12.You acknowledge that you have read this Agreement, understand it, and agree to be bound by its terms and conditions. Neither party shall be bound by any statement or representation not contained in this Agreement. No change in this Agreement is effective unless written and signed by properly authorized representatives of each party. By opening this diskette package, you agree to accept the terms and conditions of this Agreement.
vi

About this Operation GuideThis Operation Guide contains the following chapters:
1 Copy Functions
Describes the full-featured copying functions of the machine.
2 Output Management Functions
Explains the output management functions.
3 System Menu
Covers general default settings.
4 Job Accounting
Explains how to manage job accounting to share usage among various departments.
5 Troubleshooting
Explains how to handle error messages and other problems.
Appendix
Lists supported paper and intercompatible functions. Includes a glossary.
Conventions in This GuideThe following conventions are used depending on the nature of the description.
Convention Description ExampleBold Indicates operation panel
keys. Press the Start key.
[Regular] Indicates touch panel keys.
Press [Basic].
Italic Indicates touch panel messages.
Ready to copy is displayed.
Note Indicates supplemental information or operations for reference.
Note -
IMPORTANT Indicates items that are required or prohibited so as to avoid problems.
IMPORTANT -
vii

Originals and Paper SizesThis section explains the notation used in this guide when referring to sizes of originals or paper sizes.
As in A4 and B5, which may be used either in the horizontal or vertical direction, in order to indicate the orientation of the original/paper, horizontal orientation is indicated by an additional R character.
Set direction Indicated size a
a. The size of original/paper that can be used depends on the function and source tray. For further details, refer to the page detailing that function or source tray.
Vertical direction
For original/paper, dimension A is longer than B.
A4, B5, A5, B6, A6, 16K
Horizontal direction
For original/paper, dimension A is shorter than B.
A4R, B5R, A5R, B6R, A6R, 16KR
B B
A A
Original Size
B B
A A
Original Size
viii

1 Copy Functions
This chapter covers the following topics.
Selecting Paper Source 1-2Selecting Original Size 1-3
Standard Sizes ........................................................................ 1-3Other Standard Sizes .............................................................. 1-3Size Entry ................................................................................ 1-4Custom Size ............................................................................ 1-4
Copy Quantity 1-5Orientation of Original Document 1-6Offset Mode 1-7Stapling 1-8Combine Mode 1-9Margin Mode 1-12Centering Originals 1-13Border Erase 1-14
Sheet Border Erase............................................................... 1-14Book Border Erase ................................................................ 1-14Separate Border Erase.......................................................... 1-15
Page Numbering 1-16Cover Mode 1-18Booklet from Sheets 1-19Booklets from Facing Pages 1-21Memo Mode 1-22Continuous Scan 1-24Proof Copy 1-24Repeat Copy 1-25
Preparing a Job for Repeat Copy .......................................... 1-25Repeat Copy Output.............................................................. 1-25
Auto Image Rotation 1-27Selecting Output Destination 1-28EcoPrint 1-28Negative Image Copying 1-29Mirror Copying 1-29Mixed Size Originals Mode 1-30Programmed Copying 1-31
Using Programs to Copy ....................................................... 1-31Editing Program Names ........................................................ 1-31Deleting programs ................................................................. 1-32
Assigning Register Keys 1-33Assigning Register Keys........................................................ 1-33Deleting Register Keys.......................................................... 1-33
Job Build 1-34Job Build Procedure .............................................................. 1-34Setting Functions................................................................... 1-37
Copy Functions 1-1
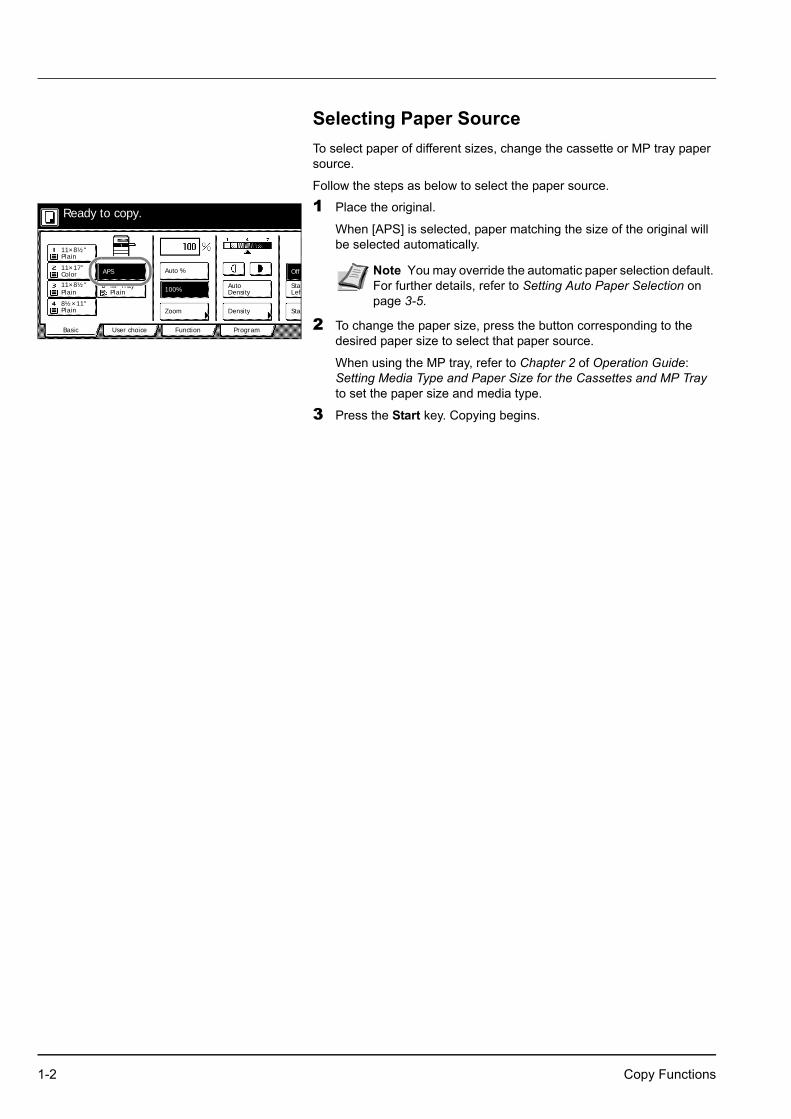
Selecting Paper Source To select paper of different sizes, change the cassette or MP tray paper source.
Follow the steps as below to select the paper source.
1 Place the original.
When [APS] is selected, paper matching the size of the original will be selected automatically.
2 To change the paper size, press the button corresponding to the desired paper size to select that paper source.
When using the MP tray, refer to Chapter 2 of Operation Guide: Setting Media Type and Paper Size for the Cassettes and MP Tray to set the paper size and media type.
3 Press the Start key. Copying begins.
ProgramFunctionUser choiceBasic
11×8½"Plain
11×17"Color
11×8½"Plain
8½×11"Plain
MP TrayPlain
APS Auto %
Zoom
100%
Density
Auto
Stap
StapLeft
Off
Ready to copy.
Density
Note You may override the automatic paper selection default. For further details, refer to Setting Auto Paper Selection on page 3-5.
1-2 Copy Functions
Selecting Original SizeSpecify the size of originals that will serve as the basis for scanning. Be sure to specify the original size when copying originals of nonstandard sizes.
Select the original size from the following groups of original size.
• Standard Sizes – Select from commonly used standard sizes. Inch models: 11 × 17", 8 1/2 × 14", 11 × 8 1/2", 8 1/2 × 11", 5 1/2 × 8 1/2", 8 1/2 × 5 1/2", 8 1/2 × 13 1/2", 8 1/2 × 13" (Oficio II), 11 × 15", A4 and A4RMetric models: A3, B4, A4, A4R, B5, B5R, A5, A5R, B6, B6R, A6R, Folio, 11 × 15", 11 × 8 1/2" and 8 1/2 × 11"
• Other Standard Sizes – Select from special-purpose standard sizes. Inch models: A3, B4, B5, B5R, A5, A5R, B6, B6R, A6R, Folio, P. Card, OUFUKU HAGAKI, 8K, 16K and 16KRMetric models: 11 × 17", 8 1/2 × 14", 5 1/2 × 8 1/2", 8 1/2 × 5 1/2", 8 1/2 × 13 1/2", 8 1/2 × 13" (Oficio II), Pstcard, OUFUKU HAGAKI, 8K, 16K and 16KR
• Size Entry – Enter the size for when not shown in the list of standard sizes. Inch modelsVertical: 2 - 11 5/8" (1/8" increments), Horizontal: 2 - 17" (1/8" increments)Metric modelsVertical: 50 - 297 mm (1 mm increments), Horizontal: 50 - 432 mm (1 mm increments)
• Custom Size – Select entered and registered original sizes. For setting custom original sizes, refer to Registering Non-standard Sizes for Originals on page 3-24.
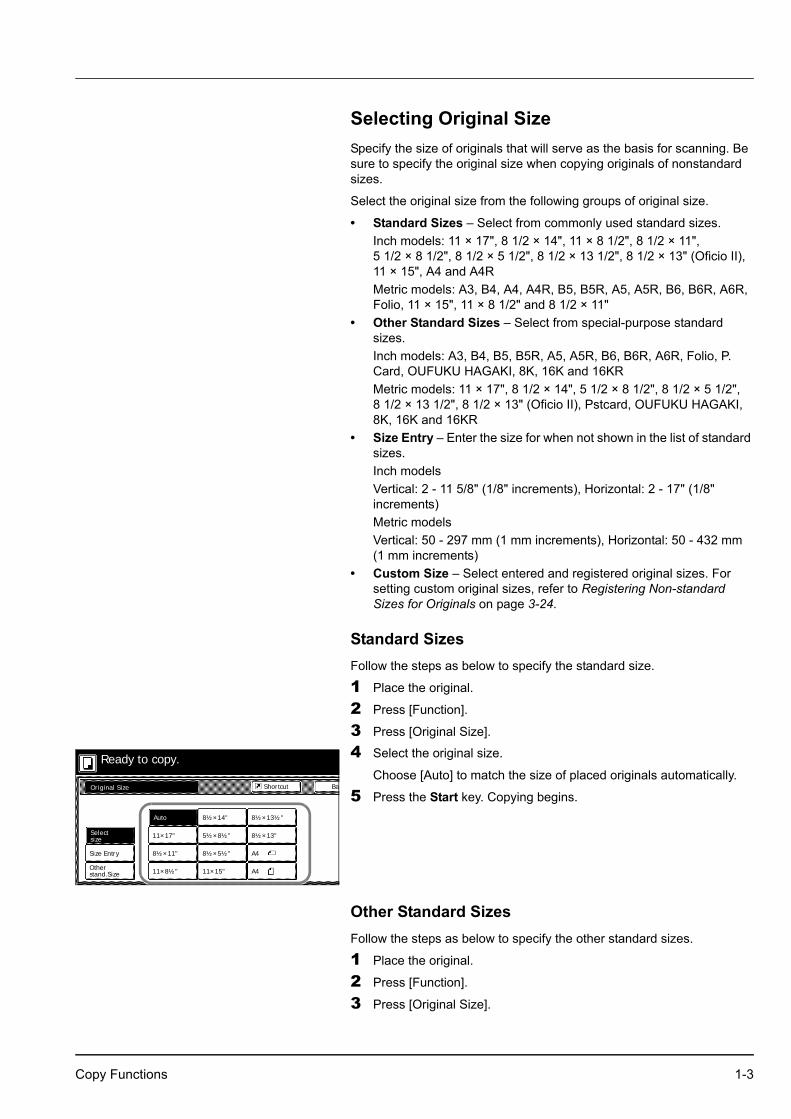
Standard SizesFollow the steps as below to specify the standard size.
1 Place the original.
2 Press [Function].
3 Press [Original Size].
4 Select the original size.
Choose [Auto] to match the size of placed originals automatically.
5 Press the Start key. Copying begins.
Other Standard SizesFollow the steps as below to specify the other standard sizes.
1 Place the original.
2 Press [Function].
3 Press [Original Size].
Select
11×8½"
8½×5½"
5½×8½"11×17"
Other
Size Entry
Auto 8½×14"
8½×11"
11×15"
8½×13½"
8½×13"
A4
BaOriginal Size
A4
stand.Size
Ready to copy.
size
Shortcut
Copy Functions 1-3

4 Press [Other stand.Size] ([Others stand.Size]).
5 Select the original size.
6 Press the Start key. Copying begins.
Size EntryFollow the steps as below to enter the original size when not listed in the standard sizes.
1 Place the original.
2 Press [Function].
3 Press [Original Size].
4 Press [Size Entry].
5 Press [+] or [–] to set the Y (height) and X (width) sizes.
With the metric models, you may enter the size directly using the numeric keys by pressing [#-Keys].
6 Press the Start key. Copying begins.
Custom SizeFollow the steps as below to specify one of the custom sizes.
1 Place the original.
2 Press [Function].
3 Press [Original Size].
4 Select the original size from Custom Size (Use regist).
5 Press the Start key. Copying begins.
Size Entry A5 B5
B5
A3
Other
B4
A5
B6
B6
Folio
Ba
P.Card
Select
A6
Original Size
Pape
stand.Size
Ready to copy.
OUFUKUHAGAKI
8K
16K
16K
size
Shortcut
BaOriginal Size
Set original scanning ran
Select
Other
Size Entry
stand.Size
XY " "
( 2~115/8) ( 2~17)
Ready to copy.
.2 .2
size
Shortcut
Close
½"
8½×5½"
5½×8½""
8½×14"
1"
11×15"
8½×13½"
8½×13"
A4
Back
Set
A4
Custom Size
Paper Size11×8½"
100%
1111/16×169/16 "
1111/16×169/16 "
1111/16×169/16 "
1111/16×169/16 "
y.
Shortcut
1-4 Copy Functions

Copy QuantitySets the number of sheets to copy. You may specify up to 999 sheets for a single copy job.
Follow the steps as below to specify the copy quantity.
1 Place the original.
2 Use the numeric keys on the operation panel to enter the desired copy quantity.
3 Press the Start key. Copying begins.
11×8½"Paper Size Set
4 in 1
Bord Erase
MarginLeft
ProgramFunctionoice
Auto %
Zoom
100%
Density
Auto
Staple
StapleLeft Top
Off
100%
Sheet
y.
Density
Note To clear the copy quantity, press the Stop/Clear key. Copy quantity will be reset to 1.
Copy Functions 1-5

Orientation of Original DocumentOrientation of the original must be specified to use the following functions.
• Duplex Mode• Split Mode (separate copies from two-sided originals)• Margin Mode• Centering Originals• Border Erase• Combine Mode• Memo Pages• Page Numbering• Booklet• Stapling (optional feature)
Placing originals on the platen
Placing originals in the optional document processor
Follow the steps as below to specify the original orientation.
1 Place the original.
2 Press [Function] and then press [ Down].
3 Press [Original Orient.].
4 According to the placed orientation of the original, press [Top Edge Top] or [Top Edge Left].
5 Press [Close].
6 Configure the functions which require specification of the original orientation, such as Duplex mode.
7 Press the Start key. Copying begins.
Original [Top Edge Top] [Top Edge Left]
Note The default setting for the original orientation may be changed. For further details, refer to Orientation of Original Document on page 3-17.
Original [Top Edge Top] [Top Edge Left]
Set
Back
Top Edge
Select OriginalOrientation.
Top Edge
Close
Paper Size11×8½"
ck Original Orientation. canhown at right side of display.ow the steps. If setting mode isng, incorrect copy will result.
100%y.
Left
Shortcut
Top
1-6 Copy Functions
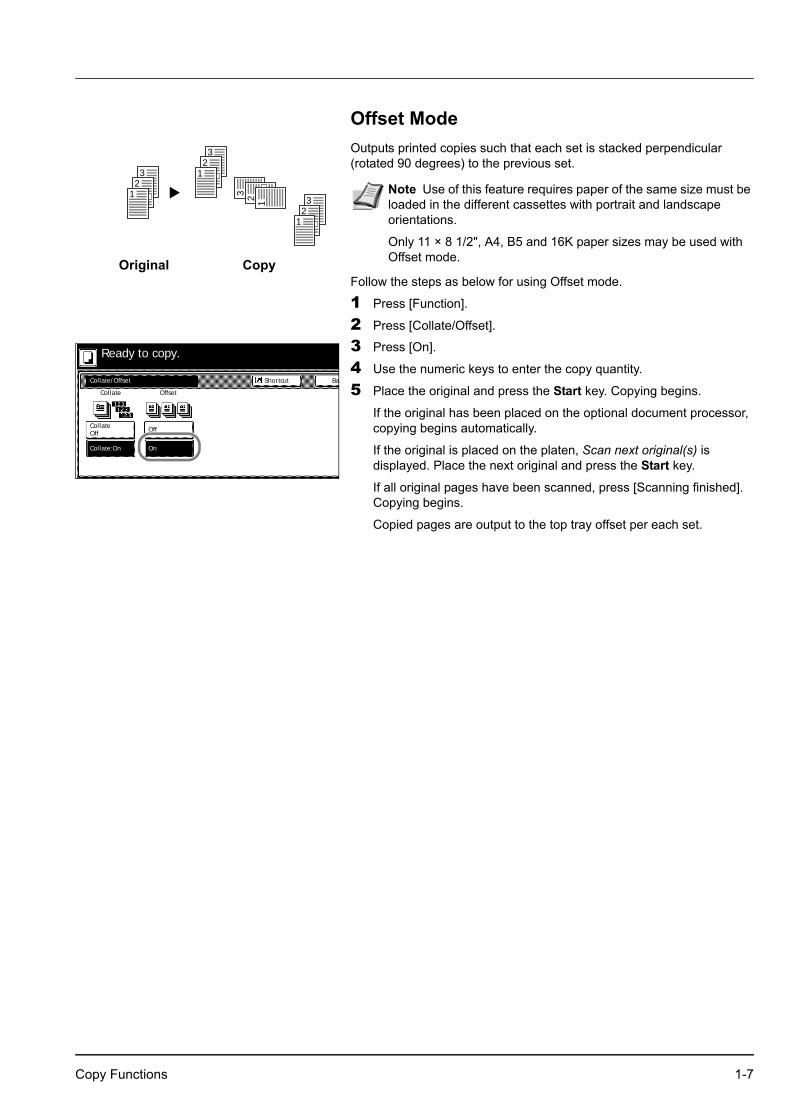
Offset ModeOutputs printed copies such that each set is stacked perpendicular (rotated 90 degrees) to the previous set.
Follow the steps as below for using Offset mode.
1 Press [Function].
2 Press [Collate/Offset].
3 Press [On].
4 Use the numeric keys to enter the copy quantity.
5 Place the original and press the Start key. Copying begins.
If the original has been placed on the optional document processor, copying begins automatically.
If the original is placed on the platen, Scan next original(s) is displayed. Place the next original and press the Start key.
If all original pages have been scanned, press [Scanning finished]. Copying begins.
Copied pages are output to the top tray offset per each set.
32
1
32
1
32
1
3 2 1Original Copy
Note Use of this feature requires paper of the same size must be loaded in the different cassettes with portrait and landscape orientations.
Only 11 × 8 1/2", A4, B5 and 16K paper sizes may be used with Offset mode.
Collate/Offset
Collate
Ba
Collate:On
Collate Offset
Off
On
Ready to copy.
Shortcut
Off
Copy Functions 1-7
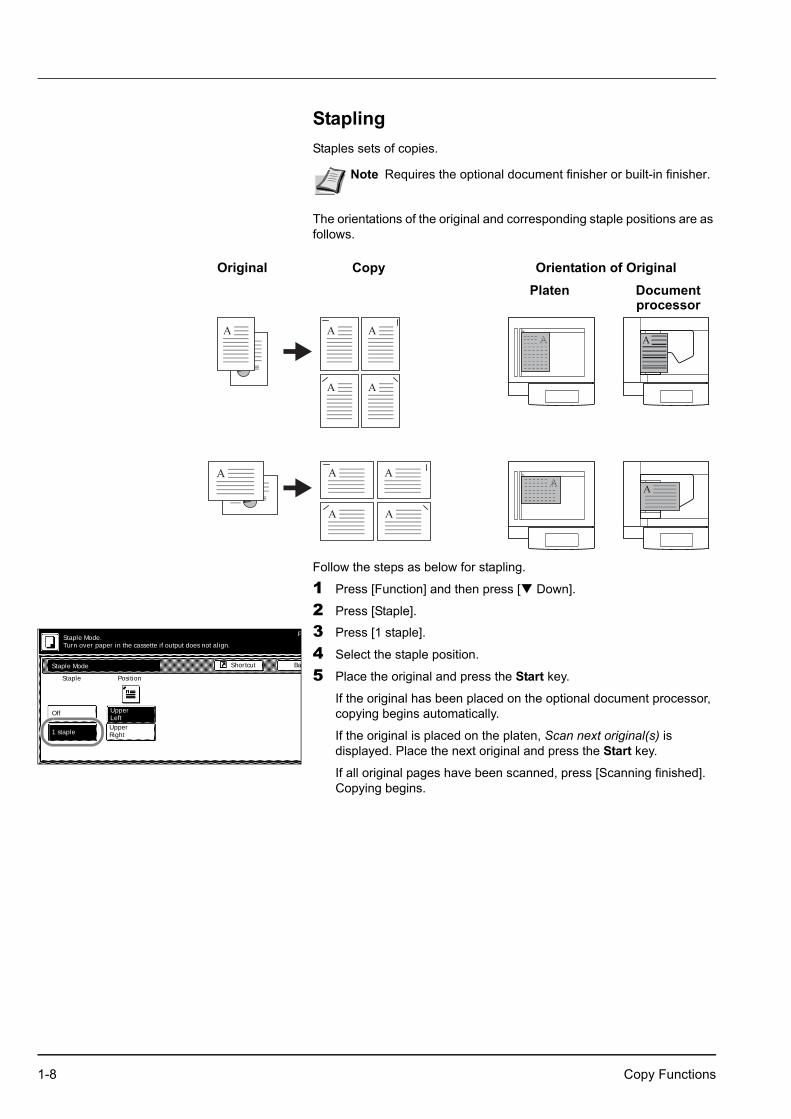
StaplingStaples sets of copies.
The orientations of the original and corresponding staple positions are as follows.
Follow the steps as below for stapling.
1 Press [Function] and then press [ Down].
2 Press [Staple].
3 Press [1 staple].
4 Select the staple position.
5 Place the original and press the Start key.
If the original has been placed on the optional document processor, copying begins automatically.
If the original is placed on the platen, Scan next original(s) is displayed. Place the next original and press the Start key.
If all original pages have been scanned, press [Scanning finished]. Copying begins.
Note Requires the optional document finisher or built-in finisher.
Copy Original Orientation of OriginalDocument processor
Platen
BaStaple Mode
P
Shortcut
Off
1 staple
PositionStaple
Upper
Upper
Staple Mode.Turn over paper in the cassette if output does not align.
Left
Right
1-8 Copy Functions

Combine ModeImages from either two or four originals are reduced and combined onto a single copy. The page boundary of each original can be indicated by a solid or dotted line.
2-in-1 Mode
Copy two originals onto a single sheet. This mode can be used with Duplex mode to copy four originals onto one sheet.
The orientations of the original and corresponding output are as follows.
Note Combine mode supports 11 × 17", 11 × 8 1/2", 8 1/2 × 11", A3, B4, A4, A4R, B5, B5R, 8K, 16K and 16KR paper sizes.
Copy Original Orientation of OriginalDocument processor
Platen
Note When placing the original on the platen, copy originals in the page order.
Copy Functions 1-9

4-in-1 Mode
For copying four originals onto a single sheet. This mode can be used with Duplex mode to copy eight originals onto one sheet.
The orientations of the original and corresponding output are as follows.
Types of Page Boundary Lines
Choose from the following options for lines to indicate page boundaries.
Follow the steps as below to combine originals.
1 Press [Function].
2 Press [Combine].
Copy Original Orientation of OriginalDocument processor
Platen
Note When placing the original on the platen, copy originals in the page order.
None DottedSolid Position Mark
1-10 Copy Functions

3 Press either [2 in 1] ([2-in-1]) or [4 in 1] ([4-in-1]).
4 Select desired page sequence from Layout.
5 Select the page boundary line from Border line.
6 Place the original and press the Start key.
If the original has been placed on the optional document processor, copying begins automatically.
If the original is placed on the platen, Scan next original(s) is displayed. Place the next original and press the Start key.
If all original pages have been scanned, press [Scanning finished]. Copying begins.
Ba
Sele
Off
2 in 1
Orie
To
Combine
Layout
4 in 1
Border line
Solid
None
Dotted
Position
Ready to copy.
Shortcut
ToMark
Copy Functions 1-11

Margin ModeYou can shift the original image to make space on the copy for binding on the left (right) or top (bottom) side. Margin widths are as follows.
Margin on the Back Side
When duplexing, you can also specify the margin on the back side.
Auto – Automatically sets margins to match the front side setting. When [Auto] is specified, the left and right margins on the front are reversed on the back. In other words, when the left margin of the front side is set to 1/2" (10 mm), the back side right margin is set to 1/2" (10 mm). The top and bottom margin widths on the back will match those on the front.
Separate Front/Back Margins – Enables you to specify the front and back settings separately.
Follow the steps as below to use the Margin mode.
1 Place the original so the top edge is aligned with the back or left of the platen.
2 Press [Function].
3 Press [Margin/Centering].
4 Press [Margin].
5 Press [ ], [ ], [ ] or [ ] to adjust the top, bottom, left and right margins.
6 For duplex copying, press [Back page margin].
7 Press [Auto] or [Front/Back margin].
[Auto] specifies the margin on the back side automatically based on the front margin.
For [Front/Back margin], press [ ], [ ], [ ] or [ ] to adjust the top, bottom, left and right margins.
8 Depending on the placed original, select [Top Edge Top] or [Top Edge Left] from Select Original Orientation.
9 Press the Start key. Copying begins.
Model Type RangeInch models 0 - 3/4" (1/8" increments)Metric models 0 - 18 mm (1 mm increments)
Note You can set the default margin width. For further details, refer to Setting Margin Defaults on page 3-8.
Ba
Sele
Off
Margin
Orie
To
Margin/Centering
Centering
Front page
Left Back pagemargin
Auto(0~¾)
"
"
(0~¾)
Ready to copy.
.0
¼
Shortcut
To
Bac
Sele
Auto
Front/Back
Orie
Back page margin
Back page
margin"
"
Ready to copy.
(0~¾)
(0~¾)
ToTo
1-12 Copy Functions

Centering OriginalsWhen copying onto paper larger than the original size, centers the original image on the paper.
Follow the steps as below for centering.
1 Place the original so the top edge is aligned with the back or left of the platen.
2 Press [Function].
3 Press [Margin/Centering].
4 Press [Centering].
5 Depending on the placed original, select [Top Edge Top] or [Top Edge Left] from Select Original Orientation.
6 Press the Start key. Copying begins.
Ba
Sele
Off
Margin
Orie
Margin/Centering
Centering
Able to center scanned image on paper.
Ready to copy.
Shortcut
ToTo
Copy Functions 1-13
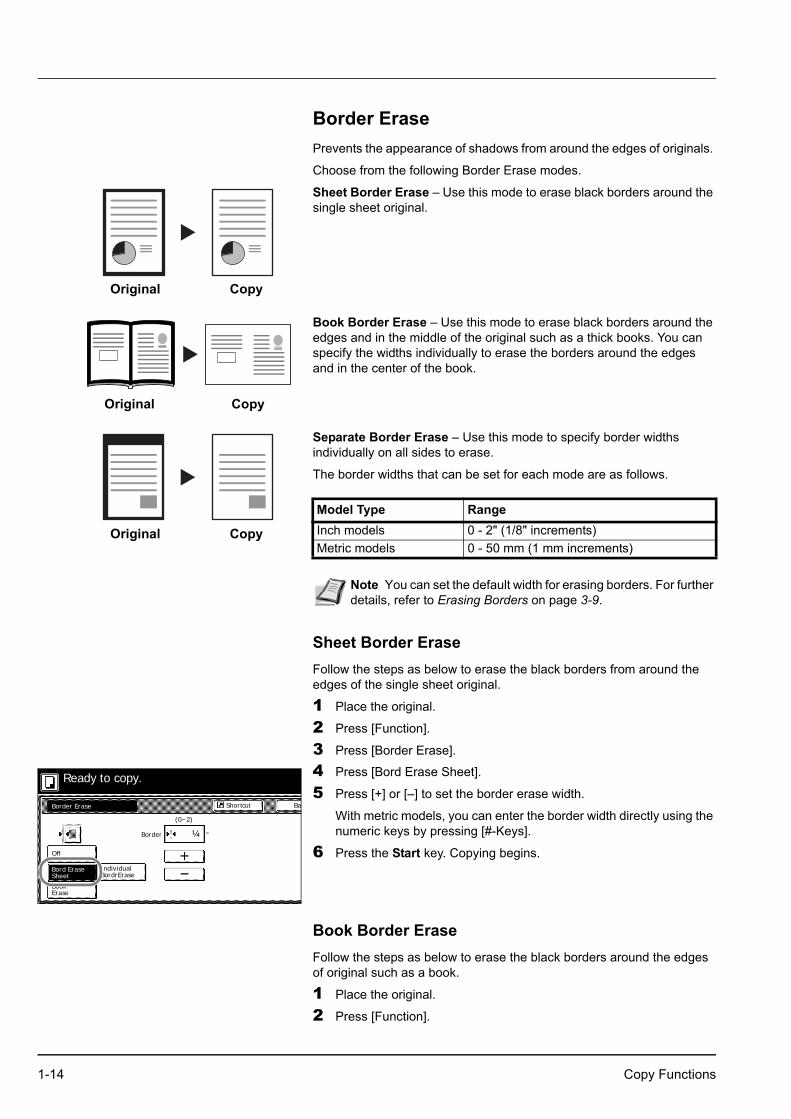
Border ErasePrevents the appearance of shadows from around the edges of originals.
Choose from the following Border Erase modes.
Sheet Border Erase – Use this mode to erase black borders around the single sheet original.
Book Border Erase – Use this mode to erase black borders around the edges and in the middle of the original such as a thick books. You can specify the widths individually to erase the borders around the edges and in the center of the book.
Separate Border Erase – Use this mode to specify border widths individually on all sides to erase.
The border widths that can be set for each mode are as follows.
Sheet Border EraseFollow the steps as below to erase the black borders from around the edges of the single sheet original.
1 Place the original.
2 Press [Function].
3 Press [Border Erase].
4 Press [Bord Erase Sheet].
5 Press [+] or [–] to set the border erase width.
With metric models, you can enter the border width directly using the numeric keys by pressing [#-Keys].
6 Press the Start key. Copying begins.
Book Border EraseFollow the steps as below to erase the black borders around the edges of original such as a book.
1 Place the original.
2 Press [Function].
Original Copy
Original Copy
Original Copy
Model Type RangeInch models 0 - 2" (1/8" increments)Metric models 0 - 50 mm (1 mm increments)
Note You can set the default width for erasing borders. For further details, refer to Erasing Borders on page 3-9.
Border Erase
Off
Bord Erase
Ba
SheetIndividualBordrErase
BookErase
Border "
Ready to copy.
(0~2)
¼
Shortcut
1-14 Copy Functions

3 Press [Border Erase].
4 Press [Book Erase].
5 Press [+] or [–] to set the Border (outer edges) and Gutter (middle) border widths.
With metric models, you can enter the border width directly using the numeric keys by pressing [#-Keys].
6 Press the Start key. Copying begins.
Separate Border EraseFollow the steps as below to erase the black borders specifying the width of the borders individually.
1 Place the original so the top edge is aligned with the back or left of the platen.
2 Press [Function].
3 Press [Border Erase].
4 Press [Individual BordrErase].
5 Depending on orientation of the placed original, select [Top Edge Top] or [Top Edge Left] from Select Original Orientation.
6 From [Top], [Bottom], [Left] and [Right], select the desired border to adjust the border width.
7 Press [+] or [–] to set the border erase width.
With metric models, you can enter the border width directly using the numeric keys by pressing [#-Keys].
8 Press [Close]. To specify widths of other borders to erase, repeat steps 6 - 8.
9 Press the Start key. Copying begins.
Border Erase
Off
Ba
IndividualBordrErase
Border
Bord EraseSheet
BookErase
Gutter
(0~2)
" "
Ready to copy.
¼ ½
(0~2)
Shortcut
Ba
Sele
Off
Orie
Bottom
Border Erase
Left
Top
RightBookErase
IndividualBordrErase
Bord EraseSheet
¼ " ¼ "
¼ " ¼ "
Ready to copy.
Shortcut
ToTo
Ba
SeleOrie
Individual Border Erase
Top
(0~2)
"
Ready to copy.
¼
ToTo
Copy Functions 1-15
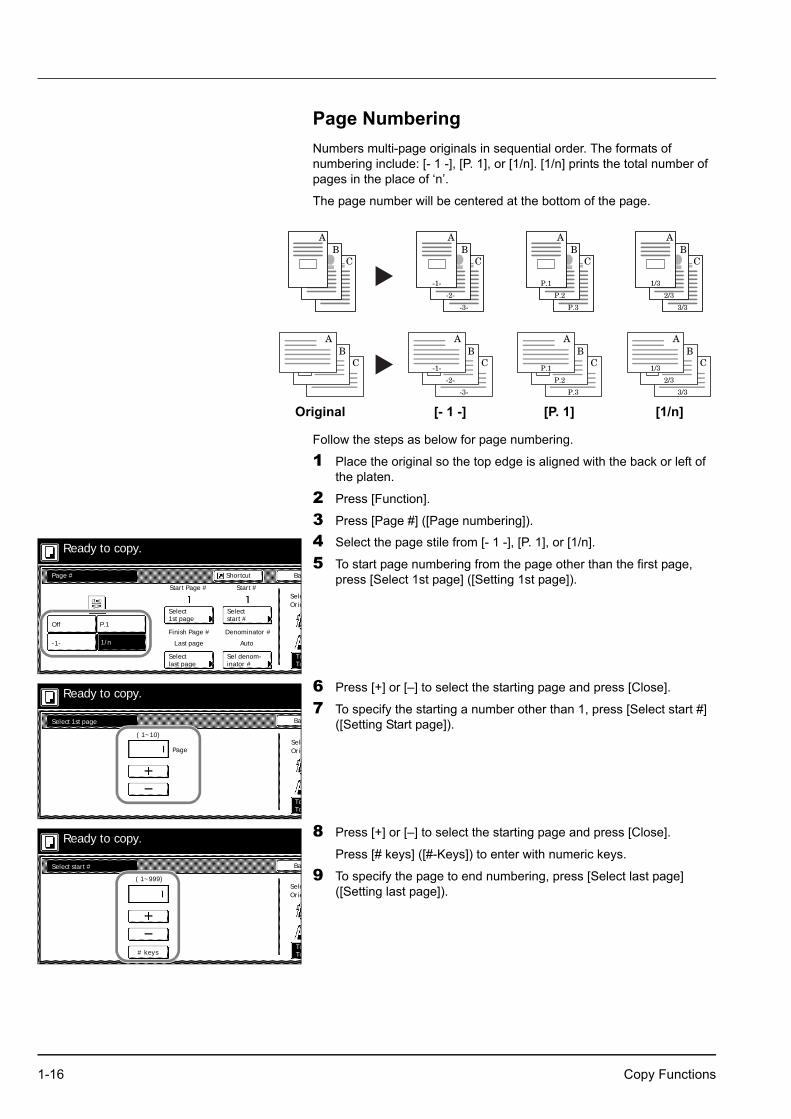
Page NumberingNumbers multi-page originals in sequential order. The formats of numbering include: [- 1 -], [P. 1], or [1/n]. [1/n] prints the total number of pages in the place of ‘n’.
The page number will be centered at the bottom of the page.
Follow the steps as below for page numbering.
1 Place the original so the top edge is aligned with the back or left of the platen.
2 Press [Function].
3 Press [Page #] ([Page numbering]).
4 Select the page stile from [- 1 -], [P. 1], or [1/n].
5 To start page numbering from the page other than the first page, press [Select 1st page] ([Setting 1st page]).
6 Press [+] or [–] to select the starting page and press [Close].
7 To specify the starting a number other than 1, press [Select start #] ([Setting Start page]).
8 Press [+] or [–] to select the starting page and press [Close].
Press [# keys] ([#-Keys]) to enter with numeric keys.
9 To specify the page to end numbering, press [Select last page] ([Setting last page]).
Original [- 1 -] [P. 1] [1/n]
Ba
Sele
Off
-1-
P.1
Orie
1/n
Start Page # Start #
Selectstart #
Page #
Selectlast page
Select1st page
Sel denom-inator #
Finish Page #
Last page
Denominator #
Auto
Ready to copy.
Shortcut
ToTo
BaSelect 1st page
SeleOriePage
( 1~10)
Ready to copy.
ToTo
Ba
SeleOrie
Select start #
# keys
( 1~999)
Ready to copy.
ToTo
1-16 Copy Functions
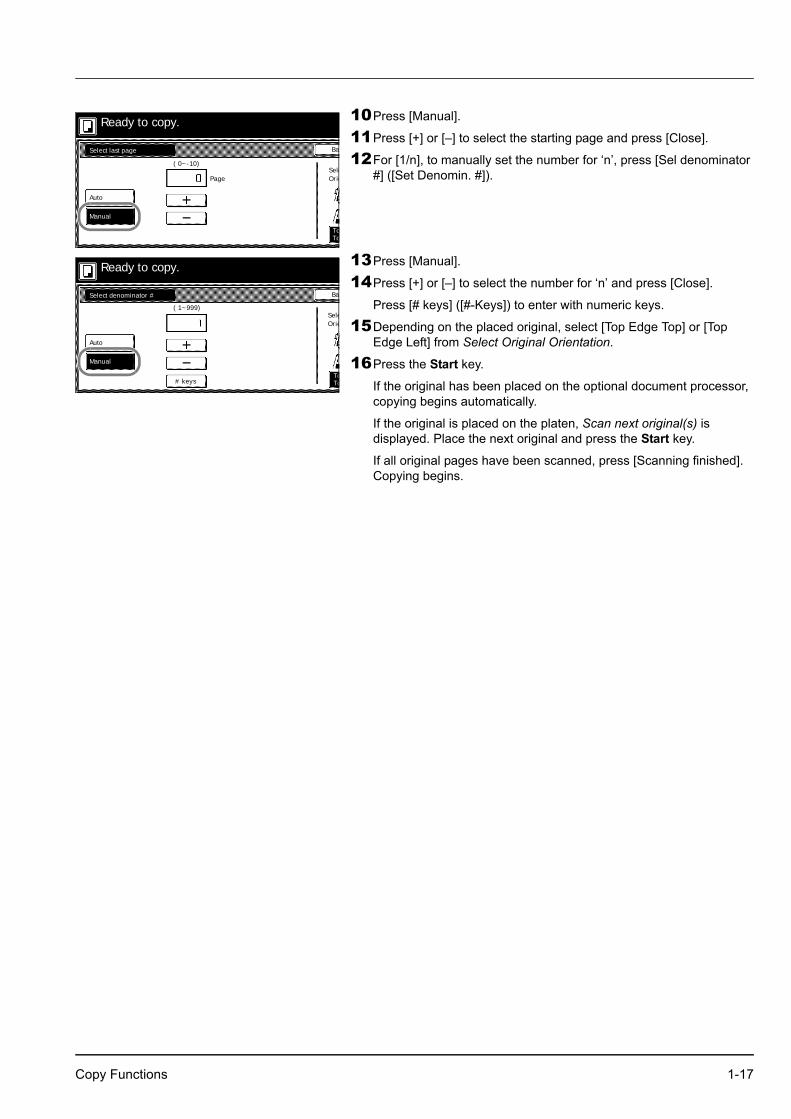
10Press [Manual].
11Press [+] or [–] to select the starting page and press [Close].
12For [1/n], to manually set the number for ‘n’, press [Sel denominator #] ([Set Denomin. #]).
13Press [Manual].
14Press [+] or [–] to select the number for ‘n’ and press [Close].
Press [# keys] ([#-Keys]) to enter with numeric keys.
15Depending on the placed original, select [Top Edge Top] or [Top Edge Left] from Select Original Orientation.
16Press the Start key.
If the original has been placed on the optional document processor, copying begins automatically.
If the original is placed on the platen, Scan next original(s) is displayed. Place the next original and press the Start key.
If all original pages have been scanned, press [Scanning finished]. Copying begins.
BaSelect last page
SeleOrie
Auto
Page
Manual
( 0~-10)
Ready to copy.
ToTo
Ba
SeleOrie
Select denominator #
Auto
Manual
# keys
( 1~999)
Ready to copy.
ToTo
Copy Functions 1-17

Cover ModeUse a distinctive front and/or back cover. Change the paper source and copy the first and last page of the original onto colored or thick paper.
Paper for the cover page is fed from the MP tray. To supply cover paper from a cassette, refer to Specifying Paper Source for Cover on page 3-6.
For duplex copying, The cover page is also printed on both sides.
Follow the steps as below for adding covers.
1 Place the original.
2 Press [Function].
3 Press [Cover].
4 Press [Front cover] or [Front Cvr + Back Cvr].
5 Press the Start key.
If the original has been placed on the optional document processor, copying begins automatically.
If the original is placed on the platen, Scan next original(s) is displayed. Place the next original and press the Start key.
If all original pages have been scanned, press [Scanning finished]. Copying begins.
Cover sheet types DescriptionFront cover Copies the first page of the original onto
cover sheet specified paper as the cover page.
Front Cvr + Back Cvr Copies the first page and last page of the original onto cover sheet paper as back and front covers.
Cover
No cover
Front Cvr
Front
Ba
Automatically adds coset using paper (color
Load the paper for specified cassette.
Ready to copy.
+ Back Cvr
from a different cassecover
Shortcut
1-18 Copy Functions
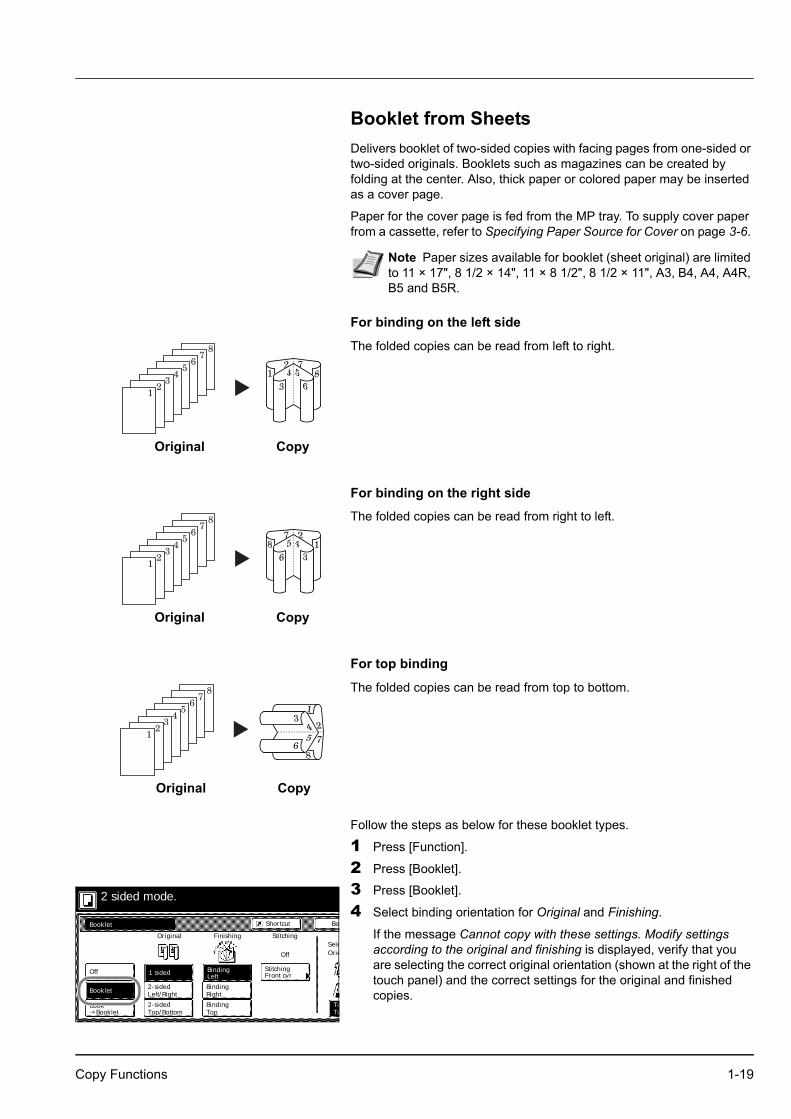
Booklet from SheetsDelivers booklet of two-sided copies with facing pages from one-sided or two-sided originals. Booklets such as magazines can be created by folding at the center. Also, thick paper or colored paper may be inserted as a cover page.
Paper for the cover page is fed from the MP tray. To supply cover paper from a cassette, refer to Specifying Paper Source for Cover on page 3-6.
For binding on the left side
The folded copies can be read from left to right.
For binding on the right side
The folded copies can be read from right to left.
For top binding
The folded copies can be read from top to bottom.
Follow the steps as below for these booklet types.
1 Press [Function].
2 Press [Booklet].
3 Press [Booklet].
4 Select binding orientation for Original and Finishing.
If the message Cannot copy with these settings. Modify settings according to the original and finishing is displayed, verify that you are selecting the correct original orientation (shown at the right of the touch panel) and the correct settings for the original and finished copies.
Note Paper sizes available for booklet (sheet original) are limited to 11 × 17", 8 1/2 × 14", 11 × 8 1/2", 8 1/2 × 11", A3, B4, A4, A4R, B5 and B5R.
Original Copy
Original Copy
Original Copy
Ba
Sele
Off
Booklet
1 sided
Shortcut
Orie
Original
Book
Left/Right2-sided
Top/Bottom2-sided
Finishing Stitching
Off
Stitching
Booklet
2 sided mode.
Binding
Binding
BindingBooklet
Right
Top
Left Front cvr
ToTo
Copy Functions 1-19

5 To insert a cover page, press [Stitching Front cvr] ([Stitching Front cov.]).
Press [On] and press [Close].
6 Place the original and press the Start key.
If the original has been placed on the optional document processor, copying begins automatically.
If the original is placed on the platen, Scan next original(s) is displayed. Place the next original and press the Start key.
If all original pages have been scanned, press [Scanning finished]. Copying begins.
Stitching Front Cvr
Off
On
Ba
Automatically adds cobinding mode using pthick) fed from a diffe
Load the paper for
2 sided mode.
specified cassette.
Note When using the platen, be sure to place the originals in page order.
1-20 Copy Functions

Booklets from Facing PagesCopies book originals to booklets consisting of two-sided copies with facing pages. Booklets such as magazines can be created by folding at the center. Also, thick paper or colored paper may be inserted as a cover page.
You can change the cassette set as the paper to be used for the cover page. For further details, refer to Specifying Paper Source for Cover on page 3-6.
Follow the steps as below for these booklet types.
1 Place the book original and press [Function].
2 Press [Booklet].
3 Press [Book Booklet].
4 Select the original and finished types.
5 To insert a cover page, press [Copy on front cvr] ([Copy on front cov.]).
Press [On] and press [Close].
6 Press the Start key. Scanning of the original begins.
Scan next original(s) is displayed. Place the next original and press the Start key.
If all original pages have been scanned, press [Scanning finished]. Copying begins.
Note Original sizes that can be used with Booklets from Facing Pages are limited to 11 × 17", 8 1/2 × 11", A3, B4, A4R, B5R, A5R, 8K, and output paper size is limited to 11 × 17", 8 1/2 × 14", 11 × 8 1/2", 8 1/2 × 11", A3, B4, A4, A4R, B5 and B5R.
BaBooklet
Setop
Shortcut
Set first page.
Book
Booklet
Off
Book Binding
Binding
Original Finishing Copy front
Off
BookLeft
Right
Copy onfront cvr
Press Start key.
Booklet
Left
Right
Copy on front cover
Off
On
Ba
When selecting ON for copying on thefront cover, follow the instruction.1.Scan front cover book original.2.Start scan book originals.
Set cover page.Press Start key.
Setop
Copy Functions 1-21

Memo ModeMakes copies with a space for adding notes. You can also copy two originals onto the same sheet with a space for notes.
Layout A
Reduces images of one original page for copying onto half of a single page, leaving the other half blank for notes.
Layout B
Reduces images of two original pages for copying onto half of a single page, leaving the other half blank for notes.
Types of Page Boundary Lines
Choose from the following options for lines to indicate page boundaries.
Follow the steps as below for Memo mode.
1 Press [Function] and then press [ Down].
2 Press [Memo Pages].
Note Memo page mode supports 11 × 17", 11 × 8 1/2", 8 1/2 × 11", A3, B4, A4, A4R, B5, B5R, 8K, 16K and 16KR page sizes.
Original Copy
Original Copy
None DottedSolid PositionMark
1-22 Copy Functions

3 Press [Layout A] or [Layout B].
4 Select desired page sequence from Layout.
5 Select the page boundary line from Border line.
6 Place the original and press the Start key.
If the original has been placed on the optional document processor, copying begins automatically.
If the original is placed on the platen, Scan next original(s) is displayed. Place the next original and press the Start key.
If all original pages have been scanned, press [Scanning finished]. Copying begins.
BaMemo Pages
Solid
Shortcut
Layout
Layout A
Layout B
Border line
Dotted
Position
None
Off
SeleOrie
Ready to copy.
MarkToTo
Copy Functions 1-23

Continuous ScanScans multiple originals for a single copy job without using the optional document processor. Divide the original into smaller sets and scan each set with the document processor. In Continuous Scan mode, you can continue scanning originals until you press [Scanning finished].
Follow the steps as below to use continuous scan.
1 Press [Function].
2 Press [Continuous Scan].
3 Press [On].
4 Place the original and press the Start key.
Place the next original and press the Start key. Scan the remaining original pages in the same manner.
When done, press [Scanning finished]. Copying begins.
Proof CopyMake a test copy of a single set to verify settings before printing the remaining sets. If a problem is found, avoid wasting paper canceling the remaining copy job.
Follow the steps below to do a Proof copy job.
1 Press [Function] and then press [ Down].
2 Press [Proof Copy].
3 Press [On].
4 Place the original and press the Start key. The proof copy begins.
5 After printing a single test copy, a confirmation screen will be displayed, and the copier will remain in standby mode until the job is approved or cancelled. Check the proof copy.
If it is acceptable, press the Start key. The remaining sets will be printed.
To change the copy quantity, press [Change Preset] and change the copy count.
If there is a problem with the copy, press [Cancel] to redo the copy settings.
Continuous Scan
Off
On
Ba
Copy images from Doplaten for output as on
Place originals then press Start key.
Shortcut
Proof Copy
Off
On
Ba
Proof copy outputs on
Ready to Proof Copy.
Shortcut
Outpu
Change
1 sided
Orig. Page
Top Edge
11×8½"
Job
APS11×8½" Plain
Count/Set
Monochrome, 1 sideTop
To continue to print, press Start key.To stop and retry, press Cancel key.Check proof copy.
Collate
Preset
1-24 Copy Functions

Repeat CopySet Repeat Copy to enable printing additional sets if required after copy completion.
Preparing a Job for Repeat CopyConfigure Repeat Copy as shown below.
1 Press [Function] and then press [ Down].
2 Press [Repeat Copy].
3 Press [On].
4 Place the original and press the Start key. Copying begins and the job is stored as a Repeat Copy job.
Repeat Copy OutputPress the Repeat Copy key to display the Check Details/Reprint screen and review the details of stored job. You can then reprint stored job entirely, print just the first page or delete the job.
Re-Printing Jobs
Follow the steps as below to reprint a Repeat Copy job.
1 Press the Repeat Copy key.
2 Press [Reprint].
Note Only one job can be stored for repeat copying. If you store a new Repeat Copy job, the data for the previous job is deleted.
Repeat Copy job is deleted when the main power is switched off.
It is also possible to disable Repeat Copy or configure Repeat Copy in default settings mode. For further details, refer to Enabling Repeat Copy on page 3-9.
Repeat Copy
Off
On
Ba
When select [On], jobYou can recall and re-
Ready to copy.
Shortcut
Close
11×8½"
Details
Top tray
Printfrom 1st
Delete
Reprint
Copy Functions 1-25
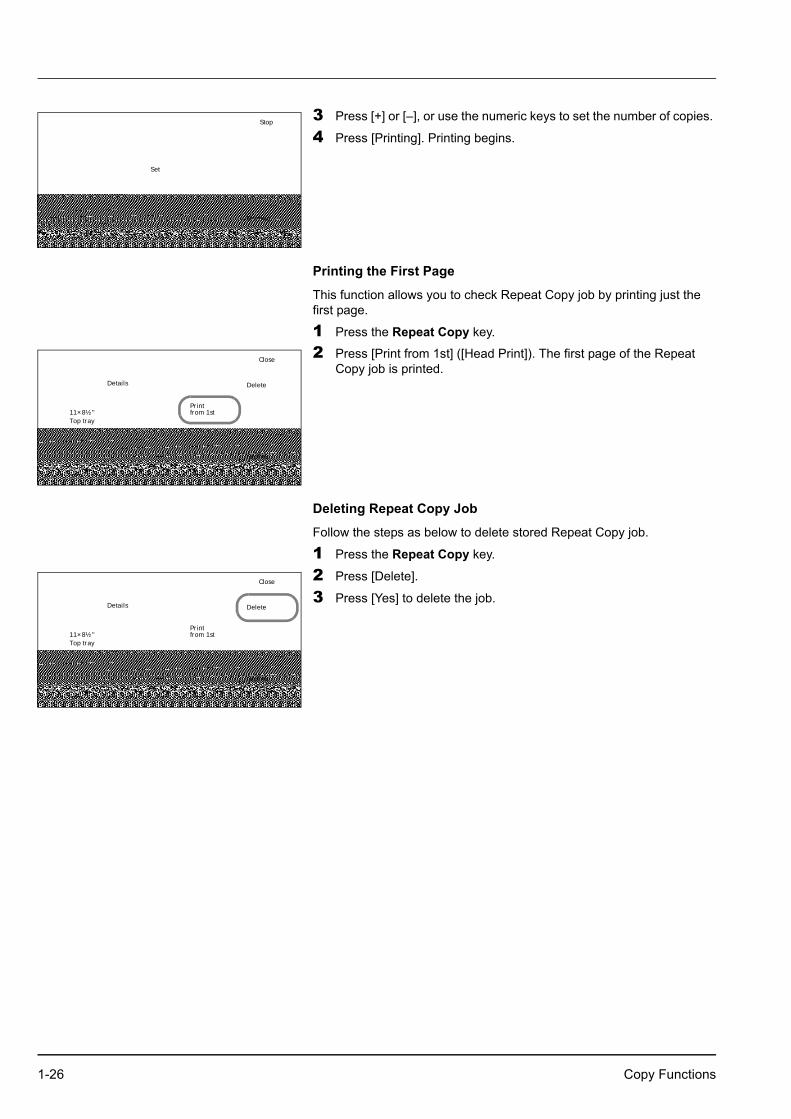
3 Press [+] or [–], or use the numeric keys to set the number of copies.
4 Press [Printing]. Printing begins.
Printing the First Page
This function allows you to check Repeat Copy job by printing just the first page.
1 Press the Repeat Copy key.
2 Press [Print from 1st] ([Head Print]). The first page of the Repeat Copy job is printed.
Deleting Repeat Copy Job
Follow the steps as below to delete stored Repeat Copy job.
1 Press the Repeat Copy key.
2 Press [Delete].
3 Press [Yes] to delete the job.
Stop
Printing
Set
Close
11×8½"
Details
Top tray
Printfrom 1st
Delete
Reprint
Close
11×8½"
Details
Top tray
Printfrom 1st
Delete
Reprint
1-26 Copy Functions
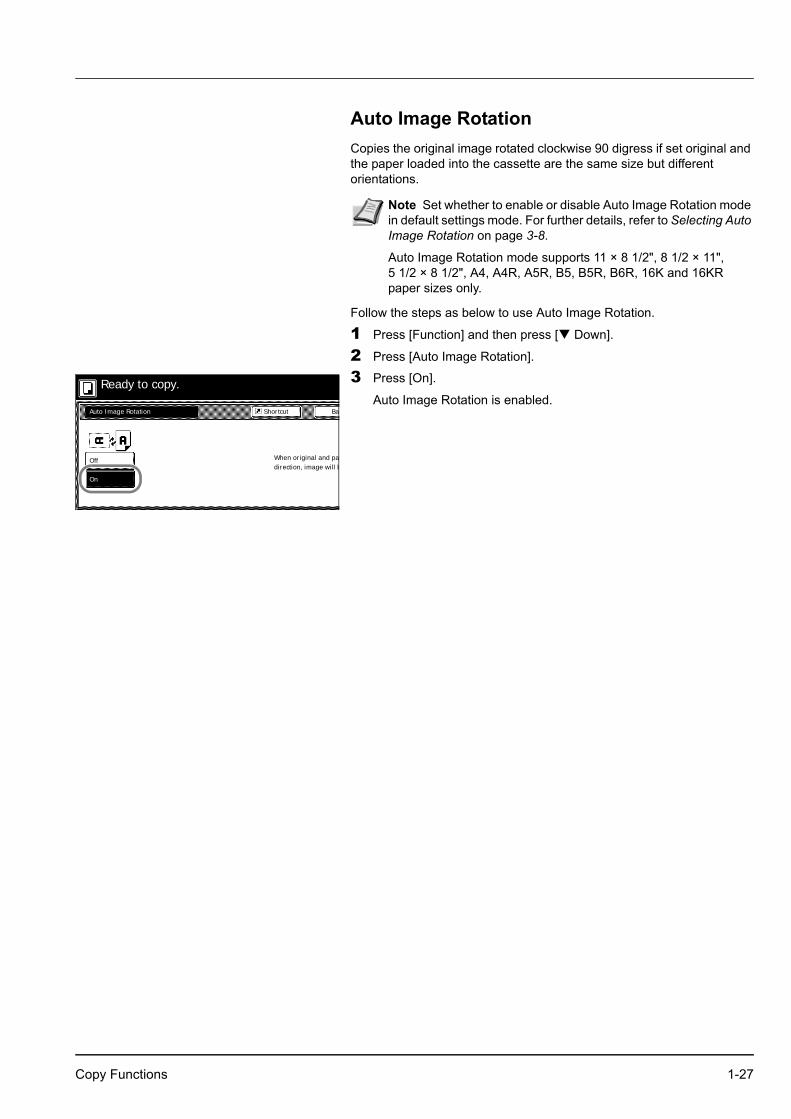
Auto Image Rotation Copies the original image rotated clockwise 90 digress if set original and the paper loaded into the cassette are the same size but different orientations.
Follow the steps as below to use Auto Image Rotation.
1 Press [Function] and then press [ Down].
2 Press [Auto Image Rotation].
3 Press [On].
Auto Image Rotation is enabled.
Note Set whether to enable or disable Auto Image Rotation mode in default settings mode. For further details, refer to Selecting Auto Image Rotation on page 3-8.
Auto Image Rotation mode supports 11 × 8 1/2", 8 1/2 × 11", 5 1/2 × 8 1/2", A4, A4R, A5R, B5, B5R, B6R, 16K and 16KR paper sizes only.
Auto Image Rotation
Off
On
Ba
When original and padirection, image will b
Ready to copy.
Shortcut
Copy Functions 1-27

Selecting Output DestinationThe optional job separator, document finisher or built-in finisher can be specified as copy output destinations.
Follow the steps as below to select the output destination.
1 Press [Function] and then press [ Down].
2 Press [Output Tray].
3 Select the output destination.
4 Place the original and press the Start key. Copying begins.
EcoPrintSet EcoPrint mode to save toner consumption. Use this mode when high-quality copying is not required (e.g., when making test copies).
Follow the below steps to configure EcoPrint.
1 Press [Function] and then press [ Down].
2 Press [EcoPrint].
3 Press [On]. EcoPrint is enabled.
Paper Output DescriptionTop tray Outputs to the top tray of the machine. Job Sep. Tray Outputs to the optional job separator. Finisher tray Outputs to the optional document finisher tray or
built-in finisher tray.
Note Requires the optional job separator, document finisher or built-in finisher.
Change the default destination for copies in default settings mode. For further details, refer to Selecting Output Destination on page 3-18.
Output Tray
Job Sep.
Top tray
Bac
Tray
Shortcut
Ready to copy.
Finishertray
Select proper output tray tmixing jobs.You can confirm output tramanagement.
Note The image may appear lighter.
EcoPrint
e saves toner.
Back
On
Close
Set
e lighter.
Off
Conserve tonerconsumption.
Image is light.
Paper Size11×8½"
100%y.
Shortcut
1-28 Copy Functions

Negative Image Copying Copies the black and white negative (reversed) images of black and white originals.
Follow the steps as below for negative image copying.
1 Press [Function] and then press [ Down].
2 Press [Negative Image].
3 Press [On]. Negative image copying is enabled.
Mirror CopyingCopies mirrored images of the original.
Follow the steps as below for Mirror Copying.
1 Press [Function] and then press [ Down].
2 Press [Mirror Image].
3 Press [On]. Mirror copying is enabled.
Negative Image
Off
On
Ba
Copy the scanned imablack and white parts.
Ready to copy.
Shortcut
Mirror Image
Off
On
Ba
Creates Mirror Image
Ready to copy.
Shortcut
Copy Functions 1-29

Mixed Size Originals ModeUsing the optional document processor, the originals of different sizes can be loaded in a batch and copied. The size of each original page is automatically detected and each original is automatically printed to the matching paper size or all originals printed are on the same size output paper.
Mixed Size Copies
Each copy is the same size as the original.
Same Sized Copies
All originals are output on a single size copy.
Follow the steps as below for Mixed Size Originals mode.
1 Place originals in document processor.
2 Press the Mixed Sized Originals key.
3 Press [Mixed Size Copies] or [Same Sized Copies].
For [Same Sized Copies], select the size of the first original page and press [Close]. Select the paper tray from the [Basic] screen.
4 Press the Start key. Copying begins.
Note This operation requires the optional document processor.
Up to 30 sheets can be loaded in to the document processor at once for Mixed Size Originals mode.
The following paper sizes can be used. Inch models: 11 × 8 1/2" and 11 × 17", 8 1/2 × 14" and 8 1/2 × 11"Metric models: A3 and A4, B4 and B5
Original Copy
Original Copy
Mixed Size Originals
Off
Same Sized
Ba
Able to scan mix size oone time using Documand copy them in unif
Copies
Ready to copy.
Mixed SizeCopies
8½×11"/
8½×14"/
1st pg. Orig
11×8½"
11×17"
Shortcut
Note In order to correctly set the finished bind direction, set the size of the first page of the original.
1-30 Copy Functions

Programmed Copying Press the program number (1 to 8) to recall the program. After registering sets of frequently used functions as a single program, you can simply press the program number as needed to recall those functions. You can also name the programs to identify them.
Registering ProgramsFollow the steps as below to register a program.
1 Access the copy mode you would like to register and press [Program].
2 Press [Register].
3 Press the number (1 to 8) of the program to register.
4 Enter the program name and press [End].
5 Press [Yes]. The program is registered.
Using Programs to CopyPress the number (1 to 8) of the program to use for copying.
1 Press [Program].
2 Press the button for the desired program number (1 to 8).
3 Place the original and press the Start key. Copying begins using the configured program.
Editing Program NamesFollow the steps as below to edit the names assigned to registered programs.
1 Press [Program].
2 Press [Change Name].
3 Press the number (1 to 8) of the program to rename.
4 Re-enter the program name and press [End].
5 Press [Yes]. The modified program name is saved.
Register present setting
Select program number.
No registration
No registration
No registration
No registration
No registration
No registration
No registration
No registration
Note Refer to the Operation Guide for how to enter text characters.
ProgramFunctionUser choiceBasic
Cha
Dele
abc
Ready to copy.
Reg
list a
list b
list c
list d
file 1
file 2
Reg
Recall
Nam
Registration name change
Select the number for changing name.
No registration
abc
list a
list b
list c
list d
file 1
file 2
Note Refer to the Operation Guide for how to enter text characters.
Copy Functions 1-31

Deleting programsFollow the steps below to delete saved programs.
1 Press [Program].
2 Press [Delete].
3 Press the number (1 to 8) of the program to delete.
4 Press [Yes]. The program is deleted. Delete registration
Select the number of program to delete.
No registration
abc
list a
list b
list c
list d
file 1
file 2
1-32 Copy Functions

Assigning Register KeysAssigns three frequently used functions listed on the [Function] screen to assign keys. Functions may also be assigned from the [Basic] screen or [User choice] screen.
Assigning Register KeysFollow the steps as below to assign register keys.
1 Open the function you would like to assign.
2 Press [Shortcut] ([Register]).
3 Press [Register].
4 Press the number (1 to 3) to be assigned.
5 Press [Yes]. The registered register keys will be displayed at the right of the [Basic] screen.
Deleting Register KeysFollow the steps as below to delete Register keys.
1 Press the Register key display the assigned function.
2 Press [Shortcut] ([Register]) to display Create Shortcut (Register).
3 Press [Delete].
4 Press the number (1 to 3) you would like to delete.
5 Press [Yes]. The register key is deleted.
Note To assign a register key, first set Showing the Register Key on page 3-10 to [On].
Ba
Sele
Off
2 in 1
Orie
To
Combine
Layout
4 in 1
Border line
Solid
None
Dotted
Position
Ready to copy.
Shortcut
ToMark
Note Functions in which [Shortcut] ([Register]) is displayed may be assigned register keys.
Register present setting
No
No
No
Select the number of program to registered.
registrat.
registrat.
registrat.
Delete registration
Bord Erase
4 in 1
Margin
Select the number of program to delete.
Left
Sheet
Copy Functions 1-33

Job BuildJob Build allows you to scan originals in several separate steps and copy at once. In each step of the scanning process you can specify different settings (such as zooming and border erase) and you can specify different types of originals. Other examples include inserting a blank sheet between sets of copies from each step and specifying a front cover page during a duplexing step.
Job Build ProcedureThis procedure describes how to use a job build for the following example.
Example
<Finished Copies>
Pages marked with * are blank, pages shown in gray are colored paper.
<Originals>
Open the Job Build Screen. Step 1:
1 Press the Job Build key.
Settings Common to All Steps
Sets Duplexing and Repeat Copy.
2 Press [1 sided/2 sided] ([1-sided/2-sided]).
Note In this example, color paper to be used for the cover page is set in the MP tray and regular paper is loaded in Cassette 1.
Note Set Repeat Copy to increase number of sets later as needed.
Other settings not used in this example may also be configured here. For further details, refer to Setting Functions on page 1-37.
Place originals then press Start key.
Job Build
Ready to Job build.
11×8½"
Paper
1 sided
Original
Basic Quality
Zoom
Top Edge Top
Finished
1 sided/2 sided
OriginalOrient.
1 sided Copy
Edit
1 sided copy-LeftFinished page #:
Step
Auto %
-
Offset
Selection Type
1-34 Copy Functions
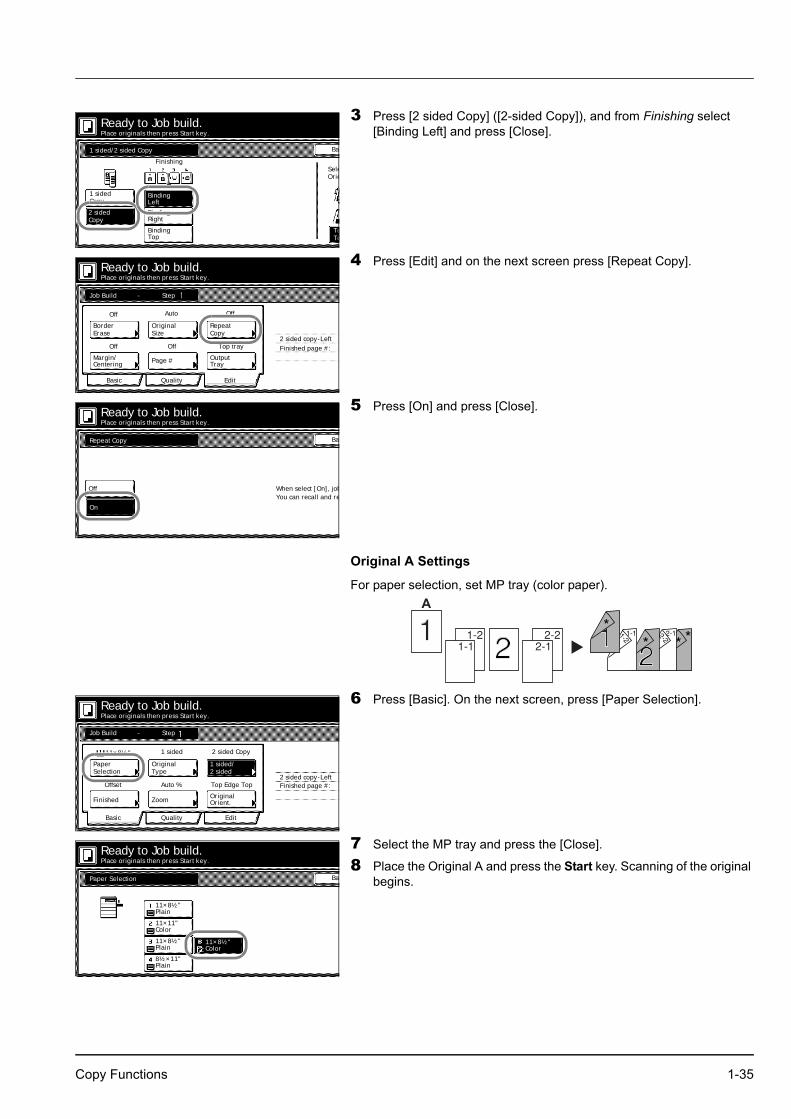
3 Press [2 sided Copy] ([2-sided Copy]), and from Finishing select [Binding Left] and press [Close].
4 Press [Edit] and on the next screen press [Repeat Copy].
5 Press [On] and press [Close].
Original A Settings
For paper selection, set MP tray (color paper).
6 Press [Basic]. On the next screen, press [Paper Selection].
7 Select the MP tray and press the [Close].
8 Place the Original A and press the Start key. Scanning of the original begins.
Place originals then press Start key.
Ba
Sele
1 sided
2 sided
Orie
1 sided/2 sided Copy
Ready to Job build.
Finishing
Binding
Binding
Binding
Copy
Copy
Left
Right
TopToTo
Place originals then press Start key.
Job Build
Ready to Job build.
Off
Border
Auto
Basic Quality
Page #
Top tray
Repeat
OutputMargin/
Off
Edit
2 sided copy-LeftFinished page #:
Step
OffOff
OriginalSize
Centering
-
Erase Copy
Tray
Place originals then press Start key.
BaRepeat Copy
Ready to Job build.
When select [On], jobYou can recall and re
Off
On
Place originals then press Start key.
Job Build
Ready to Job build.
11×8½"
Paper
1 sided
Original
Basic Quality
Zoom
Top Edge Top
Finished
1 sided/
Original
2 sided Copy
Edit
2 sided copy-LeftFinished page #:
Step
Auto %
2 sided
Orient.
Offset
-
Selection Type
BaPaper Selection
11×11"Color
11×8½"Color
11×8½"Plain
11×8½"Plain
8½×11"Plain
Place originals then press Start key.Ready to Job build.
Copy Functions 1-35

Step 2: Set Original A Back Side to Blank
9 Press [Print from Front page].
The back side of the page will be left blank and copying will continue from the next page.
Step 3: Complete the Settings for Original B.
Select Cassette 1 (plain paper) for paper setting.
10Press [Paper Selection].
11Select Cassette 1 and press [Close].
12Place Original B and press the Start key. Scanning of the original begins.
Step 4: Complete the Settings for Original C
For paper selection, set MP tray (color paper).
13Press [Paper Selection].
14Select the MP tray and press [Close].
15Place Original C and press the Start key. Scanning of the original begins.
Step 5: Leave Back Side of Original C Blank
16Press [Print from Front page].
The back side of the page will be left blank and copying will continue from the next page.
press start key.Set
Cancel
ded
ality
Top Edge Top
Original
2 sided Copy
Edit
Insert
2 sided copy-LeftFinished page #:
p
o %
al
Front pagePrint from
key when starting copy.
1 sided/
Next copy page: Rear
finishedScanning
2 sided
Orient.
page
press start key.Set
Cancel
ded
ality
Top Edge Top
Original
2 sided Copy
Edit
Insert
2 sided copy-LeftFinished page #:
p
o %
al
Front pagePrint from
key when starting copy.
1 sided/
Next copy page: Rear
finishedScanning
2 sided
Orient.
page
1-36 Copy Functions

Step 6: Complete the Settings for Original D
Select Cassette 1 (plain paper) for paper setting.
17Press [Paper Selection].
18Select Cassette 1 and press [Close].
19Place the Original D and press the Start key. Scanning of the original begins.
Step 7: Specify Blank Colored Paper for the Back Cover
For paper selection, set MP tray (color paper).
20Press [Paper Selection].
21Select the MP tray and press [Close].
22Press [Insert page] ([Insert blank page]).
23All originals have been scanned. Press [Scanning finished]. Printing begins.
24 If there are no problems with the output, use Repeat Copy to produce additional copies as necessary. For further details, refer to Repeat Copy on page 1-25.
This completes the steps for the above operation.
Setting FunctionsThis section explains the copying functions available when using Job Build.
Paper Selection
Select the paper size.
1 Press [Basic]. On the next screen, press [Paper Selection].
2 Select the MP tray or a cassette and press [Close].
press start key.Set
Cancel
ded
ality
Top Edge Top
Original
2 sided Copy
Edit
Insert
2 sided copy-LeftFinished page #:
p
o %
al
Rear pagePrint from
key when starting copy.
1 sided/
Next copy page: Front
finishedScanning
2 sided
Orient.
page
Place originals then press Start key.
Job Build
Ready to Job build.
11×8½"
Paper
1 sided
Original
Basic Quality
Zoom
Top Edge Top
Finished
1 sided/2 sided
OriginalOrient.
1 sided Copy
Edit
1 sided copy-LeftFinished page #:
Step
Auto %
-
Offset
Selection Type
Copy Functions 1-37

Original Type
Select the original type according to type of original being scanned. The following original types are available.
1 Press [Basic]. On the next screen, press [Original Type].
2 Select [1 sided] ([1-sided]), [2 sided] ([2-sided]) or [Book].
When selecting [2 sided], check the binding direction and be sure that the originals are placed in the correct orientation.
When selecting [Book], be sure that the binding direction is correct.
3 Press [Close].
1 sided/2 sided Copying
Select either [1 sided Copy] ([1-sided Copy]) or [2 sided Copy] ([2-sided Copy]) for the finish type.
1 Press [Basic]. On the next screen, press [1 sided/2 sided] ([1-sided/2-sided]).
2 Press [1 sided Copy] ([1-sided Copy]) or [2 sided Copy] ([2-sided Copy]) and from Finishing select the binding direction.
3 Check the orientation of the original.
4 Press [Close].
Finish
Set the Finish options. The following settings are available.
Offset (Group) – Each completed set is rotated 90 degrees to the next before stacking.
Stapling – Use the optional document finisher or built-in finisher to staple the completed copies.
1 Press [Basic]. On the next screen, press [Finished].
2 For finishing, press [On] ([1 set]). For further details, refer to Offset Mode on page 1-7.
For stapling, press [Staple Mode] and complete the settings. For further details, refer to Stapling on page 1-8.
Original Type Description1 sided (1-sided) Single sided sheet original. 2 sided (2-sided) 2-sided sheet original. Book Magazine or book originals with facing
pages.
Note [2 sided] ([2-sided]) is displayed when the optional document processor is installed.
Note 1 sided/2 sided copy selection is common to all steps. It may only be configured as the first step.
Note Incorrect copying may occur if the original is not placed correctly.
Note Finish settings are common for all steps. It may only be configured as the first step.
1-38 Copy Functions

3 Check the orientation of the original.
4 Press [Close].
Zoom
Select the desired magnification.
1 Press [Basic]. On the next screen, press [Zoom].
2 Select the desired magnification.
For instructions on reducing/enlarging, refer to Zoom in Chapter 3 of Operation Guide.
3 Press [Close].
Original Orientation
Check the orientation of the original.
1 Press [Basic]. On the next screen, press [Original Orient.].
2 Select [Top Edge Top] or [Top Edge Left].
3 Press [Close].
Density
Set the copy density. The setting items are as follows.
1 Press [Quality] and on the next screen press [Density].
2 Select [Auto] or [Manual].
If [Manual] is selected, press [Lighter] or [Darker] to adjust the contrast.
3 Press [Close].
Original Image Quality
Specify the Image Quality based on the original type.
1 Press [Quality] and on the next screen, press [Original Image].
2 Select the image quality. For further details on image quality, refer to Selecting Image Quality in Chapter 3 of Operation Guide.
3 Press [Close].
Note Incorrect copying may occur if the original is not placed correctly.
Note Incorrect copying may occur if the original is not placed correctly.
Item DescriptionAuto Automatically adjusts copy contrast. Manual Manually adjust the copy contrast.
Place originals then press Start key.
Job Build
Ready to Job build.
Density 4
Density
Text
Original
Basic Quality
EcoPrint
Off
Edit
1 sided copy-LeftFinished page #:
Step-
Image
Copy Functions 1-39

EcoPrint
Set EcoPrint to save toner consumption.
1 Press [Quality] and on the next screen press [EcoPrint].
2 Press [On]. EcoPrint is enabled.
3 Press [Close].
Border Erase
Prevents the appearance of shadows from around the edges of originals. The setting items are as follows.
1 Press [Edit] and on the next screen press [Border Erase].
2 Press [Bord Erase Sheet] or [Individual BordrErase] and specify the border width to erase. For further details, refer to Border Erase on page 1-14.
3 Press [Close].
Selecting original size
Specify the size of the original.
1 Press [Edit] and on the next screen press [Original Size].
2 Set the original size. For further details, refer to Selecting Original Size on page 1-3.
3 Press [Close].
Repeat Copy
Specify Repeat Copy as follows. Use Repeat Copy to enable the production of additional copies as needed after a copy job is completed.
1 Press [Edit] and on the next screen press [Repeat Copy].
2 Press [On] to activate Repeat Copy. For further details, refer to Repeat Copy on page 1-25.
3 Press [Close].
Note EcoPrint is a common setting to all steps. It may only be configured as the first step.
Item DescriptionBord Erase Sheet Erase black borders around the single
sheet original. Individual BordrErase Specify border widths individually on all
sides to erase.
Place originals then press Start key.
Job Build
Ready to Job build.
Off
Border
Auto
Basic Quality
Page #
Top tray
Repeat
OutputMargin/
Off
Edit
2 sided copy-LeftFinished page #:
Step
OffOff
OriginalSize
Centering
-
Erase Copy
Tray
Note Repeat Copy setting is common to all steps. It may only be configured as the first step.
1-40 Copy Functions

Margin/Centering
Set margin (blank borders) and centering options.
1 Press [Edit] and on the next screen press [Margin/Centering].
2 Press [Margin] or [Centering]. For further details, refer to Margin Mode on page 1-12 and Centering Originals on page 1-13.
3 Press [Close].
Page Numbering
Specify page numbering in the sequence of originals as follows.
1 Press [Edit] and on the next screen press [Page #] ([Page numbering]).
2 For further details about page numbering, refer to Page Numbering on page 1-16.
3 Press [Close].
Selecting Output Destination
The optional job separator, document finisher or built-in finisher can be specified as copy output destinations.
1 Press [Edit] and on the next screen press [Output Tray].
2 Specify the output destination. For further details, refer to Selecting Output Destination on page 1-28.
3 Press [Close].
Note Margin/Centering setting is common to all steps. It may only be configured as the first step.
Note Page numbering configuration is common to all steps. It may only be configured as the first step.
Note Output destination is displayed with the optional job separator, document finisher or built-in finisher is installed.
The output destination setting applies to all other steps. It may only be configured as the first step.
Copy Functions 1-41

1-42 Copy Functions
2 Output Management Functions
This chapter explains the machine’s output management functions.
Overview of Output Management Functions 2-2Using the Output Management Functions 2-2
[Prt Status] Screen................................................................... 2-3
Output Management Functions 2-1

Overview of Output Management FunctionsThe output management functions manage jobs that are queued for printing. For example, if the machine receives a print job or a fax while it is copying, the incoming job is placed in the print queue until it can be printed. The output management functions allow you to review the job currently being printed as well as any queued jobs.
Output management functions are useful in the following situations.
Using the Output Management FunctionsManage jobs using the [Prt Status] ([Prnt Status]) screen for output management function.
Press the Print Management key. [Prt Status] ([Prnt Status]) screen is displayed.
Purpose MethodTo find out the position of your job in the queue
You can check the status of currently queued jobs in the [Print Management] screen. Jobs are listed in order from the top down, allowing you to see at a glance how far down the queue your job is. (In the list, [ ] indicates a copy job, [ ] indicates a print job and [ ] indicates a fax.)
To find out whether your job has been printed
Check the [Print Management] screen. If your job is listed in the [Print Management] screen, it has not yet been printed.
To move a job up in the print queue
Select the job you want to print sooner in the [Print Management] screen and press [Move ahead] ([Move up]). The job moves up in the queue. You can also pause the job currently being printed and print the selected job immediately by pressing [Interrupt Print].
Note To use the machine as a printer or fax, you must install the optional printer kit or fax kit.
2-2 Output Management Functions
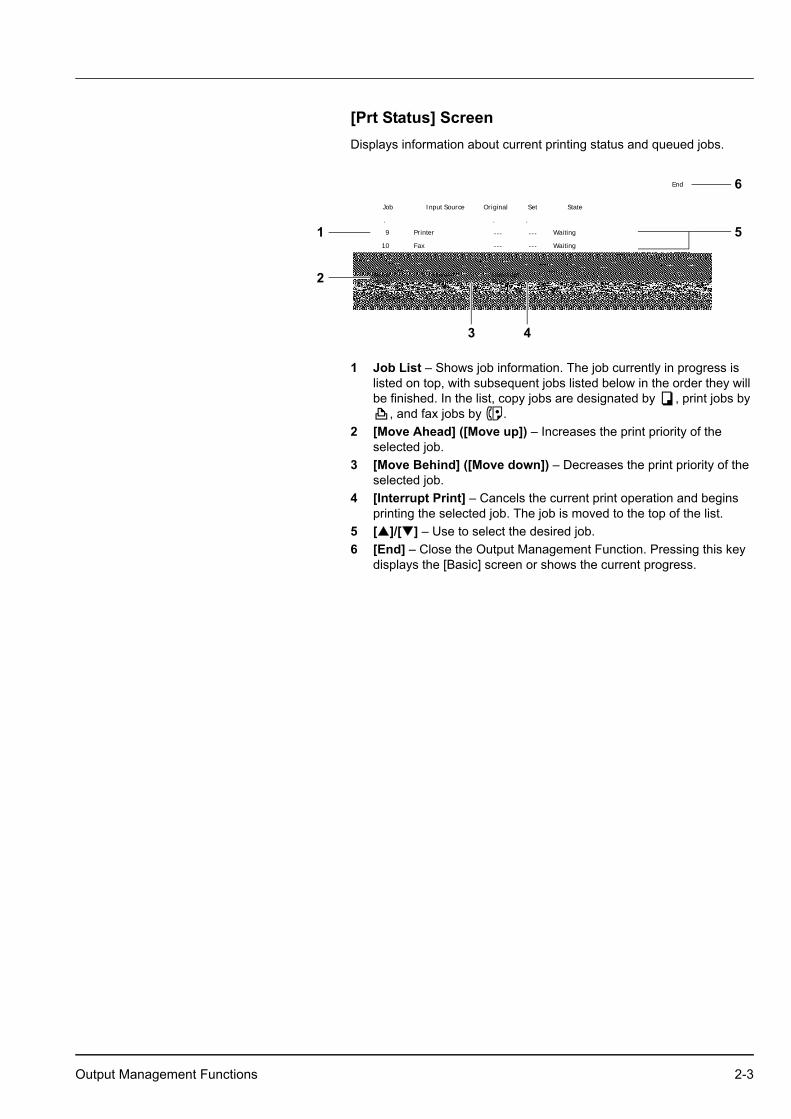
[Prt Status] ScreenDisplays information about current printing status and queued jobs.
1 Job List – Shows job information. The job currently in progress is listed on top, with subsequent jobs listed below in the order they will be finished. In the list, copy jobs are designated by , print jobs by
, and fax jobs by . 2 [Move Ahead] ([Move up]) – Increases the print priority of the
selected job.3 [Move Behind] ([Move down]) – Decreases the print priority of the
selected job. 4 [Interrupt Print] – Cancels the current print operation and begins
printing the selected job. The job is moved to the top of the list. 5 [ ]/[ ] – Use to select the desired job. 6 [End] – Close the Output Management Function. Pressing this key
displays the [Basic] screen or shows the current progress.
Print Management End
Printing
Job Input Source Original Set State
Waiting
Prt Status
InterruptPrint
MoveMove
Copy
Printer
Fax Waiting
--- ---
--- ---
BehindAhead
.8
.9
.10
.1 .50
1
2
3 4
5
6
Output Management Functions 2-3

2-4 Output Management Functions

3 System Menu
This chapter explains how to configure various settings using the menus on the machine’s operation panel.
The main configurable settings are as follows.
Default Settings 3-2Default Settings for Copying.................................................... 3-2Machine Default......................................................................3-11
Setting MP Tray 3-23Specifying the Paper Size for the MP Tray............................ 3-23Specifying the Media Type for the MP Tray........................... 3-23
Registering Non-standard Sizes for Originals 3-24Drum Refresh 3-25Printing Reports 3-26Checking Total Copy Count 3-28
System Menu 3-1

Default SettingsThis section explains how to change default settings which are applied when the machine is powered up or the Reset key is pressed. Automatically configured details set in default setting mode are called default settings. Default settings are divided between Default Settings for Copying and Machine Default. These settings may be freely modified to suit your usage patterns.
Default Settings for CopyingSet the following default copy settings.
• Density...3-3• Density Steps...3-3• Original Image Quality...3-3• Setting EcoPrint...3-4• Adjusting Background Density...3-4• Correcting Black Lines...3-4• Paper Selection...3-5• Setting Auto Paper Selection...3-5• Selecting Media Types for Automatic Paper Selection...3-5• Selecting Default Paper Source...3-6• Specifying Paper Source for Cover...3-6• Setting Auto % Priority...3-6• Adjusting Auto Density...3-7• Adjusting Manual Density...3-7• Selecting Default Zoom...3-7• Selecting Collating and Offsetting Output...3-8• Selecting Auto Image Rotation...3-8• Setting Margin Defaults...3-8• Erasing Borders...3-9• Selecting Maximum Number of Copies...3-9• Enabling Repeat Copy...3-9• Showing the Register Key...3-10• Customize (Basic Screen)...3-10• Customize (User Choice)...3-10
Accessing the Copy Default screen
Follow the procedures below to access the Copy Default screen.
1 Press the System Menu/Counter key.
2 Press [Copy Default].
3 Use the numeric keys to enter the 4 digit management code. The default setting is 2500 for the 25 cpm model and 3000 for the 30 cpm model.
If the correct management code has been entered, the Copy Default screen will be displayed.
4 Refer to the following configuration items to configure the default settings.
System Menu / Counter
System Menu
DefaultCopy
Language Job
DefaultMachine
MP Tray
Orig. SizeRegister
ReportPrint
Setting
Accoun
Note For security, it is recommended to change the management code. For further details, refer to Changing Management Code on page 3-20.
3-2 System Menu

Density
Set the density for default settings mode. The setting items are as follows.
For further information regarding density, refer to the Operation Guide.
1 Referring to Accessing the Copy Default screen on page 3-2, access the Copy Default screen.
2 Press [ ] or [ ] to select Density Mode and press [Change #].
3 Select [Manual] or [Auto].
4 Press [Close] to save settings or [Back] to cancel settings. The display returns to the Copy Default screen.
Density Steps
Change the density adjustment step amount. The setting items are as follows.
1 Referring to Accessing the Copy Default screen on page 3-2, access the Copy Default screen.
2 Press [ ] or [ ] to select Density Steps and press [Change #].
3 Select [1 step] or [0.5 step].
4 Press [Close] to save settings or [Back] to cancel settings. The display returns to the Copy Default screen.
Original Image Quality
Set the original image quality for default settings mode. The setting items are as follows.
1 Referring to Accessing the Copy Default screen on page 3-2, access the Copy Default screen.
2 Press [ ] or [ ] to select Original Image and press [Change #].
3 Select [Text+Photo], [Photo] or [Text].
4 Press [Close] to save settings or [Back] to cancel settings. The display returns to the Copy Default screen.
Item DescriptionManual Sets manual copy density. Auto Sets automatic copy density.
Item Description1 step 7 density adjustment steps are available. 0.5 step 13 more accurate density adjustment steps are
available.
Item DescriptionText+Photo Appropriate for mixed text and photo originals. Photo Appropriate for photo originals. Text Appropriate for document originals with large
amounts of text.
System Menu 3-3
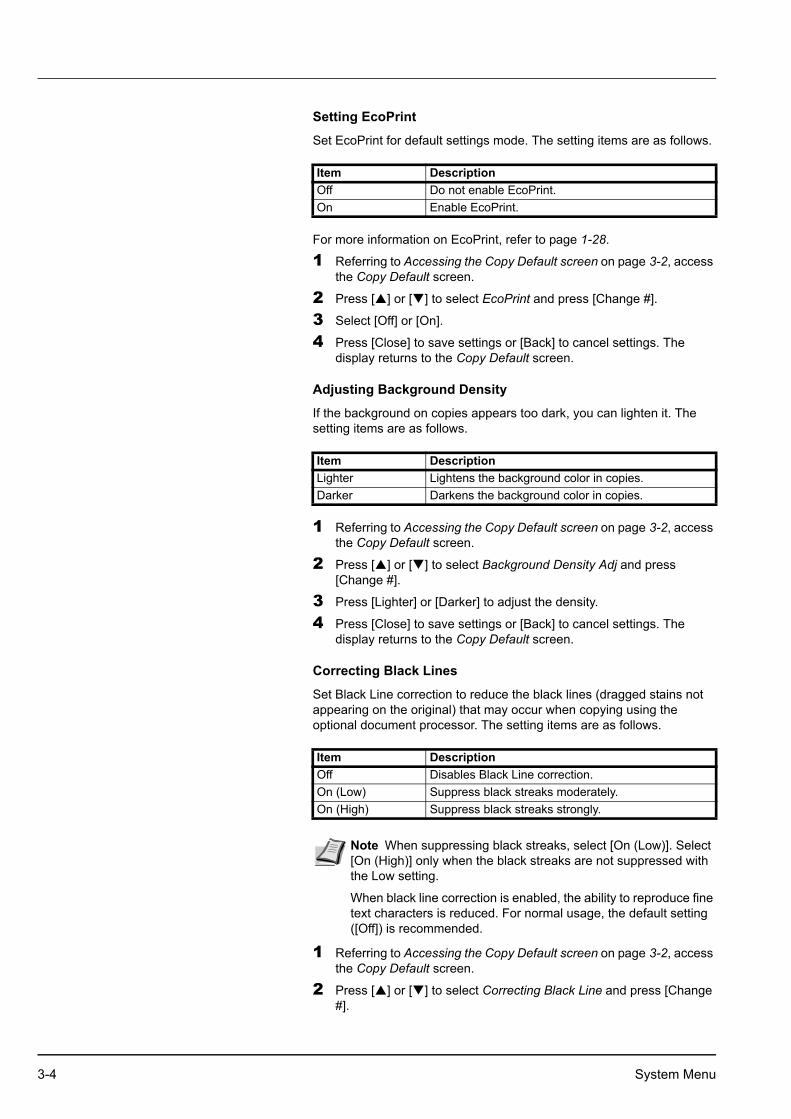
Setting EcoPrint
Set EcoPrint for default settings mode. The setting items are as follows.
For more information on EcoPrint, refer to page 1-28.
1 Referring to Accessing the Copy Default screen on page 3-2, access the Copy Default screen.
2 Press [ ] or [ ] to select EcoPrint and press [Change #].
3 Select [Off] or [On].
4 Press [Close] to save settings or [Back] to cancel settings. The display returns to the Copy Default screen.
Adjusting Background Density
If the background on copies appears too dark, you can lighten it. The setting items are as follows.
1 Referring to Accessing the Copy Default screen on page 3-2, access the Copy Default screen.
2 Press [ ] or [ ] to select Background Density Adj and press [Change #].
3 Press [Lighter] or [Darker] to adjust the density.
4 Press [Close] to save settings or [Back] to cancel settings. The display returns to the Copy Default screen.
Correcting Black Lines
Set Black Line correction to reduce the black lines (dragged stains not appearing on the original) that may occur when copying using the optional document processor. The setting items are as follows.
1 Referring to Accessing the Copy Default screen on page 3-2, access the Copy Default screen.
2 Press [ ] or [ ] to select Correcting Black Line and press [Change #].
Item DescriptionOff Do not enable EcoPrint. On Enable EcoPrint.
Item DescriptionLighter Lightens the background color in copies.Darker Darkens the background color in copies.
Item DescriptionOff Disables Black Line correction.On (Low) Suppress black streaks moderately.On (High) Suppress black streaks strongly.
Note When suppressing black streaks, select [On (Low)]. Select [On (High)] only when the black streaks are not suppressed with the Low setting.
When black line correction is enabled, the ability to reproduce fine text characters is reduced. For normal usage, the default setting ([Off]) is recommended.
3-4 System Menu

3 Select [Off], [On (Low)] or [On (High)].
4 Press [Close] to save settings or [Back] to cancel settings. The display returns to the Copy Default screen.
Paper Selection
In default settings mode, set the paper selection method for when an original is set. The setting items are as follows.
1 Referring to Accessing the Copy Default screen on page 3-2, access the Copy Default screen.
2 Press [ ] or [ ] to select Paper Selection and press [Change #].
3 Select [APS] or [Default cassette].
4 Press [Close] to save settings or [Back] to cancel settings. The display returns to the Copy Default screen.
Setting Auto Paper Selection
Set the paper selection method for Auto Paper Selection mode when changing the zoom ratio. The setting items are as follows.
1 Referring to Accessing the Copy Default screen on page 3-2, access the Copy Default screen.
2 Press [ ] or [ ] to select APS Setting and press [Change #].
3 Select [Most Suit Size] or [Same as Orig. Size].
4 Press [Close] to save settings or [Back] to cancel settings. The display returns to the Copy Default screen.
Selecting Media Types for Automatic Paper Selection
Select Automatic Paper Selection mode to limit the available media types. For example, set to [Plain] to select the cassette set the same size paper and set to plain paper for the media type. Set to [Off] to select the cassette with the same size paper regardless of media type.
The following media types are available.
Plain, Rough, Vellum, Recycled, Preprinted, Bond, Color (Colour), Prepunched, Letterhead, Thick paper, High Quality, Custom 1 - 8
1 Referring to Accessing the Copy Default screen on page 3-2, access the Copy Default screen.
Item DescriptionAPS Selects the cassette loaded with the same size
paper as the original. Default cassette Selects the cassette configured as the default
paper source (refer to page 3-6).
Item DescriptionMost Suit Size Changes the paper size to match the size after
zooming. Same as Orig. Size
Leaves the paper size the same size as the original, even after zooming.
Note Select the media type set for the current cassette. For further details, refer to Specifying the Media Type on page 3-13.
System Menu 3-5

2 Press [ ] or [ ] to select Select media type (APS) and press [Change #].
3 Select [Off] or [On].
If [On] is selected, select the media type.
4 Press [Close] to save settings or [Back] to cancel settings. The display returns to the Copy Default screen.
Selecting Default Paper Source
Automatically selects the default cassette (1 - 4).
1 Referring to Accessing the Copy Default screen on page 3-2, access the Copy Default screen.
2 Press [ ] or [ ] to select Default Paper Source and press [Change #].
3 Select the cassette to use as the default.
4 Press [Close] to save settings or [Back] to cancel settings. The display returns to the Copy Default screen.
Specifying Paper Source for Cover
Specify the paper source cassette (1 - 4) or MP tray which is loaded with cover paper. Cover paper is used in cover mode (refer to page 1-18) and booklet mode (refer to page 1-19, page 1-21).
1 Referring to Accessing the Copy Default screen on page 3-2, access the Copy Default screen.
2 Press [ ] or [ ] to select Paper Source for Cover and press [Change #].
3 Select the paper source containing the cover paper.
4 Press [Close] to save settings or [Back] to cancel settings. The display returns to the Copy Default screen.
Setting Auto % Priority
Specify whether to set auto zoom when the paper in the selected cassette is different from the size of the original. The setting items are as follows.
1 Referring to Accessing the Copy Default screen on page 3-2, access the Copy Default screen.
2 Press [ ] or [ ] to select Auto % Priority Setting and press [Change #].
3 Select [Off] or [On].
Note The MP tray may not be set as the default paper source.
Cassette 3 and Cassette 4 are shown when the optional paper feeder have been installed.
Note Cassette 3 and Cassette 4 are shown when the optional paper feeder have been installed.
Item DescriptionOff Sets zoom to equal (100%). On Automatically sets zoom to fit the paper size.
3-6 System Menu

4 Press [Close] to save settings or [Back] to cancel settings. The display returns to the Copy Default screen.
Adjusting Auto Density
Adjusts the overall lightness or darkness when copying with auto density. The setting items are as follows.
1 Referring to Accessing the Copy Default screen on page 3-2, access the Copy Default screen.
2 Press [ ] or [ ] to select Density Adjustment (Auto) and press [Change #].
3 Press [Lighter] or [Darker] to adjust the density.
4 Press [Close] to save settings or [Back] to cancel settings. The display returns to the Copy Default screen.
Adjusting Manual Density
Adjusts the overall lightness or darkness when copying with manual density. The setting items are as follows.
1 Referring to Accessing the Copy Default screen on page 3-2, access the Copy Default screen.
2 Press [ ] or [ ] to select Density Adjust. (Manual) and press [Change #].
3 Press [Lighter] or [Darker] to adjust the density.
4 Press [Close] to save settings or [Back] to cancel settings. The display returns to the Copy Default screen.
Selecting Default Zoom
Set the reduce/enlarge setting in default settings mode. The setting items are as follows.
1 Referring to Accessing the Copy Default screen on page 3-2, access the Copy Default screen.
2 Press [ ] or [ ] to select Zoom and press [Change #].
3 Select [Auto %] or [100%].
Item DescriptionLighter Lightens the overall density when copying with
auto density. Darker Darkens the overall density when copying with
auto density.
Item DescriptionLighter Lightens the overall density when copying with
manual density. Darker Darkens the overall density when copying with
manual density.
Item DescriptionAuto % Automatically sets zoom to fit the paper size. 100% Sets zoom to equal (100%).
System Menu 3-7

4 Press [Close] to save settings or [Back] to cancel settings. The display returns to the Copy Default screen.
Selecting Collating and Offsetting Output
Set collating and offsetting output options in default settings mode. The setting items are as follows.
For further details about collate mode, refer to Operation Guide; for further details about offset mode, refer to page 1-7.
1 Referring to Accessing the Copy Default screen on page 3-2, access the Copy Default screen.
2 Press [ ] or [ ] to select Collate/Offset and press [Change #].
3 Under Collate, select [Off] or [On].
4 Under Offset, select [Off] or [On].
5 Press [Close] to save settings or [Back] to cancel settings. The display returns to the Copy Default screen.
Selecting Auto Image Rotation
Set auto image rotation in default settings mode. The setting items are as follows.
For further details about auto image rotation, refer to page 1-27.
1 Referring to Accessing the Copy Default screen on page 3-2, access the Copy Default screen.
2 Press [ ] or [ ] to select Auto Image Rotation and press [Change #].
3 Select [Off] or [On].
4 Press [Close] to save settings or [Back] to cancel settings. The display returns to the Copy Default screen.
Setting Margin Defaults
Set the margin width default values. The setting ranges are as follows.
For further details about margin mode, refer to page 1-12.
1 Referring to Accessing the Copy Default screen on page 3-2, access the Copy Default screen.
Item DescriptionCollate Off Do not enable collate mode.
On Enable collate mode. Offset Off Do not enable offset mode.
On Enable offset mode.
Item DescriptionOff Do not enable auto image rotation. On Enable auto image rotation.
Model Type RangeInch models 0 - 3/4" (1/8" increments)Metric models 0 - 18 mm (1 mm increments)
3-8 System Menu

2 Press [ ] or [ ] to select Default margin width and press [Change #].
3 Press [ ], [ ], [ ] or [ ] to set the margin width.
4 Press [Close] to save settings or [Back] to cancel settings. The display returns to the Copy Default screen.
Erasing Borders
Set the border erase default values. The setting ranges are as follows.
For further details about border erase, refer to page 1-14.
1 Referring to Accessing the Copy Default screen on page 3-2, access the Copy Default screen.
2 Press [ ] or [ ] to select Default erase width and press [Change #].
3 Press [+] or [–] to set the Border (outer edges) and Gutter (middle) border widths.
4 Press [Close] to save settings or [Back] to cancel settings. The display returns to the Copy Default screen.
Selecting Maximum Number of Copies
Limits the number of sets that can be specified for a single copy. Set to between 1 - 999 sets.
1 Referring to Accessing the Copy Default screen on page 3-2, access the Copy Default screen.
2 Press [ ] or [ ] to select Preset limit and press [Change #].
3 Use the numeric keys to specify the preset limit value.
4 Press [Close] to save settings or [Back] to cancel settings. The display returns to the Copy Default screen.
Enabling Repeat Copy
Disable repeat copy or configure repeat copy in the default settings mode. The setting items are as follows.
For further details about repeat copy, refer to page 1-25.
1 Referring to Accessing the Copy Default screen on page 3-2, access the Copy Default screen.
2 Press [ ] or [ ] to select Repeat Copy and press [Change #].
3 Under Function, select [Off] or [On].
4 Under Default, select [Off] or [On].
Model Type RangeInch models 0 - 2" (1/8" increments)Metric models 0 - 50 mm (1 mm increments)
Item DescriptionFunction Off Prevents the use of repeat copy.
On Allows the use of repeat copy. Default Off Do not enable repeat copy.
On Enable repeat copy.
System Menu 3-9
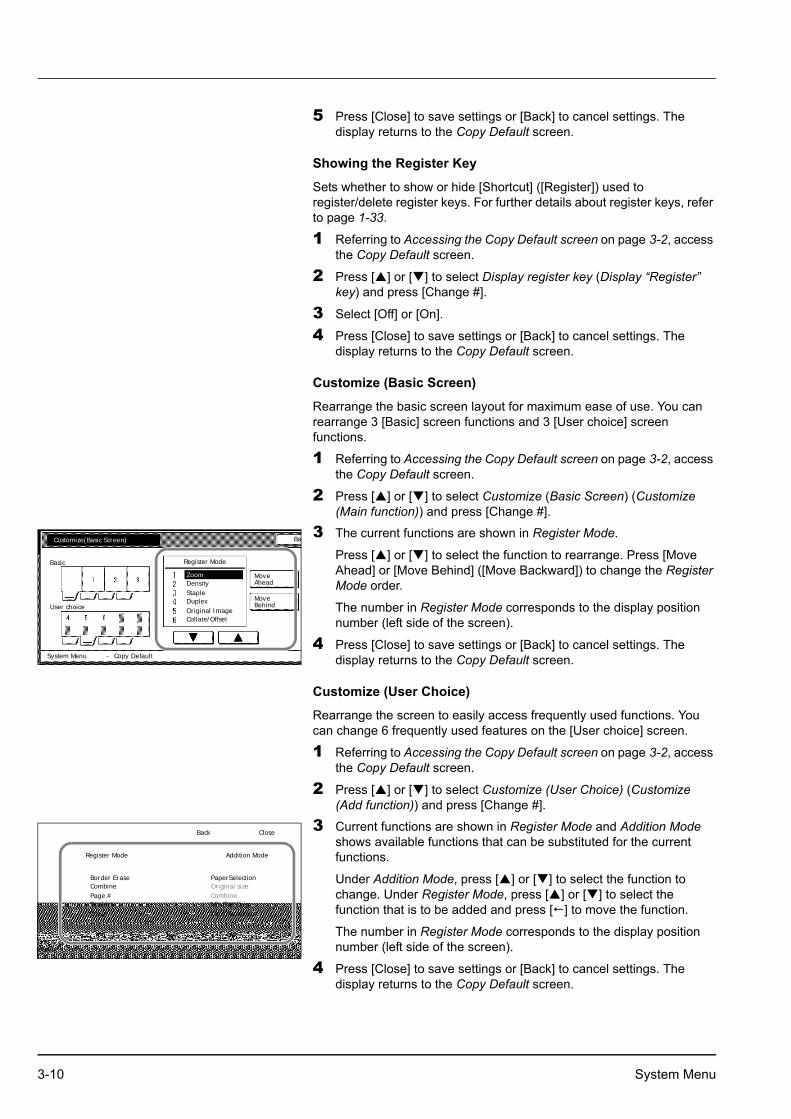
5 Press [Close] to save settings or [Back] to cancel settings. The display returns to the Copy Default screen.
Showing the Register Key
Sets whether to show or hide [Shortcut] ([Register]) used to register/delete register keys. For further details about register keys, refer to page 1-33.
1 Referring to Accessing the Copy Default screen on page 3-2, access the Copy Default screen.
2 Press [ ] or [ ] to select Display register key (Display “Register” key) and press [Change #].
3 Select [Off] or [On].
4 Press [Close] to save settings or [Back] to cancel settings. The display returns to the Copy Default screen.
Customize (Basic Screen)
Rearrange the basic screen layout for maximum ease of use. You can rearrange 3 [Basic] screen functions and 3 [User choice] screen functions.
1 Referring to Accessing the Copy Default screen on page 3-2, access the Copy Default screen.
2 Press [ ] or [ ] to select Customize (Basic Screen) (Customize (Main function)) and press [Change #].
3 The current functions are shown in Register Mode.
Press [ ] or [ ] to select the function to rearrange. Press [Move Ahead] or [Move Behind] ([Move Backward]) to change the Register Mode order.
The number in Register Mode corresponds to the display position number (left side of the screen).
4 Press [Close] to save settings or [Back] to cancel settings. The display returns to the Copy Default screen.
Customize (User Choice)
Rearrange the screen to easily access frequently used functions. You can change 6 frequently used features on the [User choice] screen.
1 Referring to Accessing the Copy Default screen on page 3-2, access the Copy Default screen.
2 Press [ ] or [ ] to select Customize (User Choice) (Customize (Add function)) and press [Change #].
3 Current functions are shown in Register Mode and Addition Mode shows available functions that can be substituted for the current functions.
Under Addition Mode, press [ ] or [ ] to select the function to change. Under Register Mode, press [ ] or [ ] to select the function that is to be added and press [ ] to move the function.
The number in Register Mode corresponds to the display position number (left side of the screen).
4 Press [Close] to save settings or [Back] to cancel settings. The display returns to the Copy Default screen.
Customize(Basic Screen) Ba
Register Mode
DensityZoom
StapleDuplexOriginal ImageCollate/Offset
Move
Move
System Menu Copy Default
Basic
User choice
-
Ahead
Behind
CloseBack
Register Mode
MarginBorder EraseCombinePage #BookletCover
Default
Addition Mode
OffPaperSelectionOriginal sizeCombineMix Size Orig.ContinuousScan
3-10 System Menu

Machine DefaultThe following items can be set for machine default.
• Enabling Auto Cassette Switching...3-12• Specifying the Paper Size...3-12• Specifying the Media Type...3-13• Registering MP Tray Paper Size...3-13• Enabling Quick Access to MP Tray Settings...3-14• Setting Media Type Properties (Paper Weight)...3-14• Setting Media Type Properties (Duplex Mode)...3-15• Setting Handling for Special Media Types...3-16• Auto Detect Originals...3-17• Orientation of Original Document...3-17• Setting Sleep Timer Timeout...3-18• Setting Low-Power Timer Timeout...3-18• Setting Auto Clear Timeout Time...3-18• Selecting Output Destination...3-18• Selecting FAX Output Mode...3-19• Select the Main Mode...3-19• Setting Notification Sounds...3-20• Silent Mode...3-20• Changing Management Code...3-20• Activating Auto Sleep...3-21• Activating Auto Clear...3-21• Auto Drum Refresh...3-22
Accessing the Machine Default Screen
Follow the steps as below to access the Machine Default screen.
1 Press the System Menu/Counter key.
2 Press [Machine Default].
3 Use the numeric keys to enter the 4 digit management code. The default setting is 2500 for the 25 cpm model and 3000 for the 30 cpm model.
If the correct management code has been entered, the Machine Default screen will be displayed.
4 Refer to the following configuration items to configure the default settings.
System Menu / Counter
System Menu
DefaultCopy
Language Job
DefaultMachine
MP Tray
Orig. SizeRegister
ReportPrint
Setting
Accoun
Note For security, it is recommended to change the management code. For further details, refer to Changing Management Code on page 3-20.
System Menu 3-11
Enabling Auto Cassette Switching
Use auto cassette switching to automatically switch the paper source to another cassette loaded with the same size and orientation paper when the current cassette runs out of paper. You can also switch to a cassette with a different media type.
The setting items are as follows.
1 Referring to Accessing the Machine Default Screen on page 3-11, access the Machine Default screen.
2 Press [ ] or [ ] to select Auto cassette switching and press [Change #].
3 Under Function, select [Off] or [On].
4 Under Paper Type, select [All types of paper] or [Feed same paper type].
5 Press [Close] to save settings or [Back] to cancel settings. The display returns to the Machine Default screen.
Specifying the Paper Size
Specify the paper sizes for Cassettes 1 - 4. The setting items are as follows.
1 Referring to Accessing the Machine Default Screen on page 3-11, access the Machine Default screen.
2 Press [ ] or [ ] to select the cassette to configure from Paper size (Cassette 1 - Cassette 4) and press [Change #].
3 Select [Auto Detection] or [Standard sizes].
If [Auto Detection] is selected, choose the unit type.
If [Standard sizes] is selected, choose the paper size.
4 Press [Close] to save settings or [Back] to cancel settings. The display returns to the Machine Default screen.
Item DescriptionFunction Off Do not enable auto cassette switching.
On Enable auto cassette switching. Paper Type All types of
paperAutomatically switches a cassette even with different media type if the paper is the same size and direction.
Feed same paper type
Do not switch to a cassette with different media type.
Item DescriptionAuto Detection The paper size is automatically detected.
[Centimeter] ([Centimetre]) or [Inch] selection is required.
Standard sizes Specify a standard size. The following paper sizes: 11 × 17", 8 1/2 × 14", 11 × 8 1/2", 8 1/2 × 11", 5 1/2 × 8 1/2", 8 1/2 × 13 1/2", 8 1/2 × 13" (Oficio II), A3, B4, A4, A4R, B5, B5R, A5R, Folio, 8K, 16K, 16KR are available.
Note Cassette 3 and Cassette 4 are shown when the optional paper feeder is installed.
3-12 System Menu

Specifying the Media Type
Specify the media type for Cassettes 1 - 4.
The available media types are Plain, Vellum, Rough, Recycled, Preprinted, Bond, Color (Colour), Prepunched, Letterhead, Thick paper, High Quality, and Custom 1 - 8.
1 Referring to Accessing the Machine Default Screen on page 3-11, access the Machine Default screen.
2 Press [ ] or [ ] to select the cassette to specify media type from Media Type (Cassette 1 - Cassette 4) and press [Change #].
3 Select the media type.
4 Press [Close] to save settings or [Back] to cancel settings. The display returns to the Machine Default screen.
Registering MP Tray Paper Size
Up to 4 custom paper sizes can be pre-registered for use with the MP tray. Registered sizes are shown as custom sizes when selecting paper size. The media type can also be specified for each registered size. The setting items are as follows.
1 Referring to Accessing the Machine Default Screen on page 3-11, access the Machine Default screen.
2 Press [ ] or [ ] to select Store Paper Size for MPT and press [Change #].
3 Press [ ] or [ ] to select the number to register from Paper size (User reg. 1 - 4) and press [Change #].
4 Press [On] and press [+] or [–] to set the Y (height) and X (width).
With the metric models, you may enter the size directly using the numeric keys by pressing [#-Keys].
To specify a media type, press [Select Media Type]. Select the media type and press [Close].
5 Press [Close] to save settings or [Back] to cancel settings.
6 Press [Close]. The display returns to the Machine Default screen.
Note Cassette 3 and Cassette 4 are shown when the optional paper feeder have been installed.
Media types in Setting Media Type Properties (Paper Weight) (refer to page 3-14) with weight (thickness) that cannot be inserted in the Cassette are not available.
Setting Detail Setting ItemPaper size Inch models
Height: 3 7/8 - 11 5/8" (1/8" increments)Width: 5 7/8 - 17" (1/8" increments)Metric modelsHeight: 98 - 297 mm (1 mm increments)Width: 148 - 432 mm (1 mm increments)
Media type Plain, Transparency, Rough, Vellum, Labels, Recycled, Preprinted, Bond, Cardstock, Color (Colour), Prepunched, Letterhead, Thick paper, Envelope, High Quality, Custom 1 - 8
System Menu 3-13

Enabling Quick Access to MP Tray Settings
Set whether to show the MP tray Settings screen when the MP tray is selected from the [Basic] screen. The setting items are as follows.
1 Referring to Accessing the Machine Default Screen on page 3-11, access the Machine Default screen.
2 Press [ ] or [ ] to select Check MP Tray sizing and press [Change #].
3 Select [Off] or [On].
4 Press [Close] to save settings or [Back] to cancel settings. The display returns to the Machine Default screen.
Setting Media Type Properties (Paper Weight)
Set the weight (paper thickness) for each type of paper. The weights that can be configured for media type are as follows.
Media type to be placed in the Cassette.
Y: Available.
N: Not Available.
Item DescriptionOff Do not show MP tray Settings when MP tray is
selected. On Show MP tray Settings when MP tray is selected.
Media Type Light (thin) Normal 1 Normal 2 Normal 3 Heavy 1 Heavy 2 Heavy 3 Extra
HeavyPlain Y Y Y Y N N N NPreprinted Y Y Y Y N N N NBond Y Y Y Y Y Y Y NRecycled Y Y Y Y N N N NVellum Y Y Y Y N N N NRough Y Y Y Y Y Y Y NLetterhead Y Y Y Y N N N NColor (Colour) Y Y Y Y N N N NPrepunched Y Y Y Y N N N NThick paper N N N N Y Y Y YHigh Quality Y Y Y Y N N N NCustom 1 - 8 Y Y Y Y Y Y Y Y
3-14 System Menu

Media type to be placed in the MP tray.
Y: Available.
N: Not Available.
Set paper weight according to the following media types and weights (g/m²).
• Light (Thin): 64 g/m² or less• Normal 1: From 60 g/m² to 75 g/m² or less• Normal 2: From 76 g/m² to 90 g/m² or less• Normal 3: From 91 g/m² to 105 g/m² or less• Heavy 1: From 106 g/m² to 135 g/m² or less• Heavy 2: From 136 g/m² to 170 g/m² or less• Heavy 3: 171 g/m² or more• Extra Heavy: OHP transparencies
1 Referring to Accessing the Machine Default Screen on page 3-11, access the Machine Default screen.
2 Press [ ] or [ ] to select Media Type (paper weight) and press [Change #].
3 Press [ ] or [ ] to select the media type to set the weight and press [Change #].
4 Select the weight. Press [Close] to save settings or [Back] to cancel settings.
5 Press [Close]. The display returns to the Machine Default screen.
Setting Media Type Properties (Duplex Mode)
Specify whether to allow duplex printing for each of custom media types 1 - 8. The setting items are as follows.
Media Type Light (thin) Normal 1 Normal 2 Normal 3 Heavy 1 Heavy 2 Heavy 3 Extra
HeavyPlain Y Y Y Y N N N NTransparency N N N N Y Y Y YPreprinted Y Y Y Y N N N NLabels Y Y Y Y Y Y Y YBond Y Y Y Y Y Y Y NRecycled Y Y Y Y N N N NVellum Y Y Y Y N N N NRough Y Y Y Y Y Y Y NLetterhead Y Y Y Y N N N NColor (Colour) Y Y Y Y N N N NPrepunched Y Y Y Y N N N NEnvelope N N N N Y Y Y YCardstock N N N N Y Y Y YThick paper N N N N Y Y Y YHigh Quality Y Y Y Y N N N NCustom 1 - 8 Y Y Y Y Y Y Y Y
Item DescriptionOff Do not use duplex mode. On Use duplex mode.
System Menu 3-15
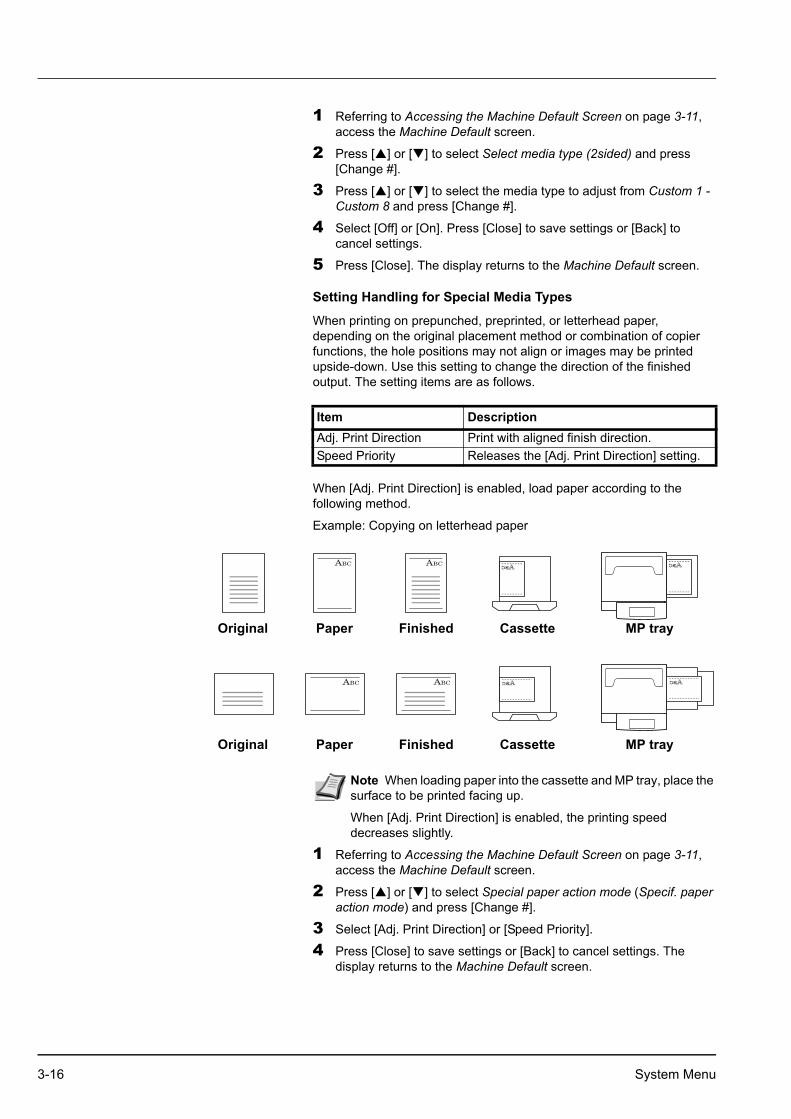
1 Referring to Accessing the Machine Default Screen on page 3-11, access the Machine Default screen.
2 Press [ ] or [ ] to select Select media type (2sided) and press [Change #].
3 Press [ ] or [ ] to select the media type to adjust from Custom 1 - Custom 8 and press [Change #].
4 Select [Off] or [On]. Press [Close] to save settings or [Back] to cancel settings.
5 Press [Close]. The display returns to the Machine Default screen.
Setting Handling for Special Media Types
When printing on prepunched, preprinted, or letterhead paper, depending on the original placement method or combination of copier functions, the hole positions may not align or images may be printed upside-down. Use this setting to change the direction of the finished output. The setting items are as follows.
When [Adj. Print Direction] is enabled, load paper according to the following method.
Example: Copying on letterhead paper
1 Referring to Accessing the Machine Default Screen on page 3-11, access the Machine Default screen.
2 Press [ ] or [ ] to select Special paper action mode (Specif. paper action mode) and press [Change #].
3 Select [Adj. Print Direction] or [Speed Priority].
4 Press [Close] to save settings or [Back] to cancel settings. The display returns to the Machine Default screen.
Item DescriptionAdj. Print Direction Print with aligned finish direction. Speed Priority Releases the [Adj. Print Direction] setting.
Original
Original
Finished
Finished
Cassette
Cassette
MP tray
MP tray
Paper
Paper
Note When loading paper into the cassette and MP tray, place the surface to be printed facing up.
When [Adj. Print Direction] is enabled, the printing speed decreases slightly.
3-16 System Menu

Auto Detect Originals
Specify the paper size to select when an original with a similar size is automatically detected. The setting items are as follows.
1 Referring to Accessing the Machine Default Screen on page 3-11, access the Machine Default screen.
2 Press [ ] or [ ] to select Org. Auto Detect Setting and press [Change #].
3 Press [ ] or [ ] to select the paper size to specify and press [Change #].
4 For Cardstock/A6, select [Cardstock] or [A6].
For B4/Folio, select [B4] or [Folio].
For 11 × 15", select [On] or [Off].
5 Press [Close] to save settings or [Back] to cancel settings.
6 Press [Close]. The display returns to the Machine Default screen.
Orientation of Original Document
Set the original orientation in default settings mode. The setting items are as follows.
For further details about original orientation, refer to page 1-6.
1 Referring to Accessing the Machine Default Screen on page 3-11, access the Machine Default screen.
2 Press [ ] or [ ] to select Orig. Orient and press [Change #].
3 Select [Top Edge Top] or [Top Edge Left].
4 Press [Close] to save settings or [Back] to cancel settings. The display returns to the Machine Default screen.
Item DescriptionCardstock/A6 Select whether to detect the size as Postcard or
A6R. B4/Folio Select whether to detect the size as B4 or Folio. 11 × 15" Select whether to automatically detect as 11 × 15".
Note This setting is displayed only for metric models.
Item DescriptionTop Edge Top Sets the top edge as the original’s upper
edge. Top Edge Left Sets the left edge as the original’s upper
edge.
System Menu 3-17

Setting Sleep Timer Timeout
Set the time until Auto Sleep mode is activated when [On] is selected in Activating Auto Sleep on page 3-21. Specify a value from 1 - 240 minutes (1 minute increments). For further details on Auto Sleep mode, refer to Sleep Mode in Chapter 3 of Operation Guide.
1 Referring to Accessing the Machine Default Screen on page 3-11, access the Machine Default screen.
2 Press [ ] or [ ] to select Sleep mode changing time and press [Change #].
3 Press [+] or [–] to set the time until Auto Sleep mode is activated.
4 Press [Close] to save settings or [Back] to cancel settings. The display returns to the Machine Default screen.
Setting Low-Power Timer Timeout
Set the time until Auto Low-Power mode is activated. Specify a value from 1 - 240 minutes (1 minute increments). For further details on Auto Low-Power mode, refer to Low-Power Mode in Chapter 3 of Operation Guide.
1 Referring to Accessing the Machine Default Screen on page 3-11, access the Machine Default screen.
2 Press [ ] or [ ] to select Low power mode chng. time and press [Change #].
3 Press [+] or [–] to set the time until Auto Low-Power mode is activated.
4 Press [Close] to save settings or [Back] to cancel settings. The display returns to the Machine Default screen.
Setting Auto Clear Timeout Time
Set the time until Auto Clear is activated after the last operation when [On] is selected in Activating Auto Clear on page 3-21. Specify a value from 10 - 270 minutes (10 minute increments).
1 Referring to Accessing the Machine Default Screen on page 3-11, access the Machine Default screen.
2 Press [ ] or [ ] to select Auto Clear Time Setting and press [Change #].
3 Press [+] or [–] to set the time until Auto Clear is activated.
4 Press [Close] to save settings or [Back] to cancel settings. The display returns to the Machine Default screen.
Selecting Output Destination
Set the default copy output destination.
Note If the device is used frequently, it is recommended to set Auto Sleep mode to a larger time delay, and to a shorter time delay if the periods of non-use are longer.
Paper Output DescriptionTop tray Outputs to the top tray of the machine. Job Sep. Tray Outputs to the optional job separator. Finisher tray Outputs to the optional document finisher tray or
built-in finisher tray.
3-18 System Menu

1 Referring to Accessing the Machine Default Screen on page 3-11, access the Machine Default screen.
2 Press [ ] or [ ] to select Select Copy output tray and press [Change #].
3 Select the output destination.
4 Press [Close] to save settings or [Back] to cancel settings. The display returns to the Machine Default screen.
Selecting FAX Output Mode
Set the default output destination for printing originals or reports received by fax.
1 Referring to Accessing the Machine Default Screen on page 3-11, access the Machine Default screen.
2 Press [ ] or [ ] to select Select FAX output tray and press [Change #].
3 Select the output destination.
4 Press [Close] to save settings or [Back] to cancel settings. The display returns to the Machine Default screen.
Select the Main Mode
Specify the screen to be first shown after power-on. The setting items are as follows.
1 Referring to Accessing the Machine Default Screen on page 3-11, access the Machine Default screen.
2 Press [ ] or [ ] to select Select the main mode (Select main mode) and press [Change #].
3 Select [Copy Mode] or [FAX Mode].
Note This setting is displayed when the optional job separator, document finisher or built-in finisher is installed.
Paper Output DescriptionTop tray Outputs to the top tray of the machine. Job Sep. Tray Outputs to the optional job separator. Finisher tray Outputs to the optional document finisher tray or
built-in finisher tray.
Note This setting is displayed when the fax kit and optional job separator, document finisher or built-in finisher is installed.
Item DescriptionCopy Mode Copy mode is set as the first screen to be shown
after the power is switched on (the screen shown when the Copy key is pressed).
FAX Mode Fax mode is set as the first screen to be shown the power is switched on (the screen shown when the FAX key is pressed).
Note This setting is displayed when the optional fax kit is installed.
System Menu 3-19

4 Press [Close] to save settings or [Back] to cancel settings. The display returns to the Machine Default screen.
Setting Notification Sounds
Set the notification sounds made by the machine during operation. The setting items are as follows.
Set each item to [On] to enable sound notification. Set each item to [Off] to disable sound notification.
1 Referring to Accessing the Machine Default Screen on page 3-11, access the Machine Default screen.
2 Press [ ] or [ ] to select Notify (Touch tone), Notify (Finish), Notify (Ready) or Notify (Attention) and press [Change #].
3 Select [Off] or [On].
4 Press [Close] to save settings or [Back] to cancel settings. The display returns to the Machine Default screen.
Silent Mode
Configures the machine to operate more quietly. To decrease the operating noise level, set Silent Mode to [On]. The setting items are as follows.
1 Referring to Accessing the Machine Default Screen on page 3-11, access the Machine Default screen.
2 Press [ ] or [ ] to select Silent Mode and press [Change #].
3 Select [Off] or [On].
4 Press [Close] to save settings or [Back] to cancel settings. The display returns to the Machine Default screen.
Changing Management Code
Change the machine’s management code.
Item DescriptionTouch tone notification The beep sound made when a key on the
operation panel or touch panel is pressed. Finish notification The sound made when a copy or print
operation finishes without error. Ready notification The sound made when warm-up is
complete. Attention notification The sound made when an error has
occurred.
Item DescriptionOff Do not enable Silent Mode. On Enable Silent Mode and reduce the operating
noise level.
IMPORTANT Be sure to record the management code when changing it. If forgotten, contact your Service Representative.
3-20 System Menu

1 Referring to Accessing the Machine Default Screen on page 3-11, access the Machine Default screen.
2 Press [ ] or [ ] to select Management code change (Change MGMT code with #) and press [Change #].
3 Use the numeric keys to enter the new management code.
4 Press [Close] to save settings or [Back] to cancel settings. The display returns to the Machine Default screen.
Activating Auto Sleep
In Auto Sleep mode, the machine automatically switches to Sleep mode if left idle for a preset period. Enable/disable the use of Auto Sleep mode here. For further details on Sleep mode, refer to Sleep Mode in Chapter 3 of Operation Guide. The setting items are as follows.
1 Referring to Accessing the Machine Default Screen on page 3-11, access the Machine Default screen.
2 Press [ ] or [ ] to select Auto sleep and press [Change #].
3 Select [Off] or [On].
4 Press [Close] to save settings or [Back] to cancel settings. The display returns to the Machine Default screen.
Activating Auto Clear
Auto Clear automatically releases various specified setting and returns to default settings mode after a specified period of time since the last device operation. Enable/disable the use of Auto Clear here. The setting items are as follows.
Note The default setting is 2500 for the 25 cpm model and 3000 for the 30 cpm model.
Change the management code to a value between 0000 - 9999. Always set to 4 digits.
It is recommended to not set the management code to an easily guessed number such as 1111 or 1234.
The following settings require the management code to be entered.
• Default Settings for Copying• Machine Default• Printing Reports• Job Accounting
Item DescriptionOff Do not use Auto Sleep mode. On Use Auto Sleep mode.
Note If Auto Sleep mode interferes with normal operation, set to disable Auto Sleep mode. Before disabling Auto Sleep mode, it is first recommended to try extending the time until Auto Sleep mode is activated (sleep mode change time).
Item DescriptionOff Do not use Auto Clear. On Use Auto Clear.
System Menu 3-21

1 Referring to Accessing the Machine Default Screen on page 3-11, access the Machine Default screen.
2 Press [ ] or [ ] to select Auto Clear and press [Change #].
3 Select [Off] or [On].
4 Press [Close] to save settings or [Back] to cancel settings. The display returns to the Machine Default screen.
Auto Drum Refresh
When the machine is turned on or is woken up from Low-Power mode or Sleep mode, the drum is sometimes automatically refreshed. Automatic drum refreshing is carried out to maintain printing quality and allows for the ambient temperature and humidity.
Use this setting to specify the duration of automatic drum refreshing. The setting items are as follows.
1 Referring to Accessing the Machine Default Screen on page 3-11, access the Machine Default screen.
2 Press [ ] or [ ] to select Auto Drum Refresh and press [Change #].
3 Select [Off], [Standard] or [Long].
4 Press [Close] to save settings or [Back] to cancel settings. The display returns to the Machine Default screen.
Item DescriptionOff Disables automatic drum refreshing.Standard Sets the standard duration for automatic drum
refreshing (maximum 140 sec.).Long Sets a longer time for automatic drum refreshing
(maximum 180 sec.).
3-22 System Menu

Setting MP TraySet the paper size and media type to match paper loaded in the MP tray.
Specifying the Paper Size for the MP TrayThe MP tray paper size setting method and available paper sizes are as follows.
Specifying the Media Type for the MP TrayThe following media types can be specified for the MP tray.
Plain, Transparency, Rough, Vellum, Labels, Recycled, Preprinted, Bond, Cardstock, Color (Colour), Prepunched, Letterhead, Thick paper, Envelope, High Quality, Custom 1 - 8
Setting method Unit Paper size
Auto Detect Inch 11 × 17", 8 1/2 × 14", 11 × 8 1/2", 8 1/2 × 11", 5 1/2 × 8 1/2"
Centimeter A3, B4, A4, A4R, B5, B5R, A5R, B6R, A6ROther Standard Sizes ISO B5, Envelope DL, Envelope C5,
Envelope C4, Comm. #10, Comm. #9, Comm. #6-3/4, Monarch, Executive, OUFUKU HAGAKI (return postcard), YOUKEI 2, YOUKEI 4, 8 1/2 × 13 1/2", 8 1/2 × 13" (Oficio II), 8K, 16K, 16KR
Input Size Inch modelsHeight: 3 7/8 - 11 5/8" (1/8" increments)Width: 5 7/8 - 17" (1/8" increments)Metric modelsHeight: 98 - 297 mm (1 mm increments)Width: 148 - 432 mm (1 mm increments)
Custom Size Pre-assigned paper size 1-4Assignable paper sizesInch modelsHeight: 3 7/8 - 11 5/8" (1/8" increments)Width: 5 7/8 - 17" (1/8" increments)Metric modelsHeight: 98 - 297 mm (1 mm increments)Width: 148 - 432 mm (1 mm increments)
Note For further details on MP tray size setting, refer to Specifying the Paper Size for the MP Tray in Chapter 2 of Operation Guide.
Note For further details about MP tray media type setting, refer to Specifying the Media Type for the MP Tray in Chapter 2 of Operation Guide.
System Menu 3-23
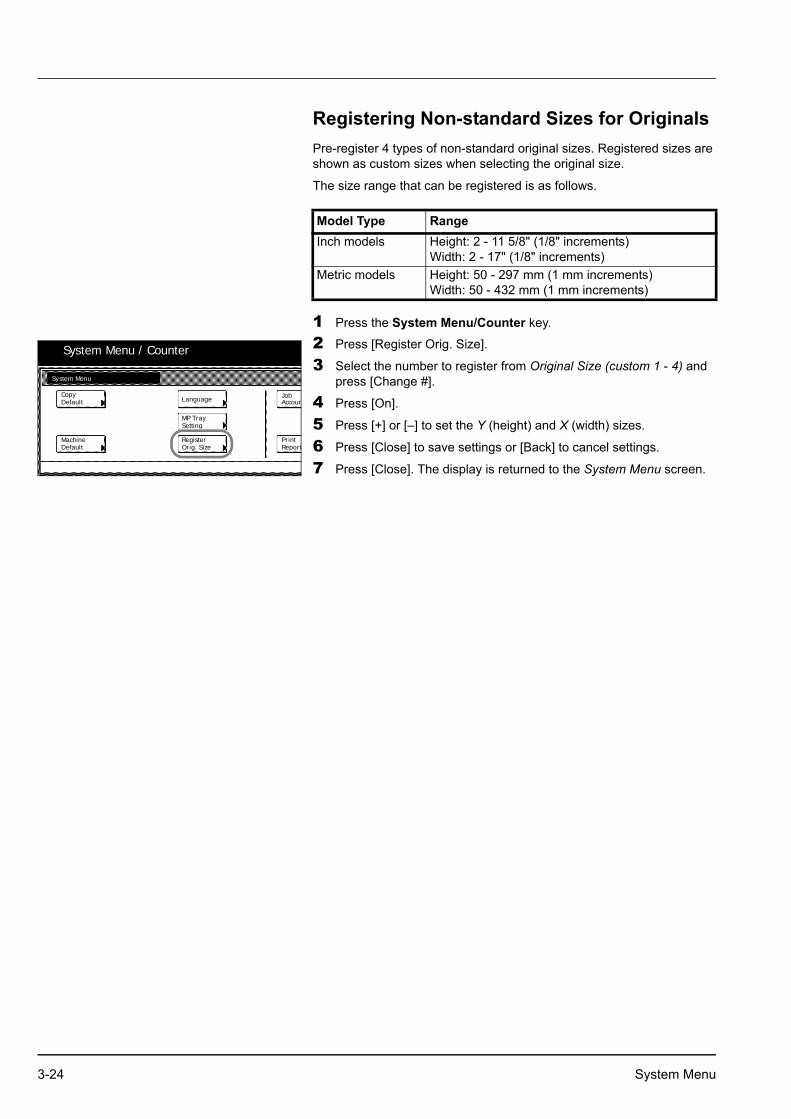
Registering Non-standard Sizes for OriginalsPre-register 4 types of non-standard original sizes. Registered sizes are shown as custom sizes when selecting the original size.
The size range that can be registered is as follows.
1 Press the System Menu/Counter key.
2 Press [Register Orig. Size].
3 Select the number to register from Original Size (custom 1 - 4) and press [Change #].
4 Press [On].
5 Press [+] or [–] to set the Y (height) and X (width) sizes.
6 Press [Close] to save settings or [Back] to cancel settings.
7 Press [Close]. The display is returned to the System Menu screen.
Model Type RangeInch models Height: 2 - 11 5/8" (1/8" increments)
Width: 2 - 17" (1/8" increments)Metric models Height: 50 - 297 mm (1 mm increments)
Width: 50 - 432 mm (1 mm increments)
System Menu / Counter
System Menu
DefaultCopy
Language Job
DefaultMachine
MP Tray
Orig. SizeRegister
ReportPrint
Setting
Accoun
3-24 System Menu

Drum RefreshRefresh the drum when image blur or white spots appear on images in copies. There are 2 drum refresh modes.
1 Press the System Menu/Counter key.
2 Press [User Adjustment].
3 Press [Drum refresh].
4 Press [Drum Refresh 1] or [Drum Refresh 2]. Drum refresh begins.
5 Press [Close] after drum refresh is complete. The display is returned to the System Menu screen.
Item DescriptionDrum Refresh 1 Use this mode when images are blurred or
smeared. Refreshing takes about 160 seconds.Drum Refresh 2 Use this mode when white spots appear on
images. Refreshing takes about 90 seconds.
IMPORTANT To use [Drum Refresh 2], load 11 × 17" or A3 size paper into the MP tray.
When you run [Drum Refresh 2], the machine makes a vibrating sound for about 90 seconds until drum refreshing is completed. The toner soiling on the ejected paper is normal and does not indicate a fault.
System Menu / Counter
User adjustment
refreshDrum
System Menu
CleaningCharger
System Menu
Drum refresh
Refresh the drum when image blur or white spots appear
User adjustment-
DrumRefresh 1
DrumRefresh 2
on the image.
Drum Refresh 1: Printed images are blurred.
and then execute Drum Refresh 2.
Drum Refresh 2: Printed images show white spots.
* Place A3/Ledger paper on the Multi Purpose tray
System Menu 3-25

Printing ReportsYou can print the following reports from the operation panel.
Copy Status Report
Machine Status Report
3-26 System Menu
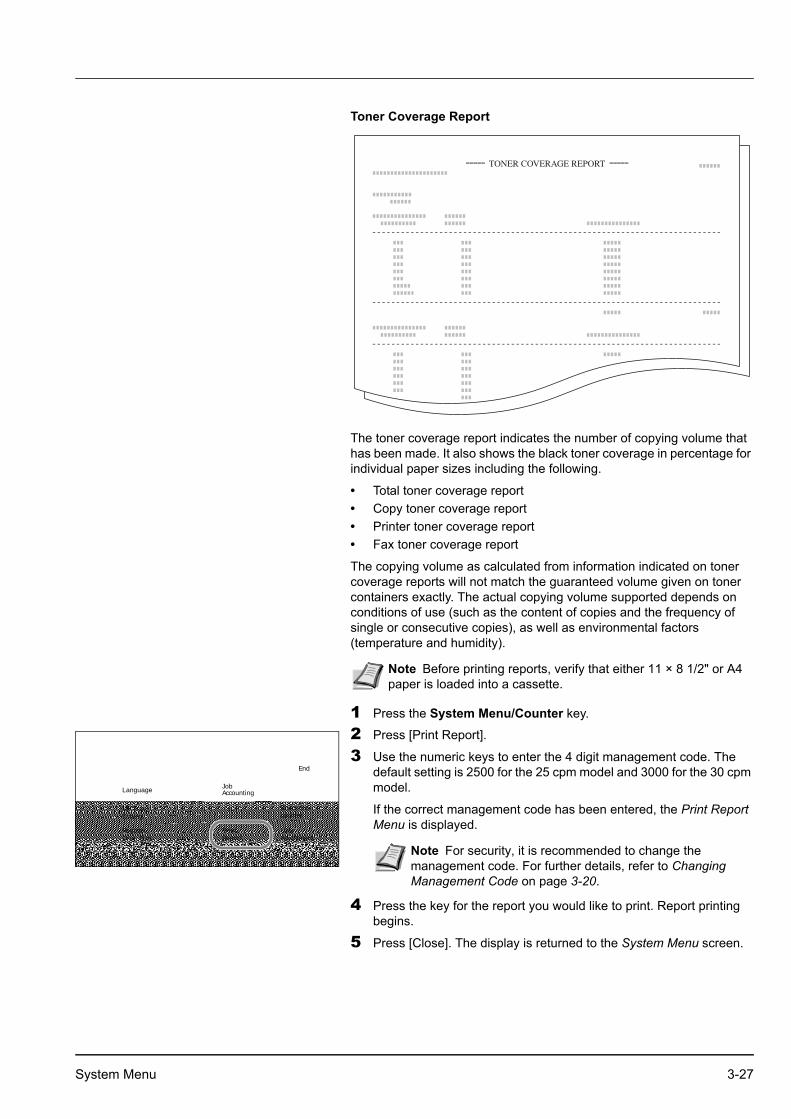
Toner Coverage Report
The toner coverage report indicates the number of copying volume that has been made. It also shows the black toner coverage in percentage for individual paper sizes including the following.
• Total toner coverage report• Copy toner coverage report• Printer toner coverage report• Fax toner coverage report
The copying volume as calculated from information indicated on toner coverage reports will not match the guaranteed volume given on toner containers exactly. The actual copying volume supported depends on conditions of use (such as the content of copies and the frequency of single or consecutive copies), as well as environmental factors (temperature and humidity).
1 Press the System Menu/Counter key.
2 Press [Print Report].
3 Use the numeric keys to enter the 4 digit management code. The default setting is 2500 for the 25 cpm model and 3000 for the 30 cpm model.
If the correct management code has been entered, the Print Report Menu is displayed.
4 Press the key for the report you would like to print. Report printing begins.
5 Press [Close]. The display is returned to the System Menu screen.
Note Before printing reports, verify that either 11 × 8 1/2" or A4 paper is loaded into a cassette.
/ Counter
End
Language Job
MP TraycounterCheck the
Orig. SizeRegister
ReportPrint
AdjustmentUser
Setting
Accounting
Note For security, it is recommended to change the management code. For further details, refer to Changing Management Code on page 3-20.
System Menu 3-27

Checking Total Copy CountCheck the total copy count from the operation panel. You can check the following values.
• Number of copies, number of prints, number of faxes, and total of all of these
• Number of original pages scanned for copy mode and fax send mode, and total of all of these
You can also print this information as a counter report.
Counter Report
1 Press the System Menu/Counter key.
2 Press [Check the counter].
3 The counts are displayed on the touch panel.
To print a counter report, press [Print Report].
To finish checking, press [Close]. The display is returned to the System Menu screen.
Note Before printing reports, verify that either 11 × 8 1/2" or A4 paper is loaded into a cassette.
To use the machine as a printer or fax, you must install the optional printer kit or fax kit.
/ Counter
End
Language Job
MP TraycounterCheck the
Orig. SizeRegister
ReportPrint
AdjustmentUser
Setting
Accounting
3-28 System Menu
4 Job Accounting
This chapter explains how to manage job accounting to share usage among various departments.
Overview of Job Accounting 4-2Managing Accounts 4-4
New Account ........................................................................... 4-4Restricting Usage .................................................................... 4-5Editing Department Information............................................... 4-8Changing Restrictions on Usage............................................. 4-9
Copy Count per Department 4-10Total Job Accounting ............................................................. 4-10Copy Count per Department...................................................4-11
Activating and Deactivating Job Accounting 4-12Job Accounting Default Settings 4-13Using Job Accounting 4-18
Copying ................................................................................. 4-18Printing .................................................................................. 4-18Faxing.................................................................................... 4-18
Job Accounting 4-1

Overview of Job AccountingYou can manage accounting the copy count incurred by individual departments by assigning a unique ID code to each department.
Job accounting helps the following activities in business organizations.
• Integrated management of copier and optional printer functions using the same department ID code.
• Manageability of up to 500 individual departments.• Availability for department ID codes with as many as eight digits
(between 0 and 99999999) for security.• Tracking the copy volume for each department and for all
departments combined.• Restricting the copy count per department in one-page increments
up to 999,999 copies.• Resetting the copy counter for each department or for all
departments combined.• Checking the total count for each department by entering the
department ID code.
Job accounting includes the following functions for managing printing counts.
IMPORTANT To restrict the number of copies using job accounting, you must switch the Copy Job Accounting from [Off] to [On] as the default. If the machine is equipped with the optional printer kit, also activate Printer Job Accounting as the default. Refer to Job Accounting Default Settings on page 4-13 for details.
Setting Description Reference Page
Management Edit New Account: Adds a new department. Up to 500 departments may be added. Delete Account: Deletes the registered departments.Edit Department Information: Changes the name and ID code for the department. Restricting Usage: Changes usage restrictions for each department.
page 4-4
Copy Count per Department
Total Copy Volume: For reading the total copy counts of all departments, printing job accounting reports and resetting the copy counter. Copy count by department: Takes totals for each department and clears counters.
page 4-10
Activating and Deactivating Job Accounting
Set whether to use Job Accounting. page 4-12
Job Accounting Default Settings
Changes the defaults for Job Accounting.
page 4-13
4-2 Job Accounting

Accessing the Job Accounting Screen
Set up Job Accounting from the Job Accounting screen. Follow the steps below to access the Job Accounting screen.
1 Press the System Menu/Counter key.
2 Press [Job Accounting].
3 Use the numeric keys to enter the 4 digit management code. The default setting is 2500 for the 25 cpm model and 3000 for the 30 cpm model.
If the correct code has been entered, the Job Accounting screen will be displayed.
4 Refer to the following configuration items to configure the default settings.
/ Counter
End
Language Job
MP TraycounterCheck the
Orig. SizeRegister
ReportPrint
AdjustmentUser
Setting
Accounting
Note For security, it is recommended to change the management code. For further details, refer to Changing Management Code on page 3-20.
Job Accounting 4-3

Managing AccountsYou can add and delete departments and define restrictions to copy count as needed.
New AccountAdds a new department. The following settings are required.
1 Referring to Accessing the Job Accounting Screen on page 4-3, access the Job Accounting screen.
2 Press [Management Edit].
3 Press [Register].
4 Press [ ] or [ ] to select Account ID and press [Change #].
5 Use the numeric keys to enter the department ID code.
6 Press [Close].
7 Press [ ] or [ ] to select Name to Display and press [Change #].
8 Enter the department name and press [End].
Refer to the Operation Guide for how to enter text characters.
9 When all entries are complete, press [Next].
10Specify restrictions on copying as desired.
Refer to Restricting Usage for how to set usage restrictions.
11Press [Registr.] to finalize settings.
To make settings on another department, press [Register] and repeat steps 4 to 11.
12Press [Close]. The touch panel will return to the Job Accounting screen.
Setting DescriptionDepartment ID Code Set for department ID codes up to 8 digits
long (between 0 and 99999999) for security.Name to display Set the department name using a maximum
of 32 alphanumeric characters. Limit in use Set usage limitation for each of the
copier/printer functions. Refer to Restricting Usage on page 4-5 for setting procedure.
Job Accounting
Each Job
Job Accountg T Register/Sett.
Total Job Management Job AccntgDef. Set.
System Menu
AccountingAccounting Edit
Close
Order of
Mgt. Inf.
Delete
Up
Down
Correction
Register
Limit
divisions division
indication
in use
0001/0003
IMPORTANT An error will occur if you do not complete Account ID and Name to display, and you will not be able to proceed to the next screen. Be sure that you have completed the entries.
An error will occur if you attempt to enter an existing department ID code. You will not be able to proceed to the next screen. Use a different ID code.
4-4 Job Accounting
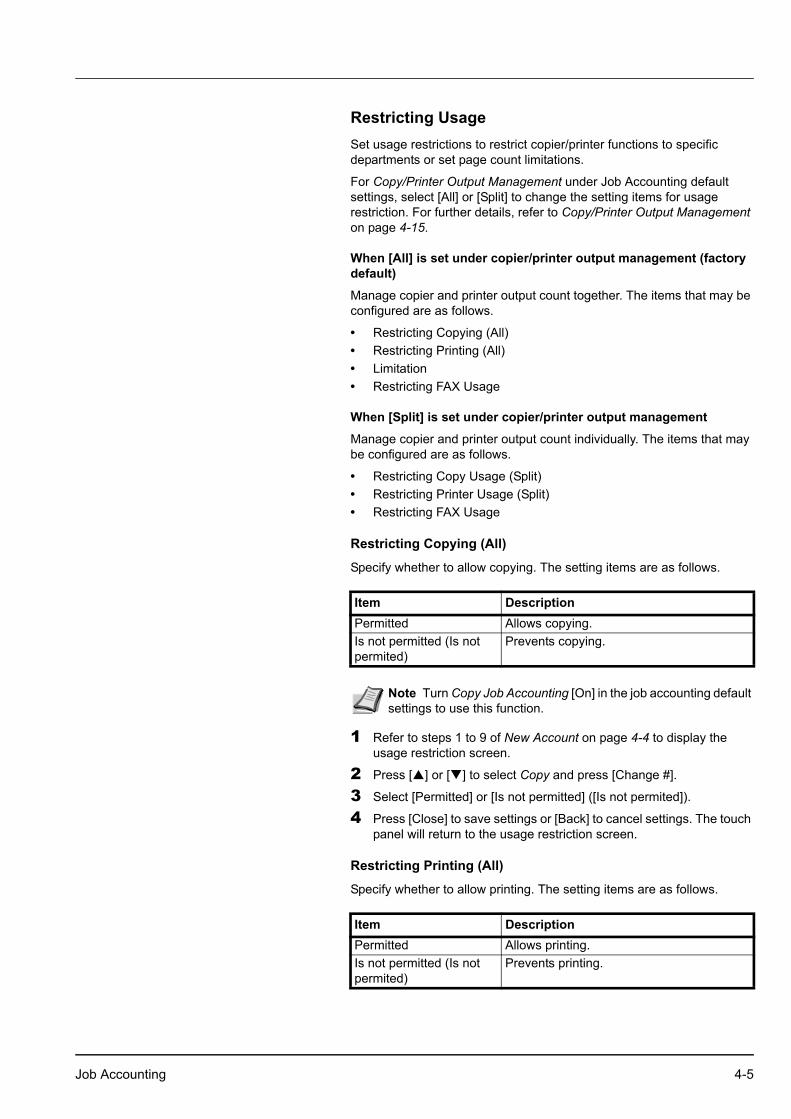
Restricting UsageSet usage restrictions to restrict copier/printer functions to specific departments or set page count limitations.
For Copy/Printer Output Management under Job Accounting default settings, select [All] or [Split] to change the setting items for usage restriction. For further details, refer to Copy/Printer Output Management on page 4-15.
When [All] is set under copier/printer output management (factory default)
Manage copier and printer output count together. The items that may be configured are as follows.
• Restricting Copying (All)• Restricting Printing (All)• Limitation• Restricting FAX Usage
When [Split] is set under copier/printer output management
Manage copier and printer output count individually. The items that may be configured are as follows.
• Restricting Copy Usage (Split)• Restricting Printer Usage (Split)• Restricting FAX Usage
Restricting Copying (All)
Specify whether to allow copying. The setting items are as follows.
1 Refer to steps 1 to 9 of New Account on page 4-4 to display the usage restriction screen.
2 Press [ ] or [ ] to select Copy and press [Change #].
3 Select [Permitted] or [Is not permitted] ([Is not permited]).
4 Press [Close] to save settings or [Back] to cancel settings. The touch panel will return to the usage restriction screen.
Restricting Printing (All)
Specify whether to allow printing. The setting items are as follows.
Item DescriptionPermitted Allows copying. Is not permitted (Is not permited)
Prevents copying.
Note Turn Copy Job Accounting [On] in the job accounting default settings to use this function.
Item DescriptionPermitted Allows printing. Is not permitted (Is not permited)
Prevents printing.
Job Accounting 4-5

1 Refer to steps 1 to 9 of New Account on page 4-4 to display the usage restriction screen.
2 Press [ ] or [ ] to select Printer and press [Change #].
3 Select [Permitted] or [Is not permitted] ([Is not permited]).
4 Press [Close] to save settings or [Back] to cancel settings. The touch panel will return to the usage restriction screen.
Limitation
Sets a limit on the number of copies printed. When the optional printer kit is installed, this limit applies to the total number of pages, including both printed and copied pages. The setting items are as follows.
1 Refer to steps 1 to 9 of New Account on page 4-4 to display the usage restriction screen.
2 Press [ ] or [ ] to select Limitation (All) and press [Change #].
3 Select [No limit] or [Counter limit].
When [Counter limit] is selected, use the numeric keys to enter the page limit.
4 Press [Close] to save settings or [Back] to cancel settings. The touch panel will return to the usage restriction screen.
Restricting FAX Usage
Set limitations for sending faxes. The setting items are as follows.
Note This setting is displayed when the optional printer kit is installed.
Turn Printer Job Accounting [On] in the job accounting default settings to use this function.
Item DescriptionNo limit Do not limit the number of pages used by the
copier and printer functions. Counter limit Limit the total number of pages used by the copier
and printer functions to between 1-999,999 pages (1 page increments).
Note This setting is not displayed in the following situations:
• When [Is not permitted] is selected in both Restricting Copying (All) (refer to page 4-5) and Restricting Printing (All) (refer to page 4-5)
• When [Is not permitted] is selected in Restricting Copying (All) and the optional printer kit is not installed
Item DescriptionNo limit Do not limit the number of pages
transmitted by fax Counter limit Limit the total number of pages sent by fax
to between 1-999,999 pages (1 page increments).
Is not permitted (Is not permited)
Prevents fax transmission.
4-6 Job Accounting

1 Refer to steps 1 to 9 of New Account on page 4-4 to display the usage restriction screen.
2 Press [ ] or [ ] to select FAX TX and press [Change #].
3 Select [No limit], [Counter limit] or [Is not permitted] ([Is not permited]).
When [Counter limit] is selected, use the numeric keys to enter the page limit.
4 Press [Close] to save settings or [Back] to cancel settings. The touch panel will return to the usage restriction screen.
Restricting Copy Usage (Split)
Set the number of sheets to copy. The setting items are as follows.
1 Refer to steps 1 to 9 of New Account on page 4-4 to display the usage restriction screen.
2 Press [ ] or [ ] to select Copy and press [Change #].
3 Select [No limit], [Counter limit] or [Is not permitted] ([Is not permited]).
When [Counter limit] is selected, use the numeric keys to enter the page limit.
4 Press [Close] to save settings or [Back] to cancel settings. The touch panel will return to the usage restriction screen.
Restricting Printer Usage (Split)
Set printer usage restrictions. The setting items are as follows.
Note This setting is displayed when the optional fax kit is installed.
Turn Fax Job Accounting [On] in the job accounting default settings to use this function.
Item DescriptionNo limit Do not limit the number of pages copiedCounter limit Limit the total number of pages copied to
between 1-999,999 pages (1 page increments).
Is not permitted (Is not permited)
Prevents copying.
Note Turn Copy Job Accounting [On] in the job accounting default settings to use this function.
Item DescriptionNo limit Do not limit the number of pages printed. Counter limit Limit the total number of pages printed to
between 1-999,999 pages (1 page increments).
Is not permitted (Is not permited)
Prevents printing.
Job Accounting 4-7

1 Refer to steps 1 to 9 of New Account on page 4-4 to display the usage restriction screen.
2 Press [ ] or [ ] to select Printer and press [Change #].
3 Select [No limit], [Counter limit] or [Is not permitted] ([Is not permited]).
When [Counter limit] is selected, use the numeric keys to enter the page limit.
4 Press [Close] to save settings or [Back] to cancel settings. The touch panel will return to the usage restriction screen.
Deleting AccountsYou can delete the department accounts registered.
1 Referring to Accessing the Job Accounting Screen on page 4-3, access the Job Accounting screen.
2 Press [Management Edit].
3 Select the department ID code to delete and press [Delete].
4 Check the ID code to delete and press [Yes].
5 Press [Close]. The touch panel will return to the Job Accounting screen.
Editing Department InformationChanges the name and ID code registered for the department.
1 Referring to Accessing the Job Accounting Screen on page 4-3, access the Job Accounting screen.
2 Press [Management Edit].
3 Select the department ID code to modify and press [Mgt. Inf. Correction].
Note This setting is displayed when the optional printer kit is installed.
Turn Printer Job Accounting [On] in the job accounting default settings to use this function.
Close
Order of
Mgt. Inf.
Delete
Up
Down
Correction
Register
Limit
divisions division
indication
in use
0001/0003
Note You can change the department display order. Press [Order of indication] and select from [Sort by Code] ([1 9] and [9 1]) and [Sort by Name] ([A Z] and [Z A]).
Note To delete other ID codes, repeat steps 3 and 4.
Close
Order of
Mgt. Inf.
Delete
Up
Down
Correction
Register
Limit
divisions division
indication
in use
0001/0003
Note You can change the department display order. Press [Order of indication] and select from [Sort by Code] ([1 9] and [9 1]) and [Sort by Name] ([A Z] and [Z A]).
4-8 Job Accounting
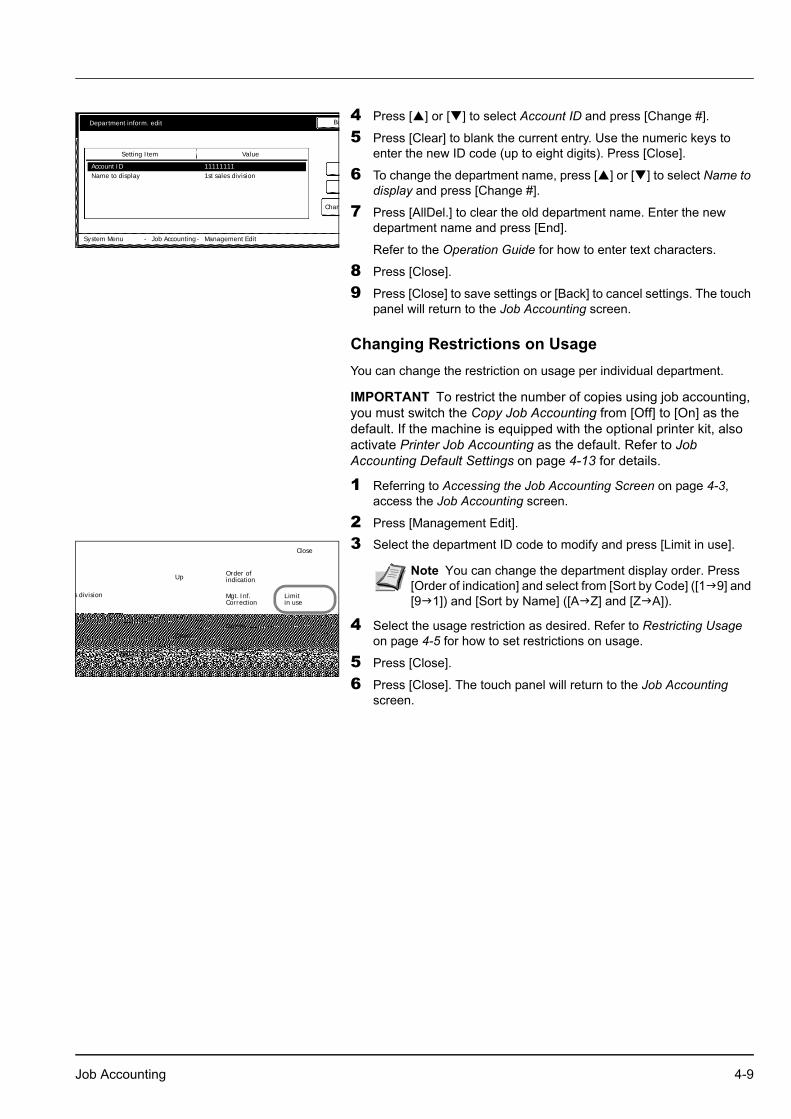
4 Press [ ] or [ ] to select Account ID and press [Change #].
5 Press [Clear] to blank the current entry. Use the numeric keys to enter the new ID code (up to eight digits). Press [Close].
6 To change the department name, press [ ] or [ ] to select Name to display and press [Change #].
7 Press [AllDel.] to clear the old department name. Enter the new department name and press [End].
Refer to the Operation Guide for how to enter text characters.
8 Press [Close].
9 Press [Close] to save settings or [Back] to cancel settings. The touch panel will return to the Job Accounting screen.
Changing Restrictions on UsageYou can change the restriction on usage per individual department.
1 Referring to Accessing the Job Accounting Screen on page 4-3, access the Job Accounting screen.
2 Press [Management Edit].
3 Select the department ID code to modify and press [Limit in use].
4 Select the usage restriction as desired. Refer to Restricting Usage on page 4-5 for how to set restrictions on usage.
5 Press [Close].
6 Press [Close]. The touch panel will return to the Job Accounting screen.
Department inform. edit
System Menu Job Accounting
ValueSetting Item
Account IDName to display 1st sales division
Management Edit
Chan
Ba
- -
11111111.
IMPORTANT To restrict the number of copies using job accounting, you must switch the Copy Job Accounting from [Off] to [On] as the default. If the machine is equipped with the optional printer kit, also activate Printer Job Accounting as the default. Refer to Job Accounting Default Settings on page 4-13 for details.
Close
Order of
Mgt. Inf.
Delete
Up
Down
Correction
Register
Limit
divisions division
indication
in use
0001/0003
Note You can change the department display order. Press [Order of indication] and select from [Sort by Code] ([1 9] and [9 1]) and [Sort by Name] ([A Z] and [Z A]).
Job Accounting 4-9
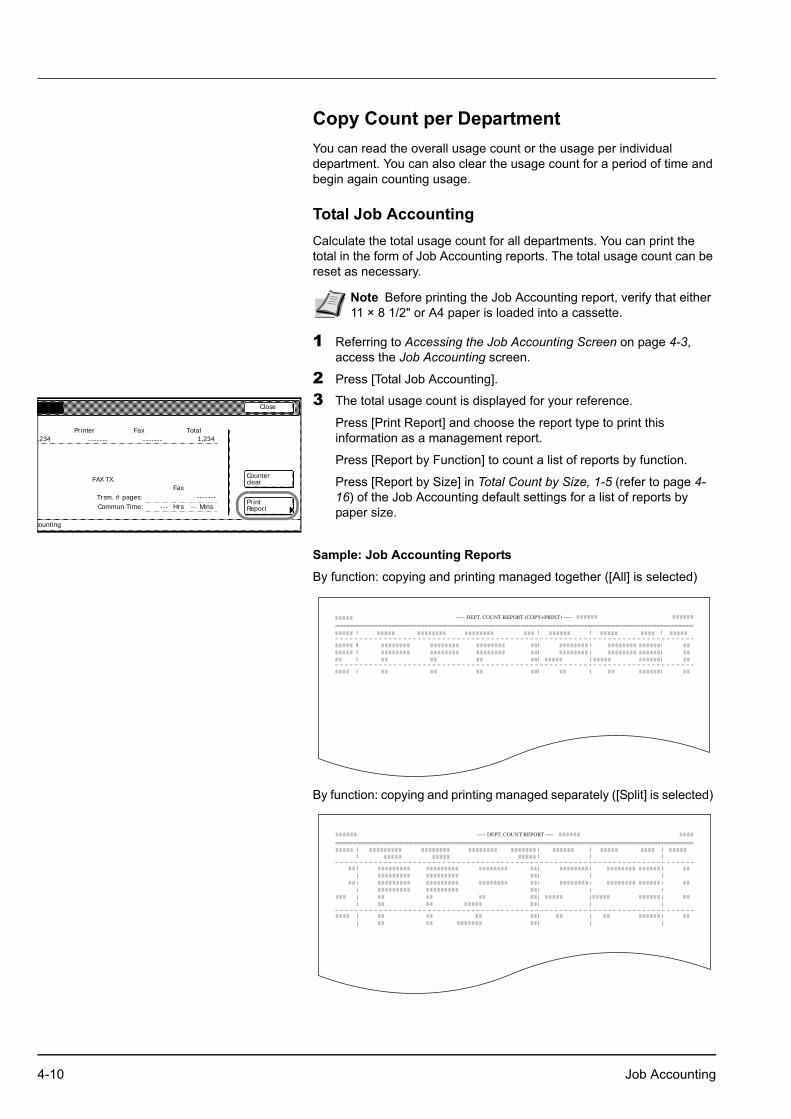
Copy Count per DepartmentYou can read the overall usage count or the usage per individual department. You can also clear the usage count for a period of time and begin again counting usage.
Total Job AccountingCalculate the total usage count for all departments. You can print the total in the form of Job Accounting reports. The total usage count can be reset as necessary.
1 Referring to Accessing the Job Accounting Screen on page 4-3, access the Job Accounting screen.
2 Press [Total Job Accounting].
3 The total usage count is displayed for your reference.
Press [Print Report] and choose the report type to print this information as a management report.
Press [Report by Function] to count a list of reports by function.
Press [Report by Size] in Total Count by Size, 1-5 (refer to page 4-16) of the Job Accounting default settings for a list of reports by paper size.
Sample: Job Accounting Reports
By function: copying and printing managed together ([All] is selected)
By function: copying and printing managed separately ([Split] is selected)
Note Before printing the Job Accounting report, verify that either 11 × 8 1/2" or A4 paper is loaded into a cassette.
Close
Counterclear
Printer Total
counting
PrintReport
Fax,234 .1,234--------------
FAX TX.Fax
-------Trsm. # pages:MinsCommun.Time: --Hrs---
4-10 Job Accounting

By paper size
4 To reset the usage count, press [Counter clear].
5 Press [Yes].
6 Press [Close]. The touch panel will return to the Job Accounting screen.
Copy Count per Department Tracks the copy count per individual department. The copy count per department can be reset as necessary.
1 Referring to Accessing the Job Accounting Screen on page 4-3, access the Job Accounting screen.
2 Press [Each Job Accounting].
3 Select the ID-code of the department and press [Total].
4 The usage count for the selected department is displayed for your reference.
5 To reset the usage count, press [Counter clear].
6 Press [Yes].
7 Press [Close].
8 Press [Close]. The touch panel will return to the Job Accounting screen.
Note Change the type of form to be printed from the Job Accounting default settings in Copy/Printer Output Management (refer to page 4-15).
Close
Order ofUp
Down
Totaldivisions divisions division
indication
0001/0003
Note In the list, ---ETC indicates the number of printouts delivered without entering an ID-code. The printouts include the following documents:
• Various reports• Reports for printing errors• Printouts from computers of which the department ID-
codes are not specified (if Printing from Unregistered Sources (Printer) is enabled in the job accounting default settings)
You can change the department display order. Press [Order of indication] and select from [Sort by Code] ([1 9] and [9 1]) and [Sort by Name] ([A Z] and [Z A]).
System Menu
Each Job Accounting
Print Pg Count
Monochrome:Copy Printer Total
Job Accounting-
.1,234 .1,2-------
FAX TX.Fax
---Trsm. # pages:MCommun.Time: --Hrs---
11111111
Note The copy limitation per department is given in parentheses after the current volume, as in 1,234 (999,999).
Job Accounting 4-11

Activating and Deactivating Job AccountingTurn job accounting on or off as necessary. The setting items are as follows.
1 Referring to Accessing the Job Accounting Screen on page 4-3, access the Job Accounting screen.
2 Select [On] or [Off].
3 Press [Close].
4 Press [End].
When you select [On], the screen for the department ID-code entry is displayed.
When you select [Off], the screen [Basic] screen is displayed.
Setting DescriptionOff Job accounting is deactivated.On Job accounting is activated.
Close
ob
Register/Sett. Job Accountg
Management Job Accntg
On
OffDef. Set.ting Edit
4-12 Job Accounting

Job Accounting Default SettingsChanges the defaults for Job Accounting.
The following items can be configured for Job Accounting default settings.
• Copy Job Accounting...4-13• Printer Job Accounting...4-13• Printer Error Report...4-14• Printing from Unregistered Sources (Printer)...4-14• Copy/Printer Output Management...4-15• Fax Job Accounting...4-15• Response to Unauthorized Requests...4-16• Default Counter Limit Value...4-16• Total Count by Size, 1-5...4-16
Copy Job Accounting
Activate or deactivate Job Accounting for copy jobs. The setting items are as follows.
1 Referring to Accessing the Job Accounting Screen on page 4-3, access the Job Accounting screen.
2 Press [Job Accntg Def. Set.].
3 Press [ ] or [ ] to select Copy Job Accounting and press [Change #].
4 Select [On] or [Off].
5 Press [Close] to save settings or [Back] to cancel settings.
6 Press [Close]. The touch panel will return to the Job Accounting screen.
Printer Job Accounting
Activate or deactivate Job Accounting when the device is used as a printer. The setting items are as follows.
1 Referring to Accessing the Job Accounting Screen on page 4-3, access the Job Accounting screen.
2 Press [Job Accntg Def. Set.].
3 Press [ ] or [ ] to select Print. Job Accounting and press [Change #].
4 Select [On] or [Off].
Setting DescriptionOff Copy Job Accounting is deactivated.On Copy Job Accounting is activated.
Job Accounting
Each Job
Job Accountg T Register/Sett.
Total Job Management Job AccntgDef. Set.
System Menu
AccountingAccounting Edit
Setting DescriptionOff Printer Job Accounting is deactivated.On Printer Job Accounting is activated.
Note This setting is displayed when the optional printer kit is installed.
Job Accounting 4-13

5 Press [Close] to save settings or [Back] to cancel settings.
6 Press [Close]. The touch panel will return to the Job Accounting screen.
Printer Error Report
When you use Job Accounting to manage printing, you can specify whether an error report is printed in case that the user attempts to print using the incorrect department code.
When the user attempts to print using the incorrect department ID code, Account ID mismatch will be displayed and the job will not be printed. Press [GO] to print the error report.
The setting items are as follows.
1 Referring to Accessing the Job Accounting Screen on page 4-3, access the Job Accounting screen.
2 Press [Job Accntg Def. Set.].
3 Press [ ] or [ ] to select Printer error report and press [Change #].
4 Select [On] or [Off].
5 Press [Close] to save settings or [Back] to cancel settings.
6 Press [Close]. The touch panel will return to the Job Accounting screen.
Printing from Unregistered Sources (Printer)
If you use Job Accounting to manage printing, you can authorize or prohibit printing from computers with printer drivers that do not support Job Accounting. The setting items are as follows.
1 Referring to Accessing the Job Accounting Screen on page 4-3, access the Job Accounting screen.
2 Press [Job Accntg Def. Set.].
3 Press [ ] or [ ] to select Other Mgt. reg. (print) and press [Change #].
4 Select [On] or [Off].
Setting DescriptionOff Do not print error report when there is an account
ID mismatch. On Print error report even if there is an account ID
mismatch.
Note This item is displayed when Printer Job Accounting (refer to page 4-13) is set to [On].
Setting DescriptionOff Users cannot print unless their printer driver
supports Job Accounting.On Users can print from computers with printer drivers
that do not support Job Accounting.
Note This item is displayed when Printer Job Accounting (refer to page 4-13) is set to [On].
4-14 Job Accounting
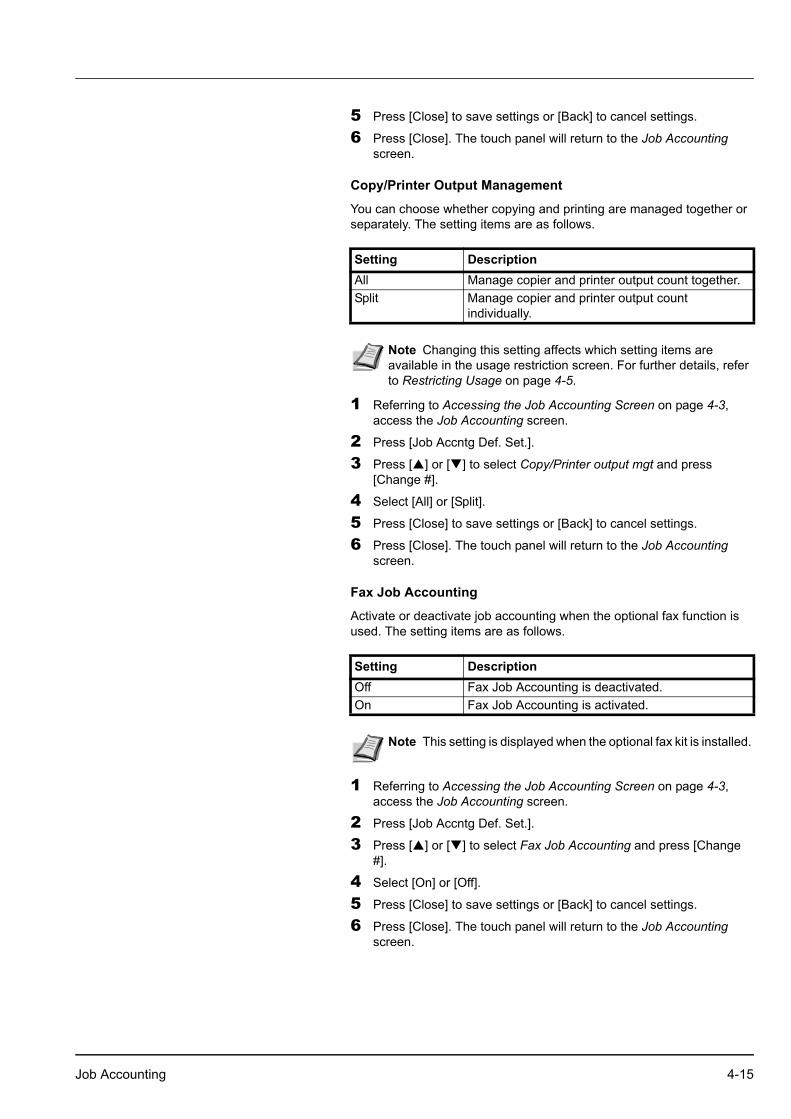
5 Press [Close] to save settings or [Back] to cancel settings.
6 Press [Close]. The touch panel will return to the Job Accounting screen.
Copy/Printer Output Management
You can choose whether copying and printing are managed together or separately. The setting items are as follows.
1 Referring to Accessing the Job Accounting Screen on page 4-3, access the Job Accounting screen.
2 Press [Job Accntg Def. Set.].
3 Press [ ] or [ ] to select Copy/Printer output mgt and press [Change #].
4 Select [All] or [Split].
5 Press [Close] to save settings or [Back] to cancel settings.
6 Press [Close]. The touch panel will return to the Job Accounting screen.
Fax Job Accounting
Activate or deactivate job accounting when the optional fax function is used. The setting items are as follows.
1 Referring to Accessing the Job Accounting Screen on page 4-3, access the Job Accounting screen.
2 Press [Job Accntg Def. Set.].
3 Press [ ] or [ ] to select Fax Job Accounting and press [Change #].
4 Select [On] or [Off].
5 Press [Close] to save settings or [Back] to cancel settings.
6 Press [Close]. The touch panel will return to the Job Accounting screen.
Setting DescriptionAll Manage copier and printer output count together. Split Manage copier and printer output count
individually.
Note Changing this setting affects which setting items are available in the usage restriction screen. For further details, refer to Restricting Usage on page 4-5.
Setting DescriptionOff Fax Job Accounting is deactivated.On Fax Job Accounting is activated.
Note This setting is displayed when the optional fax kit is installed.
Job Accounting 4-15

Response to Unauthorized Requests
Specify the actions when users attempt to copy in excess of the specified copy limitation. The setting items are as follows.
1 Referring to Accessing the Job Accounting Screen on page 4-3, access the Job Accounting screen.
2 Press [Job Accntg Def. Set.].
3 Press [ ] or [ ] to select Apply Limit and press [Change #].
4 Press [Stop job immediately], [Sub-sequently] or [Alert Only].
5 Press [Close] to save settings or [Back] to cancel settings.
6 Press [Close]. The touch panel will return to the Job Accounting screen.
Default Counter Limit Value
Specify the default of usage limitation when registering a new department. Specify between 1-999,999 sheets in 1 sheet increments.
1 Referring to Accessing the Job Accounting Screen on page 4-3, access the Job Accounting screen.
2 Press [Job Accntg Def. Set.].
3 Press [ ] or [ ] to select Def. Val. of coun. Limit and press [Change #].
4 Use the numeric keys to enter the counter limit default value.
5 Press [Close] to save settings or [Back] to cancel settings.
6 Press [Close]. The touch panel will return to the Job Accounting screen.
Total Count by Size, 1-5
You can register specific paper sizes to monitor so that you can check the copy count. You can also register types of paper.
1 Referring to Accessing the Job Accounting Screen on page 4-3, access the Job Accounting screen.
2 Press [Job Accntg Def. Set.].
3 Press [ ] or [ ] to select the number to configure from Total size 1-5 and press [Change #].
Setting RestrictionStop job immediately Restricts usage and stops output
immediately once the maximum usage has been exceeded.
Sub-sequently Continues output or scanning of the current job and restricts usage from the next job.
Alert Only Only a warning message is displayed.
Note Up to five different paper sizes can be registered for keeping track of the copy count.
If you do not specify the media type, the registered paper size will be counted regardless of the type. However, if you register a size without specifying the type as the first entry and register the same size with a type as the second entry, the usage count for the first entry will not include the count of the second entry.
4-16 Job Accounting
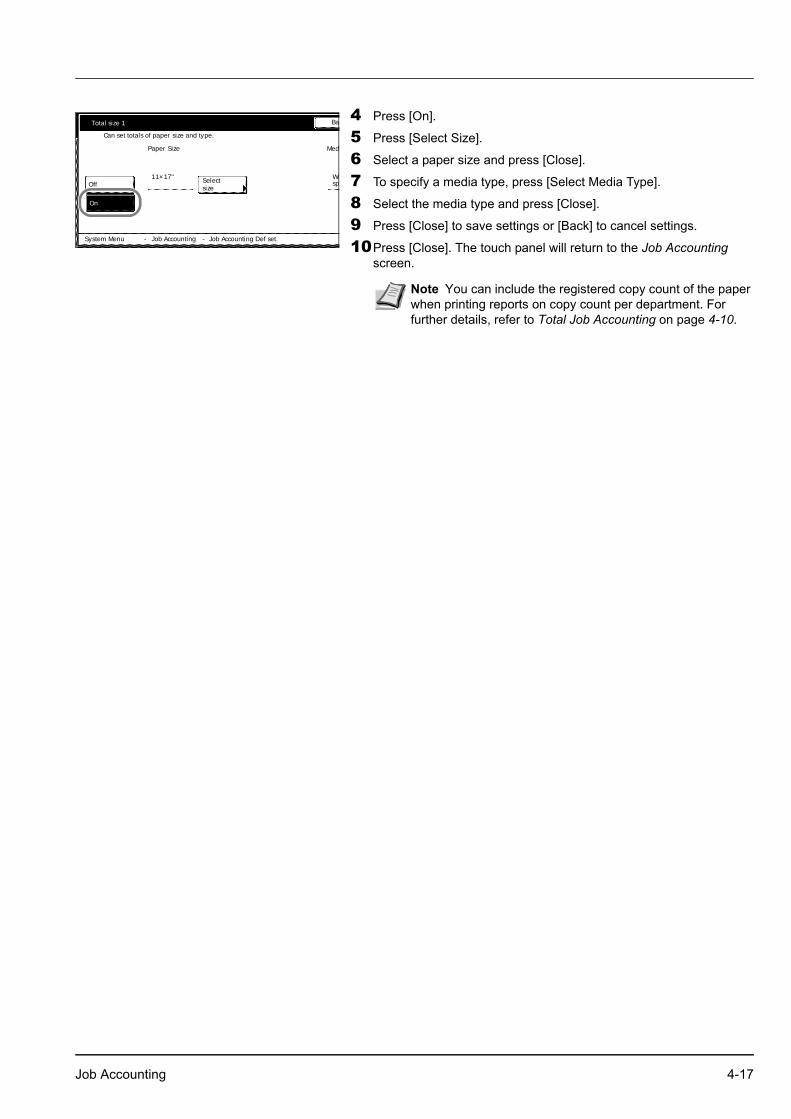
4 Press [On].
5 Press [Select Size].
6 Select a paper size and press [Close].
7 To specify a media type, press [Select Media Type].
8 Select the media type and press [Close].
9 Press [Close] to save settings or [Back] to cancel settings.
10Press [Close]. The touch panel will return to the Job Accounting screen.
Total size 1
Paper Size
Can set totals of paper size and type.
Med
Off
System Menu
11×17"
On
Job Accounting Job Accounting Def set.
Wi
Ba
- -
Select spsize
Note You can include the registered copy count of the paper when printing reports on copy count per department. For further details, refer to Total Job Accounting on page 4-10.
Job Accounting 4-17
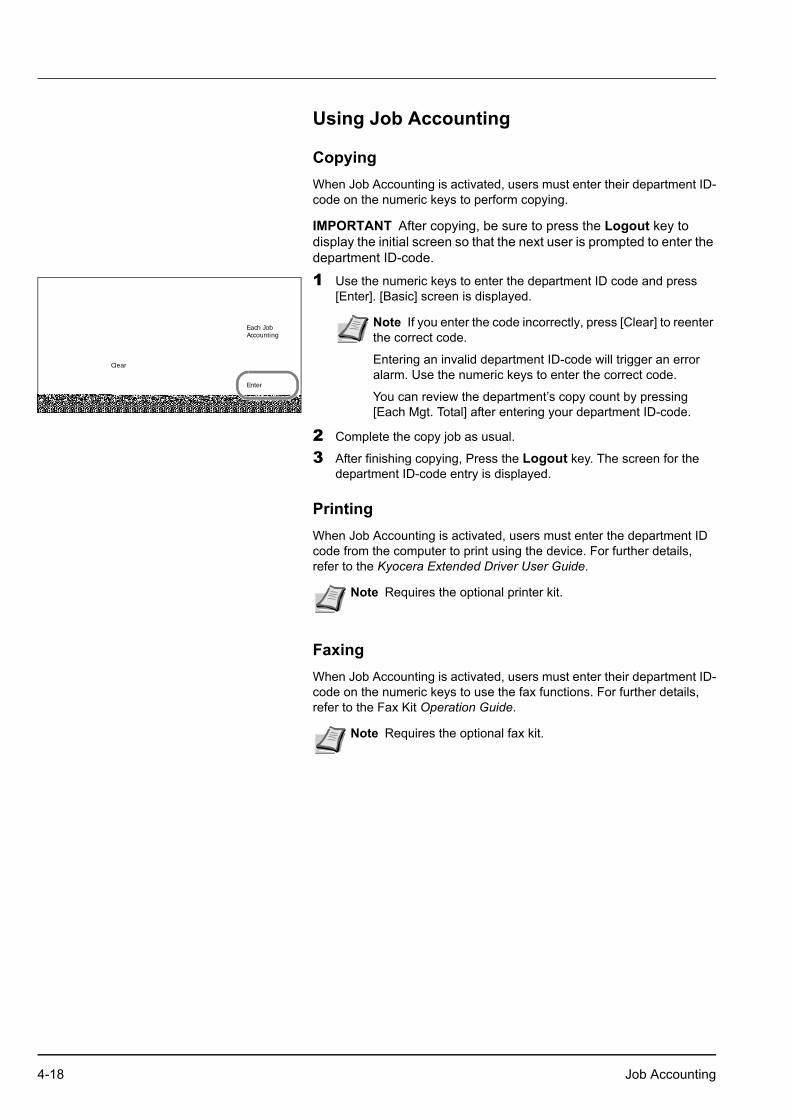
Using Job Accounting
CopyingWhen Job Accounting is activated, users must enter their department ID-code on the numeric keys to perform copying.
1 Use the numeric keys to enter the department ID code and press [Enter]. [Basic] screen is displayed.
2 Complete the copy job as usual.
3 After finishing copying, Press the Logout key. The screen for the department ID-code entry is displayed.
PrintingWhen Job Accounting is activated, users must enter the department ID code from the computer to print using the device. For further details, refer to the Kyocera Extended Driver User Guide.
FaxingWhen Job Accounting is activated, users must enter their department ID-code on the numeric keys to use the fax functions. For further details, refer to the Fax Kit Operation Guide.
IMPORTANT After copying, be sure to press the Logout key to display the initial screen so that the next user is prompted to enter the department ID-code.
Enter
Clear
Each JobAccounting
Note If you enter the code incorrectly, press [Clear] to reenter the correct code.
Entering an invalid department ID-code will trigger an error alarm. Use the numeric keys to enter the correct code.
You can review the department’s copy count by pressing [Each Mgt. Total] after entering your department ID-code.
Note Requires the optional printer kit.
Note Requires the optional fax kit.
4-18 Job Accounting

5 Troubleshooting
This chapter explains how to solve problems when they occur.
Solving Malfunctions 5-2Responding to Error Messages 5-4
Troubleshooting 5-1

Solving MalfunctionsThe table below provides general guidelines for problem solving.
If a problem occurs with your machine, check the checkpoints and perform procedures indicated on the following pages. If the problem persists, contact your Service Representative.
Symptom Checkpoints Corrective Actions Reference PageThe operation panel does not respond when the machine is switched on ( | position).
Is the machine plugged in? Plug the power cord into an AC outlet.
—
Pressing the Start key does not produce copies.
Is a message displayed on the touch panel?
Determine the appropriate response to the message and take action accordingly.
page 5-4
The original size is not detected properly.
Are the originals loaded correctly? When placing originals on the platen, place them face-down and align them with the original size indicator plates.
Refer to Operation Guide, Chapter 2
Place originals face-up in the optional document processor.
Refer to Operation Guide, Chapter 2
Is the machine installed beneath fluorescent lights?
Do not install this machine beneath fluorescent lights.
—
Blank sheets are output. Are the originals loaded correctly? When placing originals on the platen, place them face-down and align them with the original size indicator plates.
Refer to Operation Guide, Chapter 2
Place originals face-up in the optional document processor.
Refer to Operation Guide, Chapter 2
Is the machine installed beneath fluorescent lights?
Do not install this machine beneath fluorescent lights.
—
Copies are too light. Is Auto Density set? Set the correct density for auto density.
page 3-7
Is Manual Density set? Use the density adjustment key to set the correct density.
Refer to Operation Guide, Chapter 3
When changing the default density, adjust the density manually and choose the desired level.
page 3-7
Is the toner distributed evenly within the toner container?
Shake the toner container up and down approximately 10 times.
Refer to Operation Guide, Chapter 5
Is EcoPrint is enabled? Set EcoPrint to [Off]. page 1-28Is there a message indicating the addition of toner?
Replace the toner container. Refer to Operation Guide, Chapter 5
Is the paper damp? Replace the paper with new paper. Refer to Operation Guide, Chapter 2
Copies are too dark. Is Auto Density set? Set the correct density for auto density.
page 3-7
Is Manual Density set? Use the density adjustment key to set the correct density.
Refer to Operation Guide, Chapter 3
When changing the default density, adjust the density manually and choose the desired level.
page 3-7
Copies have a moire pattern (dots grouped together in patterns and not aligned uniformly).
Is the original a printed photograph?
Set the original image to [Photo]. Refer to Operation Guide, Chapter 3
5-2 Troubleshooting
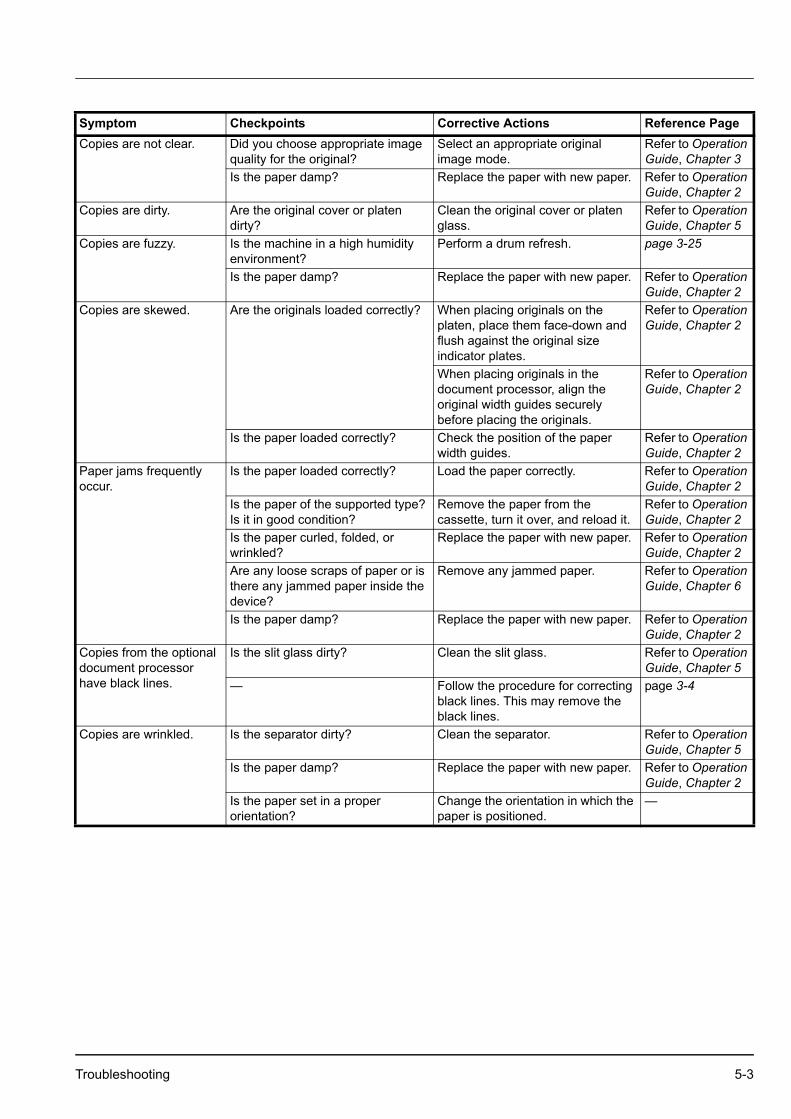
Copies are not clear. Did you choose appropriate image quality for the original?
Select an appropriate original image mode.
Refer to Operation Guide, Chapter 3
Is the paper damp? Replace the paper with new paper. Refer to Operation Guide, Chapter 2
Copies are dirty. Are the original cover or platen dirty?
Clean the original cover or platen glass.
Refer to Operation Guide, Chapter 5
Copies are fuzzy. Is the machine in a high humidity environment?
Perform a drum refresh. page 3-25
Is the paper damp? Replace the paper with new paper. Refer to Operation Guide, Chapter 2
Copies are skewed. Are the originals loaded correctly? When placing originals on the platen, place them face-down and flush against the original size indicator plates.
Refer to Operation Guide, Chapter 2
When placing originals in the document processor, align the original width guides securely before placing the originals.
Refer to Operation Guide, Chapter 2
Is the paper loaded correctly? Check the position of the paper width guides.
Refer to Operation Guide, Chapter 2
Paper jams frequently occur.
Is the paper loaded correctly? Load the paper correctly. Refer to Operation Guide, Chapter 2
Is the paper of the supported type? Is it in good condition?
Remove the paper from the cassette, turn it over, and reload it.
Refer to Operation Guide, Chapter 2
Is the paper curled, folded, or wrinkled?
Replace the paper with new paper. Refer to Operation Guide, Chapter 2
Are any loose scraps of paper or is there any jammed paper inside the device?
Remove any jammed paper. Refer to Operation Guide, Chapter 6
Is the paper damp? Replace the paper with new paper. Refer to Operation Guide, Chapter 2
Copies from the optional document processor have black lines.
Is the slit glass dirty? Clean the slit glass. Refer to Operation Guide, Chapter 5
— Follow the procedure for correcting black lines. This may remove the black lines.
page 3-4
Copies are wrinkled. Is the separator dirty? Clean the separator. Refer to Operation Guide, Chapter 5
Is the paper damp? Replace the paper with new paper. Refer to Operation Guide, Chapter 2
Is the paper set in a proper orientation?
Change the orientation in which the paper is positioned.
—
Symptom Checkpoints Corrective Actions Reference Page
Troubleshooting 5-3
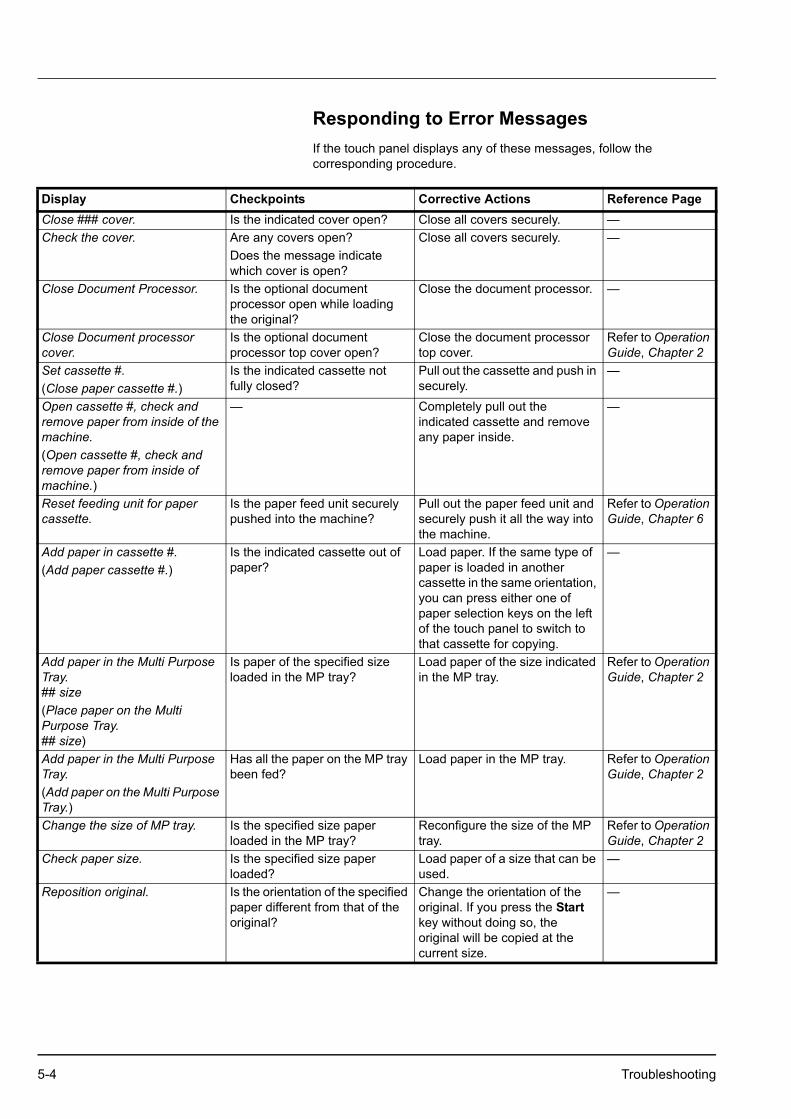
Responding to Error MessagesIf the touch panel displays any of these messages, follow the corresponding procedure.
Display Checkpoints Corrective Actions Reference PageClose ### cover. Is the indicated cover open? Close all covers securely. —Check the cover. Are any covers open?
Does the message indicate which cover is open?
Close all covers securely. —
Close Document Processor. Is the optional document processor open while loading the original?
Close the document processor. —
Close Document processor cover.
Is the optional document processor top cover open?
Close the document processor top cover.
Refer to Operation Guide, Chapter 2
Set cassette #.(Close paper cassette #.)
Is the indicated cassette not fully closed?
Pull out the cassette and push in securely.
—
Open cassette #, check and remove paper from inside of the machine.(Open cassette #, check and remove paper from inside of machine.)
— Completely pull out the indicated cassette and remove any paper inside.
—
Reset feeding unit for paper cassette.
Is the paper feed unit securely pushed into the machine?
Pull out the paper feed unit and securely push it all the way into the machine.
Refer to Operation Guide, Chapter 6
Add paper in cassette #.(Add paper cassette #.)
Is the indicated cassette out of paper?
Load paper. If the same type of paper is loaded in another cassette in the same orientation, you can press either one of paper selection keys on the left of the touch panel to switch to that cassette for copying.
—
Add paper in the Multi Purpose Tray. ## size(Place paper on the Multi Purpose Tray.## size)
Is paper of the specified size loaded in the MP tray?
Load paper of the size indicated in the MP tray.
Refer to Operation Guide, Chapter 2
Add paper in the Multi Purpose Tray.(Add paper on the Multi Purpose Tray.)
Has all the paper on the MP tray been fed?
Load paper in the MP tray. Refer to Operation Guide, Chapter 2
Change the size of MP tray. Is the specified size paper loaded in the MP tray?
Reconfigure the size of the MP tray.
Refer to Operation Guide, Chapter 2
Check paper size. Is the specified size paper loaded?
Load paper of a size that can be used.
—
Reposition original. Is the orientation of the specified paper different from that of the original?
Change the orientation of the original. If you press the Start key without doing so, the original will be copied at the current size.
—
5-4 Troubleshooting

Check paper size. Copy paper is not the same size as original.(Paper size in cassette differs from actual size. Check paper size in cassette.)
Is the specified paper loaded? Or are the settings incorrect?
Load the specified paper. Adjust any settings that are incorrect.
—
Reposition original or change cassette.(Reset original or select another paper cassette.)
Is the orientation of the specified paper different from that of the original?
Change the orientation of the original.
—
Is the machine installed beneath fluorescent lights?
Do not install this machine beneath fluorescent lights.
—
Reset originals in processor. — Remove originals from the optional document processor, stack them uniformly and reset them.
Refer to Operation Guide, Chapter 2
Reset all originals in processor.(Reset originals in processor.)
— Remove originals from the optional document processor, and reset them in the original order.
Refer to Operation Guide, Chapter 2
Reset all originals in Document Processor.(Reset originals in Document Processor.)
Are there any originals left in the optional document processor?
Remove all originals in the optional document processor.
—
Cannot copy this paper type. Can the specified copy functions be used with the selected media type?
Select another type of media. —
Cannot staple this paper type. Did you select a media type that cannot be stapled?
Select another type of media. Refer to the optional Document Finisher Operation Guide.
Cannot offset this paper size. Is a paper size not supported by Offset mode (11 × 17", 8 1/2 × 14", 5 1/2 × 8 1/2", A3, B4, A5R, B6R, Folio, 8K) loaded?
Change the paper size. page 1-9
Cannot staple this size.(Cannot staple this paper size.)
Is stapling available for the size of the loaded paper?
Change the paper size. Refer to Operation Guide, Chapter 7Refer to the optional Document Finisher Operation Guide.
Cannot staple. ## :maximum capacity (Staple)(Cannot staple.## :Max. staples)
Is the maximum page quantity for stapling exceeded?
Decrease the number of sheets to be stapled to less than the maximum staple sheet count.
Refer to Operation Guide, Chapter 7Refer to the optional Document Finisher Operation Guide.
The top tray is full of paper.Remove paper, and press Start key.
During copying, is the maximum capacity of the top tray exceeded?
Remove some pages from the top tray and press the Start key. Printing continues.
—
The top tray is full of paper.Remove paper, and press Continue key.
During printing, is the maximum capacity of the top tray exceeded?
Remove some pages from the top tray and press [Continue]. Printing continues.
—
Display Checkpoints Corrective Actions Reference Page
Troubleshooting 5-5

Paper capacity exceeded. (Finisher)Remove paper, and press Start key.
During copying, is the maximum capacity of the optional document finisher output tray exceeded?
Remove some pages from the optional document finisher and press the Start key. Printing continues.
—
Paper capacity exceeded. (Finisher)Remove paper, and press Continue key.
During printing, is the maximum capacity of the optional document finisher output tray exceeded?
Remove some pages from the optional document finisher and press [Continue]. Printing continues.
—
Remove paper. Finisher tray. Is the maximum capacity of the optional document finisher output tray exceeded?
Remove some pages from the optional document finisher.
—
These functions cannot be combined.
Have you selected functions that cannot be used together?
Check the settings. —
Exceeds pre registered copying quantity.(Copy limit for this ID-code has been reached.No copying possible.)
Is the maximum limit for copying as specified in Job Accounting mode exceeded?
The copy volume has been reached the set limit of your department. No additional copying is possible. Clear the copy count in Job Accounting.
page 4-11
Insert key counter. Is the optional key counter inserted correctly?
Insert the optional key counter securely and completely.
—
Memory full. — The current copy cannot be processed because there is no more copy memory free space, or the number of original pages exceeded the maximum 999 pages. When the following message is displayed select the resolution method. [Cancel]: Cancels copying. [Continue]: Copies up to the last scanned page.
—
Toner will be empty soon. — The toner container will need to be replaced soon. Prepare the replacement toner container.
Refer to Operation Guide, Chapter 5
Ready to copy.Add toner.
— Remaining toner is low, so only one page may be printed at a time. Prepare the replacement toner container.
Refer to Operation Guide, Chapter 5
Add toner. — Replace the toner container. Refer to Operation Guide, Chapter 5
Set the toner container. Is the toner container securely installed?
Open the front cover and pull the toner container out. Shake the container well and set back in place.
Refer to Operation Guide, Chapter 5
Clean the main charger. Have you cleaned the main charger?
Clean the main charger after replacing the toner container. After cleaning, press [End]. Adjustment begins. Wait 5 minutes.
Refer to Operation Guide, Chapter 5
Image cycle.(Now adding toner.)
— Toner replenishment is in progress. Wait until the process is completed.
—
Please wait.Now in the fusing temperature adjustment process
— Performing internal maintenance. Wait until the process is completed.
—
Display Checkpoints Corrective Actions Reference Page
5-6 Troubleshooting
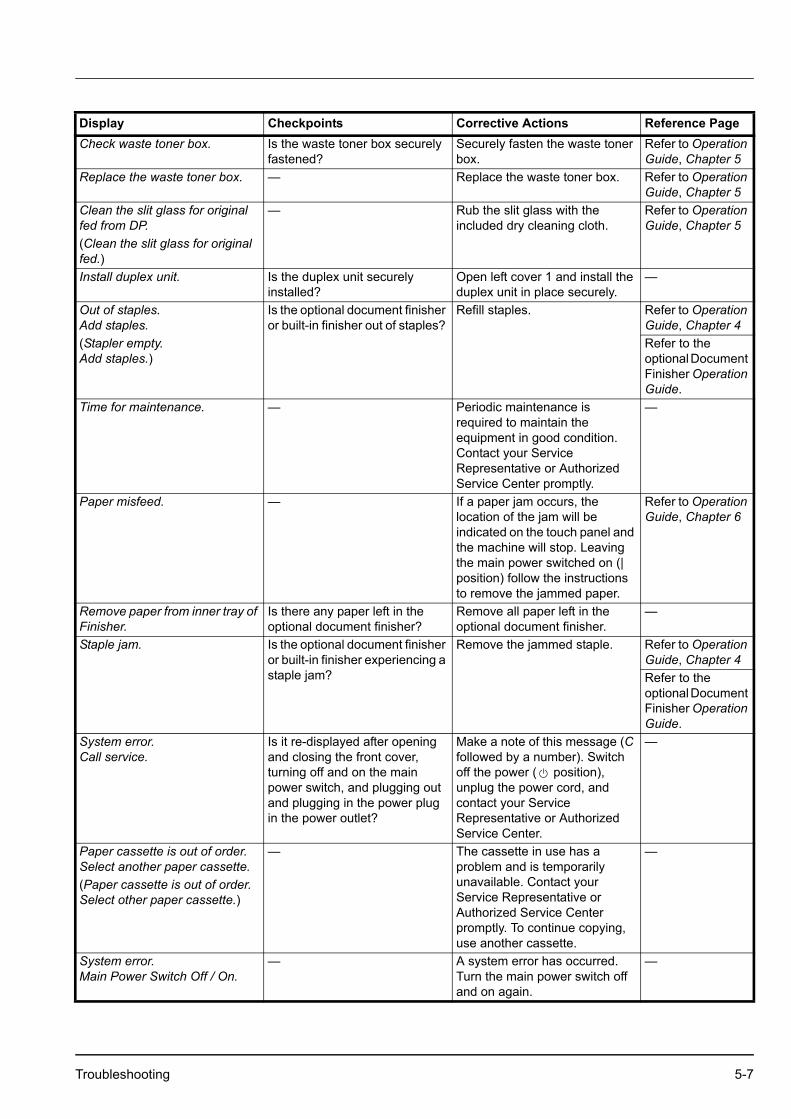
Check waste toner box. Is the waste toner box securely fastened?
Securely fasten the waste toner box.
Refer to Operation Guide, Chapter 5
Replace the waste toner box. — Replace the waste toner box. Refer to Operation Guide, Chapter 5
Clean the slit glass for original fed from DP. (Clean the slit glass for original fed.)
— Rub the slit glass with the included dry cleaning cloth.
Refer to Operation Guide, Chapter 5
Install duplex unit. Is the duplex unit securely installed?
Open left cover 1 and install the duplex unit in place securely.
—
Out of staples.Add staples.(Stapler empty.Add staples.)
Is the optional document finisher or built-in finisher out of staples?
Refill staples. Refer to Operation Guide, Chapter 4Refer to the optional Document Finisher Operation Guide.
Time for maintenance. — Periodic maintenance is required to maintain the equipment in good condition. Contact your Service Representative or Authorized Service Center promptly.
—
Paper misfeed. — If a paper jam occurs, the location of the jam will be indicated on the touch panel and the machine will stop. Leaving the main power switched on (| position) follow the instructions to remove the jammed paper.
Refer to Operation Guide, Chapter 6
Remove paper from inner tray of Finisher.
Is there any paper left in the optional document finisher?
Remove all paper left in the optional document finisher.
—
Staple jam. Is the optional document finisher or built-in finisher experiencing a staple jam?
Remove the jammed staple. Refer to Operation Guide, Chapter 4Refer to the optional Document Finisher Operation Guide.
System error.Call service.
Is it re-displayed after opening and closing the front cover, turning off and on the main power switch, and plugging out and plugging in the power plug in the power outlet?
Make a note of this message (C followed by a number). Switch off the power ( position), unplug the power cord, and contact your Service Representative or Authorized Service Center.
—
Paper cassette is out of order.Select another paper cassette.(Paper cassette is out of order.Select other paper cassette.)
— The cassette in use has a problem and is temporarily unavailable. Contact your Service Representative or Authorized Service Center promptly. To continue copying, use another cassette.
—
System error.Main Power Switch Off / On.
— A system error has occurred. Turn the main power switch off and on again.
—
Display Checkpoints Corrective Actions Reference Page
Troubleshooting 5-7
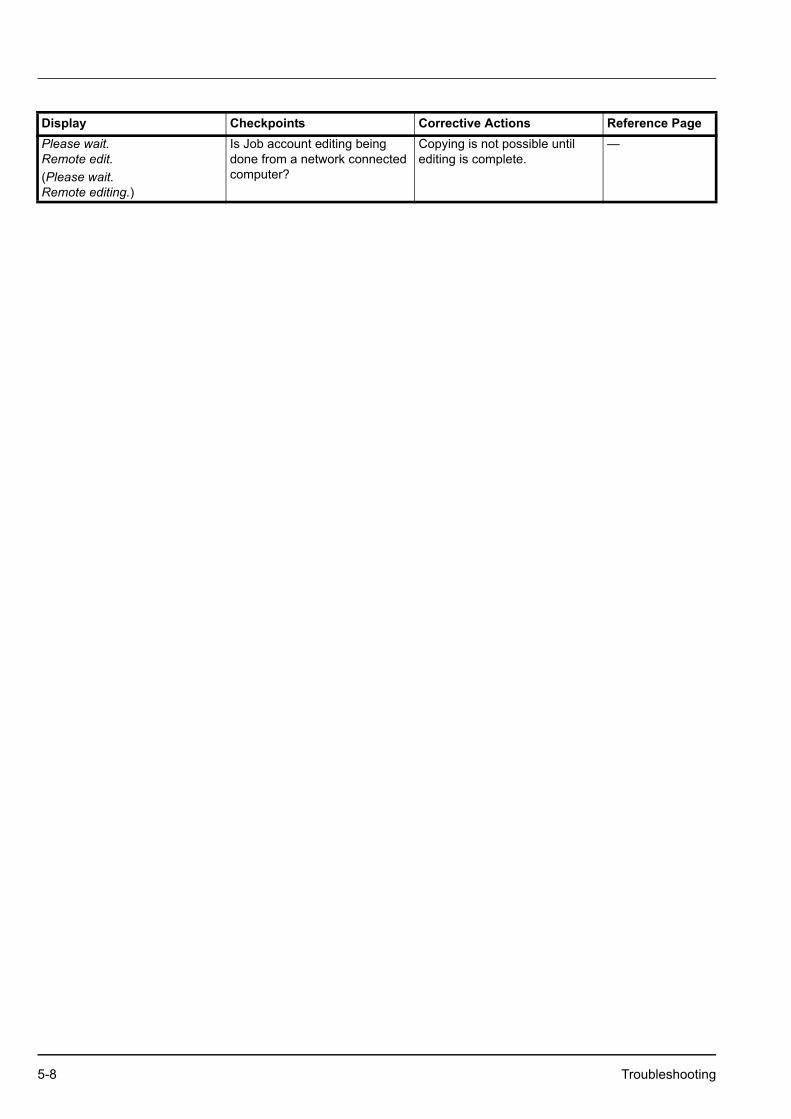
Please wait.Remote edit.(Please wait.Remote editing.)
Is Job account editing being done from a network connected computer?
Copying is not possible until editing is complete.
—Display Checkpoints Corrective Actions Reference Page
5-8 Troubleshooting

6 Appendix
This chapter covers the following topics.
Paper 6-2Basic Paper Specifications ...................................................... 6-2Choosing the Appropriate Paper ............................................. 6-3Special Paper .......................................................................... 6-6
Intercompatibility of Functions 6-10Glossary 6-15
Appendix 6-1
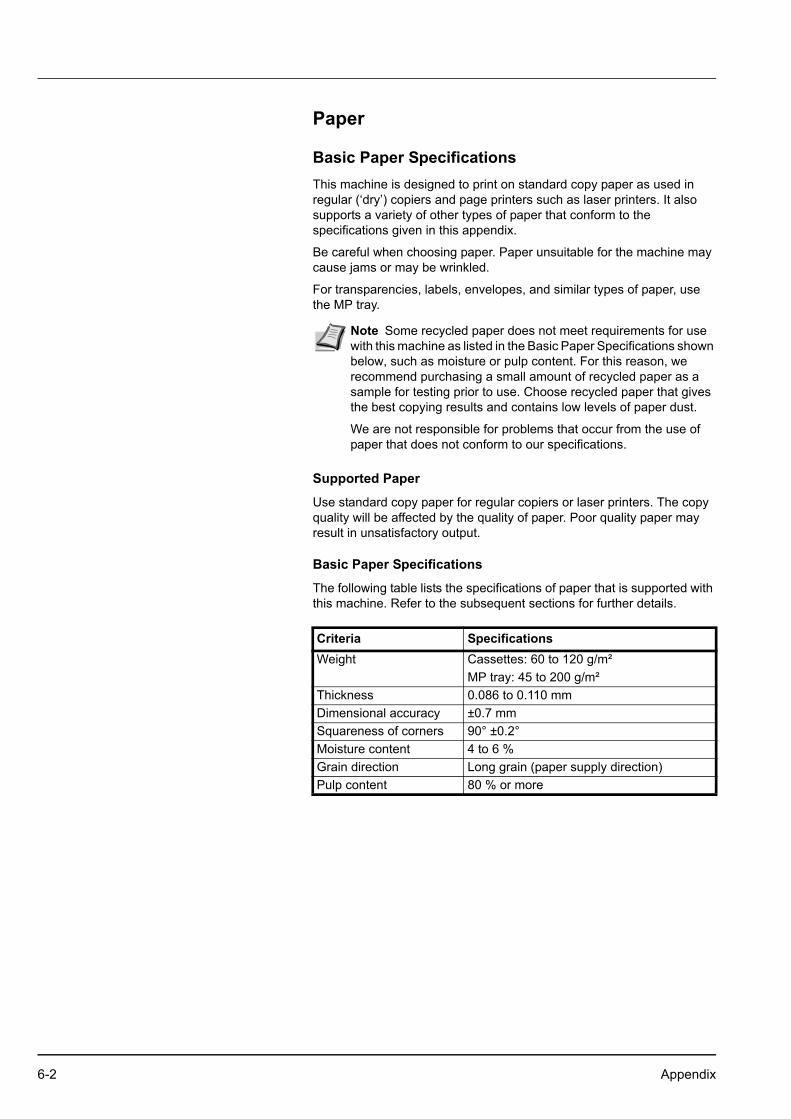
Paper
Basic Paper SpecificationsThis machine is designed to print on standard copy paper as used in regular (‘dry’) copiers and page printers such as laser printers. It also supports a variety of other types of paper that conform to the specifications given in this appendix.
Be careful when choosing paper. Paper unsuitable for the machine may cause jams or may be wrinkled.
For transparencies, labels, envelopes, and similar types of paper, use the MP tray.
Supported Paper
Use standard copy paper for regular copiers or laser printers. The copy quality will be affected by the quality of paper. Poor quality paper may result in unsatisfactory output.
Basic Paper Specifications
The following table lists the specifications of paper that is supported with this machine. Refer to the subsequent sections for further details.
Note Some recycled paper does not meet requirements for use with this machine as listed in the Basic Paper Specifications shown below, such as moisture or pulp content. For this reason, we recommend purchasing a small amount of recycled paper as a sample for testing prior to use. Choose recycled paper that gives the best copying results and contains low levels of paper dust.
We are not responsible for problems that occur from the use of paper that does not conform to our specifications.
Criteria SpecificationsWeight Cassettes: 60 to 120 g/m²
MP tray: 45 to 200 g/m²Thickness 0.086 to 0.110 mmDimensional accuracy ±0.7 mmSquareness of corners 90° ±0.2°Moisture content 4 to 6 %Grain direction Long grain (paper supply direction)Pulp content 80 % or more
6-2 Appendix

Choosing the Appropriate PaperThis section describes guidelines for choosing paper.
Condition
Avoid using paper with bent corners or that is curled, dirty, or torn. Do not use paper that has a rough surface or paper fiber lint, or that is especially delicate. Use of paper in any of these conditions will not only deliver poor copies but may also cause jams and shorten the useful life of the machine. Choose paper with a smooth and even surface; however, avoid coated paper or paper with a treated surface as it may damage the drum or fusing unit.
Ingredient
Do not use paper such as paper that has been coated or surface-treated or paper that contains plastic or carbon. These types of paper may produce harmful fumes from the heat of copying and may damage the drum.
Be sure to use plain paper that contains at least 80 % pulp, i.e., not more than 20 % of the total paper content consists of cotton or other fibers.
Supported Paper Sizes
Paper of the following sizes is supported by the cassettes and MP tray.
Measurements in the table take into account a ±0.7-mm dimensional accuracy for length and width. Corner angles must be 90° ±0.2°.
MP Tray Cassette or MP TrayB6R (128 × 182 mm) A3 (297 × 420 mm)Postcard (100 × 148 mm) B4 (257 × 364 mm)Return postcard (148 × 200 mm) A4 (297 × 210 mm)Executive (7 1/4 × 10 1/2") A4R (210 × 297 mm)Envelope DL (110 × 220 mm) B5 (257 × 182 mm)Envelope C5 (162 × 229 mm) B5R (182 × 257 mm)Envelope C4 (229 × 324 mm) A5R (148 × 210 mm)ISO B5 (176 × 250 mm) Folio (210 × 330 mm)Comm. #10 (4 1/8 × 9 1/2") 11 × 17"Comm. #9 (3 7/8 × 8 7/8") 8 1/2 × 14"Comm. #6-3/4 (3 5/8 × 6 1/2") 11 × 8 1/2"Monarch (3 7/8 × 7 1/2") 8 1/2 × 11"YOUKEI 2 (114 × 162 mm) 5 1/2 × 8 1/2"YOUKEI 4 (105 × 235 mm) 8 1/2 × 13" (Oficio II)Input size(3 7/8 × 5 7/8" to 11 5/8 × 17")(98 × 148 to 297 × 432 mm)
8 1/2 × 13 1/2"8K (273 × 394 mm)16K (273 × 197 mm)16KR (197 × 273 mm)
Appendix 6-3

Smoothness
The paper surface should be smooth, but it must be uncoated. With paper that is too smooth and slippery, several sheets may accidentally be supplied at once, causing jams.
Basis Weight
In countries that use the metric system, basis weight is the weight in grams of one sheet of paper one square meter in area. In the United States, basis weight is the weight in pounds of one ream (500 sheets) of paper cut to the standard size (or trade size) for a specific grade of paper. Paper that is too heavy or too light may be supplied incorrectly or cause paper jams, which may cause excessive wear to the machine. Mixed paper weight (i.e., thickness) may cause several sheets to be supplied at once accidentally and may also cause blurring or other copying problems if the toner fails to adhere correctly.
The recommended basis weight is between 60 and 120 g/m² (16 and 31.5 lb/ream) for the cassettes and between 45 and 200 g/m² (12 and 53 lb/ream) for the MP tray.
Thickness
Avoid using paper that is too thick or thin. Signs that paper may be too thin include frequent problems with paper jams or with several sheets being supplied at once. Paper jams may also indicate that the paper is too thick. The proper thickness is between 0.086 and 0.110 mm.
Moisture Content
Paper moisture content is the ratio of moisture to dryness expressed as a percentage. Moisture affects how the paper is supplied, the electrostatic chargeability of the paper, and how the toner adheres.
Paper moisture content varies depending on the relative humidity in the room. High relative humidity causes paper to become damp, making the edges expand so it appears wavy. Low relative humidity causes paper to lose moisture, making the edges tighten and weakening copy contrast.
Wavy or tight edges may cause the paper to slip when it is supplied. Try to keep the moisture content between 4 to 6 %.
To maintain the right level of moisture content, bear in mind the following considerations.
• Store paper in a cool, well-ventilated place. • Store paper flat and unopened in the package. Once the package is
opened, reseal it if the paper is not to be used for a while. • Store paper sealed in the original package and box. Put a pallet
under the carton to keep it raised above the floor. Especially during rainy seasons keep the paper a sufficient distance away from wooden or concrete floors.
• Before using paper that has been stored, keep it at the proper moisture level for at least 48 hours.
• Do not store paper where it is exposed to heat, sunlight, or dampness.
6-4 Appendix

Paper Grain
Paper is cut into sheets either with the grain running parallel to the length (long grain) or with the grain parallel to the width (short grain). Avoid using short-grain paper because it may be supplied incorrectly; use long-grain paper.
Other Paper Specifications
Porosity: The density of the paper fibers.
Stiffness: Paper must be stiff enough or it may buckle in the machine, causing jams.
Curl: Most paper naturally tends to curl in one direction after the package is opened. When paper passes through the fixing unit, it curls upward slightly. To deliver flat printouts, load the paper so that the curl faces towards the bottom of the paper tray.
Static electricity: During copying, paper is electrostatically charged so that the toner adheres. Choose paper that can be discharged quickly so that copies do not cling together.
Whiteness: Paper whiteness affects copy contrast. Use whiter paper for sharper, brighter copies.
Quality: Machine problems may occur if sheet sizes are not uniform or if corners are not square, edges are rough, sheets are uncut, or edges or corners are crushed. In order to prevent these problems, be especially careful when you cut the paper yourself.
Packaging: Choose paper that is properly packaged and stacked in boxes. Ideally, the packaging itself should have been treated with a coating to inhibit moisture.
Specially treated paper: We do not recommend copying onto the following types of paper, even if it conforms to the basic specifications. When you use these kinds of paper, purchase a small amount first as a sample to test.
• Glossy paper • Watermarked paper • Paper with an uneven surface • Perforated paper
Appendix 6-5
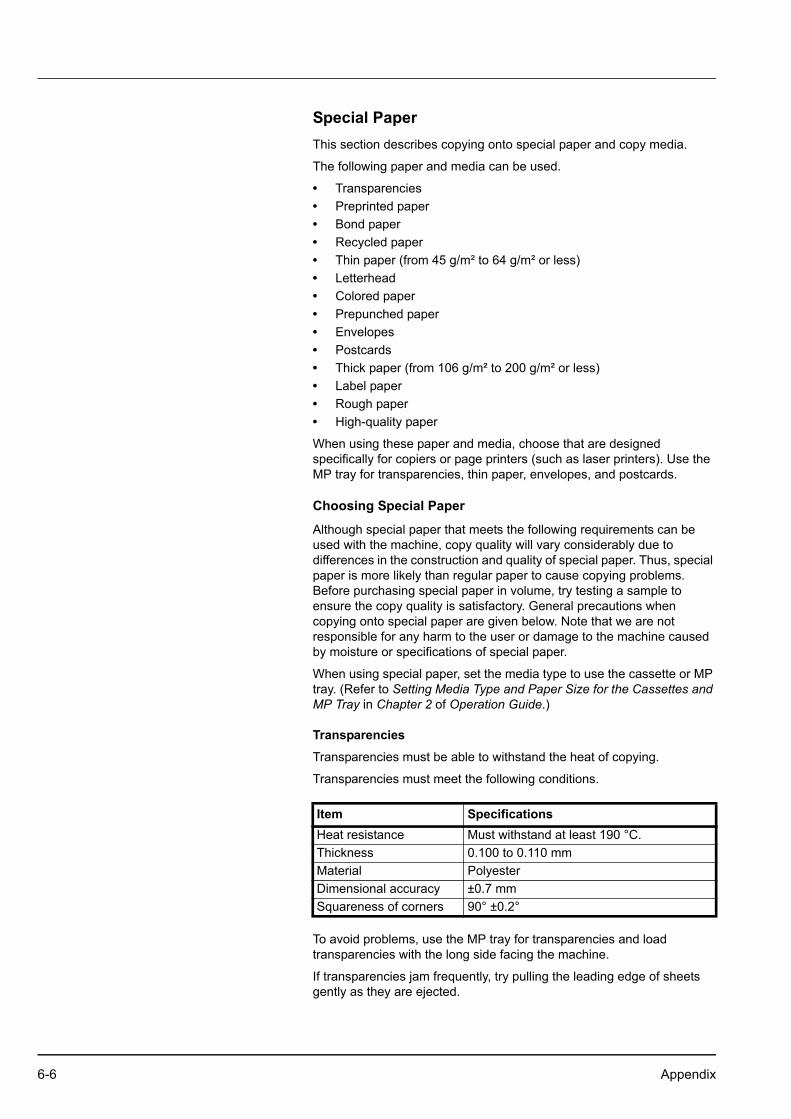
Special PaperThis section describes copying onto special paper and copy media.
The following paper and media can be used.
• Transparencies • Preprinted paper• Bond paper• Recycled paper• Thin paper (from 45 g/m² to 64 g/m² or less)• Letterhead• Colored paper• Prepunched paper• Envelopes • Postcards• Thick paper (from 106 g/m² to 200 g/m² or less)• Label paper• Rough paper• High-quality paper
When using these paper and media, choose that are designed specifically for copiers or page printers (such as laser printers). Use the MP tray for transparencies, thin paper, envelopes, and postcards.
Choosing Special Paper
Although special paper that meets the following requirements can be used with the machine, copy quality will vary considerably due to differences in the construction and quality of special paper. Thus, special paper is more likely than regular paper to cause copying problems. Before purchasing special paper in volume, try testing a sample to ensure the copy quality is satisfactory. General precautions when copying onto special paper are given below. Note that we are not responsible for any harm to the user or damage to the machine caused by moisture or specifications of special paper.
When using special paper, set the media type to use the cassette or MP tray. (Refer to Setting Media Type and Paper Size for the Cassettes and MP Tray in Chapter 2 of Operation Guide.)
Transparencies
Transparencies must be able to withstand the heat of copying.
Transparencies must meet the following conditions.
To avoid problems, use the MP tray for transparencies and load transparencies with the long side facing the machine.
If transparencies jam frequently, try pulling the leading edge of sheets gently as they are ejected.
Item SpecificationsHeat resistance Must withstand at least 190 °C.Thickness 0.100 to 0.110 mmMaterial PolyesterDimensional accuracy ±0.7 mmSquareness of corners 90° ±0.2°
6-6 Appendix
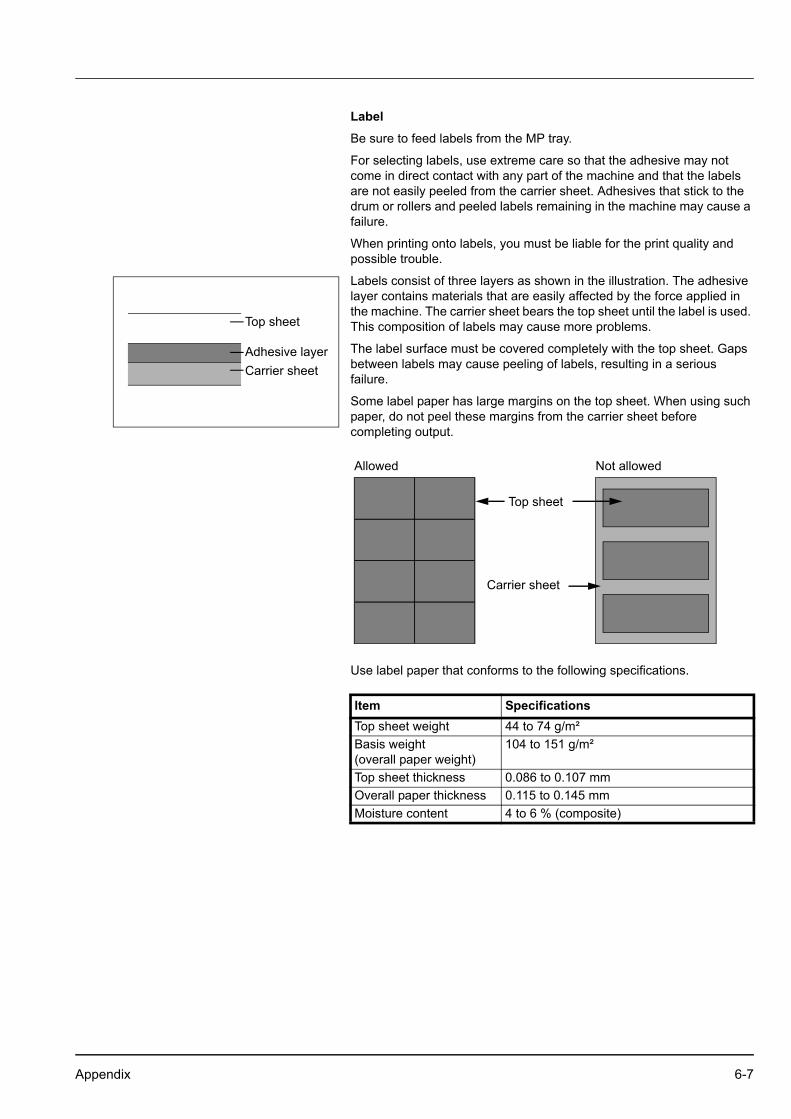
Label
Be sure to feed labels from the MP tray.
For selecting labels, use extreme care so that the adhesive may not come in direct contact with any part of the machine and that the labels are not easily peeled from the carrier sheet. Adhesives that stick to the drum or rollers and peeled labels remaining in the machine may cause a failure.
When printing onto labels, you must be liable for the print quality and possible trouble.
Labels consist of three layers as shown in the illustration. The adhesive layer contains materials that are easily affected by the force applied in the machine. The carrier sheet bears the top sheet until the label is used. This composition of labels may cause more problems.
The label surface must be covered completely with the top sheet. Gaps between labels may cause peeling of labels, resulting in a serious failure.
Some label paper has large margins on the top sheet. When using such paper, do not peel these margins from the carrier sheet before completing output.
Use label paper that conforms to the following specifications.
Top sheet
Adhesive layerCarrier sheet
Top sheet
Not allowedAllowed
Carrier sheet
Item SpecificationsTop sheet weight 44 to 74 g/m²Basis weight (overall paper weight)
104 to 151 g/m²
Top sheet thickness 0.086 to 0.107 mmOverall paper thickness 0.115 to 0.145 mmMoisture content 4 to 6 % (composite)
Appendix 6-7

Postcards
Before loading postcards into the MP tray, fan them and align the edges. If the postcard paper is curled, straighten it before loading. Copying onto curled postcards may cause jams.
Do not use perforated return postcards.
Some postcards may still have rough edges on the back side caused by a paper cutter. Remove any such rough edges by placing the postcards on a flat surface and rubbing the edges gently a few times with a ruler.
Envelopes
Use the MP tray for envelopes.
Due to the structure of envelopes, copying evenly over the entire surface may not be possible in some cases. Thin envelopes in particular may be wrinkled by the machine in some cases as they pass through it. Before purchasing envelopes in volume, try testing a sample to ensure the copy quality.
Storing envelopes for a long period may cause them to become wrinkled. Thus, keep the package sealed until you are ready to use them.
Keep the following points in mind.
Do not use envelopes with exposed adhesive. In addition, do not use the type of envelope in which the adhesive is exposed after the top layer is peeled off. Serious damage may be caused if the paper covering the adhesive comes off in the machine.
Do not use envelopes with certain special features. For example, do not use envelopes with a grommet for winding a string to close the flap or envelopes with an open or film-covered window.
If paper jams occur, load fewer envelopes at once.
To prevent paper jams when copying onto multiple envelopes, do not allow more than ten envelopes to remain in the top tray at once.
Rough edge
Rough edge
6-8 Appendix

Thick Paper
Before loading thick paper in the MP tray, fan it and align the edges. Some thick paper may still have rough edges caused by a paper cutter on the back side. Remove any such rough edges just as with Postcards by placing the paper on a flat surface and rubbing the edges gently a few times with a ruler. Copying onto paper with rough edges may cause jams.
Colored Paper
Colored paper must conform to the specifications listed on the page 6-2. In addition, the pigments in the paper must be able to withstand the heat of copying (up to 200 °C or 392 °F).
Preprinted Paper
Preprinted paper must conform to the specifications listed on the page 6-2. The colored ink must be able to withstand the heat of copying. It must be resistant to silicone oil as well. Do not use paper with a treated surface such as glossy paper used for calendars.
Recycled Paper
Recycled paper must conform to the specifications listed on the page 6-2; however, its whiteness may be considered separately.
Note If the paper is not supplied correctly even after it is smoothed, load the paper in the MP tray with the leading edge raised a few millimeters as shown in the figure.
Note Before purchasing recycled paper in volume, try testing a sample to ensure that the copy quality is satisfactory.
Appendix 6-9

Intercompatibility of FunctionsCombine the various functions to provide even greater usage efficiency. Refer to the following charts for a list of functions that may be used in combination.
Secondary Functions
Sele
ctio
n of
Pap
er
Duplex/Split Mode Select original size
Com
bine
mod
e
Auto
Den
sity
Man
ual D
ensi
ty
Zoom
Mix
ed S
ize
Orig
inal
s m
ode
copy
ing
(mix
ed fi
nish
siz
es) a
Mix
ed S
ize
Orig
inal
s m
ode
copy
ing
(sam
e fin
ish
size
) a
Con
tinuo
us S
can
Image Quality
Mar
gin
mod
e
One
-sid
ed to
Tw
o-si
ded
Two-
side
d to
Tw
o-si
ded
a
Book
to T
wo-
side
d
Two-
side
d to
One
-sid
ed a
Book
to O
ne-s
ided
Stan
dard
/Oth
er S
tand
ard
Siz
e
Size
Ent
ry
Auto
Det
ect
Cus
tom
siz
e
Equa
l siz
e (1
00%
)
XY z
oom
Auto
zoo
m
Man
ual z
oom
Text
+ P
hoto
Phot
o
Text
Prim
ary
Func
tion
Selection of Paper Y Y Y Y Y Y Y Y Y Y Y Y Y Y Y Y 26 Y Y Y Y Y Y
Dup
lex/
Split
M
ode
One-sided to Two-sided Y N N N N Y Y Y Y Y Y Y Y Y Y Y 9 Y Y Y Y Y YTwo-sided to Two-sided a Y N N N N Y Y Y Y Y Y Y Y Y Y Y Y Y Y Y Y Y YBook to Two-sided Y N N N N 31 11 Y 11 12 Y Y Y Y Y Y 9 9 Y Y Y Y YTwo-sided to One-sided a Y N N N N Y Y Y Y Y Y Y Y Y Y Y Y Y Y Y Y Y YBook to One-sided Y N N N N 31 11 Y 11 12 Y Y Y Y Y Y 9 9 Y Y Y Y Y
Sele
ct
orig
inal
siz
e Standard/Other Standard Size Y Y Y 36 Y 36 N N N Y Y Y Y Y Y Y 9 9 Y Y Y Y YSize Entry Y Y Y 16 Y 16 N N N 27 Y Y Y Y Y Y 9 9 Y Y Y Y YAuto Detect Y Y Y Y Y Y N N N Y Y Y Y Y Y Y Y Y Y Y Y Y YCustom size Y Y Y 16 Y 16 N N N 27 Y Y Y Y Y Y 9 9 Y Y Y Y Y
Combine mode Y Y Y 34 Y 34 Y 27 Y 27 Y Y Y N1 Y Y 9 9 Y Y Y Y N1Auto Density Y Y Y Y Y Y Y Y Y Y Y N Y Y Y Y Y Y Y Y 30 Y YManual Density Y Y Y Y Y Y Y Y Y Y Y N Y Y Y Y Y Y Y Y Y Y Y
Zoom
Equal size (100%) Y Y Y Y Y Y Y Y Y Y 2 Y Y N N N 3 2 Y Y Y Y YXY zoom Y Y Y Y Y Y Y Y Y Y 2 Y Y N N N 3 2 Y Y Y Y YAuto zoom Y Y Y Y Y Y Y Y Y Y 2 Y Y N N N 3 Y Y Y Y Y YManual zoom Y Y Y Y Y Y Y Y Y Y 2 Y Y N N N 3 2 Y Y Y Y Y
Mixed Size Originals mode copying (mixed finish sizes) a 9 9 Y 9 Y 9 9 9 Y 9 9 Y Y 3 3 3 3 N Y Y Y Y YMixed Size Originals mode copying (same finish size) a Y Y Y 9 Y 9 9 9 Y 9 9 Y Y N1 N1 Y N1 N 28 Y Y Y YContinuous Scan Y Y Y Y Y Y Y Y Y Y Y Y Y Y Y Y Y Y 22 Y Y Y Y
Imag
e Q
ualit
y Text + Photo Y Y Y Y Y Y Y Y Y Y Y Y Y Y Y Y Y Y Y Y N N YPhoto Y Y Y Y Y Y Y Y Y Y Y 1 Y Y Y Y Y Y Y Y N N YText Y Y Y Y Y Y Y Y Y Y Y Y Y Y Y Y Y Y Y Y N N Y
Margin mode Y Y Y Y Y Y Y Y Y Y 22 Y Y Y Y Y Y Y Y Y Y Y YCentering Originals Y Y Y Y Y Y Y Y Y Y Y Y Y Y Y Y Y Y Y Y Y Y Y NPage Numbering 42 Y Y Y Y Y Y Y Y Y Y Y Y Y Y Y Y 9 Y Y Y Y Y YCollate mode Y Y Y Y Y Y Y Y Y Y Y Y Y Y Y Y Y Y Y Y Y Y Y YOffset mode (per page) Y Y Y Y Y Y Y Y Y Y Y Y Y Y Y Y Y Y Y Y Y Y Y YOffset mode (per set) Y Y Y Y Y Y Y Y Y Y Y Y Y Y Y Y Y Y Y Y Y Y Y Y
Bord
er
eras
e Sheet Erase Y Y Y Y Y Y Y 5 Y 5 Y Y Y Y Y Y Y 6 6 Y Y Y Y YBook Erase Y Y Y Y Y Y Y 5 Y 5 Y Y Y Y Y Y Y 6 6 Y Y Y Y YSeparate Border Erase Y Y Y Y Y Y Y 5 Y 5 Y Y Y Y Y Y Y 6 6 Y Y Y Y Y
Cover Mode Y Y Y Y Y Y Y 19 Y 19 20 Y Y Y Y Y Y 9 9 Y Y Y Y YBooklet from Sheets Y N1 N1 N1 N1 N1 38 15 Y 15 18 Y Y Y N1 Y Y 9 9 Y Y Y Y 4Booklet from Facing Pages Y N1 N1 N1 N1 N1 31 15 Y 15 18 Y Y 35 35 Y 35 9 9 Y Y Y Y 4Auto Image Rotation Y Y Y Y Y Y Y Y Y Y Y Y Y Y Y Y Y Y Y Y Y Y Y YProof Copy Y Y Y Y Y Y Y Y Y Y Y Y Y Y Y Y Y Y Y Y Y Y Y YMemo Mode Y Y Y N1 Y N1 Y 27 Y 27 N Y Y Y 32 Y Y 9 9 Y Y Y Y N1EcoPrint Y Y Y Y Y Y Y Y Y Y Y Y Y Y Y Y Y Y Y Y Y Y Y Y
a. This operation requires the optional document processor.
6-10 Appendix

Secondary Functions
Cen
terin
g O
rigin
als
Page
Num
berin
g
Col
late
mod
e
Offs
et m
ode
(per
pag
e)
Offs
et m
ode
(per
set
)
Border erase
Cov
er M
ode
Book
let f
rom
She
ets
Book
let f
rom
Fac
ing
Page
s
Auto
Imag
e R
otat
ion
Proo
f Cop
y
Mem
o M
ode
EcoP
rint
Orig
inal
Orie
ntat
ion
Neg
ativ
e Im
age
Cop
ying
Mirr
or C
opyi
ng
Prep
arin
g a
Job
for R
epea
t Cop
y
Output destinationa
Stap
ling
b
Inte
rrupt
Mod
e
Shee
t Era
se
Book
Era
se
Sepa
rate
Bor
der E
rase
Job
sepa
rato
r
Top
tray
Fini
sher
tray
Y 41 Y Y Y Y Y Y Y Y Y Y Y Y Y Y Y Y Y Y Y Y Y Y Selection of Paper
Prim
ary
Func
tion
Y Y Y Y Y Y Y Y Y 8 8 Y Y Y Y Y 10 Y Y Y Y Y Y Y One-sided to Two-sided
Dup
lex/
Split
M
odeY Y Y Y Y Y Y Y Y 8 8 Y Y Y Y Y 10 Y Y Y Y Y Y Y Two-sided to Two-sided c
Y Y Y Y Y Y Y Y Y 8 8 Y Y N1 Y 7 10 Y Y Y Y Y Y Y Book to Two-sidedY Y Y Y Y Y Y Y Y 8 8 Y Y Y Y Y Y Y Y Y Y Y Y Y Two-sided to One-sided c
Y Y Y Y Y Y Y Y Y 8 8 Y Y N1 Y 7 Y Y Y Y Y Y Y Y Book to One-sidedY Y Y Y Y Y Y Y Y 38 36 Y Y Y Y Y Y Y Y Y Y Y Y Y Standard/Other Standard Size
Sele
ct
orig
inal
siz
e
Y Y Y Y Y 5 5 5 19 16 16 Y Y N1 Y Y Y Y Y Y Y Y Y Y Size EntryY Y Y Y Y Y Y Y Y Y Y Y Y Y Y Y Y Y Y Y Y Y Y Y Auto DetectY Y Y Y Y 5 5 5 19 16 16 Y Y N1 Y Y Y Y Y Y Y Y Y Y Custom sizeY Y Y Y Y Y Y Y 20 18 18 Y Y N Y Y Y Y Y Y Y Y Y Y Combine modeY Y Y Y Y Y Y Y Y Y Y Y Y Y Y Y Y Y Y Y Y Y Y Y Auto DensityY Y Y Y Y Y Y Y Y Y Y Y Y Y Y Y Y Y Y Y Y Y Y Y Manual DensityY Y Y Y Y Y Y Y Y 2 2 Y Y Y Y Y Y Y Y Y Y Y Y Y Equal size (100%)
ZoomY Y Y Y Y Y Y Y Y 2 2 Y Y 2 Y Y Y Y Y Y Y Y Y Y XY zoom
Y Y Y Y Y Y Y Y Y 2 2 Y Y Y Y Y Y Y Y Y Y Y Y Y Auto zoomY Y Y Y Y Y Y Y Y 2 2 Y Y Y Y Y Y Y Y Y Y Y Y Y Manual zoomY 9 Y Y Y 6 6 6 9 9 9 Y Y 9 Y Y Y Y Y Y Y Y 24 Y Mixed Size Originals mode copying (mixed finish sizes) c
Y Y Y Y Y 6 6 6 9 9 9 Y Y 9 Y Y Y Y Y Y Y Y Y Y Mixed Size Originals mode copying (same finish size) c
Y Y Y Y Y Y Y Y Y Y Y Y Y Y Y Y Y Y Y Y Y Y Y Y Continuous ScanY Y Y Y Y Y Y Y Y Y Y Y Y Y Y Y Y Y Y Y Y Y Y Y Text + Photo
Imag
e Q
ualit
yY Y Y Y Y Y Y Y Y Y Y Y Y Y Y Y Y Y Y Y Y Y Y Y PhotoY Y Y Y Y Y Y Y Y Y Y Y Y Y Y Y Y Y Y Y Y Y Y Y TextN Y Y Y Y Y Y Y Y 22 22 Y Y 22 Y Y Y Y Y Y Y Y Y Y Margin mode
Y Y Y Y Y Y Y Y Y Y Y Y Y Y Y Y Y Y Y Y Y Y Y Centering OriginalsY Y Y Y Y Y Y Y Y Y Y Y Y Y Y Y Y Y Y Y Y Y Y Page NumberingY Y Y Y Y Y Y Y 23 23 Y Y Y Y Y Y Y Y Y Y Y Y Y Collate modeY Y Y N Y Y Y Y 23 23 Y Y Y Y Y Y Y Y 39 39 Y N Y Offset mode (per page)Y Y Y N Y Y Y Y 23 23 Y Y Y Y Y Y Y Y 39 39 Y N Y Offset mode (per set)Y Y Y Y Y N N Y Y Y Y Y Y Y Y Y Y Y Y Y Y Y Y Sheet Erase
Bord
er
eras
e
Y Y Y Y Y N N Y N1 Y Y Y Y Y 7 Y Y Y Y Y Y Y Y Book EraseY Y Y Y Y N N Y Y Y Y Y Y Y Y Y Y Y Y Y Y Y Y Separate Border EraseY Y Y Y Y Y Y Y 14 14 Y Y N1 Y Y 21 Y Y Y Y Y Y Y Cover ModeY Y N1 13 13 Y N1 Y 14 N Y Y N1 Y Y 10 Y Y Y Y Y 17 Y Booklet from SheetsY Y N1 13 13 Y Y Y 14 N Y Y N1 Y 7 10 Y Y Y Y Y 17 Y Booklet from Facing PagesY Y Y Y Y Y Y Y Y Y Y Y Y Y Y Y Y Y Y Y Y Y Y Auto Image RotationY Y Y Y Y Y Y Y Y Y Y Y Y Y Y Y Y Y Y Y Y Y 29 Proof CopyY Y Y Y Y Y Y Y N1 N1 N1 Y Y Y Y Y Y Y Y Y Y Y Y Memo ModeY Y Y Y Y Y Y Y Y Y Y Y Y Y Y Y Y Y Y Y Y Y Y EcoPrint
a. This operation requires the optional job separater, document processor or built-in finisher.
b. This operation requires the optional document finisher or built-in finisher.
c. This operation requires the optional document processor.
Appendix 6-11

Y: May be combined.
N: May not be combined.
N1: Primary function takes precedence. Secondary function cannot be selected.
1 Auto Density is not available for photo original and print original. 2 Auto zoom is set because only auto zoom is available. 3 Auto paper is set because only auto paper is available. 4 Margin mode and Booklet mode cannot be combined. 5 Border erase is not available when the original size is selected via
user entry. 6 Border erase and Mixed Size Originals cannot be combined. 7 Combination not available because book original only allows top
edge to align to the back. 8 When Duplex mode or Split mode is selected, Booklet modes are
given secondary priority. 9 May not be combined with Mixed Size Originals mode.10 Negative image copying not permitted for Duplex mode.11 Original size selection not available for Split mode (booklet to one-
sided).
Secondary Functions
Sel
ectio
n of
Pap
er
Duplex/Split Mode Select original size
Com
bine
Mod
e
Aut
o D
ensi
ty
Man
ual D
ensi
ty
Zoom
Mix
ed S
ize
Orig
inal
s m
ode
copy
ing
(mix
ed o
rigin
al s
izes
) a
Mix
ed S
ize
Orig
inal
s m
odec
opyi
ng
(all
sam
e si
ze) a
Con
tinuo
us S
can
Image Quality
Mar
gin
mod
e
One
-sid
ed to
Tw
o-si
ded
Two-
side
d to
Tw
o-si
ded
a
Boo
k to
Tw
o-si
ded
Two-
side
d to
One
-sid
ed a
Boo
k to
One
-sid
ed
Stan
dard
/Oth
er S
tand
ard
Size
Siz
e En
try
Aut
o D
etec
t
Cus
tom
siz
e
Equ
al s
ize
(100
%)
XY
zoom
Aut
o zo
om
Man
ual z
oom
Text
+ P
hoto
Pho
to
Text
Prim
ary
Func
tion
Original Orientation Y Y Y 33 Y 33 Y Y Y Y Y Y Y Y Y Y Y Y Y Y Y Y Y YNegative Image Copying Y 22 22 22 Y Y Y Y Y Y Y Y Y Y Y Y Y Y Y Y Y Y Y YMirror Copying Y Y Y Y Y Y Y Y Y Y Y Y Y Y Y Y Y Y Y Y Y Y Y YPreparing a Job for Repeat Copy Y Y Y Y Y Y Y Y Y Y Y Y Y Y Y Y Y Y Y Y Y Y Y Y
Out
put
dest
inat
ionb Job separator Y Y Y Y Y Y Y Y Y Y Y Y Y Y Y Y Y Y Y Y Y Y Y Y
Top tray Y Y Y Y Y Y Y Y Y Y Y Y Y Y Y Y Y Y Y Y Y Y Y Y
Finisher tray Y Y Y Y Y Y Y Y Y Y Y Y Y Y Y Y Y Y Y Y Y Y Y Y
Stapling c Y Y Y Y Y Y Y Y Y Y Y Y Y Y Y Y Y 25 Y Y Y Y Y YInterrupt Mode Y Y Y Y Y Y Y Y Y Y Y Y Y Y Y Y Y Y Y Y Y Y Y YProgramming multi-part jobs: Step 1 Y Y Y Y Y Y Y Y Y Y N Y Y Y Y Y Y N N N Y Y Y YProgramming multi-part jobs: Step 2- Y N N N Y Y Y Y Y Y N Y Y Y Y Y Y N N N Y Y Y NOutput Management Functions N N N N N N N N N N N N N N N N N N N N N N N NRepeat Copy N N N N N N N N N N N N N N N N N N N N N N N N
a. This operation requires the optional document processor.
b. This operation requires the optional job separater, document processor or built-in finisher.
c. This operation requires the optional document finisher or built-in finisher.
6-12 Appendix
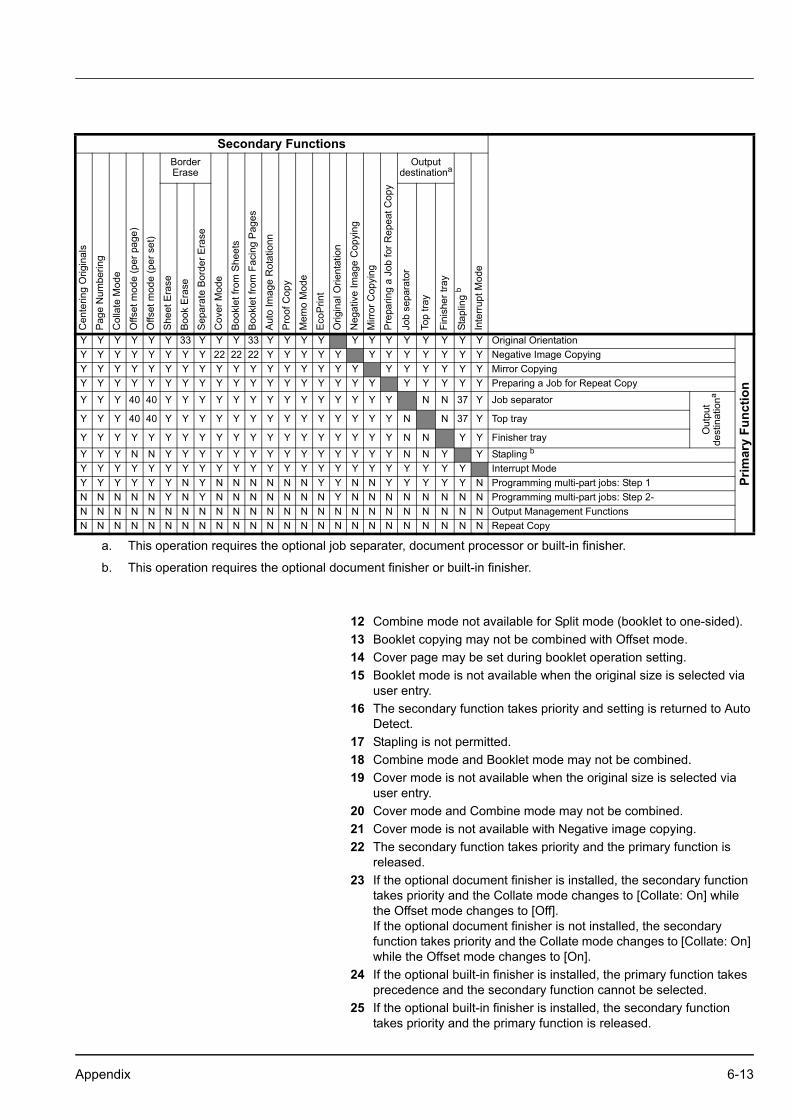
12 Combine mode not available for Split mode (booklet to one-sided). 13 Booklet copying may not be combined with Offset mode.14 Cover page may be set during booklet operation setting. 15 Booklet mode is not available when the original size is selected via
user entry. 16 The secondary function takes priority and setting is returned to Auto
Detect.17 Stapling is not permitted. 18 Combine mode and Booklet mode may not be combined. 19 Cover mode is not available when the original size is selected via
user entry. 20 Cover mode and Combine mode may not be combined. 21 Cover mode is not available with Negative image copying.22 The secondary function takes priority and the primary function is
released.23 If the optional document finisher is installed, the secondary function
takes priority and the Collate mode changes to [Collate: On] while the Offset mode changes to [Off]. If the optional document finisher is not installed, the secondary function takes priority and the Collate mode changes to [Collate: On] while the Offset mode changes to [On].
24 If the optional built-in finisher is installed, the primary function takes precedence and the secondary function cannot be selected.
25 If the optional built-in finisher is installed, the secondary function takes priority and the primary function is released.
Secondary Functions
Cen
terin
g O
rigin
als
Pag
e N
umbe
ring
Col
late
Mod
e
Offs
et m
ode
(per
pag
e)
Offs
et m
ode
(per
set
)Border Erase
Cov
er M
ode
Boo
klet
from
She
ets
Boo
klet
from
Fac
ing
Pag
es
Aut
o Im
age
Rot
atio
nn
Pro
of C
opy
Mem
o M
ode
Eco
Prin
t
Orig
inal
Orie
ntat
ion
Neg
ativ
e Im
age
Cop
ying
Mirr
or C
opyi
ng
Pre
parin
g a
Job
for R
epea
t Cop
y
Output destinationa
Stap
ling
b
Inte
rrupt
Mod
e
She
et E
rase
Boo
k Er
ase
Sep
arat
e Bo
rder
Era
se
Job
sepa
rato
r
Top
tray
Fini
sher
tray
Y Y Y Y Y Y 33 Y Y Y 33 Y Y Y Y Y Y Y Y Y Y Y Y Original Orientation
Prim
ary
Func
tion
Y Y Y Y Y Y Y Y 22 22 22 Y Y Y Y Y Y Y Y Y Y Y Y Negative Image CopyingY Y Y Y Y Y Y Y Y Y Y Y Y Y Y Y Y Y Y Y Y Y Y Mirror CopyingY Y Y Y Y Y Y Y Y Y Y Y Y Y Y Y Y Y Y Y Y Y Y Preparing a Job for Repeat Copy
Y Y Y 40 40 Y Y Y Y Y Y Y Y Y Y Y Y Y Y N N 37 Y Job separator
Out
put
dest
inat
iona
Y Y Y 40 40 Y Y Y Y Y Y Y Y Y Y Y Y Y Y N N 37 Y Top tray
Y Y Y Y Y Y Y Y Y Y Y Y Y Y Y Y Y Y Y N N Y Y Finisher tray
Y Y Y N N Y Y Y Y Y Y Y Y Y Y Y Y Y Y N N Y Y Stapling b
Y Y Y Y Y Y Y Y Y Y Y Y Y Y Y Y Y Y Y Y Y Y Y Interrupt ModeY Y Y Y Y Y N Y N N N N N N Y Y N N Y Y Y Y Y N Programming multi-part jobs: Step 1N N N N N Y N Y N N N N N N N Y N N N N N N N N Programming multi-part jobs: Step 2-N N N N N N N N N N N N N N N N N N N N N N N N Output Management FunctionsN N N N N N N N N N N N N N N N N N N N N N N N Repeat Copy
a. This operation requires the optional job separater, document processor or built-in finisher.
b. This operation requires the optional document finisher or built-in finisher.
Appendix 6-13

26 Setting is canceled due to switch to automatic paper select. 27 Combine mode is not available when the original size is selected via
user entry. 28 May not be combined with Continuous scan.29 May not be combined with Interrupt mode.30 Auto Density is not available for photo original. (switches to manual
density)31 Original size selection (Paper sizes other than 11 × 17", 8 1/2 × 11",
A3, B4, A4R, B5R, A5R and 8K.) not available. 32 May not be combined with Memo mode.33 The secondary function takes priority and original set direction is set
to [Top Edge Top]. 34 May not be combined with Combine mode. 35 May not be combined with Booklet mode. (switches to auto zoom)36 When selecting original size (B6, B6R, A6R, 11 × 15", Postcard),
secondary function is given priority and setting switches to auto detect.
37 The secondary function takes priority and the output destination changes to [Finisher Tray].
38 When selecting original size (B6, B6R, A6R, 11 × 15", Postcard), a message prompt is displayed to change the setting.
39 Cannot be selected when the optional document finisher is installed.40 The output destination changes to [Finisher tray] when the optional
document finisher is installed.41 When [APS] is set, the secondary function takes priority and the
[APS] setting is cancelled. 42 [APS] cannot be selected when page numbering is set.
6-14 Appendix

Glossary
Additional Memory
Increase the memory available to the printer. Additional memory enables printing more complex data. An additional 128 MB, 256 MB or 512 MB may be added. Contact your product service representative to find out about memory that can be used in this machine.
AppleTalk
A standard network function provided in the Mac OS from the Apple Corporation. Also used to refer to the protocol family used in AppleTalk network functionality. AppleTalk provides file sharing and printer sharing services. Applications may also be launched from other computers on an AppleTalk network.
Auto Low-Power mode
A low power mode designed for electrical power saving, activated when the machine is left unused or data has not been received for a specific period. Less power is consumed in Low-Power mode than in standby mode.
Auto Paper Selection
Automatically selects the same output paper size as the original paper size when copying.
Auto Sleep mode
A mode designed for electrical power saving, activated when the machine is left unused or data has not been received for a specific period. In Sleep mode, power consumption is kept to a minimum.
CPM (copies per minute)
The number of A4-sized copies (printouts) that can be delivered in one minute.
Default gateway
The address representing the computer or router used when accessing a computer outside the local network. If a specific gateway is not defined for the IP address being accessed, the data is sent to the host specified by the default gateway.
DHCP (Dynamic Host Configuration Protocol)
DHCP is a protocol to automatically resolve IP addresses, subnet masks, and gateway addresses on a TCP/IP network. Because it is not necessary to manually assign an IP address to each client (including printers), it is especially useful to reduce the network management workload for networks with many clients.
dpi (dots per inch)
A measure of image resolution. Indicates the number of dots in 1 inch (25.4mm).
EcoPrint
A printing mode that helps conserve toner. Prints made in this mode are thus lighter than normal.
Appendix 6-15

Emulation
A function to decode and process the page description languages of other printers. This printer provides support for PCL6, KPDL, and KC-GL emulation.
Form Feed Timeout
When sending data to a printer, there may occur time pauses. This printer includes functionality to avoid form feeding even when data is not received for a while and continue after a pause in sent data. Form feed timeout is a feature to wait the specified time before outputting this auto form feed page. The printer automatically outputs a page when the wait period has exceeded the configured form feed timeout period. However, no page is output if there is no print data on the last page.
Grayscale
A method of representing colors on a computer. Images are expressed in only shades of brightness from black to white, including no color information, or 'monochrome.' The number of gray levels that can be expressed is determined by the number of bits. 1 bit allows only black and white and no intermediate levels, 8 bits allows 256 levels (including black and white) and 16 bit allows 65536 gray levels.
IEEE1284
An international standard for connecting printers and computers. This standard was established in 1994 by the IEEE (Institute of Electrical and Electronic Engineers).
IP Address
An identification number assigned to every computer connected to a TCP/IP network. Represented by 4 octets of numbers from 0 - 255, such as 192.168.110.171.
KPDL
A Kyocera page description language compatible with Adobe PostScript Level 3.
MP tray
The paper supply tray on the right side of the machine. Use this tray instead of the cassettes when printing onto envelopes, postcards, transparencies, or labels.
NetBEUI (NetBIOS Extended User Interface) Setting
A network protocol developed by IBM in 1985. An extension of the NetBIOS protocol, NetBEUI delivers better performance than TCP/IP on small scale networks. However, it is not suitable for large scale networks because it has no routing functionality to determine the best suitable route from many routes. A standard protocol of IBM OS/2 and Microsoft Windows operating systems, which provide file and print services based on NetBEUI.
NetWare
A network OS (network management software) from Novell. Netware can be run on many different operating systems.
6-16 Appendix

PostScript
A page description language developed by Adobe Systems. PDL provides flexible font functionality and high quality graphics to deliver high quality printing. The first version, now referred to as Level 1, was introduced in 1985. Level 2, which included support for color printing and double byte languages such as Japanese was released in 1990. Level 3, which provided support for the Internet, an implementation criteria hierarchy, and support for the PDF format, was introduced in 1996.
Printer Driver
Software used to convert application data for printing. The printer driver is stored on the included CD-ROM. Install onto computers connected to this machine/printer.
Status Page
Print the Status Page to confirm various information about this device, such as total installed memory, number of pages printed or copied, or paper feed settings. The Status Page can be printed from the device operation panel.
Subnet Mask
A 32 bit value that defines how many bits of an IP address are used to identify a network in a network address.
TCP/IP (Transmission Control Protocol/Internet Protocol)
A network protocol to define data transmission standards for communication between computers and other devices.
USB (Universal Serial Bus)
This device includes a Hi-Speed USB compliant USB interface. The maximum communication speed is 480 Mbps, which supports high speed data transfer.
Appendix 6-17

6-18 Appendix

Index
Numerics2-in-1 mode ......................................................................1-94-in-1 mode ....................................................................1-10
AAdditional memory .........................................................6-15Adjusting auto density
Default setting ...........................................................3-7Adjusting background density ..........................................3-4Adjusting manual density
Default setting ...........................................................3-7AppleTalk .......................................................................6-15Auto cassette switching .................................................3-12Auto clear
Enabling/Disabling ..................................................3-21Time setting ............................................................3-18
Auto detect originals ......................................................3-17Auto image rotation ........................................................1-27
Default settings .........................................................3-8Auto Low-Power mode ..................................................6-15
Setting timeout ........................................................3-18Auto paper selection ......................................................6-15
Selecting media types for automatic paper selection 3-5Setting auto paper selection .....................................3-5
Auto Sleep mode ...........................................................6-15Enabling/Disabling ..................................................3-21Setting timeout ........................................................3-18
BBooklet
Book .......................................................................1-21Sheet originals ........................................................1-19
Border erase ..................................................................1-14Default settings .........................................................3-9
CCentering originals .........................................................1-13Changing management code .........................................3-20Checking total copy count ..............................................3-28Collate mode
Default settings .........................................................3-8Colored paper ..................................................................6-9Combine mode ................................................................1-9Continuous scan ............................................................1-24Copy/Printer output management ..................................4-15Copy count per department
Copy count per department ....................................4-11Total job accounting ................................................4-10
Copy functions .................................................................1-1Copy quantity ...................................................................1-5
Preset limit ................................................................3-9Correcting black lines ......................................................3-4
Cover .............................................................................1-18Paper source for cover .............................................3-6
cpm ................................................................................6-15Customize (basic screen) ..............................................3-10Customize (user choice) ................................................3-10
DDefault counter limit value ..............................................4-16Default gateway .............................................................6-15Default settings
Default settings for copying ......................................3-2Job accounting ........................................................4-13Machine default ......................................................3-11
Density .............................................................................3-3Density steps ...................................................................3-3DHCP .............................................................................6-15dpi ..................................................................................6-15Drum refresh ..................................................................3-25
Auto drum refresh ...................................................3-22
EEcoPrint ............................................................... 1-28, 6-15
Default settings .........................................................3-4Emulation .......................................................................6-16Envelopes ........................................................................6-8Error messages ................................................................5-4
FForm feed timeout ..........................................................6-16
GGrayscale .......................................................................6-16
IIEEE1284 .......................................................................6-16Image quality
Default settings .........................................................3-3Intercompatibility of functions .........................................6-10IP address ......................................................................6-16
JJob accounting
Activating and deactivating .....................................4-12Copy .......................................................................4-13Default settings .......................................................4-13Delete .......................................................................4-8Description ................................................................4-2Editing department information .................................4-8Fax ..........................................................................4-15
Index-1

Limit in use ................................................................4-5New account .............................................................4-4Operation during setting ..........................................4-18Printer .....................................................................4-13Total ........................................................................4-10
Job build .........................................................................1-34Procedure ...............................................................1-34Setting functions .....................................................1-37
KKPDL ..............................................................................6-16
LLabel ................................................................................6-7Legal information and conventions
About this Operation Guide ........................................ viiConventions in this guide ........................................... viiOriginals and paper sizes ..........................................viiiRegarding tradenames ............................................... iii
Limit in useChange .....................................................................4-9Copy .................................................................. 4-5, 4-7Description ................................................................4-5Fax ............................................................................4-6Limitation ...................................................................4-6Printer ............................................................... 4-5, 4-7
MMargin mode ..................................................................1-12
Default settings .........................................................3-8Memo mode ...................................................................1-22Mirror copying ................................................................1-29Mixed size originals ........................................................1-30MP tray ...........................................................................6-16
Enabling quick access to MP tray settings ..............3-14Registering MP tray paper size ...............................3-13Specifying the media type .......................................3-23Specifying the paper size ........................................3-23
NNegative image copying .................................................1-29NetBEUI .........................................................................6-16NetWare .........................................................................6-16Notification sounds .........................................................3-20
OOffset mode ......................................................................1-7
Default settings .........................................................3-8Original
Size ............................................................................viiiOriginal orientation ...........................................................1-6
Default settings .......................................................3-17Output management functions
Description ................................................................2-2[Prt Status] screen .....................................................2-3
Using the output management functions .................. 2-2
PPage numbering ............................................................ 1-16Paper ............................................................................... 6-2
Basic paper specifications ........................................ 6-2Choosing the appropriate paper ............................... 6-3Size ........................................................................... viiiSpecial paper ........................................................... 6-6
Paper Selection ............................................................... 3-5Paper source ................................................................... 1-2Postcards ........................................................................ 6-8PostScript ...................................................................... 6-17Preprinted paper .............................................................. 6-9Printer driver .................................................................. 6-17Printer error report ......................................................... 4-14Printing from unregistered sources (printer) .................. 4-14Printing reports .............................................................. 3-26Programmed copying
Deleting .................................................................. 1-32Editing names ........................................................ 1-31Registering ............................................................. 1-31Using programs to copy ......................................... 1-31
Proof copy ..................................................................... 1-24
RRecycled paper ............................................................... 6-9Register keys
Deleting .................................................................. 1-33Registering ............................................................. 1-33Setting to show/hide ............................................... 3-10
Repeat copyDefault settings ........................................................ 3-9Deleting .................................................................. 1-26Output .................................................................... 1-25Printing the first page ............................................. 1-26Setting .................................................................... 1-25
Response to unauthorized requests .............................. 4-16
SSelecting default paper source ........................................ 3-6Selecting default zoom .................................................... 3-7Selecting original size ...................................................... 1-3
Registration method ............................................... 3-24Selecting output destination .......................................... 1-28
Default setting (fax) ................................................ 3-19Default settings (copy) ........................................... 3-18
Select the main mode .................................................... 3-19Setting auto % priority ..................................................... 3-6Setting handling for special media types ....................... 3-16Silent mode ................................................................... 3-20Solving malfunctions ....................................................... 5-2Specifying the media type ............................................. 3-13Specifying the paper size .............................................. 3-12Stapling ............................................................................ 1-8Status page ................................................................... 6-17Subnet mask ................................................................. 6-17System menu .................................................................. 3-1
Index-2

TTCP/IP ...........................................................................6-17Thick paper ......................................................................6-9Total count by size .........................................................4-16Transparencies ................................................................6-6Type adjust
Duplex mode ..........................................................3-15Paper weight ...........................................................3-14
UUSB ...............................................................................6-17
Index-3

Index-4

A1
We recommend the use of our own brand supplies.We will not be liable for any damage caused by the use of third party supplies in this machine.


©2007
is a trademark of Kyocera Corporation

2007.8302JB56051


