Page 1
8/7/2019 2D 1 getting_started_basics
http://slidepdf.com/reader/full/2d-1-gettingstartedbasics 1/12
Tutorial 1: Getting Startedwith the Basics in AutoCAD
2010
Audience: Users new to AutoCAD
Prerequisites: None
Time to complete: 15 minutes
In this TutorialPlease complete the lessons in this tutorial in order. The earlier lessons include
information that is needed in the later lessons. In this tutorial, you learn how
to do the following:
NOTE For more information on the topics covered in this tutorial, see the AutoCAD
User ’ s Guide .
■ Start AutoCAD and open a new drawing
■ Draw a line, a series of lines, and an object
■ Select objects
■ Delete objects
■ Use dynamic input to enter commands
■ Zoom and pan
■ Find more information on using AutoCAD
1
Page 2
8/7/2019 2D 1 getting_started_basics
http://slidepdf.com/reader/full/2d-1-gettingstartedbasics 2/12
Lesson 1: Get StartedIn this lesson, you learn how to start AutoCAD. You also learn about the basic
areas of the AutoCAD window.
To download tutorial file
1 Go to http://www.autodesk.com/autocad-tutorials.
2 Unzip getting_started_basics.zip to C:\My Documents\Tutorials .
To start AutoCAD
1 To open AutoCAD, click Start menu (Windows) ➤ (All) Programs ➤ Autodesk ➤ AutoCAD 2010 ➤ AutoCAD 2010 - English.
NOTE If the New Features dialog box appears, select Maybe later and OKto close it.
The AutoCAD window opens with an empty drawing file named
Drawing1.dwg .
2 Before moving on to the next lesson, become familiar with the areas of
the AutoCAD window labeled below.
2 | Tutorial 1: Getting Started with the Basics in AutoCAD 2010
Page 3
8/7/2019 2D 1 getting_started_basics
http://slidepdf.com/reader/full/2d-1-gettingstartedbasics 3/12
Undo - How to start over
If you are stuck, and want to start a lesson over, you can use the Undo
command. Click the Undo icon on the Quick Access toolbar, which is located
at the top of the window. You may need to click it a few times to undo allprevious commands
Esc - Cancel a command
If you accidentally click in the drawing area, display a shortcut menu, or start
a command, you can always escape by pressing the Esc key on your keyboard.
Lesson 1: Get Started | 3
Page 4
8/7/2019 2D 1 getting_started_basics
http://slidepdf.com/reader/full/2d-1-gettingstartedbasics 4/12
Lesson 2: Draw LinesIn this lesson, you learn how to draw a line, a series of connected lines, and
an object created with lines. In addition, you learn how to select and erase
lines.
To draw a line
1 On the ribbon, click Home tab ➤ Draw panel ➤ Line.
2 Drag the mouse down to the empty drawing. A crosshairs cursor appears
with three text boxes. The “Specify first point” box is called the dynamic
prompt. With the dynamic prompt, you can keep your eyes on your work
and do not have to look down to the command line.
NOTE If the dynamic prompt is not visible, press the F12 key to turn it on.
3 The other two text boxes show the location (x and y coordinates) of the
cursor. Use the mouse to move the cursor around and notice that the
coordinates change.
4 In the empty drawing, click the mouse to pick a start point for your firstline. The dynamic prompt changes to “Specify next point or”.
4 | Tutorial 1: Getting Started with the Basics in AutoCAD 2010
Page 5
8/7/2019 2D 1 getting_started_basics
http://slidepdf.com/reader/full/2d-1-gettingstartedbasics 5/12
5 Drag the cursor in any direction and click to pick the end point of your
line. Other text boxes appear with additional information about the line.
You can ignore these for now.6 Press the Enter key on your keyboard to end the line. You have drawn
your first line!
To select and delete a single line
Before you learn how to draw a series of lines, select and delete the line you
just drew.
1 Move the cursor over the line to highlight it; the line will appear darker
and dotted.
2 Click the mouse to select the line. You know it is selected when three
square selection handles appear and the line changes to a dotted line.
Lesson 2: Draw Lines | 5
Page 6
8/7/2019 2D 1 getting_started_basics
http://slidepdf.com/reader/full/2d-1-gettingstartedbasics 6/12
3 Press the Delete key on your keyboard to erase the line. You have learned
how to select a single object and delete it.
To draw a series of connected lines
1 On the ribbon, click Home tab ➤ Draw panel ➤ Line.
2 Drag the mouse down to the empty drawing. Click to specify the first
point for the line.
3 Drag the cursor in any direction and click to pick the next point of your
line. You have drawn the first line in a series of connected lines.
4 Drag the mouse and click to specify the next point. You have drawn the
second line in a series of connected lines.
5 Continue to drag the mouse and click to specify points to add more lines.
6 When you want to end the series of lines, press the Enter key on yourkeyboard.
6 | Tutorial 1: Getting Started with the Basics in AutoCAD 2010
Page 7
8/7/2019 2D 1 getting_started_basics
http://slidepdf.com/reader/full/2d-1-gettingstartedbasics 7/12
To select and delete a series of lines
Before you learn how to connect a series of lines to create an object, deletethe lines that you just drew. In the steps below, you will use a window selection
box to select all of the lines at the same time.
1 Move the cursor above and to the left of the lines.
2 Click and hold down the mouse button as you drag to the right and down
to form a selection box around the lines.
3 Click when all of the lines are inside the box. After you click, the square
selection handles appear and the lines become dotted.
4 Press the Delete key on your keyboard to erase the lines.
To connect a series of lines to form an object
1 On the ribbon, click Home tab ➤ Draw panel ➤ Line.
Lesson 2: Draw Lines | 7
Page 8
8/7/2019 2D 1 getting_started_basics
http://slidepdf.com/reader/full/2d-1-gettingstartedbasics 8/12
2 Drag the mouse down to the empty drawing. Click to specify the first
point of the line.
3 Drag the cursor in any direction and click to pick the next point of the
line.
4 Continue dragging and clicking to create a few more lines.
5 Right after you pick the last point, without moving the mouse, use the
keyboard to type close. As you type the close command, it appears in a
small text box in the window.
6 Press the Enter key on your keyboard to complete the close command.
The end of the last line you drew is connected to the beginning of your
first line. This method of directly entering a command into the window
is called dynamic input. It is faster and easier than using the command
line.
8 | Tutorial 1: Getting Started with the Basics in AutoCAD 2010
Page 9
8/7/2019 2D 1 getting_started_basics
http://slidepdf.com/reader/full/2d-1-gettingstartedbasics 9/12
7 Before moving on to the next lesson, click ➤ Close to close your
drawing. You do not need to save it.
Lesson 3: Zoom and Pan with the Mouse WheelIn this lesson, you learn to zoom and pan in a sample drawing.
To open the sample drawing
1 Click ➤ Open ➤ Drawing and select kitchens.dwg in the Select
File dialog box. You may need to browse to C:\My Documents\Tutorials .
This is one of the files you downloaded at the beginning of this tutorial.
2 Click Open.
3 Make sure you are in Model space. If not, click the Model tab in the lower
left corner of the window.
To zoom in and zoom out using the mouse wheel
The easiest way to zoom in and out in your drawing is with the mouse wheel.
1 With the cursor in the drawing area, to zoom in and magnify a section
of the drawing, scroll the mouse wheel up.
Lesson 3: Zoom and Pan with the Mouse Wheel | 9
Page 10
8/7/2019 2D 1 getting_started_basics
http://slidepdf.com/reader/full/2d-1-gettingstartedbasics 10/12
Page 11
8/7/2019 2D 1 getting_started_basics
http://slidepdf.com/reader/full/2d-1-gettingstartedbasics 11/12
5 Before moving on to the next lesson, click ➤ Close to close your
drawing. Do not save it.
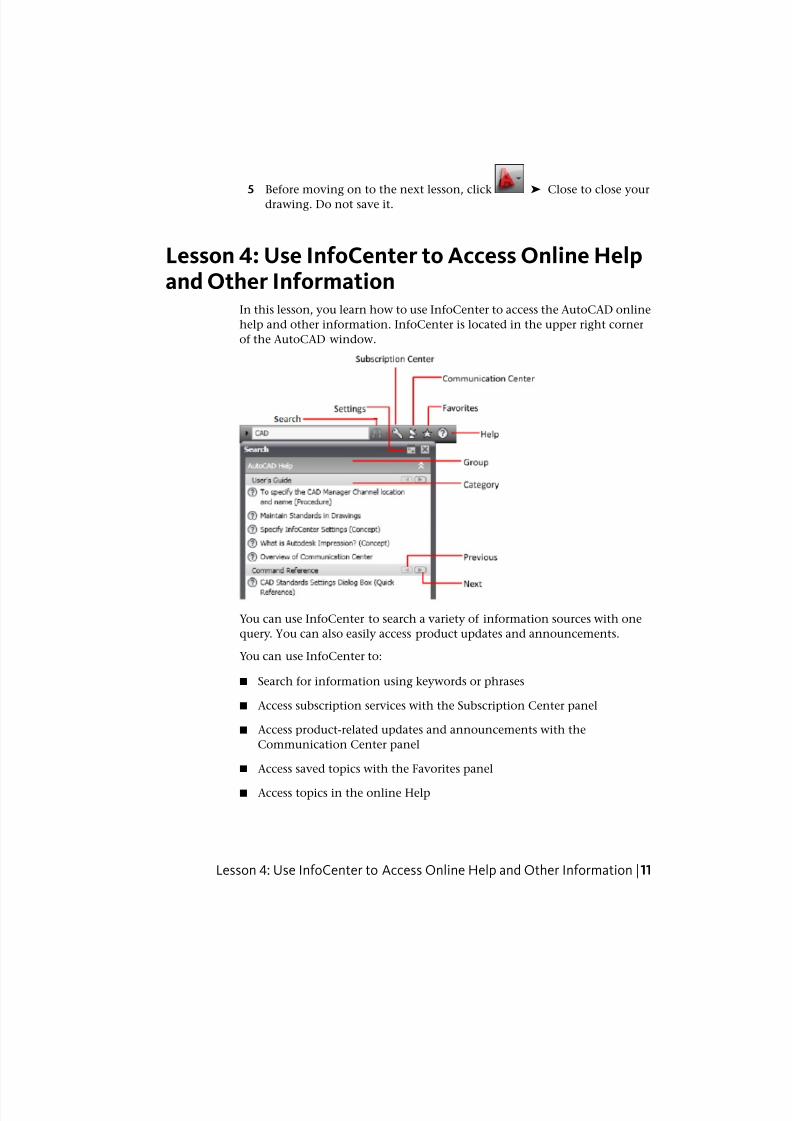
Lesson 4: Use InfoCenter to Access Online Helpand Other Information
In this lesson, you learn how to use InfoCenter to access the AutoCAD online
help and other information. InfoCenter is located in the upper right corner
of the AutoCAD window.
You can use InfoCenter to search a variety of information sources with one
query. You can also easily access product updates and announcements.
You can use InfoCenter to:
■ Search for information using keywords or phrases
■ Access subscription services with the Subscription Center panel
■ Access product-related updates and announcements with the
Communication Center panel
■ Access saved topics with the Favorites panel
■ Access topics in the online Help
Lesson 4: Use InfoCenter to Access Online Help and Other Information | 11
Page 12
8/7/2019 2D 1 getting_started_basics
http://slidepdf.com/reader/full/2d-1-gettingstartedbasics 12/12
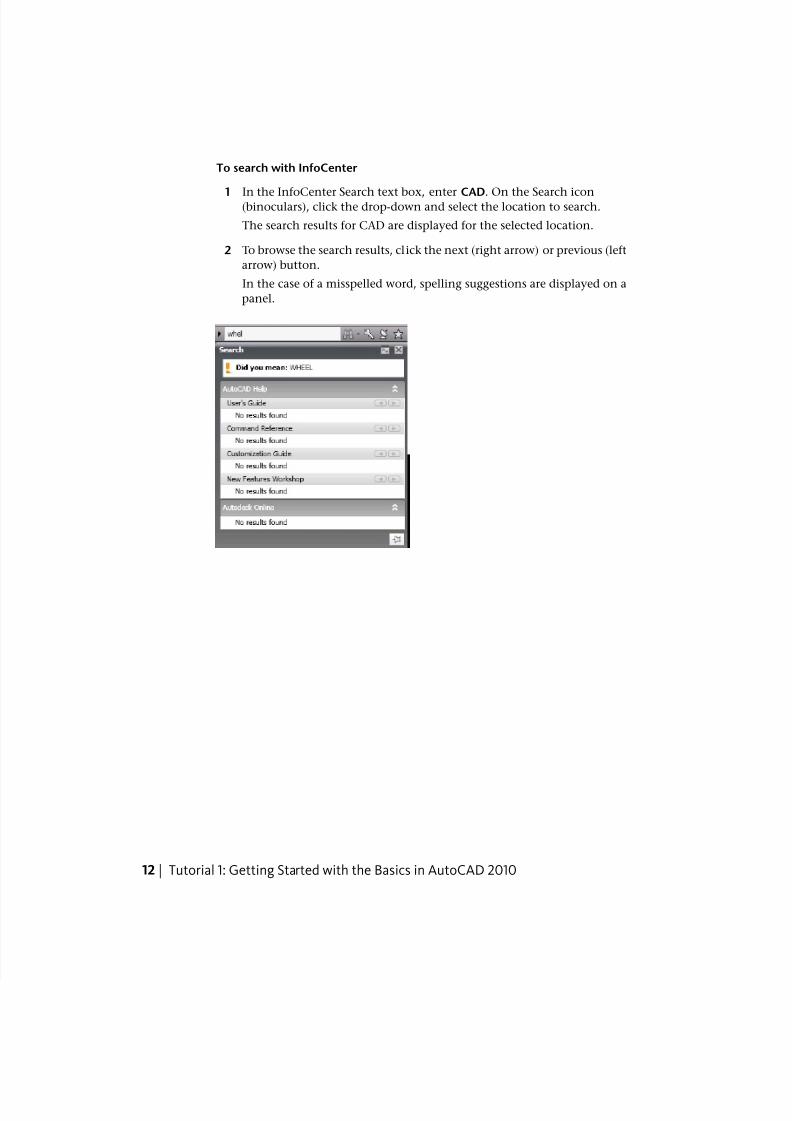
To search with InfoCenter
1 In the InfoCenter Search text box, enter CAD. On the Search icon(binoculars), click the drop-down and select the location to search.
The search results for CAD are displayed for the selected location.
2 To browse the search results, click the next (right arrow) or previous (left
arrow) button.
In the case of a misspelled word, spelling suggestions are displayed on a
panel.
12 | Tutorial 1: Getting Started with the Basics in AutoCAD 2010