detail arrow Use the phillips screwdriver to screw 8 camstuds (4 per side) 1 side (4 per shelf) to the top panel. Join the bottom rail to the bottom panel and the top rail NOTE:when attaching the bottom rail and top rail the pre drilled holes on the unfinished (back) section of these 2 parts must face the BACK OF THE SHELF. Note: the camlocks are tightened by turning them clockwise 3 top panel 8 camstuds shelf pins bottom rail bottom panel top rail 21 dowels (pre installed) into the underside of the sides, as shown. the finished front edge of the shelf is facing to the front When shelves are placed on the shelf pins, make sure Insert the shelf pins at the desired levels for what you If one side of the back panel is unfinished, put the unfinished side facing the outside. screws can be hammered into the holes, or with a sloted The back panel can be attached two ways : screwdriver. Attaching the back panel screw 5 back panel wish to store. shelves of the Bookcase. 6 pin Insert 4 camlocks into the top panel and 4 camlocks into the bottom panel, with arrows facing out, as shown detail. 2 4 clock-wise to tight them. Use the phillips screwdriver to rotate the camlocks Connect the assembled parts to the side panels. hole top panel bottom panel A S S E M B L Y I N S T R U C T I O N S May include spare hardware HARDWARE back panel screws for BOOKCASES (1) Bottom rail (1) Top rail (2) Side panel (1) Top panel (1) Bottom panel (1) Back panel 30"h = (1) Shelf 36"h = (2) Shelves 60"h = (4) Shelves 48"h = (3) Shelves 84"h = (6) Shelves 72"h = (5) Shelves PIECES 8 camlocks Tools required: a phillips screwdriver, a hammer and/or a rubber mallet.
Transcript
detail
arrow
Use the phillips screwdriver to screw 8 camstuds (4 per side)
1
side
(4 per shelf)
to the top panel.Join the bottom rail to the bottom panel and the top rail
NOTE:when attaching the bottom rail and top rail thepre drilled holes on the unfinished (back) section of these 2parts must face the BACK OF THE SHELF.
Note: the camlocks are tightened by turning them clockwise
3
top panel
8 camstuds
shelf pins
bottom rail
bottom panel
top rail
21 dowels(pre installed)
into the underside of the sides, as shown.
the finished front edge of the shelf is facing to the frontWhen shelves are placed on the shelf pins, make sure
Insert the shelf pins at the desired levels for what you
If one side of the back panel is unfinished, put the unfinishedside facing the outside.
screws can be hammered into the holes, or with a slotedThe back panel can be attached two ways :
screwdriver.
Attaching the back panel
screw
5
back panel
wish to store.
shelves
of the Bookcase.
6
pin
Insert 4 camlocks into the top panel and 4 camlocks intothe bottom panel, with arrows facing out, as shown detail.2
4 clock-wise to tight them.Use the phillips screwdriver to rotate the camlocksConnect the assembled parts to the side panels.
hole
top panelbottom panel
A S S E M B L Y I N S T R U C T I O N S
May include spare hardware
HARDWARE
back panelscrews for
BOOKCASES
(1) Bottom rail
(1) Top rail
(2) Side panel
(1) Top panel
(1) Bottom panel
(1) Back panel
30"h = (1) Shelf36"h = (2) Shelves
60"h = (4) Shelves48"h = (3) Shelves
84"h = (6) Shelves72"h = (5) Shelves
PIECES
8 camlocks
Tools required: a phillips screwdriver, a hammer and/or a rubber mallet.
dÈtail
flËche
Utilisez le tournevis Phillips pour visser 8 gougeons de
1
cÙtÈ
(4 par tablette)
rail supÈrieur au panneau supÈrieur.Assemblez le rail infÈrieur au panneau infÈrieur et le
NOTE: Lorsque vous attachez le rail infÈrieur et le railsupÈrieur, les trous dÈj‡ parcÈs sur la section non finie (arriËre)de ces 2 piËces doivent faire face ‡ L'ARRIERE DE LA TABLETTE.
Note: Les cames de blocage se serrent en les tournant dans le sesns horaire.
3
panneau supÈrieur
8 goujons de came
Goupilles de
rail infÈrieur
panneau infÈrieur
rail supÈrieur
21 goupilles(prÈ-assemblÈes)
came (4 par cÙtÈ) dans la partie infÈrieure des cÙtÈs,
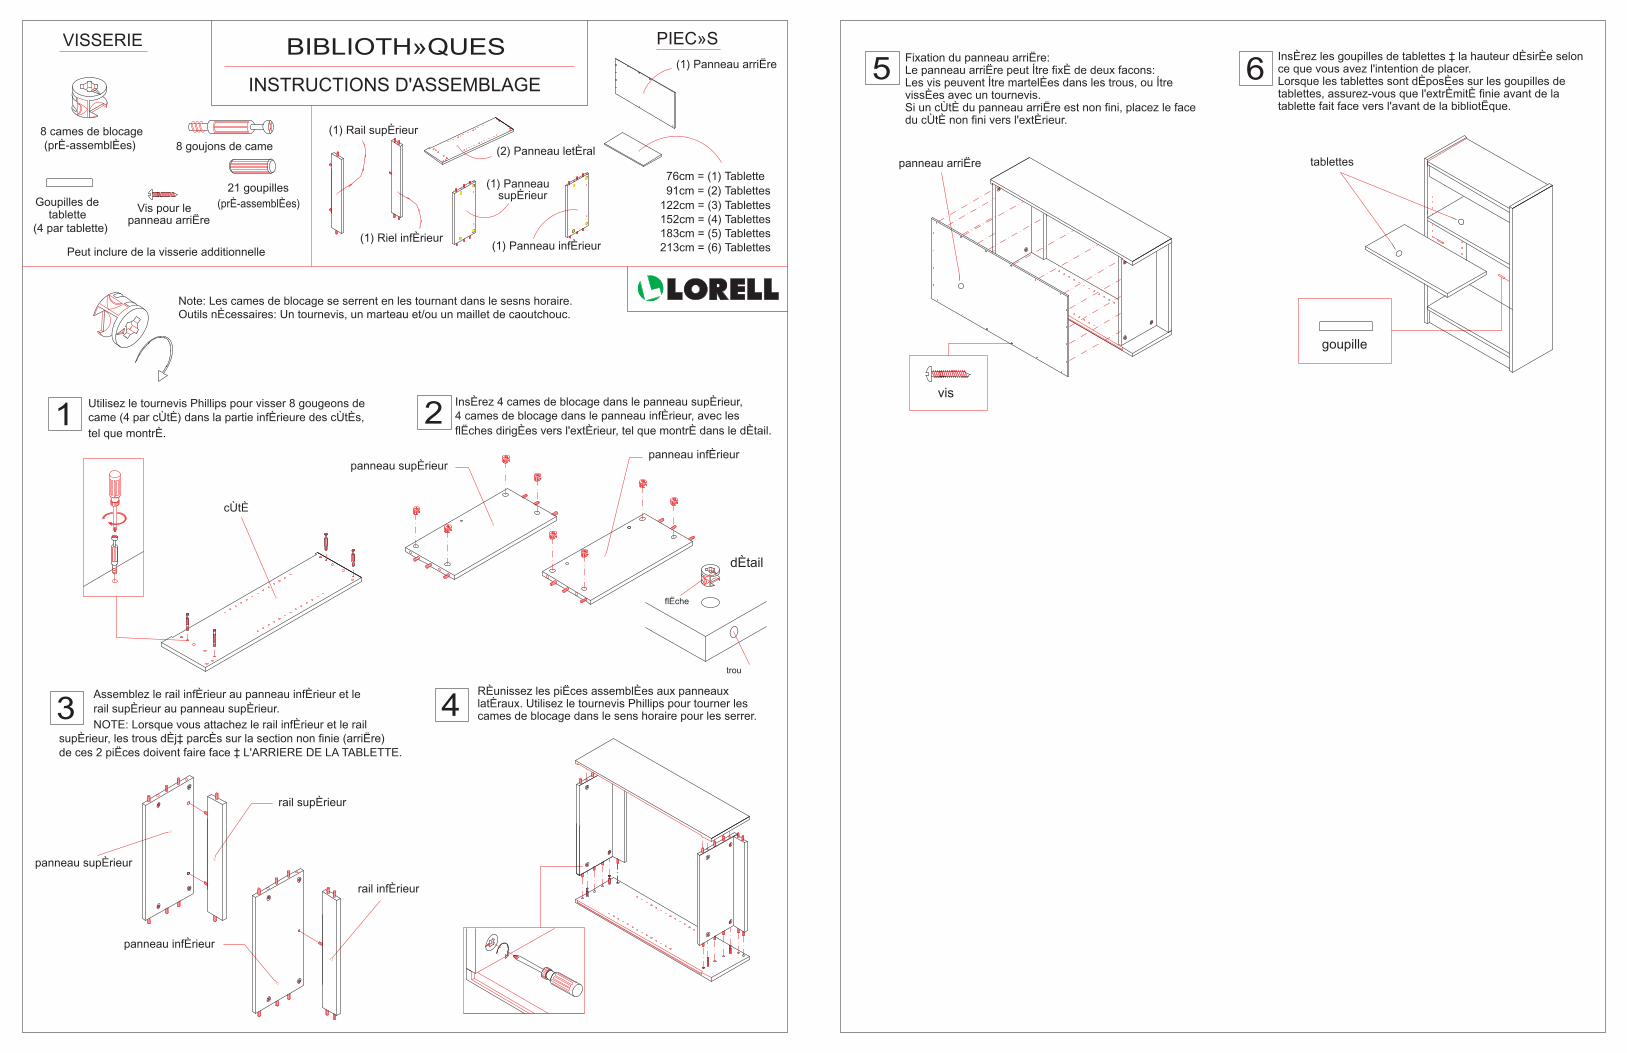
tablettes, assurez-vous que l'extrÈmitÈ finie avant de laLorsque les tablettes sont dÈposÈes sur les goupilles de
InsÈrez les goupilles de tablettes ‡ la hauteur dÈsirÈe selon
Si un cÙtÈ du panneau arriËre est non fini, placez le facedu cÙtÈ non fini vers l'extÈrieur.
Les vis peuvent Ítre martelÈes dans les trous, ou ÍtreLe panneau arriËre peut Ítre fixÈ de deux facons:
vissÈes avec un tournevis.
Fixation du panneau arriËre:
vis
5
panneau arriËre
ce que vous avez l'intention de placer.
tablettes
tablette fait face vers l'avant de la bibliotËque.
6
goupille
InsÈrez 4 cames de blocage dans le panneau supÈrieur,4 cames de blocage dans le panneau infÈrieur, avec les2
4 cames de blocage dans le sens horaire pour les serrer.latÈraux. Utilisez le tournevis Phillips pour tourner lesRÈunissez les piËces assemblÈes aux panneaux
trou
panneau supÈrieurpanneau infÈrieur
INSTRUCTIONS D'ASSEMBLAGE
Peut inclure de la visserie additionnelle
VISSERIE
panneau arriËreVis pour le
BIBLIOTH»QUES
(1) Riel infÈrieur
(1) Rail supÈrieur
(2) Panneau letÈral
(1) Panneau
(1) Panneau infÈrieur
(1) Panneau arriËre
76cm = (1) Tablette91cm = (2) Tablettes
152cm = (4) Tablettes122cm = (3) Tablettes
213cm = (6) Tablettes183cm = (5) Tablettes
PIEC»S
8 cames de blocage
tablette
supÈrieur
flËches dirigÈes vers l'extÈrieur, tel que montrÈ dans le dÈtail.
(prÈ-assemblÈes)
tel que montrÈ.
Outils nÈcessaires: Un tournevis, un marteau et/ou un maillet de caoutchouc.
detalle
flecha
Use el dasarmador phillips para atornillar los 8 pernos (4 por
1
panel lateral
(4 por repisa)
al panel inferior.Una el riel superior al panel superior y el riel inferior
NOTA: Al unir el riel superior y el riel inferior, los orificiosya perforados en la secciÛn sin acabado de estas dos piezas(secciÛn posterior), deben ver hacia la PARTE POSTERIOR
Nota: Los cerrojos de leva se aprietan gir·ndolos en sentido de las
3
panel superior
8 pernos
clavijas para
riel inferior
panel inferior
riel superior
21 tarugos(preensamblados)
cada panel lateral) en los orificios de los paneles laterales,
Cuando haya colocado las repisas encima de las clavijas,las repisas.
Inserte las clavijas para repisas a los niveles desados,
Si un lado del panel posterior no tiene acabado, coloqueese lado sin acabado hacia afuera.
Puede amartillar los tornillos en los orificios o puedeEl panel posterior se puede unir de dos maneras:
atornillarlos con un desarmador phillips.
Una el panel posterior.
tornillo
5
panel posterior
dependiendo de lo que desÈe colocar en las repisas en
repisas
aseg˙rese de que la orilla frontal de la repisa quede de
6
clavija
Inserte 4 cerrojos de leva en el panel superior y 4 en el panel inferior, con las flechas hacia la perforaciÛn de la 2
4 cerrojos de leva, en sentido de las manecillas del reloj.Use el desarmador phillips para girar y apretar losUna las partes ensambladas a los paneles laterales.
perforaciÛn
panel superiorpanel inferior
INSTRUCCIONES DE ENSAMBLE
May include spare hardware
FERRETERIA
panel posteriortornillos para
LIBREROS
(1) Riel inferior
(1) Riel superior
(2) Panel lateral
(1) Panel
(1) Panel inferior
(1) Panel posterior
76cm = (1) Repisa91cm = (2) Repisas
152cm = (4) Repisas122cm = (3) Repisas
213cm = (6) Repisas183cm = (5) Repisas
PIEZAS
8 cerrojos de leva
repisa
superior
como se muestra en la figura. orilla, como se muestra en el detalle.
DE LA REPISA.
frente al Librero.
manecillas del reloj.Herramientas requeridas: un desarmador phillips, un martillo y/o una maza de hule.