25 2 U SING VB .NET TO C REATE A F IRST S OLUTION LEARNING OBJECTIVES After reading this chapter, you will be able to: 1. Begin using Visual Studio .NET and then VB .NET. 2. Point out and discuss the elements of the Microsoft Development Environment (MDE) used for VB. NET. 3. Discuss the use of the form in creating a VB .NET solution. 4. Understand controls and their properties. 5. Describe the use of a message box for output for a solution. 6. Discuss the Code window used to write an event handler. 7. List the different types of files that make up a VB .NET project and be able to save an application. 8. Use the various VB .NET help facilities to answer questions about creating a solu- tion. GETTING STARTED WITH VB .NET To start VB .NET in Windows, you first need to understand that VB .NET is a part of Microsoft’s Visual Studio .NET development environment as are a number of other languages including Visual C++ and Visual C#. All of these languages use the same environment which is called the Microsoft Development Environment (MDE). To start Visual Studio . NET, select the corresponding menu item from the Programs list on the Start Menu. Once you are in Visual Studio .NET, the first thing you will see is a splash screen showing the languages that are available from Visual Studio .NET and then the Start Page like that shown in Figure 2-1. In this case, the Visual Studio .NET Start Page shows the projects you’ve worked on most recently in the center of the page and the help facility on the bottom right of the screen. In this case, no projects are shown because we are assuming you are just starting your work with VB .NET. Below this list are two buttons, one for opening an existing project and one for starting a new project. We will using the latter button in our initial work. Depending on how your system has been configured, your screen may look slightly different from this one in terms of what is shown on the right. However, it always has the list of recent projects in the center as well as a list of items on the left.
Transcript
25
2 USING VB .NET TO CREATE A FIRST SOLUTION
LEARNING OBJECTIVES
After reading this chapter, you will be able to:1. Begin using Visual Studio .NET and then VB .NET.2. Point out and discuss the elements of the Microsoft Development Environment
(MDE) used for VB. NET.3. Discuss the use of the form in creating a VB .NET solution.4. Understand controls and their properties.5. Describe the use of a message box for output for a solution.6. Discuss the Code window used to write an event handler.7. List the different types of files that make up a VB .NET project and be able to save
an application.8. Use the various VB .NET help facilities to answer questions about creating a solu-
tion.
GETTING STARTED WITH VB .NET
To start VB .NET in Windows, you first need to understand that VB .NET is a part ofMicrosoft’s Visual Studio .NET development environment as are a number of otherlanguages including Visual C++ and Visual C#. All of these languages use the sameenvironment which is called the Microsoft Development Environment (MDE). Tostart Visual Studio . NET, select the corresponding menu item from the Programs liston the Start Menu. Once you are in Visual Studio .NET, the first thing you will see is asplash screen showing the languages that are available from Visual Studio .NET andthen the Start Page like that shown in Figure 2-1.
In this case, the Visual Studio .NET Start Page shows the projects you’ve workedon most recently in the center of the page and the help facility on the bottom right ofthe screen. In this case, no projects are shown because we are assuming you are juststarting your work with VB .NET. Below this list are two buttons, one for opening anexisting project and one for starting a new project. We will using the latter button inour initial work.
Depending on how your system has been configured, your screen may lookslightly different from this one in terms of what is shown on the right. However, italways has the list of recent projects in the center as well as a list of items on the left.
26 Chapter 2 Using VB .NET to Create a First Solution
The left-hand list has some optional links to Web pages or Internet newsgroups formore information than that provided by the VB .NET Help facility as well as oneselection on the left which you need to visit—the My Profile option. Selecting thisoption displays a page on which you can determines parameters for your version ofVB .NET. While you could change several of these, the only one you really need tochange is the Filter option. Because Visual Studio .NET has a number of languages init, requesting help on a feature may return information on all of the languages ratherthan just VB .NET. Using a filter enables you to restrict the help information youreceive to just the language you are learning, in this case, VB .NET. For that reason, wesuggest you change the Filter option from the default option of No filter to the VisualBasic option as shown in Figure 2-2. Doing this will make the help option more usefulto you. Once you’ve have made this change, click on Get Started to return to theStart page.
Once you have your Start page configured, you are ready to move on to the actualVB .NET development environment by clicking the New Project button. Making thisselection displays the dialog box shown in Figure 2-3 from which you can choose a
FIGURE 2-1. Start page for VB .NET
FIGURE 2-2. Selecting a filter option
GETTING STARTED WITH VB .NET 27
type of project on which to work and a type of template to use. In both cases, we willuse the default selections—Visual Basic Projects and a Windows Application. Thisdialog box also has a default name for the project—WindowsApplication1 which weneed to change to Vintage2 to match the project on which we are working. It alsoshows the default drive and folder in which it will be stored. If this is your homemachine on which you have installed Visual Studio .NET, then the default location isC:\My Documents\Visual Studio Projects. If you are working on a lab machine, it mayhave a different default location for the files or you may be instructed to change thelocation. For the remainder of this book, we will assume that all files are stored in thedefault location, whatever that may be. Figure 2-3 shows the dialog box with all ofthese choices pointed out.
Changing the name of the project to Vintage2 and excepting the default informa-tion for the remainde of this dialog box and clicking Ok results in the Windows Formdesigner for VB .NET being displayed as shown in Figure 2-4. (There are two othermodes, Run and Break, which we will discuss later.) Key elements of the designer arepointed out in this figure.
The key elements of the VB .NET MDE are the project title bar, the menu bar,the toolbar, the Toolbox (currently hidden), the design window containing one ormore forms, the Windows buttons, the Solution Explorer window, the Properties win-dow, the Task List Window and the tabs. The first three of these elements should befamiliar to you from other Windows software. The title bar shows the name of theproject. It also shows that you are in the design mode. The menu bar has a variety ofmenu options, beginning with File and ending with Help, that makes it possible tocarry out the operations necessary to create a VB .NET project. As we go through thecreation of VB .NET projects, we will discuss the various menu options.
The toolbar contains icons that replicate the most commonly used menu options.In VB .NET, as in many Windows applications, there is more than one toolbar avail-able to you; the standard toolbar is what is displayed initially. You can also customizethe toolbars by adding or deleting icons. At the right end of the toolbar are the Win-dows button that provide instant access to key windows of the MDE such as theToolbox and Properties window. As with all buttons on the toolbar, pausing the cursoron them causes a Tool Tip to appear displaying the name of that button.
FIGURE 2-3. Dialog box for starting project Project Type
Application Type
File Name
File Location
28 Chapter 2 Using VB .NET to Create a First Solution
The Task list is a “scratchpad” area where the programmer can make a “to do”list for themselves or members of their programming team. Finally, there are a numberof tabs of which two are pointed out—the Properties and Dynamic Help tabs. Othertabs on this screen include the Task List and Output tabs on the bottom left of thecurrent Task List window and the Start and Form1.vb [Design] tabs at the upper leftside of the Solution Window. We will discuss the Design Window, Toolbox, and Solu-tion Explorer and Properties Windows in separate sections.
You should be aware that the VB .NET MDE shown in Figure 2-4 is the defaulttabbed documents environment. This name comes from the fact that tabs are usedto switch between pages or windows in this environment. For example, if you clickedon the Dynamic Help tab at the bottom of the screen, a window with a list of help top-ics would appear. You could then return to the Properties window by clicking on itstab. You can also close any window by clicking the Close symbol in the upper right-hand corner of the window. However, if you close a window, it’s tab is no longer visibleand you will need to use selections from the menu bar to display it again. Also, if youselect a help topic, information on that topic will be displayed in the Form windowand a tab for this topic will remain when when you return to the Form designer. Forexample, if you clicked the Dynamic Help tab and selected Windows Form Designer,information on this topic will replace the current form and when you return to theForm designer by clicking the appropriate tab, the Start Page tab will be replaced witha tab for this help topic.
FIGURE 2-4. VB .NET MDE
Title Bar Menu BarToolbar Windows buttons
Toolbox (hidden)
SolutionExplorer
PropertiesWindow
TabsTask ListInitial blank form Design window
Tip: The MDE for Visual Studio .NET (and VB .NET ) is very flexi-ble both in terms of appearance and ways to carry out the same opera-tion. We will show you the most typical method for carrying out eachoperation—you can experiment with other methods.
GETTING STARTED WITH VB .NET 29
It is also possible in VB .NET to use the older multiple document interface(MDI) envionment that was the default for earlier versions of Visual Basic. If yourinterface looks differently from that shown above, you are in the MDI interface andyou should change back to the tabbed environment by selecting the Tools option fromthe menu and then selecting Options. Making these selections will display the dialogbox shown in Figure 2-5. In this case, the General option has been selected. In this
dialog box, you can select the development environment (tabbed documents or MDI)using option or radio buttons and you can set a number of other parameters. The mostimportant of the other selections is the button bar immediately beneath the environ-ment radio buttons labeled “Reset Window Layout”—this button bar will return yourscreen to that shown in Figure 2-4. This is especially important when working a com-puter lab and a previous user has “rearranged” your screen by moving the windowsaround.
The Form Window In the middle of the VB .NET MDE is the design window with an inital blank form.This window is key to the creation of any VB .NET project since it enables you to eas-ily create a Windows applicaton by placing objects on the form and writing code forthem during the design process. A blank form is shown in Figure 2-6. Note that it alsohas a title bar, which contains the name of the form (initially Form1). There are alsothe typical Windows minimize, maximize, and exit controls. More important, the blankform has a grid of dots to help you position objects. When an object is placed on theform, it will automatically “snap” to the nearest dot. Objects can thus be lined up on arow or column of dots to provide a pleasing appearance . You will notice that thereare white squares on the bottom, right-hand side, and corners of the form—these areits sizing handles which can be used to change the size of the form with the mouse.Because forms are automatically docked to the upper left-hand corner of the designwindow, the upper-left hand sizing handled are grey indicating you cannot change thedimensions in that direction..
The Toolbox The Toolbox holds the objects that are placed on the form to create the VB .NETproject. By default, the toolbox is hidden on the left-hand side of the design windowto increase the space in the Design Window and appears only when the mouse pointer
FIGURE 2-5. Options| General dialog box
-
30 Chapter 2 Using VB .NET to Create a First Solution
is passed over it. You can display it permanently on the left side of the Design windowby clicking on the pushpin icon( ) in the Toolbox titlebar just to the left of the closeicon. The objects in the toolbox are commonly referred to as controls, since they con-trol the response of the project to events such as mouse clicks. Such controls includethe four types we used in our example in Chapter 1—buttons, labels, images, and text-boxes as well as many more. There are many more controls in this tool box than willbe used in this textbook and they are divided into groups—Data, Component, Win-dows Forms, Clipboard Ring, and General, In this introductory programming text, wewill primarily use the Windows Form group and the Data Group. The visible part of theToolbox is shown in Figure 2-7. and Table 2-1 shows the icons for controls in theWindows Forms toolbox which we will use in this book plus its name and its action.We will also use some controls from the Data toolbox in Chapters 9 and 10.
You may recognize many of the controls in the Windows Forms toolbox fromusing other applications If the Windows Form list is not shown when the Toolbox isdisplayed, simply click the Windows Form tab on the toolbox. More controls can beseen by scrolling down the toolbox. (Depending on the resolution of your screen, youmay see more or less icons then shown in Figure 2-7.).
FIGURE 2-6. Blank form
Tip: In actuality, all windows in the MDE can be made to auto-hideby using the pushpin icon. The Toolbox window is the only one that isset to auto-hide as a part of the default setup.
TABLE 2-1: Default Toolbox Controls
Icon Name Action
Pointer Selects another control; moves controls around screen
Label Displays text (read only; no input)
Button Responds to events, typically, a mouse click
TextBox Displays and inputs text
MainMenu Creates menus in applications
CheckBox Responds to being checked
Figure 2-7. WindowsForms Toolbox
GETTING STARTED WITH VB .NET 31
In addition to the controls shown in Figure 2-4 and listed in Table 2-1, there aremany custom controls that can be added to your Toolbox. Some of these controls areavailable with VB .NET, but you must add them to the default Toolbox; they can beadded individually or as a group.
Solutions Explorer Window
On the right side of the VB .NET development environment are two windows—theSolution Explorer window and the Properties/Help window. The top window is theSolution Explorer window. Like the Windows Explorer that is a part of Windows,the Solution Explorer window enables you to view the various parts of the solution tothe programming problem. A solution contains all files and folders necessary to exe-cute the application including one or more project files which contain the actual codefor the application. At the top of the Solution Explorer window are a number of but-tons that can be used to display the Code or Designer windows, refresh the currentwindow, show more files in the Solutions Explorer window, or display the Propertieswindow. The Solution Explorer window for the new application named Vintage2 con-taning 1 project, and a number of folders or files. The key item is the the form file,Form1.vb, with which we will work. In Figure 2-8, the Project Explorer window showsthe current project (Vintage2) with one form file (Form1.vb). If there are multipleforms or other objects in the project, they will also be shown here. Note that it hastabs that enable you to switch between the Solution Explorer window and the ClassView window that displays the basic building blocks of the solution. For the timebeing, we will only be interested in the Solution Explorer window as create projects.
Properties Window Beneath the Project Explorer window in Figure 2-4 is the Properties window with theproperties for the VB .NET object that is currently highlighted. Since there is only oneobject—the form—the properties for it are currently shown in the Properties windowwith the default text property—Form1—for this form being highlighted. When otherobjects are added to the form their properties can also be displayed in the Properties
RadioButton Responds to being on or off
GroupBox Acts as container for other controls
PictureBox Displays an image; responds to events
Panel Acts as container for other controls
DataGrid Displays data in a table format
ListBox Displays list of text items
Checked ListBox Displays list of text items with checks beside selected items
ComboBox Acts as drop-down list box
VScroll (vertical) and HScroll (hori-zontal) scroll bars
Responds to scrolling by returning a value
TABLE 2-1: Default Toolbox Controls (Continued)
Icon Name Action
32 Chapter 2 Using VB .NET to Create a First Solution
window. However, it is important to note that the properties for only one object canappear in the Properties window and that to view the properties for another object,you must click that object.
Step-by-Step 2-1: Starting a project
1. If you are going to install the copy of Microsoft Visual Studio .NET Trial Versionon your own computer, do so now. Caution: it requires Windows 2000 (not ME) or XP towork. This copy works for 60 days, but your instructor has instructions for upgradingto a permanent version for a small fee.2. Using Windows Explorer, go into the Visual Studios Projects folder and create a newfolder named Chapter2. This is where you will save all of your work for this chapter.3. Regardless of whether your are working from home or in a computer lab, accessVisual Studio .NET by using the Programs option from the Windows Start menu. Ifyou are working from home, set your Start Page parameters to use the Visual BasicHelp filter. Next, select New Project and change the name to Vintage2. Finally, selectBrowse to find the Chapter2 folder you created in the previous exercise in which youwill be saving the Vintage2 project.4. If your screens do not look like Figures 2-1 and 2-3, you may need to use theTools|Options|General option to reset the page reset the window layout. You mayalso need to select Show Start Page for the At Startup: option.5. Point out the various parts of the opening screen for VB .NET. Where is theMenubar and Toolbar? Point out the Windows buttons and click the one that causesthe Toolbox to appear. Display it by moving the cursor over it and make sure that theWindows Forms toolbox is displayed. Point out the first six controls from Table 2-1.Turn off the Auto-Hide function of the Toolbox and then turn it back on.
FIGURE 2-8. Project Explorer window
View code View Designer Refresh
Show all files
Show propertiesSolution name
Project name
Form file
FORM PROPERTIES 33
6. Switch from the Properties window to the Help window by clicking on theDynamic Help tab on the bottom of the window. See if you can make it reappear byclicking the appropriate Windows button at the right end of the toolbar.
It’s Your Turn!
1. Of what larger development system is VB .NET a part?
2. What are the three basic modes of VB .NET?3. List and describe the key elements of the VB .NET MDE.4. Which of the toolbox controls would be most appropriate for each of the follow-ing?
a. Add a permanent indicator on the form. b. Provide a list of items for the user to select.c. Provide a space for users to enter input.d. Allow a user to mark one or more from several options.e. Provide a means for the user to begin an action.
6. Start VB. NET by following the Step-by-Step Instructions 2-1.
FORM PROPERTIES
As we said earlier, all objects have properties that define them. VB .NET propertiesinclude the object’s name, its caption, whether it is visible, its size, and so on. To learnabout properties in VB .NET, we will use the object that is a part of every project: theform.
When VB .NET is started, it automatically loads a form on the screen. This is theinitial form, and for the next few chapters it is the only form we will consider. Sincethis is the only object on the screen, the Properties window automatically displays theproperties for the form, as shown in Figure 2-9. If you click on the form, the name ofthe form—currently, Form1, is displayed in the Object listbox at the top of the Prop-erties window along with the type of object—in this case, Systems.Windows.Forms.Form. If there were other objects on the form, clicking the down arrow on theObject box would display a drop-down list box of these objects, and clicking on one ofthese other objects would display its properties.
The Properties List tabs enable you to view the list of properties in one of twoways: categorically or alphabetically, by clicking one of the first two buttons below the
Mini-Summary 2-1: Getting started with VB .NET
1. The VB .NET development environment is a typical Windows-based application with title bar and menu bar. It also has a Toolbox and toolbar.2. The Design window contains the form that is used to create VB .NET applications.3. The Properties window is used to modify object properties and the Solution Explorer window shows the files that are a part of the project.
34 Chapter 2 Using VB .NET to Create a First Solution
Object list box. Even though the default method of listing the properties is to groupthem by categories, we have shown them in alphabetical order since it is easier to finda property when they are in alphabetical order. Note, however, that the Name propertyis shown third from the top even though alphabetically it would not come in that loca-tion. This makes it easier for you to find and change this property.
If you were to select the Categorized tab, the properties would be grouped by cat-egories, such as Accessibility, Appearance, Behavior, and so on. For example, the back-ground and foreground colors and the font for the object’s caption would be includedunder Appearance. In any case, properties with a plus sign (+) beside them have sub-properties which can be displayed by clicking the plus sign.
Finally, the Description Pane at the bottom of the screen provides a brief descrip-tion of the property that is currently highlighted in the Properties window—in thiscase, the BackColor property.
For the current form, we want to change only two properties: the Name and theText properties. The Name property is used to refer to the object in the VB .NETcode that defines the way the object responds to an event, and the Text property is thetext that the object displays to the user in the title bar. While they could be the same, inpractice they seldom are. You can use almost any text for the object Text property,since its purpose is to identify the control to the user. However, we need to pay closeattention to the Name property.
FIGURE 2-9. Properties window for form
Window Name
PropertiesList Tabs
ScrollableList ofProperties
Object list box
Description
TIP: If the Properties window is not visible on the screen, press theF4 function key or click on the Properties Window button on the tool-bar to make it visible.
FORM PROPERTIES 35
The Name Property An object’s Name property must start with a letter or an underscore (_)and can be aslong as you wish, but long names are hard to work with. It can include numbers andscore characters, but it cannot include punctuation or spaces. For the name of theform, we should use something that reminds us of the purpose of the project; forexample, if we are creating a project for the Vintage DVDs example introduced inChapter 1,so we could simply name the form “Vintage.” However, the name shouldalso indicate the type of object being referred to—in this case, a form. For purposes ofnaming objects, Microsoft has developed a list of prefixes that correspond to types ofobjects. For example, frm is for a form, btn for a button, and lbl for a label. As we takeup each object, we will use the appropriate prefix.
If we take both objectives into account—that is, a name that reminds us of thepurpose of the object and a prefix that matches the type of object—a good name for aform for the Vintage DVDs example is frmVintage. While VB .NET is not sensitive tothe case you use in naming objects, the prefix is usually shown in lowercase letters andthe mnemonic part of the name begins with a capital letter.
Changing an object’s properties
All objects have a set of default properties that are automatically displayed in the Prop-erties window. To change an object’s property, you must first give the object the focusby clicking on it. Then use the Properties window’s scroll bar to find the property youwish to change. In the case of the Name property, if the properties are in alphabeticalorder, it is already near the top of the list. Next, click in any column for the propertyyou wish to change to highlight it and type a new value, automatically replacing the oldvalue. Finally, press ENTER. For example, to change the Name property, highlight itand type the new name: frmVintage to replace the default name. (Note: The newname, frmVintage, is not actually in boldface or italics in the Properties window, but wewill use this method to distinguish text you should input from normal text.) When theName property of the form is changed, the new name is displayed at the top of theProperties window, in the Object box, and in the right column of the Name propertyrow.
The Text property of the form will be displayed in the title bar of the form, so wewant a string of characters that will be in line with the purpose of the project. In thiscase, the name of the store would be an appropriate caption. To create a new captionfor the form, simply highlight the current one in the Properties window (Form1) andchange it to Vintage DVDs. Notice that the new Text property now appears in thetitle bar of the form.
Changing the Startup object
When a VB .NET solution is executed, it immediately looks for the Startup object.This is the form or code object that is executed first. The default Startup object is theinitial form you add to the project—Form1, and, if you change to name of the form tosomething else like frmVintage, then you need to also change the Startup object. Thisis accomplished through the Project Properties dialog box which is accessed by right-clicking the Project file in the Solution Explorer window. The resulting Properties dia-log box is shown in Figure 2-10 with the new form name, frmVintage, highlighted in theStartup object listbox. Failure to change the Startup object to the new form name willresult in an error message whenever you execute the project.
Tip: You can tell which object on the form has the focus by it havinga dotted border and there being sizing handles on the border.
36 Chapter 2 Using VB .NET to Create a First Solution
Step-by-Step 2-2: Creating a form
1. If you have not completed Step-by-Step Instructions 2-1, do so now.
2. Click anywhere in the initial form to ensure that it has the focus. If the Propertieswindow is not visible, press F4 to make it visible or Click the Properties Windows but-ton on the toolbar. If it is not already in alphabetical order, click on the “Alphabetical”button.3. Highlight the Name property in the Properties window and change it to frmVin-tage. Note the effect on the Properties window. Does the form itself change in anydiscernible way?4. Note all of the locations on the screen where the new name for the form is dis-played.5. Highlight the Text property for the frmVintage form and change it to VintageDVDs. How does the form change?6. Go to the Properties window and scroll down the list of the properties and high-light the Enabled property. What does this property do according to its description inthe lower section of the properties window?7. To change the Startup object for the project, right-click on the Project file name inthe Solutions window (typically, the second name from the top in the Solution win-dow.) The Property dialog box shown in Figure 2-10 will be displayed. Click on theStartup object listbox and select frmVintage as the Startup object. Click OK to savethis change..
FIGURE 2-10. Project property page
ADDING CONTROLS TO THE FORM 37
It’s Your Turn!
1. Which properties primarily affect the form’s appearance?
2. Complete the Step-by-Step Instructions 2-2 to name the form, change it’s textproperty, and the change the project Startup object.3. Experiment with changing the Backcolor property for frmVintage by highlightingit and clicking the down arrow. Next, click the Custom tab and select a color. Toreturn to the original grey color, click the System tab under the Backcolor propertyand select Control.
ADDING CONTROLS TO THE FORM
Now that you have seen how to access VB .NET and have become familiar with theopening screen and the Properties window, we are ready to work with controls in theToolbox to begin creating a project. However, we first need to recall the six-step pro-cess for doing this, presented in Chapter 1: 1. Define problem 2. Create interface 3. Develop logic for action objects 4. Write and test code for action objects 5. Test overall project 6. Document project in writing.
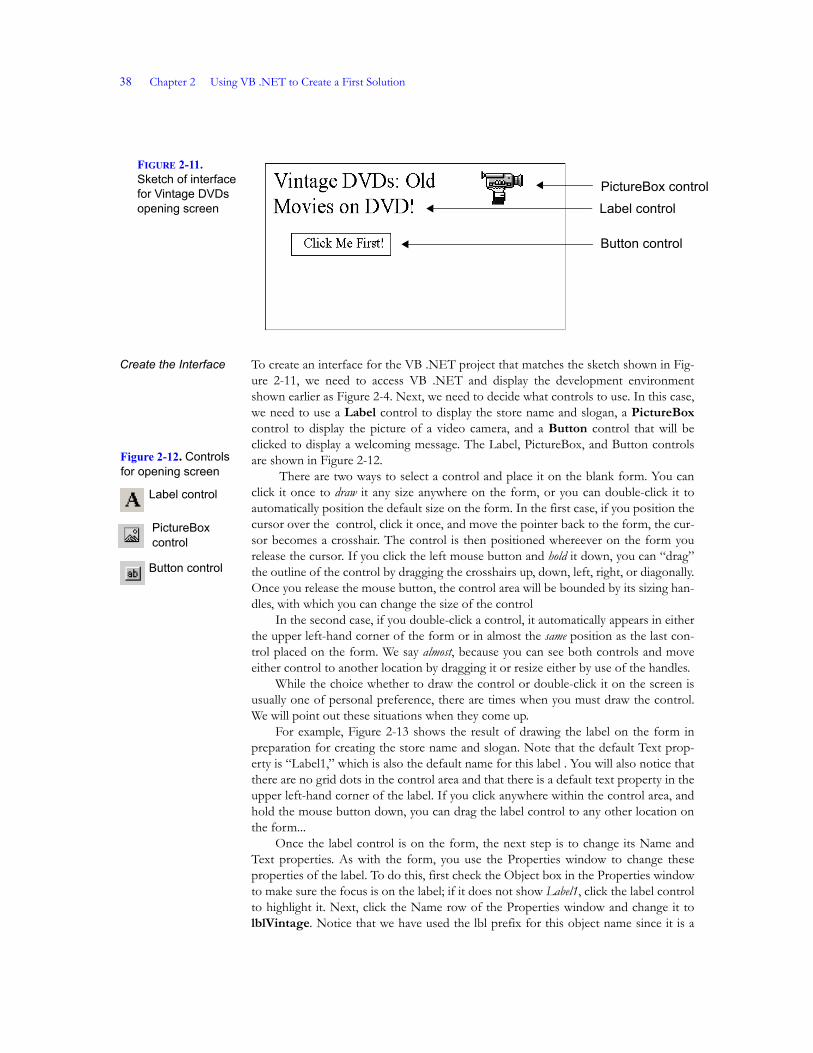
Defining the Problem In our the Vintage DVDs example discussed in Chapter 1, the owner of VintageDVDs wants an opening screen that will display the store’s name along with some typeof picture representing DVDs. He also wants to be able to click a button and displayan opening message. Based on this description, we can sketch the interface for thisproblem. Such a sketch is shown in Figure 2-11.
In Figure 2-11, note that we have three types of controls on the sketch of theopening screen for Vintage DVDs one control that displays the name of the store andits slogan, a second control that displays a picture of video camera, and a third controlthat is a button with the caption “Click Me First!” In an actual situation, before westart to create the interface in VB .NET, we would need to have the client approve thissketch. If the owner of Vintage DVDs likes this proposed interface, we can go aheadto the second step, which is to create the interface.
Mini-Summary 2-2: Changing the Properties of a VB .NET Object
1. To change a property of a control, first select the control by clicking on it. If the Properties window is not visible, you may display it by pressing F4.2. Control properties are changed by moving the cursor to the Properties window, selecting the property to be changed, entering a new setting for the selected item, and pressing ENTER to accept the change3. The Startup object must be changed to the new name of the form using the Project Property page.
38 Chapter 2 Using VB .NET to Create a First Solution
Create the Interface To create an interface for the VB .NET project that matches the sketch shown in Fig-ure 2-11, we need to access VB .NET and display the development environmentshown earlier as Figure 2-4. Next, we need to decide what controls to use. In this case,we need to use a Label control to display the store name and slogan, a PictureBoxcontrol to display the picture of a video camera, and a Button control that will beclicked to display a welcoming message. The Label, PictureBox, and Button controlsare shown in Figure 2-12.
There are two ways to select a control and place it on the blank form. You canclick it once to draw it any size anywhere on the form, or you can double-click it toautomatically position the default size on the form. In the first case, if you position thecursor over the control, click it once, and move the pointer back to the form, the cur-sor becomes a crosshair. The control is then positioned whereever on the form yourelease the cursor. If you click the left mouse button and hold it down, you can “drag”the outline of the control by dragging the crosshairs up, down, left, right, or diagonally.Once you release the mouse button, the control area will be bounded by its sizing han-dles, with which you can change the size of the control
In the second case, if you double-click a control, it automatically appears in eitherthe upper left-hand corner of the form or in almost the same position as the last con-trol placed on the form. We say almost, because you can see both controls and moveeither control to another location by dragging it or resize either by use of the handles.
While the choice whether to draw the control or double-click it on the screen isusually one of personal preference, there are times when you must draw the control.We will point out these situations when they come up.
For example, Figure 2-13 shows the result of drawing the label on the form inpreparation for creating the store name and slogan. Note that the default Text prop-erty is “Label1,” which is also the default name for this label . You will also notice thatthere are no grid dots in the control area and that there is a default text property in theupper left-hand corner of the label. If you click anywhere within the control area, andhold the mouse button down, you can drag the label control to any other location onthe form...
Once the label control is on the form, the next step is to change its Name andText properties. As with the form, you use the Properties window to change theseproperties of the label. To do this, first check the Object box in the Properties windowto make sure the focus is on the label; if it does not show Label1, click the label controlto highlight it. Next, click the Name row of the Properties window and change it tolblVintage. Notice that we have used the lbl prefix for this object name since it is a
FIGURE 2-11. Sketch of interface for Vintage DVDs opening screen Label control
Button control
PictureBox control
Figure 2-12. Controls for opening screen
Label control
Button control
PictureBox control
ADDING CONTROLS TO THE FORM 39
label, and that the rest of the name is the same as that of the form. This will not causeany confusion since one name begins with frm and the other with lbl. When youchange the name for the label, notice that the text does not change. Typically, the onlytime the name and text properties of a control are the same is before you change eitherof them.
To change the Text property for the lblVintage label, use the same approach asyou did for the form: Highlight the Text property and change it—in this case to Vin-tage DVDs: Old Movies on DVD! Note that the actual label text will not changeuntil you press ENTER. Notice also that, while the text in the label changes to the newsetting, it is not large enough to act as an eye-catching heading for the form. Toincrease the size of the Text property of the label, we need to change the label Fontproperty.
When you select the Font property for a control, an icon with three dots is dis-played. This indicates that clicking on this icon will display a dialog box in which wecan make changes to the font of the corresponding label. This dialog box is shown inFigure 2-14 with list boxes that enable you to change the font type (currently MS SansSerif), the font style (currently Regular), and the font size (currently 8 points). Since wewant the label caption to stand out, we need to change the font style to Bold and thefont size to 14 points. Clicking Ok executes these changes. Finally, since the label cap-tion text will “wrap” within the defined label size, we need to use the sizing handles tochange the size of the label to display it on two lines like the sketch. The results ofthese operations are shown in Figure 2-15. .
Adding the Image Control
To add the PictureBox control to the form, single-click it and draw it to the right of theexisting Label control. Change the Name property to picVintageLogo and use thesizing handles to enlarge it so its height and width are the same as the height of the
FIGURE 2-13. Label control drawn in form
Default Label Text property
Sizing Handles
TIP: To force a label to automatically fit its text, change the Autosizeproperty to True.
Tip: You can also change the Font property by clicking the plus (+)sign beside it to show the same selections in the Property window asare shown in the dialog box.
dialogbox icon
40 Chapter 2 Using VB .NET to Create a First Solution
label control. The PictureBox control does not have a Text property, but it does have aImage property you can use to insert a graphic image. To do this, select the Imageproperty and click the dialog box icon to display a list of folders from which to choosean image. The image we are going to use (camera.ico) is found in the ProgramFiles\Visual Studio .NET\Common7\Graphics\Icons\Misc folder on your com-puter’s hard disk (your instructor may give you different instructions as where to lookfor the file.) This will display a variety of icons from which to choose. Find the cameraicon and select it to be inserted into the PictureBox control.
When you insert the Camera.ico file into the image control, it does not automati-cally expand to fill the current size of the control; in fact, the PictureBox control mayshrink to fit the size of the icon. Even if you resize the PictureBox control, the picturewithin it may not change. To enlarge the image control and the icon simultaneously,you must use the SizeMode property. Clicking this property displays a down arrowindicating that there are multiple options from which to chose. Clicking on the down
FIGURE 2-14. The Font dialog box
FIGURE 2-15. Completed Label control
SizeMode Property Options
ADDING CONTROLS TO THE FORM 41
arrow displays these options and you should choose the StretchImage option. Dothis will cause the image within the PictureBox control to expand to fit the size of thecontrol. The top portion of the resulting screen will look like that shown in Figure 2-16 .
Adding a Button Control
Now that you have added the two controls to the Vintage DVDs form that are prima-rily for appearance purposes, you are ready to add the Button control that, whenclicked, will display a message. To add the Button control, double-click the corre-sponding icon in the Toolbox to display it on the form, and then move it to immedi-ately beneath the Label control. Change the Name property of the Button control tobtnMessage and replace the default Text property with the message Click me first!.As you did with the Label control, use the Font property to display the text in 12-pointboldface type. If the message is too long to be displayed on the button, use the sizinghandles to lengthen the button so the text is displayed on a single line. The result ofthese actions will be a screen like that displayed in Figure 2-17.
Step-by-Step Instructions 2-3: Adding controls to a form
1. Add a label control to your form by drawing it in the upper left-hand corner of theform.2. Click this label and change its Name property to lblVintage. Also, move it downfrom the corner and expand its width.
FIGURE 2-16. Result of adding PictureBox control
FIGURE 2-17. Result of adding button button control
TIP: Often you will use several similar control objects as part of yourinterface, for example several labels that have the same font typefaceand size. You may be able to save some time by creating the first ofthese control objects then copying and pasting it as necessary. VB.NET will automatically give them different names.
42 Chapter 2 Using VB .NET to Create a First Solution
3. Change the Text property of this label to Vintage DVDs: Old Movies on DVD!.Change the Font property of this label to have a font style of Bold and a size of 14points. (Leave the font type as is.) Use the handles on the label to resize it as necessaryto make the result appear like that shown in Figure 2-15.4. Draw a PictureBox control to the right of the existing Label control so that itsheight and width are approximately the same as the height of the Label control. Usethe form grid to help you make this adjustment. Change the Name property for thePictureBox control to picVintageLogo.5. What properties of the PictureBox control may be used to set it to an exact size?Do the Button and Label controls also have these properties?6. Insert the Program Files\Visual Studio .NET\Common7\Graphics\Icons\Misc\camera.ico file (or whereever you instructor directs you to find it) as the Image prop-erty for the PictureBox control and change its SizeMode property to StretchImage.The resulting image should be like that shown in Figure 2-16.7. Add a Button control to the form with a Name property of btnMessage and acaption of Click me first!. Change the Font property to have the text displayed in 12-point boldface type. The result should appear like that shown in Figure 2-17.
It’s Your Turn!
1. Add a second label to the Vintage DVDs form you created in Step-by-Step Instruc-tions 2-3 by double-clicking the label icon in the Toolbox. 2. Move this second label around the screen with your mouse. Resize it to be approxi-mately one-half the width of the form.3. If the second label does not have the focus, click on it once. Now press the Deletekey to delete the second label.What property of the PictureBox control is used to dis-play a graphic?4. Where are the graphics that can be added to the PictureBox control found?5. What property of the PictureBox control must be changed to enlarge the graphic?6. Follow Step-by-Step Instructions 2-4 to add picture box and button controls to theVintage DVDs form.
Mini-Summary 2-3: Steps for adding a control to a form
1. Select the control you want to add to the form in the Toolbox and either click the control once to draw it on the form, or double-click the control to position it in the center of the form..2. If you clicked the control once, use the crosshair to “draw” it on the form by holding the left mouse button down. In either case, drag the control to the desired position and use the sizing handles to adjust it to the desired size.3. Change the properties for the control as discussed earlier.
ADDING CODE TO THE PROJECT 43
ADDING CODE TO THE PROJECT
Now that you have a completed the interface, the next steps in the application devel-opment process are to develop the logic for the action objects in the project and towrite and test the code for them. There is only one action object—the button—in theVintage DVDs project, and the logic is very simple: Display the “Welcome to VintageDVDs” message when the button is clicked. The only input is the mouse-click eventand the only output is the message. There is no processing to speak of.
Write and Test Code for Action Objects
Once you have created the logic for the action objects, the next step is to write and testthe code for each of the action objects. There is only one action object in the VintageDVDs project: the button. The code for this object must display a welcome messagewhen it is clicked.
To do this, we need a very useful VB .NET operation: the message box. Themessage box is a special dialog box with a message placed there by the project devel-oper. When requested by some event, the message box will appear on the screen dis-playing the message. It will remain on the screen until the user clicks its Ok button. Towrite the code that will display a message box in the Vintage DVDs application whenthe button is clicked, we need to add code for the click event for the Button control.To do this, double-click the button on the form to display the Code window as shownin Figure 2-18.
The Code window is the place in the VB .NET development environment wherewe enter the code that will cause the various objects to respond as we want them to.This code is called an event handler because it defines how the object will respond toan event. Note that it shows the name of this new class that we have created—frmVin-tage in the Class List Box in the top left side of the code window. It also shows con-trol and the event—btnMessage_Click—in the Method list box in the top right of theCode window. Note also that there is a tab for the Design window enabling you toquickly switch back to this view of the project.
When you access the Code window, the first and last lines of the event handlerprocedure are already displayed with a blank line between them. The first line beginswith “Private Sub ...” and last line is “End sub”. When you open the Code window,you will probably not see the end of the first line—"Handles btnMessage.Click", as itmay extend off the screen. We have used the underscore (_) continuation character to"wrap" the code so you can see this important part of the first line. It tells us that thisis the code procedure that handles the Click event for the btnMessage button. This is
FIGURE 2-18. Code window for Button control
Class List Box Methods List Box Design Tab
Code for event handler
44 Chapter 2 Using VB .NET to Create a First Solution
the default procedure for the Button control that automatically is displayed when youdouble click the Button control. However, as we shall see later, you do not have to usethe default event for a control. Because this is a code procedure to handle the event, itis also often referred to as an event procedure.
To display a dialog box with a message in it when the btnMessage control isclicked, you should move the cursor to the blank line between the first and last lines ofthe btnMessage_Click event procedure and add a single line of code to this procedure:
MsgBox (“Welcome to Vintage DVDs”)as shown in Figure 2-18. As you enter this code, you will probably see a help tip win-dow pop up; you may ignore it for the time being.
Note that for better readability you should indent the instruction by pressing theTab key. VB .NET will check lines of code that you enter and alert you to obviousvocabulary and syntax errors. However, it cannot catch all errors, especially errors thatare based on invalid logic.
Note that this is the code window for just the btnMessage_Click event. All of theobjects in this project—the Form, Label, Button and PictureBox controls can beaccessed by clicking the down arrow on the Class list box. The events for those con-trols can be accessed by clicking the down arrow on the Methods listbox. For example,to reach the double-click event for the PictureBox, you would select the PictureBoxcontrol from the Class listbox and then select double-click from the Methods listbox.
To return to the form design window, you can click on the Form1.vb [Design] tabin the Form Design window or click the View Object button in the Solution Explorerwindow. To return to the Code window, you can double-click the control for whichyou wish to add code, click the Form1.vb tab, or click the View Code button in theSolution Explorer window.
Once you have entered the single instruction for btnMessage_Click event in theCode window, you are ready to test your project by executing it. You can do this in anumber of ways, but we suggest you use the VCR-type Start button on the toolbar.When you click this button, the grid dots on the form will disappear and you will be inRun Time. You can now click the button to determine if you have entered the codecorrectly. If you have, the message box shown in Figure 2-19 will appear. Note thatthere are no grid dots on the form, because the grid disappears when the project isexecuted. Note also that the title bar of the message box has a caption of “Vintage2”This is the current name of the solution. Any message boxes displayed in the solutionuse the solution name as their default title. In a later chapter, you will learn how tocontrol the title bar caption for a message box. If you click Ok on this window, it willdisappear.
When you clicked the Run button on the Standard toolbar, a new Debug toolbarappeared beneath the existing toolbars. We will use this toolbar later to look for errorsin your programs. For the time being, we want to use the VCR-type Stop button onthis toolbar to terminate the execution of the project .
If you have not entered the code correctly, you may receive an error message ask-ing you if you wish to continue. If this occurs, you should choose not to continue. This
TIP: You can execute a project by selecting the Start option from theDebug submenu (denoted as Debug|Start) or by pressing the F5function key. You can stop the execution of a project clicking theclose icon in the upper right-hand corner of the form..
Start
Stop
ADDING CODE TO THE PROJECT 45
will generate an error message in the Task list. Double-clicking anywhere in this errormessage will display the Code window with the error highlighted. For example, if wemisspelled the Msgbox command as MgBox, this will result in an error. Figure 2-20shows the Code window and Task list resulting from this error.
The error can be corrected in the Code window and the project run again. Someerrors will not generate an error message; instead they will result in the project not car-rying out the desired results. These errors are usually the result of an error in theunderlying logic, so you will need to go back and check the IPO Tables andpseudocode to find the error. Once you have found it, you must transfer the correc-tion in logic to the code for the control and start the error-checking process again.
FIGURE 2-19. Message window displayed
FIGURE 2-20. Error in project
Tip: If you receive an error messagte in the Task List window, trydouble-clicking the error. In many cases, the line with the error willbe displayed
46 Chapter 2 Using VB .NET to Create a First Solution
Test Overall Project and Document It
Normally, after you have coded and tested each individual action object, you are readyto test the overall project and document it. However, in this very simple first projectthese steps are unnecessary. In later projects, we will discuss the process of carryingout these steps.
Step-by-Step Instructions 2-5: Adding code to a button
1. Double-click the btnMessage button and add the single instruction after the firstline in the Code window as shown in Figure 2-18:
Msgbox “Welcome to Vintage DVDs”2. Notice that when you clicked the btnMessage button some VB .NET code wasautomatically generated. How do the automatically generated statements indicate theircorresponding action object and event?3. Click the View Designer button in the Solution Explorer window to display theform. Click the Run button on the toolbar and then click the btnMessage button. Yourform should look like Figure 2-19.4. Click the Ok button on the message box and then click the Stop button on theDebug toolbar.5. Click the View Code button, change the term “Msgbox” in the message box state-ment to “Msbbox” and run the project again. What happens? Correct your error andrun it again to make sure you did not add other errors.6. Terminate the execution of your project and display the form again.
It’s Your Turn!
1. How do you add code to an object on a form?
2. Where does the code for the object go in the code window?3. How do you switch between the code window and the form design window?4. What buttons do you use to start and stop a project?
Mini-Summary 2-4: Writing and Testing an Event Procedure
1. To add code for a control, double-click it to display the Code window with the first and last lines of the event handler already entered.2. Enter the code for the control between the existing first and last lines of the event handler.3. Click the View Designer button on the Solution Explorer window or the Design Tab to display the form.4. Click the Run button on the toolbar to execute the project. Use the Stop button on the Debug toolbar to terminate the project. 5. Test the functionality of the control; if an error occurs, correct it in the Code window.
WORKING WITH FILES IN VB .NET 47
5. Where are errors in a project listed?
WORKING WITH FILES IN VB .NET
Now that you have a little experience working with VB .NET, we will take a closerlook at the menu bar and toolbar to work with files in VB .NET The menu bar con-tains options that correspond to submenus that contain all of the commands neededfor working with the development environment. The toolbar contains icons corre-sponding to the more commonly used menu commands. As in other Windows appli-cations, you access an option from the menu bar by clicking on the option or bypressing the Alt key and, while holding it down, pressing the underlined letter. Forexample, you can access the File option by clicking on the word File in the menu bar orby pressing the Alt+F key combination. Once you have a submenu, you can selectcommands or submenus from it in a similar manner. Figure 2-21 shows the top half ofthe File menu. An icon beside a submenu option indicates that this option is also avail-able on a toolbar.
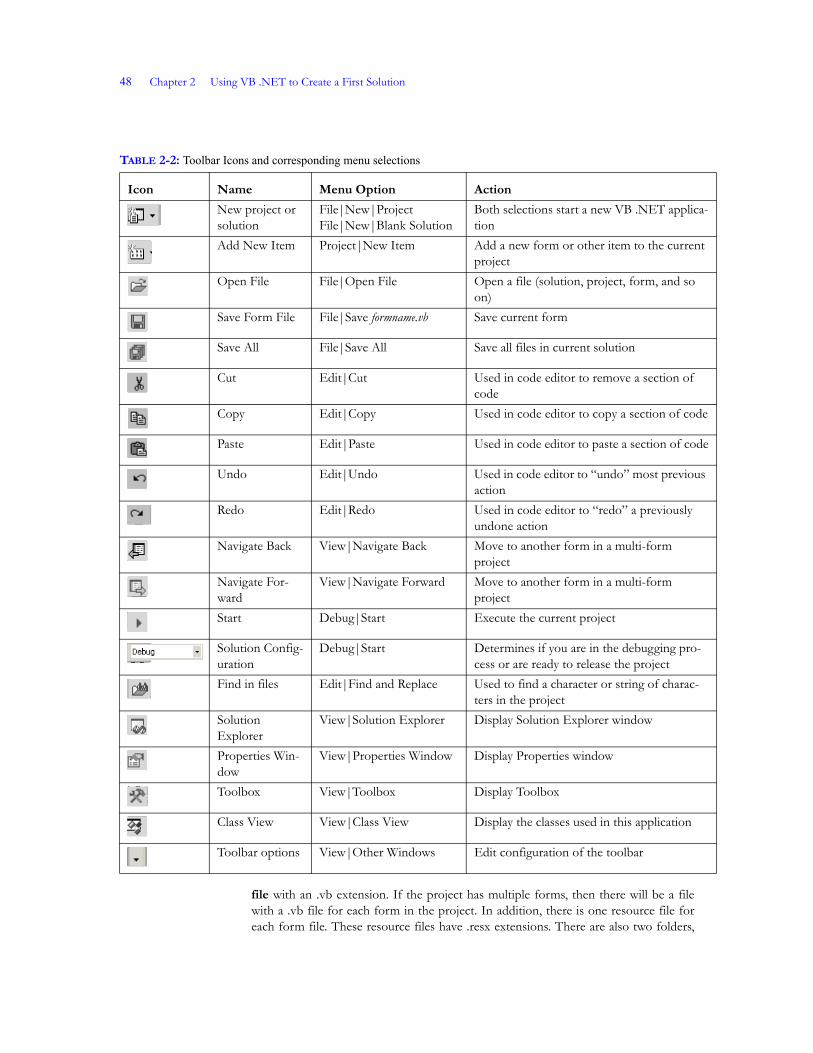
The Standard Toolbar Clicking an icon on the toolbar is a shortcut way of carrying out the most popularcommands. ToolTips are available to help remind you of the purpose of each of thetoolbar icons. The icons for the Standard toolbar and their names, correspondingmenu options, and use are shown in Table 2-2.
In addition to the Standard or default toolbar, there are other toolbars that con-tain icons for specialized operations. For example, the Debug toolbar contains iconsrepresenting all of the operations you will need to find errors in your projects. You cansee what toolbars are open for your project by selecting the View|Toolbar menuoption and noting those with a checkmark beside them. You can open new ones orclose those that are open by checking or unchecking them. For purposes of this book,we will only assume that the Standard and Web toolbars are open.
Files in VB .NET When you have completed a project or when you have to stop work before finishing,you need to save your work to disk so you can retrieve it later for more work. In addi-tion, you should save your work frequently, especially before attempting to executeyour application. To save a project, you first need to understand the files that are a partof it. First, recall that a file is a group of data, instructions, or information to which a name can beapplied. In VB .NET, each solution has one solution file with an .sln extension and atleast one project file with a .vbproj extension. Each project typically has one form
FIGURE 2-21. A portion of the File submenu
48 Chapter 2 Using VB .NET to Create a First Solution
file with an .vb extension. If the project has multiple forms, then there will be a filewith a .vb file for each form in the project. In addition, there is one resource file foreach form file. These resource files have .resx extensions. There are also two folders,
TABLE 2-2: Toolbar Icons and corresponding menu selections
Icon Name Menu Option Action
New project or solution
File|New|ProjectFile|New|Blank Solution
Both selections start a new VB .NET applica-tion
Add New Item Project|New Item Add a new form or other item to the current project
Open File File|Open File Open a file (solution, project, form, and so on)
Save Form File File|Save formname.vb Save current form
Save All File|Save All Save all files in current solution
Cut Edit|Cut Used in code editor to remove a section of code
Copy Edit|Copy Used in code editor to copy a section of code
Paste Edit|Paste Used in code editor to paste a section of code
Undo Edit|Undo Used in code editor to “undo” most previous action
Redo Edit|Redo Used in code editor to “redo” a previously
undone actionNavigate Back View|Navigate Back Move to another form in a multi-form
projectNavigate For-ward
View|Navigate Forward Move to another form in a multi-form project
Start Debug|Start Execute the current project
Solution Config-uration
Debug|Start Determines if you are in the debugging pro-cess or are ready to release the project
Find in files Edit|Find and Replace Used to find a character or string of charac-ters in the project
Solution Explorer
View|Solution Explorer Display Solution Explorer window
Properties Win-dow
View|Properties Window Display Properties window
Toolbox View|Toolbox Display Toolbox
Class View View|Class View Display the classes used in this application
Toolbar options View|Other Windows Edit configuration of the toolbar
WORKING WITH FILES IN VB .NET 49
Bin and Object, that are used in the process of converting a VB .NET solution into abinary form. Finally, for each project, there is utility program named AssemblyInfo.vbFigure 2-22 provides an overview of the VB .NET file structure.
Where there a number of files and folders in each VB .NET solution, you needonly worry about a few since the remainder are automatically taken care of by theMDE. When you started a new solution named Vintage2, VB .NET generated a folderwith a name of Vintage2 for you in the Chapter2 folder.. The solution (.sln) and project(.vbproj) files were also given these same names and your form file was namedform1.vb. Since we will be using the same solution and project files as we are updatingthe Vintage DVDs project, we will need to rename them so they can say the same(Vintage) throughout the book. Similarly, since the form name is a generic name thatdoes not fit the Vintage DVDs solution on which we are working, we will change it inthe next section.
Saving VB .NET Files To save a VB .NET solution with the default names, simply click the Save icon on thetoolbar. Since all such files are saved in separate folders, there is no problem with over-writing other files with the same name for different solution. However, to change thenames of the .sln, .vbproj, and .vb files before saving the project. To change the namesof the .sln and .vbproj files to Vintage from Vintage2, right-click on them and select theRename option.
For the form file, you need to actually use the File menu and go to use the SaveForm1.vb as ... option. When you do this, a Save File As dialog box will be displayedfor the current folder (Vintage2), with the current form file name (initially, Form1.vb).We want to change this name to Vintage.vb, so simply click on the file name in the dia-log box if it is not already highlighted and type in the new name, Vintage.vb and pressENTER. Note: do not include the file extension in the file name. VB .NET will auto-matically add the appropriate extension. If there were additional forms or project ele-ments, their filenames will also be shown here for you to accept or change.
Once you have changed the default filenames, clicking on the Save All icon willautomatically save them again without displaying the file dialog boxes. Only if youselect File|Save filename.vb as... will the file dialog box be displayed. When youhave completed your work on a project, you can exit VB .NET by selecting the Exitoption from the File submenu (File|Exit).
FIGURE 2-22. VB .NET file structure
50 Chapter 2 Using VB .NET to Create a First Solution
Retrieving a saved solution or starting a new one
Retrieving a previously saved project from disk is very easy. When you first access VB.NET, the solutions on which you have worked most recently will be listed on the StartPage and you can simply click on the work to open. If a solution is not listed, you cansee more solutions by clicking on the "Open Project" button and then selecting thefolder you wish to open. You can also open a solution from within another solution byusing the File|Open Projects menu option and doing the same operation.
Instead of retrieving an existing solution, you will often want to start a new one. Ifyou choose to do this from the Start Page, you simply click "New Project" and enter aname for the project in the New Project dialog box (shown earlier as Figure 2-3). Onthe other hand, if you want to start from within the VB .NET MDE, you can do thisby selecting the File|New|Blank Solution... option. In either case, it is very impor-tant to change the generic solution name composed of "WindowApplication" plus anumber to a name that more clearly defines the application. Otherwise, even if youchange the name of all files within the solution, they will still all be saved in a folderwith this generic name. Naming the name of the application at the beginning definesthe name of the folder in which all files are saved.
Step-by-Step Instructions 2-6: Saving a project
1. Right-click on Vintage2.sln and change the name to Vintage.sln. Similarly, right-click on Vintage2.vbproj and change the name to Vintage.vbproj.2. Select File|Save Form1.vb As... from the VB .NET menubar (the filename ismost likely form1.vb) and change the file name to Vintage and press ENTER (it willautomatically add the .vb extension.)3. Select Programs|Windows Explorer from the Windows Start menu and check tomake sure the files have been saved in the Vintage2 folder.4. Use the File|Exit menu option to exit the VB .NET MDE. Now start VB .NETagain and select the Vintage2 application from the Start Page. Use the Run icon toexecute the project. Terminate it by clicking the Stop icon.
Mini-Summary 2-5: Working with files in VB .NET
1. There are 21 operations that can be executed from the toolbar. All of these operations correspond to com-mands available from the menu bar.2. The types of files that make up a VB .NET project include the solution file (.sln), project files (.vbproj), form files (.vb), and resource files (.resx). There are also the bin and object folders.3. You should save the form files through the File|Save Form1.vb as ... menu option. 4. You can save a project though the toolbar Save All icon or through the File|Save All menu option. Simi-larly, you can open a saved project through Open Project toolbar icon or through the File|Open Project menu option. 4. To start a new project, select the File|New Project menu option and give it a name when you open it.
USING VB .NET HELP 51
It’s Your Turn!
1. Describe the meaning of each of the following VB .NET file extensions:
a. .vbb. .vbprojc. .slnd. .resx
2. Why is it necessary to change the form file name and not the other file names?3. What is the difference between the form file name and the form name?
USING VB .NET HELP
VB .NET is a very powerful development platform that offers many more capabilitiesthan can be discussed in an introductory programming text such as this. Fortunately,VB .NET also offers developers a powerful Help system that offers help on virtuallyany possible question. In fact, there are four types of help available to you in VB.NET: the Help menu option, Dynamic help, Web-based help, and Auto help. We willdiscuss each type of help in a separate section.
Figure 2-22 Using the Help menu option
If you select the Help menu option, the various options shown in Figure 2-22 are dis-played. Note that it starts out with one of the other types of help—Dynamic Helpwhich is a powerful new help system that is a part of VB .NET and which will be dis-cussed separately in the next section. Also listed are options for Contents, Index,andSearch in addition to a number of other options. Probably the only other option youmight select is the Show Start Page option which takes you back to the Start Pagefrom which you can change your Profile if you wish.
With all three of the Contents, Index, and Search Help menu options, selecting anoption displays a list of results in the Solution Explorer Window. For example, if youselect Index, the results are displayed as shown in Figure 2-23. Note that the usual con-tents of the Solution Explorer Window are replaced by a list of help items in alphabet-ical order with a search window at the top, but that there is a Solution Explorer tab atthe bottom of the window which will take you back to it. Note also that this windowshows that the help is being filtered by the Visual Basic so only help topics for that lan-guage are shown.
The Contents Help menu option is an organized to provide a book-like discus-sion of Visual Studio and VB .NET. In fact the book icon is used to show the variouschapters that can be opened with this type help. If you "drill down" far enough, a doc-ument icon is displayed and clicking on it will display the actual help in the WinFormDesigner window.
Tip: You should be aware that, because VB .NET is a part of theVisual Studio .NET system, unless you select the Visual Basic Helpfilter on the My Profile page, when you select help on a topic, youwill receive help on that topic for all of the languages in Visual Studio.NET. Selecting this filter restricts help to just VB .NET.
52 Chapter 2 Using VB .NET to Create a First Solution
The Index Help menu option provides an alphabetized list of keywords forVisual Basic (VB .NET) as shown in Figure 2-23. You can select a keyword by clickingit, the corresponding help document will be displayed in the WinForms Designer win-dow. If there are multiple matching documents, they will be listed in in a separate dia-log box from which you can select the one that best matches your needs. You can alsoenter a word in the box above the Index list and search for matching keywords. Forexample, if you chose the Index Help menu option and then entered "button" as asearch word, you would receive a number of possible matches. However, since we areworking on Windows forms, you would choose the option that matches this type ofbutton. Clicking on "Overview", would display two possible matches in the Task Listand selecting "Introduction to the Windows Button Control" displays the screenshown in Figure 2-24 with the list of options in the dialog box (which has been dockedbelow the main window by dragging it there) and the help document in the WinFormDesign window.
The Search Help menu option enables you to search all of the Help documentsinstead of just the titles or keywords. For example, if you wished to find other exam-ples of the use of the word "clipped" which is found in the fifth line of the documentshown in Figure 2-24, you could enter this word in the input box for the Search optionand find other documents containing this word.
FIGURE 2-23. Index Help screen in Solution Explorer Window
FIGURE 2-24. Example of Help Document
USING VB .NET HELP 53
Between the Contents, Index, and Search options on the Help menu, you can findout how to carry out almost any option in VB. NET. They are undoubtedly extremelypowerful help tools.
Dynamic Help A new and very useful help tool in VB .NET is Dynamic Help. When Dynamic Helpis selected from either the Help menu or from the tab at the bottom of the Propertieswindow, a list of help topics replaces the existing list of properties in the Propertieswindow. This list of help topics is context-sensitive in that clicking a control on a form indesign mode or positioning the cursor on a term in the Code window will result in VB.NET attempting to provide context sensitive help on the item to which you are point-ing. While it is not always perfect in matching the help provided to your needs, it doesa very good job on most things. For example, if you click the button in the VintageDVD application, a list of help topics is shown in the Properties window and one ofthem is the same "Introduction to the Windows Button Control" option which wasshown Figure 2-24. Similarly, if you position the cursor on the MsgBox instruction inthe Code window, a list of topics, sample code, and general instructions on gettingstarted with VB. NET relating to the MsgBox instruction instruction will be displayedin the Properties window as shown in Figure 2-25. Clicking on one of these topics willresult in information about it being displayed in the WinForm Designer window. Inmany situations, Dynamic Help can be the fastest way to obtain information on a con-trol, code instruction, or other feature of VB. NET.
"Think Ahead" Help In addition to the type of help where you are actively looking for information, VB.NET can automatically provide you several types of information as you work. In theprocess of entering code, you may have already noticed the little boxes that pop upwith information about the statement you are entering. These boxes are a part ofMicrosoft’s effort to have VB .NET “think ahead” and provide you with informationyou need to complete the statement. There are two primary kinds of "think ahead"help in VB .NET: Auto List and Parameter Information. In the first case, Auto Listdisplays a box of items that can be used to complete a statement. For example, if you
FIGURE 2-25. Dynamic Help Screen
TIP: Pressing F1 will also result in Dynamic Help being activated forthe current control or code.
54 Chapter 2 Using VB .NET to Create a First Solution
type a word or phrase in the Code window, the Auto List feature provides you with alist of possible completions from which to choose. Highlighting one the completionsin the list and pressing ENTER will insert the completion at the end of the currentstatement.
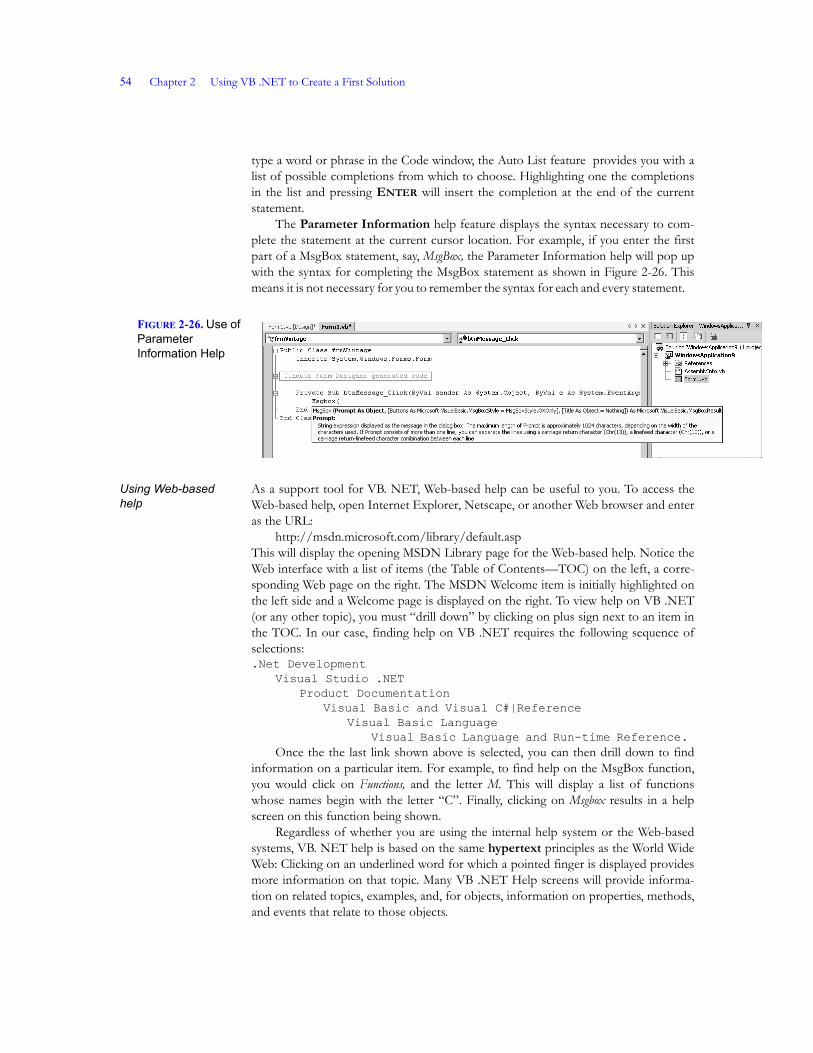
The Parameter Information help feature displays the syntax necessary to com-plete the statement at the current cursor location. For example, if you enter the firstpart of a MsgBox statement, say, MsgBox, the Parameter Information help will pop upwith the syntax for completing the MsgBox statement as shown in Figure 2-26. Thismeans it is not necessary for you to remember the syntax for each and every statement.
Using Web-based help
As a support tool for VB. NET, Web-based help can be useful to you. To access theWeb-based help, open Internet Explorer, Netscape, or another Web browser and enteras the URL:
http://msdn.microsoft.com/library/default.aspThis will display the opening MSDN Library page for the Web-based help. Notice theWeb interface with a list of items (the Table of Contents—TOC) on the left, a corre-sponding Web page on the right. The MSDN Welcome item is initially highlighted onthe left side and a Welcome page is displayed on the right. To view help on VB .NET(or any other topic), you must “drill down” by clicking on plus sign next to an item inthe TOC. In our case, finding help on VB .NET requires the following sequence ofselections: .Net Development
Visual Studio .NETProduct Documentation
Visual Basic and Visual C#|ReferenceVisual Basic Language
Visual Basic Language and Run-time Reference. Once the the last link shown above is selected, you can then drill down to find
information on a particular item. For example, to find help on the MsgBox function,you would click on Functions, and the letter M. This will display a list of functionswhose names begin with the letter “C”. Finally, clicking on Msgbox results in a helpscreen on this function being shown.
Regardless of whether you are using the internal help system or the Web-basedsystems, VB. NET help is based on the same hypertext principles as the World WideWeb: Clicking on an underlined word for which a pointed finger is displayed providesmore information on that topic. Many VB .NET Help screens will provide informa-tion on related topics, examples, and, for objects, information on properties, methods,and events that relate to those objects.
FIGURE 2-26. Use of Parameter Information Help
USING VB .NET HELP 55
Step-by-Step 2-7: Using the Help in VB .NET
1. Position the pointer on the MsgBox function in the code window for the VintageDVD application. Now select Dynamic Help from either the Help menu or the tab atthe bottom of the Properties window. You should see the similar information to thatdisplayed in the Properties window as shown earlier in Figure 2-25.2. With the code window for the Vintage DVD application still displayed, position thepointer at the end of the first line of the btnMessage event handler procedure andpress ENTER to open up a blank line. Type MsgBox and press the SPACEBAR once.You should now see the same Parameter Information help as was shown in Figure 2-26. 3. Press ESC to exit the Parameter Information help and then select File|Exit to exitVB .NET without saving the revised Vintage DVDs application.
It’s Your Turn
1. Select Help from the menu bar, select the Index option from the Help menu, andenter PictureBox Control into the input box. Select Overview and then Introduc-tion to the Windows PictureBox Control to display information on the PictureBoxControl. Select the underlined option that will display information on loading an imageat design time. Select the Solution Explorer tab at the bottom of the window to returnto the Solution Explorer view.
Tip: This Web site is very dynamic and may actually be somewhatdifferent from that described.
Mini-Summary 2-6: VB .NET Help
1. There are three types of help available to you in VB .NET: the Help menu option, Dynamic Help, and "Think Ahead" Help. 2. The Help menu option has three main types of help: Contents, Index, and Search. Contents provides a dis-cussion of major topics while the Index help provides a searchable list of keywords. The Search operation can be used to search for any words in all help documents. Much of this information is shown in the Solution Explorer window. The help documents themselves are shown in the WinForm Design window.3. With Dynamic Help, you can locate the cursor on a control on the form or word in the Code window and see a list of help topics on that control or code statement in the Solution Explorer window.4. If you are typing a statement, VB .NET will try to “think ahead” and provide information on completing that statement. 5. Using the Web-based help, you must “drill down” to the information you need through a series of lists of items.
56 Chapter 2 Using VB .NET to Create a First Solution
2. Click the Search option Help screen and enter PictureBox Control into the inputbox. How many matches did you find? Click on the exit icon at the top right of theWinForms Design window to exit the Help System. Can you return to the most recentresults quickly? How?3. Use Help to find the answers to the following:
a. What is the Rnd function?b. What does the Inputbox function do?c. What does the End statement do?d. Which arguments are required for the Msgbox function?
4. Repeat the previous question using Web-based help.
SUMMARY At the beginning of the chapter, we said you would be able to do a number of things after reading it.Let’s review those things here:1. Begin using Visual Studio .NET and then VB .NET. VB .NET is one of sev-
eral languages which can be used to create applications using Visual Studio .NET. Starting Visual Studio .NET results in the Start Page being displayed from which the user can create their Profile. The Profile can include setting up a filter to display only VB. NET help topics. New projects can be started or existing projects can be opened. If a new project is being started, it must be named and the type of project selected before the design environment is displayed.
2. Point out the elements of the Microsoft Development Environment (MDE) used for VB .NET. Understanding the Microsoft Development Environment (MDE) is essential to being able to create information system applications in VB. NET. The MDE includes the menu bar, toolbar, Toolbox, Window Forms (Win-Form) Designer window, Solution Explorer window, Properties window, and Task List/Output window. The menu bar provides access to all of the commands needed to create applications, and the toolbar has icons corresponding to the more popular commands. The Toolbox has icons corresponding to various controls that can be dragged onto the WinForm window to create an interface. The Solution Explorer window shows the files that make up the project, and the Properties win-dow displays the properties of the controls on the Form. The Task List/Output window displays tasks to be completed by multiple developers or output messsages from executing application when it is completed.
3. Discuss the use of the form in creating a VB .NET project. The form is the object on which the the interface for the application is created. A form can be resized to match the needs of the application. The actual application involves adde-ing instances of controls and writing code for those controls that should respond to an event.
4. Understand controls and their properties. Controls are instances of objects that are located in the toolbox and can be positioned on the form to create an interface. An instance of a control can be placed on the form by selecting it from the Tool-box and drawing on the form or double-clicking the control to display it on the form. Controls used in this chapter included the Label, Button, and PictureBox. All
NEW VB .NET ELEMENTS 57
controls have properties or attributes such as the name, text, and image properties that can be set in design mode. These properties distinguish one instance of a con-trol from another on the same form.
5. Discuss the Code window used to write an event handler. Once the interface has been created, the next step is to write the code for the action objects on the form to handle an event such as a mouse click. This is done by double-clicking a control and entering the instructions for it in VB .NET in the Code window to respond to a specific event. In this chapter we used the Code window to cause a message box to appear with a specific message when a button was clicked.
6. List the different types of files that make up a VB .NET application and be able to save an application. The files that make up a VB .NET application include a solution file with an .sln extension, one or more project files with a .vbproj extension, one or more form files with a .vb extension, a resource file for each form file with an .resx extension and an assemblyinfo file with a .vb exten-sion. You can save an application through the toolbar Save Files icon or through the File|Save All menu option. You can change the name of files with the Proper-ties window or through the File|Save formname As ... menu option. Similarly, you can open a saved application through the File|Open Project menu option.
7. Understand how to use the various VB .NET help facilities to answer ques-tions about creating a project. There are six types of internal help available to you in VB .NET: the Help menu with the Content, Index, and Search options, Dynamic help, and two types of think ahead help. You can also access help over the Web. Using the Web-based help, you must “drill down” to the information you need through a series of lists of items. .
EXERCISES 1. Describe two techniques for adding controls to a form at design time.
NEW VB .NET ELEMENTS
Controls/Objects Properties Methods Events
Form object NameCaption
label control NameCaptionFont
button control NameCaptionFont
Click
image control NamePicture
NEW PROGRAMMING STATEMENTS
MsgBox “message”
58 Chapter 2 Using VB .NET to Create a First Solution
2. Suppose that you will be using four command buttons on your form. You wouldlike for all four buttons to be the same size. In addition, you would like to line them upvertically along their right edge with equal spacing between them. Which button prop-erties would you set? Provide an example of how you would set these property values.3. Compare the properties of the form, Button, Label, and PictureBox controls. Whatproperties do they have in common? What properties are different?4. When will the following code be executed? Describe what occurs when it is exe-cuted.
Private Sub PicActiveImage_Click(ByVal sender As Object, _ByVal e As System.EventArgs) Handles PicActiveImage.Click Msgbox("Hi Kids. Welcome to my albright."End Sub
5. Using VB .NET, create a simple project that includes a form, a button, and a mes-sage that appears when the button is clicked. Test and save your project and exit VB.NET. Using any file utility, such as Windows Explorer, change the file name of the.frm file. Re-enter VB .NET and re-load your project. What happens when the projectattempts to load? What occurs when you try to run the project? What error did theinstructions lead you to make? Why does this error occur? Can you determine how tocorrect the problem?
PROJECTS 1. Use the File|New Project menu option to create a VB .NET interface that willcorrespond to the sketch shown in Figure 2-27. Give appropriate names to your con-trols. Assume that when you click the CommandButton control, a message is displayedthat reads, “Professor Beige’s Grading Program.” The question mark symbol can befound at \graphics\icons\misc\question.ico in the VB .NET directory. Use 16-pointArial font for the label. Test your project and correct any problems. Save the form asEx2-1.frm and the project as Ex2-1.vbp. Place them in a folder named Ex2-1 in theChapter2 folder on your data disk. Use the Windows Explorer tool to determine whatother files were created when you created the project files.
KEY TERMS
Auto Helpbinary form fileClass ListboxCode windowcontext sensitive helpcontinuation charactercontrolscustom controlsdefault eventdesign modeDesign windowevent handlerevent procedureEvents/Procedures list box
filefocusformform filehypertextmenu barmessage boxmodule fileMicrosoft Development Environ-ment (MDE)
Multiple Document Interface (MDI)Object list boxProgram Design modeProject Explorer window
2. Use the File|New Project menu option to create a VB .NET interface that willimplement the sketch shown in Figure 2-28. Give appropriate names to your controls.Assume that when you click the CommandButton control, a message is displayed thatreads, “When completed, this button will start the program.” The world symbol can befound at \graphics\icons\elements\world.ico. Use 18-point Times New Roman fontfor the label. Test your project and correct any problems. Save the form as Ex2-2.frmand the project as Ex2-2.vbp. Place them in a folder named Ex2-2 in the Chapter2folder on your data disk.
3. Create a VB .NET interface that will implement the sketch shown in Figure 2-29.Give appropriate names to your controls. Assume that when you click the button con-trol, a message is displayed that reads, “When completed, this program will computegas mileages.” The cars symbol can be found at \graphics\icons\industry\cars.ico. Use18-point Arial Black font for the label. Use the Line control with its Border Style prop-erty set to “dashed” to create the dashed line beneath the label. Change the Backcolorproperty of the form to yellow using the Palette tab. (Yellow is in the third row, fourthfrom the left.) Also, change the Backcolor property on the label to the same color. Testyour project and correct any problems. Save the form as Ex2-3.frm and the project asEx2-3.vbp. Place them in a folder named Ex2-3 in the Chapter2 folder on your datadisk.
4. Smith and Jones, Inc., needs you to create a VB .NET interface that will implementthe sketch shown in Figure 2-30. Give your controls appropriate names. Assume thatwhen you click the top CommandButton control, a message is displayed that reads,“When completed, this button will calculate breakeven volume and revenue/costs.”
FIGURE 2-27. Sketch of interface for Exercise 1 CS 201 Programming in Visual Basic
Click me first!
FIGURE 2-28. Sketch of interface for Exercise 2
Shrub and Turf Lawn Care“We take care of the World”
Click to start
60 Chapter 2 Using VB .NET to Create a First Solution
The graph symbol can be found at \graphics\icons\office\graph01.ico. Use 18-pointImpact font for the label. Use the Line control with its Border Style property set to “sol-id” to create the line beneath the label. Change the Backcolor property of the form towhite using the Palette tab (white is in the first row, first column). Also, change theBackcolor property on the label to the same color. Save the form as Ex2-4.frm and theproject as Ex2-4.vbp. Place them in a folder named Ex2-4 in the Chapter2 folder onyour data disk.
5. Cover-Your-Walls, Inc., has requested your services to create an interface for a VB.NET program that will compute room area and number of rolls of wallpaper needed.A sketch is shown in Figure 2-31. Assume that when you click the button control, amessage is displayed that reads, “When completed, this button will calculate room areaand number of rolls required.” The house symbol can be found at \graphics\icons\misc\house.ico. Use 16-point Desdemona font for the label. Change the Back-color property of the form to white using the Palette tab (white is in the first row, firstcolumn). Also, change the Backcolor property on the label to the same color. Save theform as Ex2-5.frm and the project as Ex2-5.vbp. Place them in a folder named Ex2-5 in the Chapter2 folder on your data disk.
6. Anyone who has watched television late at night has noticed (among other strangeprogramming) various pitches for “get-rich-quick” schemes. Some of these make theoutrageous claim that they can help you double your money in a very short time. A sim-ple “rule of thumb” that can be used to estimate the number of years required to double
FIGURE 2-29. Sketch of interface for Exercise 3 Click to Calculate Gas Mileage
ACME, INC.Gas Mileage Testing Program
FIGURE 2-30. Sketch of interface for Exercise 4 Calculate
BreakevenVolume and
Smith andJones, Inc.
Cost/Volume
PROJECTS 61
your money is known as the “rule of 72.” Using the rule of 72 the approximate numberof years to double an investment is equal to 72 divided by the annual percentage re-turned (for a savings account this would be the interest rate). This rule assumes that theinterest is compounded annually and is not taxed. Design a VB .NET program to beused in applying the rule of 72 using an IPO, pseudocode, and a sketch of the interface.Make sure that your interface is intuitive and visually pleasing from a user’s perspective.Begin implementing your program by creating a partial interface in VB .NET using thecontrols that you know. Feel free to experiment with other controls on your form. Savethe form as Ex2-6.frm and the project as Ex2-6.vbp. Place them in a folder namedEx2-6 in the Chapter2 folder on your data disk.
7. Professional and hard-core amateur athletes often use a heart monitor to check theirheart rate during training. The monitor will indicate whether or not the heart rate iswithin an acceptable range of values. For those of us who are somewhat less than pro-fessional in our training, there is a pair of simple formulas that can be used to determinethis range called the target heart rate zone. We can then monitor our heart rate duringaerobic exercise and try to maintain it within this zone. The lower limit of the zone maybe estimated as 60% of the difference between 220 and your age. The upper limit of thezone may be estimated as 75% of the difference between 220 and your age. Design aVB .NET program to determine your target heart rate zone. Use an IPO, pseudocode,and a sketch of the interface. Make sure that your interface is intuitive and visually pleas-ing from a user’s perspective. Begin implementing your program by creating a partialinterface in VB .NET using the controls that you know. Feel free to experiment withother controls on your form. Save the form as Ex2-7.frm and the project as Ex2-7.vbp. Place them in a folder named Ex2-7 in the Chapter2 folder on your data disk.
8. Have you ever wondered which size pizza actually provides the most pizza for yourpizza buying dollar? Round pizzas are often identified by their diameter. The size of thepizza in square inches may be computed using the formula for the area of a circle (area= π*diameter2/4). The price of the pizza per square inch may then be calculated by di-viding the total price by the pizza’s area. Design a VB .NET program to be used in de-termining the area of a pizza in square inches and the price per square inch. Use an IPO,pseudocode, and a sketch of the interface. Make sure that your interface is intuitive andvisually pleasing from a user’s perspective. Begin implementing your program by creat-ing a partial interface in VB .NET using the controls that you know. Feel free to exper-iment with other controls on your form. Save the form as Ex2-8.frm and the project
FIGURE 2-31. Sketch of interface for Exercise 5
Cover-Your-Walls, Inc.
Calculate
62 Chapter 2 Using VB .NET to Create a First Solution
as Ex2-8.vbp. Place them in a folder named Ex2-8 in the Chapter2 folder on your datadisk.
This material is protected by copyright and may not be downloaded, reproduced, stored in a retrieval system, modified, made available on a network, used to create derivative works, or transmitted in any form or by any means, except (i) in the Unit-ed States, as permitted under Section 107 or 108 of the 1976 United States Copyright Act, or internationally, as permitted by other applicable national copyright laws, or (ii) as expressly authorized on this Web site, or (iii) with the prior written permission of Wiley