Weather Briefings 3 - 1 3 WEATHER BRIEFINGS This chapter co vers everything you need to know about adding weather briefing data to your planned route. FliteStar Weather Briefing No w that your flight from Denver to Portland is planned, you should check the current and forecast weather for this part of the United States before filing your flight plan. FliteStar provides a connection to CSC DUATS and to DTC DUAT as well as the Jeppesen international weather service. To access the weather briefing for your flight: 1. Click the Weather tab. The DUATS Controller appears at the bottom of the screen. 2. Select either DTC DUAT (dialup or Internet) or CSC DUATS (dialup or Internet) from the Weather Provider list and fill in your access number and password. 3. From the Weather Types list, select Standard WX: Area and click Add . The Standard WX: Area dialog box appears. 4. In the Standard WX: Area box: • Enter an appropriate time in the Departure Time field. • Select the Use Zulu check box. • Type KBJC in the Departure Point field. T o access the benefits of the Weather tab, you must first establish an account with one or more weather service. For information on creating an account with a weather service, see Help/DUATS/Set Up Your DUATS Accounts. Figure 3-1: The DUATS Controller area.
Transcript
CH03.fm Page 1 Tuesday, August 19, 2003 6:57 AM
3 WEATHER BRIEFINGSThis chapter covers everything you need to know about adding weather briefing data to your planned route.
FliteStar Weather Briefing Now that your flight from Denver to Portland is planned, you should check the current and forecast weather for this part of the United States before filing your flight plan. FliteStar provides a connection to CSC DUATS and to DTC DUAT as well as the Jeppesen international weather service.
To access the weather briefing for your flight:
1. Click the Weather tab. The DUATS Controller appears at the bottom of the screen.
2. Select either DTC DUAT (dialup or Internet) or CSC DUATS (dialup or Internet) from theWeather Provider list and fill in your access number and password.
3. From the Weather Types list, select Standard WX: Area and click Add. The Standard WX:Area dialog box appears.
4. In the Standard WX: Area box:
• Enter an appropriate time in the Departure Time field.
• Select the Use Zulu check box.
• Type KBJC in the Departure Point field.
To access the benefits of the Weather tab, you must first establish an account with one or more weather service. For information on creating an account with a weather service, see Help/DUATS/Set Up Your DUATS Accounts.
Figure 3-1: The DUATS Controller area.
Weather Briefings 3 - 1
CH03.fm Page 2 Tuesday, August 19, 2003 6:57 AM
• Type N1234 in the Tail Number field.
• Type 12000 in the Altitude field and 25 in the Radius field.
• Select the Plain Language, FAA Weather, and General FDC NOTAMS check boxes.
• Click OK.
1. From the Weather Types list, select Graphic Weather Maps (CSC DUATS) or WeatherMaps (DTC DUAT). Click Add.
2. From the list that appears, select the following weather maps:
• Surface Analysis
• 12 Hour Surface Forecast
• Weather Depiction
3. Ensure the aircraft Tail Number field is correct (N1234) and click Done.
4. Click Connect.
Inspecting the Weather BriefingOnce you’ve set up the DUATS properties, FliteStar executes script commands that automatically issue instructions to the DUATS. FliteStar then tags all of the collated textual matter for retrieval by subject and stores any downloaded maps or other images.
You have several options for viewing the weather information.
• View a specific type of weather information by clicking the appropriate title from the weather type list to the right of the weather view.
• View a graphical weather map by clicking the thumbnail for the appropriate map from the weather type list.
• To view Radar, AIRMET, SIGMET, and Winds Aloft graphically, click the Chart View tab then click the appropriate icon from the Weather Toolbar.
For definitions of the types of weather products, see online help DUATS & Weather/ Working with DUATS/ DUATS Weather Briefings.
Plain language reports can be lengthy.
The Profile View shows clouds and the directions of winds aloft, if available.
3 - 2 Weather Briefings
CH03.fm Page 3 Tuesday, August 19, 2003 6:57 AM
Overlaying Weather Graphics on the Chart ViewDTC DUAT and Jeppesen Weather provide weather maps that can be placed on top of a charted route. To access this feature:
1. Click the Chart View tab.
2. Click View > DUATS Controller.
3. Using the DUATS Controller, select Jeppesen WX: Internet and Jeppesen WeatherImages. Click Add.
Move the mouse cursor over a wind arrow in the Profile View (do not click) and wind data displays as a tooltip.
Figure 3-2: Side bar of Terminal Window.
Weather Briefings 3 - 3
CH03.fm Page 4 Tuesday, August 19, 2003 6:57 AM
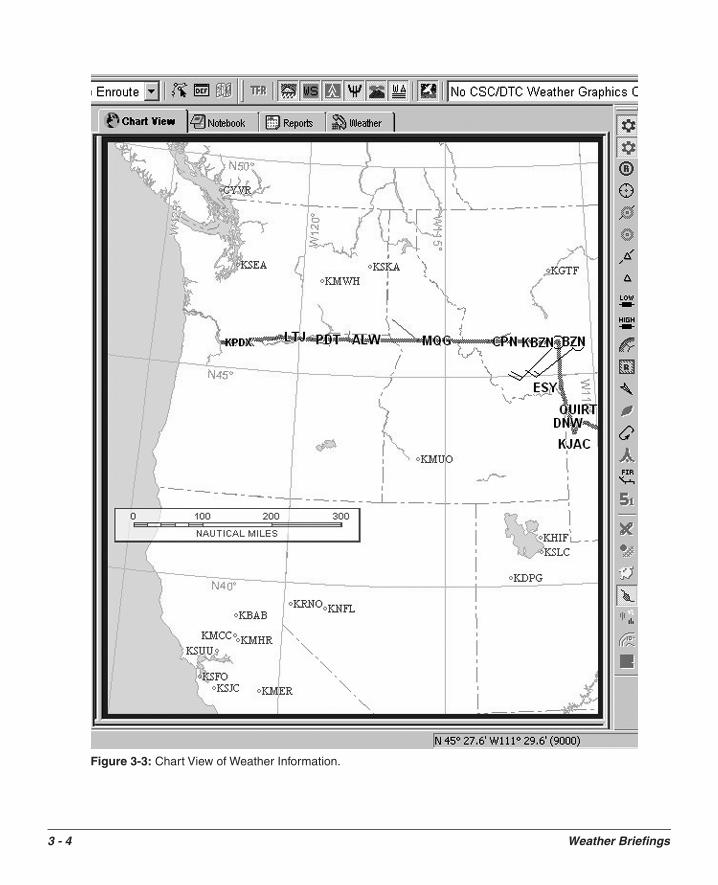
Figure 3-3: Chart View of Weather Information.
3 - 4 Weather Briefings
CH03.fm Page 5 Tuesday, August 19, 2003 6:57 AM
4. At the bottom of the Weather Graphics Selection dialog box, select the Check for NewWeather Graphics check box. This updates the map list.
5. Click OK to close the dialog box.
6. Click Connect.
7. In the Script Commands list, double-click Jeppesen Weather Images to see the updated maplist.
8. In the Weather Graphics Selection dialog box, click Northwest US in the Region drop-downlist.
9. Click the Radar Images tab and select the Northwest US Radar Base Reflectivity check box.
10. Click the Surface/Low Level Sig. Weather tab and select the Northwest US SurfaceWeather check box.
In most cases, you want to be sure the weather charts encompass the entire flight. You may want to add other maps from other regions by selecting another area in the Region drop-down list.
Figure 3-4: The Weather Graphics Selection dialog box.
Weather Briefings 3 - 5
CH03.fm Page 6 Tuesday, August 19, 2003 6:57 AM
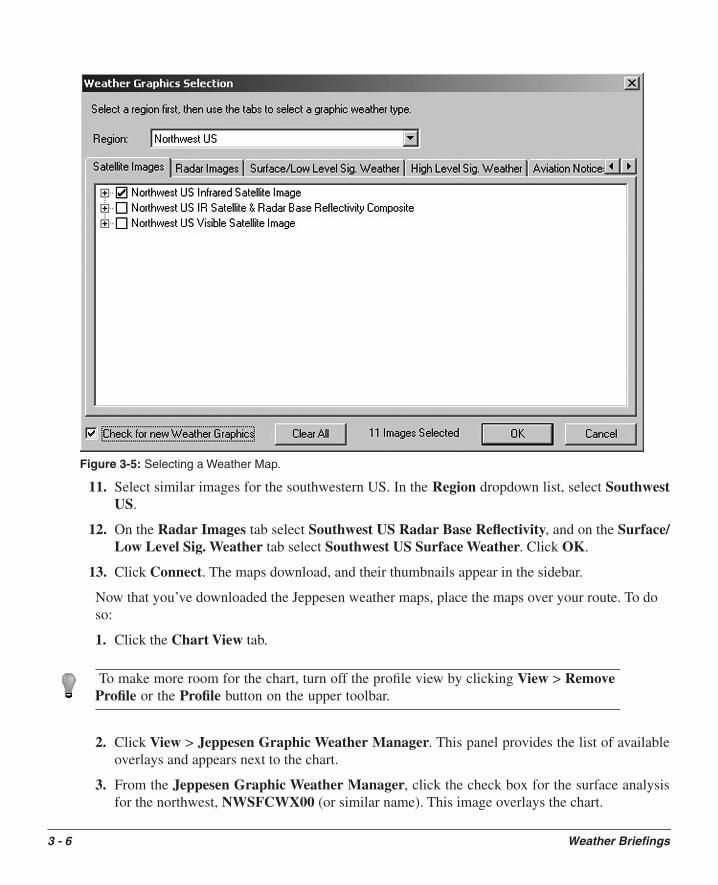
11. Select similar images for the southwestern US. In the Region dropdown list, select SouthwestUS.
12. On the Radar Images tab select Southwest US Radar Base Reflectivity, and on the Surface/Low Level Sig. Weather tab select Southwest US Surface Weather. Click OK.
13. Click Connect. The maps download, and their thumbnails appear in the sidebar.
Now that you’ve downloaded the Jeppesen weather maps, place the maps over your route. To do so:
1. Click the Chart View tab.
2. Click View > Jeppesen Graphic Weather Manager. This panel provides the list of availableoverlays and appears next to the chart.
3. From the Jeppesen Graphic Weather Manager, click the check box for the surface analysisfor the northwest, NWSFCWX00 (or similar name). This image overlays the chart.
To make more room for the chart, turn off the profile view by clicking View > Remove Profile or the Profile button on the upper toolbar.
Figure 3-5: Selecting a Weather Map.
3 - 6 Weather Briefings
CH03.fm Page 7 Tuesday, August 19, 2003 6:57 AM
4. To see if this overlaid weather graphic covers a substantial part of your route, click theRoutePack from the list (KBJC to KPDX) and press CTRL + R to show the entire route.
5. To see other weather maps overlaid on the route, select a different map from the GraphicWeather Manager.
File FAA Flight Plan with CSC DUATS or DTC DUATOnce you have a planned route and have ensured the weather won’t adversely affect the flight, you need to file a flight plan. To do so:
1. Click the Weather tab.
2. In the DUATS Controller, select either DTC DUAT or CSC DUATS.
To make more room for the chart, turn off the Jeppesen Graphic Weather Manager by clicking View > Jeppesen Graphic Weather Manager.
Figure 3-6: Selecting Another Area Map
Weather Briefings 3 - 7
CH03.fm Page 8 Tuesday, August 19, 2003 6:57 AM
3. From the Weather Types list, click File FAA Flight Plan and click Add. The File Flight Plandialog box appears.
Figure 3-7: The Jeppesen Graphic Weather Manager.
3 - 8 Weather Briefings
CH03.fm Page 9 Tuesday, August 19, 2003 6:57 AM
Figure 3-8: The chart you overlaid on your route should look like this.
Weather Briefings 3 - 9
CH03.fm Page 10 Tuesday, August 19, 2003 6:57 AM
4. All of the entries should be filled with the appropriate parameters. Look closely at each andmodify any that are incorrect.
5. Click OK. FliteStar prompts you for any missing or incorrect information.
6. Click Connect to file the plan.
If you did not create a flight plan yet, the File FAA Flight Plan box will be empty. If so, you can create the flight plan here.
Do not connect for this exercise. This action files your flight plan as active with the FAA for the next 18 hours.
For more information on modifying, filing additional plans, filing an ICAO plan, or canceling a flight plan, see online Help/DUATS Controller/Filing Flight Plans to DUATS.