20
1 Dynamics 365 Portal Capabilities for Dynamics 365 Self-hosted Installation Guide VERSION: 1.0 RELEASED: July 2017
1
Dynamics
365
Portal Capabilities for Dynamics
365
Self-hosted Installation
Guide
VERSION: 1.0
RELEASED: July 2017
2
Contents
Introduction ............................................................................................................................................................................................ 3
Deployment process ........................................................................................................................................................................... 3
Prerequisites ........................................................................................................................................................................................... 3
System requirements ..................................................................................................................................................................... 3
Import portal package into Dynamics 365 ................................................................................................................................. 9
Register Dynamics 365 SDK cmdlets ....................................................................................................................................... 9
Run Portals import script........................................................................................................................................................... 10
Publish Web Application to IIS ............................................................................................................................................... 11
Publish Web Application to Azure ......................................................................................................................................... 14
Web Notification Configuration .................................................................................................................................................. 17
Managing Web Notification URLs in Dynamics 365 ...................................................................................................... 17
Attributes & Relationships ........................................................................................................................................................ 18
Portal Configuration .................................................................................................................................................................... 18
Batch Data Operations ............................................................................................................................................................... 18
Troubleshooting................................................................................................................................................................................. 19
Find unique organization name of your Dynamics 365 ................................................................................................ 19
Secure the App_Data folder ..................................................................................................................................................... 19
IIS: Content-Length 0 for CSS, JavaScript and images .................................................................................................. 19
Copyright .............................................................................................................................................................................................. 20

3
Introduction
We’re introducing an open-source version of the portal to allow you to customize portal as per your
requirement. You can also perform Dynamics 365 on-premises deployments by deploying the solution
packages to your Dynamics 365 server manually.
Deployment process If you deploy Dynamics 365, you can:
• Customize your portal with asp.net code
• Deploy portals in your own Azure subscription
• Install portals using Dynamics 365 on-premise
• Minimize support obligations of portals
• Move back to an out-of-box non-customized version of portals, and then upgrade to the SaaS
version
Dynamics 365 can be deployed on on-premises or Office 365. The deployment process consists of the
following steps:
1. Install portal package into Dynamics 365
2. Publish web application
Prerequisites • Dynamics 365 SDK
• Visual Studio 2015
• Azure SDK for .NET 2.9 or later
• Dynamics 365 (online) or on-premises version 8.1 or later
System requirements
The following requirements are the minimum needed to install Portals:
Developer Workstation
Operating System (one of)
• Windows 7
• Windows 8.x
• Windows 10.x
• Windows Server 2008 (any edition)
• Windows Server 2008 R2 (any edition)
• Windows Server 2012 (any edition)
• Windows Server 2012 R2 (any edition)

4
Software Requirements
• Visual Studio
• Microsoft .NET Framework version 4.5
• Dynamics 365 Software Development Kit
• Windows Identity Foundation
• Internet Information Services (IIS) (optional)
• Windows Features:
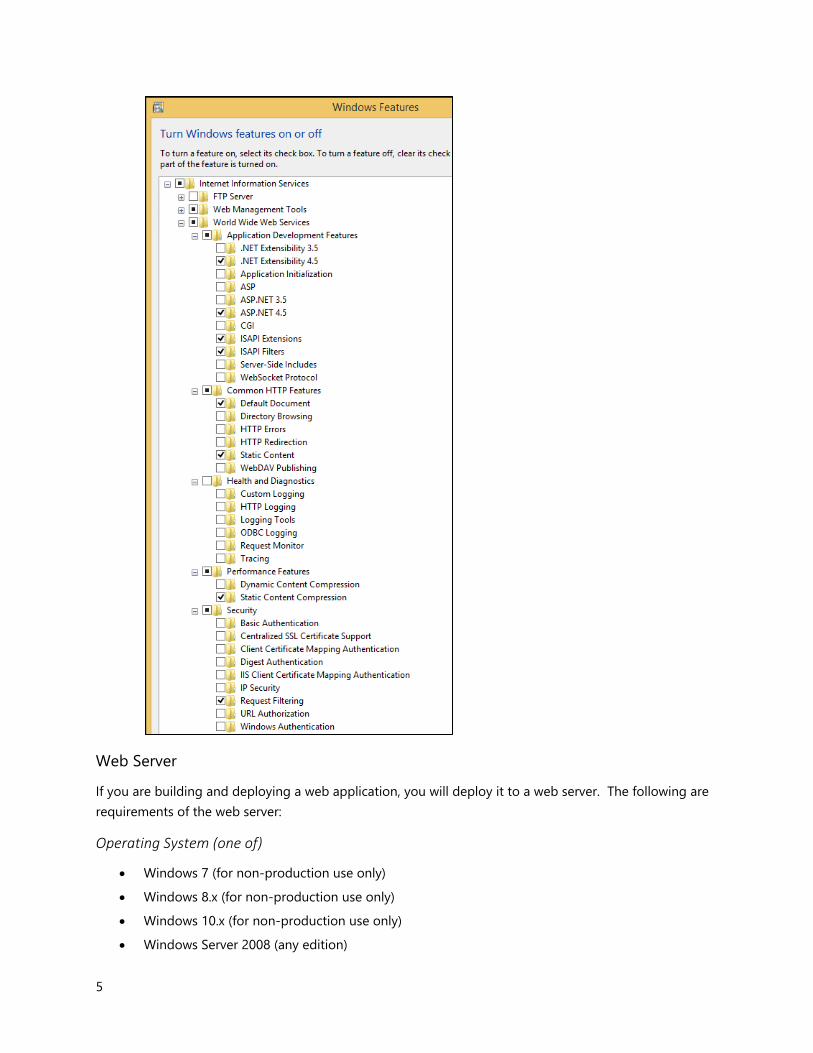
5
Web Server
If you are building and deploying a web application, you will deploy it to a web server. The following are
requirements of the web server:
Operating System (one of)
• Windows 7 (for non-production use only)
• Windows 8.x (for non-production use only)
• Windows 10.x (for non-production use only)
• Windows Server 2008 (any edition)

6
• Windows Server 2008 R2 (any edition)
• Windows Server 2012
• Windows Server 2012 R2 (any edition)
Software Requirements
• Microsoft .NET Framework version 4.5
• Including Windows Communication Foundation HTTP Activation
• Internet Information Server (IIS)
• Windows Identity Foundation (Only required for ACS authentication)
• Server Roles and Features:

7

8
Hardware Recommendations
Please note that the hardware recommendations given here are based on the needs of a single website
with basic resource needs. Given that we do not know the specific load or traffic patterns of your
application, please use this as a baseline and scale up as you see fit. If you have thousands of users,
multiple websites and/or hundreds of pages, those will have a heavy performance impact on your server
and you will want to increase the resources allocated to the server. We do strongly recommend the use
of virtual machines as their resources can easily be scaled up if the application needs additional resources.
• We recommend the use of virtual machines hosted on any current-gen hardware (Dell, HP, etc.) or
cloud services provider (Azure, Amazon, etc.).
• We recommend - as a minimum - two (2) CPU cores.
• We recommend - as a minimum - four (4) gigabytes of RAM.
Dynamics 365 (on-premises) Server
Portals require a functioning instance of Dynamics 365 where the version dependent upon Portal
version. The product can support any deployment model and authentication scheme that is compatible
with Dynamics 365. This includes Active Directory, claims, and Internet Facing Deployments (IFD), Live ID
for Dynamics 365 (online), and OID for Dynamics 365 (online) with Office 365. It is recommended that
you have the latest rollup hotfixes installed on your Dynamics 365 server.
Note: Microsoft Dynamics CRM 1.2, 3.0, 4.0, 2011, and 2013 are not supported for Portals.
It is highly recommended that you apply the latest Dynamics 365 (on-premises) Update Rollup before
installing our solution packages.
Network Layout
Portals can be configured in numerous ways both within your own network and in the cloud. Here are a
couple sample layouts depicting what the configuration can look like.
• Portals hosted in a DMZ
• Portals hosted without a DMZ
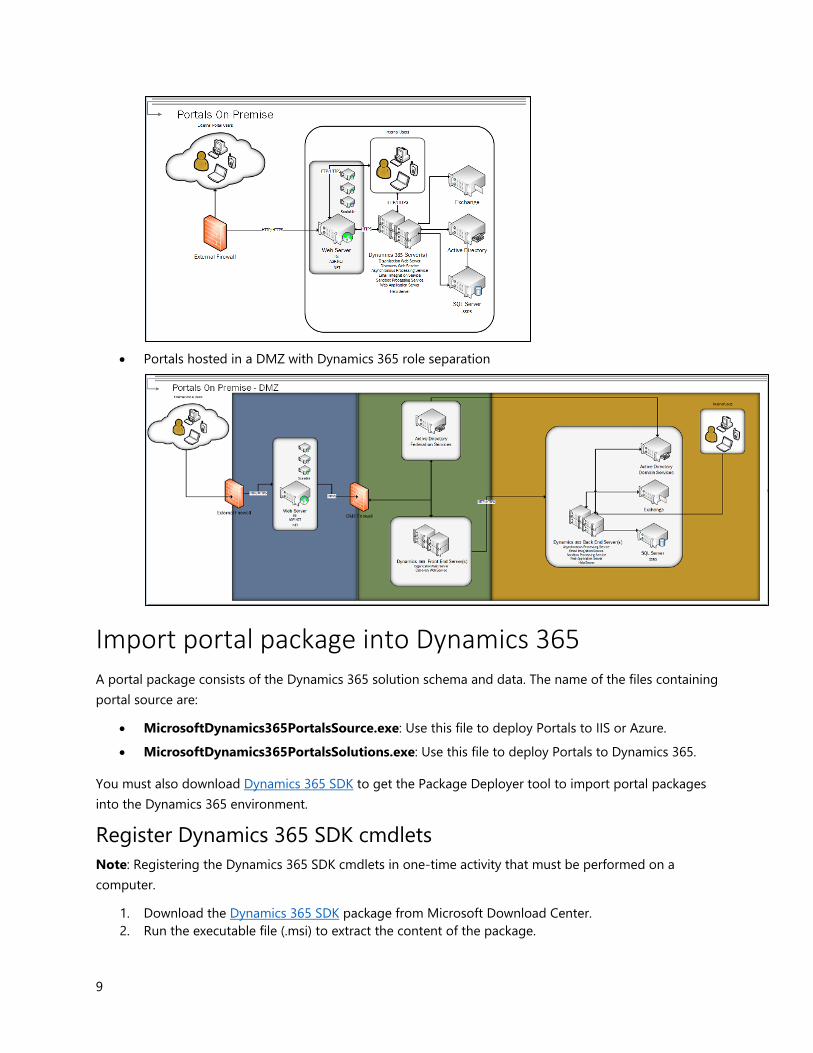
9
• Portals hosted in a DMZ with Dynamics 365 role separation
Import portal package into Dynamics 365 A portal package consists of the Dynamics 365 solution schema and data. The name of the files containing
portal source are:
• MicrosoftDynamics365PortalsSource.exe: Use this file to deploy Portals to IIS or Azure.
• MicrosoftDynamics365PortalsSolutions.exe: Use this file to deploy Portals to Dynamics 365.
You must also download Dynamics 365 SDK to get the Package Deployer tool to import portal packages
into the Dynamics 365 environment.
Register Dynamics 365 SDK cmdlets
Note: Registering the Dynamics 365 SDK cmdlets in one-time activity that must be performed on a
computer.
1. Download the Dynamics 365 SDK package from Microsoft Download Center.
2. Run the executable file (.msi) to extract the content of the package.
10
Let’s assume you extracted the package to C:\Dynamics365 folder on your computer. The Package
Deployer tool and the other required files become available at the following location:
C:\Dynamics365\SDK\Tools\PackageDeployer
3. Follow the below steps to register the SDK’s PowerShell cmdlets:
a. Start Windows PowerShell with elevated privileges (run as administrator).
b. Navigate to the PowerShell folder under the PackageDeployer folder. cd C:\Dynamics365\SDK\Tools\PackageDeployer\PowerShell
c. Run the RegisterXRMTooling.ps1 script to register the Package Deployer Windows
PowerShell assembly (.dll), and install the Windows PowerShell snap-in for the Package
Deployer tool. .\RegisterXRMTooling.ps1
For more details on SDK’s PowerShell cmdlet, see here.
Note: If you are unable to run the script, check your script execution policy by running the
following command: get-executionpolicy
If the script execution policy is set to restricted, elevate it by running the following command:
set-executionpolicy unrestricted
Run Portals import script
The portals solution distribution includes the following PowerShell scripts in the
Portals\PackageDeployerPackages folder:
• Import.ps1: Prompts you to select a package to import, specify Dynamics 365 environment
details, and then runs the ImportPackage.ps1 script to import the portal package into the
Dynamics 365.
• ImportPackage.ps1: Takes the selected package and Dynamics 365 parameters, and then
executes the SDK’s Import-CrmPackage PowerShell cmdlet to import the package into Dynamics
365.
Caution: Please be aware that this package contains a specific version of the portal solution files that were
current at the time of release. The portal source code has only been tested to function on this specific
version of the solution files. Please ensure that you do not upgrade your portal solutions through the
Dynamics 365 Administration Center or have them upgraded by installing a new portal via the Dynamics
365 Administration Center as that will upgrade your solutions to a version that has not been tested with
this version of your portal host. There is no guarantee that future versions of the portal solutions will be
backwards compatible with older portal source code. There is no mechanism to roll back solution versions
outside of completely uninstalling them and reinstalling them which will result in data deletion. No
support will be given to customers to restore operation of their portals deployed from this package
resulting from an upgrade of the portal solutions to newer versions. The only remedy would be for
customers to make appropriate modifications to the portal source code to be compatible with the new
solution files and to redeploy the portal. There is no plan for us to provide an update to the portal source
code or the technical information required to be compatible with future versions.
1. Run the MicrosoftDynamics365PortalsSolutions.exe file to extract the content.
Let’s assume you extracted the content to C:\MicrosoftDynamics365.
11
2. Navigate to the PackageDeployerPackages folder under the Portals folder. cd C:\MicrosoftDynamics365\Portals\Solutions\PackageDeployerPackages
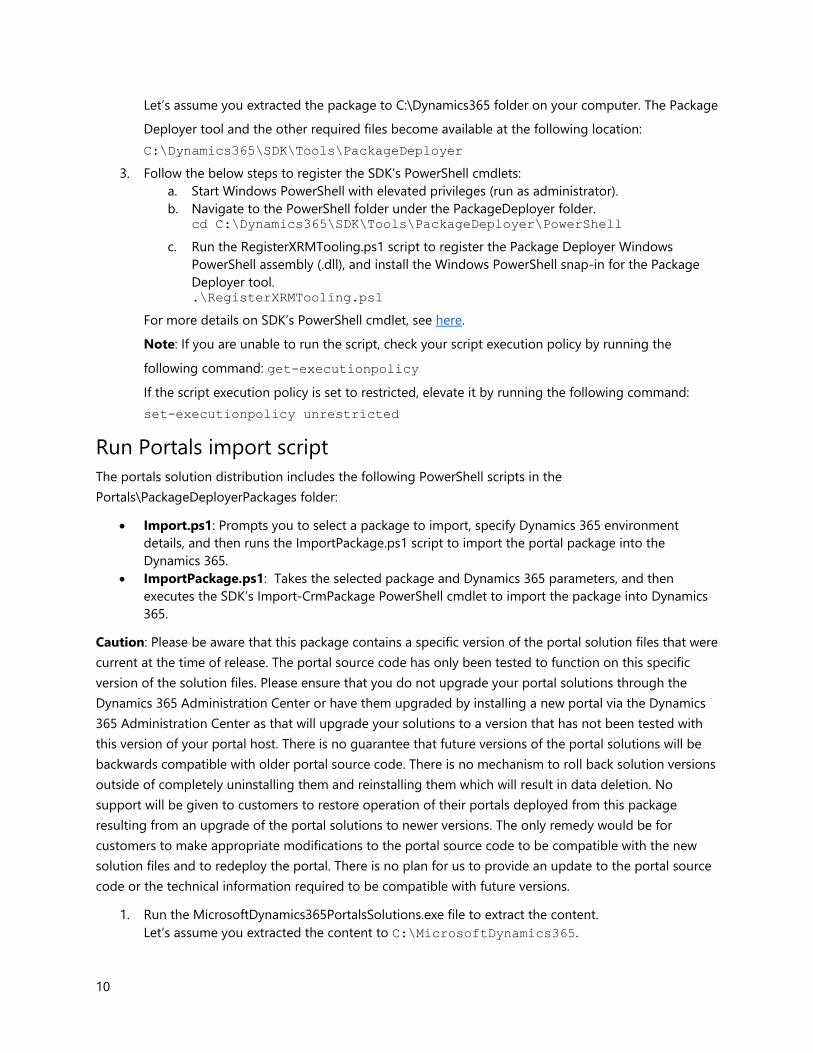
3. Run the Import.ps1 script to start the package deployment. .\Import.ps1
The CRM connection type options are displayed.
4. Enter one of the following:
a. P for on-premise
b. O for Office 365
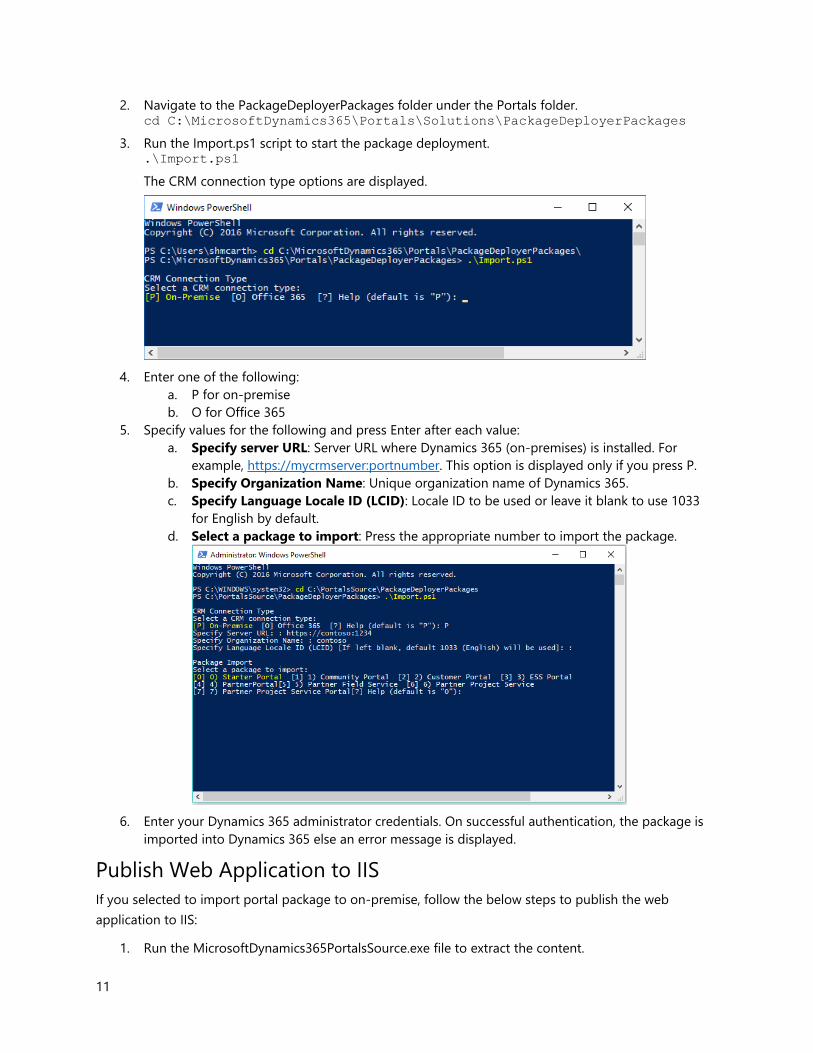
5. Specify values for the following and press Enter after each value:
a. Specify server URL: Server URL where Dynamics 365 (on-premises) is installed. For
example, https://mycrmserver:portnumber. This option is displayed only if you press P.
b. Specify Organization Name: Unique organization name of Dynamics 365.
c. Specify Language Locale ID (LCID): Locale ID to be used or leave it blank to use 1033
for English by default.
d. Select a package to import: Press the appropriate number to import the package.
6. Enter your Dynamics 365 administrator credentials. On successful authentication, the package is
imported into Dynamics 365 else an error message is displayed.
Publish Web Application to IIS
If you selected to import portal package to on-premise, follow the below steps to publish the web
application to IIS:
1. Run the MicrosoftDynamics365PortalsSource.exe file to extract the content.
12
Let’s assume you extracted the content to C:\MicrosoftDynamics365.
2. Open the C:\MicrosoftDynamics365\Portals\Solutions\Portals\Portals.sln file in Visual Studio 2015.
3. Go to Build > Build Solution to build the solution.
4. Copy the C:\MicrosoftDynamics365\Portals\Samples\MasterPortal\ folder to a file location on the
web server where IIS is installed.
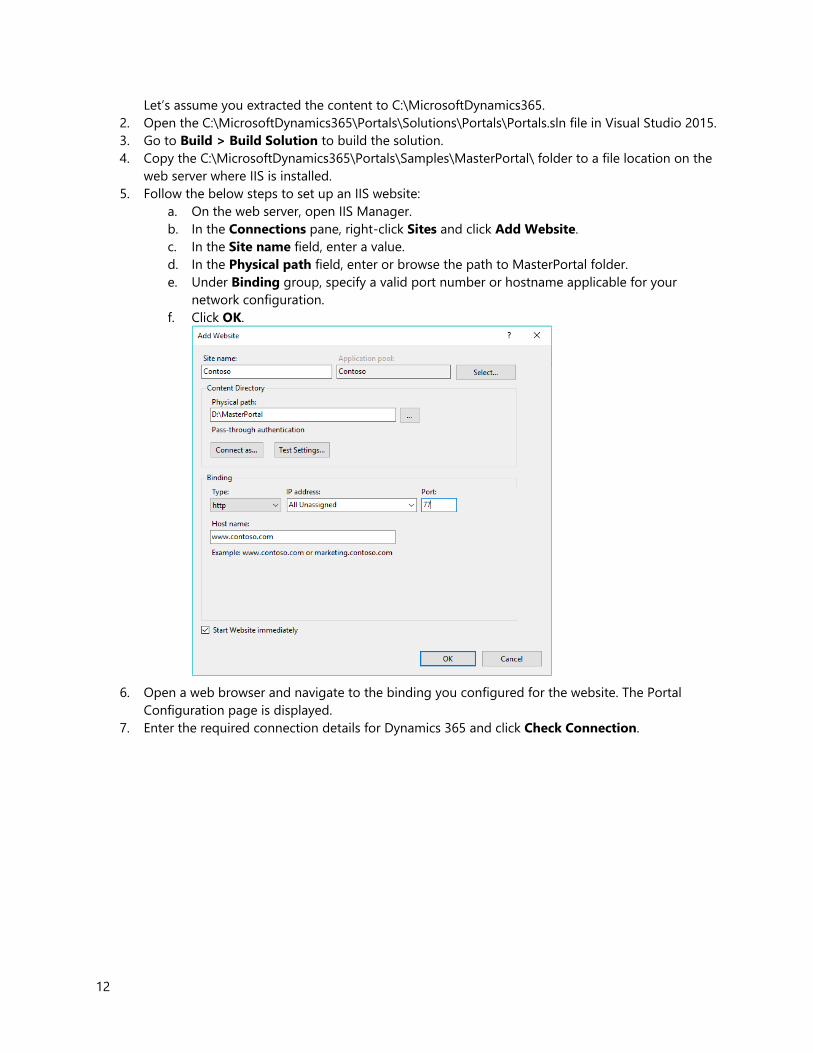
5. Follow the below steps to set up an IIS website:
a. On the web server, open IIS Manager.
b. In the Connections pane, right-click Sites and click Add Website.
c. In the Site name field, enter a value.
d. In the Physical path field, enter or browse the path to MasterPortal folder.
e. Under Binding group, specify a valid port number or hostname applicable for your
network configuration.
f. Click OK.
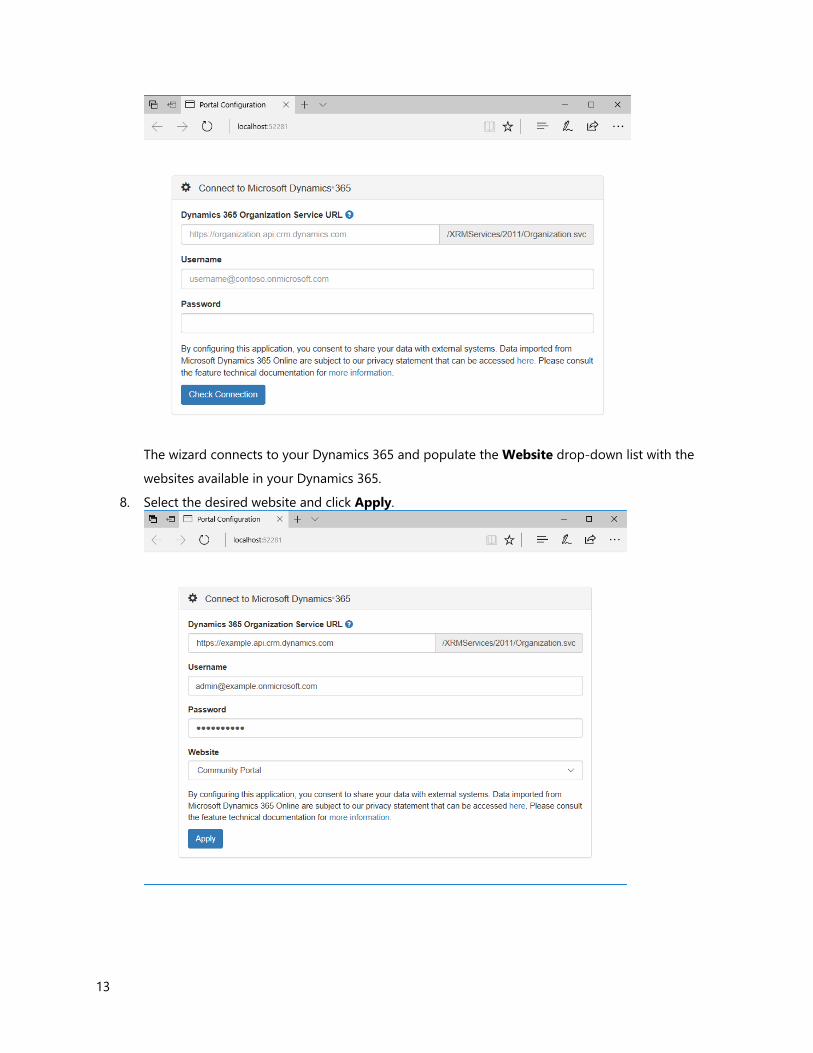
6. Open a web browser and navigate to the binding you configured for the website. The Portal
Configuration page is displayed.
7. Enter the required connection details for Dynamics 365 and click Check Connection.
13
The wizard connects to your Dynamics 365 and populate the Website drop-down list with the
websites available in your Dynamics 365.
8. Select the desired website and click Apply.

14
Publish Web Application to Azure
If you selected to import portal package to Office 365, follow the below steps to publish the web
application to Azure:
1. Run the MicrosoftDynamics365PortalsSource.exe file to extract the content.
Let’s assume you extracted the content to C:\MicrosoftDynamics365.
2. Open the C:\ MicrosoftDynamics365\Portals\Solutions\Portals\Portals.sln file in Visual Studio
2015.
3. Right-click the MasterPortal web application project in the Solution Explorer and select Publish.
The Publish Web window is displayed.
4. On the Profile tab, select Microsoft Azure App Service as the publish target.
The App Service window is displayed.
5. Provide the appropriate account and subscription details for Azure and click OK.
6. On the Connection tab, specify the required details and click Next.
15
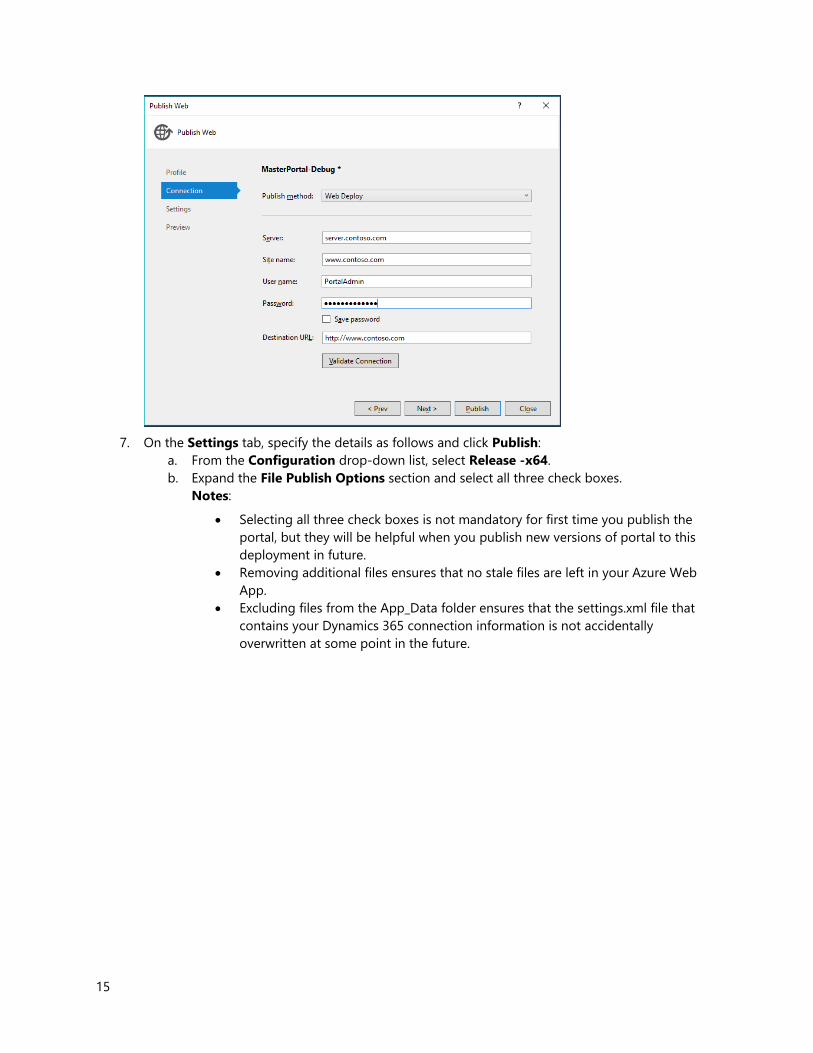
7. On the Settings tab, specify the details as follows and click Publish:
a. From the Configuration drop-down list, select Release -x64.
b. Expand the File Publish Options section and select all three check boxes.
Notes:
• Selecting all three check boxes is not mandatory for first time you publish the
portal, but they will be helpful when you publish new versions of portal to this
deployment in future.
• Removing additional files ensures that no stale files are left in your Azure Web
App.
• Excluding files from the App_Data folder ensures that the settings.xml file that
contains your Dynamics 365 connection information is not accidentally
overwritten at some point in the future.

16
The Visual Studio output window will log the status of the publishing task. When the publish
completes, your Azure website is launched in a new browser window. The Portal Configuration
page is displayed.
8. Enter the required connection details for Dynamics 365 and click Check Connection.
The wizard connects to your Dynamics 365 and populate the Website drop-down list with the
websites available in your Dynamics 365.
9. Select the desired website and click Apply.

17
Web Notification Configuration
Managing Web Notification URLs in Dynamics 365
The Web Notification URLs can be created, edited and deleted within Dynamics 365.
1. Log into Dynamics 365.
2. Navigate to Advanced Find and select Web Notification URLs from the Look for drop-down
list.
3. Click Results.
To create a new web notification URL
• Click New Web Notification URL from the LIST TOOLS tab.
To edit and existing web notification URL
1. Double-click on the existing Web Notification URL listed in the grid.
2. Specify a Name of the Portal.
3. Specify the URL to your portal and add /WebNotification.axd to the end of the URL
4. Click Save & Close.

18
Attributes & Relationships
The table below explains the Web Notification URL attributes used by Portals.
Name Description
Name The descriptive name of the record. This field has
no impact on Web Notifications and is purely
for reference within Dynamics 365.
URL The URL to your portal's cache invalidation
handler.
Example: http://website.com/WebNotification.axd
Note: The Web Notification plugin runs in a
sandbox, which has an additional restriction on
what URLs can be used. IP addresses and localhost
URLs are NOT allowed as outbound HTTP calls
from the Dynamics 365 sandbox service. Therefore
the URL must consist of a domain name.
Portal Configuration
The following handler declaration should exist in the portal's web.config file in order for the website to
process the HTTP POST request made by the web notifications. This will already exist in the web.config we
distribute in the MasterPortal project. If your web.config does not include this handler declaration, you will
need to add it.
<configuration>
<system.webServer>
<handlers>
<add name="CacheInvalidation" verb="*" path="WebNotification.axd"
preCondition="integratedMode"
type="Adxstudio.Xrm.Web.Handlers.CacheInvalidationHandler, Adxstudio.Xrm"/>
</handlers>
</system.webServer>
</configuration>
Batch Data Operations
If large-scale data operations such as a bulk data import occur, the volume of system jobs running
WebNotificationPlugin steps may impact the execution of other system jobs or negatively affect the
performance of the portal. If your environment is experiencing this, it may be best to disable the plugin
steps for the WebNotificationPlugin temporarily and then enable them once these large-scale data
operations have completed. While the plugin steps are disabled, the portal cache will become stale and
you will need to invalidate the cache once your large-scale data operations are complete and you have re-
enabled the plugin steps. You can force the portal cache to be invalidated/refreshed by recycling the IIS
website's application pool.

19
Troubleshooting
Find unique organization name of your Dynamics 365
1. Log into Dynamics 365.
2. Go to Settings > Customization > Developer Resources.
3. The unique organization name is available in the Unique Name field.
Secure the App_Data folder
1. On the web server, open IIS Manager.
2. In the Connections pane, select the website for which you need to modify permissions.
3. In the Actions pane, click Basic Settings and see the name of the application pool being used.
4. In the Connections pane, click Application Pools and see the value in the Identity column for the
application pool of your website. The value in the Identity column is the system account used for
running this application pool.
5. Right-click your website and select Edit Permissions. The Properties dialog box is displayed.
6. On the Security tab, add the required permission for the system account used for running the
application pool.
Note: If the value in the Identity column is ApplicationPoolIdentity, the user name will be IIS
AppPool\DefaultAppPool. While adding this user, ensure that the location is set to your local
computer because this is a local account.
IIS: Content-Length 0 for CSS, JavaScript and images
If static content such as CSS, JavaScript, and images are not loaded properly, do the following:
1. Go to Control Panel > Programs and Features.
2. In the left pane, click Turn Windows features on or off. The Windows Features dialog box is
displayed.
3. Navigate to Internet Information Services > World Wide Web Services > Common HTTP
Features.
4. Select Static Content.

20
5. Click OK.
Copyright This document is provided “as-is”. Information and views expressed in this document, including URL and
other Internet Web site references, may change without notice.
Some examples depicted herein are provided for illustration only and are fictitious. No real association or
connection is intended or should be inferred.
This document does not provide you with any legal rights to any intellectual property in any Microsoft
product. You may copy and use this document for your internal, reference purposes.
© 2017 Microsoft. All rights reserved.
Microsoft, Active Directory, Azure, Internet Explorer, Office 365, Dynamics 365, and Windows are
trademarks of the Microsoft group of companies. All other trademarks are property of their respective
owners.


